1. Feature Overview
Portals are modular and can be altered, extended, or enhanced using JavaScript. They can be extended to accommodate additional functionality like –
- Integrating analytics services to capture page views, engagement events, conversion events –
- Portals broadcast specific engagement activities during the lead journey which can be subscribed to and posted to the respective analytics service.
- Integrating third-party chatbot services.
- Fetching/Updating data from external databases or apps using JavaScript.
- Overriding the style of a specific component inside the portal designer using your own custom scripts.
To know more about Portals, see Portal Management.
2. Integrating Google Analytics and Facebook Pixel
On integration, both Google Analytics and Facebook Pixel track pageviews, visitor count, and other basic events. However, in order to track custom engagement or conversion activities, you must write custom push events specific to the analytics service.
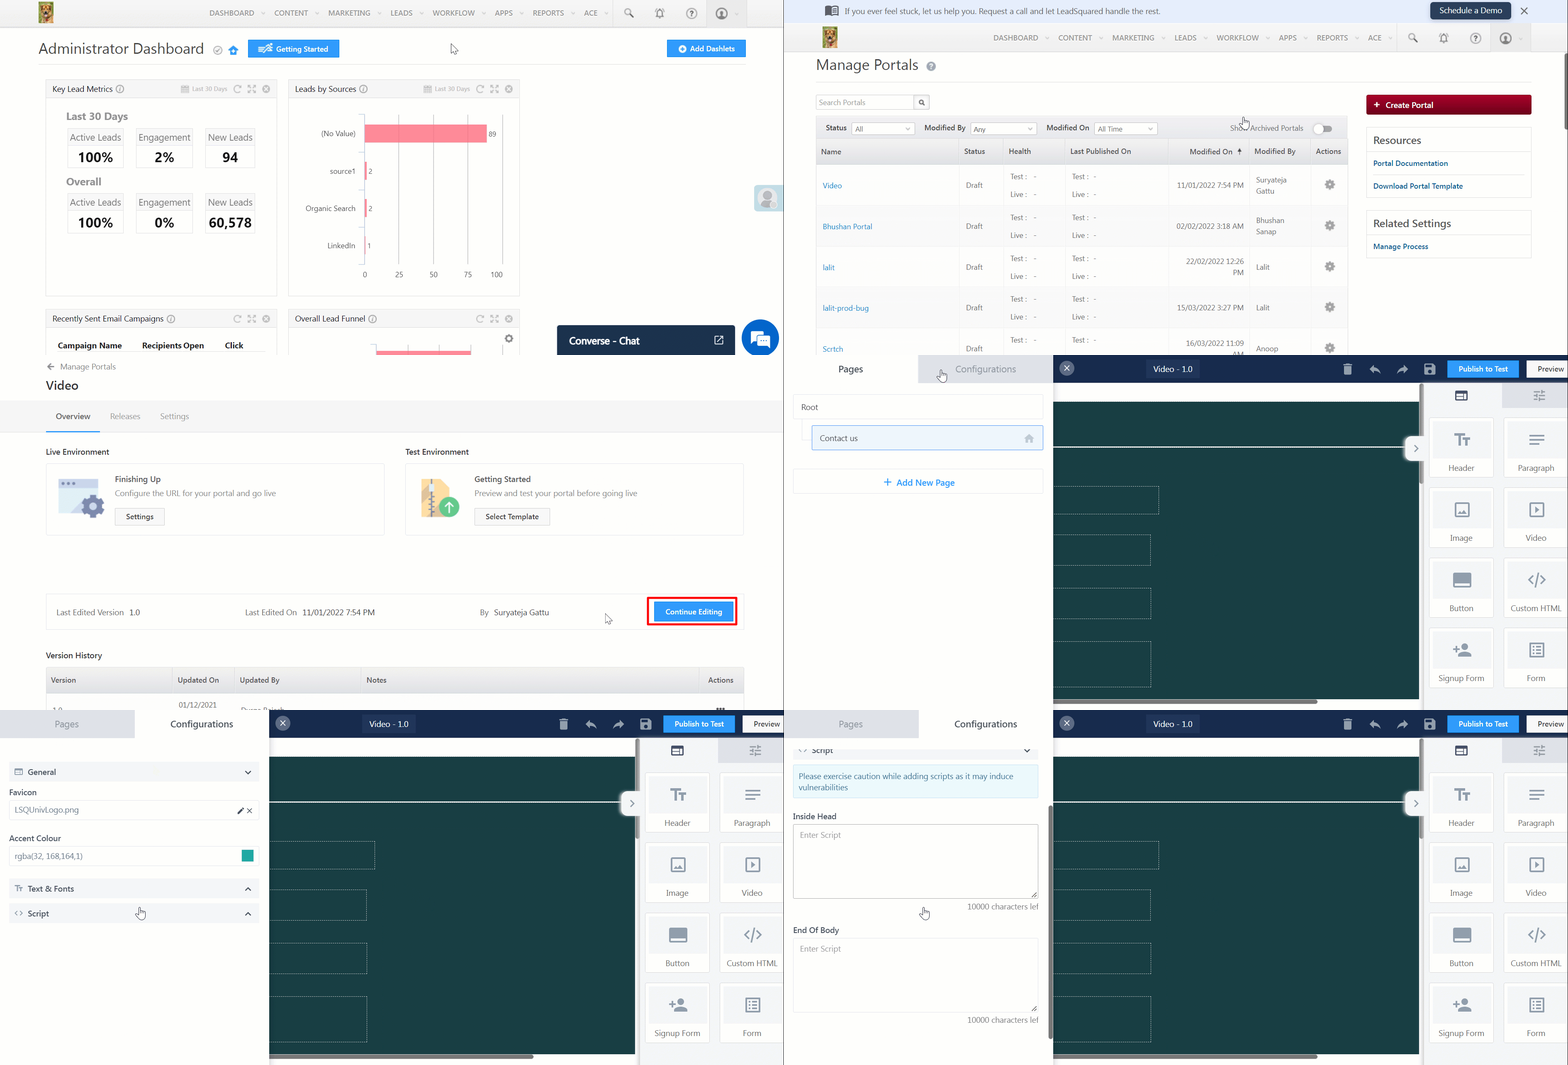
- Navigate to Workflow>Manage Portals.
- Select the Portal you need to view and click Continue Editing.
- Click
 and then Configurations.
 - Click the Script dropdown.
- Paste the script obtained in the Inside Head and End of Body sections as per the specifications.
2.1 Frequent Issues Encountered
- Wrong trigger configuration: The conditions you have targeted must be present for the expected trigger behaviour.
- Extra specific triggers: Triggers must not be too specific. Example: A URL trigger that is set to fire on http://www.example.com will not fire if the URL is https://www.example.com . Use a common fragment for the trigger criteria, such as “example.com”.

2.2 Issues Encountered with Facebook Pixel
Refer to the following checklist to ensure that Pixel is firing properly.
- Check whether your raw pixel fires match. If you’re using Facebook pixel, you can check how many times your specific standard events were triggered in your pixel dashboard.
- If your raw pixel fires match but there’s a discrepancy in conversion values, check your currency, decimal places, and other variables in your purchase event codes.
- Do not use a combination of conditional and unconditional firing with your tags. Also, expect minor discrepancies while using conditional firing.
- If Facebook is reporting more conversions than your other analytics tools, use the Pixel Helper tool to check for duplicate pixel fires, which can sometimes be caused by redirects.
- If Facebook is reporting fewer conversions, check if the pixel piggybacking on existing tag managers has been implemented correctly.
2.3 Debugging Google Analytics and Facebook Pixel
The tools mentioned below can be used to debug Google Analytics and Facebook Pixel.
- Facebook Pixel Helper – Works in the background to look for conversions or Facebook pixels and provides real-time feedback on the implementation.
- Google Tag Assistant Recordings – Validates, diagnoses, and troubleshoots issues with your Google Analytics implementation in real-time. You can record typical user flows through your website and get an immediate analysis of your setup. Google Tag Assistant Recordings can help you find missing or mangled tags, invalid events, filters, and much more.
3. Overriding the Style of Portal Components with Custom Scripts
You can use custom JavaScript to override a style property of a component that is not available in configurations. To override the CSS properties of a component, use its class name. The properties will be applied to all components with the class name. If you want to isolate this to a specific component, set a custom class name to the component and use this class with JavaScript to style it.
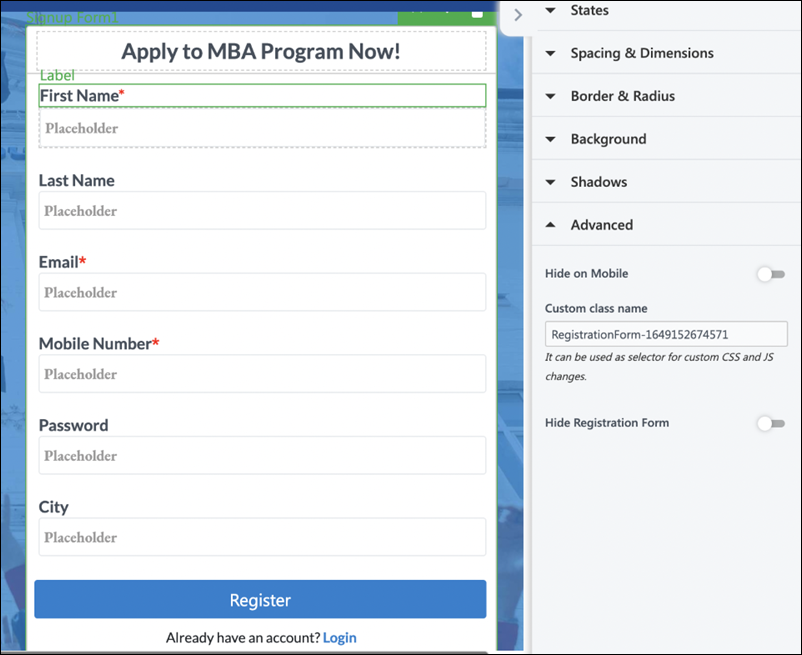
Select a portal component and tag it with a custom CSS class name –
- Click the Advanced dropdown and enter a value in the Custom class name field.
- Use this class name in your custom scripts to isolate and override its style and behavior without affecting any other components in the portal.

4. Extending Portals with Custom Behaviour
Portals track various engagement events performed by leads. You can consume these events via custom scripts and –
- Post them to –
- Analytics services like Google Analytics
- Advertisement services like Facebook Ads
- Display a pop-up message on the portal, etc.
| Trigger | Event Name | Event Payload |
| When a user logs in to the portal successfully | LSQ_FORM_LOGIN_SUCCESS | Login method – otp, password |
| When a user initiates portal login | LSQ_FORM_LOGIN_INITIATED | Login method – otp, password |
| When a user fails portal login | LSQ_FORM_LOGIN_FAILURE | Login method – otp, password |
| When a user verifies email or phone number through OTP on the portal during registration | LSQ_OTP_VERIFIED | Verification type – signup, login |
| When a user initiates portal registration | LSQ_FORM_SIGNUP_INITIATED | Sign up method – otp, password |
| When a user registers on the portal successfully | LSQ_FORM_SIGNUP_SUCCESS | Sign up method – otp, password |
| When a user fails to register on the portal | LSQ_FORM_SIGNUP_FAILURE | Sign up method – otp, password |
| When a user raises forgot password request through the portals successfully | LSQ_FORM_FORGOTPASSWORD_SUCCESS | – |
| When a user fails to raise forgot password request through the portals | LSQ_FORM_FORGOTPASSWORD_FAILURE | – |
| When a user resets the portal password successfully | LSQ_FORM_RESETPASSWORD_SUCCESS | – |
| When a user fails to reset the portal password | LSQ_FORM_RESETPASSWORD_FAILED | – |
| When a form is loaded on the portal | LSQ_FORM_LOAD_COMPLETE | form name |
| When a form is saved on the portal | LSQ_FORM_SAVE_COMPLETE | form name, tab name |
| When a form is submitted on the portal | LSQ_FORM_SUBMITTED | form name |
| When a form is saved as a draft on the portal | LSQ_FORM_SAVE_AS_DRAFT_COMPLETE | formName, portalId, TabId, FormId |
| When a user initiates payment via a payment gateway through forms on the portal | LSQ_PAYMENT_INITIATED | form name, product name, payment gateway, currency |
| When a user fails to complete payment via a payment gateway through forms on the portal | LSQ_PAYMENT_FAILED | form name, product name, payment gateway, currency |
| When a user completes a payment via a payment gateway through forms on the portal | LSQ_PAYMENT_COMPLETED | form name, product name, payment gateway, currency |
Common event payloads to be used in all triggers –
- lead id – Prospect Id of the lead performing the action
- portal id – Id of the portal on which the action was performed
- timestamp – The time stamp at which the action was performed
- page title – Name or title of the portal page on which the action was performed
- page path – Absolute path or URL of the portal page on which the action was performed
- origin – default value of the portal
These events can be consumed via custom scripts written at the Portal Designer > Configurations > Script: a) Inside Head <head> b) End of body <body>
window.addEventListener("LSQ_FORM_SIGNUP_SUCCESS", (event) => { console.log("Printed when user has registered.", event.detail); // Your logic goes here. Push Google Analytics / Facebook Pixel events here or any other custom behaviour you intend to achieve. // Example: Track a Google Analytics Event //gtag('event', 'portal_sign_up', {'event_category' : 'admission_portal', 'event_label' : '2022_admission'}); // Example: Track a Facebook Pixel Event //fbq('track', 'ViewContent', {content_name: 'Sign Up Form'});});
Any Questions?
Did you find this article helpful? Please let us know any feedback you may have in the comments section below. We’d love to hear from you and help you out!


