


Get Started
Sales Suite
Field Ops
Marketing
Service CRM
Integrations & Apps
FloStack
Object Types in LeadSquared Mobile App
1. Feature Overview
This article helps Administrators enable and customize Object Types on the LeadSquared mobile app (both iOS & Android). It also shows how field sales teams can use Object Types to organize and perform their daily workflows easily within the app.
What are Object Types?
Object Types allow you to represent and manage different business entities such as Students, Parents, Agents, Partners, and more as distinct modules within your CRM. With Object Types enabled, you can customize how leads, opportunities, tasks, activities and plans are managed for each of these entities. On the LeadSquared Mobile App, Object Types help streamline your workflow by showing only the most relevant information and actions based on the type of object you’re working with.
Why use Object Types?
With Object Types, you can:
- Avoid clutter by separating data for different entities instead of overloading the leads module
- Customize deeply with each object type having its own:
- Forms and fields
- Opportunity stages and pipelines
- Activities, tasks, and Smart Views
- Give sales teams views and actions that match the object type they’re working with
2. Prerequisites
- Object Types is a paid feature. To get this enabled, reach out to support@leadsquared.com.
- You must have the latest version of the LeadSquared mobile app installed on your device.
- Admins must first enable Object Types to appear on the mobile app via –
- Mobile Navigation Settings in the side or bottom menu
- Casa Menu Builder in the side or bottom menu
- Casa Widgets in the homepage
Once enabled in any of the 3 specified ways, the list pages for each Object Type are displayed on the mobile app.
3. Mobile App Capabilities with Object Types
Once an Admin enables and configures Object Types, they are fully supported in the mobile app—exactly as set up by the admins.
With Object Types enabled, the following pages and features become available –
| Feature | Description |
| Object Type List Page | See your objects grouped by type (e.g., Dealers, Distributors, Manufacturers) in separate, easy-to-browse list pages. |
| Custom Object Views | Personalize the details page for each object type – choose what shows in the vCard, which tabs appear, and what actions are available. |
| Add Objects | Create new objects directly from the list page for that object type (and also from Smart Views). |
| Smart Filtering | Quickly find the right records with filters made specifically for each object type (available across Objects, Tasks, Near Me, and Journeys). |
| Object Type Chips | Switch between object types instantly using quick-select chips in task and activity lists, Near Me and while creating plans on Journeys. |
| Enhanced Journeys | Build and manage plans for specific object types or use templates – all with full mobile support. |
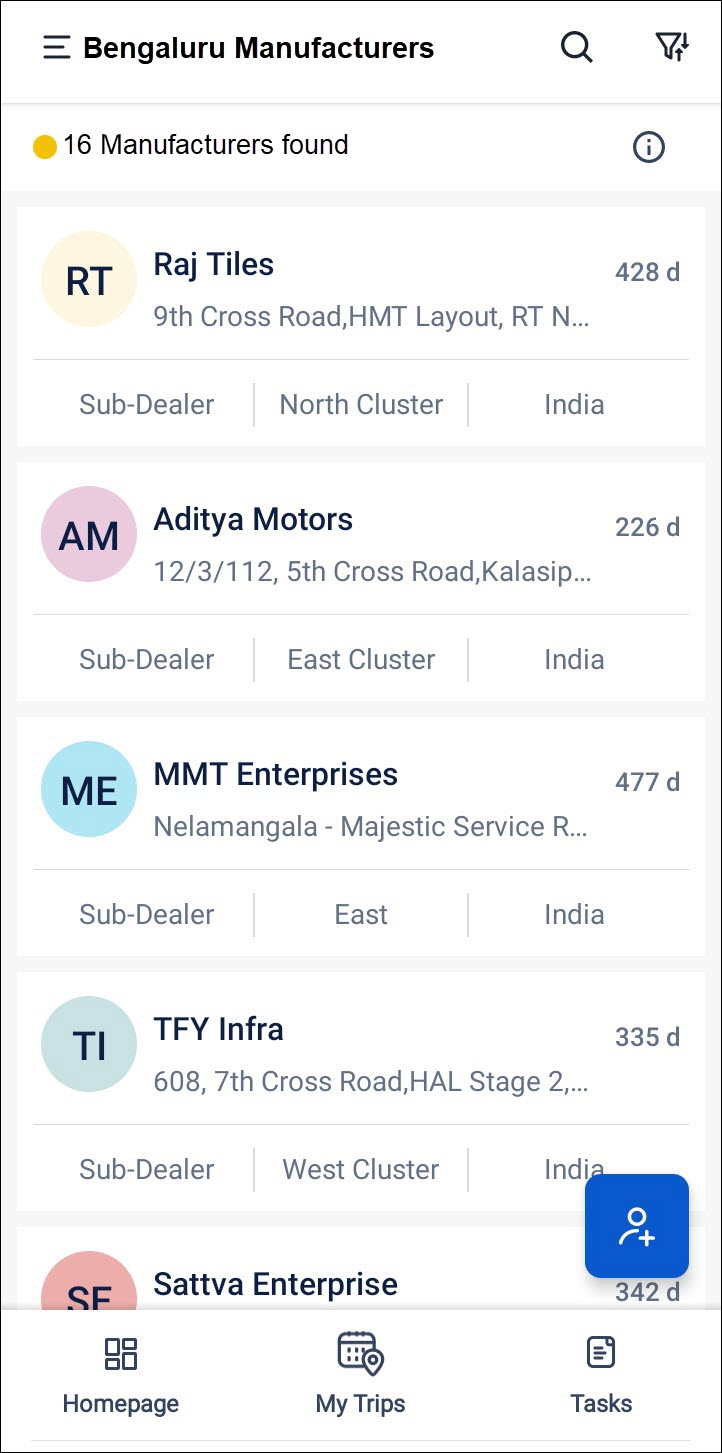
4. Dedicated List Page for each Object Type
In the mobile app, each object type has its own dedicated list page. These pages allow you to view and manage objects specific to each type.
You can view the object list pages in the mobile app by first configuring them through –
- Mobile Navigation Settings in the side or bottom menu
- Casa Menu Builder in the side or bottom menu
- Casa Widgets in the homepage
4.1 How To Configure Object List Pages via Mobile Navigation Settings
Once configured the object list pages show up in the hamburger menu on the mobile app. In the screenshot below, the object types (Manufacturer, Dealer and Distributor) are configured to be displayed on top.
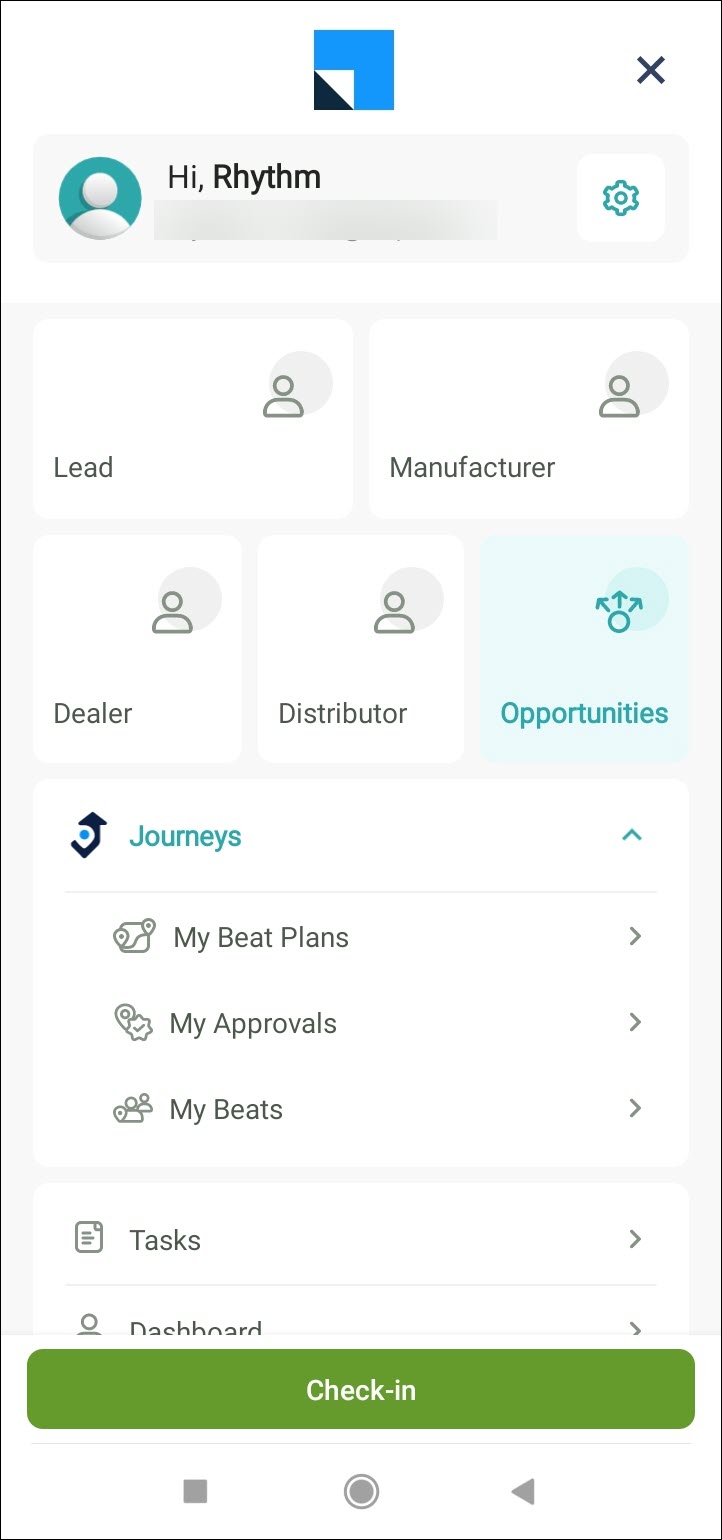
To configure the hamburger menu with the object types –
- Navigate to Settings>Mobile App>Mobile Navigation.
- Drag and drop the relevant object type name in the Visible Menu Tabs as required. Click Save.
In the example below, the object types are Dealer, Manufacturer and Distributor.

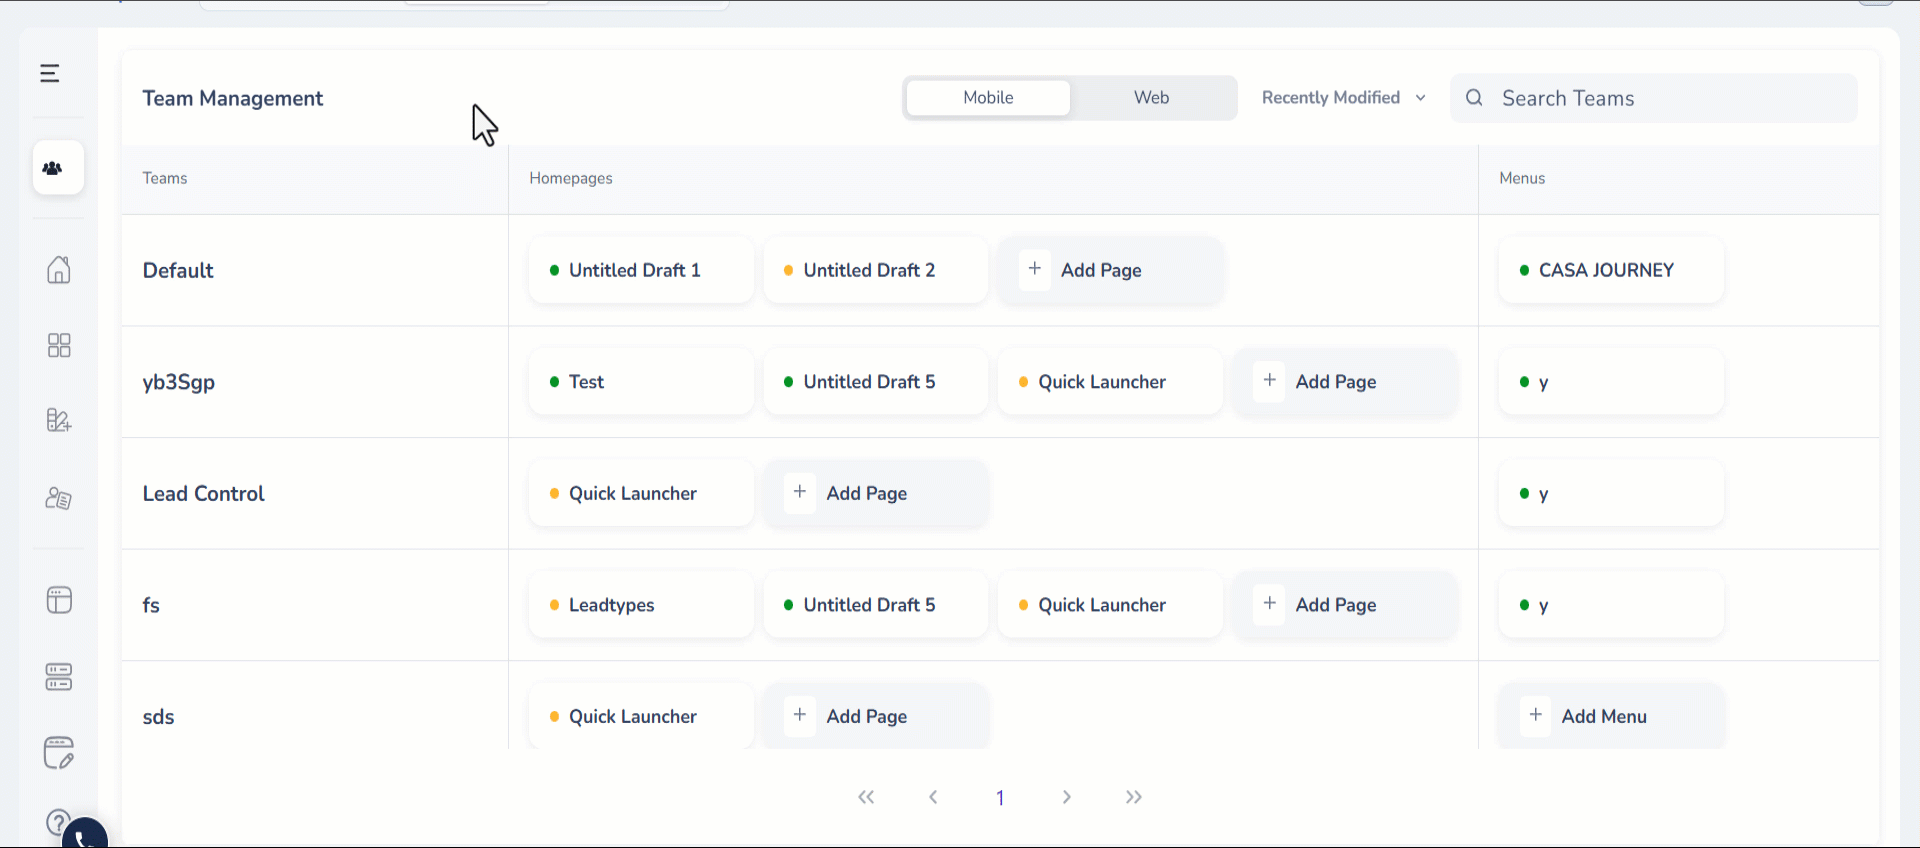
4.2 How To Configure Object List Pages in Menus via Casa
If you have Casa enabled, you can use the Menu Builder to add My Teams to the mobile app menu.
- Navigate to Builder (Casa) from your LeadSquared Dashboard.
- From the left menu, select Menu under Mobile.
- Click Create New and you will be taken to the Menu Builder page.
- In the Menu Builder you can configure the relevant object type page to be visible in the Bottom Menu or Side Menu.

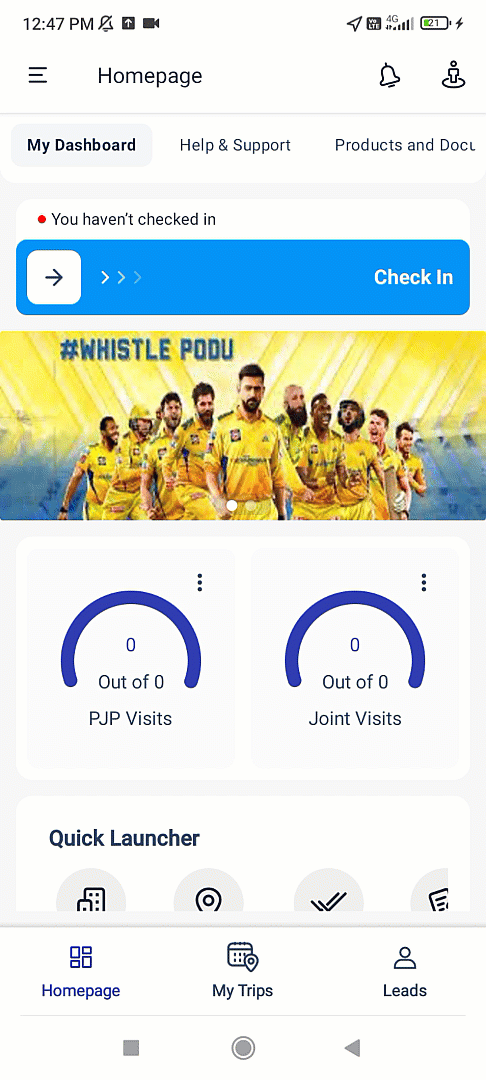
4.3 How To Add Object List Pages to the Homepage using Casa Widgets
The Object type list pages can be added to the Mobile App Homepage by configuring it in the following Casa Widgets:
- Quick Launcher
- Banner
- Image Tiles
- Navigate to Builder (Casa) and select Homepage from the left menu under Mobile.
- While configuring the Quick Launcher / Banner / Image Tile widget, select the relevant object type from the Navigate To dropdown.
5. Add Objects from the Object List Page
Once object type list pages are configured by the Admin and displayed on the mobile app, field sales users can easily add new object types as part of their daily workflows.
Since each object type has its own dedicated list page, adding new objects is straightforward and intuitive. You can simply navigate to the correct object type’s list page and use the default or dynamic form to add an object without the risk of mixing up types.
6. Create Object Details View
Admins can customize the Object Details page to display relevant information in an organized and meaningful way. For example, within the same account, you can create separate views for the Distributor and Customer object types, each with its own relevant tabs and actions.


To create a view for a particular object or opportunity type –
- On your LeadSquared Web App, navigate to Settings>Mobile App>Details Customization.
- Select Lead from the first dropdown.
- Choose the relevant object type or opportunity type from the Choose Object Type dropdown.
- Click Enable.
- Create your custom view by naming it and adding the relevant tabs from the list of Available Tabs into Selected Tabs.
- Similarly, add relevant actions from the list of Available Actions into Selected Actions. Once you’ve made the required additions, click Save View.

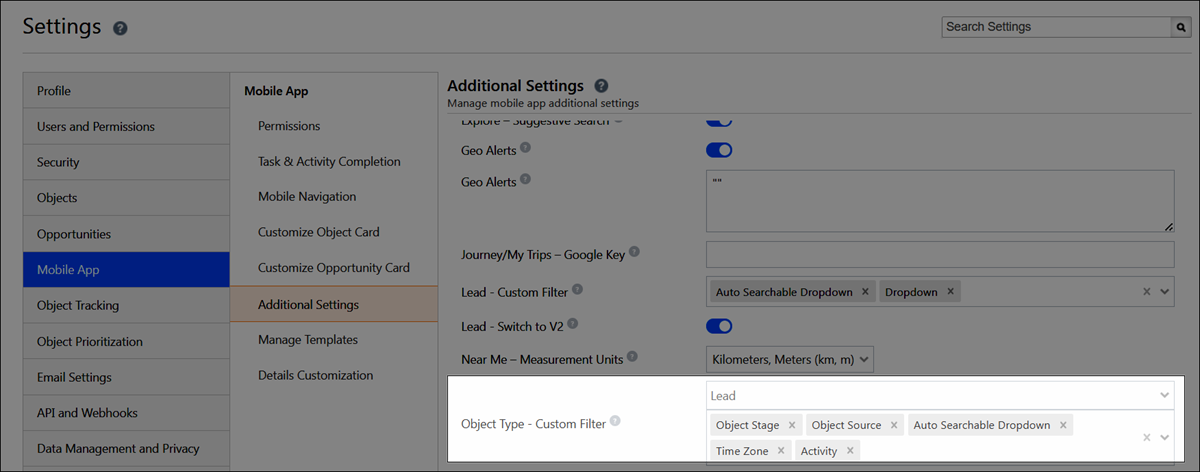
7. Customize Filters for Each Object Type
Configure a unique set of filters for each Object Type to ensure users can quickly find relevant information. These filters will appear in key areas of the LeadSquared Mobile App such as the Object List, Objects Near Me (when an object type chip is selected), and Journeys planning screens. This enables users to narrow down results using criteria that are meaningful to each object type.
The first screenshot displays the filters (Owner, Object Stage) configured for Customer object type and the second screenshot displays the filters (Owner, Country) configured for Manufacturer object type.

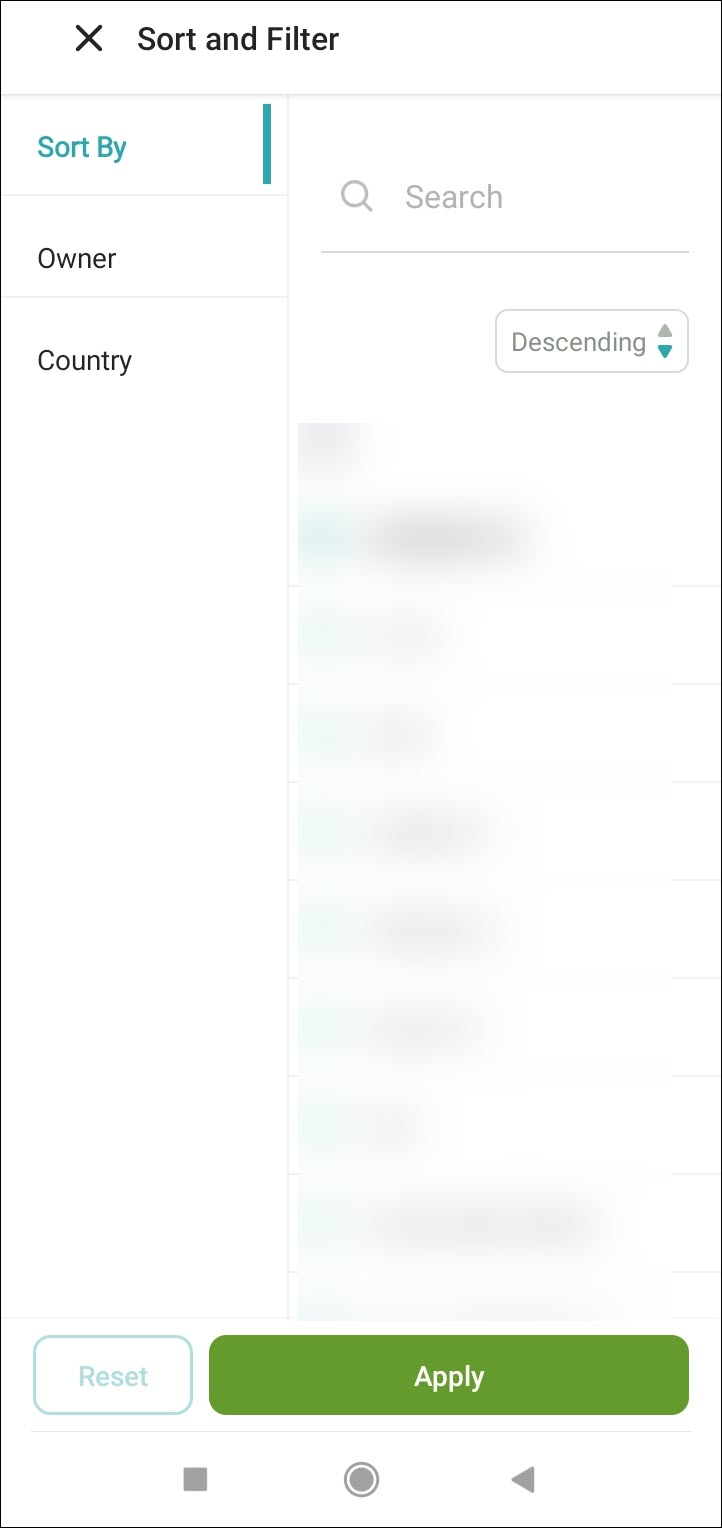
To configure and manage a distinct set of filters for each object type –
- Navigate to Settings>Mobile App>Additional Settings.
- Under Near Me, you will find Object Type – Custom Filter.
- From the Object dropdown, select the relevant object type.
- From the Custom Filter dropdown, select the relevant filters and click Save.
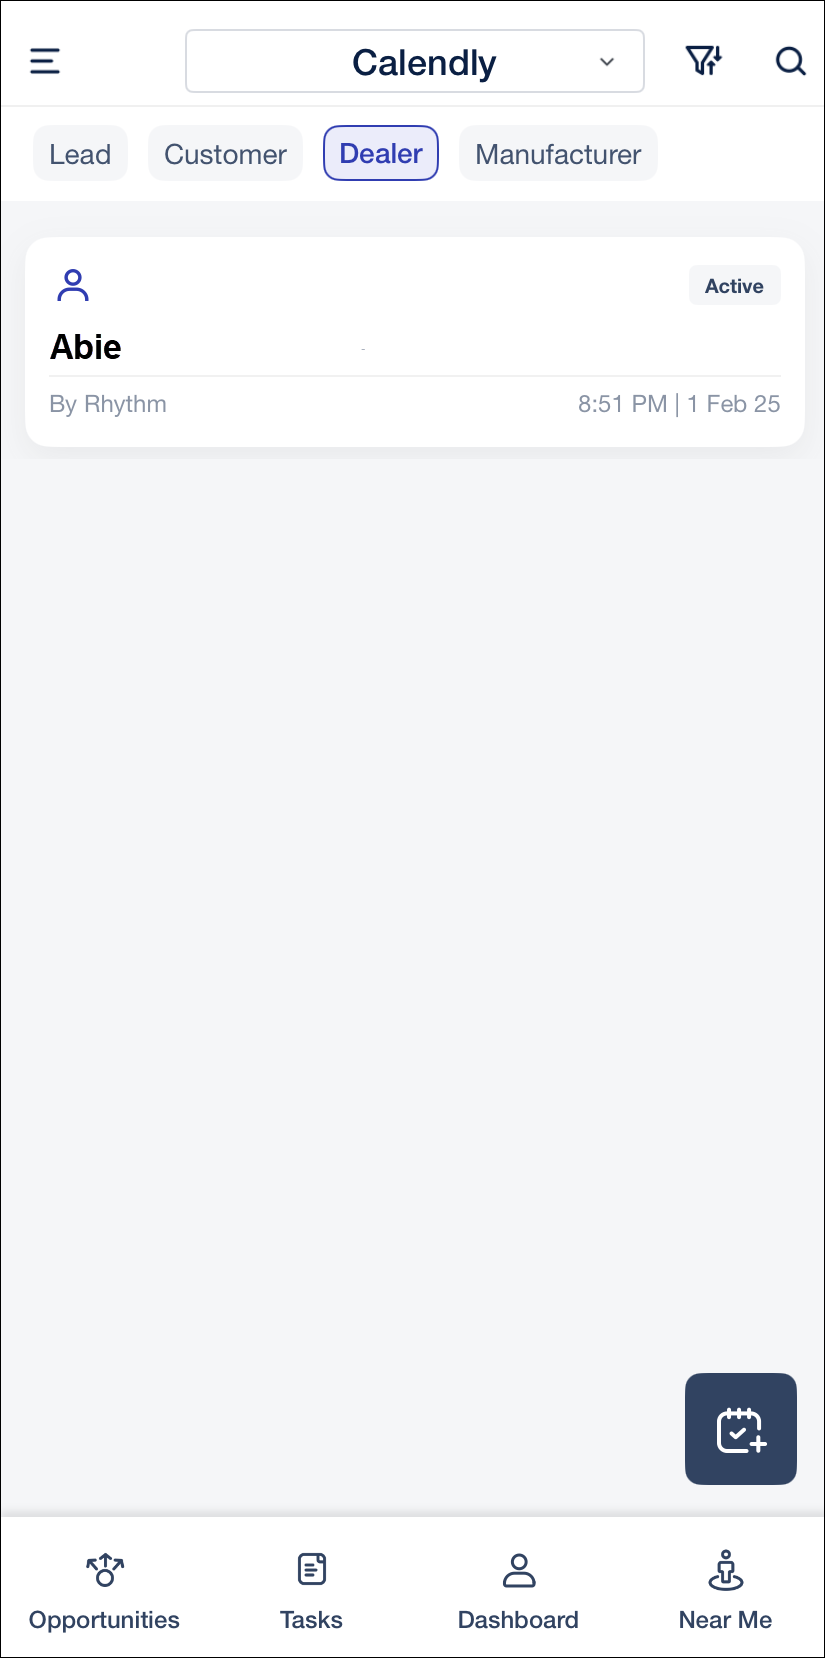
8. Smart Views
Lead, Activity and Opportunity Smart Views are created and managed separately for each Object Type. On the Mobile App, each Smart View will display only the relevant data for its assigned Object Type, including customized object cards and dynamic forms.
You can new object, activity or opportunity under a specific Smart View, directly from the mobile app. The following screenshot shows a Lead Smart View configured for the ‘Manufacturers’ object type.
9. Activity List and Add Activity
Field sales users can use the Object Type chips displayed on top of the Activity List page to select the desired object type. To post an activity under a specific object type, tap the Add activity icon under the relevant object type.
10. Tasks
Field Sales users can manage and organize tasks efficiently with Object Types. Object type is displayed on task cards alongside the object name in task lists, map views, and on My Trips task cards. You can also use the Object Type filter in the Tasks page to refine your task list.
When adding a task through default task forms, users will be prompted with an Object Type selection list, followed by a task type selection list ensuring that each task is linked to the correct object type. For dynamic forms, the appropriate form will automatically launch based on the selected object type from the list.

11. Casa
LeadSquared’s Casa feature lets you design homepages for your mobile application. When used with Object Types, Casa allows you to build dashboards that reflect each team’s focus area – helping sales reps, managers, and field agents see the most relevant data and actions as soon as they log in.
For example:
- A Student Enrollment Team homepage can highlight pending follow-ups, open opportunities, and a shortcut to the enrollment form.
- A Teacher Onboarding Team homepage can show tasks like document collection, a teacher list shortcut or interview scheduling specific to the Teacher object type.
To see the Casa Widgets that support Object Types, see Object Types in Casa for Mobile.
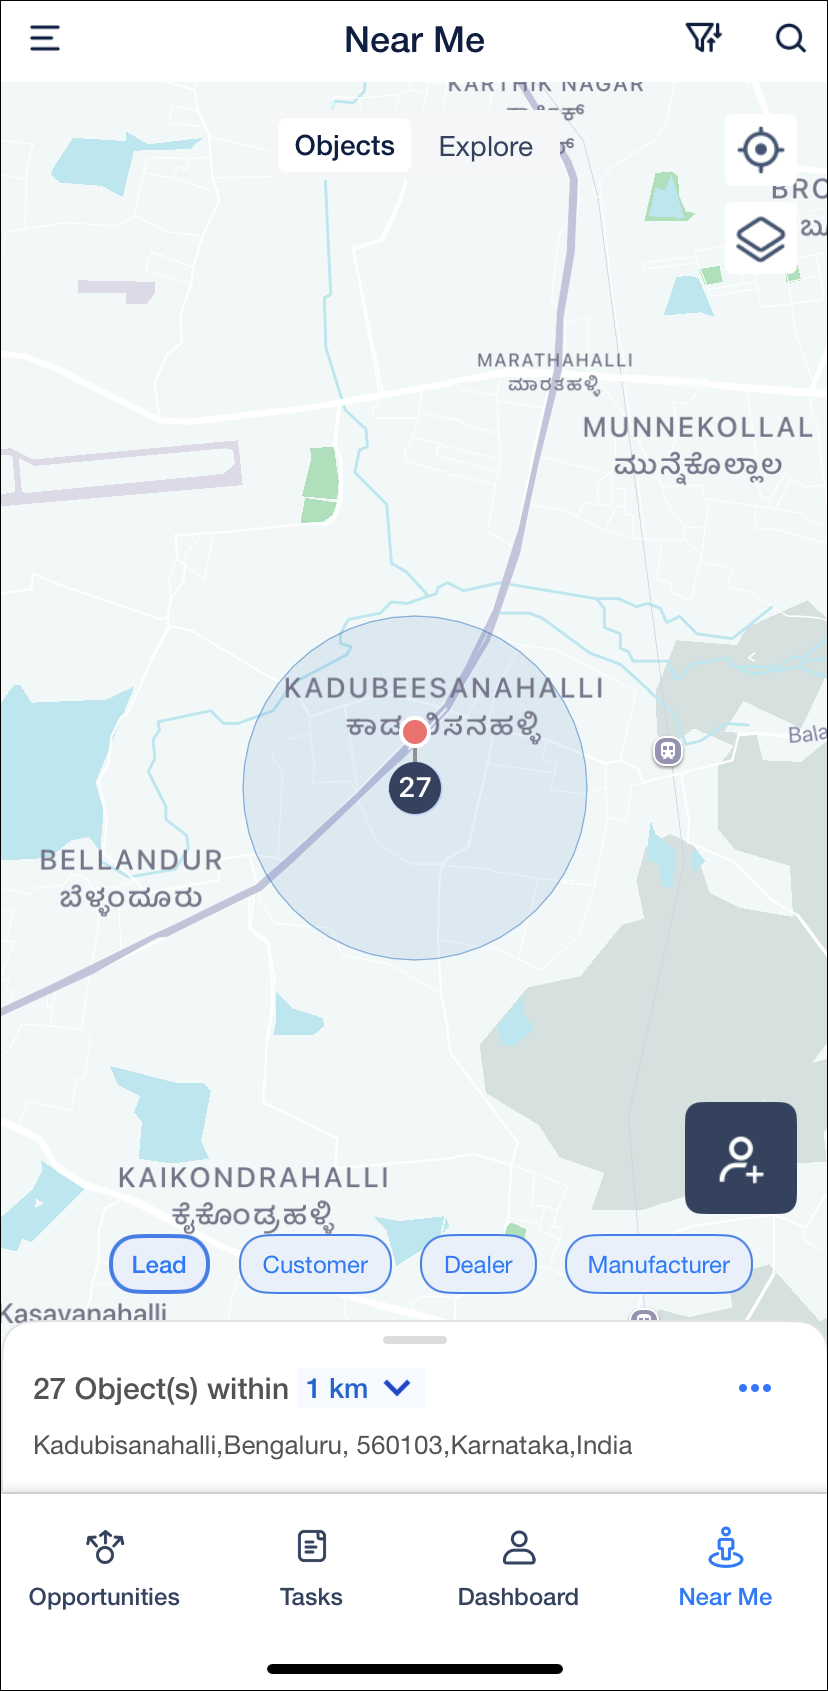
12. Near Me
LeadSquared’s Near Me feature helps users discover and manage nearby leads or objects based on their current location. When Object Types are enabled, this feature allows users to further filter, view, and add objects specific to each object type. In this section, we’ll describe how field sales users can –
- View Objects near you
- Add Objects near you
- Add Objects from Objects Tab
- Add Objects from Explore Tab
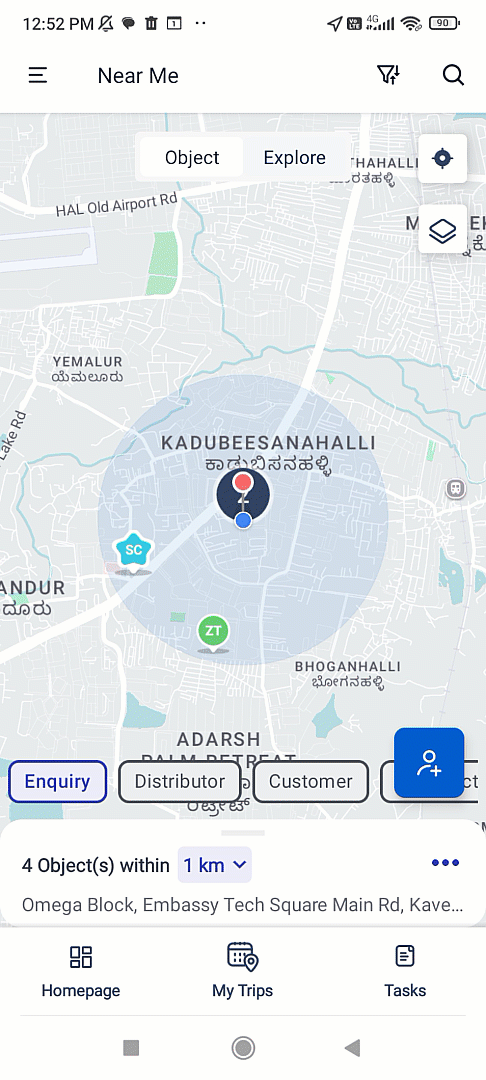
12.1 How To View Objects Near Me Based On Object Types
Object type chips are displayed at the bottom of the Objects tab to facilitate easier object categorization. Tap the relevant object type chip to view all the objects under it. Filters apply specifically to the chosen object type, while searches span across all object types.
12.2 How To Add Objects Under Specific Object Types from Near Me
You can add objects in Near Me quickly from the Objects and Explore tabs.
12.2.1 Add Objects from Objects Tab
You can add objects under specific object types from the Near Me page. In the Objects tab on the Near Me page, when you tap the Add Object icon, the default or dynamic form configured for the selected object type chip will be launched directly.
12.2.2 Add Objects from Explore Tab
In the Explore tab, when you tap the Add New Objects button from the More (three dots) menu, an object type selector popup appears. Once you select the object type, the configured default or dynamic form will be launched directly.

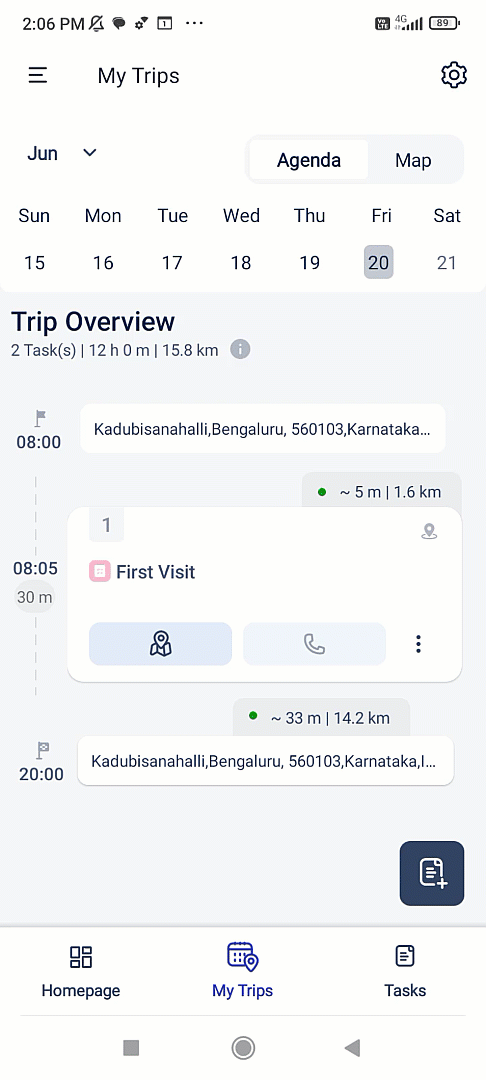
13. My Trips
My Trips is a day planning feature in the mobile app that helps you maximize productivity by optimizing your daily route. You can set your start time, start location, end time, and end location. Based on this, My Trips automatically schedules your existing appointments and tasks taking into consideration the distance and time constraints. In My Trips, you can add tasks apart from the existing ones.
When creating a new task in My Trips, you must first select the Object Type the task is associated with. This ensures the task is correctly linked and managed according to the selected object.
14. Journeys
Journeys is a field sales planning feature available on the LeadSquared Mobile App. It enables sales users to create structured visit plans by selecting specific leads and scheduling interactions over a defined time period. From Journeys, you can –
- Create Object-Based (Lead-Based) Plans
- Create and View Templates
- Create Template-Based Plans
- Approve / Reject Plans
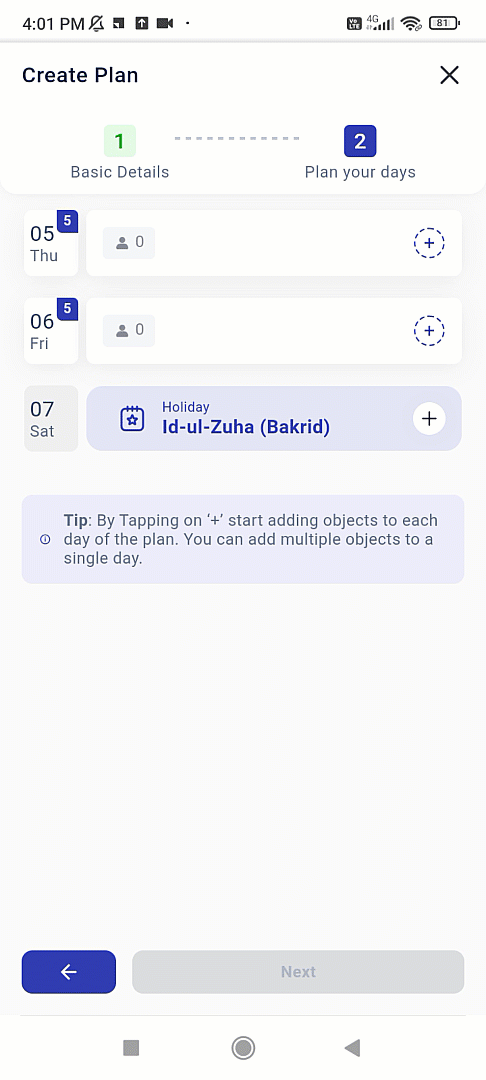
14.1 How To Create Object-Based Plan
- Navigate to the side menu and select My Plans on your Mobile App.
- Tap the Create Plan
 icon.
icon. - Select the Date Range and Working Days.
- Select Objects under Create Plan with and Tap Next.
- Tap each day’s card to add objects categorized under object type chips.
- Once added, tap the relevant day’s card to view the objects categorized based on the object types. You can view the task load for each day by tapping the date card.
- Once the required objects are added across all days in the plan, click Next. You will be shown a summary of all the objects and tasks in the plan. Tap the number of objects to see a breakdown based on the object types. Then tap Submit for Approval.
14.1.1 Smart View Support for Object-Based (Lead-Based) Plans
You can filter and add objects from Smart Views in Object-Based (Lead-Based) plans. While creating or editing a plan, tap the All Objects (Smart Views) dropdown and select the relevant Smart View. The Smart Views dropdown dynamically updates based on the Object Type selected.
14.2 How To View and Create Templates
Navigate to My Templates on your Mobile App and open any template. A preview pop-up displays all objects within the template, grouped by object type. This helps you view information more effectively.
To create a new template from My Templates –
- Click the
 Add Template icon.
 - Add the Template Name and a Description. Next, select a unique colour to set as the display icon for the template. Click Next.
- Object type chips are displayed on top of the screen. Select the relevant object type and add the objects. Click Save.
14.3 How To Create Template-Based Plan
- In My Plans, tap the Create Plan icon.
- Select the Date Range and Working Days.
- Select Templates under Create Plan with and tap Next and proceed further.
- Once the required templates are added across all days in the plan, click Next. You will be shown a summary of all the objects, templates and tasks in the plan. Tap the number of objects to see a breakdown based on the object types. Then tap Submit for Approval.
14.4 How To Approve/Reject Plans
As a Manager, you can open and review plans submitted by your team, with objects grouped by Object Type. Tapping on a day’s card opens a pop-up preview displaying all planned objects under each Object Type. Tapping the date card displays all tasks grouped under each Object Type. To learn how to approve plans, see Approve Plans.
Any Questions?
Did you find this article helpful? Please let us know any feedback you may have in the comments section below. We’d love to hear from you and help you out!