


Get Started

Sales Suite
Field Ops
Marketing
Service CRM
Integrations & Apps
FloStack
Flostack – Booking and Events

1. Feature Overview
The Bookings & Events module is the central hub for publishing, managing, and sharing all scheduling experiences created in Flostack. Whether you’re hosting personal consultations, running large-scale webinars, or offering multiple types of sessions to leads and customers, this module brings everything together in one place.
It consists of three core components:
- Booking Links – Personalized one-on-one scheduling pages that let individuals book time directly with an advisor, counselor, or team member.
- Events – group sessions such as webinars, orientations, demos, or training programs with configurable capacity, presenters, and landing pages.
- Listing Pages – Public pages that display your events, your booking links, or a catalogue of professionals fetched from an external system, so visitors can browse and book from one place.
All these components are powered by Meeting Types, which define the underlying rules—availability, duration, buffers, capacity, form fields, and more. Meeting Types ensure consistent scheduling behavior across every booking experience, while Bookings & Events determine how these experiences are shared with your audience.
2. Prerequisites
To learn more about FloStack (www.flostack.io), and enable it on your account, contact flostack@leadsquared.com.
3. Booking Links
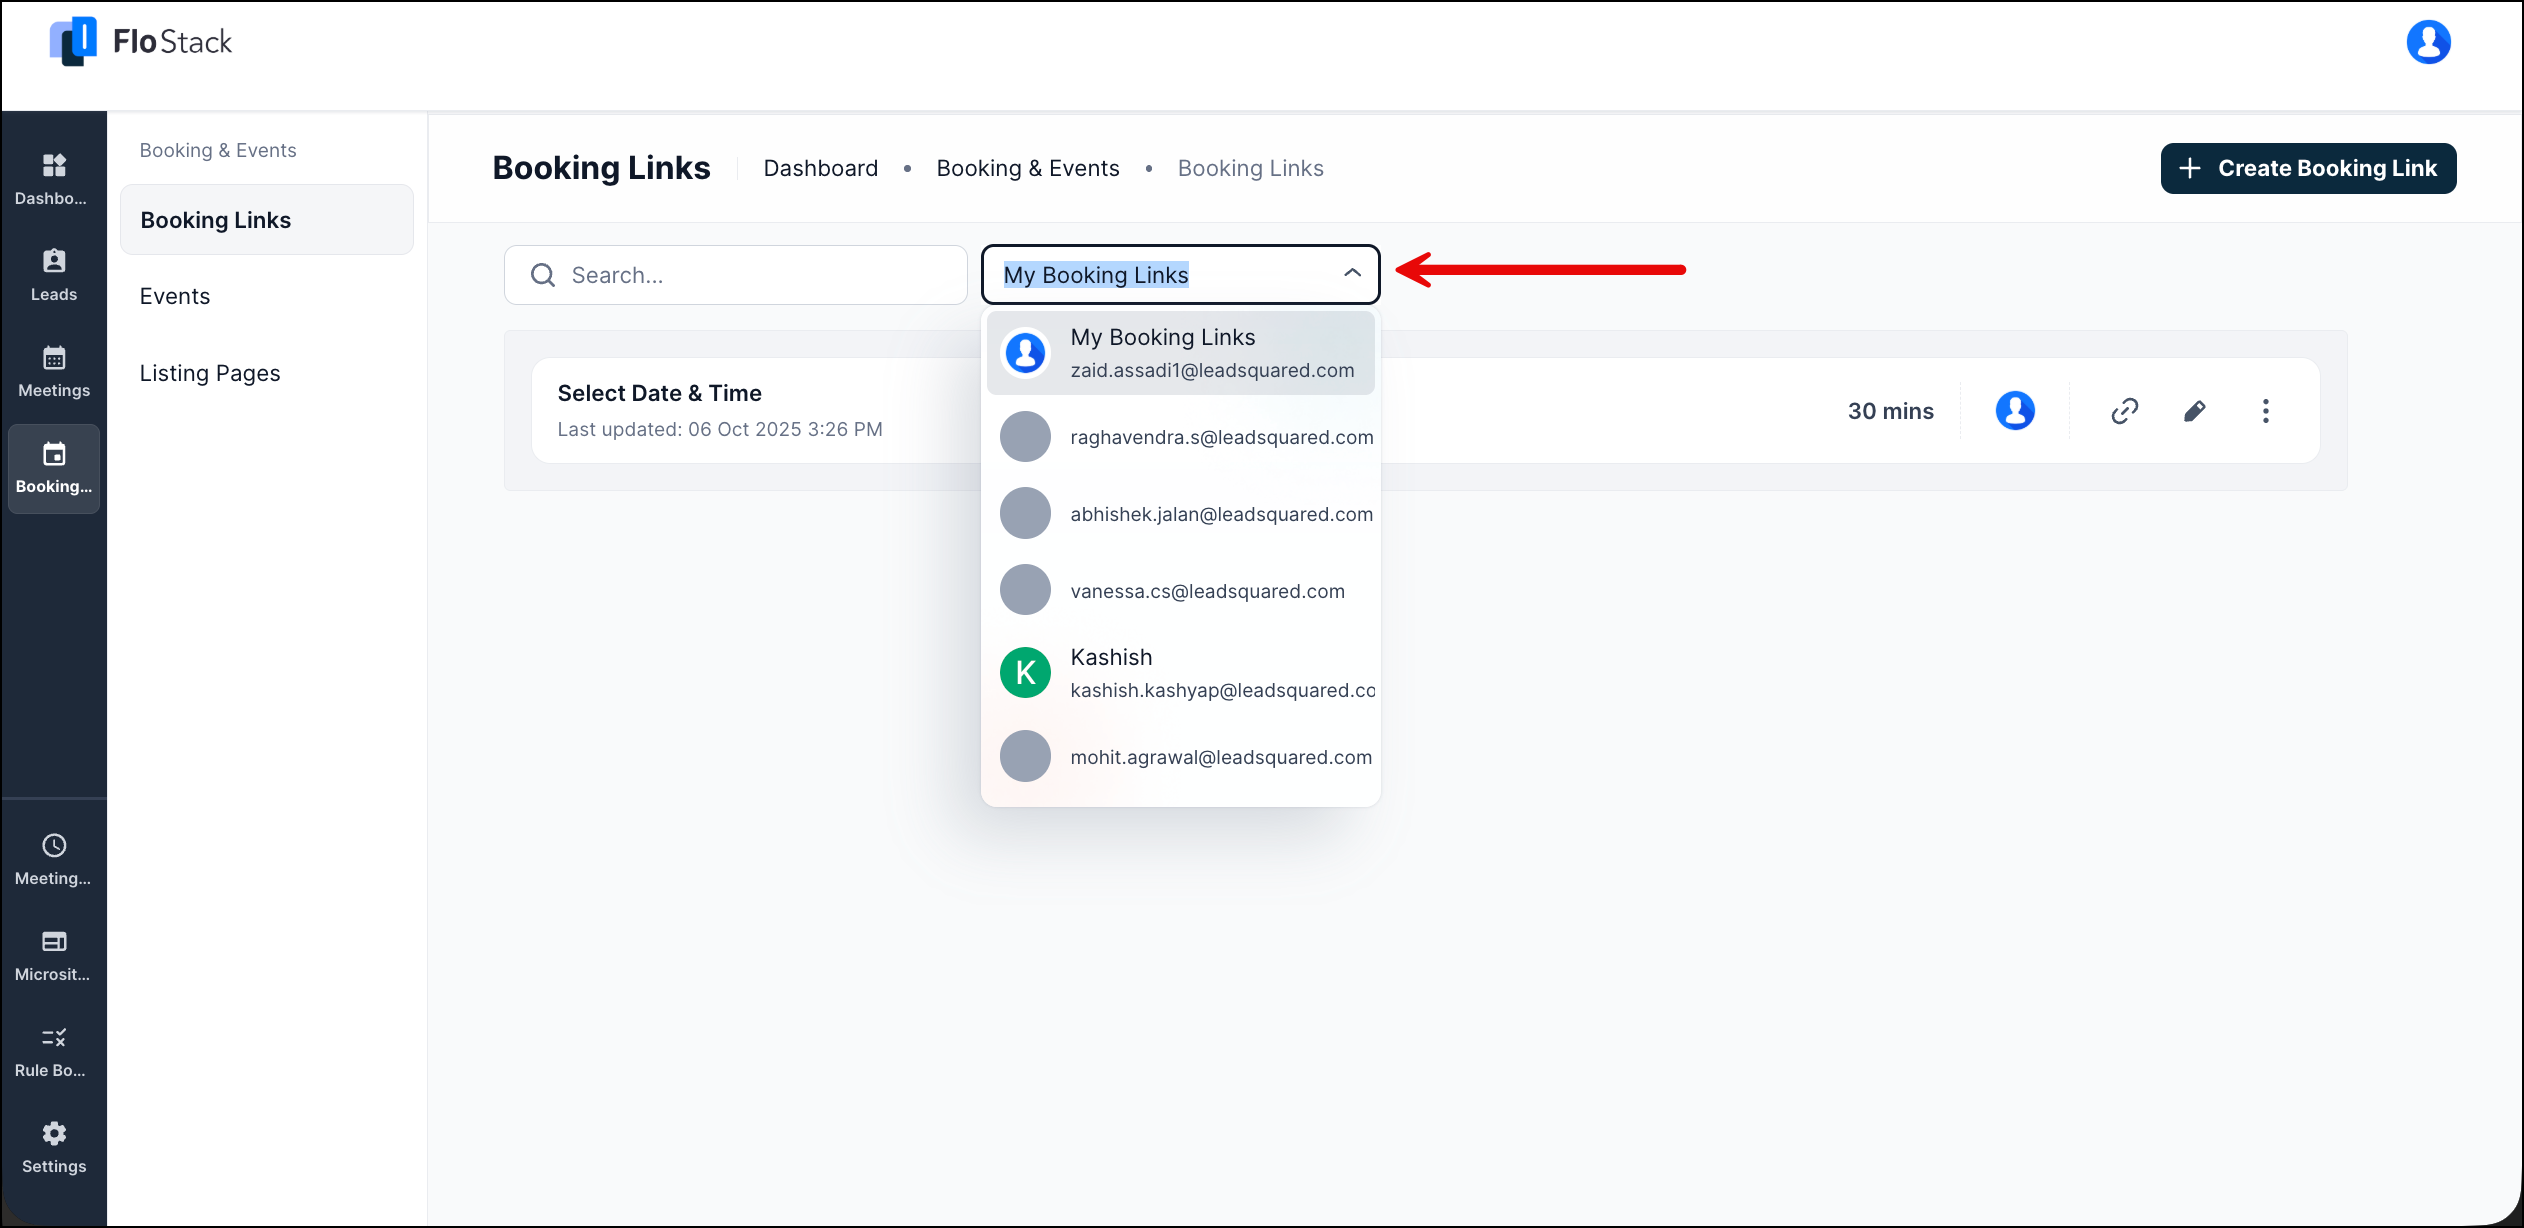
Booking Links allow you to create personal or team scheduling pages for one-to-one meetings. Each link is powered by either your default availability or Meeting Type and automatically respects your availability, duration, buffers, and calendar sync settings.

Create a Booking Link
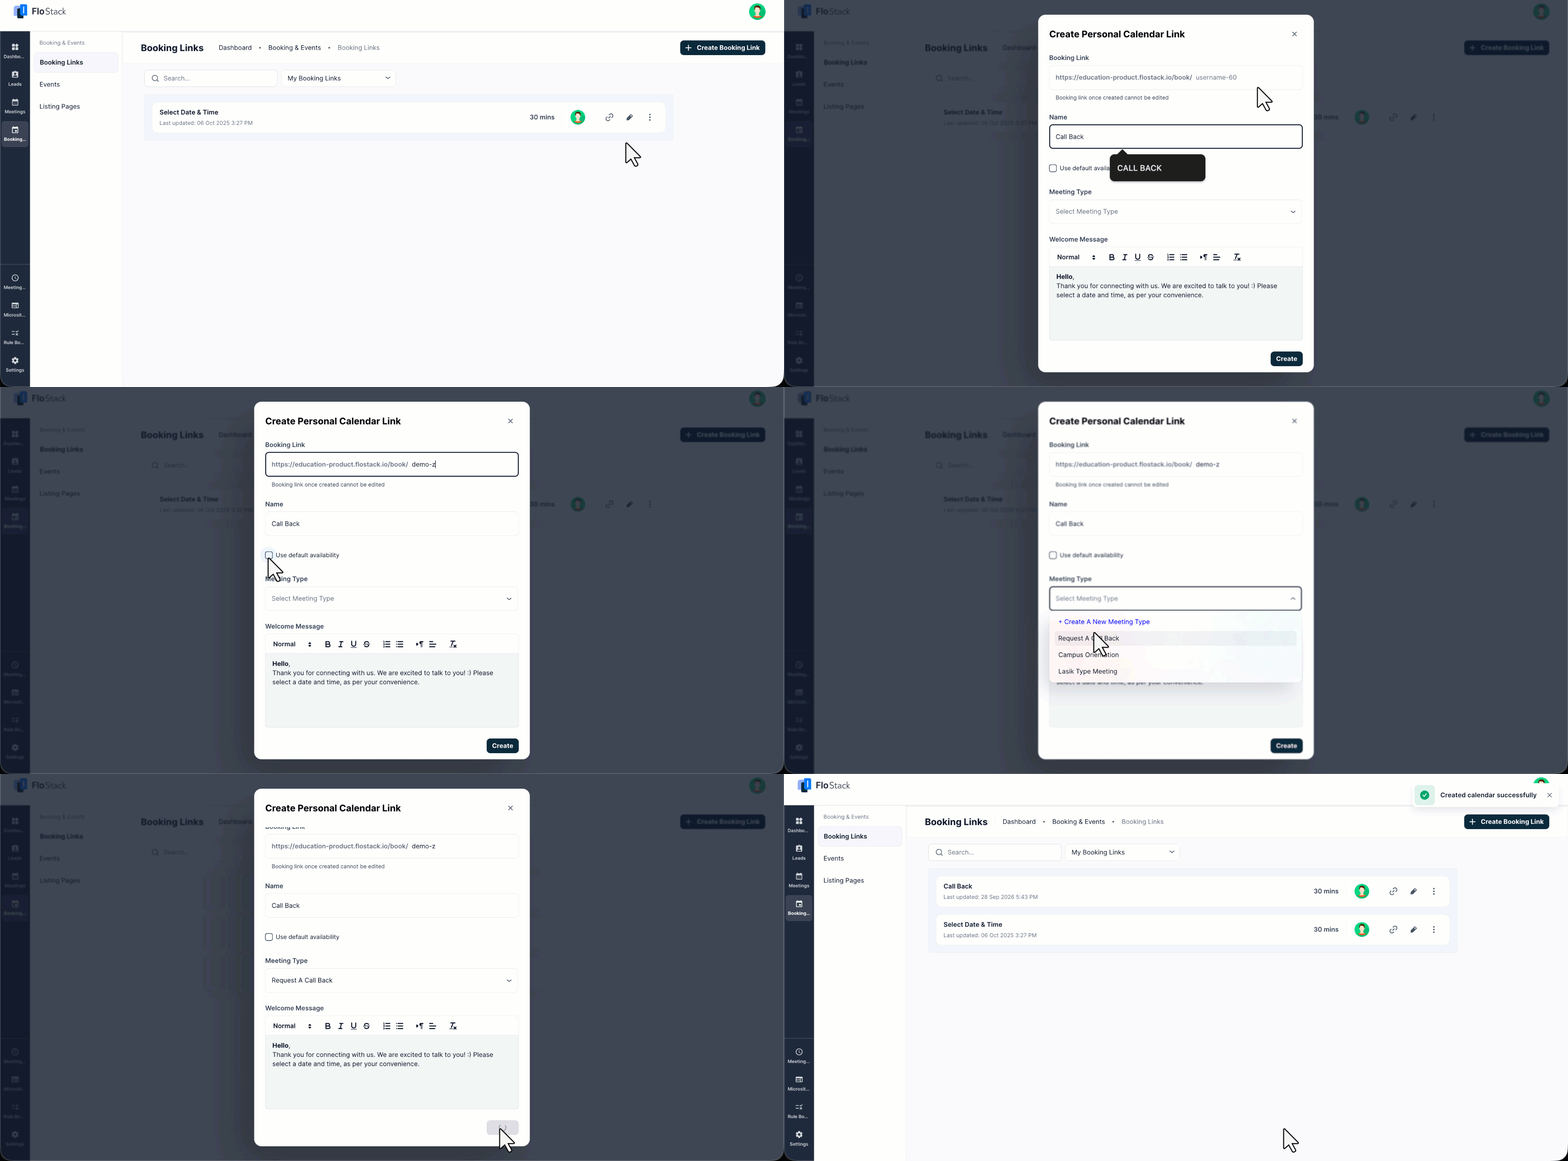
- Navigate to Booking & Events>Booking Links.
- Click Create Booking Link.
- Configure:
- Booking Link URL – The public link attendees will use to book time with you
- Name – Internal name for identifying the booking link
- Use Default Availability –When enabled, the link will use the default availability configured on your Settings page.
- Duration – Pulled from the default calendar, this can be overridden.
- Meeting Type – Instead of the Default Availability option, you can select a meeting type that defines the availability, buffers, increments.
- Welcome Message – Shown on the public scheduler
- Save to generate your booking link.
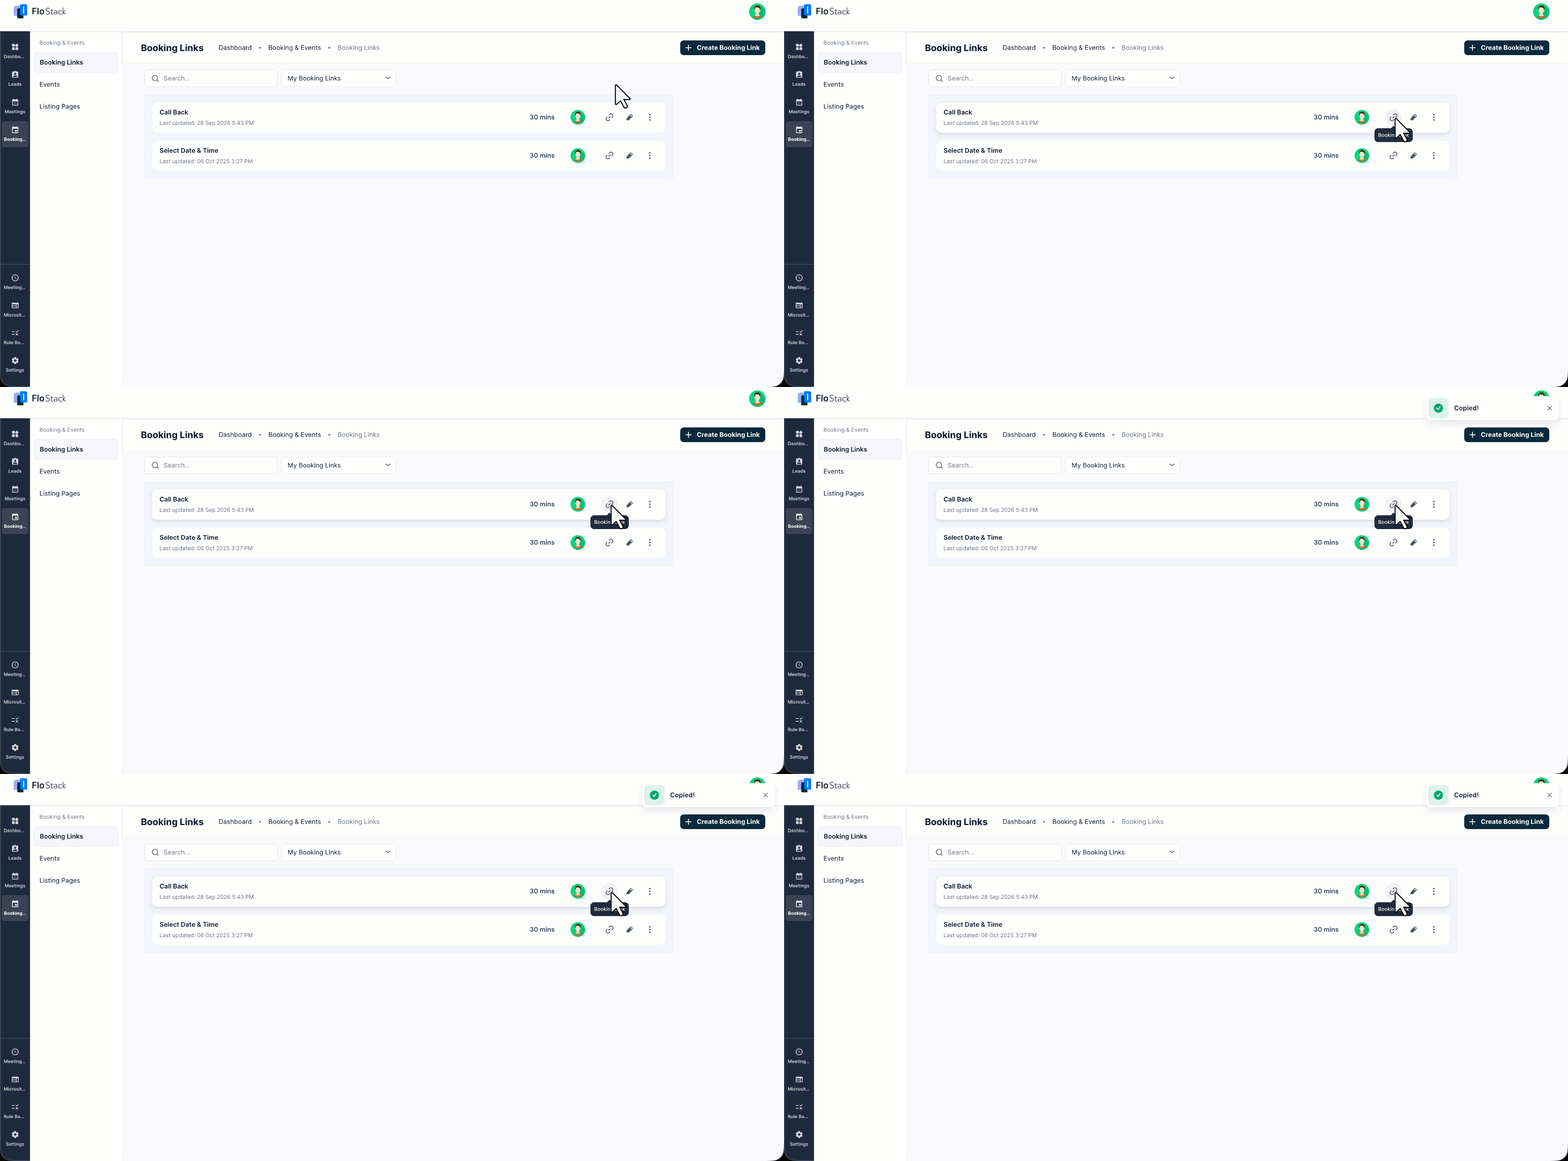
Click the copy icon to copy the booking link.
4. Events
Events let you create group sessions such as webinars, workshops, or open houses. An event uses a meeting type as its base configuration and allows you to add presenters, capacity limits, and a fully customizable landing page.
The Events section in Flostack provides a centralized view of all scheduled and created events. It includes two primary tabs—Agenda and All Events—along with options to create new events and manage attendees.
4.1 Agenda Tab
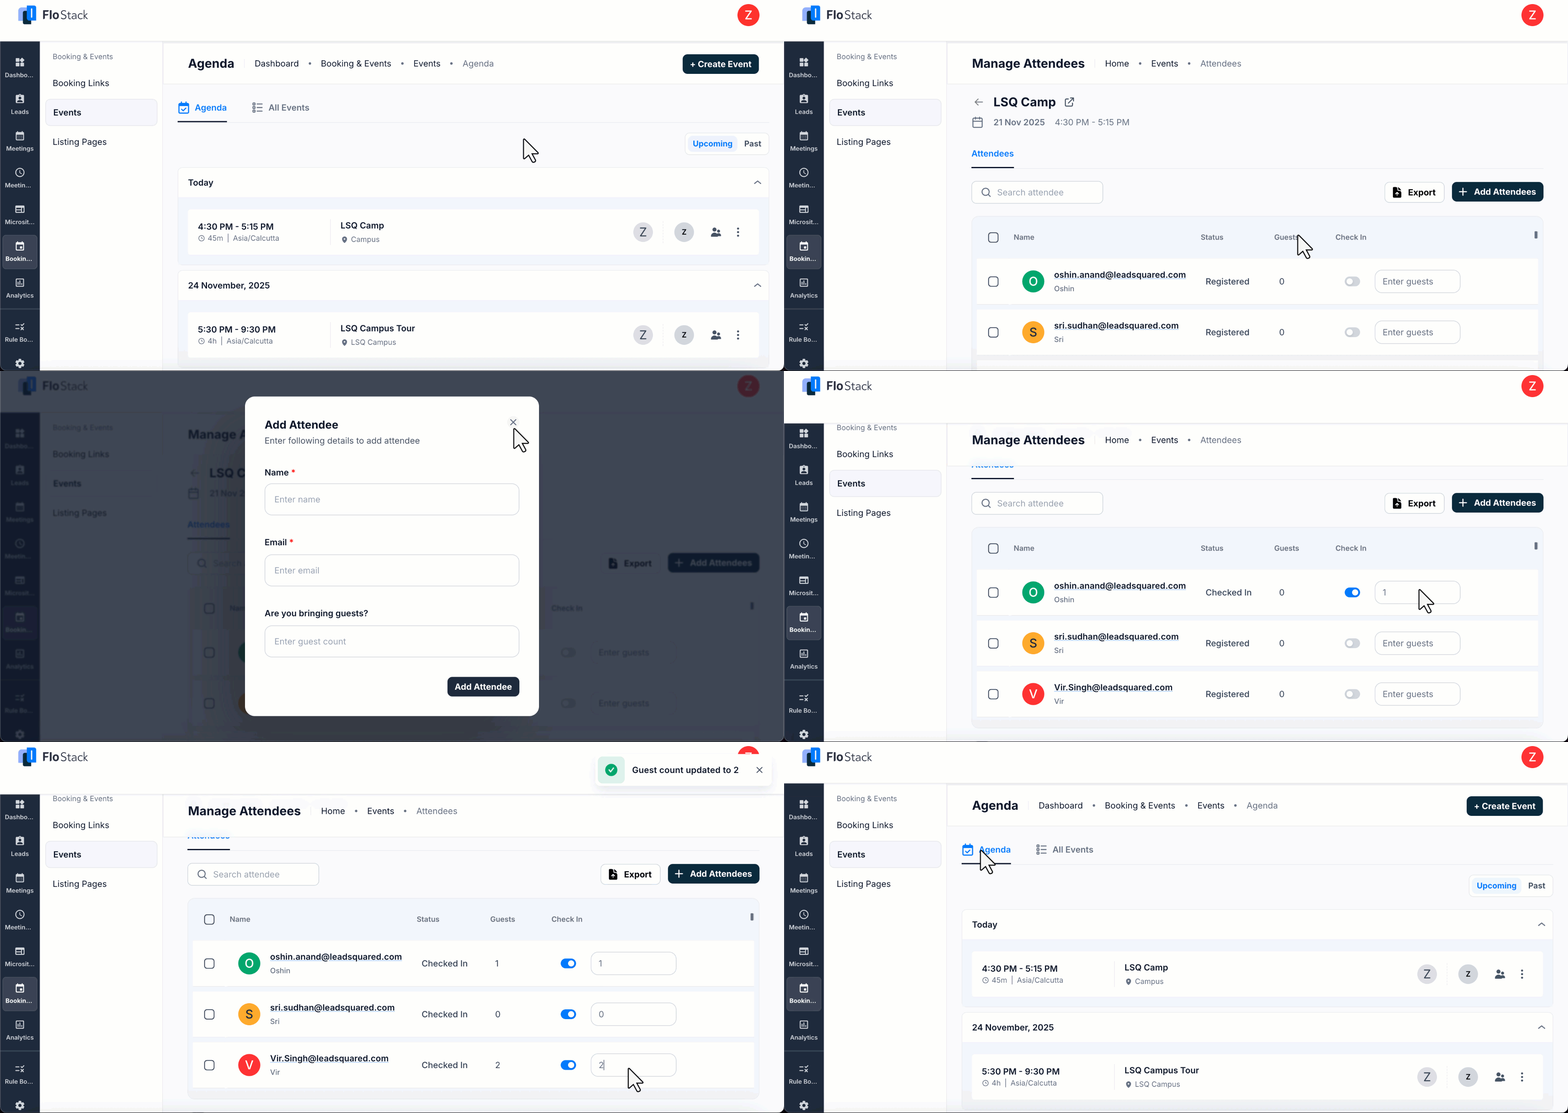
The Agenda tab displays the full calendar of upcoming and past event occurrences, helping organizers quickly track what’s scheduled.
Key Features
- Upcoming / Past View: A side toggle lets you switch between upcoming and past event occurrences.
- Event Overview: Each event entry shows details about the events.
- Manage Attendees: Click the Manage Attendees button on an event to –
- View the list of all registered attendees
- Check in attendees who have arrived, and specify if they’ve brought guests.
- Export the attendee list
- Add attendees manually
This tab is ideal for tracking real-time event activity and managing participant lists.
4.2 All Events Tab
The All Events tab shows every event that has been created in your workspace—regardless of event status or number of attendees. This tab acts as your complete repository of events.
Creating an Event
Click Create Event to start building a new event. You will first choose between two creation modes:
4.2.1 Event Scheduler
Choose this when you want a standard scheduler-based booking experience. This option is ideal for straightforward scheduling without a custom landing page.
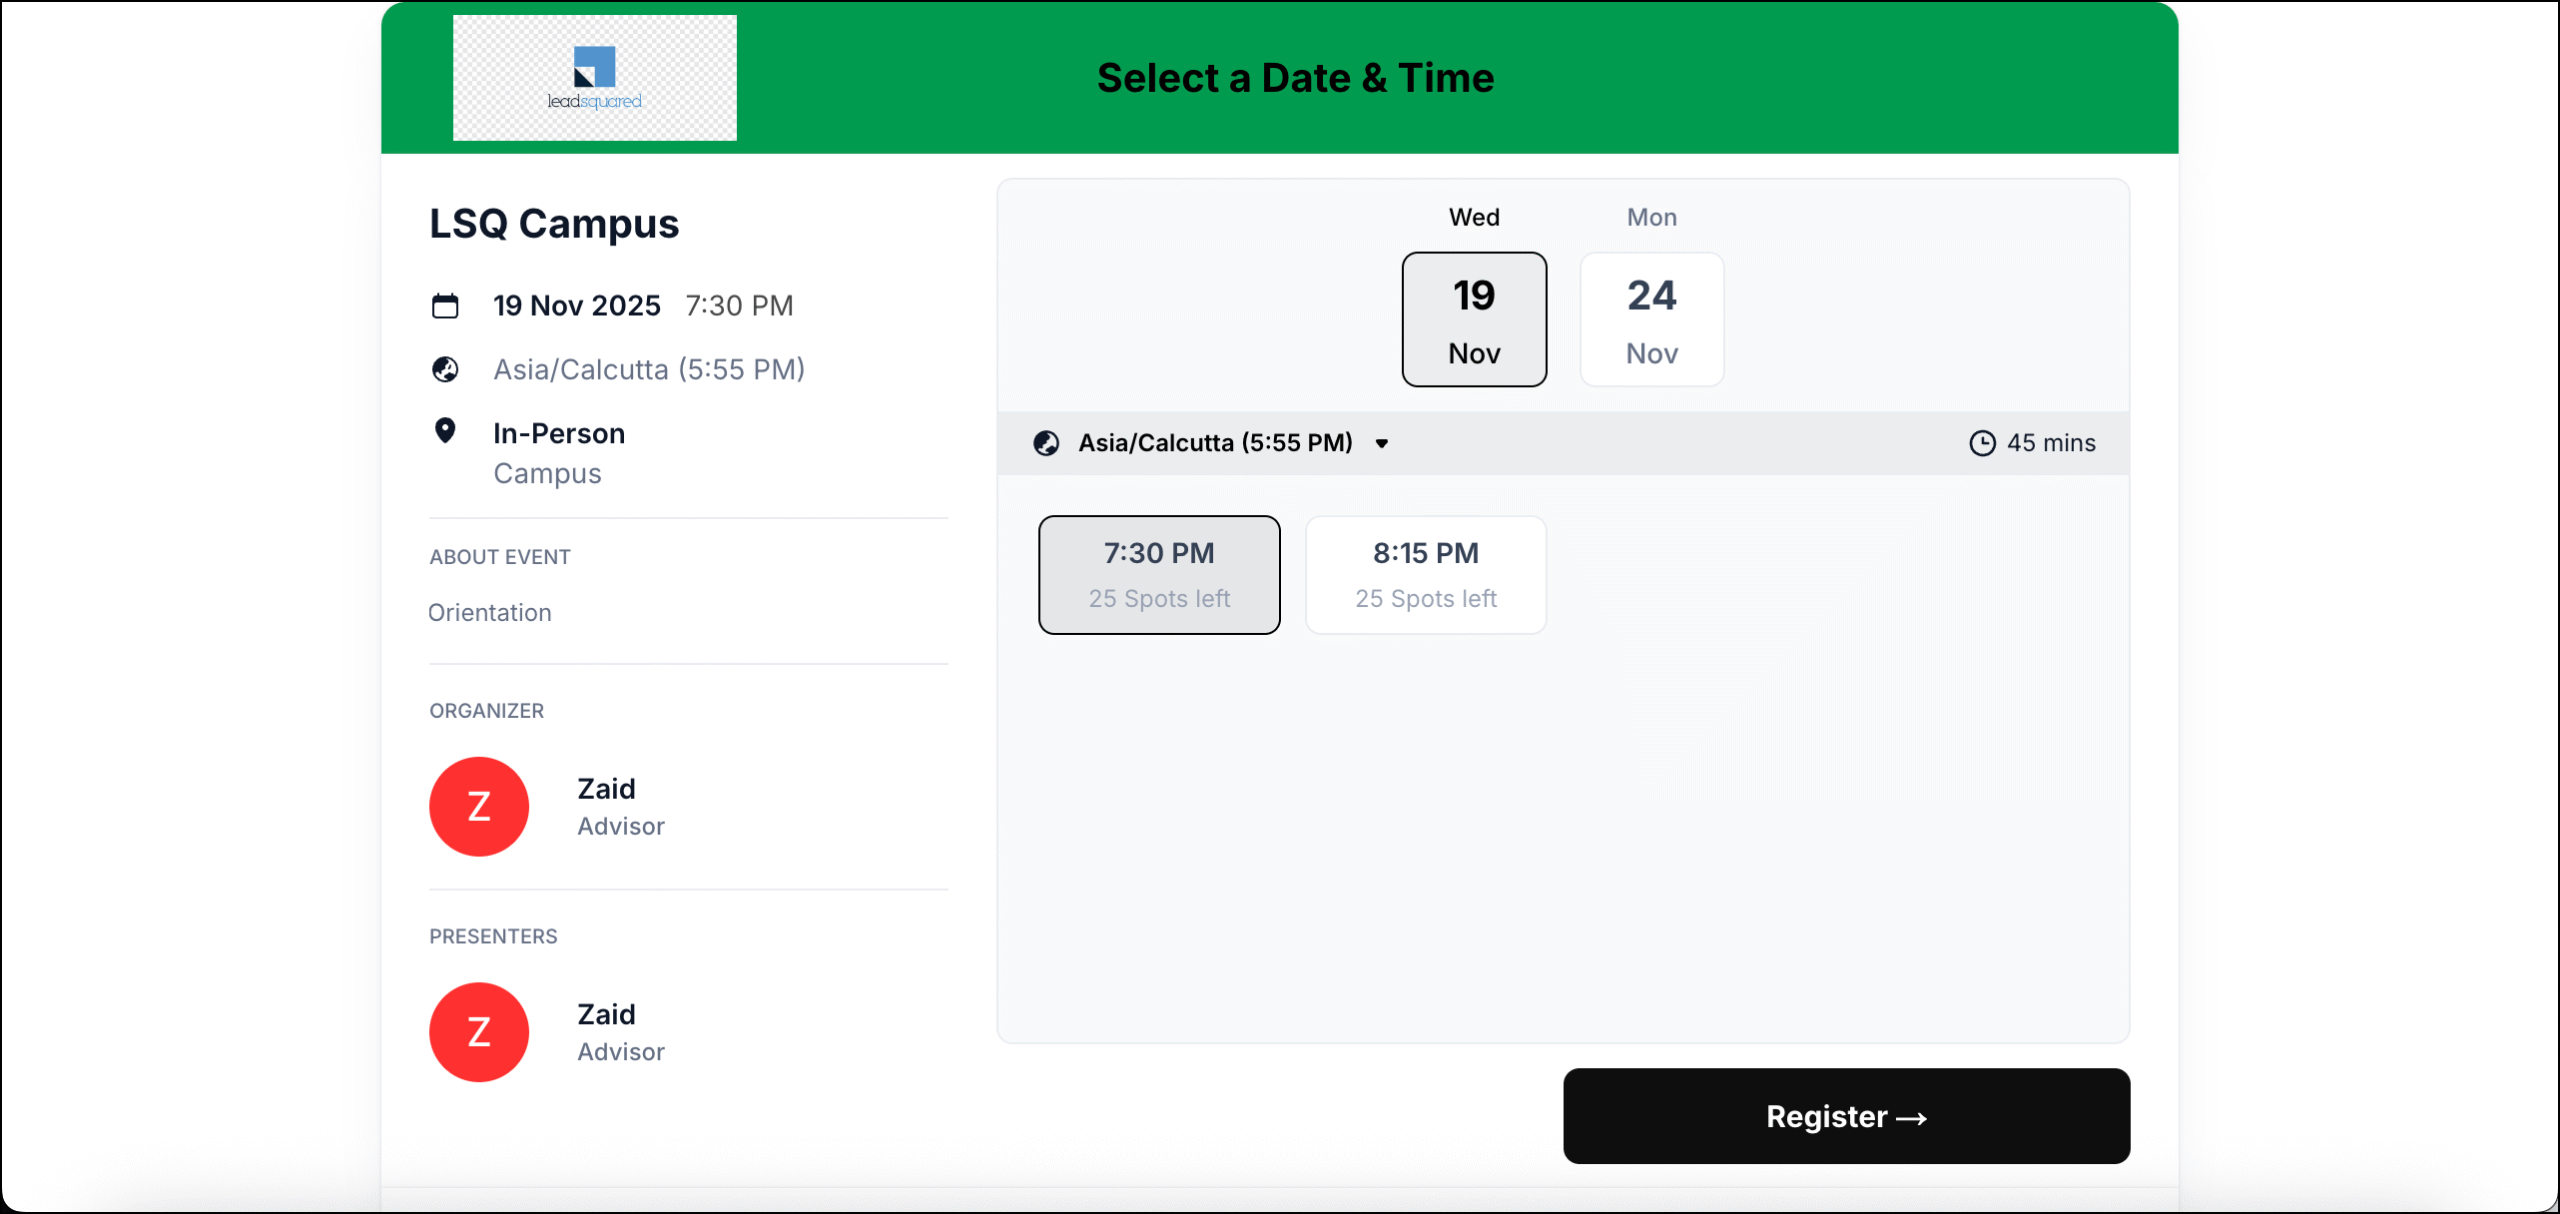
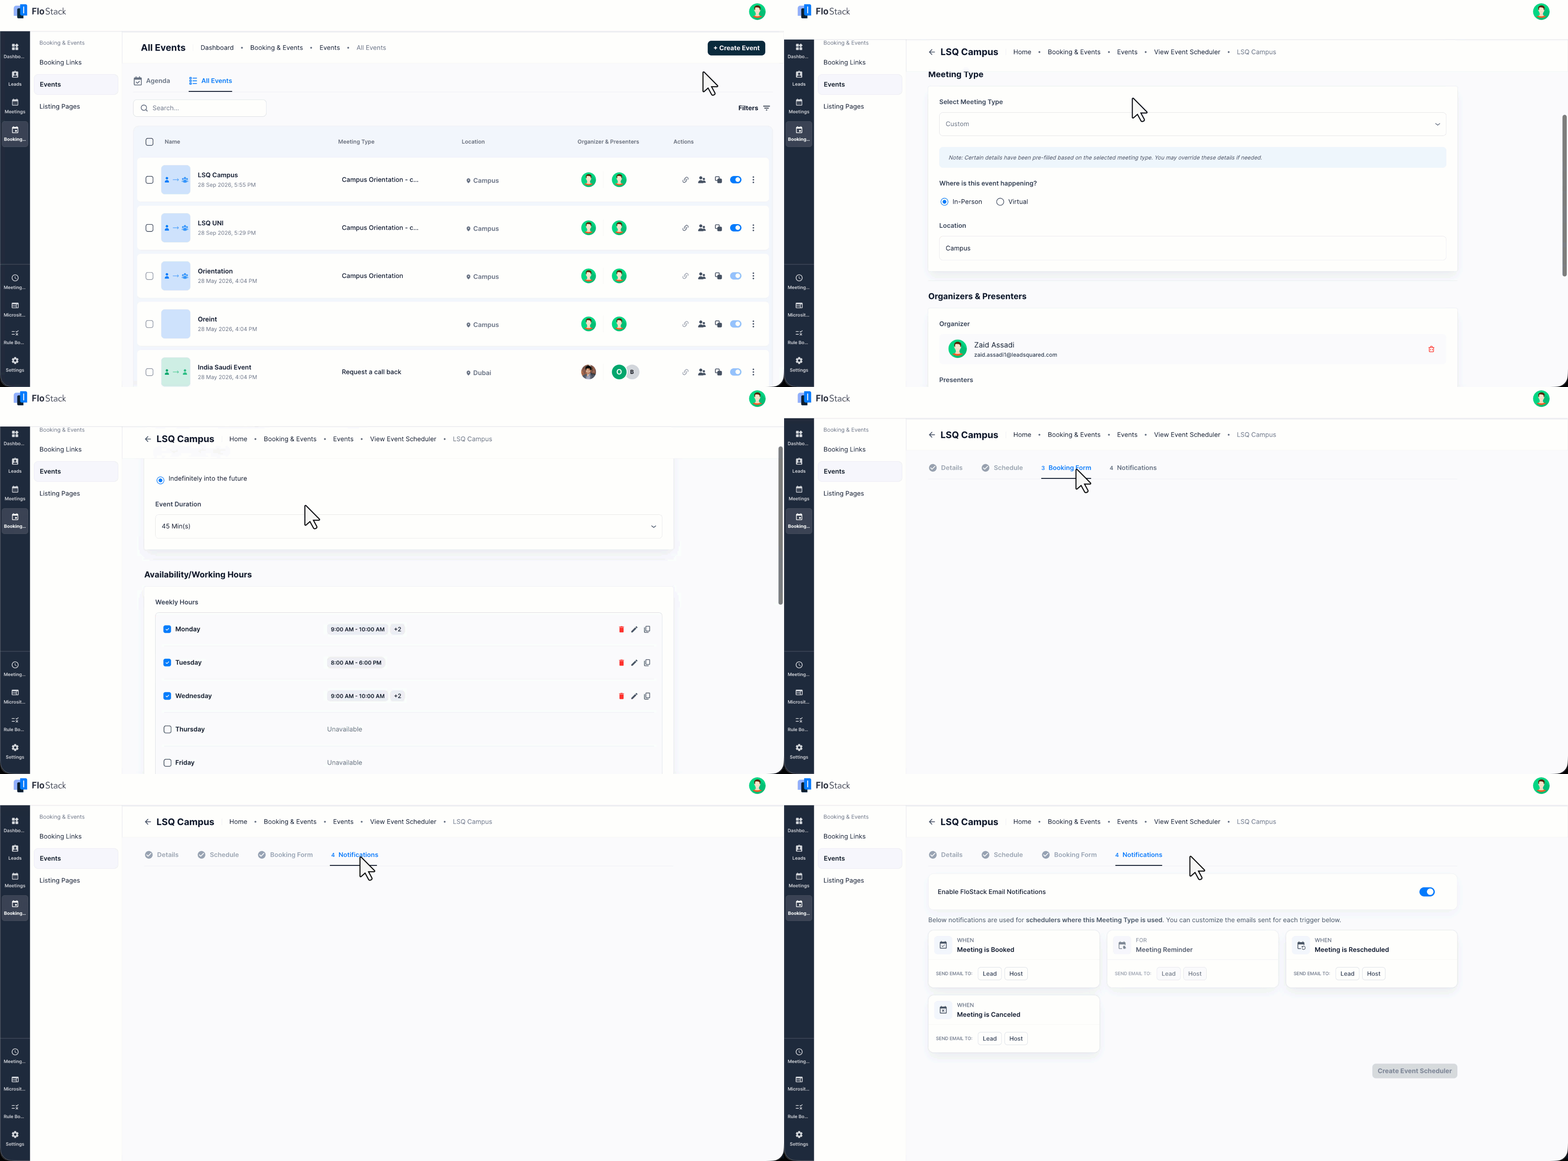
You can configure:
- Event Details –
- Name
- Description
- Meeting type
- Organizers & Presenters
- Capacity management
- Schedule –
- Date & event duration
- Availability/working hours
- Meeting limits.
- Booking Form –
- Create Event Link
- Invitee Form Questions
- Enable or disable the option to allow the registrants to bring guests.
- Confirmation Page
- Notifications –
- FloStack can send automatic emails to the lead and the host at key points in the event lifecycle. To configure them, go to the Notifications step and enable the Enable FloStack Email Notifications toggle. The following triggers are available:
- Meeting is Booked – Sent when a lead registers for the event.
- Meeting Reminder – Sent to the lead ahead of the scheduled event.
- Meeting is Rescheduled – Sent when the event date or time changes.
- Meeting is Canceled – Sent when the event is called off.
- Against Send Email To, select Lead, Host, or both. To change the content of an email, click the relevant trigger and edit the template.
- FloStack can send automatic emails to the lead and the host at key points in the event lifecycle. To configure them, go to the Notifications step and enable the Enable FloStack Email Notifications toggle. The following triggers are available:
Most of the configuration for the Schedule and Booking Form section will be autopopulated with the Meeting Type configuration you’ve selected. It’s possible to further modify some of the configuration once it’s autopopulated.
4.2.2 Event Landing Page
Choose this when you want a fully branded event page with images, highlights, multimedia, and custom sections. This option provides a richer, marketing-friendly page to promote the event.
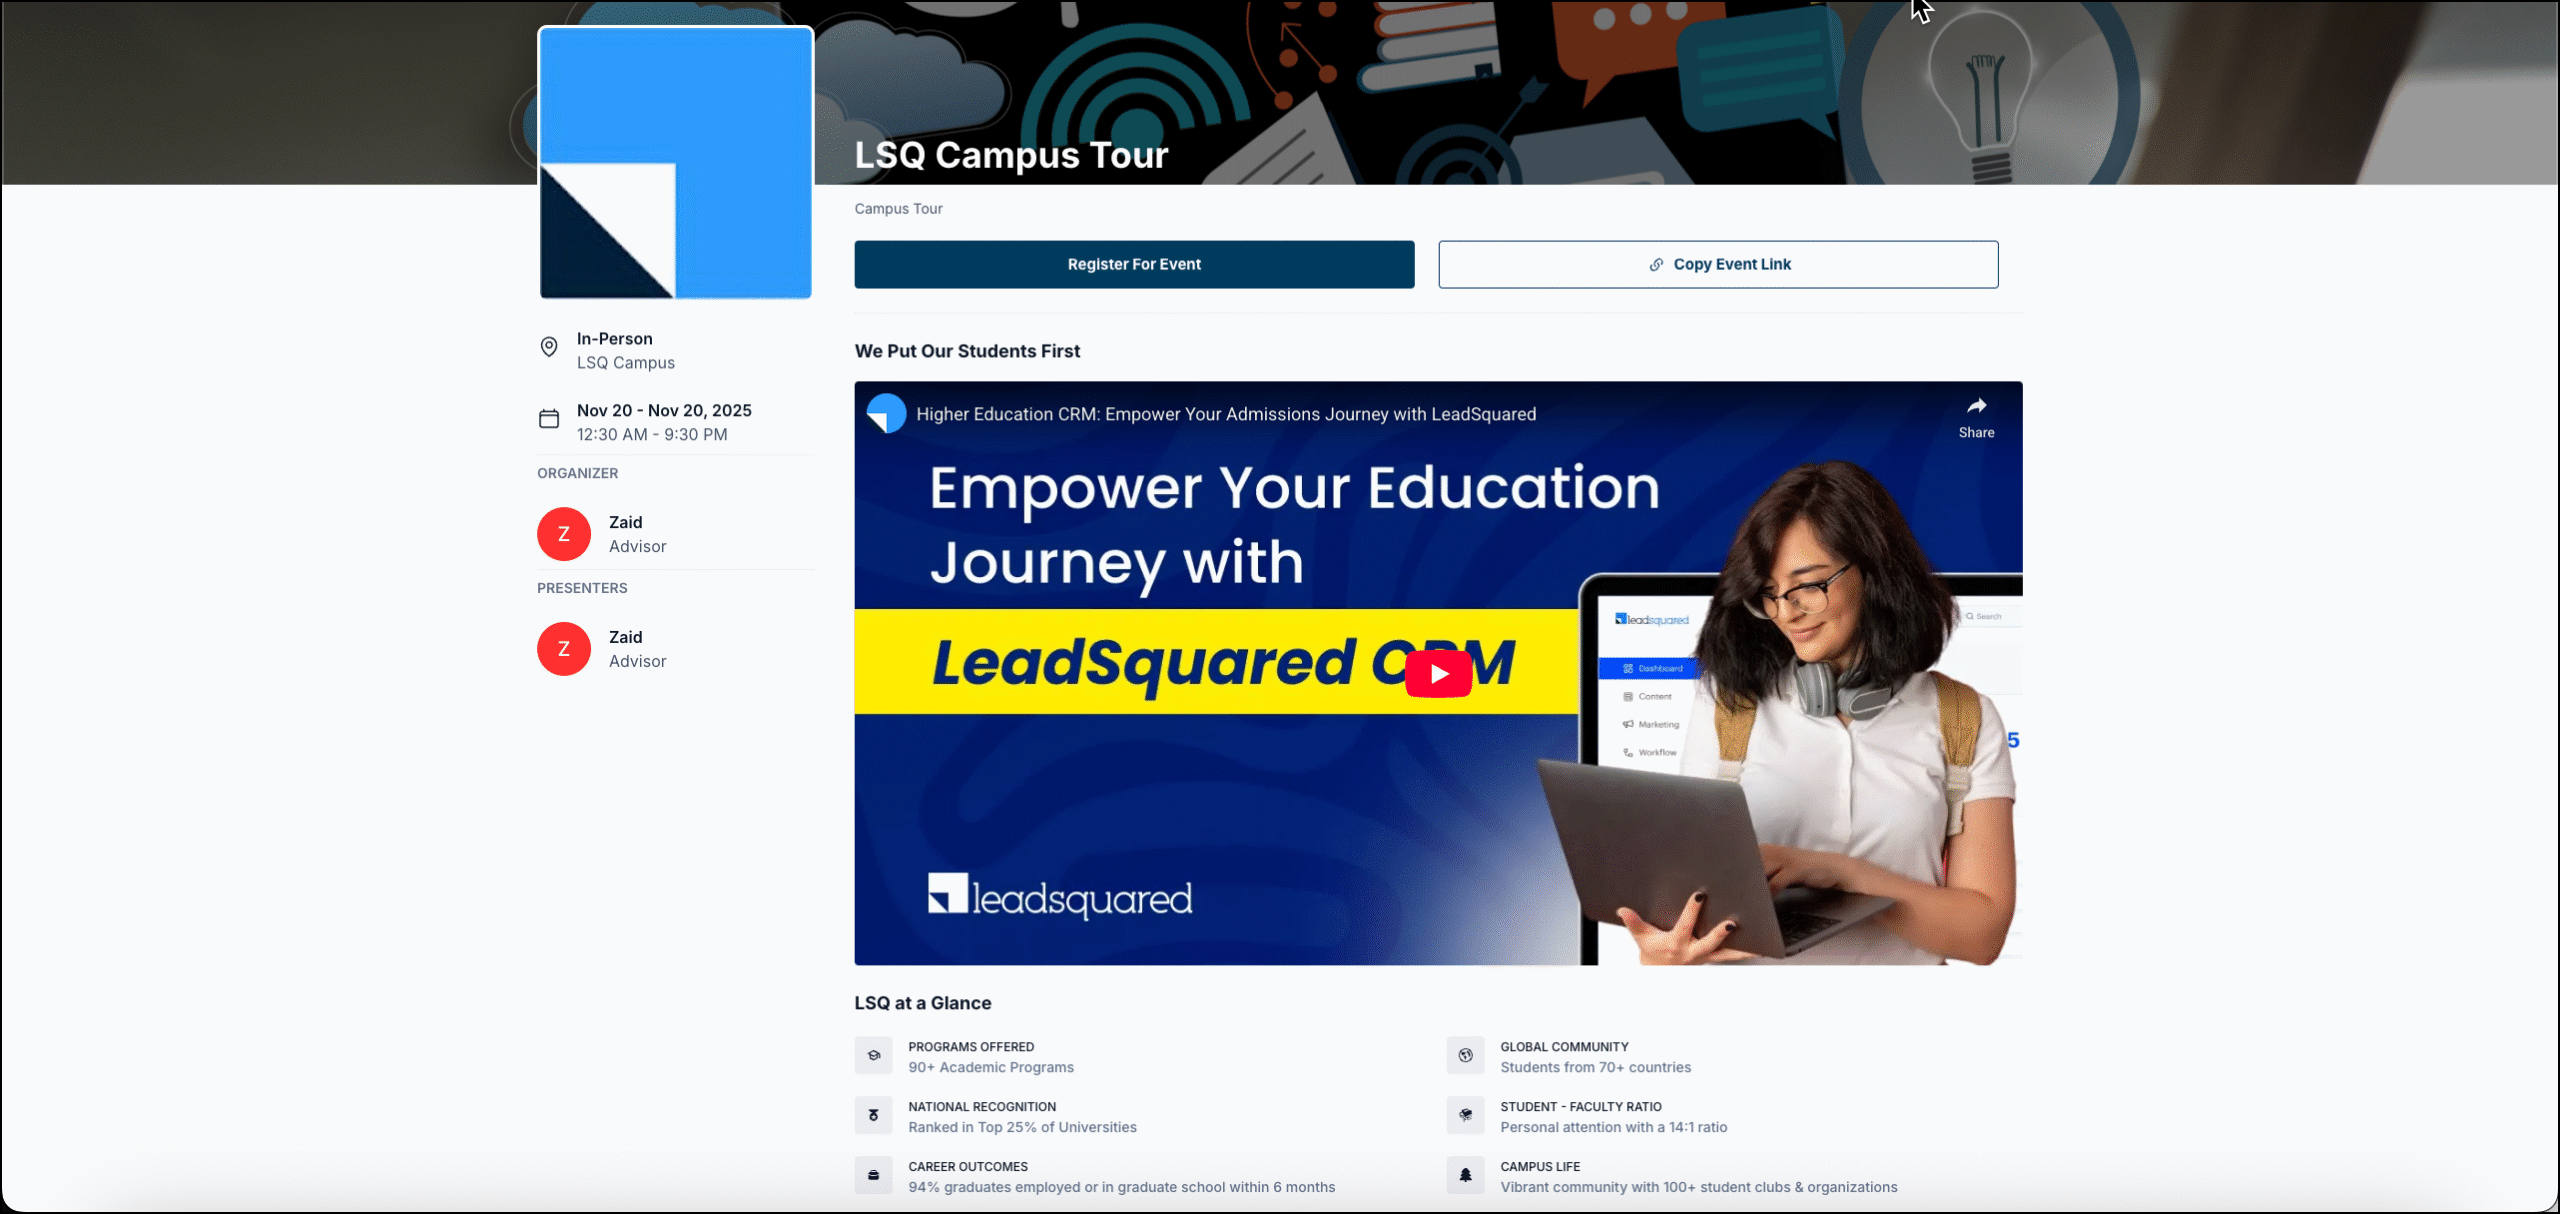
You can configure:
- Type of Event Landing Page – Select either one-off or recurring. Select one-off if you want to create a fresh events landing page without a pre-configured meeting types template.
- Event Details –
- Name
- Description
- Meeting type (only available in the recurring type, in the one-off event you can select the Mode of meeting).
- Organizers & Presenters
- Capacity management
- Schedule –
- Date & event duration
- Availability/working hours
- Meeting limits.
- Booking Form –
- Create Event Link
- Invitee Form Questions
- Confirmation Page
- Landing Page Design –
- Upload Images: Add Banner and Main Image to the page.
- Register Button: Configure the button label and color for the Register/CTA button.
- Landing Page Widgets: The following widgets are available –
- Highlights: Add highlights to showcase important numbers or information.
- Embed URL: Enter URL to embed resources from web in your landing page.
- Image Gallery: Add images alone or with text content as cards.
- Text Block: Add heading and body text.
- Notifications –
- FloStack can send automatic emails to the lead and the host at key points in the event lifecycle. To configure them, go to the Notifications step and enable the Enable FloStack Email Notifications toggle. The following triggers are available:
- Meeting is Booked – Sent when a lead registers for the event.
- Meeting Reminder – Sent to the lead ahead of the scheduled event.
- Meeting is Rescheduled – Sent when the event date or time changes.
- Meeting is Canceled – Sent when the event is called off.
- Against Send Email To, select Lead, Host, or both. To change the content of an email, click the relevant trigger and edit the template.
- FloStack can send automatic emails to the lead and the host at key points in the event lifecycle. To configure them, go to the Notifications step and enable the Enable FloStack Email Notifications toggle. The following triggers are available:
 icon to copy the Event link.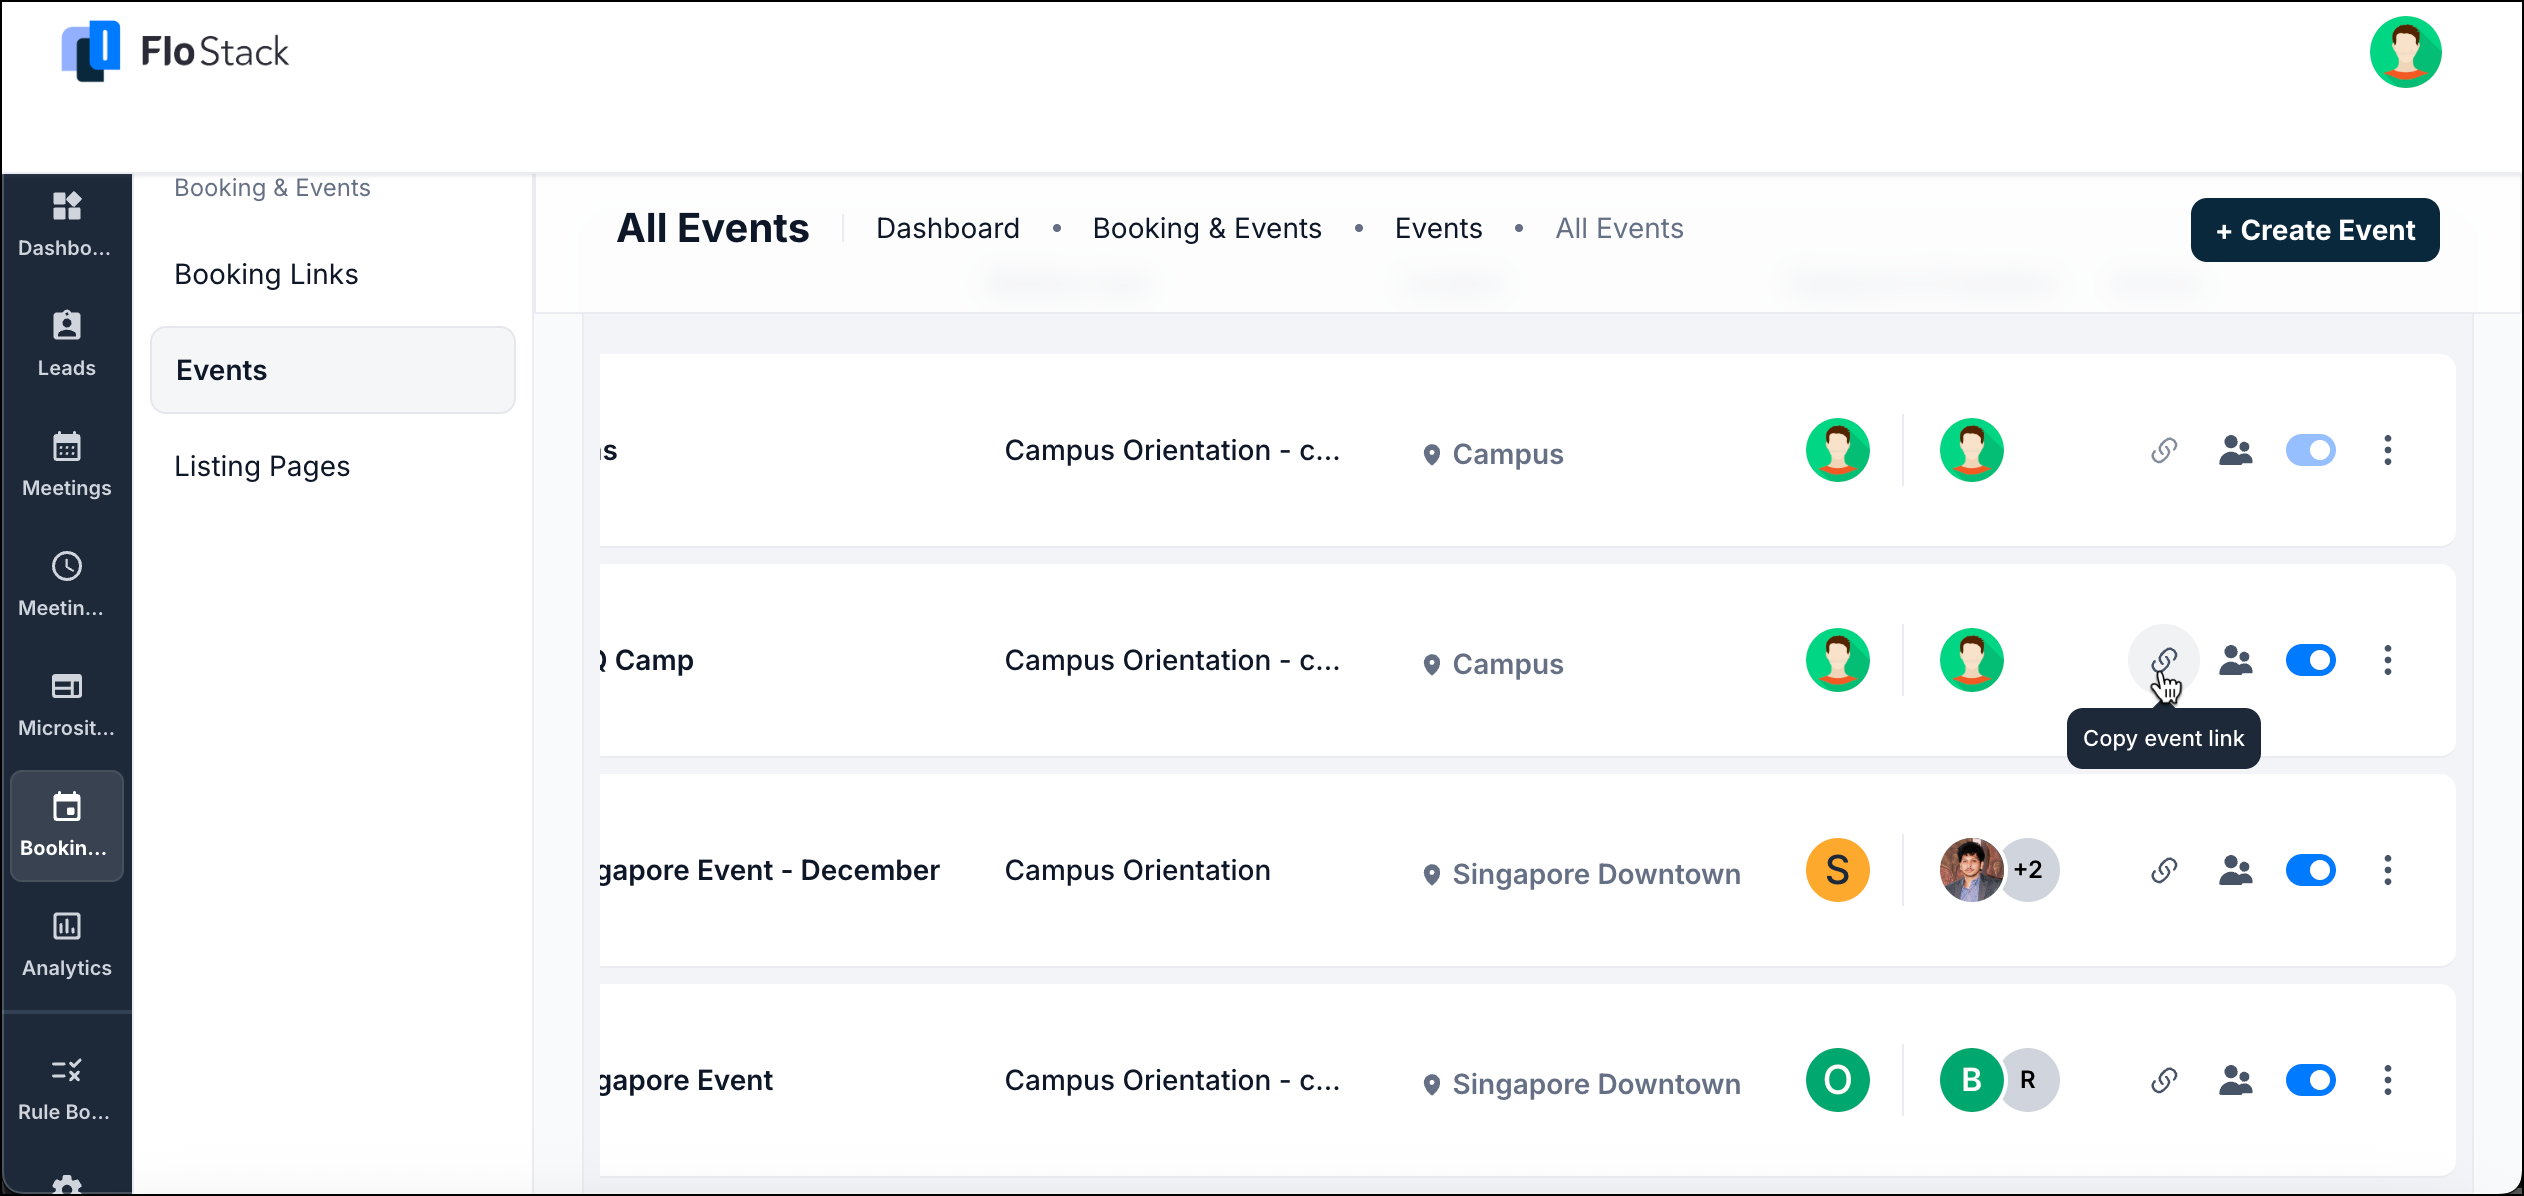
5. Listing Page
A Listing Page is a public page that presents a set of bookable options in one place, so visitors can discover and register for any session you offer.
FloStack supports three types of listing pages, each on its own tab:
- Events Page – Displays the events you select.
- Booking Links Page – Displays the booking links you select.
- Catalogue – Displays professionals and their availability, fetched from an external system that your account is connected to.
Use Case
- A university publishes a Listing Page to showcase all available sessions, such as counseling appointments, campus tours, orientation events, and workshops, allowing prospective students to browse and register from one central page.
- A multi-specialty clinic uses a Listing Page to display all consultation types and group health sessions in one place, enabling patients to quickly find and book the right appointment without contacting the clinic.

5.1 Events Page and Booking Links Page
How It Works
On the Listing Page screen, you can create dedicated listings for Events or Booking Links.
- In the Events tab, click Create to build a listing page that showcases selected events.
- In the Booking Links tab, click Create to publish a listing page containing selected one-on-one scheduling links.
For either type, you can configure:
- Name – Internal and public-facing title of the page
- Link – The URL for sharing the listing page
- Description – A short summary shown at the top of the page
- Items to Display – Add the specific events or booking links you want to include
Once saved, the listing page becomes a single, shareable destination for visitors to browse and register for your events or book one-on-one sessions.
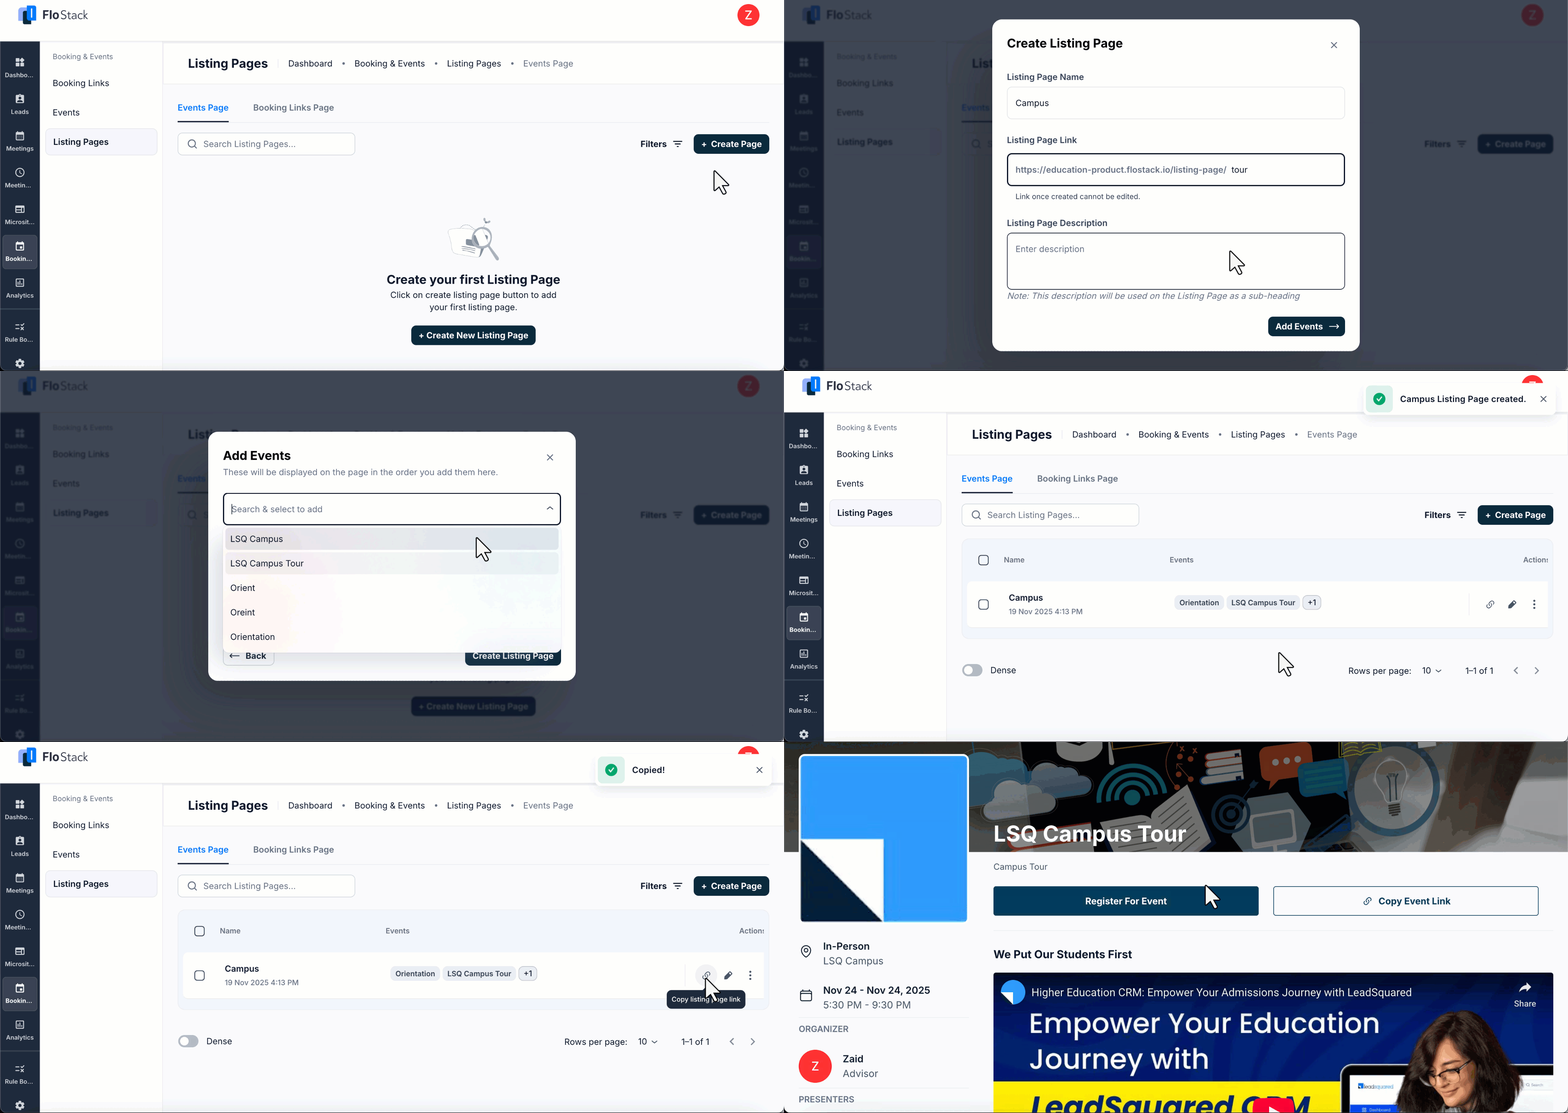
icon to copy the listing link.
5.2 Catalogue
A Catalogue listing page displays a list of professionals, such as doctors, that is fetched from an external system connected to your account. Visitors filter the list, select a professional, view the available slots, and book an appointment on the same page.
Unlike the other two listing page types, you do not select the items to display. The listings, the filters, and the availability are all fetched from the connected system, and the booking, rescheduling, and cancellation actions are passed back to it.
The connection is established through LeadSquared Universal Data Sync (UDS), which acts as the middle layer between FloStack and the external system.
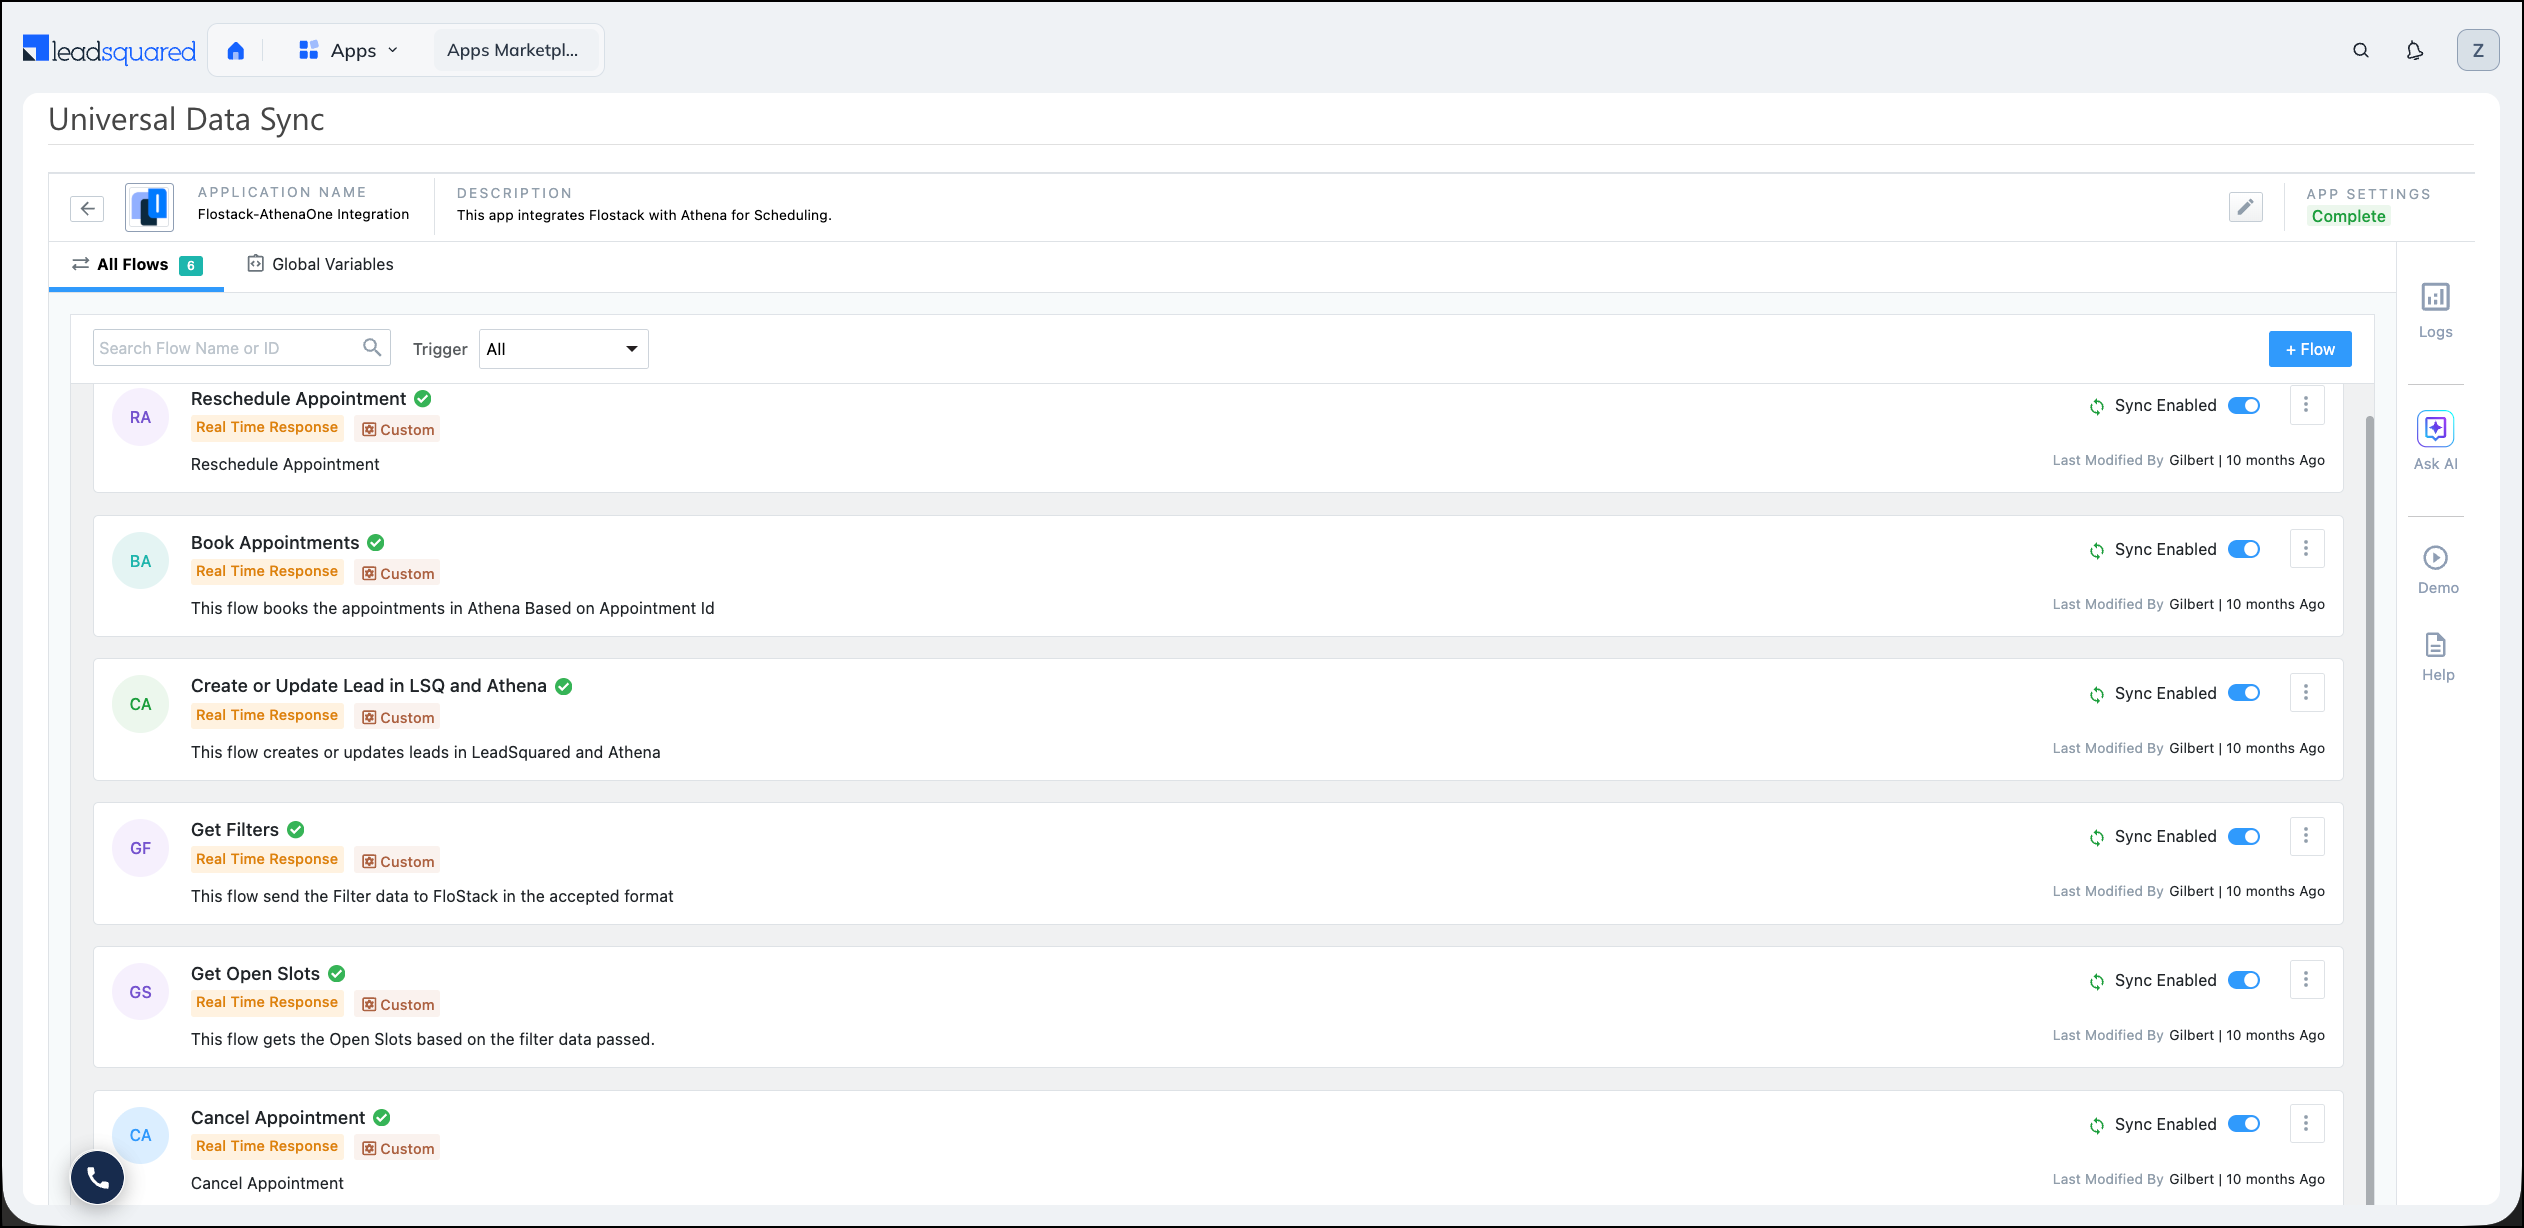
5.2.1 What Visitors See
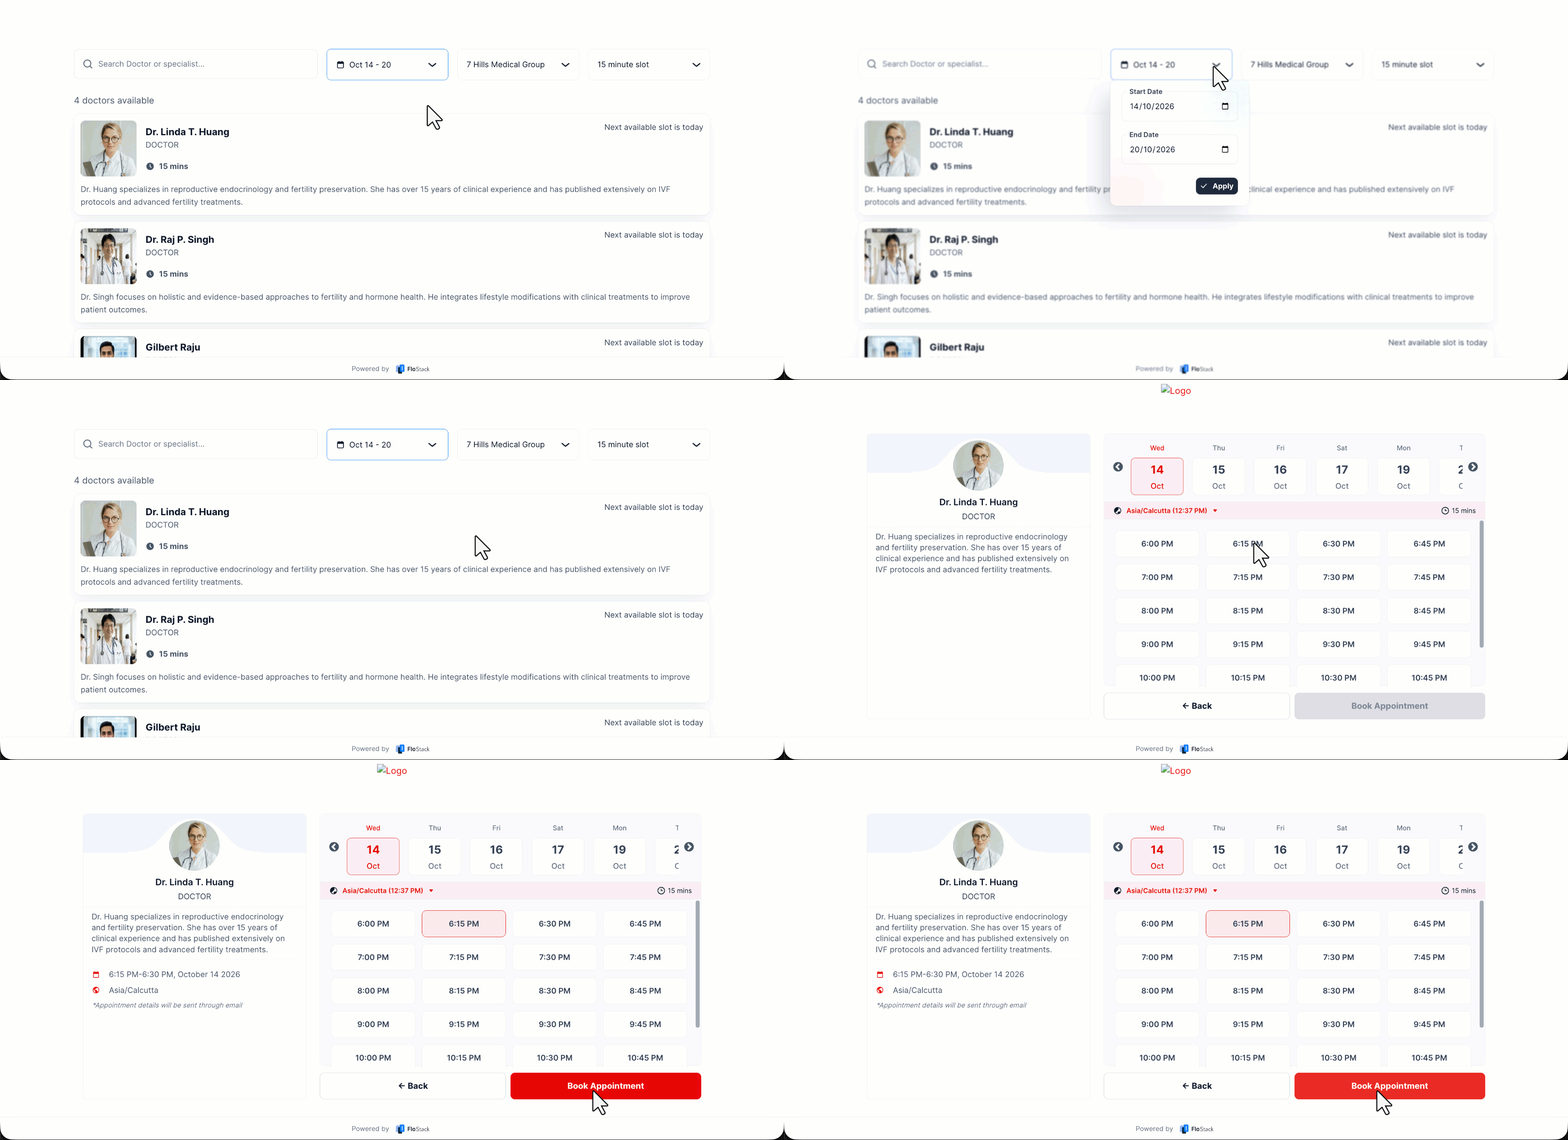
On a catalogue page, visitors can:
- Search for a professional by name or specialisation, and narrow the list using the date range and the filters fetched from the connected system.
- View the professionals that match the filters, along with the appointment duration, a description, and the next available slot.
- Click a professional to view the available slots for the selected date and time zone.
- Select a slot and click Book Appointment.
5.2.2 Configure the Catalogue Endpoints
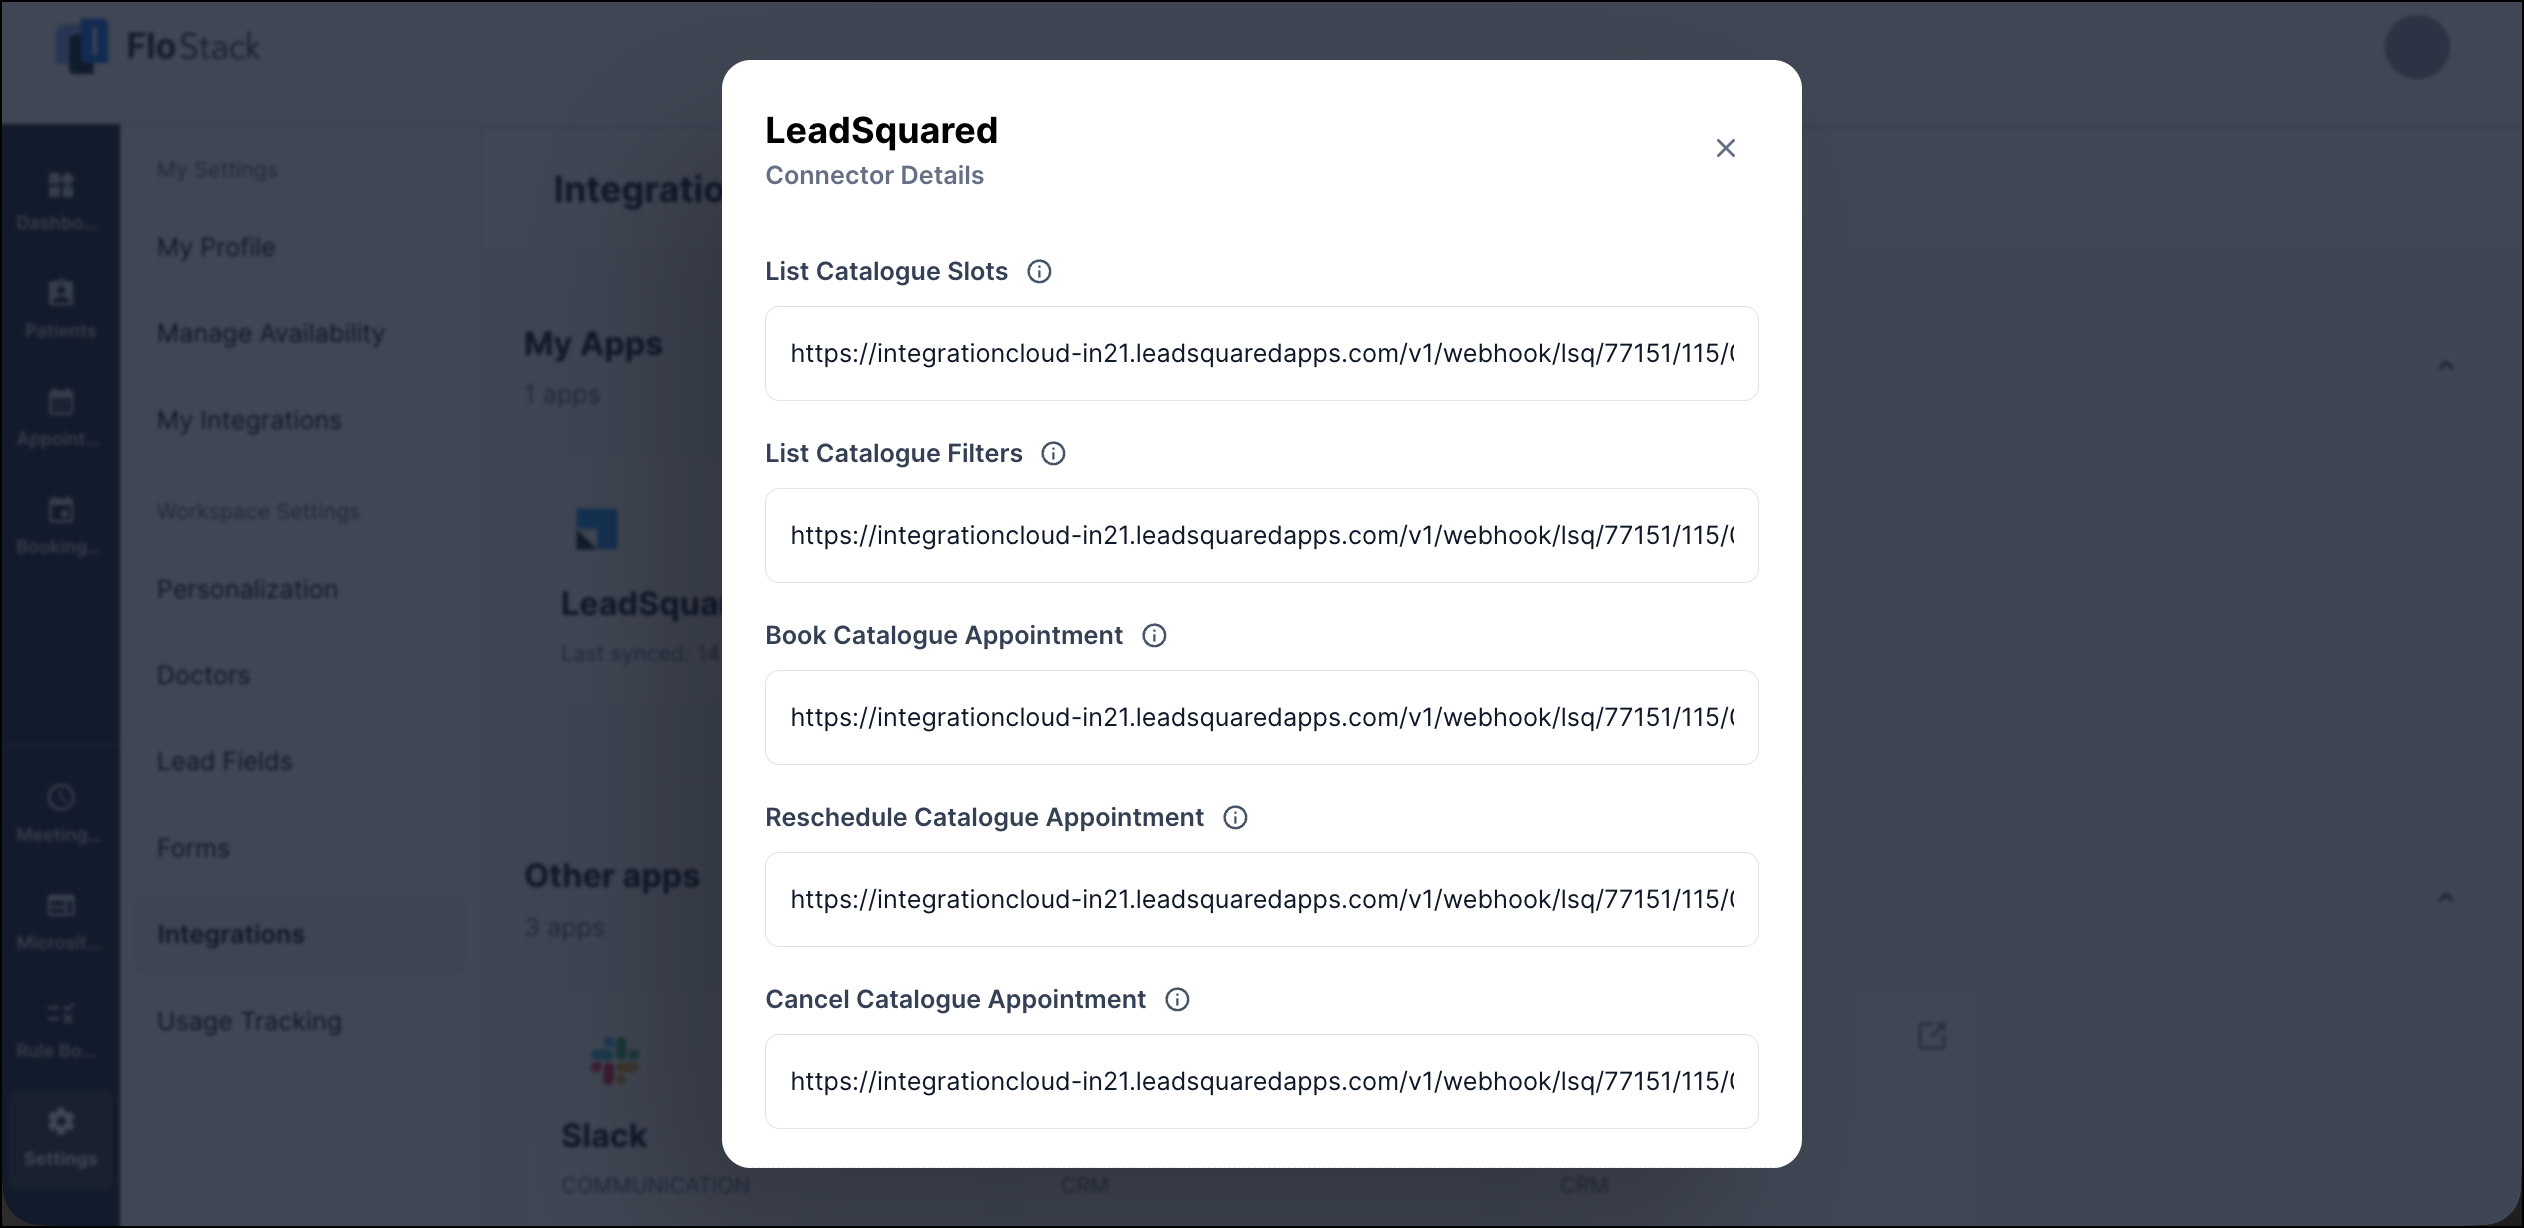
Before you create a catalogue page, add the UDS endpoints to the LeadSquared connector.
- Navigate to Settings>Integrations.
- Alongside the LeadSquared connector, click the edit icon.
- On the LeadSquared Connector Details pop-up window, enter the UDS URL in each of the following fields:
- List Catalogue Slots – Returns the available slots for a professional.
- List Catalogue Filters – Returns the filters displayed on the catalogue page.
- Book Catalogue Appointment – Creates the appointment in the connected system.
- Reschedule Catalogue Appointment – Updates an existing appointment in the connected system.
- Cancel Catalogue Appointment – Cancels an existing appointment in the connected system.
- Save the connector details.
5.2.3 Create a Catalogue Listing Page
- Navigate to Booking & Events>Listing Pages, and then click the Catalogue
- Click Create Page. If you have not created a catalogue page yet, click Create New.
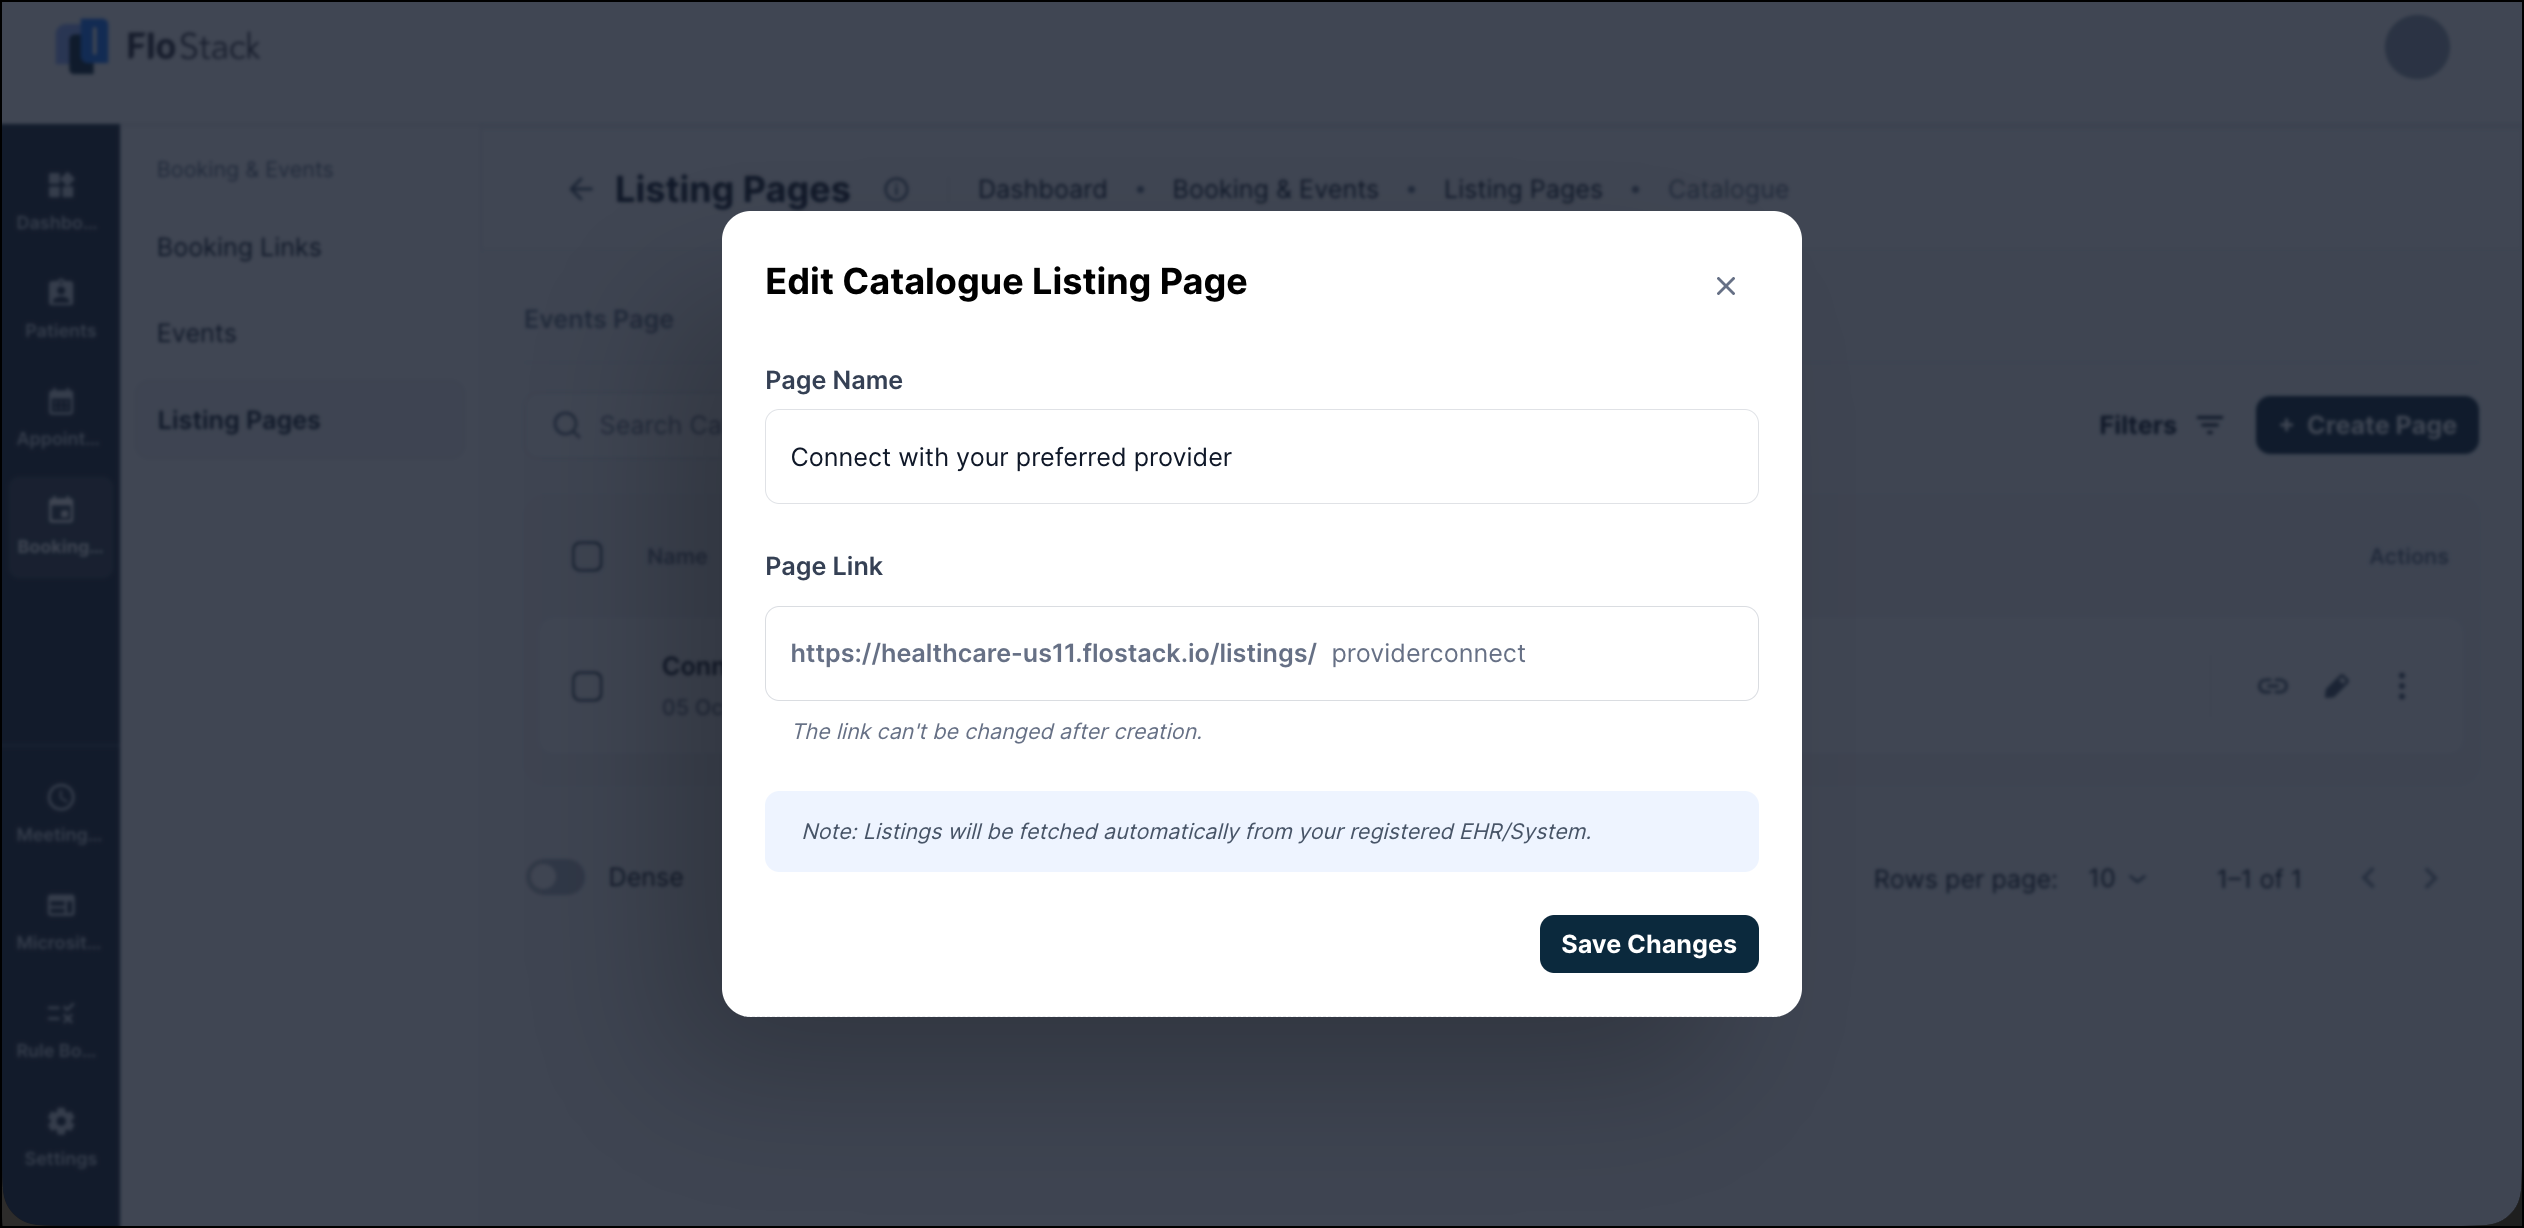
- On the Create Catalogue Listing Page pop-up window, configure:
- Page Name – The name used to identify the page.
- Page Link – The last part of the public URL. The first part of the URL is fixed for your account.
- Click Create Catalogue.
Note:
- The page link cannot be changed after the page is created.
- You can create more than one catalogue page. Every catalogue page fetches the same data from the same connected system. Create more than one page when you want to publish the catalogue in more than one place and identify where each booking came from.
FAQs
1. What happens to guests added to a booking?
When the person scheduling a booking adds guests (by entering the number of guests and their email addresses), those details are stored for reference only. FloStack does not create leads from the guest email addresses, and no notifications are sent to the guests. Only the person who created the booking receives the booking notification.
Any Questions?
Did you find this article helpful? Please let us know any feedback you may have in the comments section below. We’d love to hear from you and help you out!