


Get Started
Sales Suite
Field Ops
Marketing
Service CRM
Integrations & Apps
FloStack
Configure Rule Board on FloStack
1. Feature Overview
The Rule Board feature in FloStack enables businesses to streamline their sales process by implementing structured automation rules. By leveraging these rules, sales teams can create a tailored journey for every lead entering their system, ensuring the most efficient and personalized engagement. The Rule Board allows you to define:
- Prioritization Rules: Automatically categorize and prioritize leads based on predefined criteria, ensuring high-value leads receive immediate attention.
- Sales Rep Assignment Rules: Establish clear lead-routing mechanisms, assigning leads to the most suitable sales representatives based on set conditions.
- Microsite Rules: Personalize the user experience by dynamically directing leads to specific microsites based on their attributes and engagement history.
This functionality helps organizations improve lead conversion rates, optimize resource allocation, and enhance overall sales efficiency.
For example, consider a SaaS company specializing in enterprise collaboration tools that receives thousands of inbound leads every month. To maximize efficiency, they implement Rule Board automation as follows:
- High-Potential Enterprise Leads: If a lead belongs to a company with over 1,000 employees and a high turnover, they are assigned the highest priority. These leads are given access to the Microsite and can view senior sales representatives’ calendars to book a meeting.
- Mid-Tier Business Leads: If a lead belongs to a company with 200-999 employees, they are given medium priority. These leads are given microsite access and can view business development representatives’ calendars to book a meeting.
- SMB Leads: Leads from companies with fewer than 200 employees will need nurturing. They aren’t given access to a microsite or a representative’s calendar but should still be able to request a meeting.
- General Inquiries & Unqualified Leads: Leads that do not match any of the above categories are placed in the lowest-priority bucket and receive an automated response with self-service resources.
2. Prerequisites
You must be an admin user on FloStack. To learn more about FloStack (www.flostack.io), and enable it on your account, contact flostack@leadsquared.com.
3. Prioritization Rules
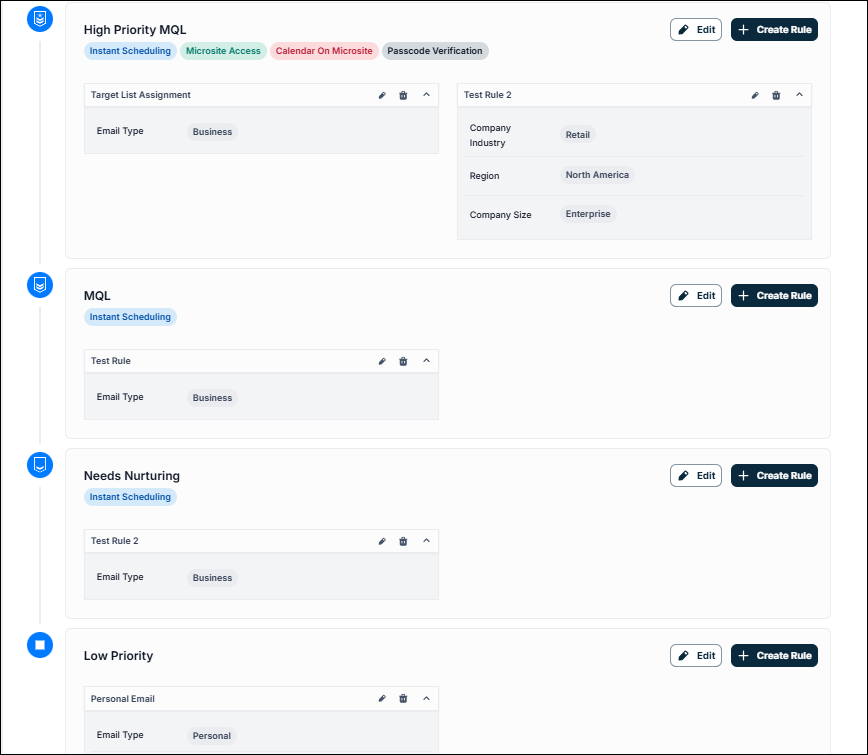
Assign priority levels to leads using prioritization buckets based on specific criteria.
The rules in prioritization buckets are applied in a top-to-bottom order. Once a lead matches the criteria of a bucket, its priority is determined, and all subsequent bucket rules are ignored. Each bucket has specific actions available to the lead, with higher-priority buckets offering more critical actions, such as allowing a lead to book a meeting with a representative.
For instance, the example below shows 4 buckets with a top-to-bottom priority.
3.1 Create Rules
For example, let’s create a rule that qualifies all leads from India into a particular bucket.
To add a rule to a bucket:
- Click the + Create Rule button.
- Click the Add Condition drop-down and select a condition you want to apply (you can apply all the conditions from the drop-down in a single rule).
- Select the value for the condition.
- Enter a Rule name.
- Click Create Rule.

3.2 Add Actions
Click the Edit button to configure a name for the Priority Bucket. Next, add actions for this bucket.
You can enable the following actions –
- Instant Scheduling – Shows the assigned sales reps calendar immediately
post form submission, to instantly schedule a meeting. - Microsite Access – Allows the inbound lead to access the assigned
microsite.- Enable Chat on Microsite – Allows the inbound lead to use chat option in
microsite to instantly message their assigned sales rep - Enable Calendar on Microsite – Adds the sales reps availability on the
microsite to let the lead schedule/reschedule time with their rep - Enable Passcode – Adds a passcode verification check to access microsi
(one-time code sent on lead’s email)
- Enable Chat on Microsite – Allows the inbound lead to use chat option in
- Event Access – Allow visitors to book the event.
- Show References – Redirects to a ‘Thank You’ pop up and shows content
present in reference list. This is enabled only when Microsite Access is disabled, and typically used for Low Priority leads
For example, since it is a “High Priority” bucket, Microsite access could be enabled for these leads.
To add actions to a bucket:
- Click the Edit button.
- Give this bucket a name.
- Select the actions you want to enable.

4. Routing Rules Or Sales Rep Rules
Use the Routing Rules feature to define how leads are routed to sales representatives. You can create routing conditions based on the priority bucket the lead qualifies for or specify other custom conditions.
To add a rule:
- Click the + Create Rule button.
- Click the Add Condition drop-down and select a condition you want to apply (you can apply all the conditions from the drop-down in a single rule).
- The Lead Priority condition will let you select the priority buckets from Prioritization Rules.
- Select the value for the condition.
- In the Assign to field, choose one or more sales reps.
- Enter a Rule name.
- Click Create Rule.
Note:
- Click the Rule List button to view or edit all the configured rules.
- Some rule conditions can be edited using the Configure Attributes option, while others are automatically picked up from your list of Target Companies.
5. Meeting Type Rules
The Meeting Type Rules in FloStack allow you to route leads to specific assignees based on the meeting type selected in a form submission. This ensures that each lead is directed to the right representative or department automatically, based on predefined routing logic.
Configure Meeting Type Rules
- Click + Create Rule.
- Define one or more conditions. Common examples include:
- Email Type – e.g., Business or Personal
- Lead Priority – e.g., High Priority or Low Priority
- Region – e.g., North America, LATAM, or EMEA
- Under Assign Meeting Type, select the desired meeting type.
- Click Save.
6. Microsite Rules
Use the Microsite Rules feature to define how leads are routed to a specific Microsite.
To add a rule:
- Click the + Create Rule button.
- Click the Add Condition drop-down and select a condition you want to apply (you can apply all the conditions from the drop-down in a single rule).
- Select the value for the condition.
- In the Assign Template field, choose a Template.
- Enter a Rule name.
- Click Create Rule.
Note:
- Click the Rule List button to view or edit all the configured rules.
- Some rule conditions can be edited using the Configure Attributes option, while others are automatically picked up from your list of Target Companies.
Any Questions?
Did you find this article helpful? If you have any questions or comments, please let us know in the comments section below. We’d love to hear from you and help you out!