


Get Started

Sales Suite
Field Ops
Marketing
Service CRM
Integrations & Apps
FloStack
Create Meeting Types on Flostack

1. Feature Overview
The Meetings Type feature in Flostack enables users to define and manage different categories of meetings with tailored scheduling rules. It supports instant scheduling, allowing users to specify availability for specific purposes, while controlling duration, time slots, visibility, and participant capacity.
Meeting types can be one-on-one or group meetings, and can be virtual (with calendar integration) or in-person. This ensures smooth scheduling, prevents conflicts, and improves the overall attendee experience.
Benefits
- Targeted Scheduling: Allocate time for specific purposes, such as KYC verification, interviews, training sessions, or client meetings.
- Efficient Time Management: Control availability by day, time, and meeting type to reduce conflicts and no-shows.
- Automation-Friendly: Preconfigured meeting types integrate with booking links, events, and UDS (e.g., LeadSquared) to automate lead capture.
- Enhanced Attendee Experience: Participants see only relevant time slots and available capacity, simplifying the booking process.
2. One-on-One Vs Group Meetings
The following are the differences between One-on-One and Group Meetings –
2.1 One-on-One Meetings
These are private sessions with a single attendee. They are ideal for interviews, consultations, or client calls where focused, individual attention is required. Each slot is booked by one participant, and availability is blocked automatically via calendar integration.
Use Case
- A prospective student wants a personal consultation with an admissions advisor about program eligibility.
- A potential customer needs a detailed walkthrough of a product or service.
2.2 Group Meetings
These sessions accommodate multiple participants at the same time. They are suitable for workshops, webinars, or training sessions. Users can define the maximum capacity for each slot, while availability is managed for the organizer, allowing multiple attendees to book until the capacity is reached.
Use Case
- A university wants to run a campus tour or program orientation for multiple students simultaneously.
- A company runs a product demo webinar where multiple leads join at the same time.
3. Creating Meeting Types
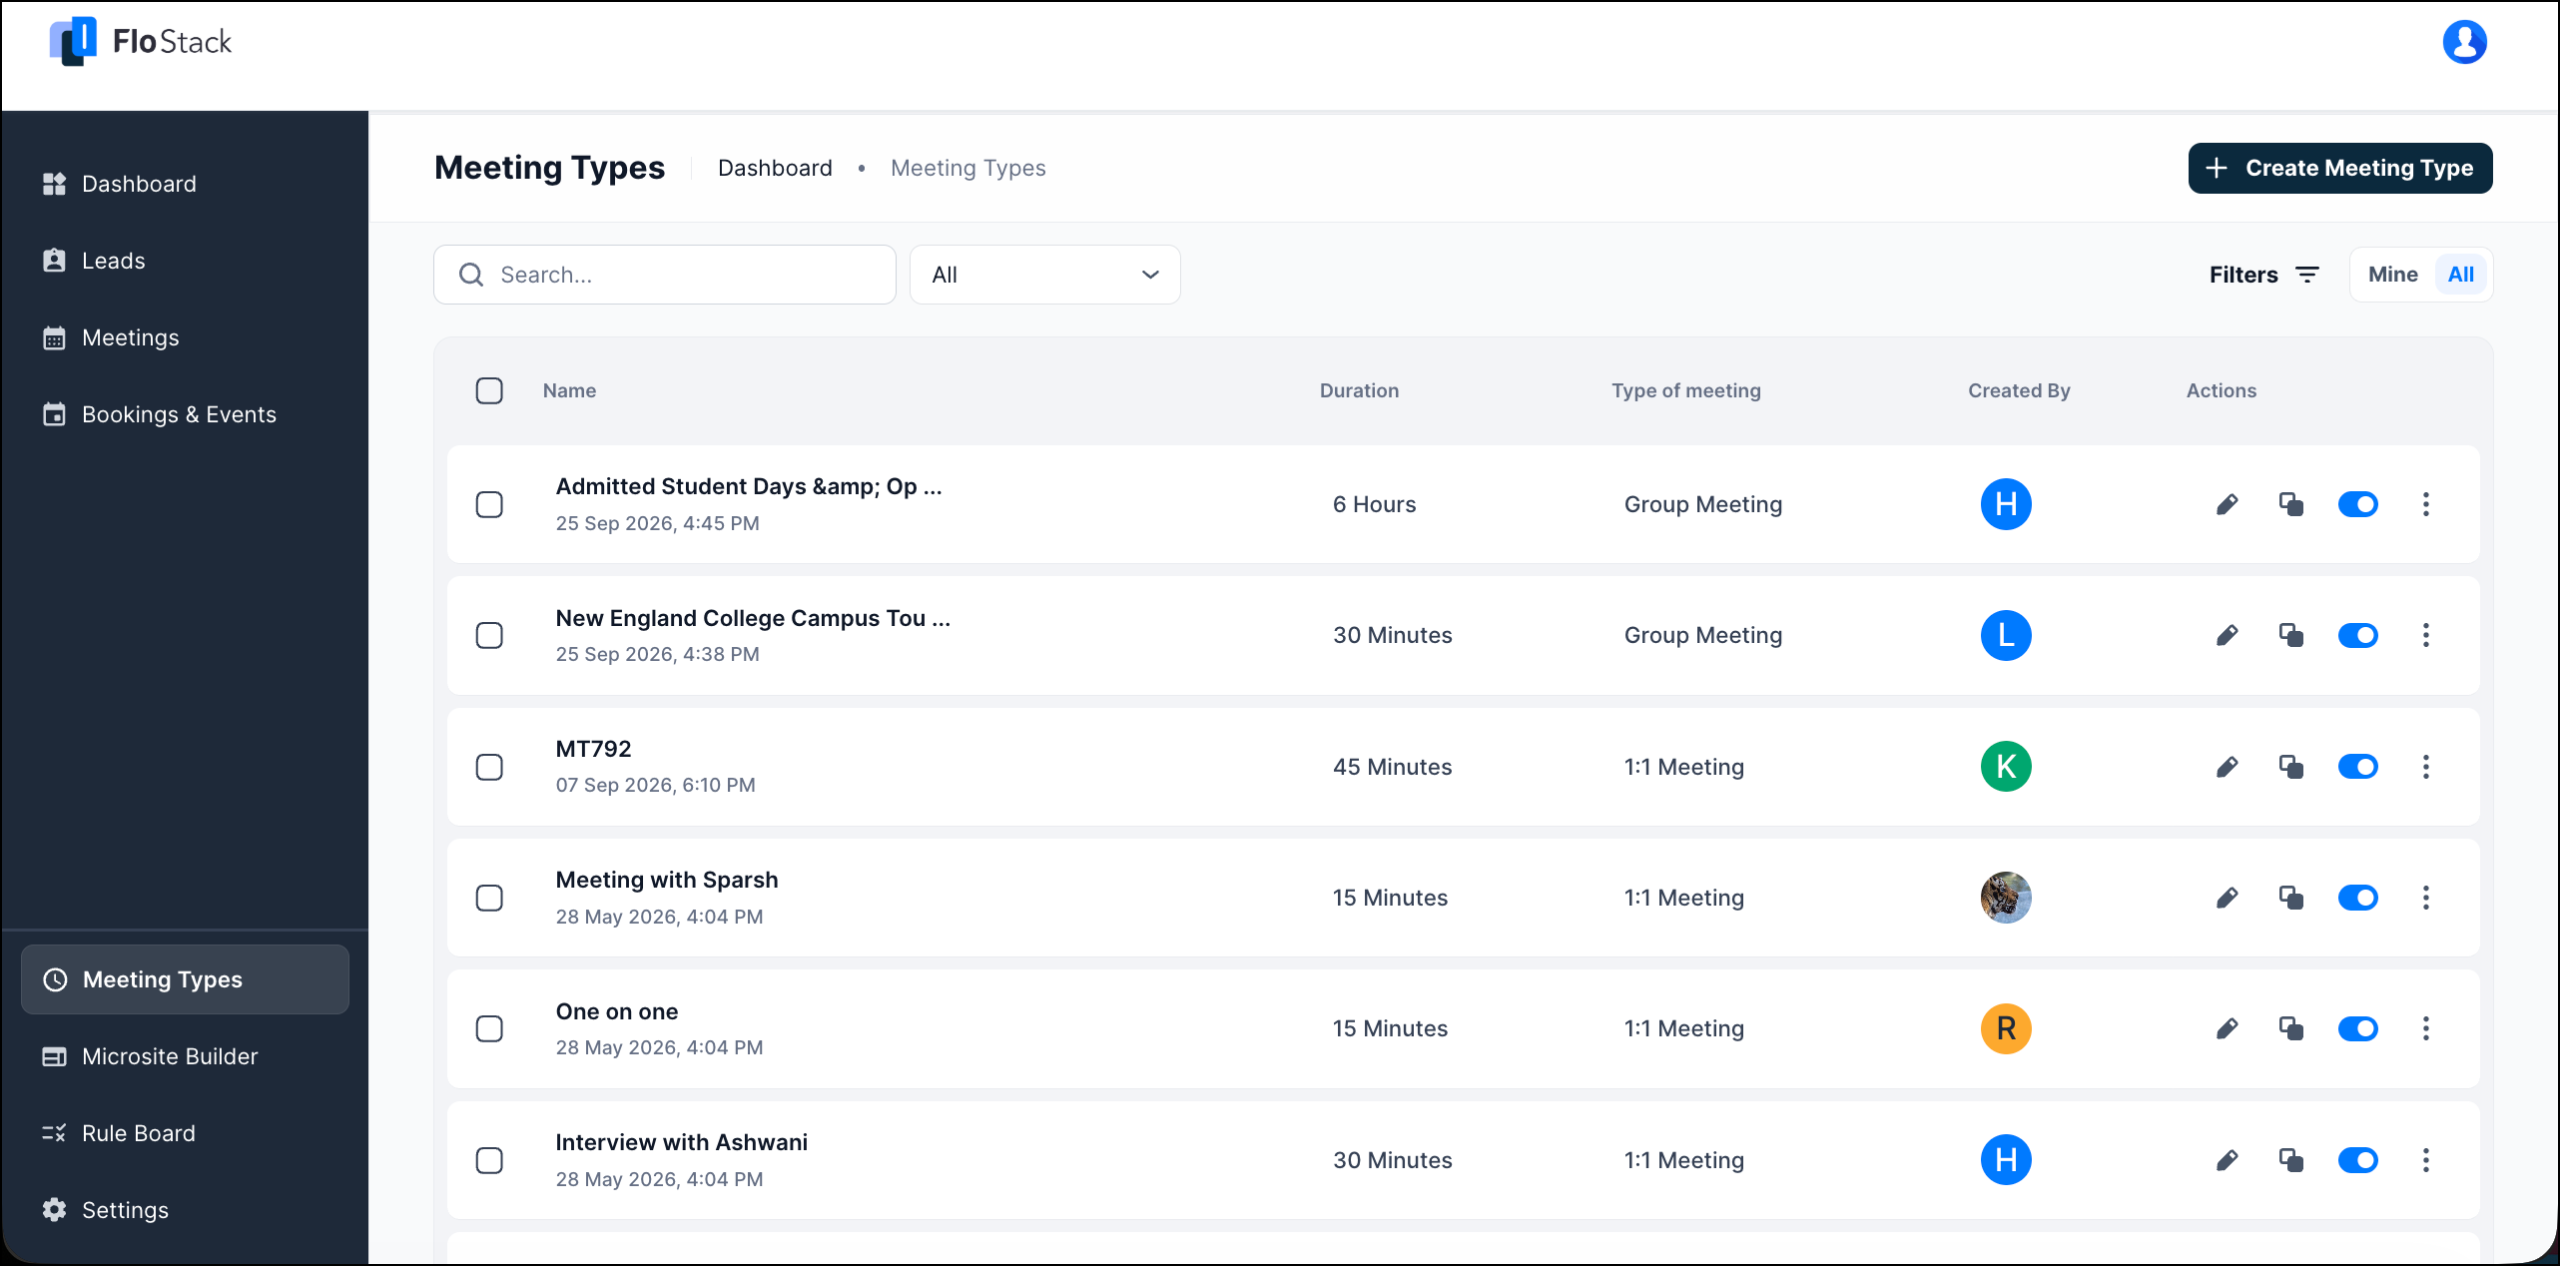
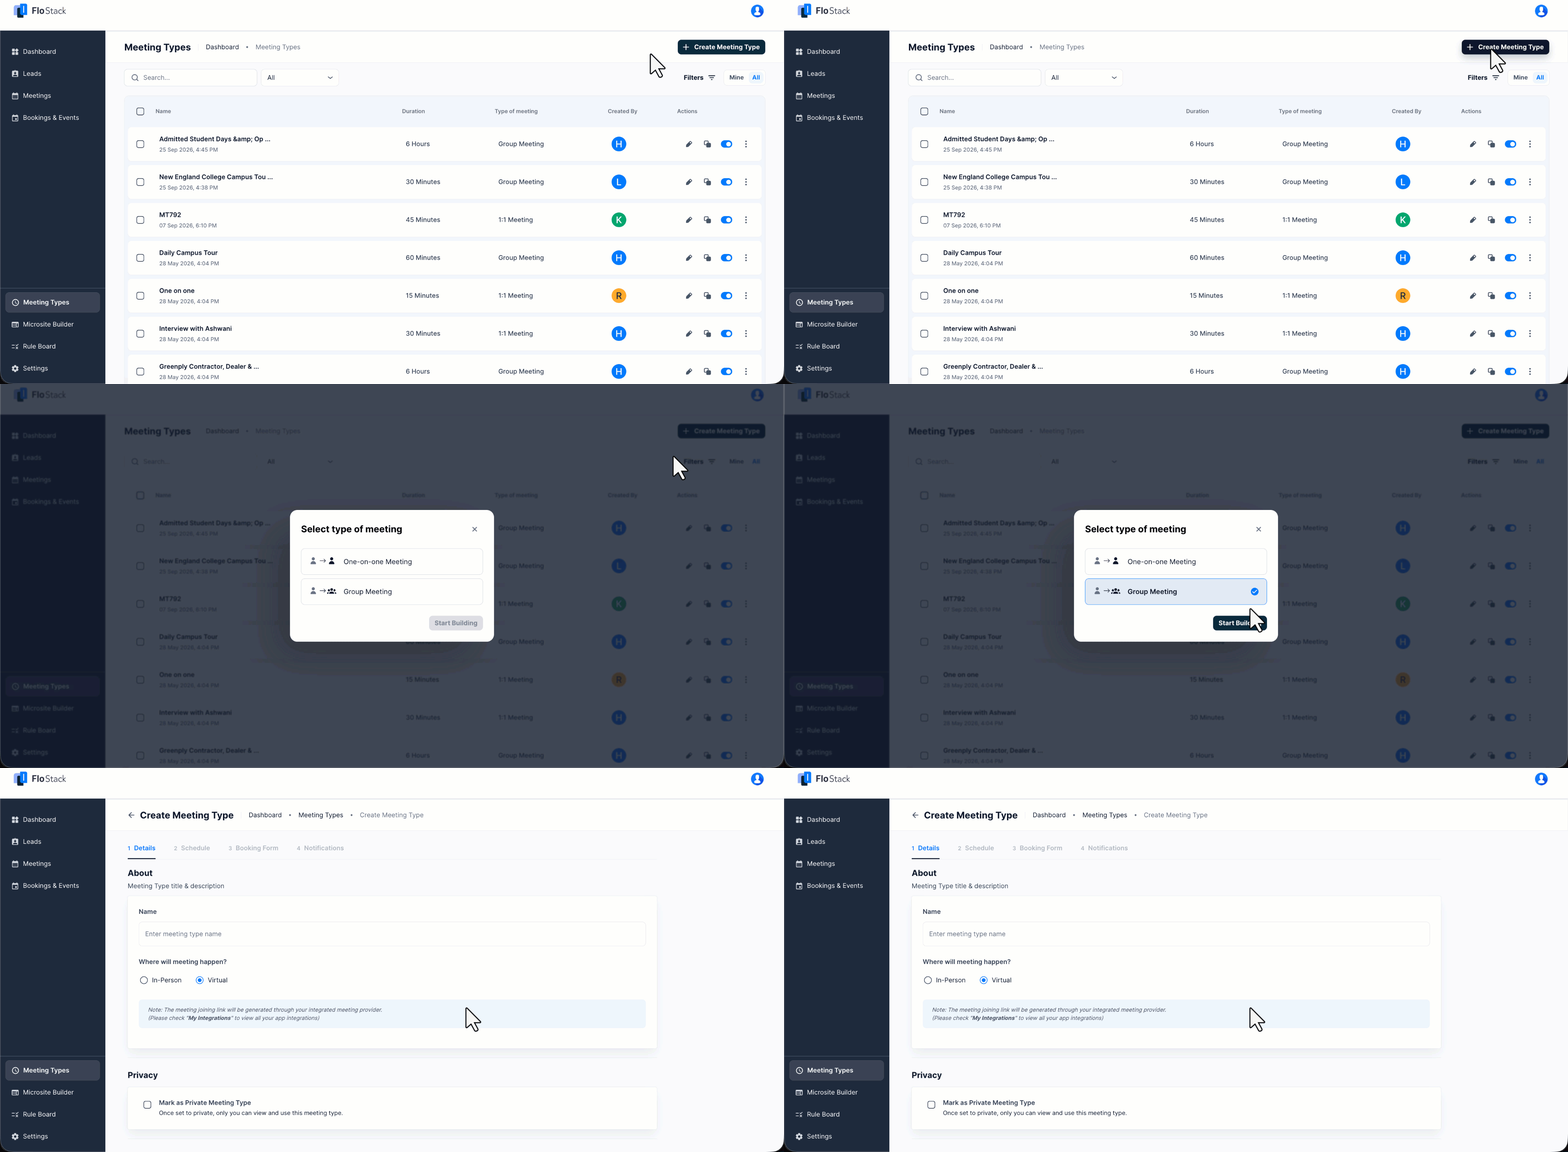
From the FloStack dashboard, navigate to Meeting Types in the left-hand menu. You’ll see all created types with details like name, duration, and type. Click + Create Meeting Type and choose the type, One-on-One or Group.
3.1 Add Meeting Details
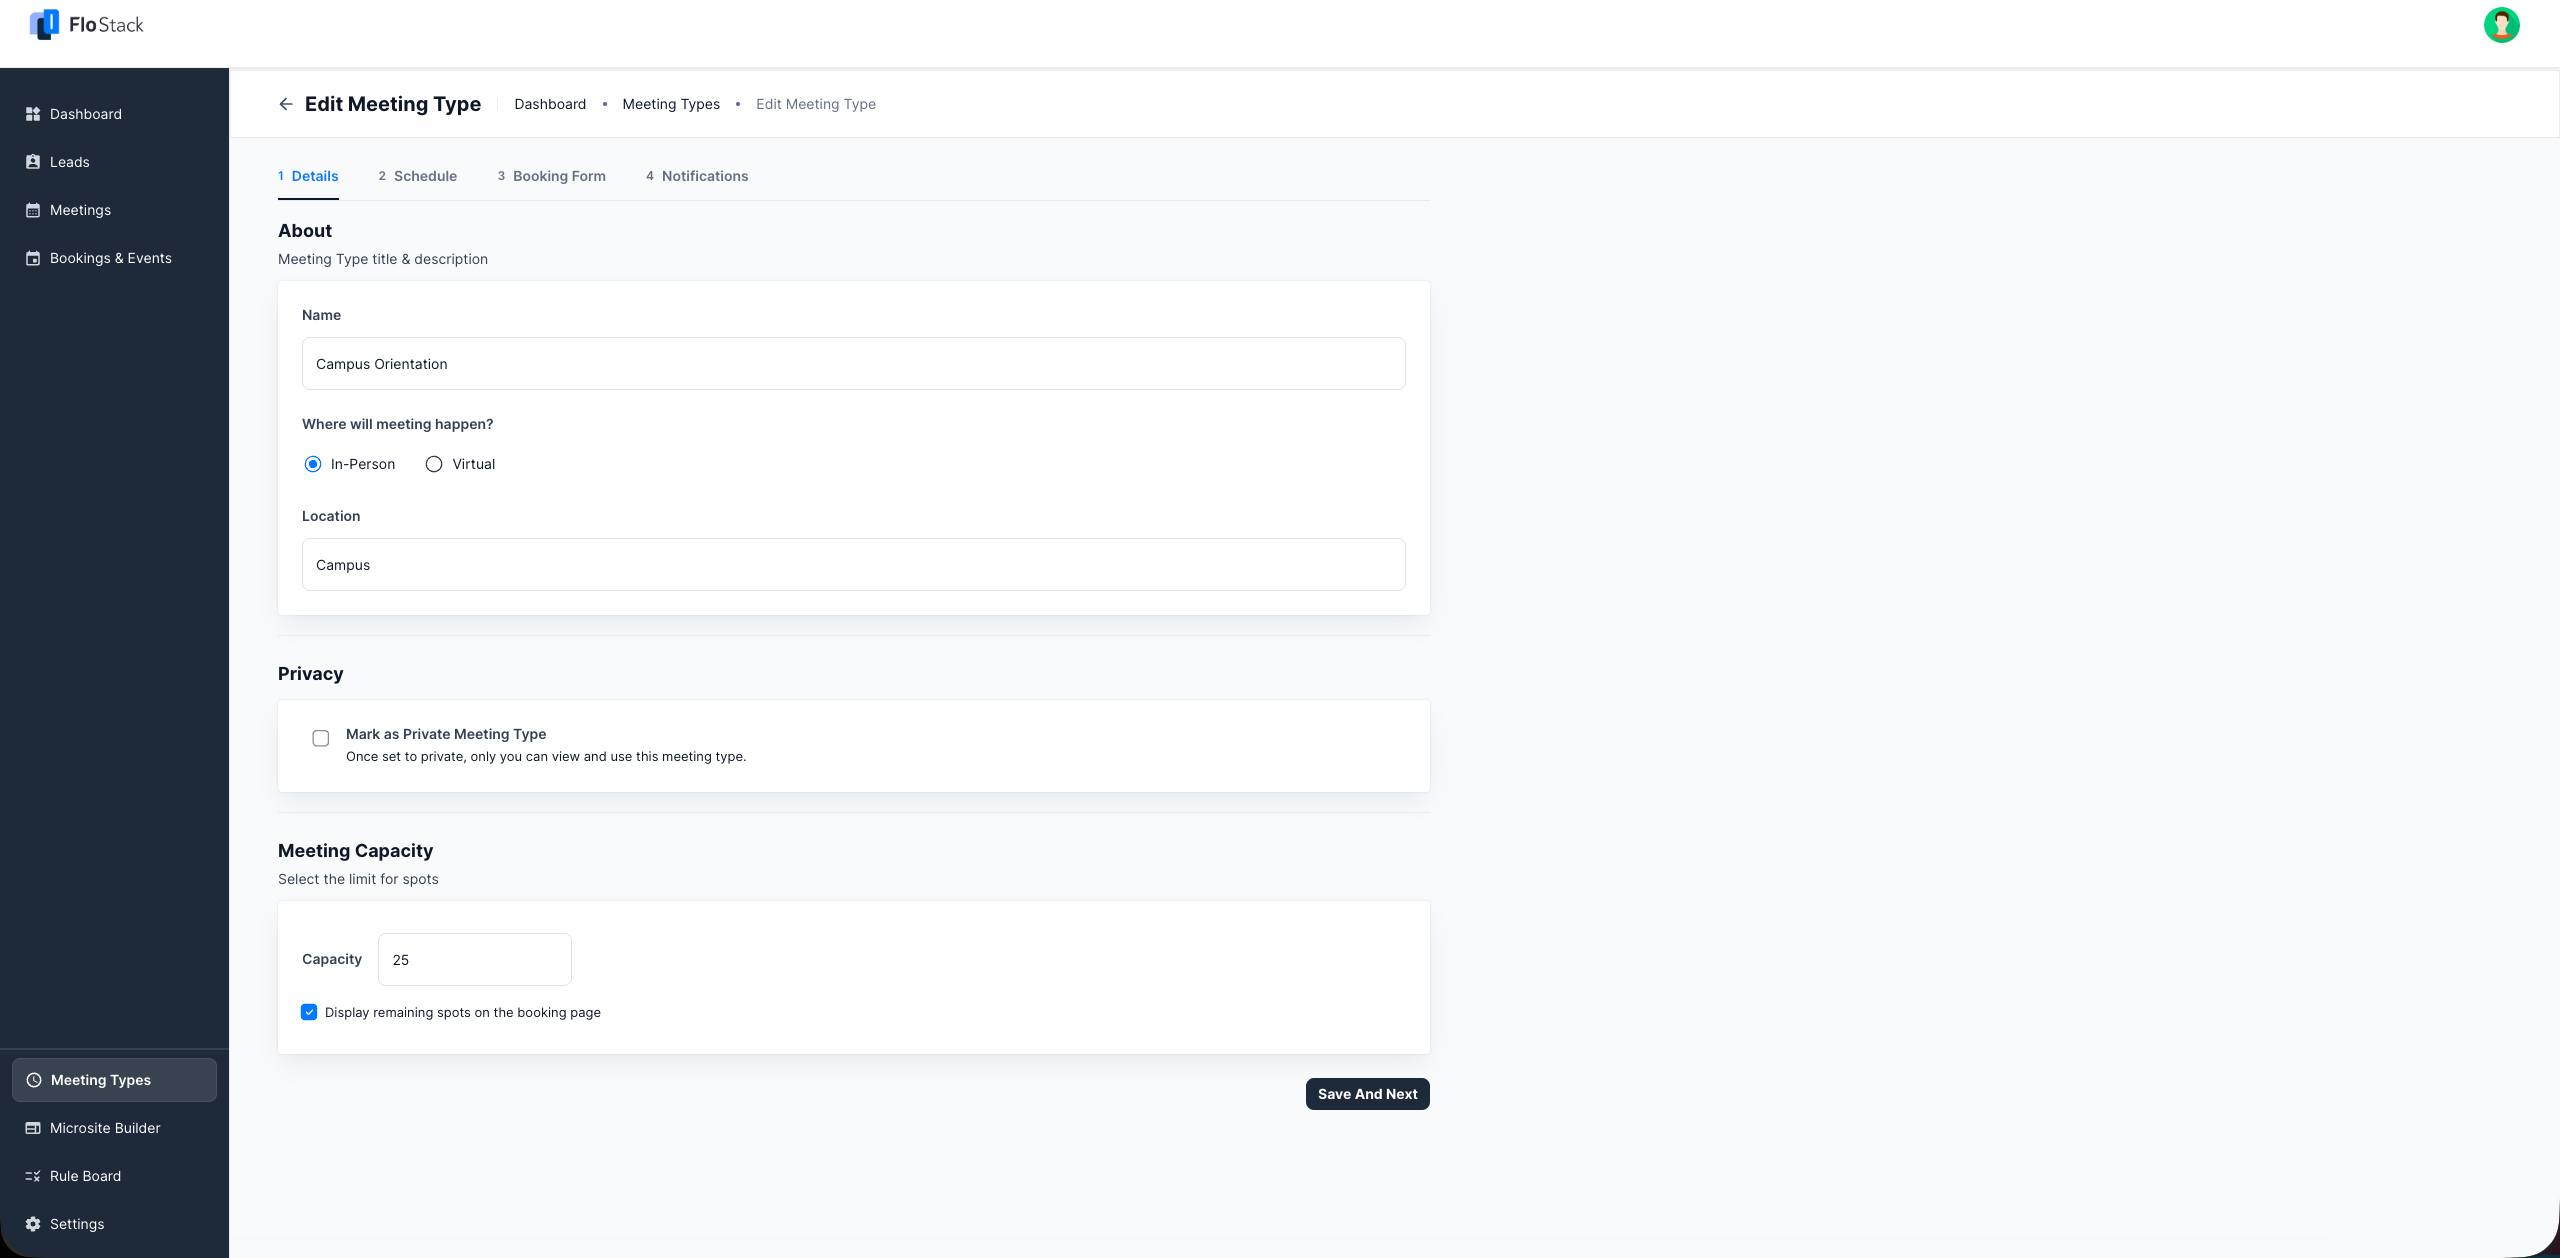
- Name: e.g., “Campus Orientation Session”
- Mode: In-Person or Virtual
- Location: Required if In-Person
- Private Option: Select if the meeting should not appear publicly. Only you can view and use this meeting type.
- Meeting Capacity (Group Only): For Group Meetings, you have the option to limit the number of spots and display remaining spots on the booking page.
3.2 Set Schedule & Availability
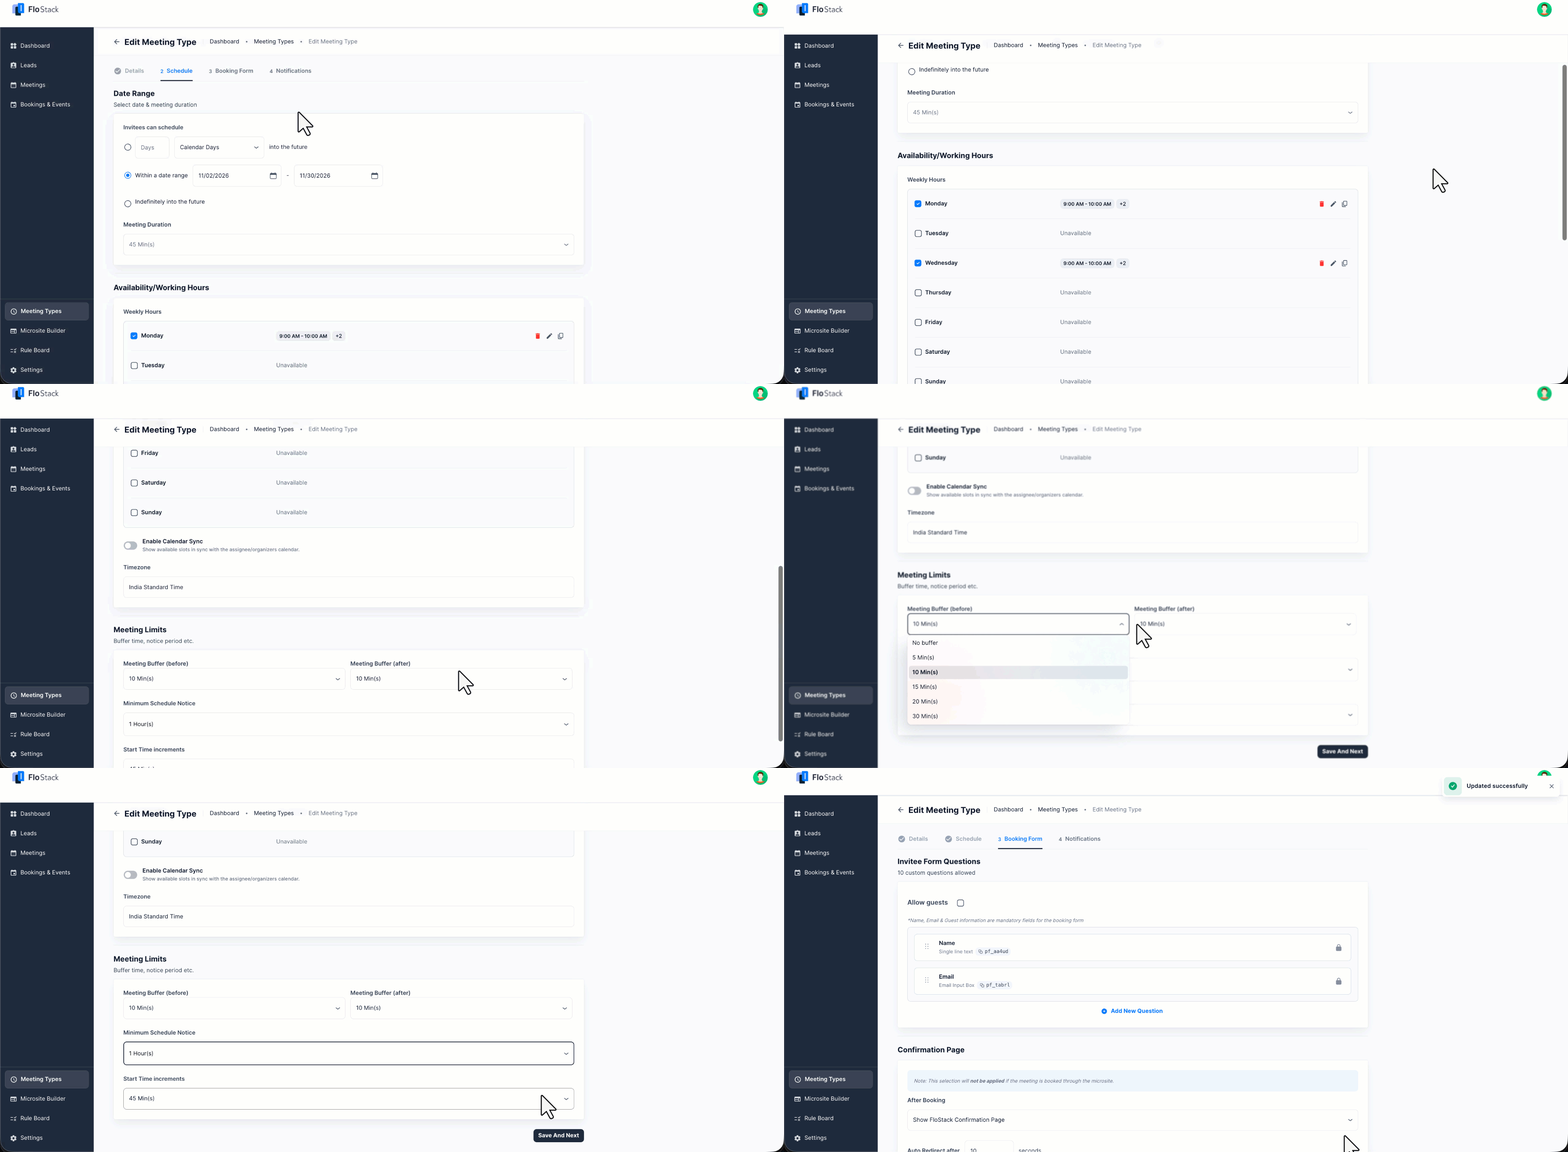
- Date Range: Defines when the meeting type is available for booking.
- You can choose between fixed range or indefinite.
- Duration: Length of each meeting in minutes.
- For example, 15, 30, or 60 minutes.
- Weekly Hours: Days of the week and time ranges when the advisor is available for booking.
- For example, Monday and Wednesday, 9:00 AM–5:00 PM.
- Calendar Sync: Connects the advisor’s external calendar (Google, Outlook, etc.) to FloStack and automatically blocks times that are already booked, preventing conflicts.
- You can sync your calendar on the My Integrations page.
- Timezone: Select your preferred timezone.
- Meeting Buffers: Buffer time added before and after each meeting.
- For example, add a 10-minute buffer before a 30-minute call so that an advisor has time to prepare.
- Minimum Schedule Notice: Minimum lead time required before a lead can book a meeting. It prevents last-minute bookings that the advisor cannot accommodate.
- For example, if you add a 2-hour notice and the current time is 2 PM, the earliest bookable slot is 4 PM.
- Start Time Increments: Defines the frequency at which time slots appear for booking.
- For example –
- 15-minute increments → slots at 9:00, 9:15, 9:30, 9:45, etc.
- 30-minute increments → slots at 9:00, 9:30, 10:00, etc.
- For example –
3.3 Customize Booking Form
3.3.1 Invitee Form Questions
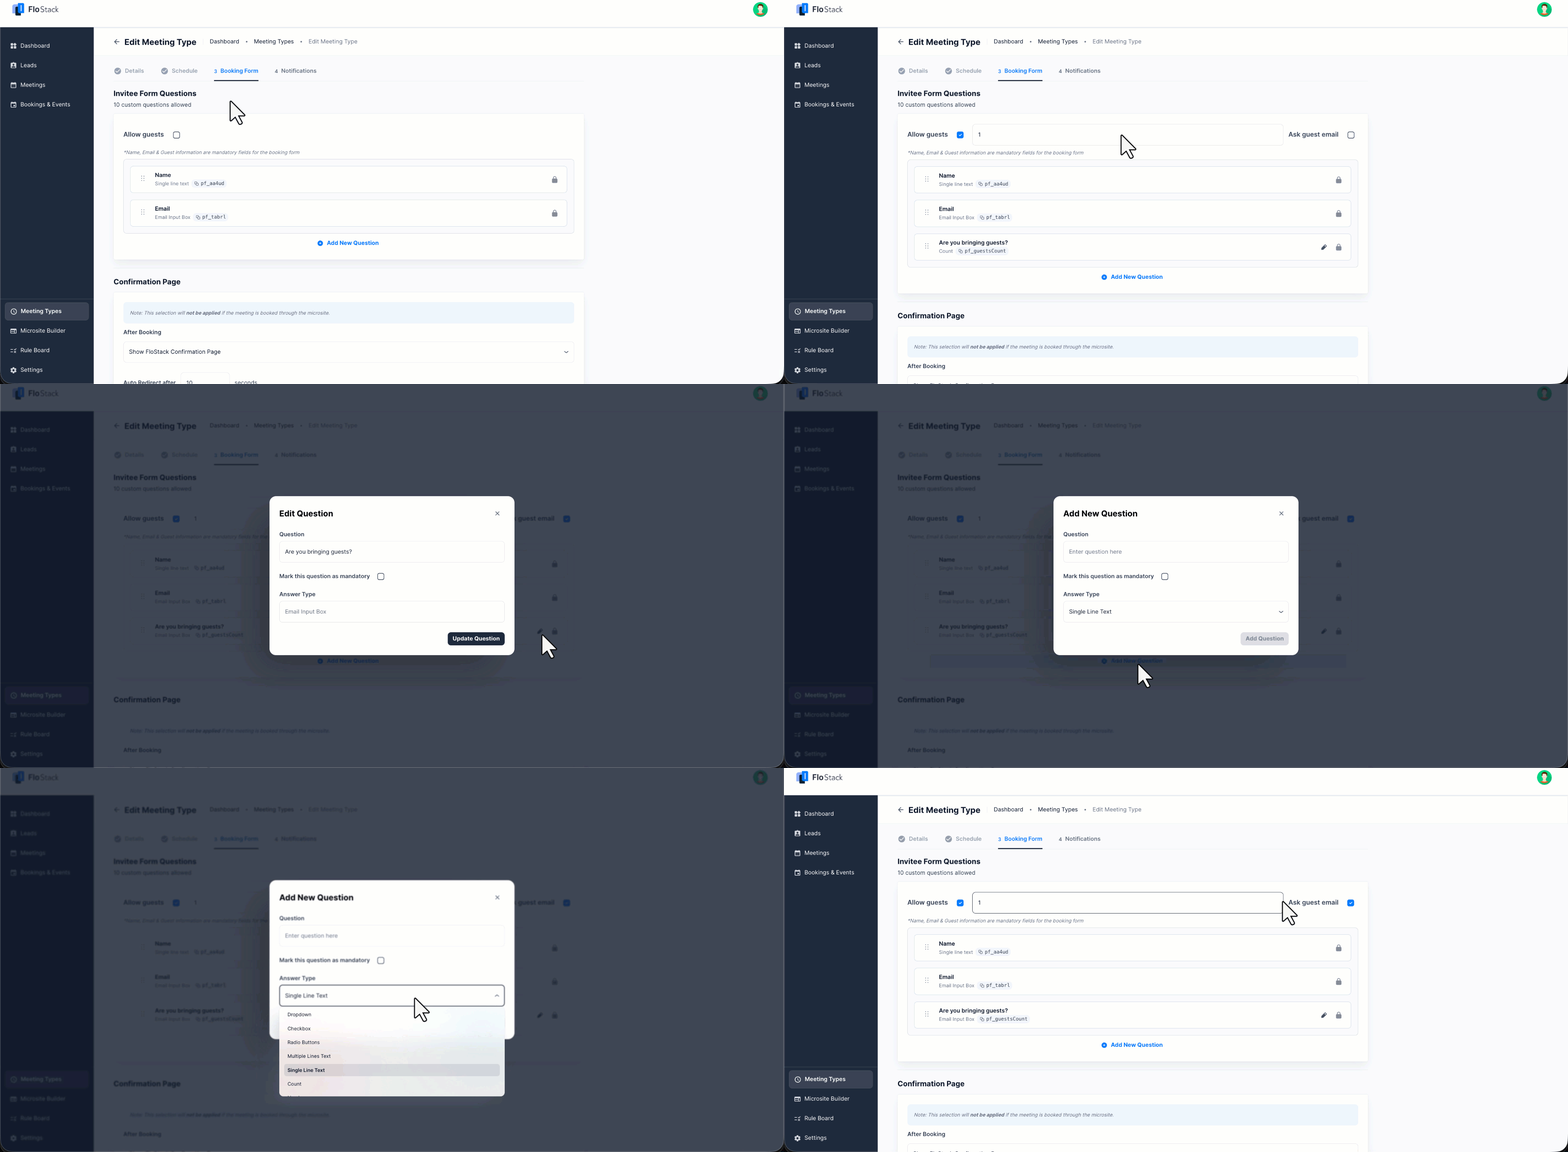
- To let attendees bring additional participants, select Allow guests, and then enter the maximum number of guests an attendee can add.
- Select Ask guest email to collect the email address of each guest. When this option is cleared, the form collects only the number of guests.
- When you allow guests, FloStack adds the question “Are you bringing guests?” to the booking form, you can mark this question as mandatory by clicking the edit button next to the question.
- To change the question text, click the edit icon alongside the question. The answer type is set automatically based on your Ask guest email selection and cannot be changed.
- By default, the form collects Name and Email of the attendees, these are mandatory fields.
- Additionally, configure up to 10 custom questions to ask the attendees, and even mark them as mandatory.
- The following Answer Types can be configured: Dropdown, Checkbox, Radio Buttons, Multiple Lines Text, Single Line Text, Count, Phone Number, and Email Input Box.
3.3.2 Prefill the Booking Form Fields
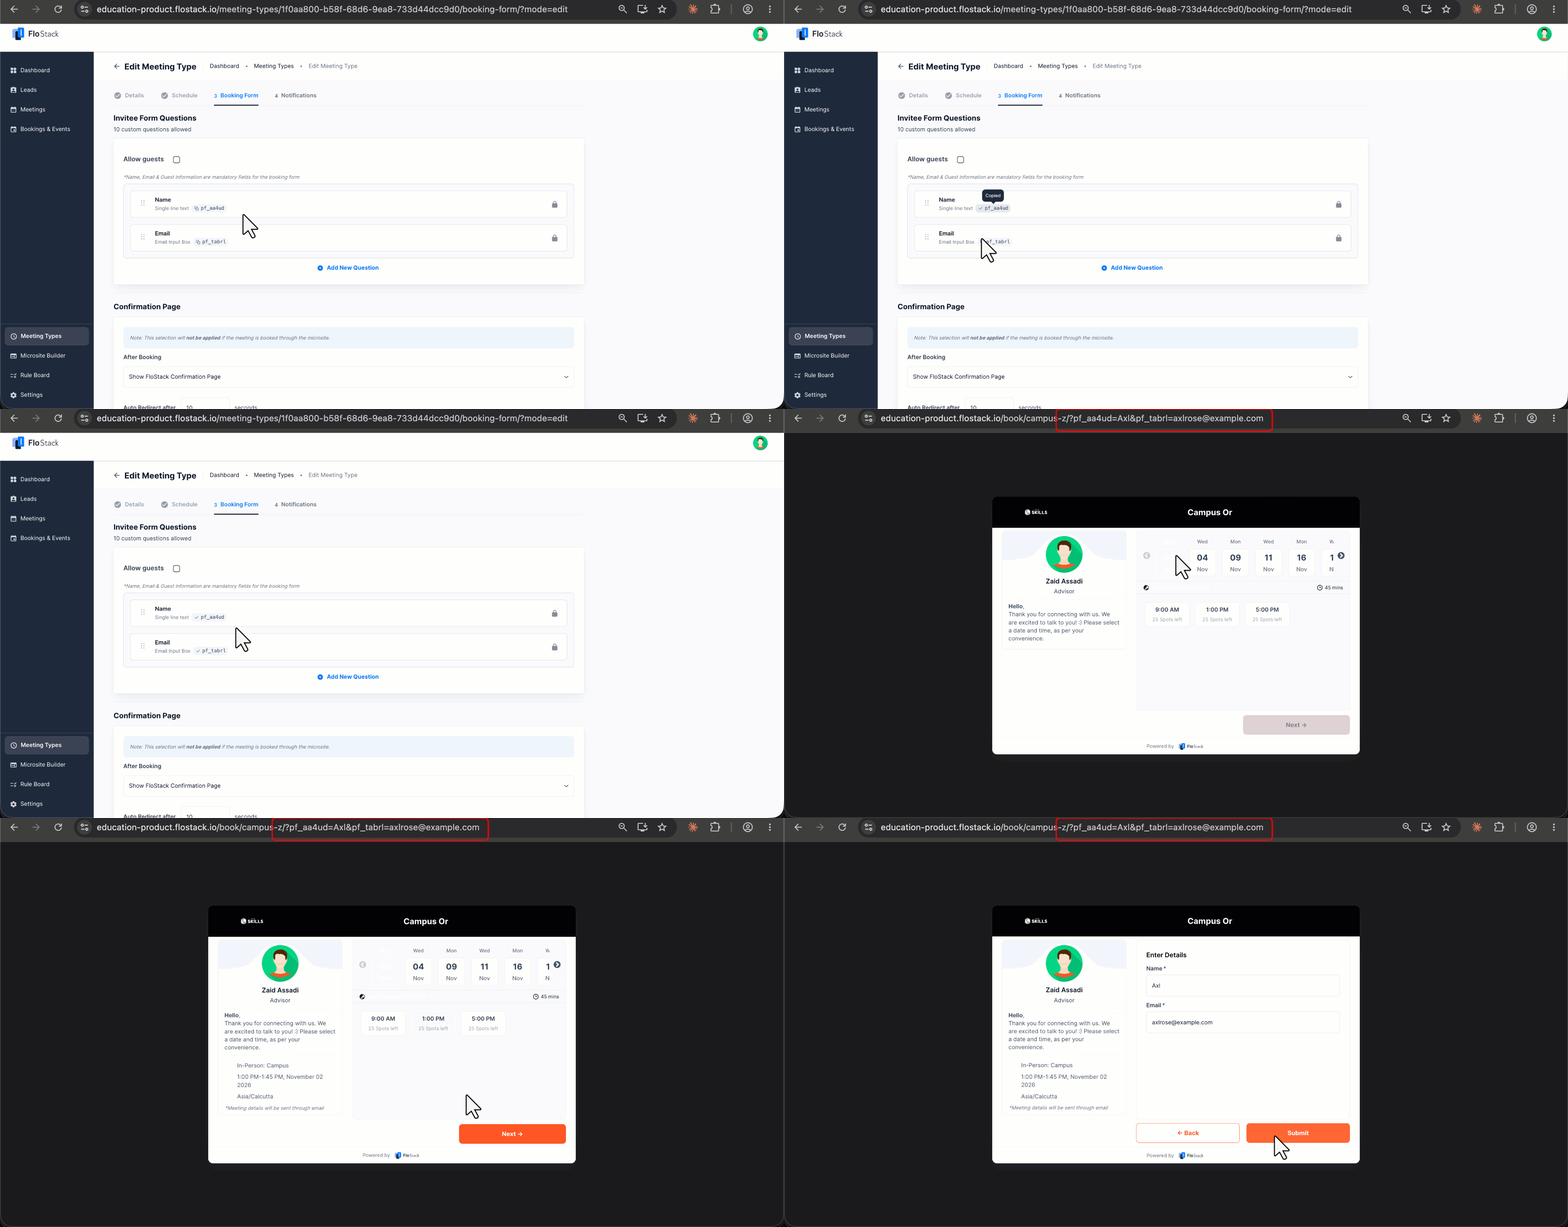
Each field has a prefill parameter, displayed below the field name, for example pf_aa4ud. Pass a value for the parameter in the booking link, and the field is filled in advance when the attendee opens the link. This is useful when the attendee reaches the booking link from another page, such as a pop-up on your website that has already collected their name and email address. The attendee then only selects a slot and submits the form.
To use a parameter, hover your cursor over it, click the copy icon, and then append it to the booking link in the format ?parameter=value. Separate each additional parameter with an ampersand.
The values are usually not fixed. On the page that sends attendees to the booking link, pass the fields that captured the attendee’s details instead of typed-out values. The browser resolves them when the attendee opens the link, and the attendee sees the resolved values on the booking form.
For example:https://example-us11.flostack.io/book/link2/?pf_ds9xh=${email}&pf_zgdat=${name}&pf_abc14=${mobile}
Each pair has two halves. The parameter on the left is the FloStack field, copied from the booking form. The value on the right is the name of the field in your own system that holds the data. You control the names on the right, and you can map any field on the booking form this way, not only Name and Email. If you have a question on your booking form asking for a mobile number and it has the parameter pf_abc14 , and your form stores the number in a field named mobile, the pair is pf_abc14=${mobile}.
Note:
- Parameters are unique to each field and to each meeting type, so always copy them from the meeting type you’re sharing.
- For Dropdown, Radio Buttons and Checkbox fields, the value you pass must match one of the configured options exactly.
- If the booking link uses default availability instead of a meeting type, use the fixed parameters
pf_nameandpf_email.
3.3.3 Confirmation Page
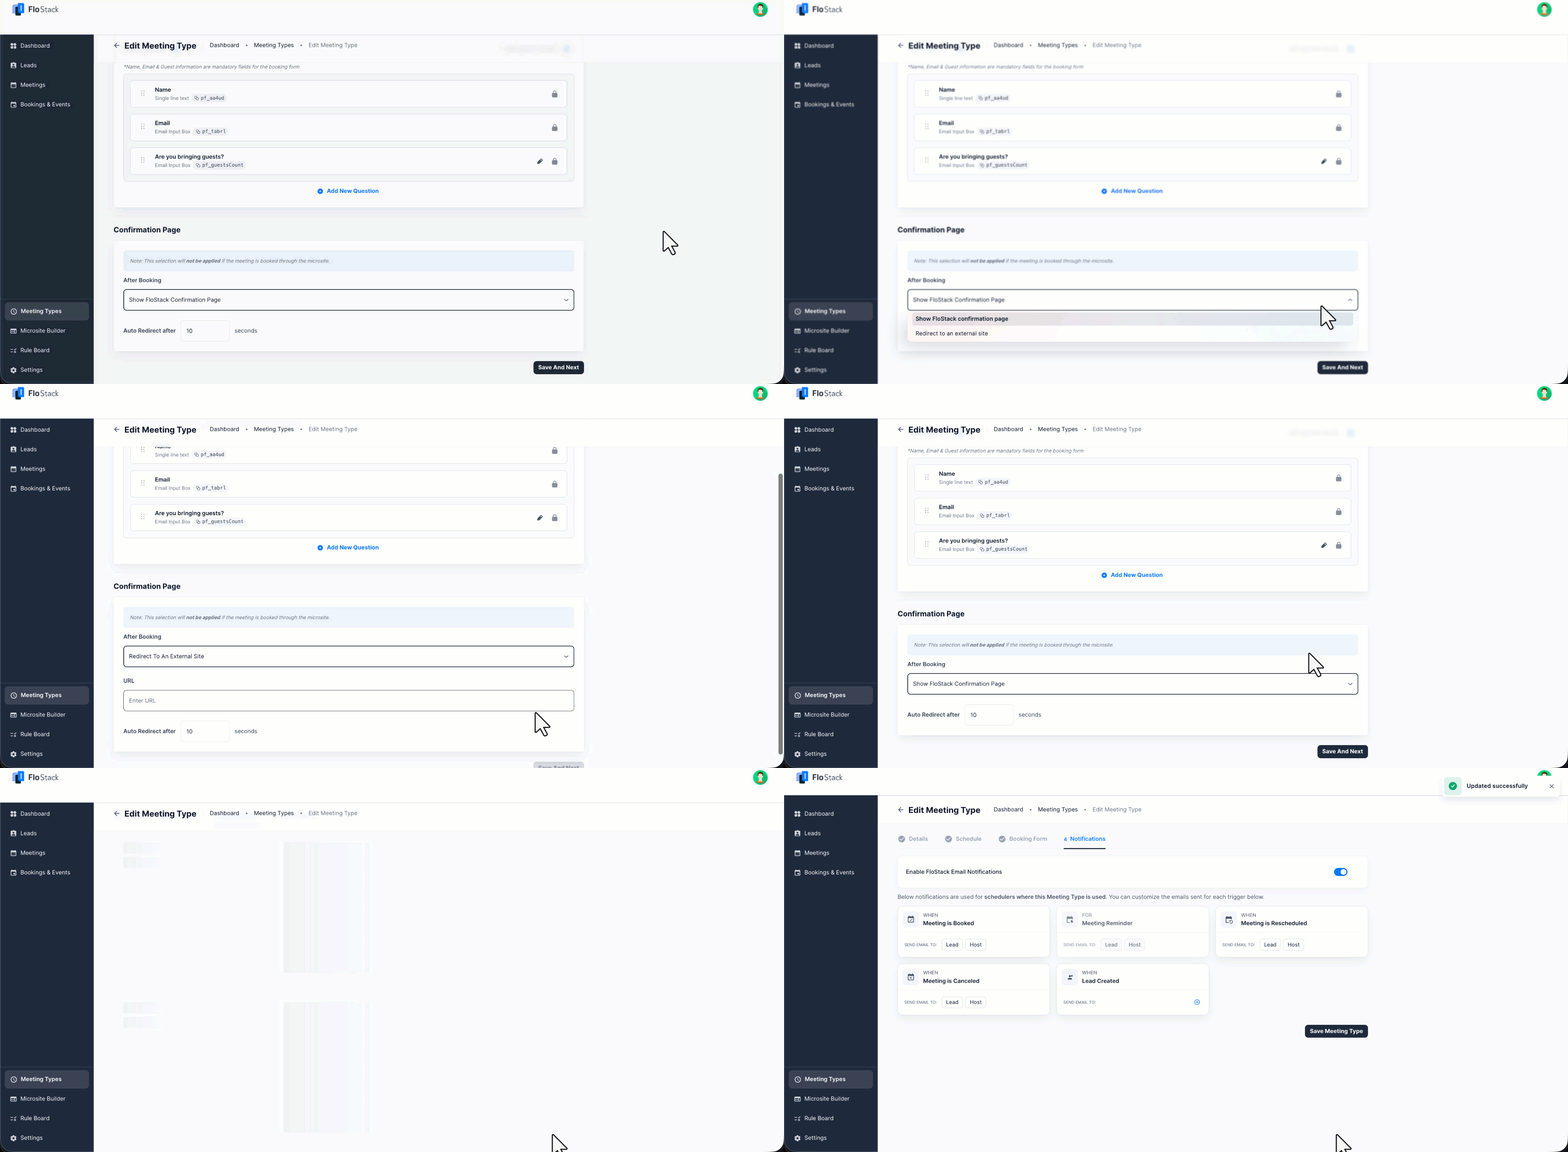
Post-booking re-direction can show a FloStack confirmation page or redirect to a custom URL. Configuration for auto-redirect after a certain duration is also available.
3.4 Set Up Email Notifications
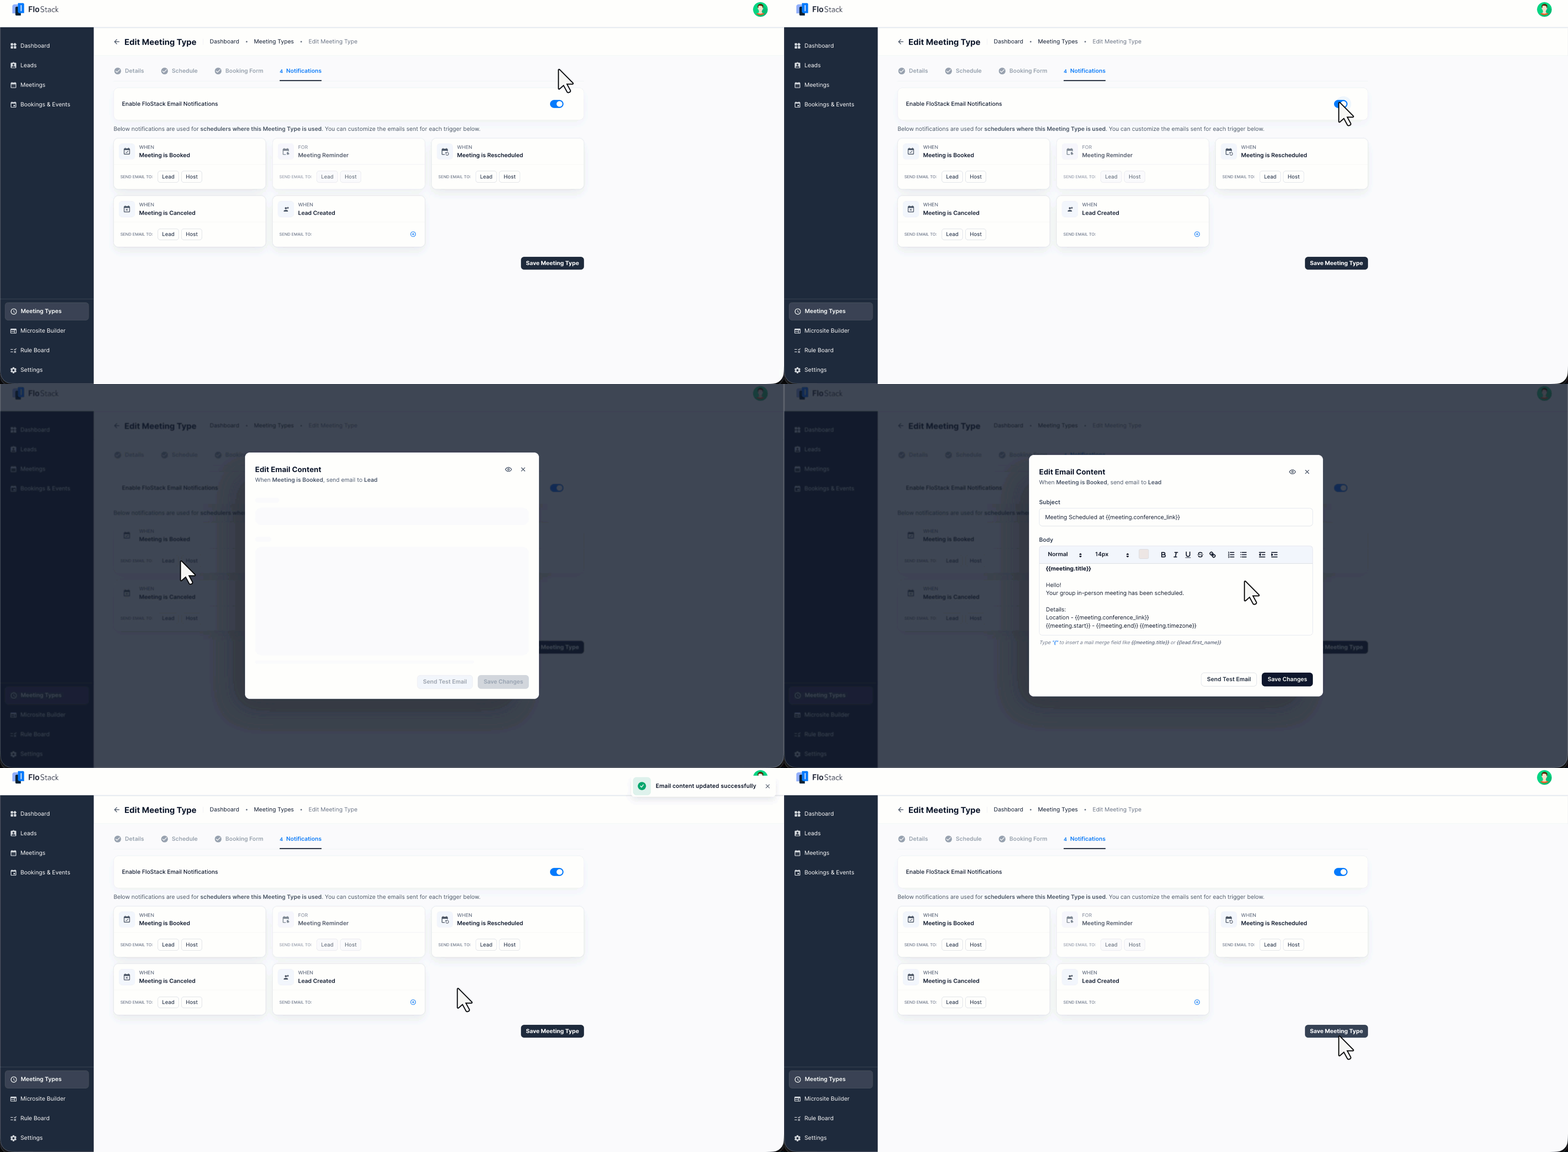
FloStack can send automatic emails to the lead and the host at key points in the meeting lifecycle. The notifications you configure here apply only to schedulers where this meeting type is used.
To turn notifications on, enable the FloStack Email Notifications toggle. Against Send Email To, select Lead, Host, or both, depending on who should receive the email. To change the content of an email, click the relevant trigger and edit the template. Once you’re done, click Save Meeting Type.
4. Generate the Booking Link and Routing Rule
Once you’ve set up a meeting type, you can use it in Bookings & Events and configure Meeting Type Rules to automatically route leads based on form submissions.
- Booking and Event links can be shared on microsites, emails, or other channels.
- Leads can view available time slots and book meetings directly.
Any Questions?
Did you find this article helpful? If you have any questions or comments, please let us know in the comments section below. We’d love to hear from you and help you out!