


Get Started
Sales Suite
Field Ops
Marketing
Service CRM
Integrations & Apps
FloStack
How to Track Application Status Using Forms & Activities in Portals
1. Feature Overview
Portals allow users to fill out complex application forms (e.g. course application, loan application, scholarship application, etc) and track the status of their applications. They can also be configured to enable users to perform different actions based on the status of the application. A user’s application will go through several stages – Initiated, Applied, Processing, Approved, Rejected, etc.
Each stage change can be triggered either by some user interaction like initiating an application, submitting an application or through an external event like getting an application approved or rejected. These interactions are carried by the user onto Forms in Portals.
We expect:
- When a user starts filling out an application form –> Change the application activity status to ‘Initiated’
- When a user submits the application form –> Change the application activity status to ‘Applied‘
This article explains how you can automatically change the status of the application activity as per the user’s interaction with the application form. To know more about Portals, see Portal Management.
2. Prerequisites
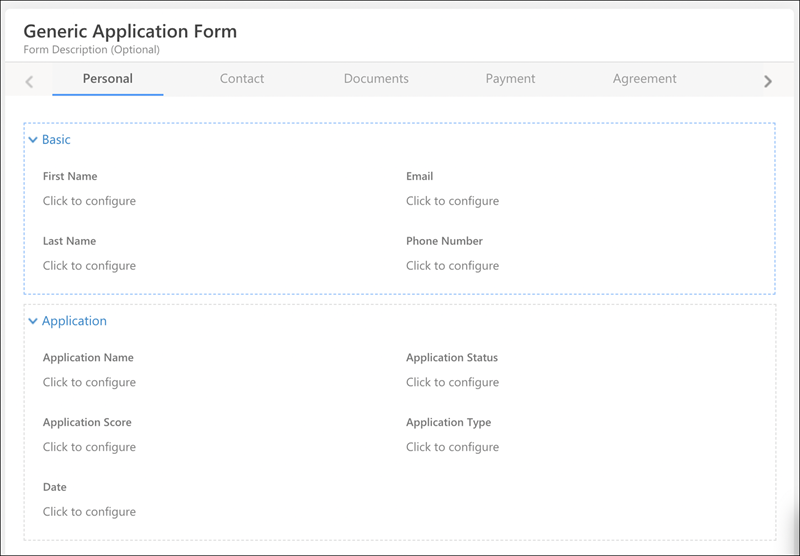
- An Activity: To track the actions (status, information, selections, etc) carried out by the user/lead on the application Form. Here, the status will be a dropdown field with the following items: Active, Processing, Approved. To learn more about activities, see Manage Activities.
- A Multi-step Form: (Lead & Activity Fields) This will be our application Form with the above (1) activity fields integrated. Toggle the’Save at each step’ option via Manage Form > [Select the Form] > Additional Settings. So, it saves the Form progress at each step. For more details, see How to Save Multi-step forms in Portals.
- A Portal with the Form linked to the page.
3. Example Use Case
Let’s take the example of an education portal where users can visit and fill the application for a course. When the user opens the Form and saves the first step, we want to change the status of our activity (which gets created on the first save) to Active. This represents an application for a lead that is active and needs nurturing. When the user submits the application form, the status needs to be changed to Processing so that the lead’s application can be processed and given immediate attention.
Form filling initiated (Active) –> Form submitted (Processing) –> Approved (Approved)
4. Change Activity status to ‘Active’
This section explains how you can change the application activity status to Active when a user starts filling an application form.
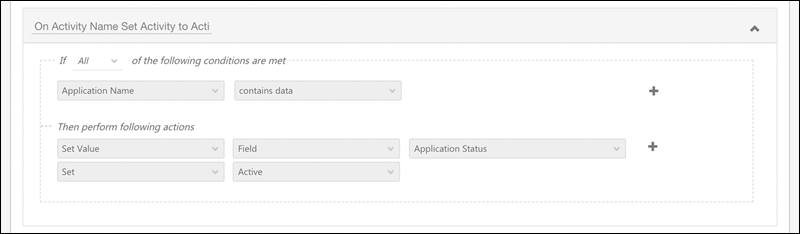
Here we want to set the activity status to Active once the user fills the first form step/tab and clicks save. Hence, we’ll configure the rule accordingly on an activity field in the first tab so that when the user saves the first step, and this field contains a value, then we can consider the application as Active.
- Navigate to Workflow>Manage Forms.
- Hover your cursor over
 and select Live Edit.
 - Drag an activity field from left hand side Field drawer. Your activity field must –
- not be hidden
- be required
- need input in the first tab inside form.
- Click on the activity status field in the first tab and enable Hide by default.
- Switch to Rules from Form Designer via the topmost tab.
- To add a new rule, click on Add Rule.
- Add the rule – If Activity field (e.g., Application Name) contains data, then set value in the hidden Activity field to Active.
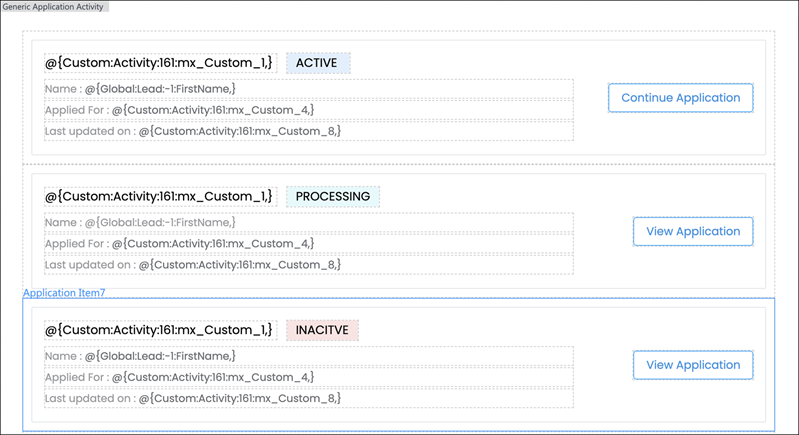
When the user opens the form and fills the first tab with the specific activity field and saves it, the activity status field will be set to Active. Based on this, we can set up automations to communicate with the user or even integrate application blocks in the Portal portals page acting as a ‘Dashboard’ page where users can track their Active applications and complete them.
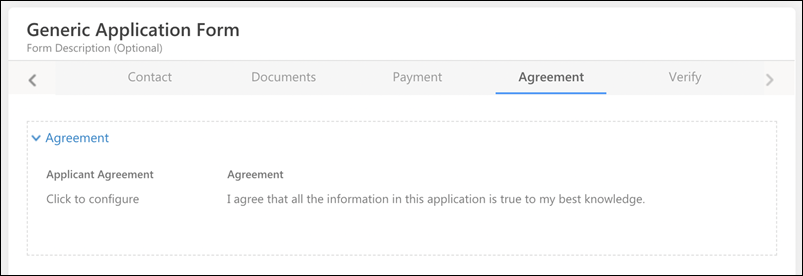
5. Change Activity Status to ‘Processing’
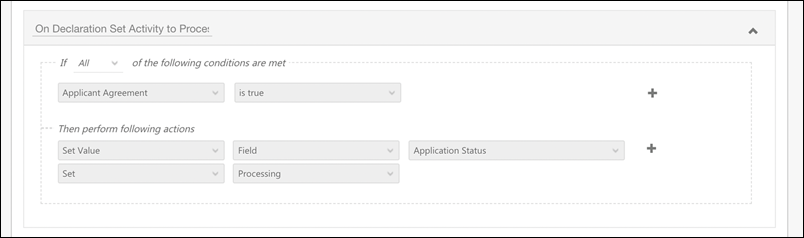
The activity status must be changed to Processing once the user fills the form and submits it. To do so –
- Navigate to Manage Forms.
- Hover your cursor over and select Live Edit.
- Drag an activity field from left hand side Field drawer. Your activity field must –
- not be hidden
- be required
- need input in the first tab inside form.
- Switch to Rules from Form Designer via the topmost tab.
- To add a new rule, click on Add Rule.
- Add the rule – If Activity field (i.e. your activity field that’s not hidden) contains data, then set value in the hidden Activity field to Processing.
When the user submits the form after filling the last tab with the specific activity field, the activity status field will be set to Processing. Based on this we can set up automations to communicate with the user or even integrate application blocks in Portal portals page acting as a ‘Dashboard’ page where users can track their Processing applications and download their PDFs.
Be sure to integrate Application Block with the application activity in the portals so that users can track their application status in real time and take specific actions on each status assigned.
Any Questions?
Did you find this article helpful? Please let us know any feedback you may have in the comments section below. We’d love to hear from you and help you out!