


Get Started
Sales Suite
Field Ops
Marketing
Service CRM
Integrations & Apps
FloStack
Activity Management – Feature Guide
1. Feature Overview
Once Leads and Opportunities are captured in your account, you can monitor their progress down the sales funnel by tracking notable interactions and events, or ‘Activities’. Activities help you understand a lead’s position in the conversion funnel, and accordingly automate nurturing and sales processes. Activities include email opens, website visits, link clicks, site visits, product demos, etc.
What is the difference between Activities and Tasks?
In LeadSquared, activities are actions carried out by a lead (such as email opens, link clicks, incoming phone calls, website visits, etc.). You can also create custom activities (such as loan application, document submission, home visit, etc.). However, in principle, activities help you track notable events in a lead’s journey, from prospect to customer.
Tasks, appointments or to-do’s, are created for your LeadSquared users, to drive a lead to conversion. Tasks usually have scheduled date and time, and can be tracked using LeadSquared’s tasks calendar.
2. Activity Types
2.1 Core Activities
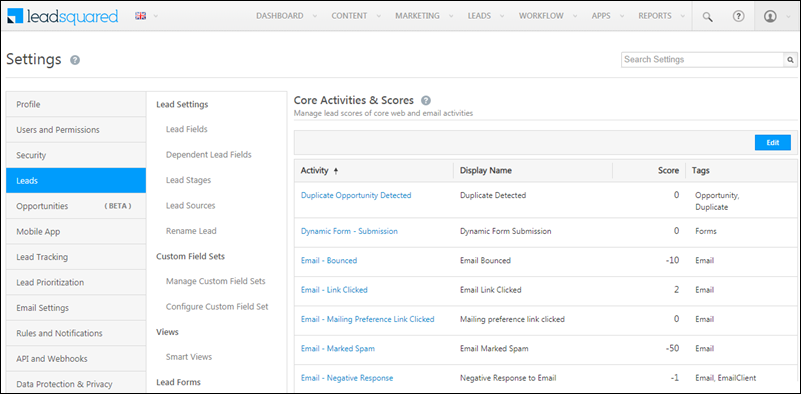
LeadSquared comes pre-built with a number of core or system activities like email bounced, email link clicked, website page visited, lead captured, etc. We automatically post these activities against your Leads or Opportunities, whenever they are performed (provided the LeadSquared Tracking Script is installed). The activities then appear in the Manage Activites page or on the Lead Details page.
To view the list of core activities in your account, navigate to My Profile>Settings>Leads>Activities and Scores>Core Activities & Scores.
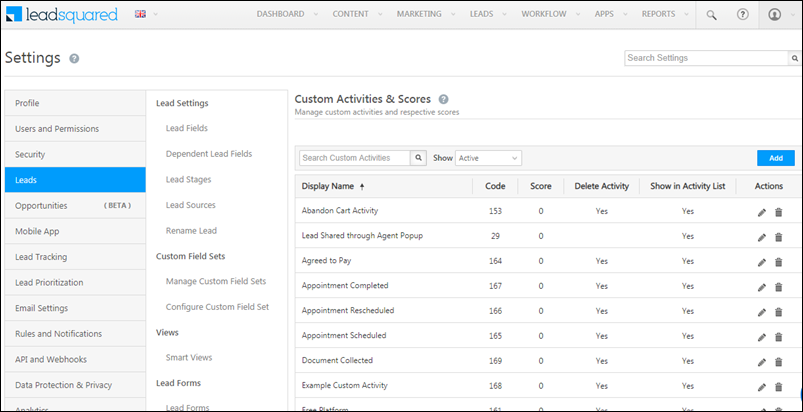
2.2 Custom Activities
In addition to core activities, you can also create custom activities to accommodate your own unique use cases. For complete details on how to create custom activity types, see How to Add Custom Activity Types. You can also add fields within each custom activity to capture relevant data. Once you’ve created custom activity types, they will be available to be added against the leads and opportunities (from the Manage Activities page, the Lead Details page, etc.).
Here are some examples –
| Industry | Custom Activity |
| Real Estate | Site Visit |
| Education | Attended Fair |
| Healthcare | Clinic Visit |
| Finance | KYC Document Collection |
| Travel | Itinerary Shared |
| Generic | Attended Webinar, Downloaded Document, Had a Phone Call |
To view the list of custom activities in your account, navigate to My Profile>Settings>Leads>Activities and Scores>Custom Activities & Scores.
Note:
- If opportunities are enabled on your account, you can post activities directly on the opportunity. To know how to add activities to opportunities, refer to Opportunity Details.
- Additionally, you can also capture activities posted on your B2B accounts as well. To know more, please refer to How to Post Activities on Accounts?
3. Lead Scoring
Every time a lead performs a core or custom activity (such as email open, link click, etc.), a score is assigned for this activity, and this score is posted against the lead. You can customize the score for each activity type, as per your business requirement, and the industry you’re present in. This will help you identify relevant leads. To know more, please refer to How does Lead Scoring work?
4. Add Activities
Once you’ve configured activity types, you can add activities to both leads and opportunities from the following pages within LeadSquared –
4.1 From Manage Activities Page
You can add the activity to a lead as well as to an opportunity. All activities you add will be displayed on the Manage Activities page as well as the corresponding Lead Details and Opportunity Details page. To do this –
- From the main menu, navigate to Leads>Manage Activities.
- Select the custom activity from the Activity Type dropdown.
- Click the Add Custom Activity button, and on the activity pop-up, enter the activity, lead and opportunity details.
- Once you’re done, click Add.
4.2 From Manage Leads Page
You can add both core as well as custom activities directly to a lead from the Lead Details page. This will also show up on the Manage Activities page. To do this –
- From the main menu, navigate to Leads>Manage Leads.
- Against an existing lead, under Actions, hover your cursor over the
 icon, and click Add Activity.
 - On the Add Notable Activity pop-up, enter all the relevant details, and click Add.
To add activities to leads in bulk from the Manage Leads page –
- Click the
 against the leads you want to add the activities to.
 - Then, hover your cursor over the
 button, and click Add Activity.
 - On the Add Notable Activity pop-up, enter all the relevant details, and click Add.

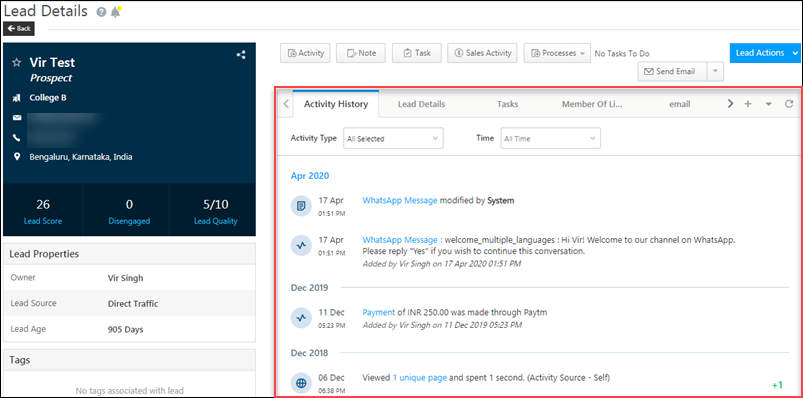
4.3 From Lead Details Page
You can add both core as well as custom activities directly to a lead from the Lead Details page. This will also show up on the Manage Activities page. To do this –
- From the main menu, navigate to Leads>Manage Leads, and click on a lead.
- On the Lead Details page, click the
 button.
 - On the Add Notable Activity pop-up, enter all the relevant details, and click Add.
- You can now view the activity listed under the Activity tab. You can also view all the activity details that have been added to the lead here.

4.4 From the Manage Opportunities Page
You add activities to an individual opportunity from the Manage Opportunities page. This will also show up on the Manage Activities page. To do this –
- From the main menu, navigate to Leads>Manage Opportunities>Opportunity Type.
- Against an Opportunity Name, under Actions, hover your cursor over the
 icon, and click Add Activity.
 - On the Add Notable Activity pop-up, enter all the relevant details, and click Add. To know more, please refer to Opportunity Management.
4.5 From Opportunity Details Page
You add activities to an individual opportunity from the Manage Opportunities page. This will also show up on the Manage Activities page. To do this –
- From the LeadSquared main menu, navigate to Leads>Manage Opportunities>Opportunity Type.
- Under Enquiry, click any existing opportunity.
- On the Opportunity Details page, click the button.
- On the Add Notable Activity pop-up, from the Activity Type dropdown, select an activity, and enter relevant details.
- Once you’re done, click Add.
- You can now view the activity listed under the Activity tab. You can also view all the activity details that have been added to the opportunity here. To know more, please refer to Opportunity Details.
4.6 From the Mobile Application
- From the mobile app dashboard, tap
 .
. - Tap Leads and select the lead you want to add the activity to.
- From the bottom left of your Lead Details screen, tap Add Activity.
- Select the Custom Activity for which you’ve enabled tracking.
- Enter the relevant details and tap Save.
5. Import Activities
You can import an activity through a CSV file* similar to how you import leads and opportunities. To import activities –
- From the main menu, navigate to Leads>Manage Activities.
- On the Manage Activities page, click the Import Activities button.
- Upload the CSV file.
- Map the CSV File Columns to the Activity Type Fields.
- Review the validation report.
- Check the status of your report.
To learn about the above steps in detail, please refer to How to Import Activities.

6. Export Activities
To download your activities as CSV file –
- From the main menu, navigate to Leads>Manage Activities.
- Under the button, click Export Activities.
- On the Export Activities pop-up, choose whether you want to all fields or selected fields. If you want to export selected fields, click the corresponding checkbox, then click the Choose Fields link.
- Click Export when you’re done.
Note:
- You can export up to 5-lakh (500,000) activity records in a single request. To set the activity export limit on your account, contact your account manager, or write to support@leadsquared.com.
- All date-time fields you export will be displayed in the time zone configured in your LeadSquared account. You can edit the time zone and other profile settings from Your Profile.
- You can also export fields of a custom field set. However, file type fields cannot be exported.
7. Bulk Updates
This is especially helpful for users who work on activities rather than leads and opportunities. With this feature, you can update activity fields in bulk by selecting the checkboxes alongside the records you want to update on the Manage Activities page, and then click Bulk Update under![]() . You can update a maximum of 1,000 activities at a time.
. You can update a maximum of 1,000 activities at a time.
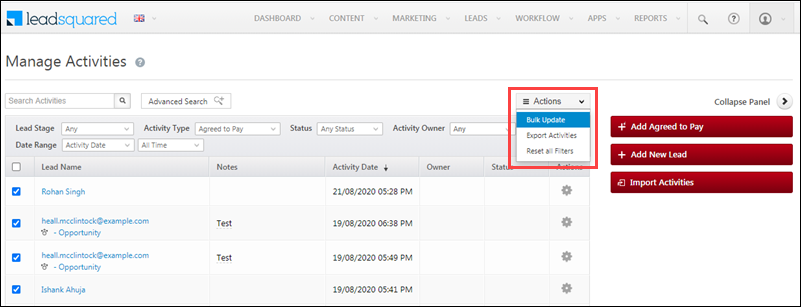
On the Bulk Update pop up, select the activity field and the new value, click Update and your changes will be applied to all selected records.

8. Advanced Search
You can use advanced search to find leads where a specific any custom activity has taken place. You can also select the number of days within which the activity has taken place. You can set up these searches as follows –
- Navigate to Leads>Manage Activities.
- Click
 .
. - Select Lead Activity Is Any Activity or a specific activity as per your use case.
- Then select the number of days.
- Click Add. Once your criteria is added, click Find Activities.
9. Forms and Processes
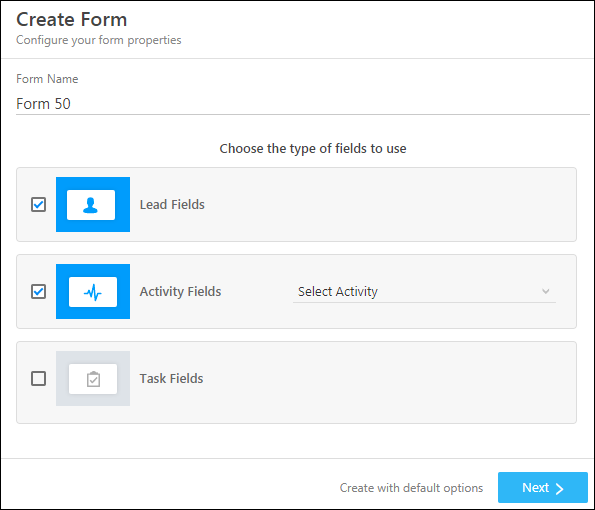
Once you create an activity type, you’ll have to then create and configure the default form for that particular activity.

You can also use LeadSquared’s Forms and Processes feature to create dynamic forms. Through these forms, you can set rules and conditions for activity capture. You can also add activities, as well as create leads, opportunities and tasks.
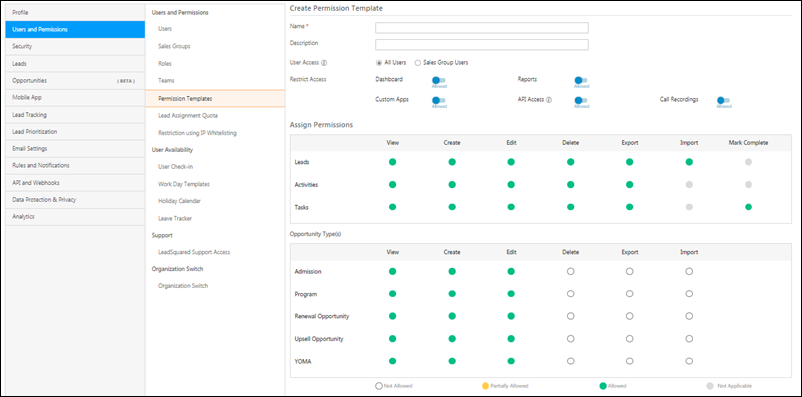
9. Permission Templates
Through Permission Templates, you grant access only to specific users to be able to view, add, update, delete, export and import activities. You can use this to prevent your sales users from viewing or adding activities of your marketing users, and so on. To know how to do this, please refer to How to Create a Permission Template?
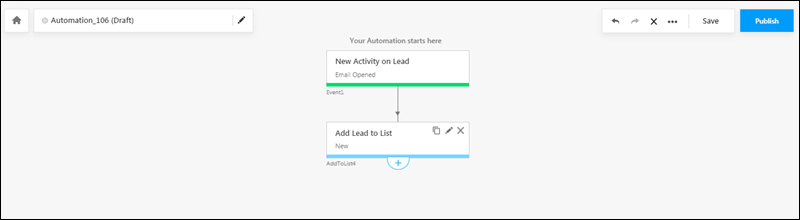
10. Automations
You can create automations using the following activities triggers.

Every time the activity you’ve selected (such as email open, etc.) is completed, you can set up an automation to perform various functions, such as assign a task to a user, update various fields, etc. In the below example, every time a lead opens an email, the lead then gets added to a list. To know more, please refer to Automation Home.
Any Questions?
Did you find this article helpful? Please let us know any feedback you may have in the comments section below. We’d love to hear from you and help you out!