


Get Started
Sales Suite
Field Ops
Marketing
Service CRM
Integrations & Apps
FloStack
IDfy Connector for KYC
1. Feature Overview
IDfy offers Know Your Client (KYC) verification solutions for lending, financial, banking, HR, insurance and payment services. Integrate LeadSquared with IDfy to leverage their KYC verification services directly from your LeadSquared account.
Once integrated, you can use LeadSquared Forms and LeadSquared Portals to seamlessly verify KYC details like PAN, Aadhaar, Address, Mobile, etc.
Example Use Cases
You can carry out video KYC verifications when a lead –
- Applies for a home loan/educational loan/personal loan/ automobile loan, etc.
- Applies for a new credit card
- Opens a Demat account
- Re-authenticates their credit card
2. Prerequisites
- This is a paid feature. To enable it, contact your account manager, or write to support@leadsquared.com.
- You must be the Administrator of your LeadSquared account to install and configure this connector.
- You must have an IDfy Account with access to their API collection for the required services.
- In instances where 2-way KYC configurations need to be set up, the IDfy team will have to share the customer account specific Agent Portal login link.
- In instances where you’re setting up Aadhaar/PAN document fetch via Digilocker configurations, you’ll require a Secret ID (secret key) from IDfy.
3. How it Works
First, install and configure the IDfy connector. Then, create a dynamic Form to facilitate the actual KYC verification for your users. Using Form Rules, trigger the KYC verification, and map the response from IDfy to display the KYC data to the end user. Once the form is created, set up a Process that displays the Form to your user when they perform an Edit action on the Lead Details page.
The IDfy integration requires the following steps –
- Install and configure the IDfy connector
- Select the configuration type (such as RBI Compliant 2-way Video KYC, etc.).
- Once the connector is configured, the Initiate KYC API Details and Webhook API Details are generated. Copy the –
- Initiate KYC API Details, and use it to create a Form Rule in your LeadSquared account.
- Webhook API Details, and pass it on to the IDfy account executive.
- Create a dynamic form to trigger the KYC
- Add the lead fields to the Form.
- Use the Initiate KYC API Details to create a Form Rule on this Form. This rule is used to trigger the Video KYC process.
- Publish the Form.
- Create a Process to display the Form to your users
- Create the Process on a Lead Details Edit action.
4. Install the Connector
- From your LeadSquared account, navigate to Apps>Apps Marketplace.
- Search for IDfy Connector, and click Install.
- Alternatively, you can find the connector on the left panel, under Verifications.
- Once installed, hover your cursor over
 , and click Configure.
5. Configure the Connector
The LeadSquared implementation team will carry out the steps listed in this section. Please assist them by providing the required details.
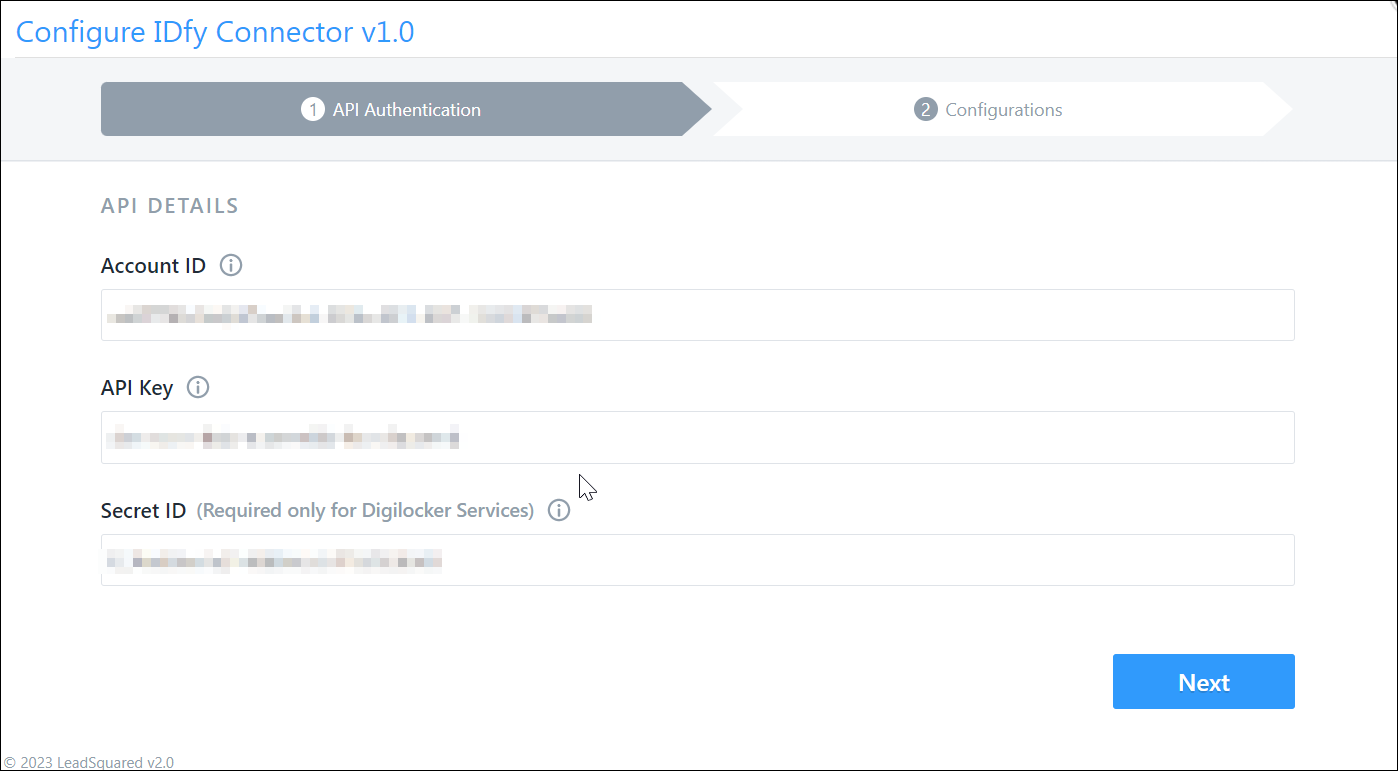
5.1 API Authentication
Obtain the following details from your IDfy account, and pass them to your LeadSquared account manager –
- Account ID – Your IDfy account’s ID. To obtain this, contact your IDfy account manager.
- API Key – Your IDfy account’s API key. To obtain this, refer to IDfy’s API suite.
- Secret ID (optional) – Secret key provided by your IDfy account. This is required only if you plan to use Digilocker services (Aadhaar/PAN document fetch via Digilocker).
Once you’re done, click Next.
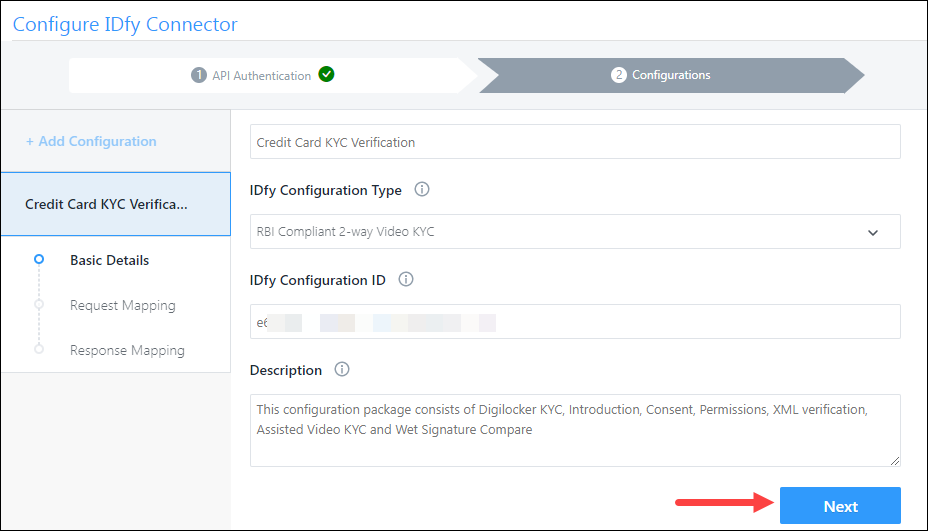
5.2 Configurations
LeadSquared has created a set of pre-defined configurations, each of which is designed to help you comply with a specific use case. Choose the configuration that’s best suited for your organization –
| Configuration Type | Configuration Components |
| RBI Compliant 2-way Video KYC | Choose this when verifications have to be carried out by leads along with assistance from your users/agents.
Your leads need to complete the following verification –
Your leads and users have to carry out the following verifications together –
|
| SEBI Compliant 1-way Video KYC | Choose this when the lead needs to carry out the KYC on their own, without assistance from any user/agent from your organization. Your leads need to complete the following verification and provide the following details –
|
| RBI Compliant 1-way Video KYC | Choose this when only the lead needs to carry out the KYC on their own, without assistance from any user in your organization. This configuration package consists of –
|
| RBI Compliant 2-way Video KYC with pre-verified Aadhaar | Choose this when verifications have to be carried out by leads along with assistance from your users/agents.
Your leads need to complete the following verification –
Your leads and users together have to carry out the assisted video KYC. |
| Aadhaar document fetch via Digilocker | Fetches the following Aadhaar details from the lead’s Digilocker account, and populates the mapped lead fields in LeadSquared –
Once set up, your lead receives a link via email. On clicking the link they’re directed to a page to enter their Digilocker credentials. On successful authentication, the lead’s Aadhaar details are fetched and the corresponding lead fields are populated. |
| PAN document fetch via Digilocker | Fetches the following PAN details from the lead’s Digilocker account, and populates the mapped lead fields in LeadSquared –
Once set up, your lead receives a link via email. On clicking the link they’re directed to a page to enter their Digilocker credentials. On successful authentication, the lead’s Aadhaar details are fetched and the corresponding lead fields are populated. |
Once you’ve selected the configuration type best suited to solve your requirement, share the following details with your LeadSquared account manager –
- Configuration Name – A display name for the selected configuration (e.g., RBI Compliant VKYC for Home Loan, etc.).
- IDfy Configuration Type – The configuration type you’ve selected (e.g., RBI Compliant 2-way Video KYC). Depending on the regulatory compliance you want to opt for, choose from the RBI/SEBI options available.
- IDfy Configuration ID – Contact your IDfy account manager to obtain the configuration ID for the configuration type (e.g., RBI Compliant 2-way Video KYC) you’ve selected.
Once all your details are entered, click Next.
Note: You can choose to build multiple configurations if required. For example, if you want to carry out RBI Compliant 2-way Video KYC and SEBI Compliant 1-way Video KYC, this can also be achieved.
5.3 Request Mapping
For the selected configuration type, map the attributes required by IDfy with the corresponding LeadSquared lead fields.
- Each IDfy Attribute is displayed using a relevant name (e.g., First Name, Date of Birth, etc.) along with the attribute’s data type (e.g., text, date, etc.).
- The Input* requirements for each field are specified.
- By default, the Entity is set to Lead**. This requires you to map the attributes to lead fields only.
- Under Entity Fields, map the attribute to the relevant LeadSquared custom or system lead field (e.g., First Name, Date of Birth, etc.).
- If you’ve selected RBI Compliant 2-way Video KYC or RBI Compliant 2-way Video KYC with pre-verified Aadhaar as the configuration type, your users will require the answers to the security questions they’re going to ask the lead (such as “What is the name of the city you are located in?”, etc.). Your user will use these answers to verify the lead. Under Security Question, map the Question to the corresponding lead field in which the correct answers are stored for each lead.
- Once you’re done, click Next.
Note:
- *For all the attributes, the Regular Expression (Regex) is specified. You can copy
 the expression and use it in the LeadSquared form (under field properties) to validate the data present in a field.
 - **Only the Lead entity is supported. Activities, opportunities, accounts, etc. are not supported.
- To map the Request attribute to a LeadSquared lead field, we recommend you create a Custom Lead Field that follows the same data type as the attribute field. Also, ensure all the Request attributes are mapped to a corresponding LeadSquared lead field.
- The IDfy attributes displayed here depend on the configuration type you’ve selected. Each configuration type has a different set of attributes that need to be mapped.
5.4 Response Mapping
For the selected configuration type, map the response sent from IDfy to the corresponding lead fields in LeadSquared. The response is stored in the selected fields.
- Each IDfy Response Node is displayed using a relevant name (e.g., First Name, Date of Birth, etc.) along with the response’s data type (e.g., text, decimal, etc.). Alongside the node, hover your cursor over
 to view the details of the response.
 - Under Entity Fields, map the response to the relevant LeadSquared custom or system lead field (e.g., First Name, Video KYC Status, Date of Birth, etc.).
- Once you’re done, click Save. This completes the connector set-up process.
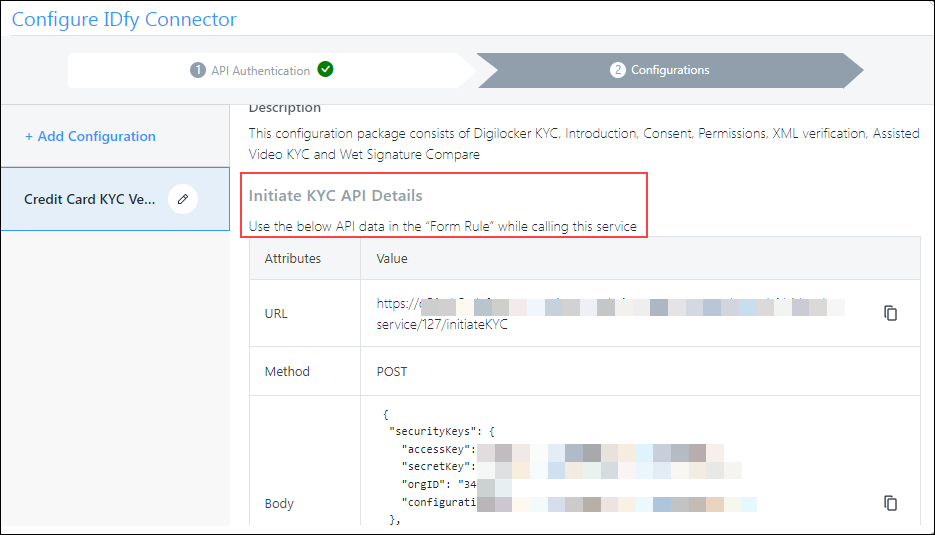
5.5 Initiate KYC API Details
Once the request and response fields are successfully mapped to your LeadSquared account, the Initiate KYC API Details are generated. This is an internally created API that’s used to trigger the video KYC process. Copy ![]() this API’s details, and add use it to create a Form Rule. This is covered in more detail in the Create a Dynamic Form section.
this API’s details, and add use it to create a Form Rule. This is covered in more detail in the Create a Dynamic Form section.
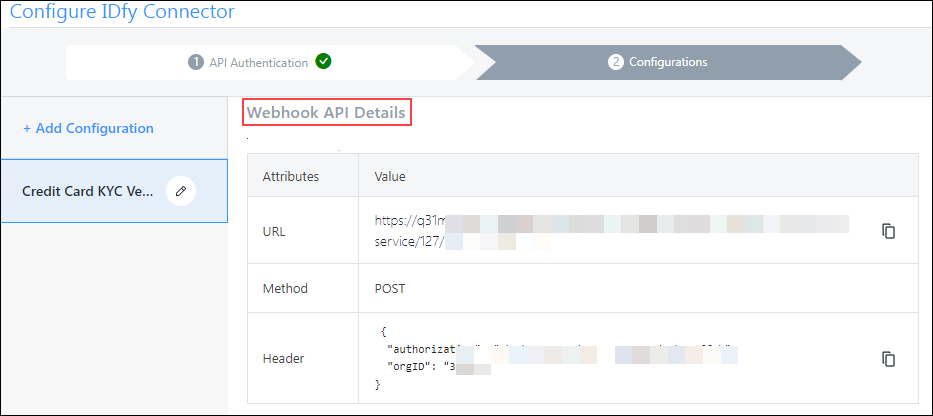
5.6 Webhook API Details
Copy ![]() the Webhook API Details (the URL, Method and Header), and share it with your IDfy SPOC. They’ll use these details to send the video KYC response back to your LeadSquared account.
the Webhook API Details (the URL, Method and Header), and share it with your IDfy SPOC. They’ll use these details to send the video KYC response back to your LeadSquared account.
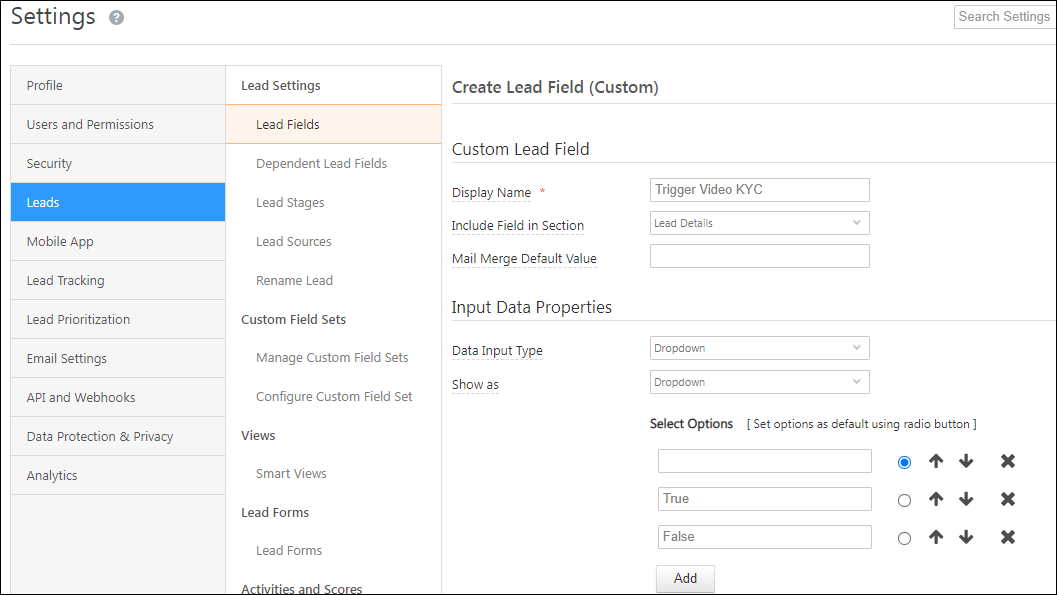
6. Create Custom Lead Fields for the Form
Before you create and configure a Form to initiate the KYC process, create the following lead fields –
- Trigger Video KYC – Set the Data Input Type to Dropdown, and add the options True and False.
- Alternatively, this lead field can also be created as a checkbox.
- Email Status – Set the Data Input Type to Text.
7. Create a Dynamic Form for the KYC Process
Once you’ve configured the connector, set up a seamless KYC process for the end-user using dynamic forms –
- Create a new form or edit an existing one. For more details, see How to Create a Form.
- Add the lead/activity/opportunity fields required for KYC to the form.
- Ensure these fields were mapped correctly during the connector configuration and testing.
- Add the Regex to the field-level validation properties.
- Add the relevant rules.
Example
In this example, we’re setting up a dynamic form using IDfy’s SEBI Compliant 1-way Video KYC configuration.
We’re using a multi-step form for this example. In the first step, we’re capturing the lead’s First and Last Name, DOB, and Email.
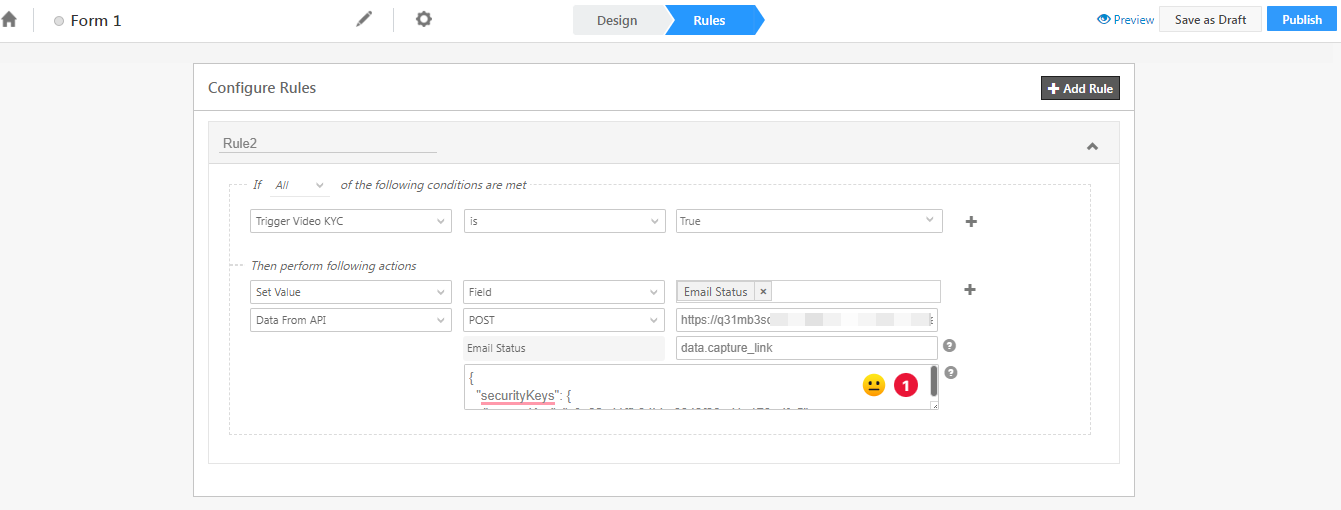
In the second step, add the Trigger Video KYC and Email Status fields to the form, and create a Form Rule using this field.

This rule is set up using the following example –
If ‘Trigger Video KYC’ is True,
Then Set Value of Field ‘Email Status’ using Data From API – POST <paste the API URL and Body data obtained from the Initiate KYC API Details screen> and map the message node from the response in the summary screen.
When the agent triggers the video KYC from the form, this rule ensures that a link to complete the video KKYC is generated and delivered to the lead via email. The ‘Email Status’ field is populated with the deliverability status of the email.
Alternatively, if you choose to store the ‘capture_link’ in your account (in case you want to share it with your leads manually), alongside ‘Email Status’, pass data.capture_link.
In this case, in addition to the link to complete the video KYC verification being sent to the lead via email, the ‘Email Status’ field is also populated with the KYC verification link. This link can also be shared manually by the agent with the lead if required.
Once you’re done, Publish the form.
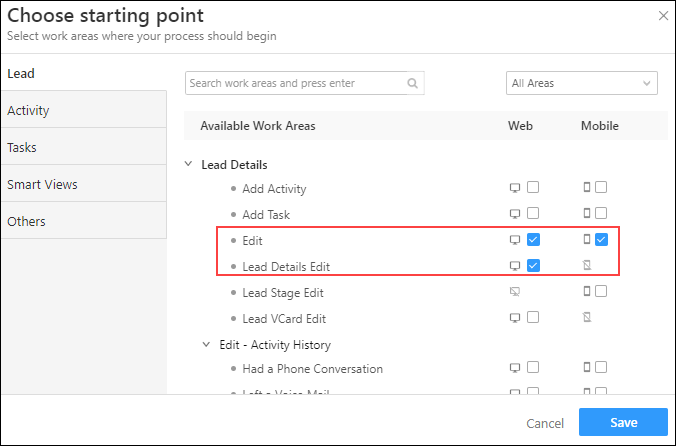
8. Create a Process
Once the Form is published, use it to Create a Process. When you’re creating a Process, remember to –
- Create the process At a Specific Work Area
- Choose the starting point as Edit and/or Lead Details Edit under Lead Details.
Once the Process is set up, Publish it.
9. Next Steps
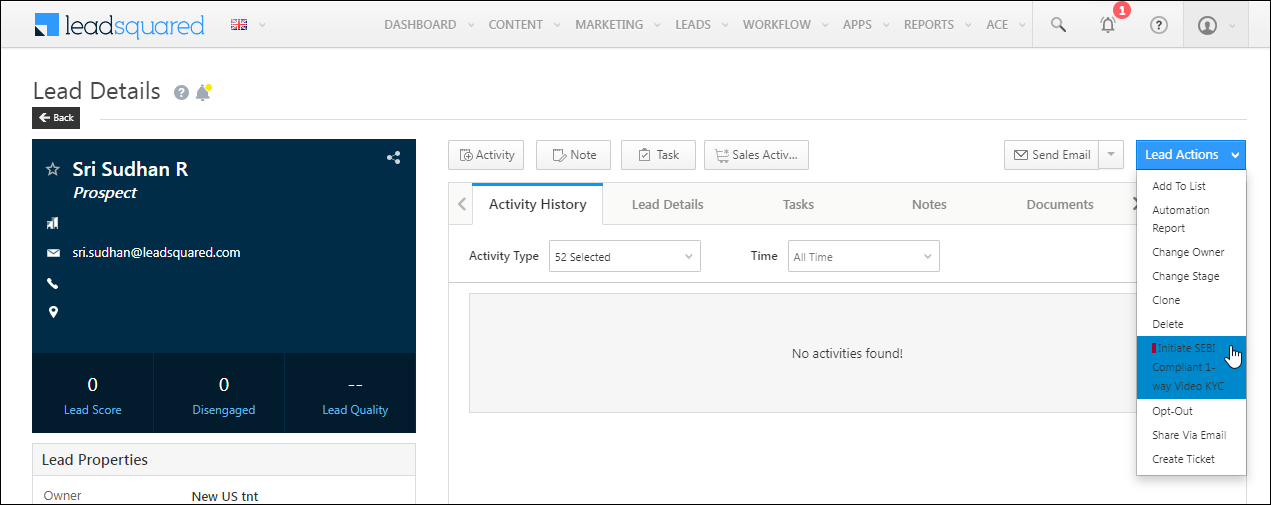
Once the connector is installed, and the Forms and Processes are set up, your sales users can start initiating the KYC process for your leads. To know more, refer to Initiate the KYC Process using the IDfy Connector.
Any Questions?
Did you find this article helpful? Please let us know any feedback you may have in the comments section below. We’d love to hear from you and help you out!
Hello sir
Hello, Vineet. What’s the query you’d like us to address?