1. Feature Overview
When you collect sensitive information about your leads (as part of KYC processes, etc.), which may include their identification documents, address proof, credit score, etc., you need to receive consent from the lead to collect this data. Recording the lead’s consent is helpful for audits and lets you stay compliant with government rules and regulations.
Once you integrate the Consent Management App with LeadSquared, you can use LeadSqured Dynamic Forms to trigger a consent approval email to collect sensitive data belonging to the lead. If the lead provides or denies their consent, it will be captured as an Activity on the Lead Details page.

2. Prerequisites
- You must be the Administrator of your LeadSquared account to install and configure this connector.
- This is a paid feature. To enable it, reach out to your account manager, or write to support@leadsquared.com.
3. How it Works
First, install and configure the Consent Management connector. Then, create a Dynamic Form to facilitate the actual consent approval from your leads. You can use Form Rules to trigger the consent approval and map the response from the lead as an Activity.
The Consent Management App requires the following steps –
- Install and configure the Consent Management connector
- Create a consent purpose and enter the relevant details (Consent Name, Consent Text, Company Logo, etc.,). You can create multiple consent approval flows to maintain approvals for different KYC/document collection processes.
- Map the Lead Field with the Email ID Attribute. This mapping is required to send a consent approval email to the lead.
- Create a Dynamic Form to trigger the consent approval
- Add the lead fields to the Form.
- Use the Initiate Lead Consent details from the Consent Management connector to create a Form Rule on this Form. This rule is used to trigger the consent management process.
- Publish the Form.
4. Install the Connector
- From your LeadSquared account, navigate to Apps>Apps Marketplace.
- Search for Consent Management, and click Install.
- Alternatively, you can find the connector on the left panel, under Verifications.
- Once installed, hover your cursor over
 , and click Configure.

5. Configure the Connector
Click on ![]() to add a Consent Purpose. The configuration has two steps –
to add a Consent Purpose. The configuration has two steps –
5.1 Page Configuration
You can enter the following details on your Consent Page Configuration –
*Mandatory fields.
| Page Configuration Field | Description |
| Consent Name* | Name of the consent capture configuration. |
| Consent Purpose* | Purpose of the consent collection from the lead. There is a 100 character limit to this field. |
| Company Logo* | Your company’s logo. This logo will be visible on the consent page UI. |
| Primary Colour* | Enter a Primary Colour as a hex code – you could match the colour of your company branding |
| Consent Text* | The consent approval text displayed to the lead. There is a 500 character limit to this field. |
| Link to Terms & Conditions | Link to the Terms & Conditions page of your company. |
| Support Email Address | Your company’s support email address. This address will be shown to the lead when they withdraw their consent. |
To take a look at how your landing page will look, click Preview. Once you’re satisfied, click Next.

5.2 Communication Configuration
Configure the consent communication and mapping.
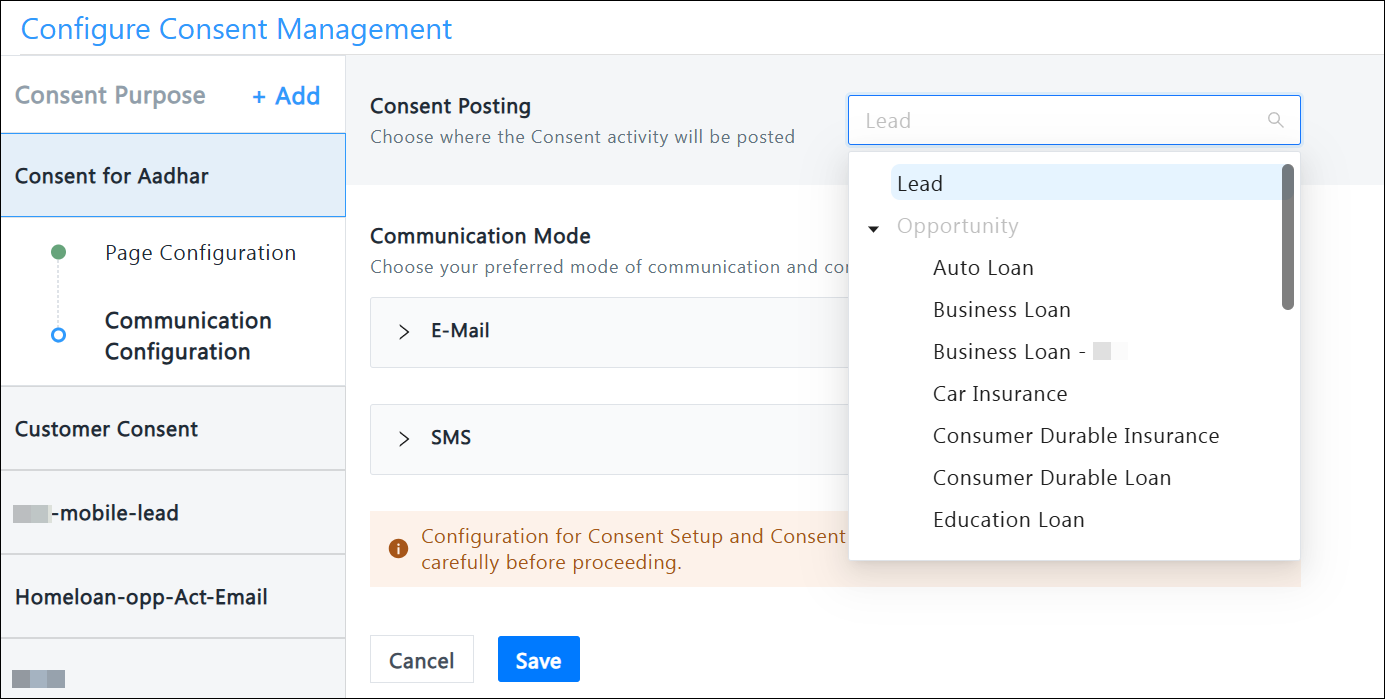
5.2.2 Consent Posting
Choose where the consent activity should be posted: at the lead level or for a specific opportunity.
For instance, selecting Lead will apply the consent to the lead and all subsequent opportunities associated with it. On the other hand, selecting a specific opportunity will restrict the consent to that particular opportunity only.
5.2.3 Communication Mode
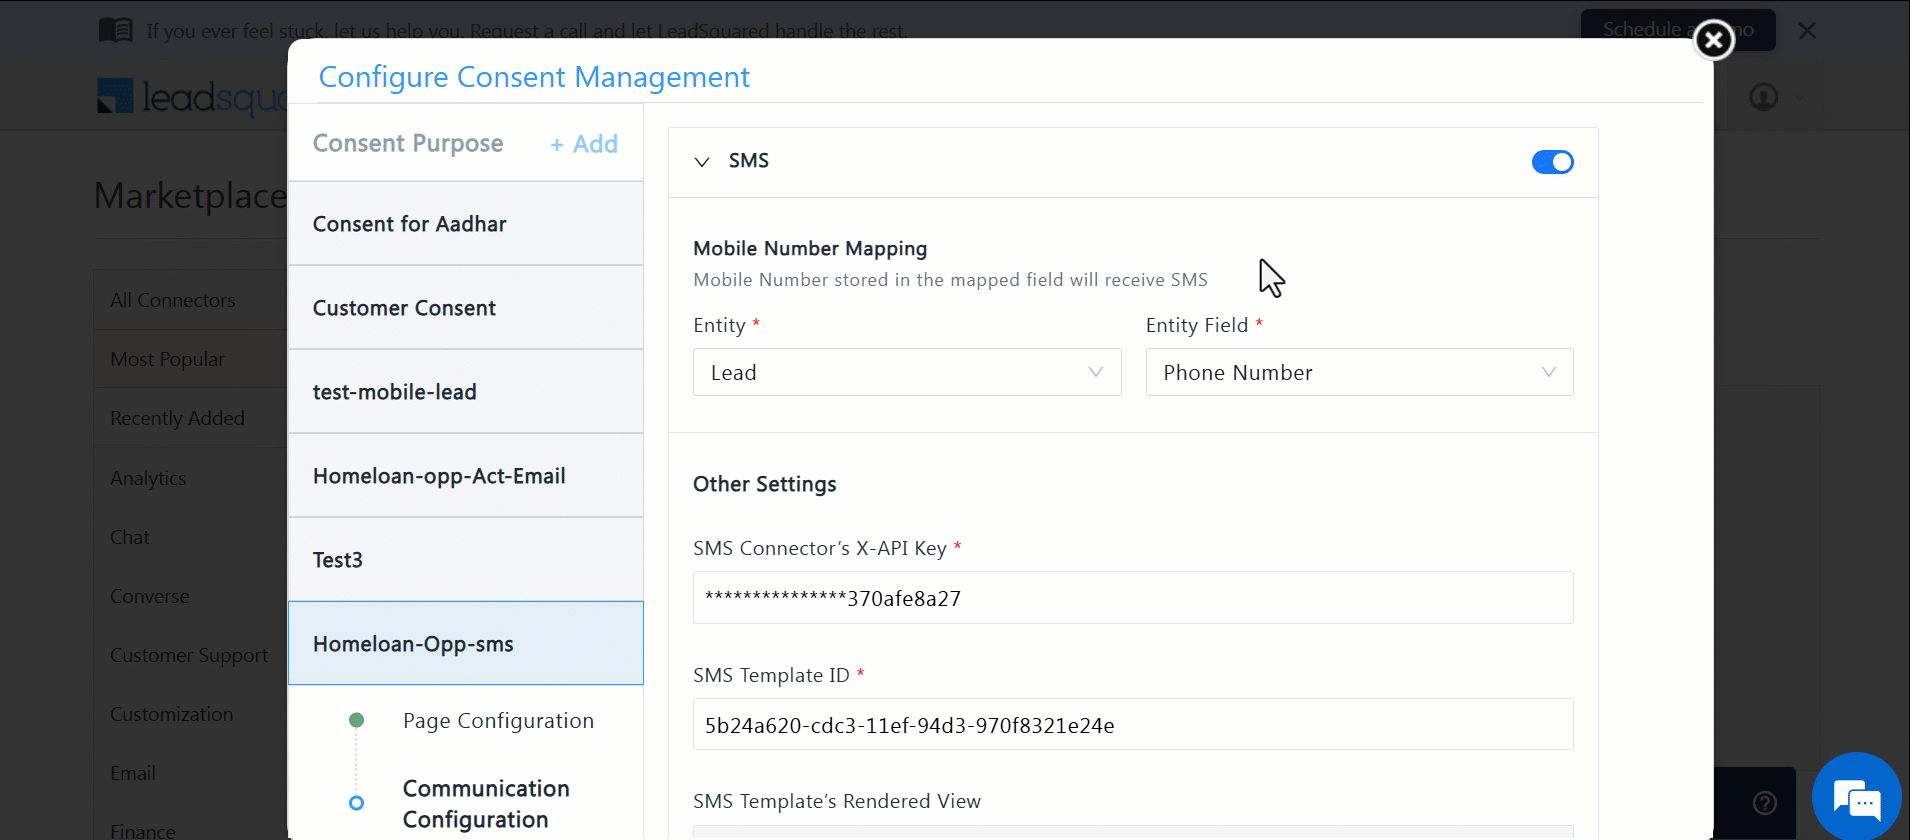
The consent communication can be sent via either Email or SMS.
When the Email option is enabled, you can map the email to be sent to an entity field in either a Lead or an Activity under the Email Mapping section.
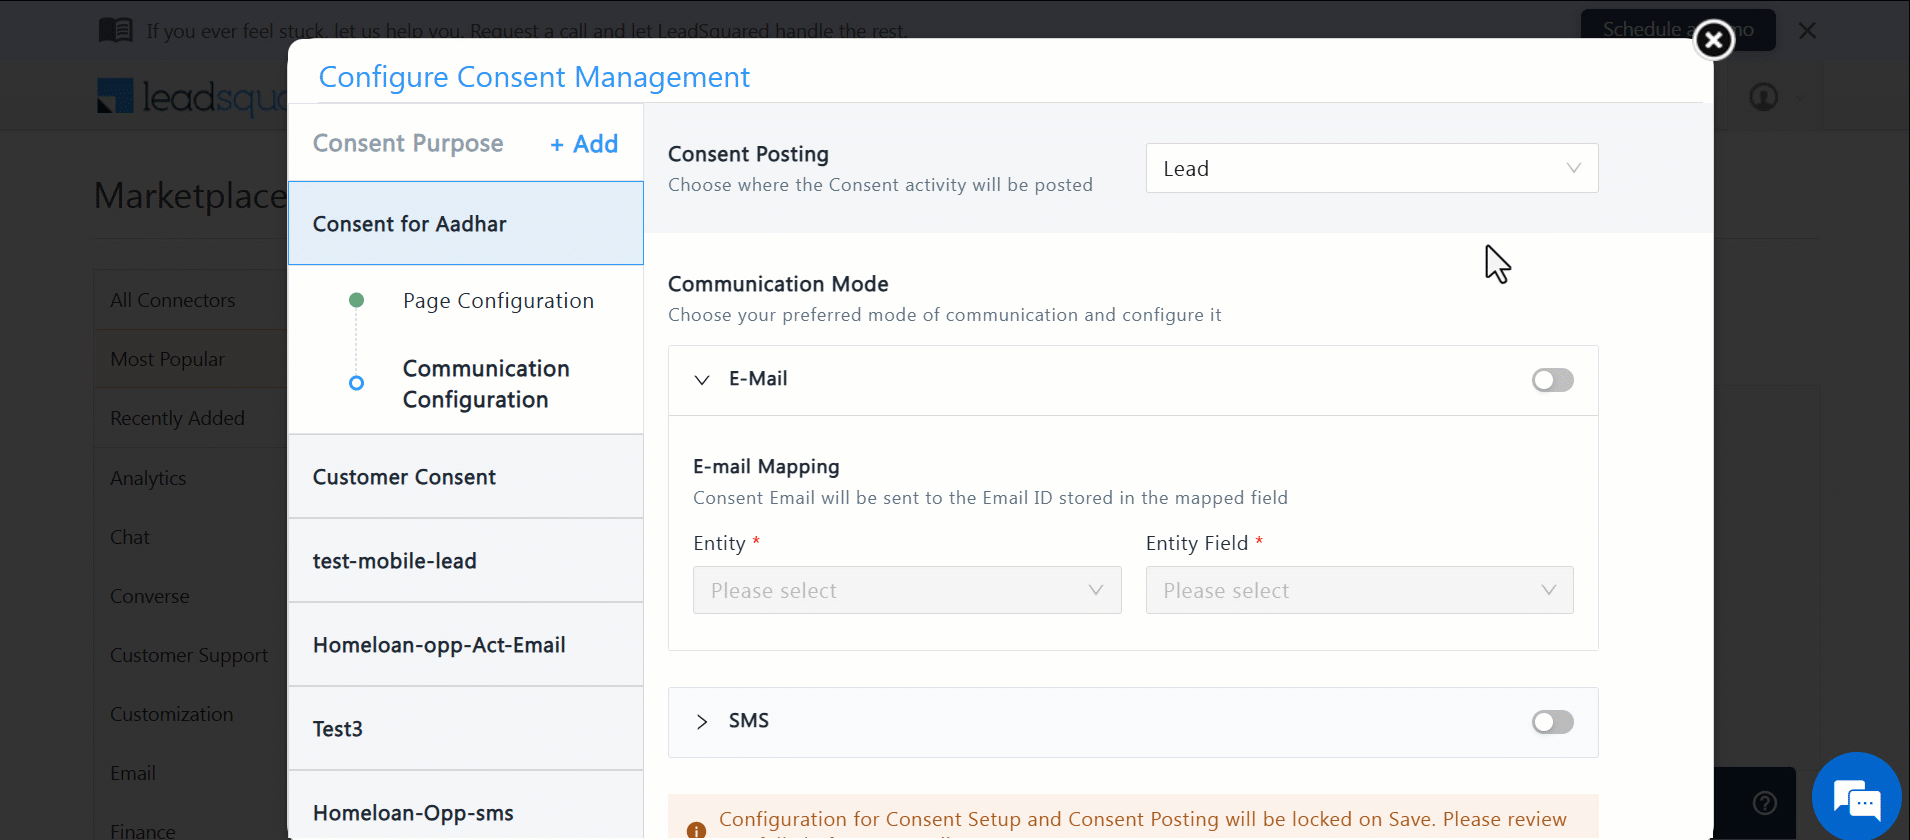
SMS
When the SMS option is enabled:
- Map the SMS to an entity field in either a Lead or an Activity under the Mobile Number Mapping section.
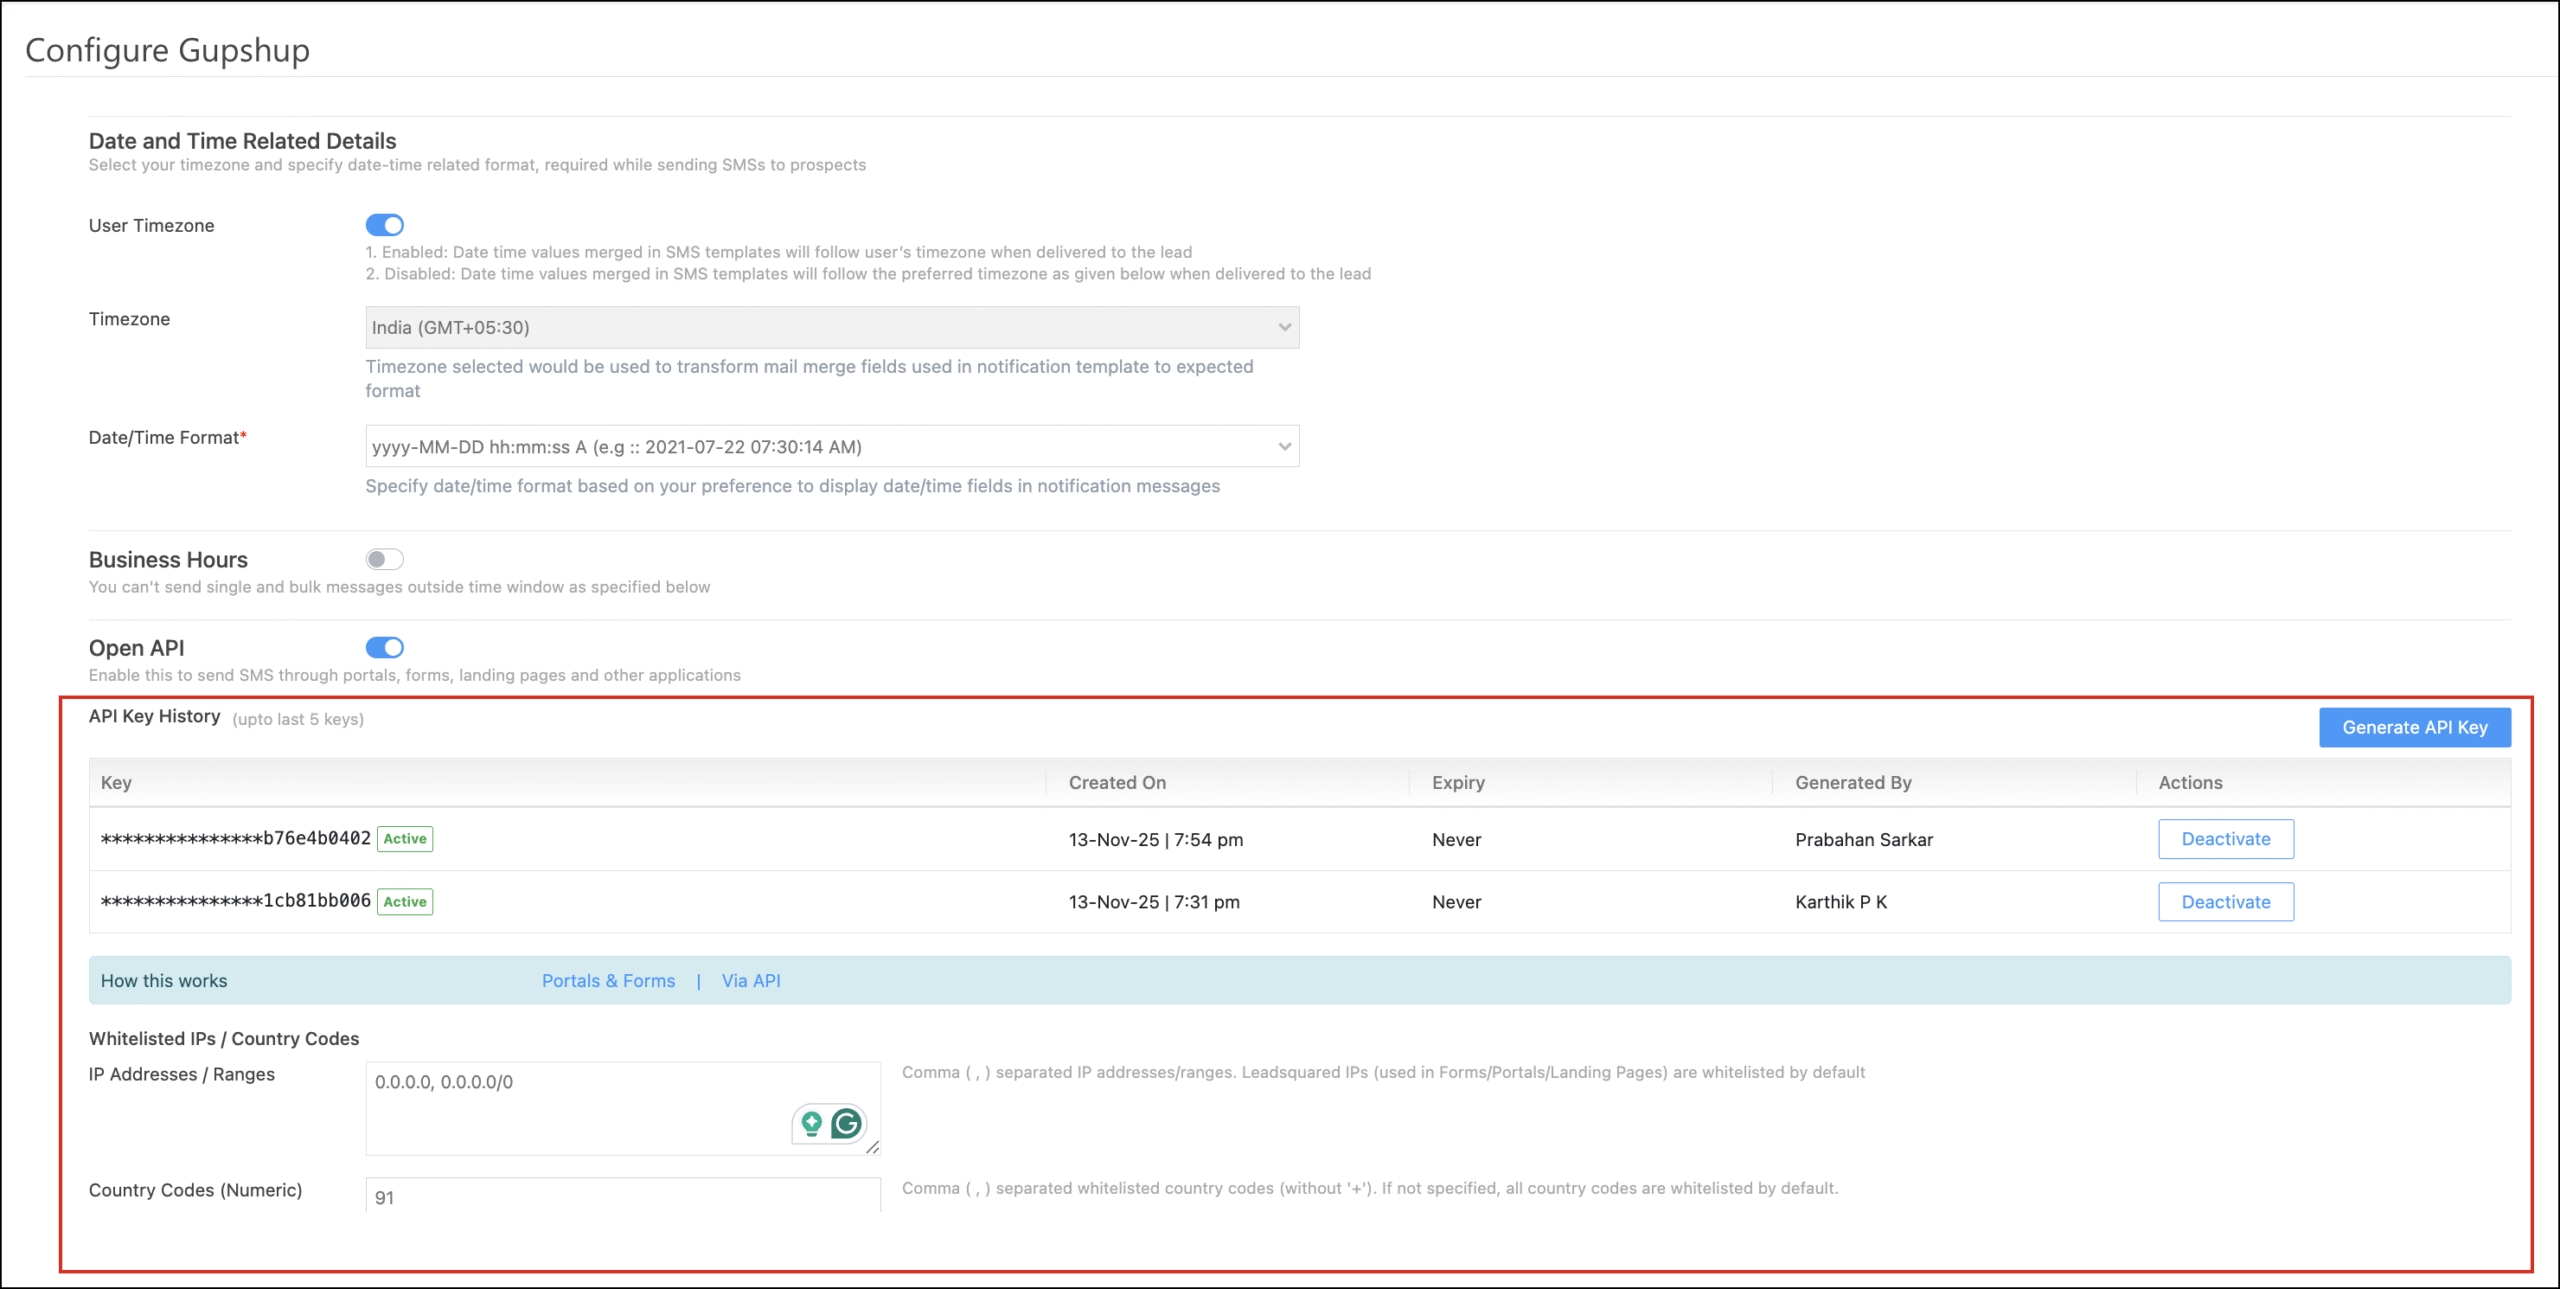
- Configure the SMS Connector’s X-API Key and SMS Template ID, as provided by your telephony/SMS provider.
- For example, if you’re using Gupshup, you can find the X-API Key under the Advanced tab on the configuration screen in LeadSquared (it will be visible once when you generate the key). Additionally, ensure that you whitelist your APIs and country code in the Whitelist section.
- In the Map Template Variable section:
- Map the Reference Number (OTP) as var1.
- Map the Consent Capture URL as var2.
-
Note: When creating the SMS template, the category must be set to OTP, and Source Availability must be Send API.
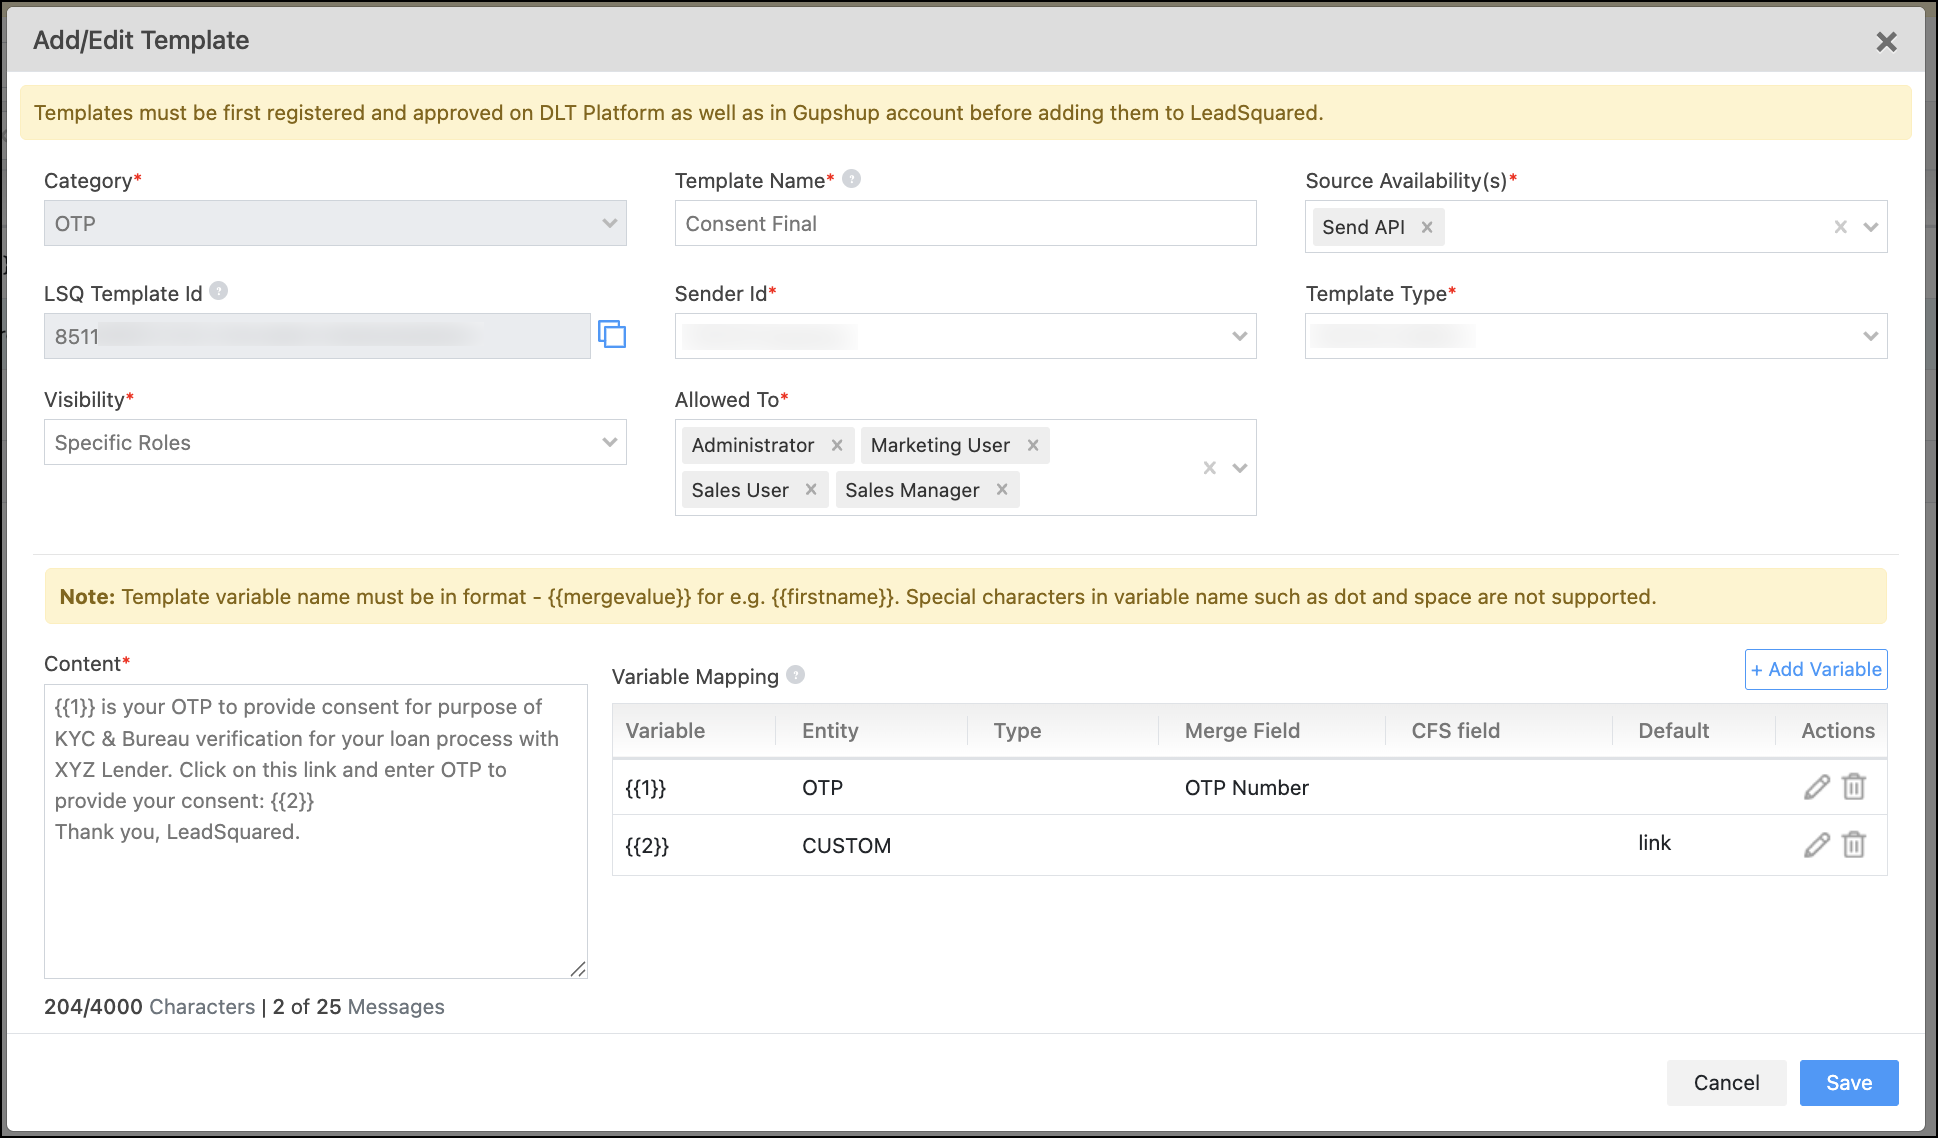
Review the SMS Template’s Rendered View to ensure proper mapping.
Note:
- For Lead and Opportunity, the entity field must support the Phone Number data type.
- If Activity is selected as the Entity in Phone Number Mapping, the supported data type must be String and must follow the +91-xxxxxxxxx format.
Once done, click Save.
Note: When saved –
- The configuration for Consent Setup and Consent Posting is locked.
- Only the Company Logo and Primary Color can be modified on the first page.
- Changes to the Consent Posting Entity (Lead, Opportunity) are no longer allowed.
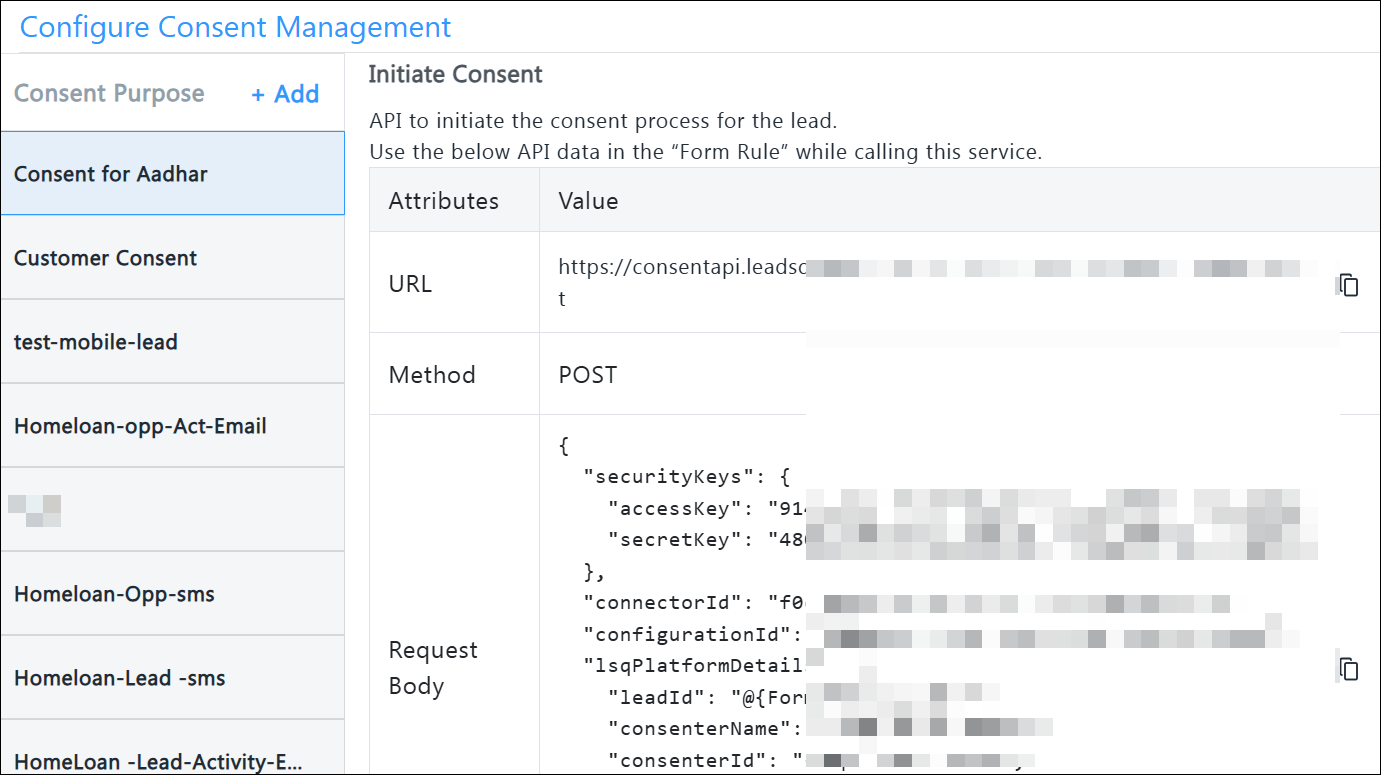
5.3 Initiate Lead Consent
Once the Consent Management App is successfully configured, the Initiate Lead Consent API details are generated. This internally created API is used to trigger the consent approval process. Copy  these API details and use them to create a Form Rule. For more information, refer to the Create a Dynamic Form section.
Note:
- consenterName is a mandatory parameter.
- consenterID, consenterAddress, and customIdentifier are Optional. These fields can be mapped in the form and serve as identifiers for the consenter, the individual providing consent, or the reason for obtaining consent.
5.4 Trigger Multiple Consent Processes
You can trigger multiple consent processes. For example, you can create a consent process to perform KYC and a separate consent process to fetch CIBIL Scores. You can define the Consent Purpose for each process. The Consent Purpose will be visible to the lead on the consent email and on the Consent Capture Link.

6. Create Custom Lead Fields for the Form
Before you configure a Form to initiate the consent approval process, create the following lead fields –
| Custom Lead Field | Description |
| Trigger Consent Approval | Create a consent approval trigger to trigger a consent email to the lead. Set the Data Input Type to Dropdown or Boolean, and add the options Yes or No. |
| Response | This field will capture the response once the API is triggered. Set the Data Input Type to Text. |
| Status | This field will capture the status of the consent approval from the lead –
Set the Data Input Type to Text. |
| Consent Capture Link | This field will display the URL of the consent capture landing page sent to the lead. Set the Data Input Type to Text. |

7. Create a Dynamic Form for the Consent Approval Process
Create a Dynamic Form and add the Custom Lead Fields.

Next, create a Form Rule for the trigger field. This is set up using the following example rule –
If ‘Trigger consent process to collect Aadhaar details’ is true,
Then Set Value of Field ‘Consent Approval Response’, ‘Consent Approval Status’, and ‘Consent Capture Link’ using Data From API – POST <API URL, post data obtained from Initiate Lead Consent> and map the specific response parameters to set the field values.

Once a consent email is generated, the consent capture link will expire 72 hours (3 days) after being generated. If a response has not been captured in this time frame, then a new consent email will need to be triggered.


Next Steps
When you’re done, Publish the form. Next –
- Use the Process Designer to embed it in a work area on LeadSquared.
- Use the Portal Designer to embed the form in a self-serve application portal.
Any Questions?
Did you find this article helpful? Please let us know any feedback you may have in the comments section below. We’d love to hear from you and help you out!


