


Get Started
Sales Suite
Field Ops
Marketing
Service CRM
Integrations & Apps
FloStack
Integrate WhatsApp Contact Capture with LeadSquared
1. Feature Overview
When your users share contact details of leads (as VCF files) to your WhatsApp Business chat number, this connector captures the contact data in real time and maps it to your LeadSquared account. Once the leads are synced, you can leverage LeadSquared’s CRM features to nurture and convert your leads.
2. Prerequisites
- You must be the Administrator of your LeadSquared account.
- You must have an active WhatsApp Business account.
- This is a paid feature. To enable it, reach out to your account manager, or write to support@leadsquared.com.
3. How it Works
To push contact (lead) data from your WhatsApp Business account to your LeadSquared account, configure the WhatsApp Chat connector instance. Once you set it up, a webhook URL is generated. Configure this URL in your WhatsApp service provider account (e.g., Gupshup, Kaleyra, etc.), and enable the sync for the connector instance in LeadSquared. This will begin the lead capture process.
4. Installation
You must first install and configure the WhatsApp Contact Capture connector.
- Navigate to Apps>Apps Marketplace.
- Search for WhatsApp Contact Capture, and click Install.
- Alternatively, you can find the connector on the left panel, under Lead Capture.
- Once installed, hover your cursor over
 , and click Configure.
4.1 Configure the connector
Once you’ve installed the connector, on the Configure WhatsApp Contact Capture pop-up, configure the connector access for the non-Admin users in your account. Only those users for whom access is granted can view and access the connector (under the Apps main menu).
- Select if you want to grant Connector Access that’s Based on Role or Advanced (User Level).
- Based on Role – From the Specify Roles dropdown, select the LeadSquared user roles that can use the connector.
- Advanced (User Level) – From the Advanced (User Level) dropdown, select a user boolean field. Based on the value entered in the selected boolean field, the user can access the connector (e.g., for the user Sam, if the “Is Employee” boolean user field contains the value “Yes”, then this user can access the connector).
- Once you’re done, click Save Details. To continue the configuration, refer to the below sections.
5. Admin Configuration
To continue the connector configuration, navigate to Apps>WhatsApp Contact Capture.
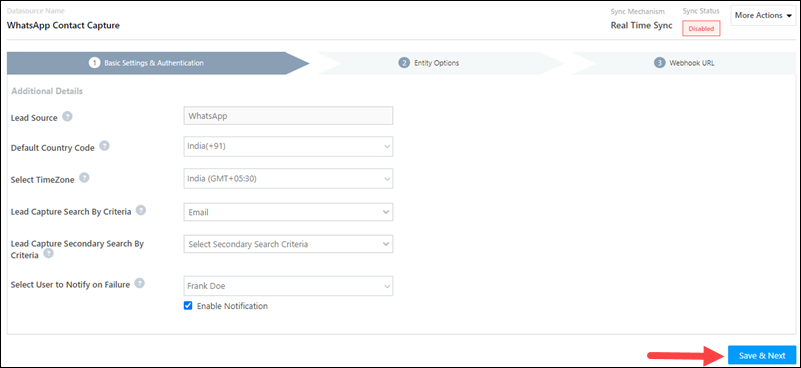
5.1 Basic Settings
Enter the following details –
| Property | Description |
| Lead Source | Enter the lead source through which the leads were captured (e.g., WhatsApp Contact Capture, email campaign, etc.). This detail will be displayed on the Lead Details page, under Lead Source. |
| Default Country Code | If the lead’s mobile number is captured without a country code, then the default country code that’s selected from the dropdown will be added to the lead’s mobile number. |
| Select Time Zone | The time zone of your WhatsApp Business account. |
| Lead Capture Search By Criteria | To avoid duplicate leads, you must select one unique lead field (e.g., email Id, mobile number, PAN number, etc.) as the search key. This will be used to identify the leads pushed from WhatsApp.
To know how to mark a LeadSquared lead field as unique, please refer to How to Make a Custom Field Unique. |
| Lead Capture Secondary Search By Criteria | If lead capture through the primary Search By criteria fails, it will be re-attempted using the secondary Search By criteria. |
| Select User to Notify on Failure | If there is an error in fetching leads, the selected user will receive a failure message via email. You can select a user from the list of all the users available in your LeadSquared account.
To know more about the type of errors, please refer to Error Notifications. |
| Enable Notification | Enable the |
Once you’re done entering all the details, click Save & Next.
5.2 Entity Options
Define the sync behavior of the connector when leads are captured.
5.2.1 Lead/Contact Entity
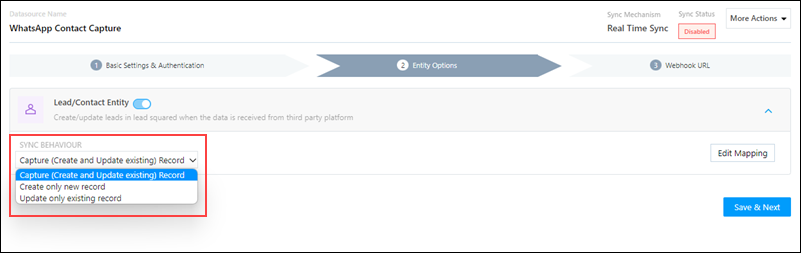
Based on the Lead Capture Search By criteria selected (email Id, phone number, etc.), LeadSquared identifies and captures leads from your WhatsApp Business account. Lead capture is enabled by default, and it cannot be disabled. The following options are available to configure the connector’s Sync Behaviour –
- Capture (Create and Update existing) Record – Leads that only exist in your WhatsApp Business account (but not in your LeadSquared account) will get created in LeadSquared. Leads that exist in both your WhatsApp Business and LeadSquared accounts will get updated.
- Create only new record – Leads that only exist in your WhatsApp Business account (but not in your LeadSquared account) will get created in LeadSquared.
- Update only existing record – Leads that exist in both your WhatsApp Business and LeadSquared accounts will get updated in LeadSquared.
5.2.2 Mapping
On the Mapping screen, the WhatsApp Contact Capture system fields mapped to the corresponding LeadSquared lead fields are visible. This mapping is carried out by default. If required, you can change or update the default field mapping.
- To provide a default value for any field, click
 , enter the value under Default Value, and click
  .
.
- If the data provider doesn’t send data for any lead field, then the default value will get assigned to that specific field. But if the field already has an existing value, then the default value will be ignored.
- To disable lead data capture for any field, disable the
 slider.
 - You can also mark and update a unique lead field as the search key from this screen, by clicking
 .
. - To create a custom WhatsApp Contact Capture field, click the Add Custom button.
- Once this field is created, you must map it to the relevant LeadSquared lead field.
- After the field is mapped, to save the custom field, click .
- To delete a custom field, click
 .
.
Once you’re done mapping, click Save & Next.
5.3 Webhook URL
After you provide basic details and finish field mapping, a custom webhook URL is generated. To automate lead capture, copy this URL and configure it in your WhatsApp service provider’s account (reach out to the account manager from your service provider’s end).
After you’ve configured the URL, click More Actions, and enable the sync job. This ensures the data will be pushed to LeadSquared using the webhook configured in your WhatsApp service provider’s account.
Note:
- To know how to configure this Webhook URL in your WhatsApp Business account, please get in touch with your WhatsApp service provider’s account manager.
- From the More Actions dropdown, click View Logs to view the logs of all sync jobs that have taken place.
To know more, refer to the setup instructions –
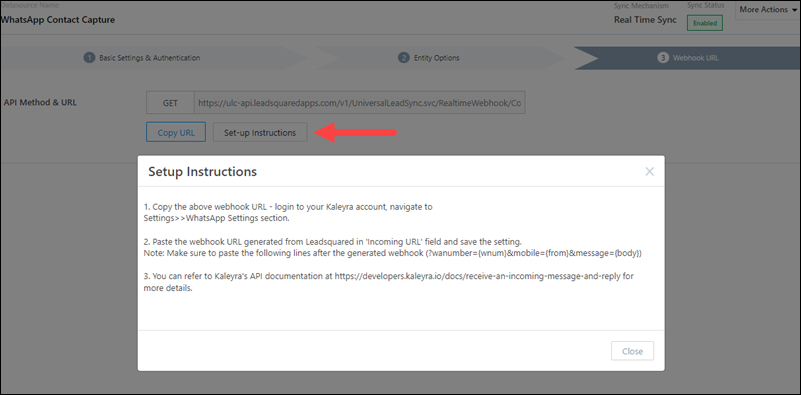
Note: Paste and pass the following parameters at the end of the webhook –
(?wanumber={wnum}&mobile={from}&message={body})
6. View Logs
Here, view logs of all the sync jobs that have taken place. View New Events (New Leads) Updated Events (Updated Leads), and Errors (when capturing leads).
- Navigate to Apps>Whatsapp Contact Capture.
- From the More Actions dropdown, click View Logs.
- You can filter the logs by selecting a date range (Today, Last 7 Days, This Month, and Last Month), by selecting the Job Status (“All”, “Success” and “Failure”), and by selecting the Sync Status (All, Error, and Success).
- You can view the sync status of the following events –
- New Events – List of all the new leads that have been created in LeadSquared during the selected date range.
- Updated Events – A list of all the –
- Duplicate leads that were created with the same Search by Criteria value (e.g., with the same Email Id, Mobile Number, etc.).
- Leads that previously contained errors, which were fixed and synced successfully.
- Errors – The list of leads that have not been captured due to mapping errors (e.g., when a boolean field is mapped to an integer field, etc.).
- To view the Sync Response details, under Request ID/Sync Job ID, click the Id.
- Under the right panel, you can view the response status, the API URL, the request, and the response.
- The responses that are successful will contain the details of the leads that have been pushed by WhatsApp.
- You can also view the lead capture response under Sync API Response, Leads Updated and Errors in Leads, by clicking
 .
.
7. Other Actions
You can edit or delete the WhatsApp Contact Capture connector instance that you created. To do this –
- Navigate to Apps>App Marketplace.
- Search for WhatsApp Contact Capture.
- Alongside the WhatsApp Contact Capture connector, hover your cursor over .
- From the list of options, you can perform the following actions –
- Edit Configuration
- Disable Configuration
- Remove Configuration
8. View Reports
You can view the total number of leads that have been pushed by WhatsApp, by referring to the Lead Source report. To know more, please refer to How to track the source of your Leads using Lead Source Report?
Any Questions?
Did you find this article helpful? Please let us know any feedback you may have in the comments section below. We’d love to hear from you and help you out!