


Get Started
Sales Suite
Field Ops
Marketing
Service CRM
Integrations & Apps
FloStack
Mobile App Additional Settings
Feature Overview
You can configure the mobile app at a granular level for your sales users through the Mobile App Additional Settings. To access the settings, from the LeadSquared web app, navigate to My Profile>Settings>Mobile App>Additional Settings.
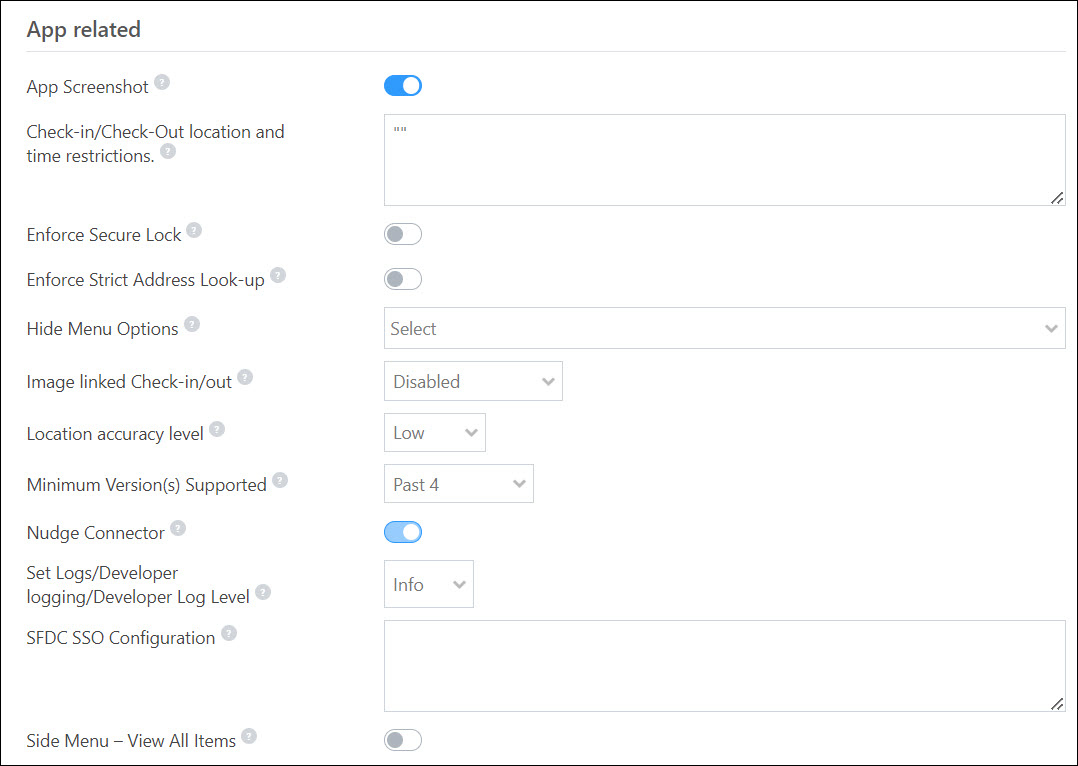
App Related
| Setting | Description |
| App Screenshot | Enable the |
| Check In and Out Entity Level | Pass a JSON here to enable check-in and check-out at the entity level. To know more, refer to Lead/Opportunity Level Check-in and Check-out. |
| Check-in/Check-Out location and time restrictions. | Pass a JSON here to restrict users from checking in/checking out on the mobile app based on the time and location preferences. |
| Default Dashboard | You can switch between the Casa and Analytics dashboards on the mobile app homepage. Through this setting, select which dashboard should open first on the screen. |
| Enforce Secure Lock | This will lock the LeadSquared mobile app, and whenever the app is launched, it can be unlocked only from the device level (e.g., through fingerprint unlock, mobile pin code unlock, face recognition, etc.). This will add an additional layer of security to the mobile app, by ensuring only the mobile device owner can view data inside LeadSquared. Additionally, a secure screen is introduced that prevents sensitive app content from being visible while using multiple apps simultaneously.
Once enabled, if the app is unlocked but it remains in the background for 15-minutes, the app is automatically locked. Note: The app lock depends on the device’s security settings. If device-level authentication (e.g., PIN, fingerprint, or face ID) is not enabled, the app cannot enforce this lock. Both device-level and app-level settings must be enabled for this feature to work properly. |
| Enforce Strict Address Look-up | Enable the |
| Hide Menu Options | Enter the menu options to be hidden from the Settings menu. |
| Image linked Check-in/out | Enable this setting to make it mandatory for users to capture a photo of themselves during the check-in/out process. You can choose to enable this setting for –
Set the Location Tracking Accuracy as V2-High for this feature to work. |
| Location accuracy level | Select the accuracy level (low, medium, or high) of the location fetched. By default, this level will be set to low. With higher accuracy levels, battery consumption also increases. |
| Minimum Version(s) Supported | From the dropdown, configure the LeadSquared mobile app update frequency for your users –
|
| Nudge Connector | If the Nudges Connector is installed and configured in your account, this slider will be enabled by default. The slider cannot be enabled or disabled from this screen. To enable the Nudges Connector, reach out to your account manager, or write to support@leadsquared.com. |
| SFDC SSO Configuration | Pass a JSON in a defined format here to configure SFDC SSO within mobile. |
| Side Menu – View All Items | Enable the |
Attachments
| Setting | Description |
| Images Compression | By default, the image compression setting is set to “High”. You can change this using the following –
|
| Restrict file upload | Restrict your users from attaching files through the “Attach/Browse file” options present under the Attachment and File type fields. For e.g., during a lead’s KYC verification, this setting ensures your field users capture the lead’s photo, rather than attaching and uploading photos shared with them by the lead.
The following options can be set –
*If the Restrict file upload Mobile App Setting is set to Across App, you can override this setting for specific CFS fields, and allow your users to upload files to this CFS. This will ensure your users can’t upload files to any location inside the LeadSquared application, except for the CFS field for which this setting is enabled. To do this, when creating or editing a Custom Field Set, enable the Override ‘Restrict file upload’ mobile setting. |

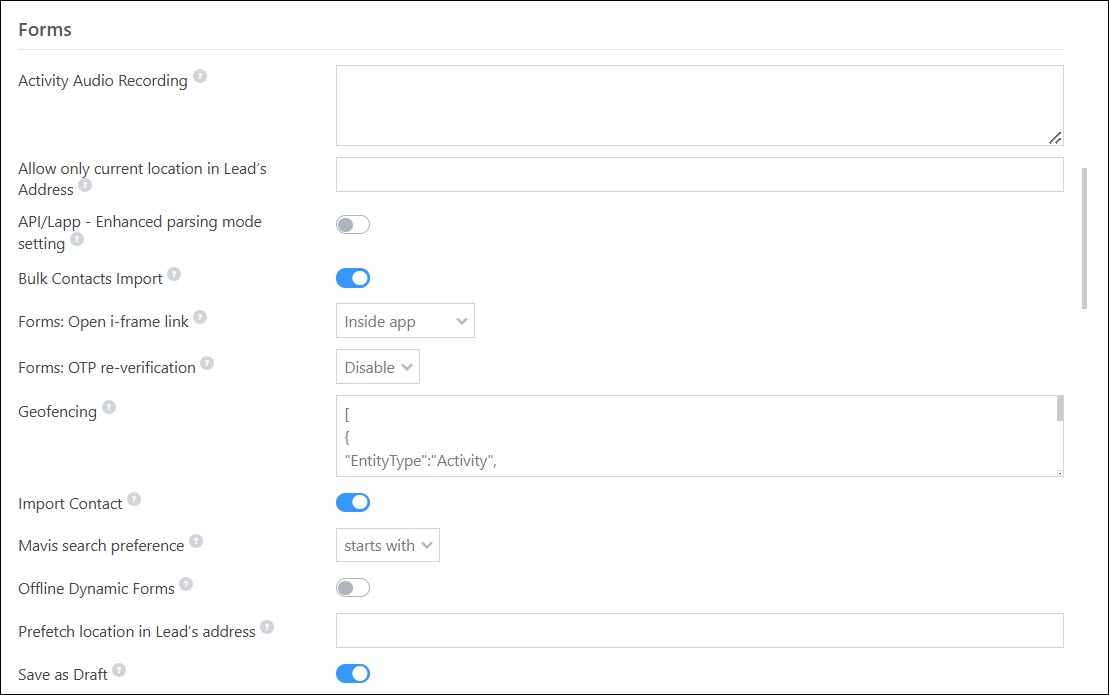
Forms
| Setting | Description |
| Activity Audio Recording | Pass a JSON here to record the audio of face-to-face meetings through the LeadSquared mobile app. To know more, please refer to Audio Recording for F2F Meetings. |
| Allow only current location in Lead’s Address | This is a form level setting. When enabled, the user can fetch their current location and populate the lead’s Address. Users will not be able to manually edit any of these Address fields. To enable this feature, enter the relevant comma-separated Form IDs. |
| Bulk Contacts Import | Enable the
|
| Forms: Open i-frame link | From your LeadSquared app, you can open i-Frame links –
|
| Forms: OTP re-verification | Enable multiple OTP verifications in the Email and Phone fields of a form. This will be required every time a user submits a form. |
| Geofencing | To ensure your field sales users can post custom activities only when they are in the lead’s vicinity, refer to LeadSquared Geofencing. |
| Import Contact | Enable the |
| Mavis search preference | Admins can define the search preference for Mavis dropdown fields within the dynamic form. Contains setting retrieves all options that contain the entered text. Starts With setting retrieves all options that begin with the entered text. |
| Prefetch location in Lead’s address | When enabled, the Address 1 Lead Field in a form will be auto-populated with the user’s current location. To enable this feature, enter the relevant comma-separated Form IDs. |
| Save As Draft | When enabled, the incomplete forms will be saved as drafts in the app. A maximum of 25 drafts can be saved at a time. |
| Set current location in lead address | This is a tenant level setting. When enabled, the user’s current location is fetched and auto-populated as the lead’s Address. Users will not be able to manually edit any of these Address fields. This is to ensure users physically visit leads while adding them to LeadSquared. |
| Text Recognition | By default, you can use the mobile app to capture text from images. To disable this feature across the mobile app, enable Text Recognition. |
| Work Area Validation | By passing a JSON, you can restrict your users from performing all actions (such as Add Leads, Update Tasks, etc.) on the LeadSquared mobile app. For e.g., you can restrict your users from performing actions until they have completed their training, until their background verification check is complete, etc. Access will be restricted based on the value of a Custom User Field. For e.g., you can enable access only when the value of the ‘Training Status’ custom field is ‘Completed’. To enable this feature on your account, reach out to your account manager, or write to support@leadsquared.com.By passing a JSON, you can customize the message that is displayed on the Mandatory Check-in popup in the mobile app.Sample JSON {
“workAreaValidationMethods”: [
{
“method”: “Checkin”,
“forceCheckin” : “true”,
“forceCheckinMessage” : “”
}
]
}
|
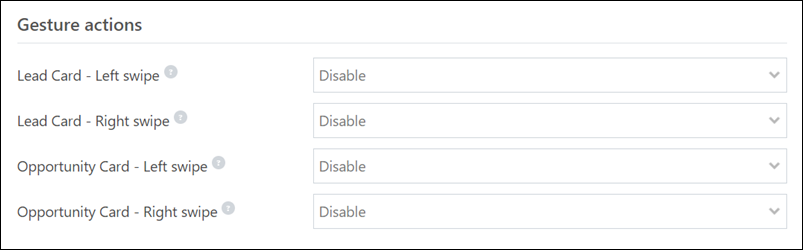
Gesture Actions
| Setting | Description |
| Lead Card – Left Swipe | Configure the Lead Card to perform any one of the following actions when the card is swiped left –
|
| Lead Card – Right Swipe | Configure the Lead Card to perform any one of the following actions when the card is swiped right –
|
| Opportunity Card – Left Swipe | Configure the Opportunity Card to perform any one of the following actions when the card is swiped left –
|
| Opportunity Card – Right Swipe | Configure the Opportunity Card to perform any one of the following actions when the card is swiped right –
|
Lead
| Setting | Description |
| Hide Lead Age | Enable this setting to hide the lead’s age on the Lead Card. |

Location
| Setting | Description |
| Location Tracking Accuracy | Configure this setting to set the accuracy of the location tracking feature on Mobile App. Keep in mind that as you increase the location tracking accuracy, the users’ battery consumption will also increase. |
![]()
Near Me
| Setting | Description |
| Explore – Google Key | Enter your Google Map API Key to fetch and display businesses near you when using the Explore – Near Me feature. |
| Explore – Keywords | Enter keywords denoting businesses (e.g., Supermarkets, Hospitals, Gyms, etc.) you want to show by default when using the Explore – Near Me feature. |
| Explore – Suggestive Search | Enable this setting to display suggestions when using the Explore – Near Me search bar. For e.g., when users type “Hos”, the search results will show a list of all the places that contain the words “Hos” in their title, like Hosmat Hospital, Manipal Hospital, etc. |
| Geo Alerts | Enable this setting to receive notifications about leads located near the user. Each notification will provide users with relevant details about nearby leads, such as the lead’s name and location. They can also take actions like calling the lead or navigating to their location using Google Maps directly from the notification. To use this feature,
Once enabled,
|
| Lead – Custom Filter | Once enabled, filter leads on ‘Near Me’ based on any system or custom dropdown field, including searchable dropdowns, large option sets, multi-select dropdowns, dropdowns with others.
You can select a maximum of 5 options. |
| Lead – Switch to V2 | Before you enable the Lead – Custom Filter setting, enable Lead – Switch to V2. |
| Near Me – Measurement Units | From the dropdown, select the relevant option to display the Near Me radius either in Kilometers, Meters or Miles, Yards. |

Opportunity
| Setting | Description |
| Opportunity Custom Filter | Admins can define exactly which fields should be shown in the opportunity list filter for each opportunity type. 4 custom fields can be added alongside 6 default ones (Owner, Status, Stage, Product, Date Range, Lead Stage). Filters within the Opportunity Tab in the Lead Details page will also reflect based on the opportunity type. If no type is selected, the default filter options will continue to apply. Filters will remain applied until you logout of the app. |
| Opportunity Call Tracking | When enabled, outbound calls placed from the following pages will be tracked as activities on the opportunity instead of the lead –
For inbound calls, users will be given an option to track the activity on the lead or opportunity. |

Search
| Setting | Description |
| Lead Partial Search | When enabled, on the On Lead Lists and Lead Smart Views, you can search for leads using partial keywords. For example, if you search for “Mar”, leads with the names “Marcus”, “Mark”, “Marianne”, etc., will show up in the search results. |
| Search Preference | Use the following options to define the Lead and Account search behaviour across the mobile app –
|

Note:
- If the swipe action is customized for one side only (left or right), it will be disabled for the other side (the default actions will not be displayed on the other side).
- Enable the Location Tracking on LeadSquared Mobile feature is enabled on your account before you pass the Geofencing JSON.
- Users will not be able to post Geofenced activities on a lead that does not have a location.
- Your users must have an active internet connection for the Geofencing feature to work.
Tasks
| Setting | Description |
| Task Completion | Enter the relevant JSON to complete tasks on the LeadSquared Mobile App even when your users are not connected to the internet. They can mark tasks as Completed in offline mode, fill out associated completion forms, and continue working without interruption. |

Any Questions?
Did you find this article helpful? Please let us know any feedback you may have in the comments section below. We’d love to hear from you and help you out!
Hey, how do we capture the check in, check out location via mobile app? Is it only possible if location insights feature is enabled?
Hi, Sakhet.
If you’re talking about configuring Check-in and Check-out, here’s how you can do it. Note that you must be an administrator user to configure this feature.
1. Navigate to My Account>Settings>Users and Permissions>User Availability>User Check-In.
2. Click the slider alongside ‘User Check-In’.
3. Next, click the Configure button.
You can configure the feature either at the roles or groups level. To learn more, see User Management Features: Check-In and Check-out.
If you’re talking about accessing the check-in/check-out location information of your users, you can navigate to Reports and find it from the Check-in Check-out History and User Attendance Analysis Reports.
Details Customization is not added in this page
Hello, Amit.
The Details Customization setting is only available for customers who have the latest version of the mobile app enabled. If you do, you’ll find the tab under the Mobile App setting. Keep in mind that this setting is to customize the lead details view only on the mobile app. If you wish to customize this view on the web app, refer to Customize the Lead Details Page/View.
Please make another article on Geofencing.
Hi, thanks for bringing this to our attention. Hope this helps – LeadSquared’s Geofencing.