


Get Started
Sales Suite
Field Ops
Marketing
Service CRM
Integrations & Apps
FloStack
Limit the Number of Leads Assigned to a User – Lead Assignment Quotas
1. Feature Overview
The Lead Assignment Quota feature gives you granular control over lead distribution. You can set limits on the number of leads that can be assigned to users based on quotas defined at the user role level (such as Sales User, etc.), or individual user level. This will help prevent overburdening your users with too many leads, based on the following criteria –
- Role Level – You can set quotas based on the user role (such as Sales User, Sales Manager, etc.).
- User Level – You can set quotas for individual users in your organization (such as for users John, Paul, George and Ringo).
- Duration – You can set quotas based on daily or weekly durations (such as assigning 5 leads to all users daily, 20 leads to all users weekly, 100 leads to all users monthly, etc.).
This article details how you can configure lead assignment quotas across daily, weekly and monthly cycles at the Role level or User level.
- For the Role level, all you need to do is configure the Lead Assignment Quota, and it will be applicable across the selected user role in your account. No additional configuration is required when you set up the lead distribution automation. This quota will apply to manual lead distributions (for e.g., if a manager assigns leads to a user) and to lead distributions set up via automation (using the lead distribution automation card).
- For the User level assignment, once you’ve set up the assignment quotas, you’ll have to configure the ‘Distribute Lead’ card of an Automation to execute the lead assignment quotas defined on the Settings page.
2. How it Works
First, configure the Lead Assignment Quota settings. You can set up quotas on both Role-level and User-level –
- For Role-level lead assignment, once you configure the Lead Assignment Quota settings, no further steps are required while setting up the lead distribution automation. Once the settings are saved, it’s applied to the selected Role level across your organization.
- For User-level lead assignment, when you set up an automation using the Distribute Lead card, select a relevant quota you configured in the previous step. Once you’ve selected the quota, configure whether the lead assignment quota should apply to daily, weekly, or monthly cycles. Once this is done, Publish the automation. Your users will start receiving leads according to the quotas you’ve defined.
3. Configure Lead Assignment Quotas
You can configure the Lead Assignment Quota on the Role Level (such as Sales User, Sales Manager, etc.) and User Level (such as assign leads to users John, Paul, George, and Ringo).
To enable this feature –
- Navigate My Account>Settings>Users and Permissions>Lead Assignment Quota.
- Click the Enable Lead Assignment Quota slider.
3.1 Configure Role level Lead Assignment Quota
Here, you can configure lead assignment quotas based on different user roles (Sales Users, Sales Managers, Marketing Users and Admins) in your organization. This is useful when you want to assign a maximum number of leads uniformly to a specific user role.
For e.g., if you configure this quota to assign only 50 leads to Sales Users per day, from the total leads captured in a day, a maximum of 50 leads will be assigned to each sales user.
This quota will not affect lead distribution among the non-sales users (such as Admins, Marketing Users) in the organization.
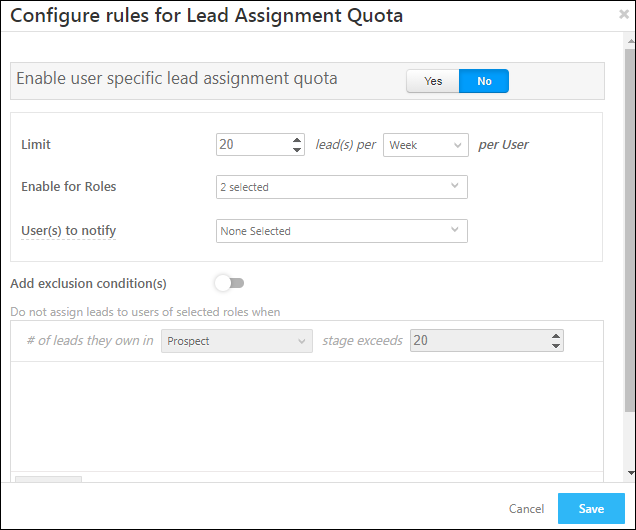
On the Configure rules for Lead Assignment Quota pop-up, against Enable user-specific lead assignment quota enter, select No. Then, enter the following details –
| Configuration | Description |
| Limit | Set a limit on the number of leads you want to assign to a user role across daily, weekly or monthly cycles. |
| Enable for Roles | Enable lead assignment limits for user roles. |
| Users to Notify | Notify users when the quota is reached. The ‘User’s Manager’ is selected based on the value you provide in the ‘Reporting To’ field of the user’s profile. |
| Add Exclusion Conditions | Prevent leads from being assigned to users when they already have a specific number of leads in a particular lead stage. This ensures users aren’t overwhelmed and allows them to concentrate on leads in critical stages.
For e.g., if you configure the stage to ‘Prospect’ and leads to ’20’, users that have more than 20 leads in the prospect stage won’t get assigned new leads. |
Once you’re done, click Save.
3.2 Configure User specific Lead Assignment Quota
Here, you can configure lead assignment quotas for specific users in your organization. These users can have different user roles. This is useful when you want to assign different number of leads to different users.
For e.g., let’s look at an organization that has five users – John, Paul, George, Ringo, and Yoko. John, Paul, and Yoko are Sales Users, while George and Ringo are Admins. If the company wants to assign 5 leads to John, Yoko, and Ringo, and 3 leads to Paul and George, they can achieve this through User specific Lead Assignment Quota. The organization can further define quotas for different durations (daily, weekly, monthly) for each individual user.
On the Configure rules for Lead Assignment Quota pop-up, against Enable user-specific lead assignment quota, select Yes. In the configuration, you must use a custom user field with the data-type as Number. This field will contain the lead assignment quota (which is 5 and 3 in the example given above) for each user.
Enter the following details –
| Configuration | Description |
| Configuration Key | The name of the configuration which will help you distinguish the configurations on the Distribute Lead card automation. This field is non-editable. |
| Configuration Value | All the custom number-type user fields you’ve created will show up in this dropdown. From the list of fields, select the relevant field you created to assign leads to the user. |
| Default Value | Enter the number of leads you want to assign to your users by default.*
This is useful when the custom number-type user field is blank for a particular user. In this instance, the default value will get assigned to the user. But if the field already has an existing value, then the default value will be ignored. |
| Add | To add additional configurations, click Add. You can add up to 10 configurations in total. |
| Add Exclusion Conditions | Prevent leads from being assigned to users when they already have a specific number of leads in a particular lead stage. This ensures users aren’t overwhelmed and allows them to concentrate on leads in critical stages.
For e.g., if you configure the stage to ‘Prospect’ and leads to ’20’, users that have more than 20 leads in the prospect stage won’t get assigned new leads. |
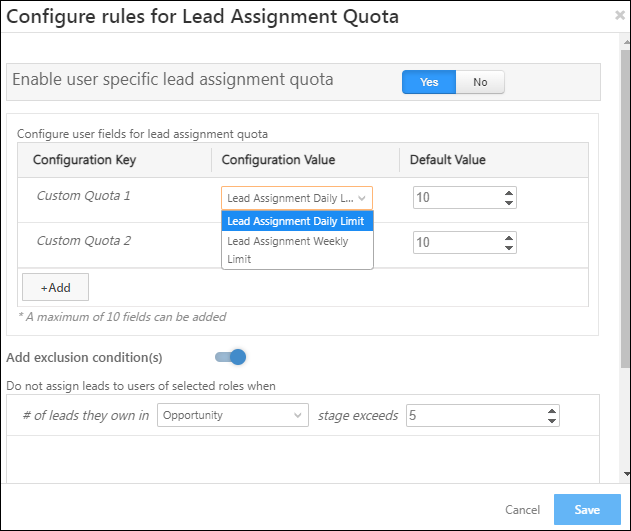
Once you’re done, click Save.
Note:
- The assignment quota limit for users will apply across all automations, where the Customize Lead Quota at User Level setting is enabled on the Distribute Lead card.
- *To assign the lead distribution value for each of your users, navigate to the Manage Users page, and edit the custom user number-type field you selected from the Configuration Value dropdown. For e.g., for the user John, if we edit the Lead Assignment Daily Limit user field (which we created), and set the value to 5, then a maximum of 5 leads will get assigned to John.
4. Configure Lead Distribution Automation
Once you’ve configured User specific Lead Assignment Quotas, you’ll have to set up an automation, with the Distribute Lead card. On this card, select the User level quota you created in the previous step, and Publish the automation.
- Navigate to Workflow>Automation, and click Create Automation, and from the list of available triggers, select any trigger.
- After selecting a trigger, click Sales Execution, and then click Distribute Lead.
- Enter a rule name in the space provided and then click the Choose conditions(s) link, and add relevant conditions.
- On the Distribute Lead pop-up, from the Assign Leads To dropdown, select Users, and click Choose users and assignment order.
- Alternatively, you can select Groups or User Properties from the dropdown. All three options are equally valid.
- On the Select Users pop-up, from the Users column, select the list of users you want to apply the assignment quota to. Once you’re done, click Save.
- Under Availability Status, you can choose to distribute leads to –
- All – When selected, leads will be distributed to all the users you’ve selected, irrespective of whether they’re online (checked-in) or offline.
- Available – When selected, from the list of users you’ve selected, leads will only be distributed to the users who are online.
- Under Availability Status, you can choose to distribute leads to –
- Then, alongside Customize Lead quota at user level, enable the
 checkbox.
 - Alongside the cycle duration on which you want to set up lead distribution, from the dropdown, select a relevant custom quota (which you created in the previous step). Based on this quota, and based on the lead distribution cycle you’ve selected, leads will get assigned to the selected users.
- Daily Limit – The quota you’ve configured will be applied to daily lead distribution. For e.g., if the quota is set to 5 leads, then a maximum of 5 leads will be assigned daily to each of the selected users.
- Weekly Limit – The quota you’ve configured will be applied to weekly lead distribution. For e.g., if the quota is set to 20 leads, then a maximum of 20 leads will be assigned weekly to each of the selected users.
- Monthly Limit – The quota you’ve configured will be applied to monthly lead distribution. For e.g., if the quota is set to 80 leads, then a maximum of 80 leads will be assigned monthly to each of the selected users.
- Set Default Rule – When a lead doesn’t satisfy the rules you’ve set, select a default user to whom the lead should be assigned.
- Evaluate on latest data – When enabled, the automation will consider the latest data available in your account at the time of triggering.
- Once you’re done, click Save.
Note:
- The definitions for a
- Day is from 12 AM to 11:59 PM.
- Week is from Monday to Friday.
- Month is from the month’s first calendar day to the last calendar day.
- Zipcode or Pincode based lead distribution among users cannot be carried out. To do that, please refer to Zip Based Lead Distribution.
5. FAQs
- For a User-level lead distribution, can the lead assignment quota for a user get exceeded? Like, if the Lead Assignment Quota is set to 5, can the user get 12 leads assigned to him?
Yes, this is possible. If the lead is assigned to the user manually, or through other automations where the Customize Lead Quota at User Level setting is disabled on the Distribute Lead card, or through APIs.
- Why are leads not getting assigned to the selected user (based on the User-level), even though the number of leads assigned through the Lead Distribution automation is less than the maximum limit configured on the custom number-type user field?
Leads that are assigned manually, or through other automations, are also counted under the quota limit you’ve set on the custom number-type user field. For e.g., if you’ve set the limit to 15 leads, and a user gets 10 leads assigned manually by his manager, and 5 leads through the Lead Distribution automation you’ve configured (where the Customize Lead Quota at User Level setting is enabled), the system would consider that the limit you’ve configured has been reached. No new leads will be assigned to the user within the assignment cycle.
Any Questions?
Did you find this article helpful? Please let us know any feedback you may have in the comments section below. We’d love to hear from you and help you out!