Get Started
Sales Suite
Field Ops
Marketing
Service CRM
Integrations & Apps
FloStack
Zip Based Lead Distribution
The zip based lead distribution app lets you automatically assign leads, custom activities and tasks to users based on zip code. The app comes pre-built with powerful features such as round-robin lead/task/activity distribution and radial search*.
* If the mapping isn’t found for a particular user you’re trying to assign a lead to, a radial search is performed and the user within the next closest zip code will be assigned the lead. This functionality is enabled for the Indian region by default. If you want it enabled for your region, please contact support@leadsquared.com.
This article takes you through –
- Installing and configuring the zip-based lead and activity distribution app.
- Implementing the application in your workflow through –
- Webhooks
- Rules
- Automation
Note: If you’re new to the lead distribution feature we highly recommend you first understand the best way to distribute leads to your users.
Example Use Case
Here are just a few examples of what you can achieve through zip-based distribution –
- Automatically assign all leads from different zip codes to region-specific sales teams.
- Assign custom activities for India leads to your field sales users across the country.
- Distribute tasks for North India leads to your telephony agents in the northern region.
All examples assume that you’re storing zip code data in a lead/activity/task field, that you’ve correctly configured the app and uploaded a CSV file to map zip codes to users.
Requirements
- You have to be the administrator to access the app settings.
- You will have to upload excel files (CSV format) which maps zip codes to LeadSquared user email addresses.
- Add relevant webhooks, rules or create an automation to implement zip distribution.
The LeadSquared Zip Based Distribution App is a licensed feature. It may not be available under your plan. Please contact support@leadsquared.com if you are unable to find it.
Setup
Setting up the app involves –
- Installation
- Profile Configuration*
- Uploading a CSV
- Copying the webhook URL to use it in rules, automation, webhooks
*You can set up zip based distribution on a lead field, activity field or task field (where you’re storing zip codes). If you want to set up distributions based on activity zip fields or task zip fields, we recommend you create a new profile for each.
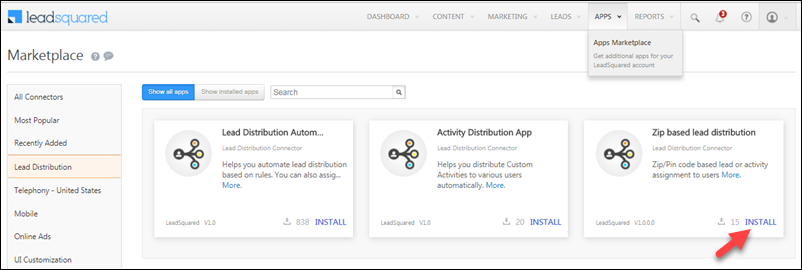
Install the app
Navigate to Apps>App Marketplace>Lead Distribution (on the left panel)>Select the zip based distribution app and click Install.
Profile Configuration
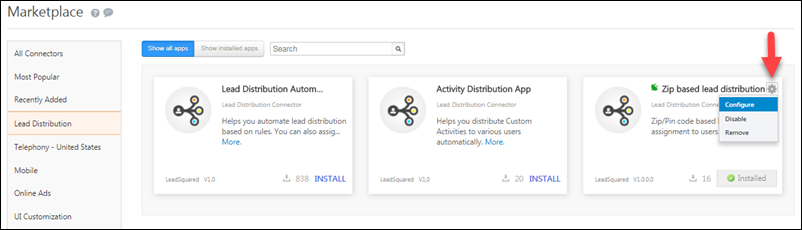
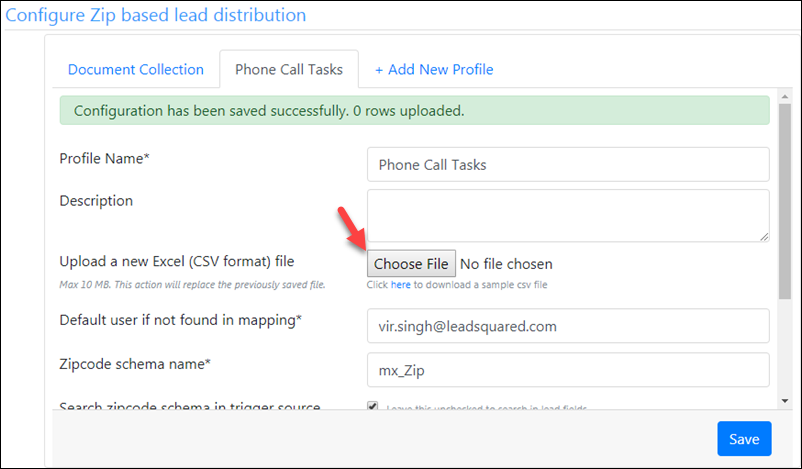
Once the app is installed, hover the mouse over the settings ![]() wheel and click Configure.
wheel and click Configure.
You can create multiple profiles and upload a CSV file for each profile. You may want to have separate profiles for different tasks or different activities. For example, you could create a separate profile for document collection activities where you distribute leads to on-field users, and a separate profile for phone call tasks where you distribute leads to your call centre agents.
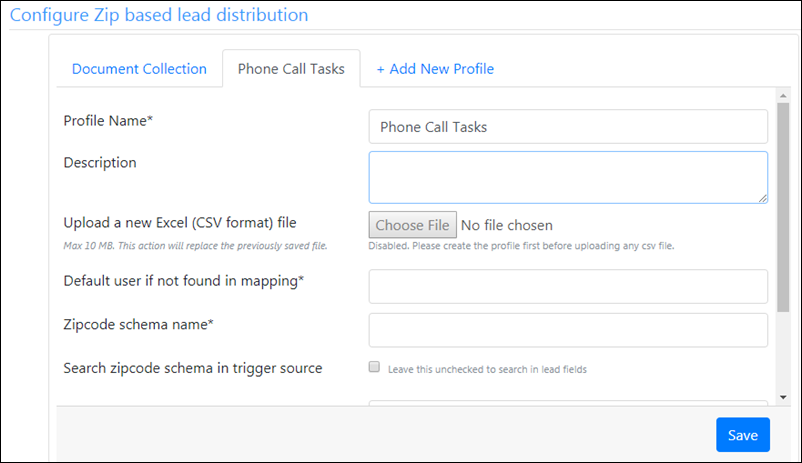
Enter all the mandatory (*) fields and then click Save to proceed to the next step (uploading the CSV file).
| Field | Description |
| Profile Name* | Enter a name for your profile. Ensure that the name clearly describes the purpose of the profile to avoid confusion later (while setting up the trigger through automation, rules, etc.). For example, “Document Collection Tasks”, “Phone Call Tasks”, etc. |
| Description | Elaborate on the purpose of the profile. For example “To collect documents for the KYC process”. |
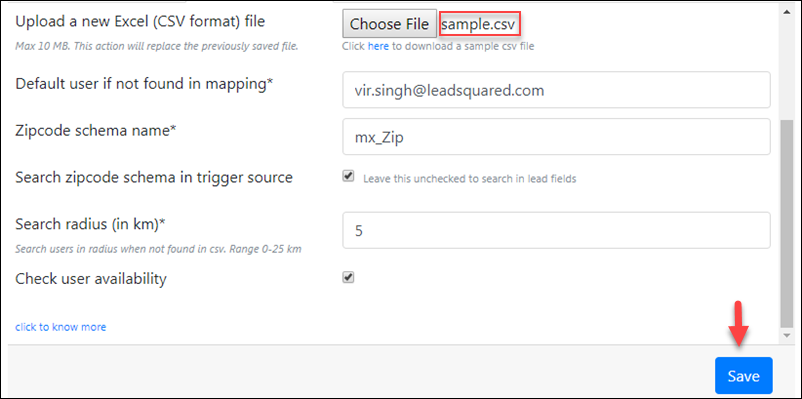
| Upload a new Excel (CSV format) file | The Choose File option will remain greyed out until you enter all mandatory fields, click Save and create the profile. Once enabled, you can browse and upload a CSV file from your computer. |
| Default user if not found in mapping* | Enter the email address of the default user. If a user’s email address specified in your CSV file doesn’t match a user in your LeadSquared account, leads will be distributed to the default user you specify here. |
| Zipcode schema name* | Enter the schema name of the zip code field. You can enter the schema name of a corresponding lead, activity or task field depending on whether you want to distribute leads based on the lead’s zip code, the zip code of a custom activity or the zip code of a task. |
| Search zipcode schema in trigger source | If you want to distribute leads based on the zip code of a custom activity or a task, enable this checkbox. If you don’t enable this checkbox, the system will assume that the schema name you entered was for a lead field.
Note: We do not validate the schema_name while saving the configuration. Ensure that you input it correctly with proper casing. For example, mx_Custom_1 should not be entered as mx_custom_1. |
| Search radius (in km)* | When a zip code in your CSV file isn’t supported, the system will search for users located in the geographically closest zip code within the radius you define here.
For example, for the zip code 110001, if you specify a 5 km radius, here are the closest zip codes in ascending order –
If the radius specified here is exhausted, the lead/activity/task will be assigned to the default user. Note: Only integers are accepted and the maximum value is 30 km. |
| Check user availability | If you check this option, leads/tasks/activities will only be distributed to users who are available. The user availability check is based on the workday template configured for the current day. |
Upload a CSV file
Once you’ve entered all the mandatory fields and saved a profile, the Choose File option will be enabled. You can now upload a CSV file to map zip codes with the email addresses of users you want leads/tasks/activities distributed to –
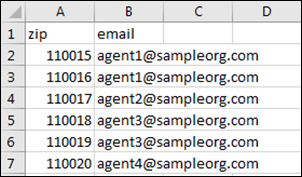
Note: Download the sample CSV to understand the format. Ensure that the column headings are exactly the same as shown in sample CSV.
The CSV file you upload should follow the sample format shown below. This file will be used to map zip codes with the email addresses of your LeadSquared users. Be sure to enter the correct email addresses of your users.
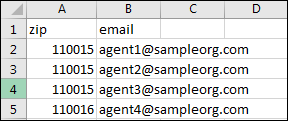
Note: If you want to assign the same zip code to multiple users, add the same zip in multiple rows with the user’s email addresses alongside. These users will be assigned the leads in round-robin fashion automatically.
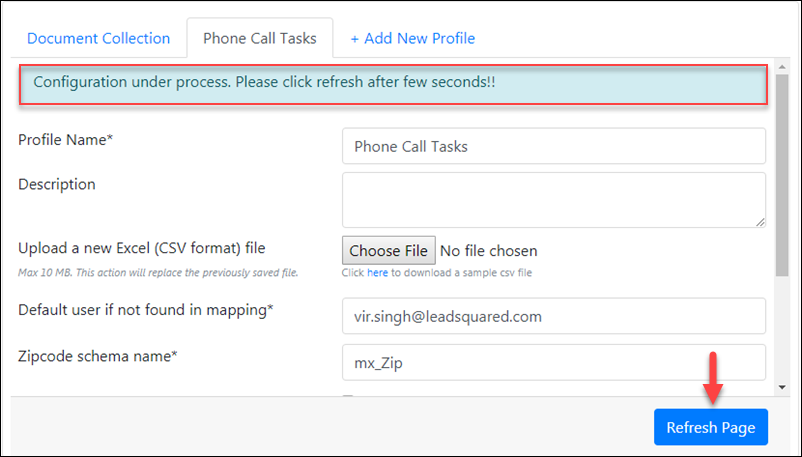
Once you’ve uploaded the CSV file it will show up on the pop-up as highlighted below. Click Save to continue.
Wait for a few seconds after saving your file, then click the Refresh Page button.
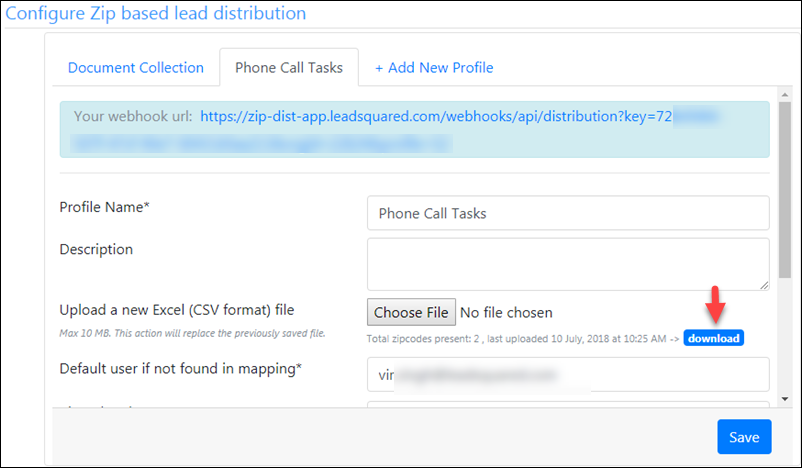
Your configuration will now be successfully applied. You can click the link highlighted below to view the file you just uploaded.
Note:
- Every time you upload a new CSV file, the previous file gets replaced. So if you want to add more zip codes and email addresses to the CSV file we recommend that you click the link (shown above) to first download the previous CSV file, add the new zip codes and email addresses to the downloaded file and then re-upload it to avoid losing the previous data.
- If a user in your CSV file is de-activated, the mapping for that user gets removed. If you activate the user again in future, you’ll have to re-upload the CSV file with the mapping of the de-activated user.
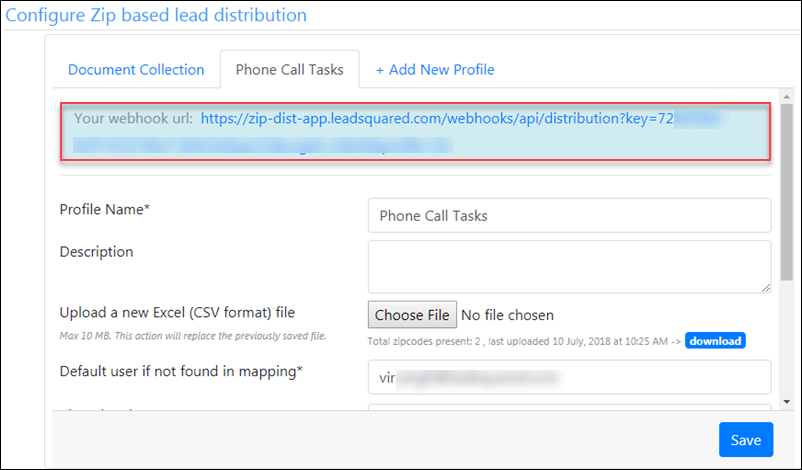
Copy the webhook URL
Once your file is successfully uploaded and saved, your webhook URL will become visible. Click to copy the webhook URL. You can now use it to trigger the zip code based lead or custom activity distribution in 3 different ways:
1. Setup webhooks
2. Setup rules
3. Setup an automation
Use the app in your workflow
Once you’ve copied the webhook URL from the zip based distribution app, it’s time to integrate it into your workflow by setting up a trigger.
Setup Webhooks
Webhooks can be set up to trigger zip-based distribution on the following events –
- Lead Create
- Lead Field Value Change (Zip field)
Every time a lead creation or lead field value change (zip field) event occurs, the zip based distribution will trigger. If you want to distribute leads that already exist on your LeadSquared account, you will have to update the zip code lead field.
The following example takes you through setting up a webhook for lead creation events. For more information, see LeadSquared Webhooks.
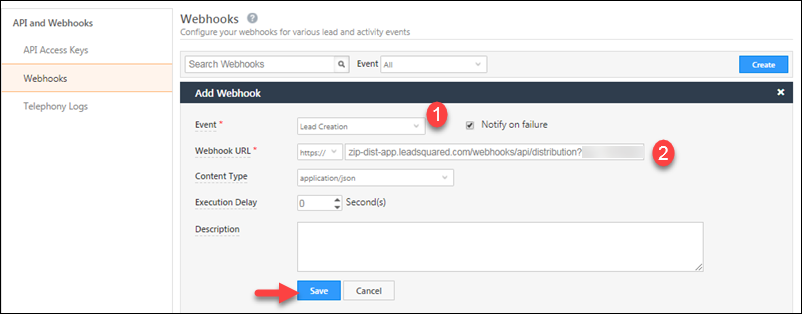
Navigate to Settings>API and Webhooks>Webhooks, and click Create.
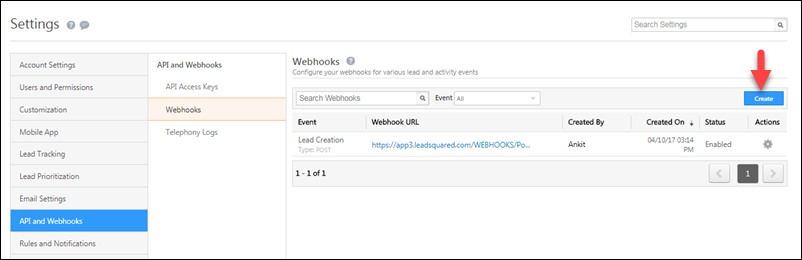
In the Add Webhook section, use the Event drop-down to select either the Lead Creation or Lead Field Value Change event. Next, paste your webhook URL, select the format you want the data posted in (optional), set an execution delay (optional) and enter a description (optional). Click Save to continue.
Setup Rules
You can configure rules to trigger zip-based distribution on the following events –
- Lead Create
- Lead Update
- Activity Create
- Activity Update
- Task Create
- Task Complete
This example takes you through setting up a rule for the custom activity create event. For more information on setting up rules, see LeadSquared Rules and Notifications.
Navigate to Settings>Rules and Notifications, then click Create.

Now select the event as lead create, lead update, activity create, activity update, task create or task complete. Then select the specific lead field (in case of lead update) or specific custom activity (in case of activity creation or activity update). Click Set Conditions to continue.
Note: Even though all activities show up on the select activity drop-down, be sure to select only custom activities. The rule you setup will not work for system activities.

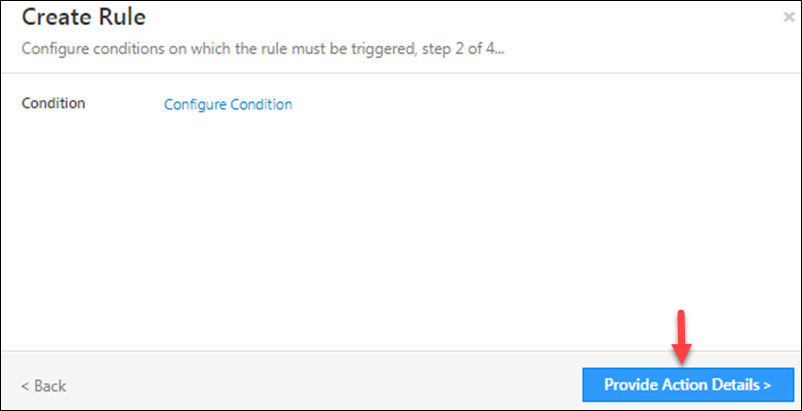
You can set up conditions if you want. Click Provide Action Details to continue.
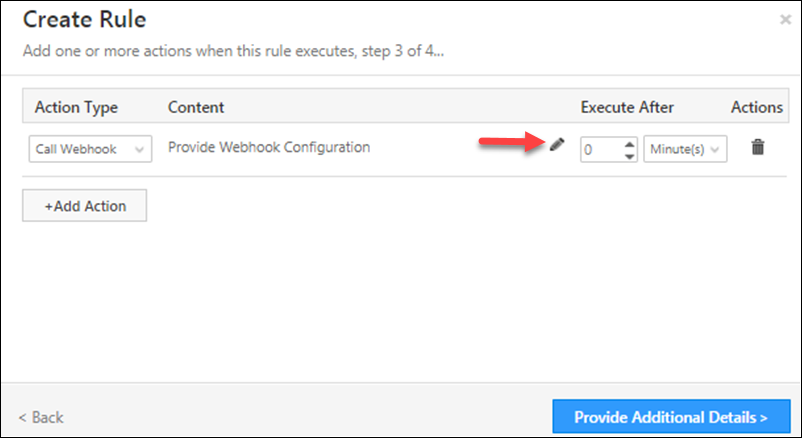
From the Action Type drop-down, select Call Webhook. Then click the pencil icon to add the webhook configurations.
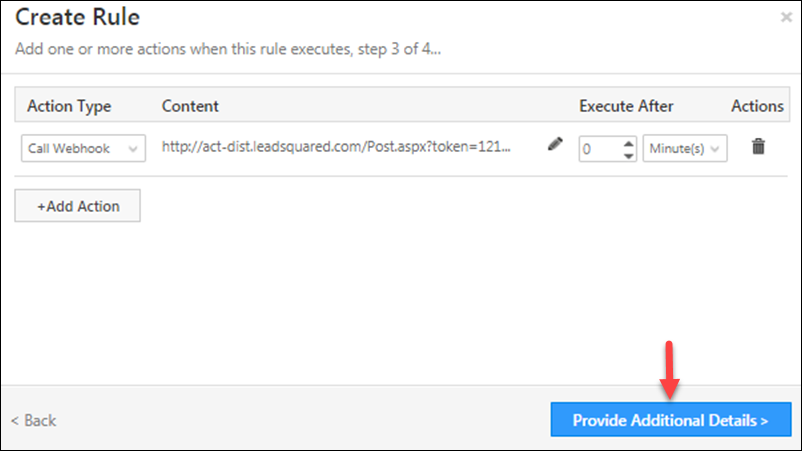
Now paste your webhook URL and click Verify. Then click Save.

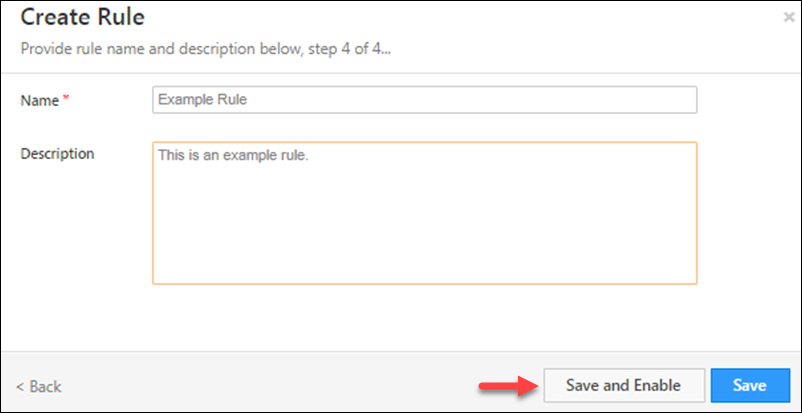
Click Provide Additional Details to continue.
Finally, set a name and description for the rule and click Save and Enable to bring the rule into immediate effect or click Save to enable the rule sometime later.
Setup an Automation
You can configure automations to trigger zip-based distribution on the following events –
- Lead Create
- Lead Update
- Activity Create
- Activity Update
- Task Create
- Task Complete
As an alternative to setting up webhooks or rules, you can also trigger the zip based distribution through an automation. For more information automation, see Automation Feature of LeadSquared.
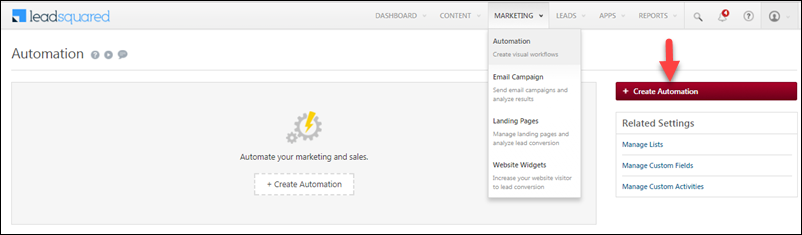
Navigate to Workflow>Automation, then click Create Automation.
Select a template and choose the automation trigger.
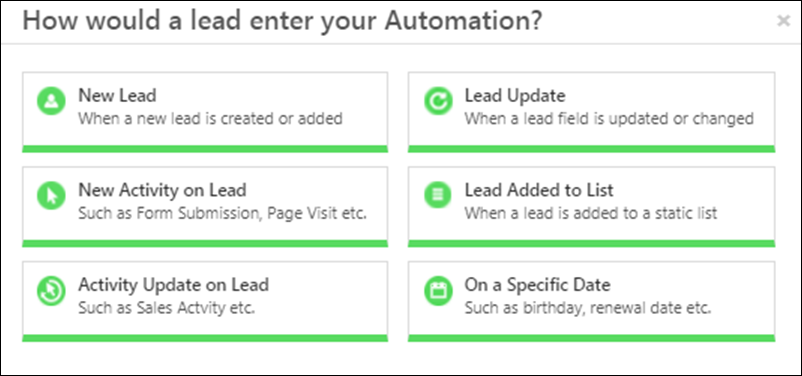
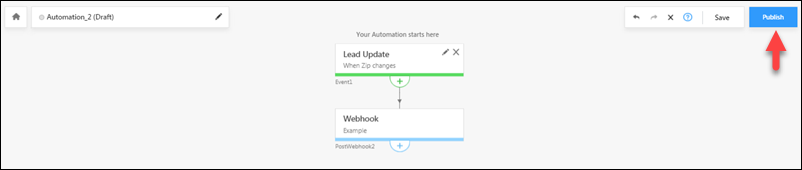
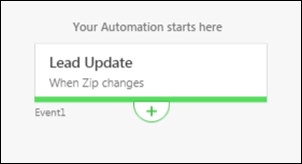
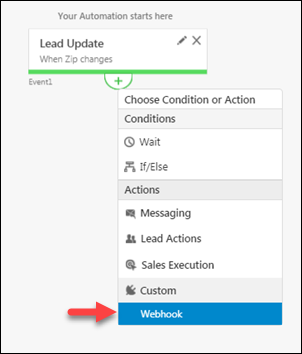
This example takes you through a simple automation where the zip based distribution will be configured every time a lead’s zip code is updated. The trigger selected is Lead Update and the lead field on which the trigger is based is Zip.
On clicking the green add button above, you will now have to choose the action that follows the trigger. Under Actions, choose Webhook.
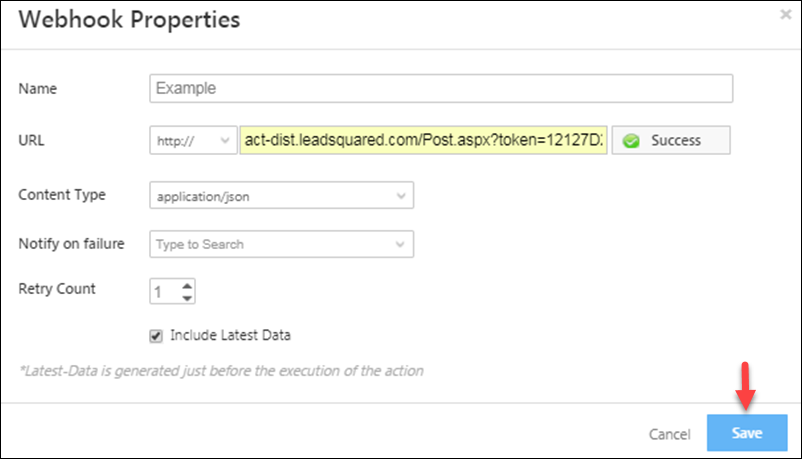
Now enter a name for the webhook, paste the webhook URL and click Verify. Once the webhook is verified, click Save.
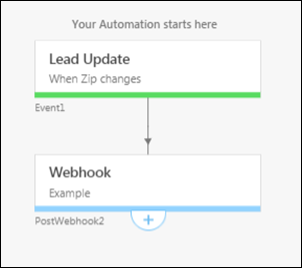
The automation is now set up such that every time a lead’s zip code is updated, the zip based lead distribution will be triggered.
Click Publish to bring the automation into effect or click Save if you want to publish the automation later.