1. Feature Overview
Once a ticket is resolved, send the Customer Satisfaction Survey (CSAT Survey) to gauge if your customers are satisfied with the resolution provided and give them a chance to rate their overall experience when interacting with your agents. This survey helps you understand the effectiveness of your agents when dealing with customers and provides insights into which customer support areas need improvement.
After configuring the CSAT survey, you can either set up a Notification to send the CSAT email to customers when a ticket is resolved or closed, or you can allow your agents to directly link the survey on the email they’re sending to customers from the Ticket Details page.
You can also set-up CSAT surveys on your chat (WhatsApp), chatbot and telephony channels.
Once your customer completes the survey, their response can be visible on the Ticket Conversation tab on the Ticket Details page.
2. Prerequisites
- Service CRM is a paid feature. To enable it, contact your account manager, or write to scsupport@leadsquared.com.
- You must be a Service CRM Admin to configure the Customer Satisfaction Survey on your account.
- To configure the chat survey, Converse and Chatbot must be enabled and configured on your account.
3. Access the Email and Telephony Survey
Once you log in to LeadSquared (https://login.leadsquared.com/), to configure the survey –
- Navigate to My Profile>Settings>Service Cloud.
- On the Service Cloud Settings page, under Workflows, click Customer Satisfaction.
- On the Customer Satisfaction Surveys page, alongside Default Customer Satisfaction Survey, under Actions, click
 to edit the existing default survey.
- To create a fresh survey, click Create New Survey.
4. Configure the Email Survey
On the Edit Survey/Create New Survey page, configure the following details –
- Survey Name – Add a display name. This name is for internal reference only and will NOT be visible to your customers.
- Survey Question – Add the question you want to display to your customers on the survey.
- Rating Type – Select from the following rating styles –
- Star – Lets you configure a star rating scale ranging from 3 to 10 stars.
- Smiley – Lets you configure a rating scale with disappointed, neutral, and happy emoji.
- Thumbs – Lets you configure a thumbs-up and thumbs-down rating scale.
- Response on Ratings – Based on the rating type you’ve selected, configure the display message for each rating here. This message will be shown to your customer after they submit their rating.
- Thank You Message – Enter the message shown to your customers when they successfully submit the survey. This is optional.
- Additional Questions – Check this box to include up to five additional questions in the survey. This is optional.
- You can set the answer type as Short Answer or MCQ. For MCQs, choose to allow either a single answer or multiple (Multi-select) answers.
- Add Comment – To allow your customers to add a comment on the survey, enable the slider. This is optional.
- Allow agents to add manually – When enabled, agents can manually include this survey in their emails to customers.
- Type of Link – Choose how you want the survey to be rendered on emails to your customers –
- Take the survey button
- Add as a URL link
- Reopen Ticket – Tickets will be automatically reopened if the CSAT rating received through emails is lower than the threshold you configure here, enabling quicker follow-up on dissatisfied customer experiences.
- Notify Agents – Agents will receive a notification if the CSAT rating received is lower than the threshold you configure here, enabling quicker follow-up on dissatisfied customer experiences.
- From the Notify To dropdown, select the list of agents you want to notify.
If you’re not looking to add a telephony survey, click Save, and Publish the Survey.
5. Configure the Telephony Survey
When enabled, customers can rate their phone interactions with your agents using their dial-pad, providing insights into their satisfaction with your telephonic support. This helps you assess agent performance, improve customer experience, and refine your service quality based on direct feedback.
- Valid Inputs – Select the dial-pad keys (e.g., 1 for satisfied, 2 for not satisfied, etc.) customers can use to submit their survey responses.
- Map Inputs – For the selected number, map each dial-pad key to a star rating (e.g., press 1 for 1 star, press 2 for 2 stars, etc.).
Once you’re done, click Save.

6. Activate the Email and Telephony Survey
Once a survey is configured, you must publish it for it to go live. To do this –
- Navigate to the Customer Satisfaction Surveys page.
- Alongside the survey you want to make activate, under Actions, click , and click Activate. The survey is live.
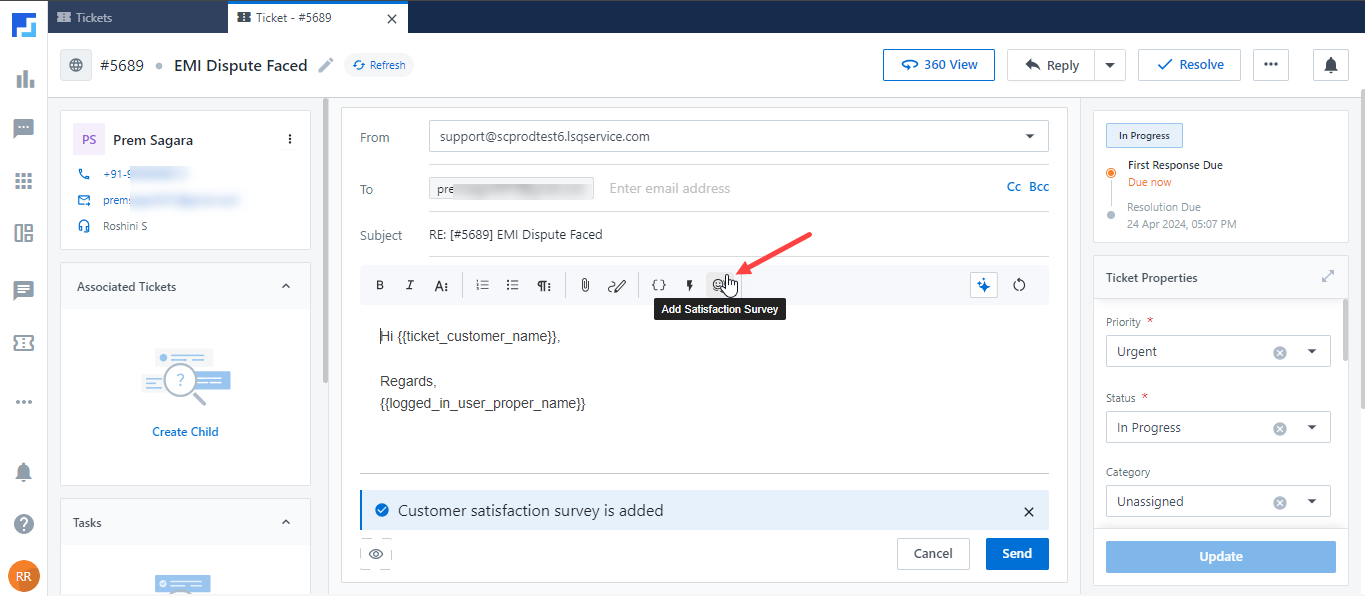
7. Send the Email Survey
If you’ve enabled the option for agents to add survey links to customer emails, they can include these surveys when replying from the Ticket Details page. To add a survey –
- When replying to a customer, from the reply tray, click the Merge Tags
 icon.
icon. - From the list of options, select CSAT Survey.
- Based on the survey’s configuration, whether it’s sent as a button or a URL, the corresponding option will appear in the email.

8. Configure the Chat Survey
To send a WhatsApp survey to your customers –
- Navigate to My Profile>Settings>Converse, and under Converse Service Settings, click Customer Satisfaction.
- Click Create New Survey, and on the Customer Satisfaction page, enter the following details –
- Name – Enter a name to identify the survey internally. This won’t be visible to customers.
- Description – Enter a survey description to identify the survey internally. This is optional.
- WhatsApp CSAT Type – Select whether to send the survey on WhatsApp as a link or a button.
- Survey Question – Add the question you want to display to your customers on the survey.
- Additional Comments – Enable this checkbox to let customers add comments when answering the survey. This is optional.
- This doesn’t apply if you select WhatsApp CSAT Type as Buttons.
- CTA Label Text – Enter the display text for the CTA button (e.g., “Submit Survey”, etc.). This is optional.
- This doesn’t apply if you select WhatsApp CSAT Type as Buttons.
- Thank You Message – Enter the message shown to your customers when they successfully submit the survey.
- Trigger When – Enable the checkbox to trigger the survey when the chat is closed by the agent.
- Select Service Groups – Select the Service Groups for which this survey will apply. The survey is only applied to chat conversations between users in these groups and customers.
- Notify Agents – Agents will receive a notification if the CSAT rating received is lower than the threshold you configure here, enabling quicker follow-up on dissatisfied customer experiences.
- From the Notify To dropdown, select the list of agents you want to notify.
- Preview the bot, and ensure it displays the configured content.
- Once you’re done, click Save and Publish. The bot is now live for your customers.

9. Configure the Chatbot Survey
- Navigate to My Profile>Settings>Converse, and under Chatbot Settings, click Customer Satisfaction.
- Click Create New Survey, and on the Customer Satisfaction page, enter the following details –
- Name – Enter a name to identify the survey internally. This won’t be visible to customers.
- Description – Enter a survey description to identify the survey internally. This is optional.
- Select Bots – Select the chatbots you want to apply this survey to.
- Survey Question – Add the question you want to display to your customers on the survey.
- Additional Comments – Enable this checkbox to let customers add comments when answering the survey. This is optional.
- CTA Label Text – Enter the display text for the CTA button (e.g., “Submit Survey”, etc.). This is optional.
- Thank You Message – Enter the message shown to your customers when they successfully submit the survey.
- Trigger When – Set the number of minutes from the lead’s last message after which the survey is sent.
- If the checkbox is enabled, the system considers the inactivity message configured in your account and sends the survey after that message is sent to the customer.
- Preview the bot, and ensure it displays the configured content.
- Once you’re done, click Save and Publish. The bot is now live for your customers.

Any Questions?
Did you find this article helpful? Please let us know your feedback in the comments section below. We’d love to hear from you and help you out!


