1. Feature Overview
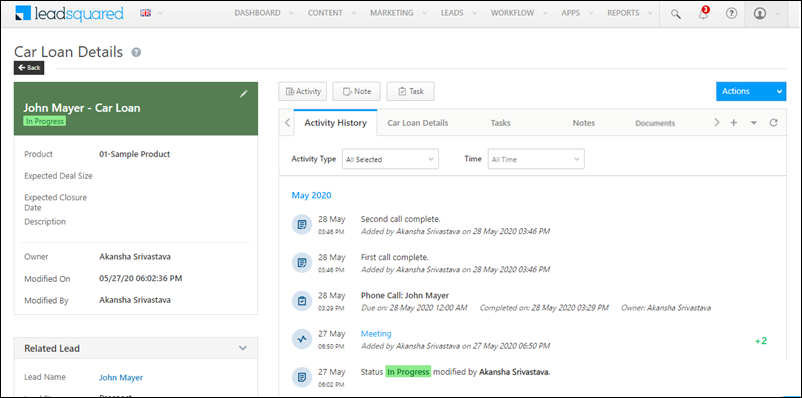
Opportunities in LeadSquared represent potential deals. On the Opportunity Details page, you can add details pertaining to the opportunity, add activities, tasks and notes to the opportunity, and track the opportunity to completion. This will also enable all the stakeholders to be up-to-date on the current status of the opportunity.
Note:
- To know how to create Opportunities, refer to Opportunity Configurations.
- To know how to customise your Opportunity Details page, refer to Opportunity Details View Customization.
2. Prerequisites
- You must be the Administrator of your LeadSquared account.
- You must have the opportunities feature enabled on your account. To enable it, please write to support@leadsquared.com
3. Activities
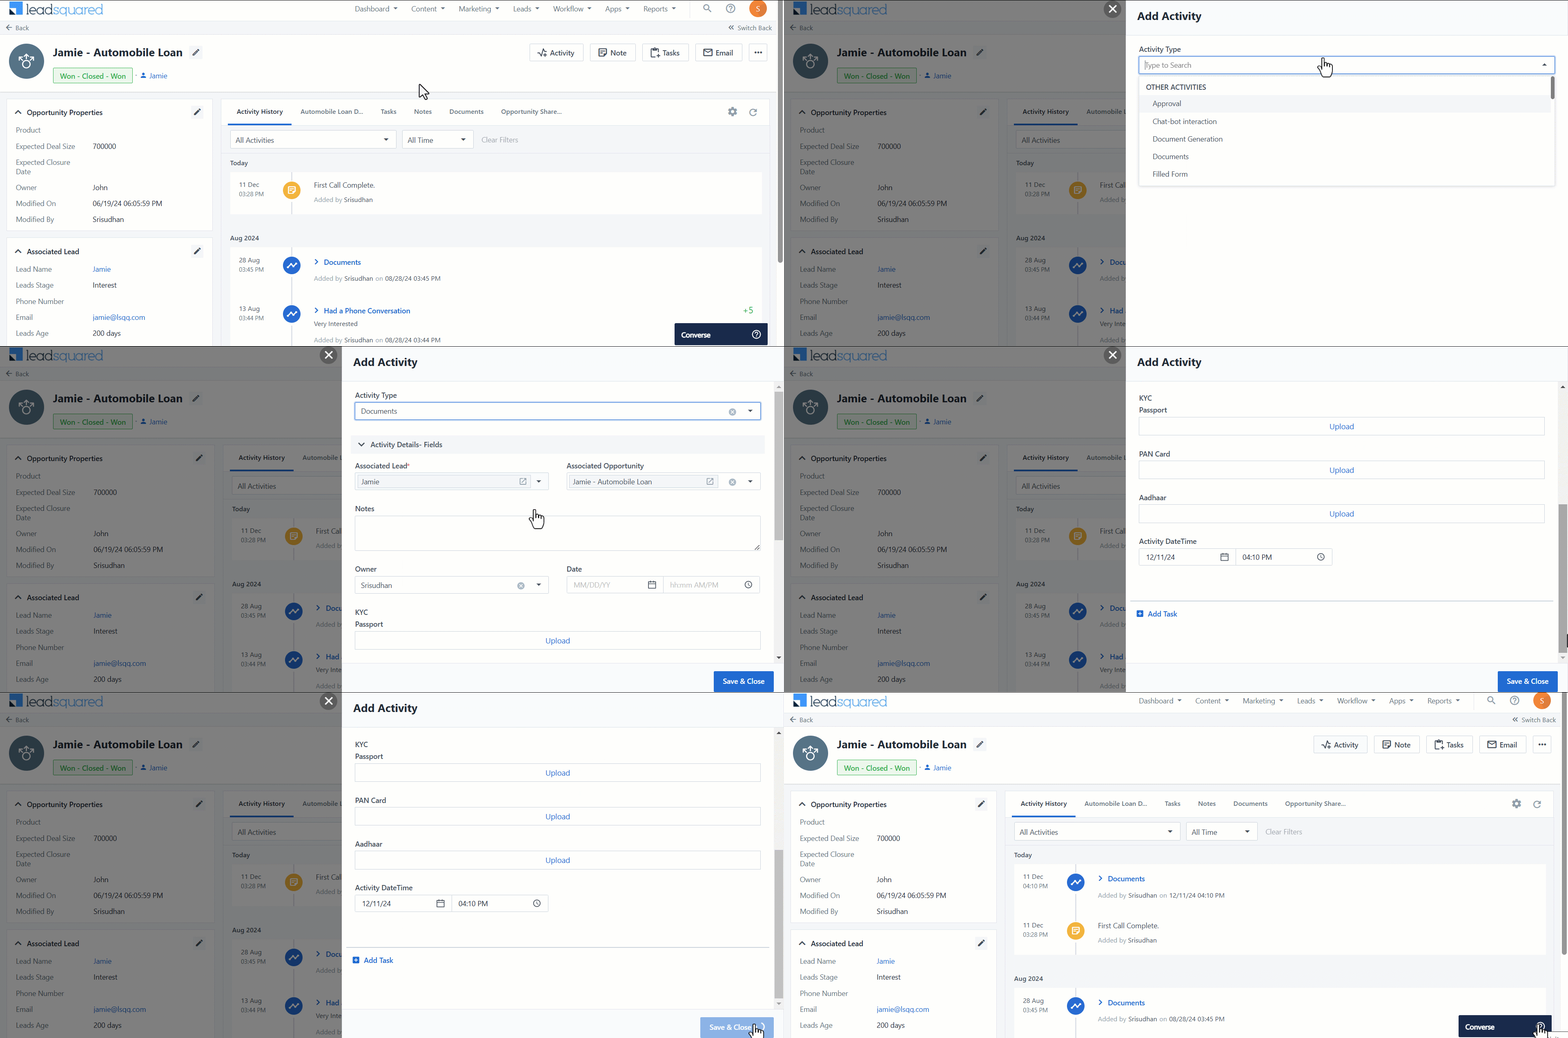
You can add and track activities on your opportunities from the Opportunity Details page. You can add activities from the list of activities you’ve created. An example of this is –
- Enquiry phone call
- Opened email
- Clicked on advertisement
To know how to create custom activities, refer to How to Add a Custom Activity.
3.1 Add Activities
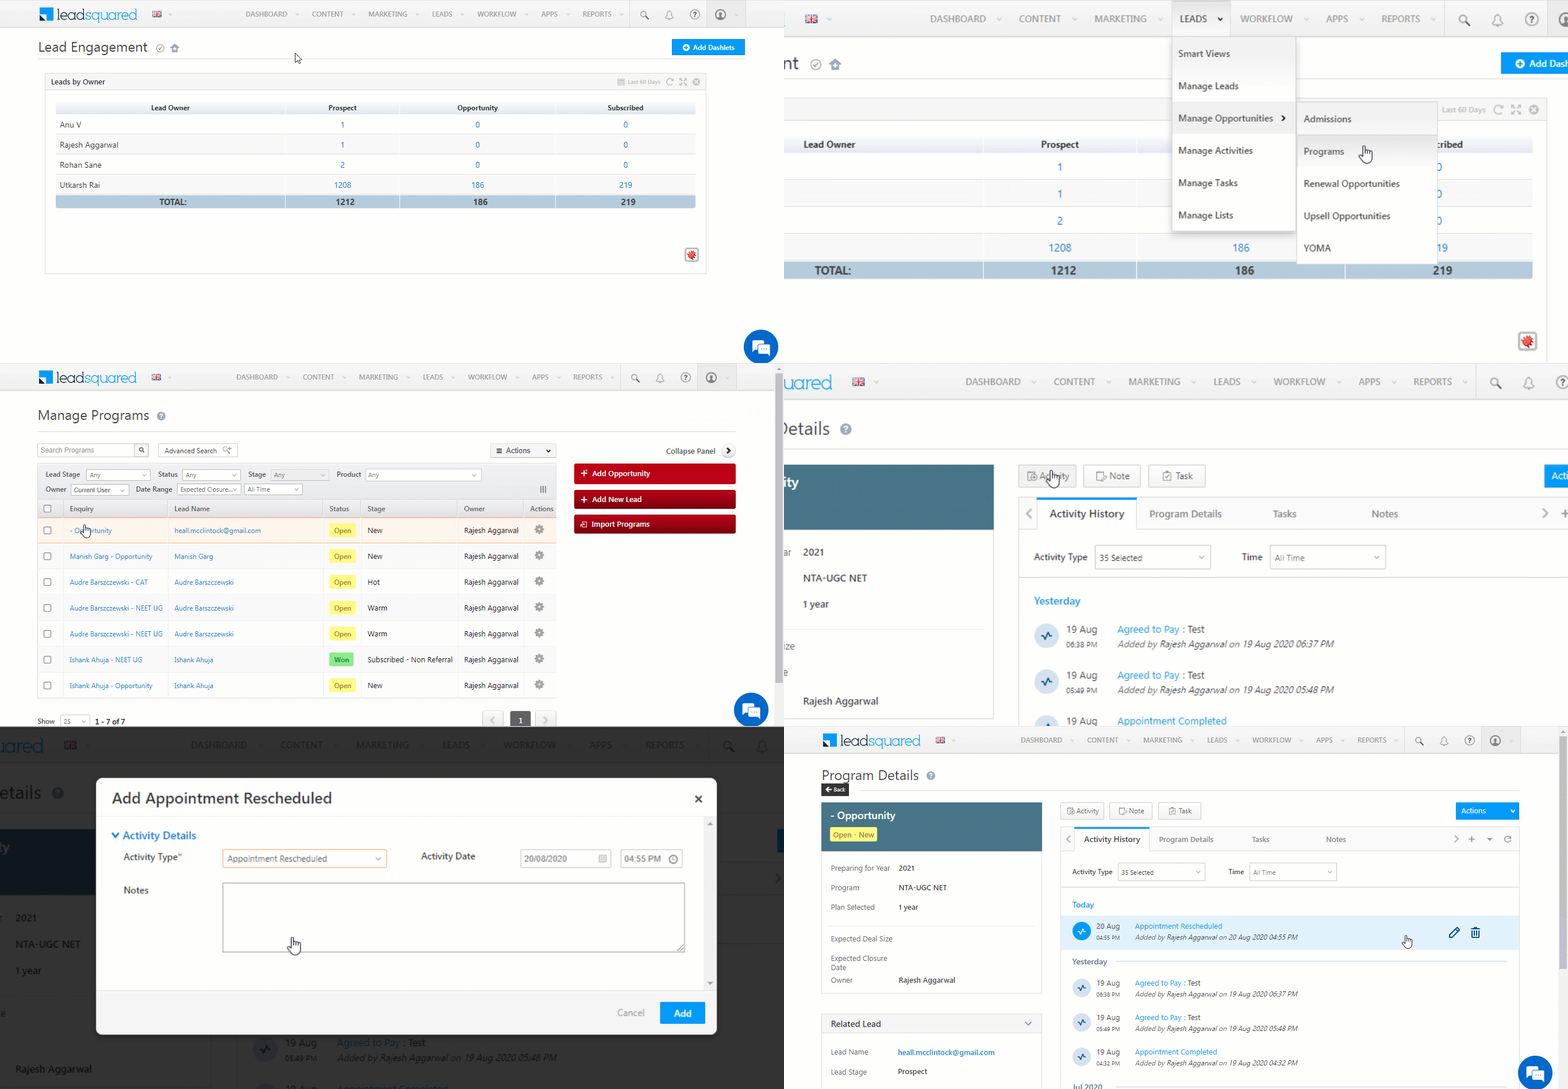
- From the LeadSquared main menu, navigate to Leads>Manage Opportunities>Opportunity Type.
- Under Enquiry, click any existing opportunity.
- On the Opportunity Details page, click the
 button.
 - On the Add Notable Activity pop-up, from the Activity Type dropdown, select an activity.
- You can add an activity date and additional activity details in the pop-up.
- Once you’re done, click Add. You’ll get a notification once the activity is successfully added.
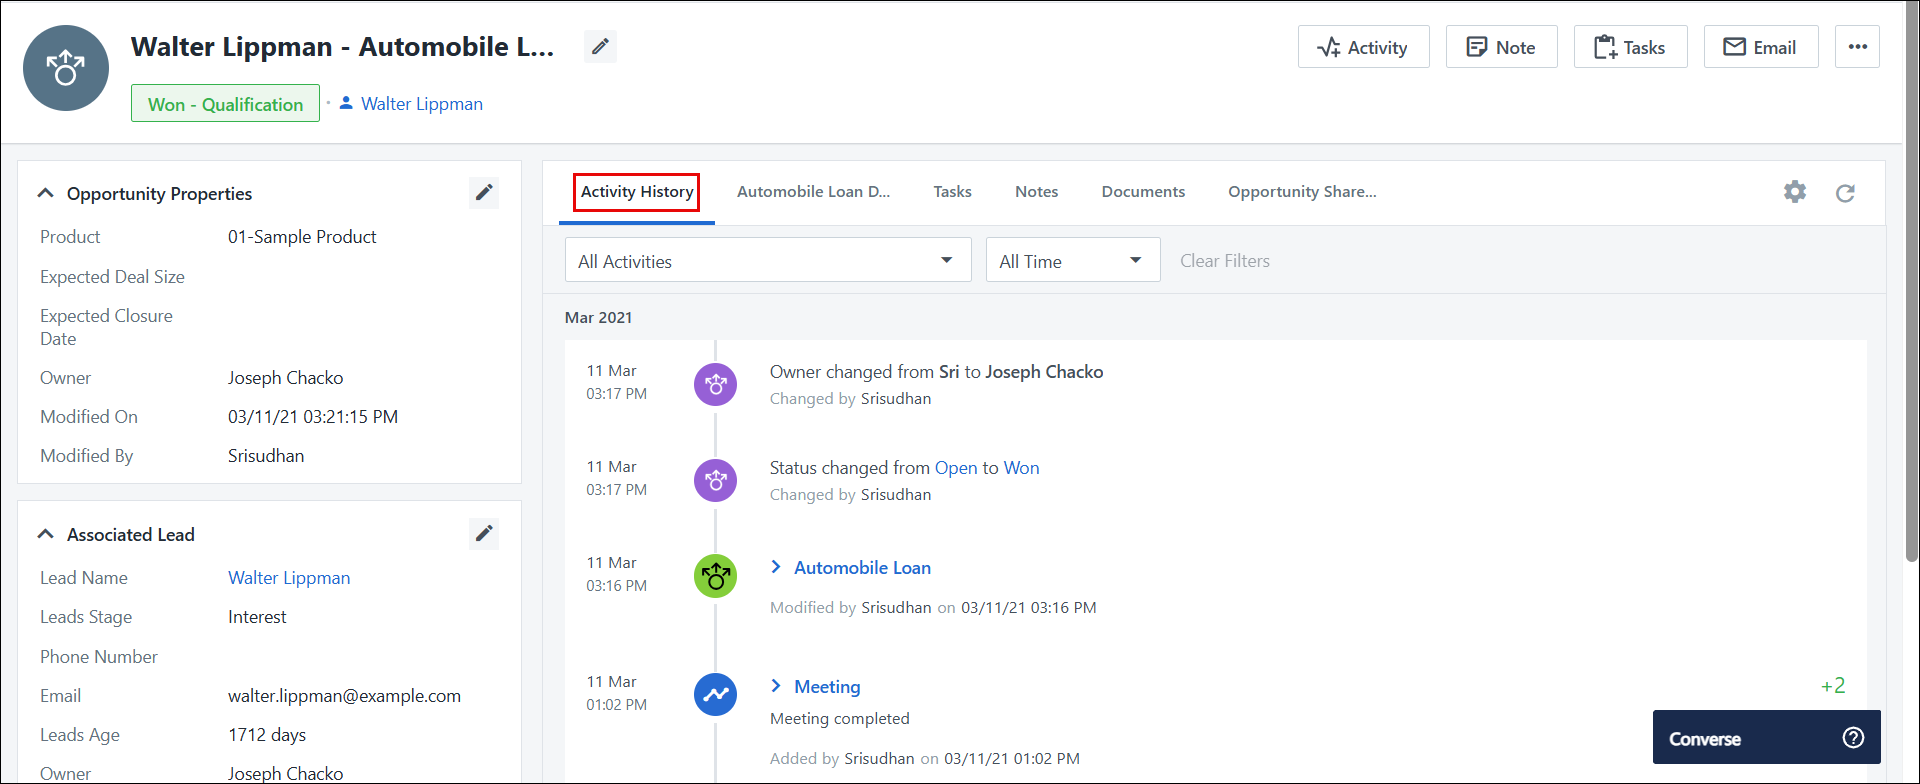
3.2 Activity History
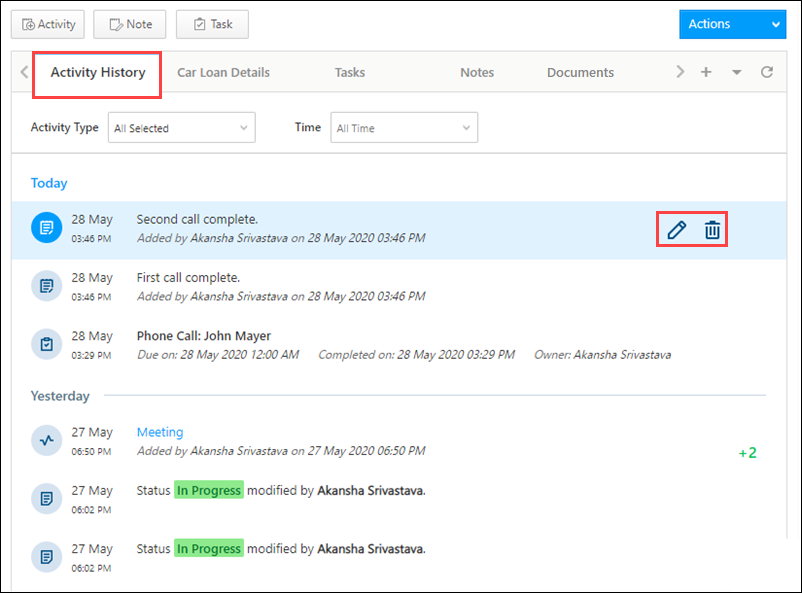
Under Activity History, you can see the list of changes that have been made. The changes are recorded for the following –
Audit History
- Change in status – Every time there’s a change in the opportunity status.
- Change in source – Every time there’s a change in the opportunity’s source.
- Change in owner – Every time there’s a change in the opportunity’s owner.
- Notes – Every time a note is added.
- To edit an existing activity, hover your cursor on the right side of an entry, and click the
 icon.
icon. - To delete an existing activity, hover your cursor on the right side of an entry, and click the
 icon.
icon.
3.3 Activity Actions
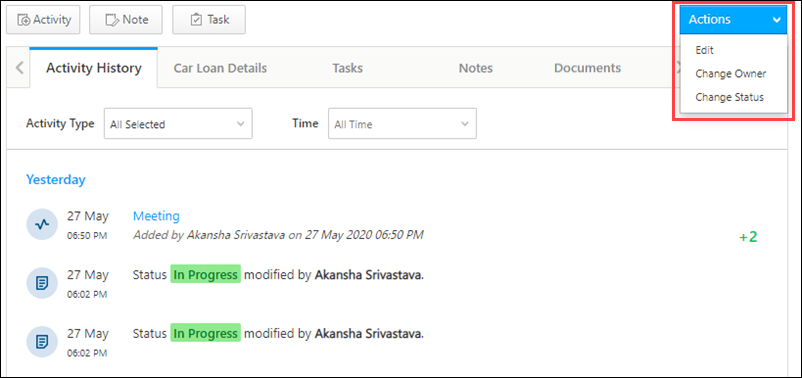
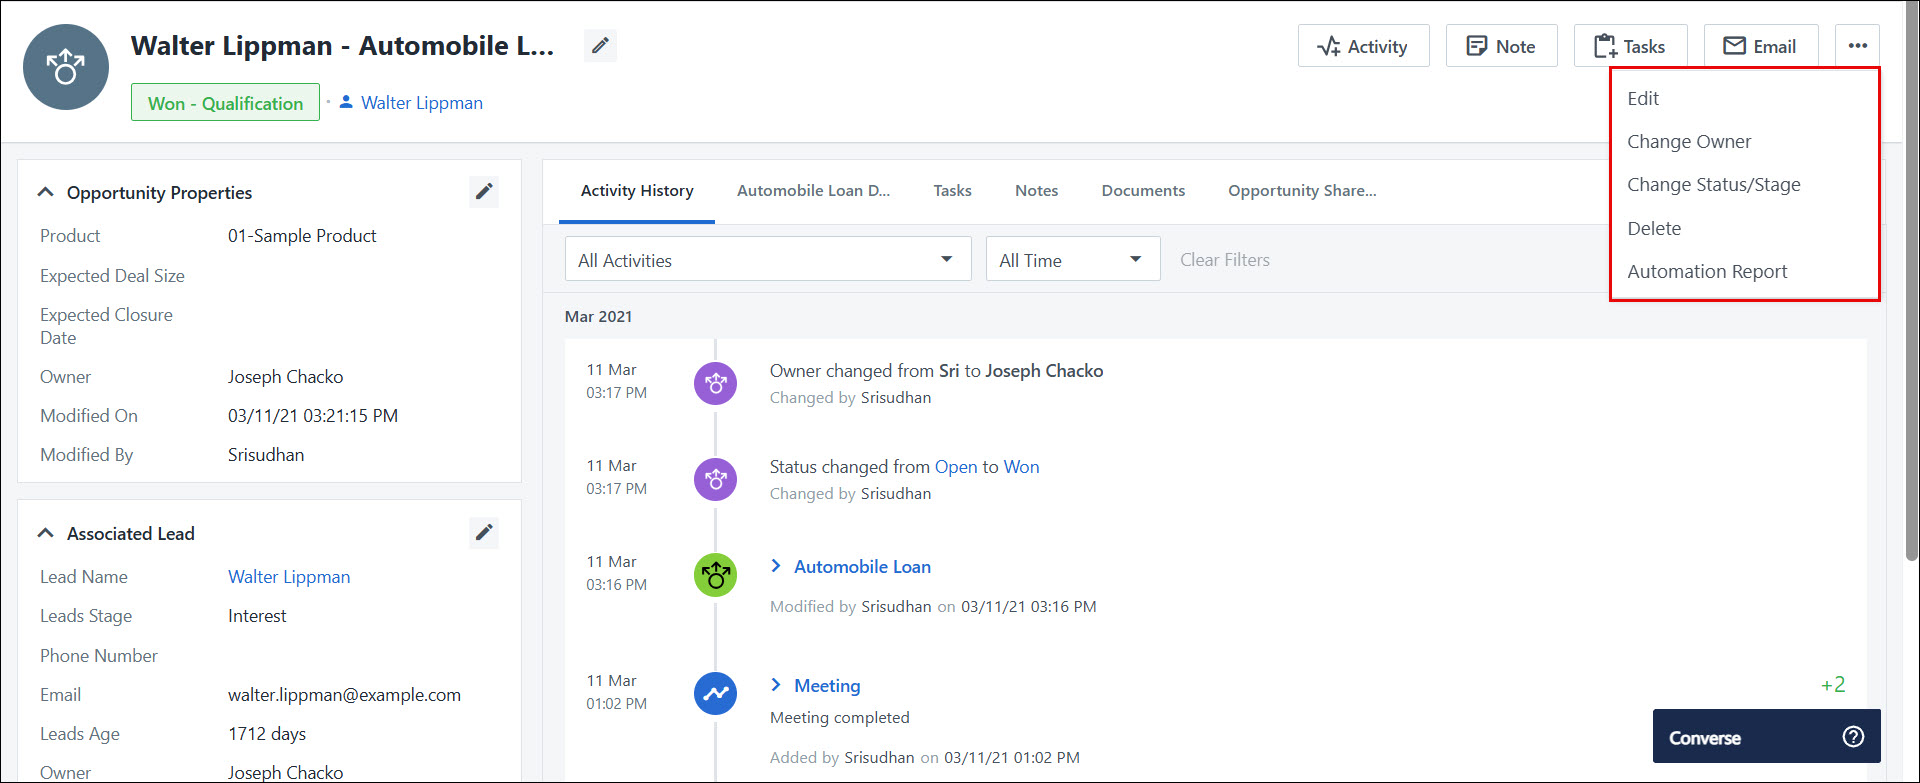
You can use the Actions dropdown available on the top right corner to make changes to the activity.
| Property | Description |
| Edit | To make edits to the activities that have been posted on the opportunity. |
| Change Owner | To change the current owner the opportunity is tagged to. |
| Change Status | To update the current status of the opportunity, along with stating a reason and adding comments as to why the status has changed. |
3.4 Opportunity Details
The opportunity fields can be updated under the Opportunity Details tab. These are the fields that were included when the opportunity was created. To know how to add or remove fields from the opportunity form, refer to Opportunity Configurations.
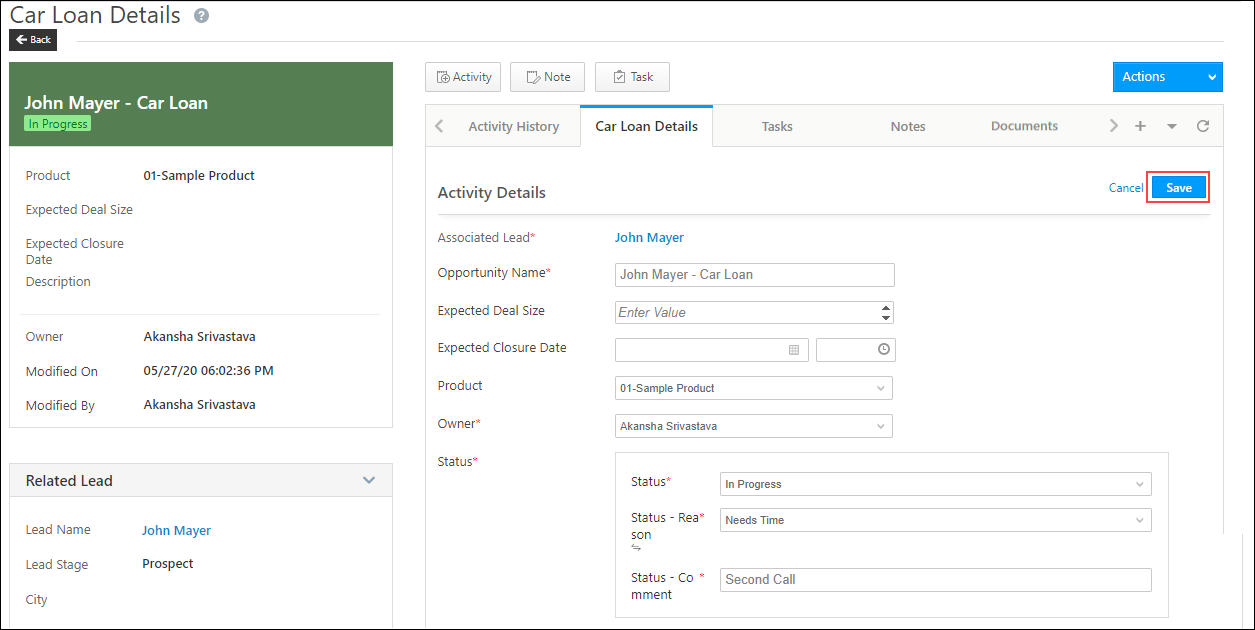 Once you’ve updated the opportunity fields, click Save.
4. Tasks
You can add and track tasks on your opportunities from the Opportunities Details page. You can add tasks from the list of tasks you’ve created. Examples of tasks are –
- To-do lists
- Set-up meeting
- Collect documents
To know how to set up custom tasks, refer to How to Create Tasks and Schedule Reminders.
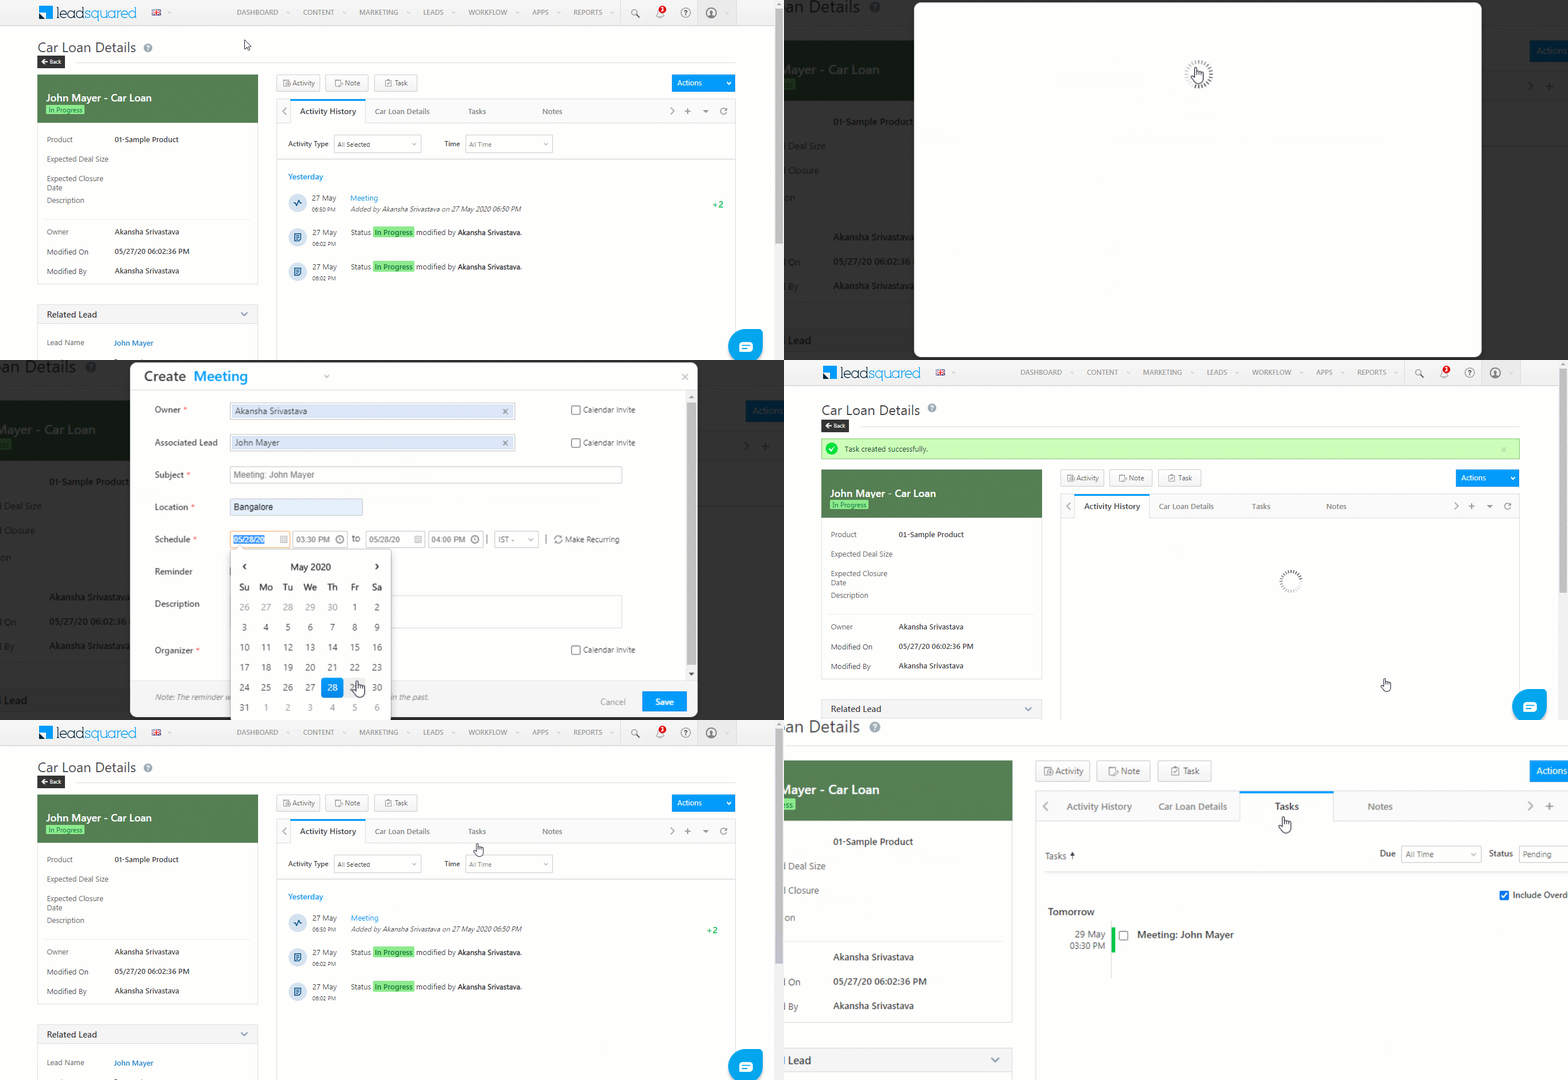
4.1 Add Tasks
- From the LeadSquared main menu, navigate to Leads>Manage Opportunities>Opportunity Type.
- Under Enquiry, click any existing opportunity.
- On the Opportunity Details page, hover your cursor over the
 button.
 - From the list of available tasks, choose a task.
- In the Create Task pop-up, enter all the required details.
- Once you’re done, click Save. You’ll get a notification once the task is successfully added.
4.2 View Tasks
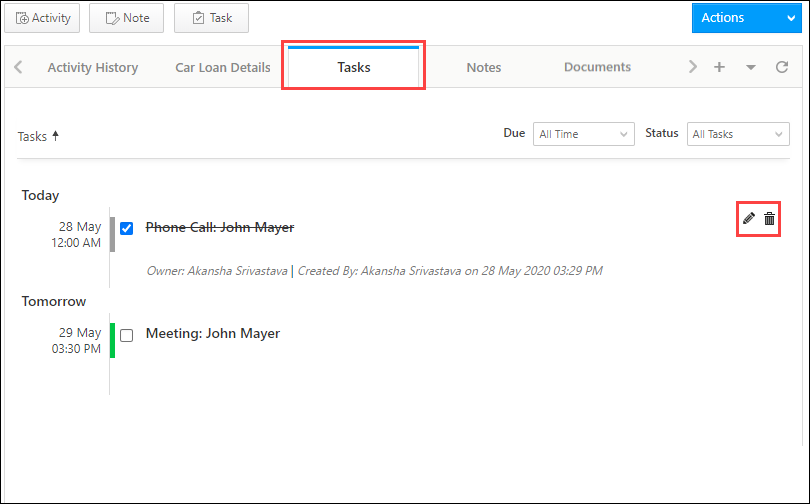
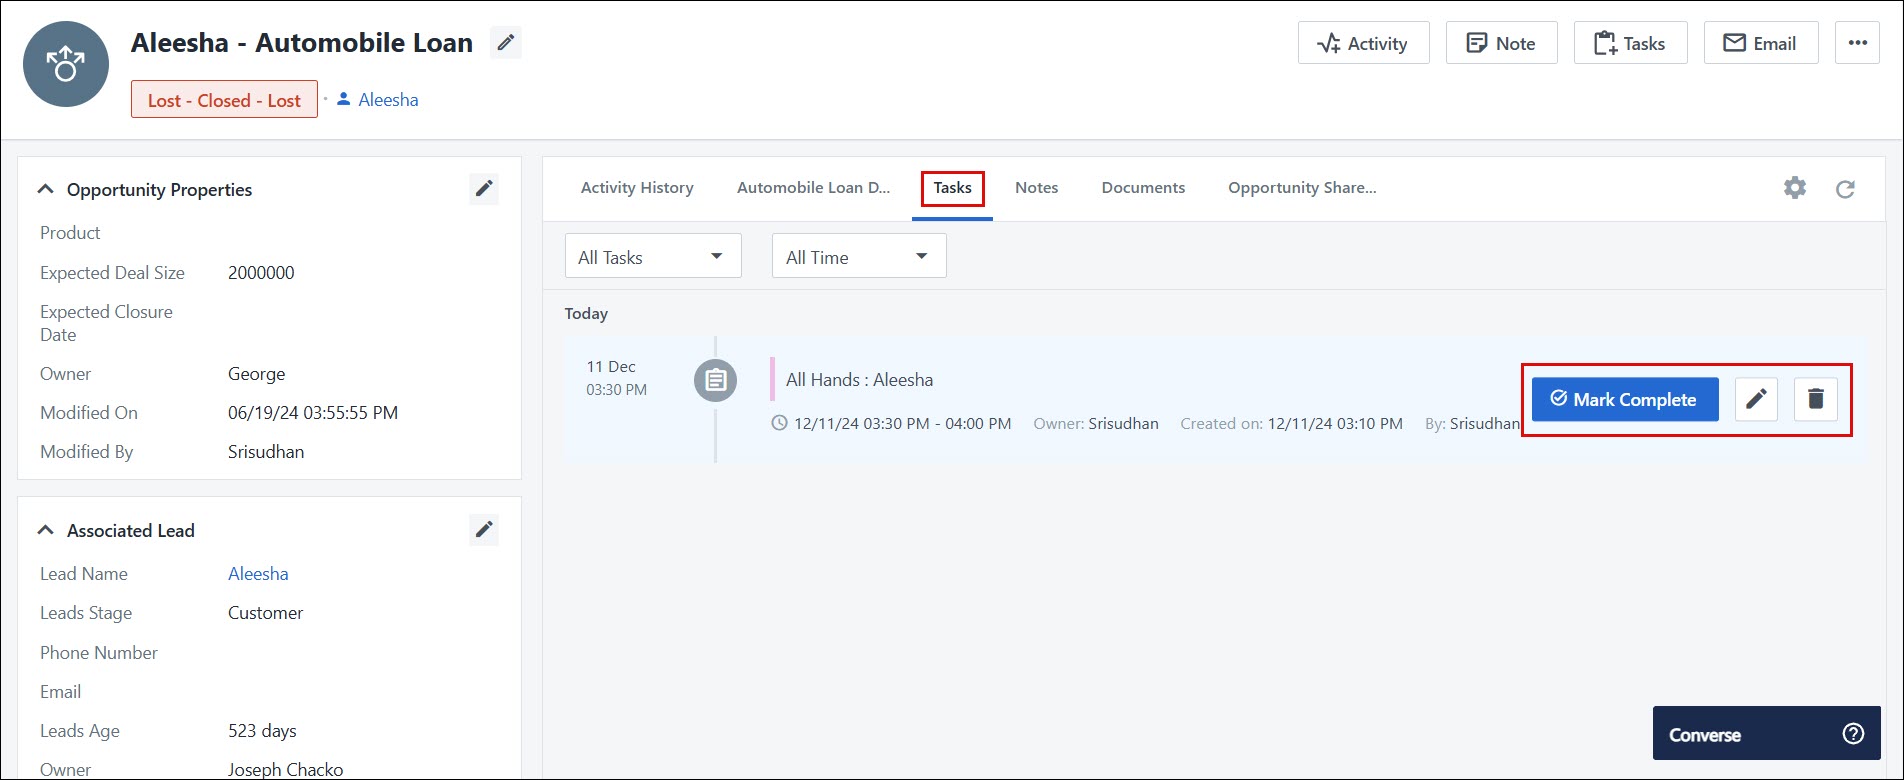
Under the Tasks tab, the logs of all the completed and pending tasks are available.
- To edit an existing note, hover your cursor on the right side of an entry, and click the
 icon.
icon. - To delete an existing note, hover your cursor on the right side of an entry, and click the
 icon.
icon.
5. Notes
Add notes to the opportunity to ensure all the stakeholders are on the same page at any given time.
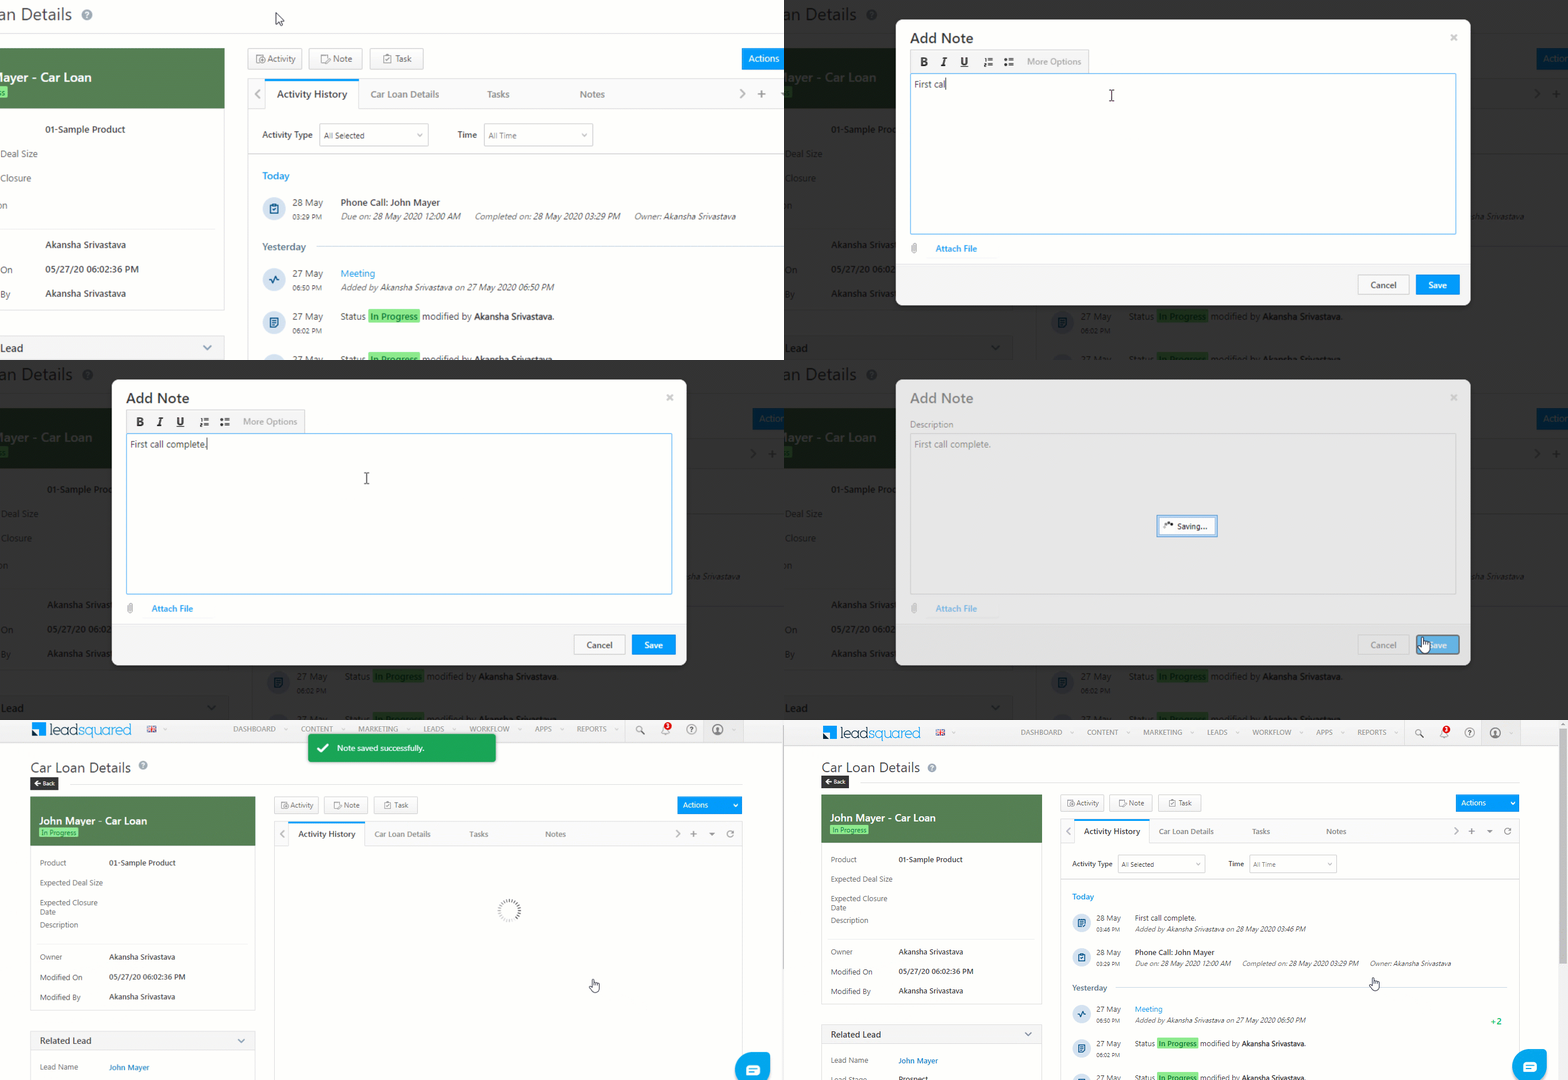
5.1 Add Notes
- From the LeadSquared main menu, navigate to Leads>Manage Opportunities>Opportunity Type.
- Under Enquiry, click any existing opportunity.
- On the Opportunity Details page, click the
 button.
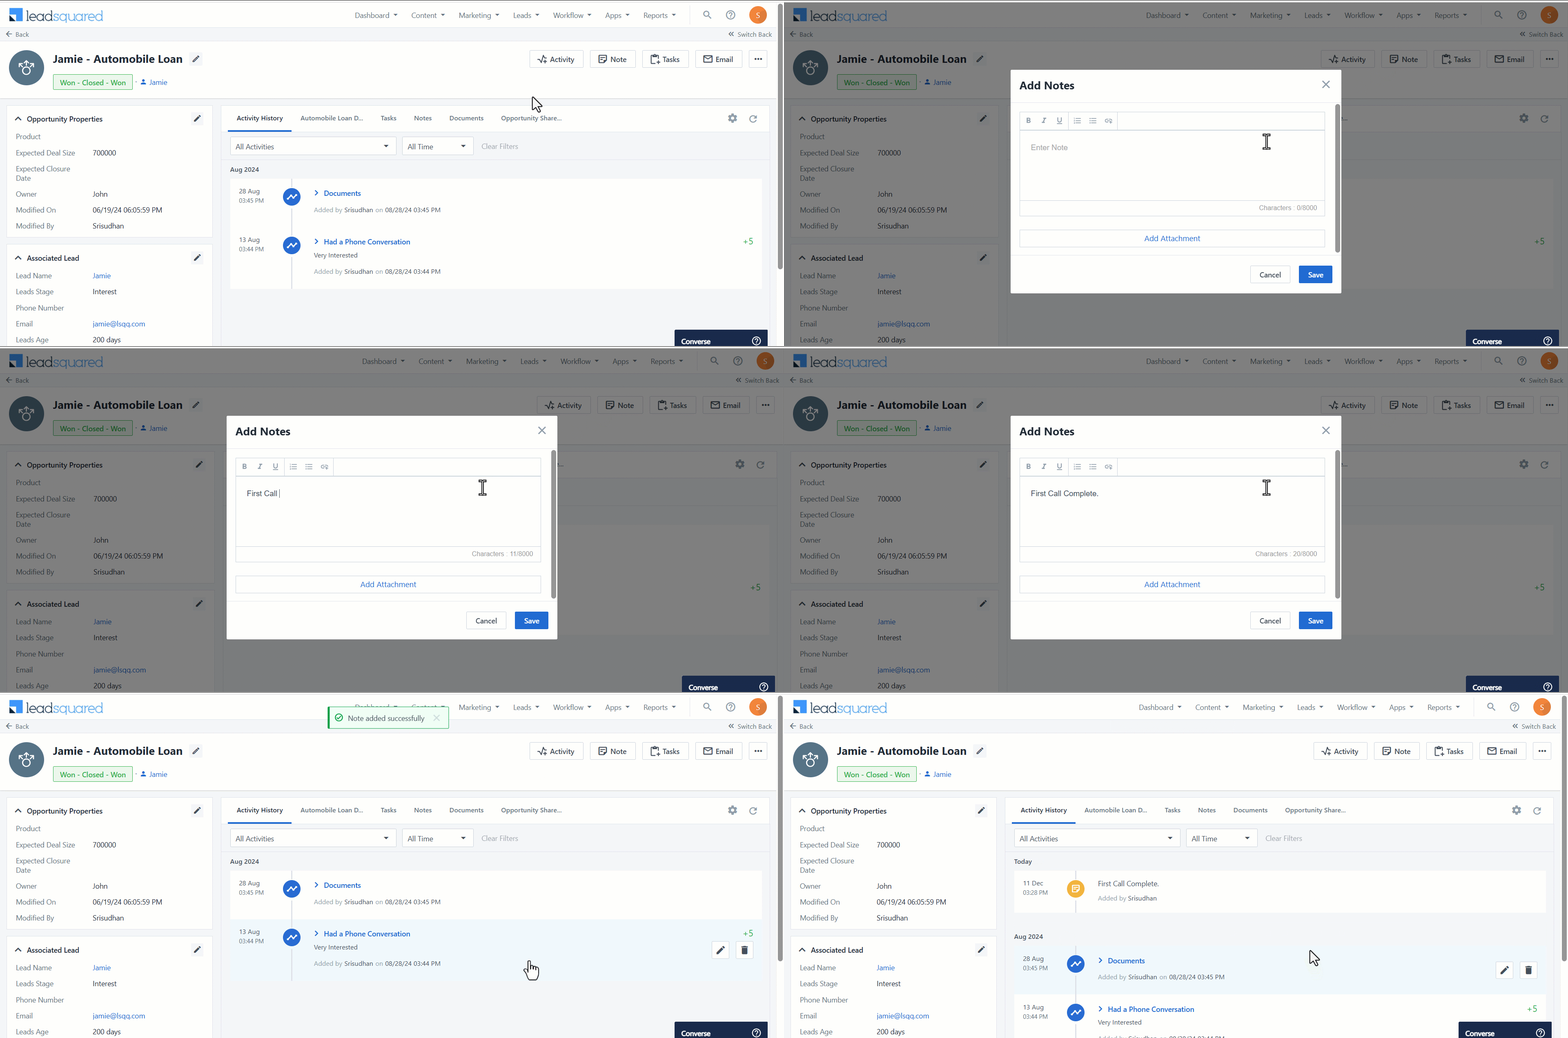
 - In the Add Note pop-up, add relevant notes.
- Click Attach File to upload relevant files to the opportunity. The maximum file size you can upload is 10 MB.
- Once you’re done, click Save. You’ll get a notification once the note is successfully added.
5.2 View Notes
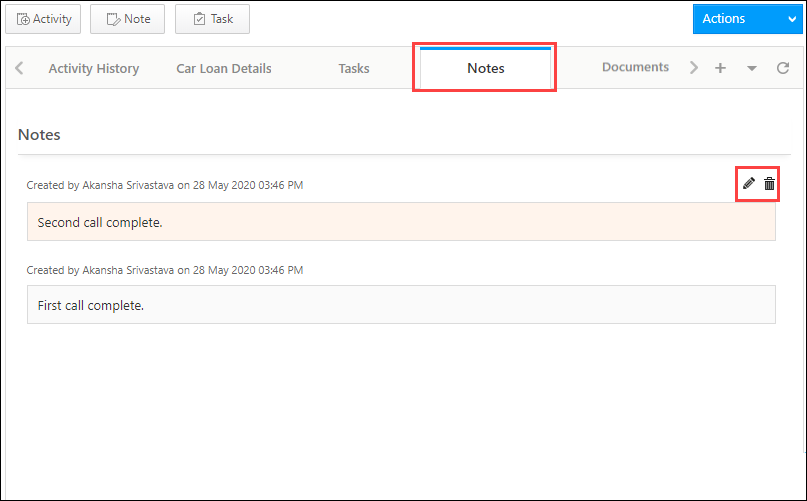
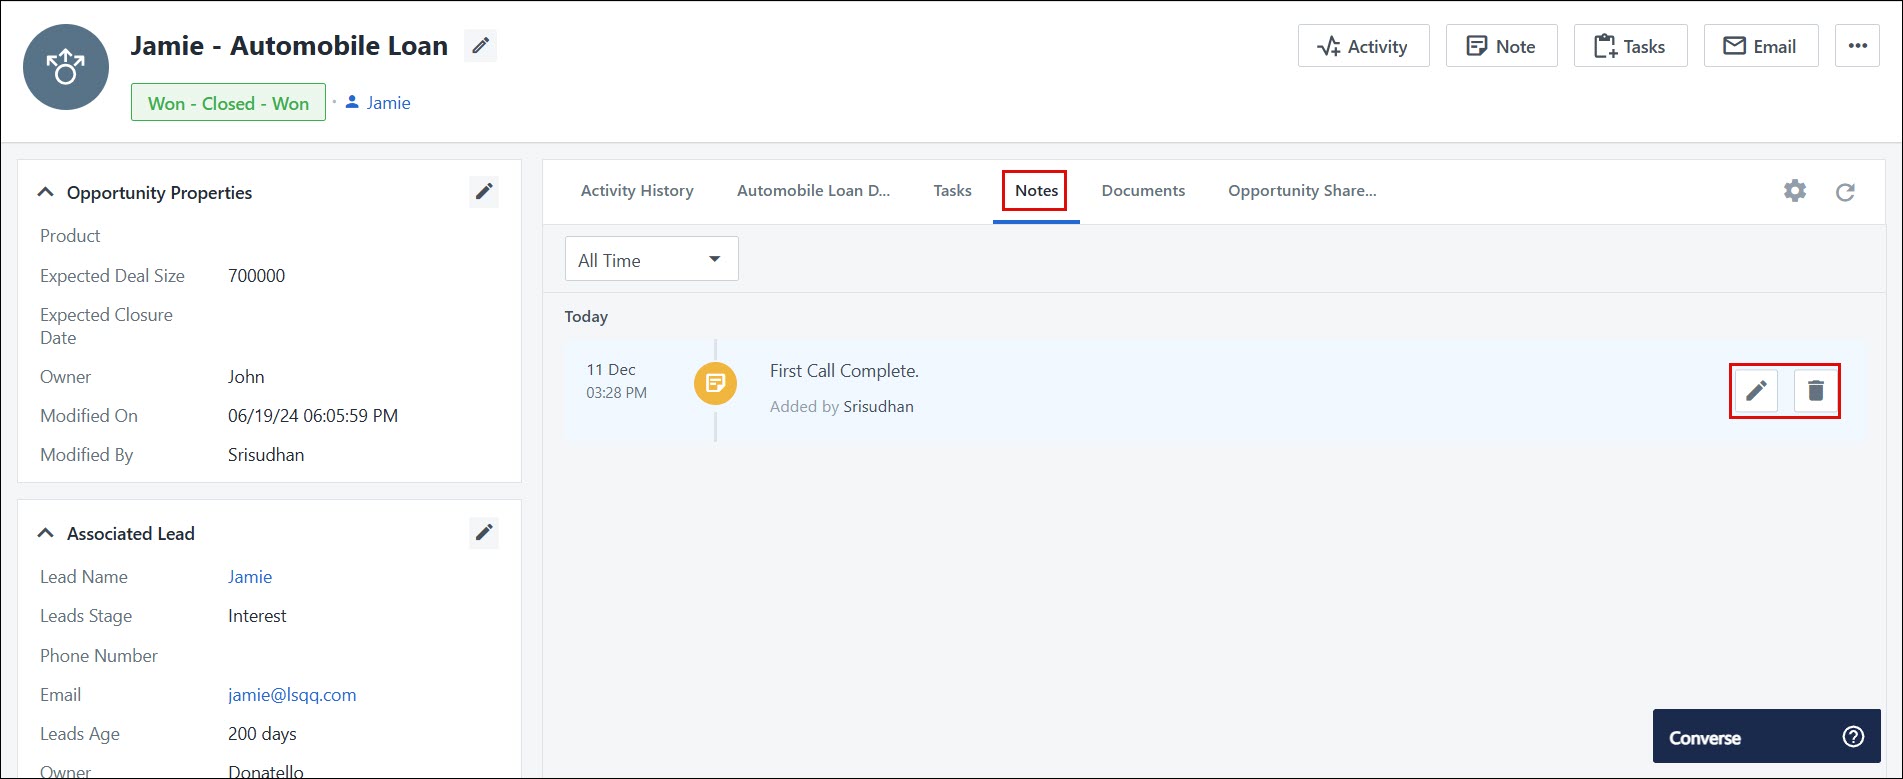
Under the Notes tab, a record of all the notes that were added is available.
- To edit an existing note, hover your cursor on the right side of an entry, and click the
 icon.
icon. - To delete an existing note, hover your cursor on the right side of an entry, and click the
 icon.
icon.
6. Documents
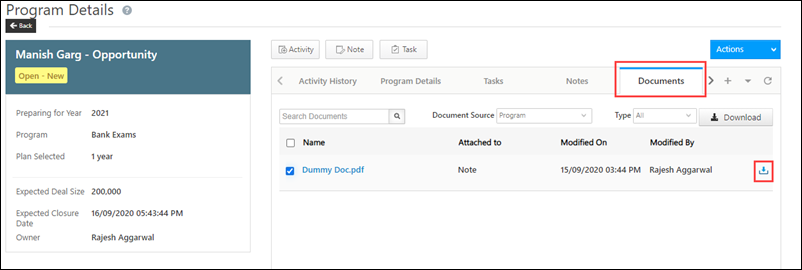
On the Documents tab, view all the documents that were uploaded to the opportunity. To download a document –
- Click the
 checkbox against a document.
 - Click the
 icon against the document name, to download the file.
- Alternatively, you can click the Download button on the top-right corner of the page.
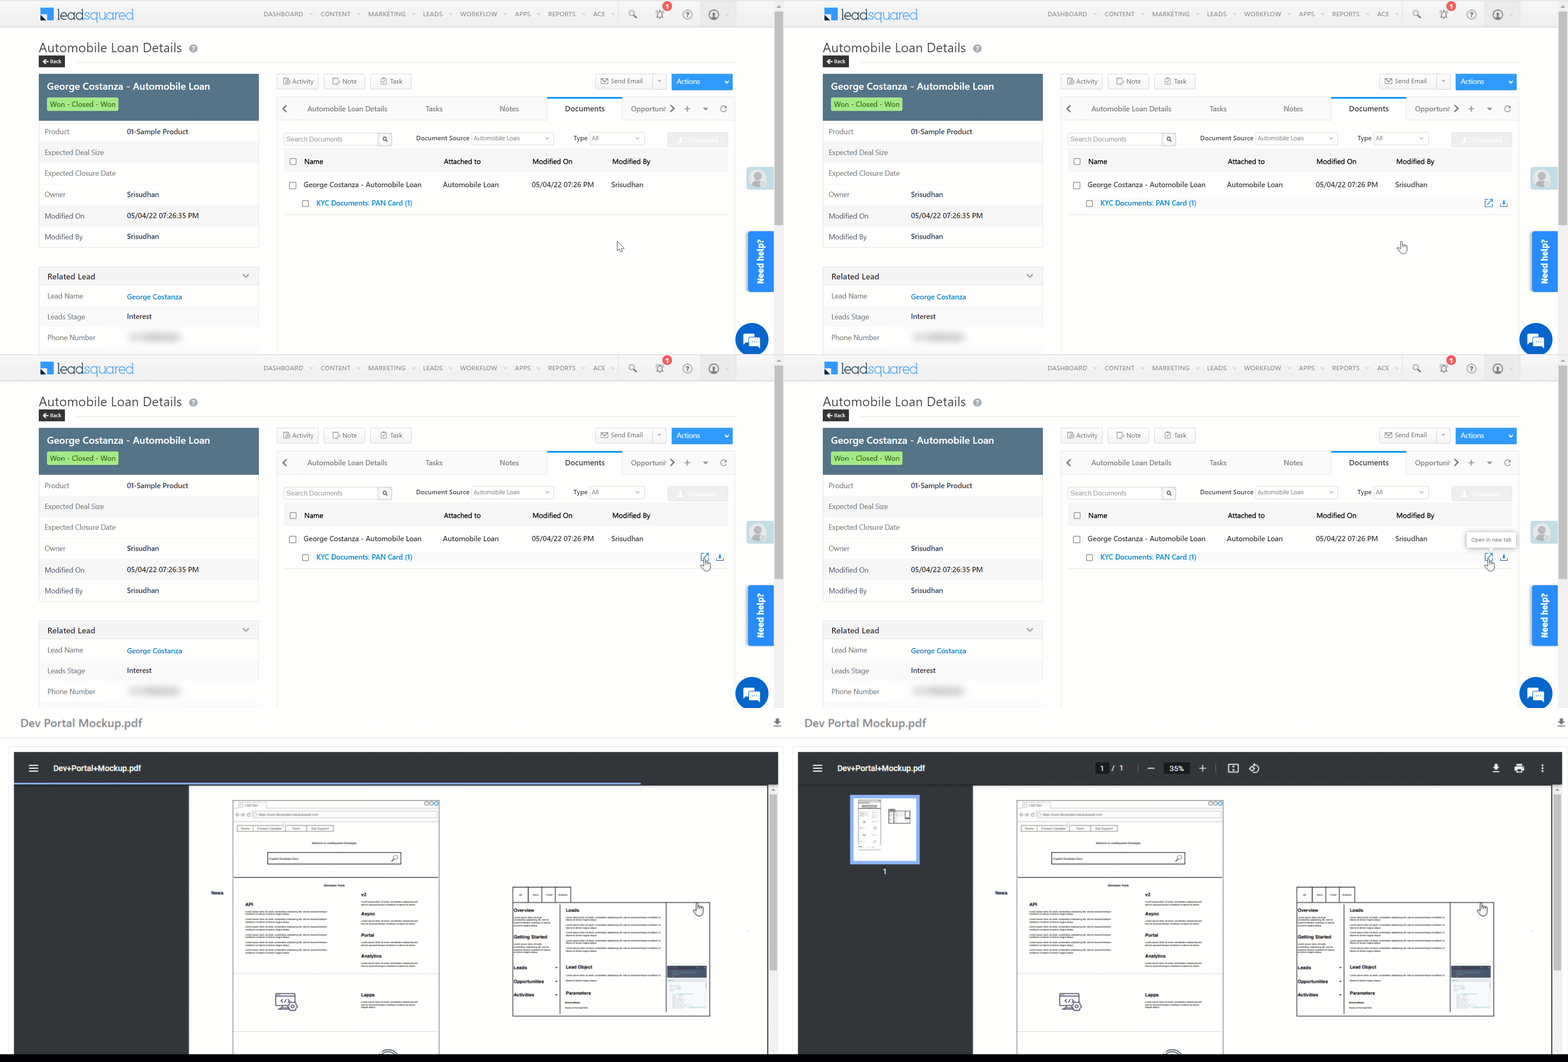
You can open the documents in a new browser tab for quicker verification against the opportunity’s details. This helps in improving the efficiency of Sales Users who verify large numbers of documents received from opportunities. This feature is now available by default on the Opportunity Details page.
7. Send Emails
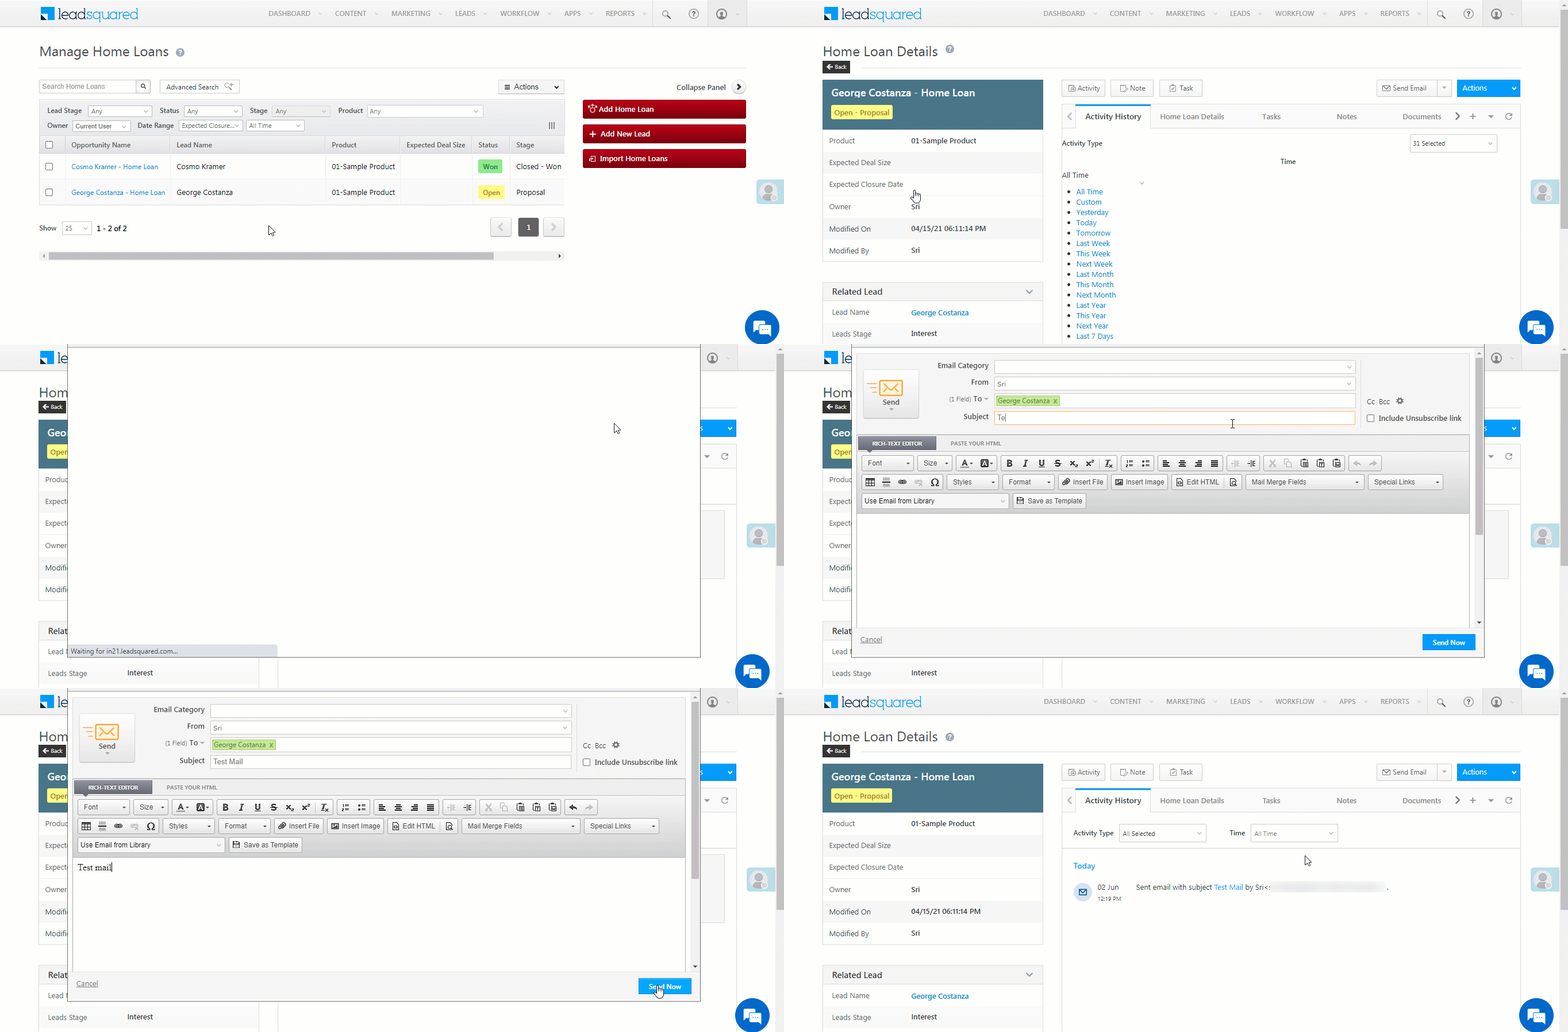
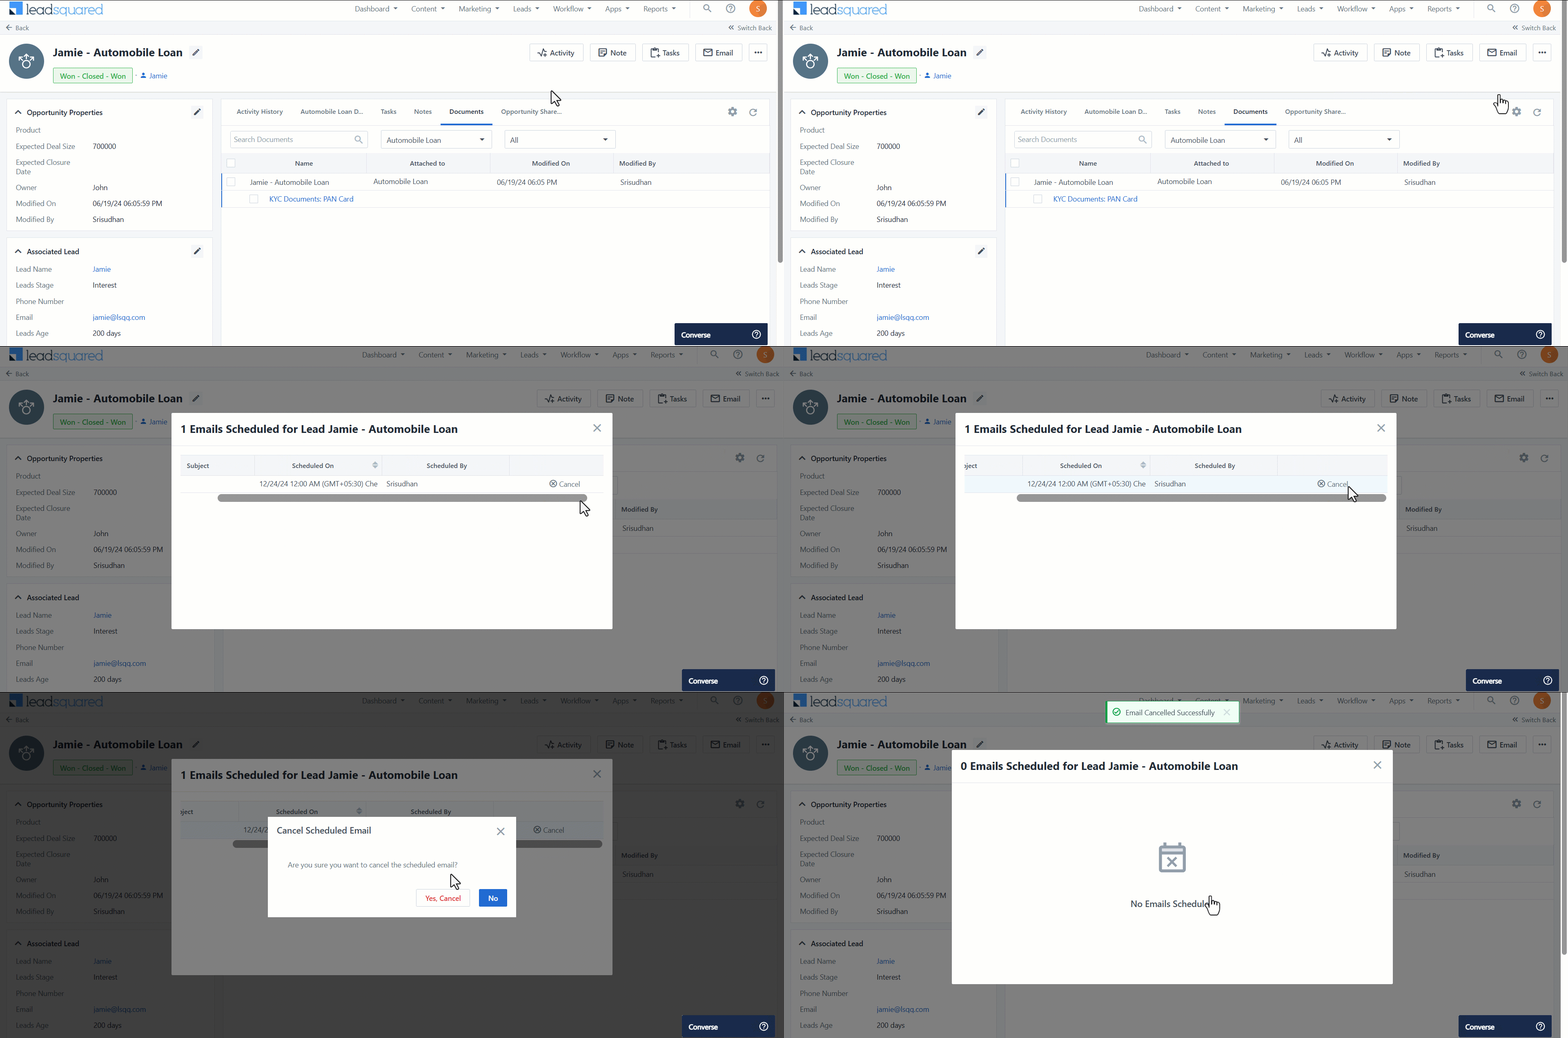
From the Opportunity Details page, you can send one-to-one emails to your leads, as well as view scheduled emails. To do this, click the ![]() button.
button.
You can also view all the activities related to the email (incoming emails, sent emails, bounced emails, and emails marked as spam), as well as reply to emails, from the Activity History tab.
8. Troubleshooting
Why can’t I see the Opportunity Details tab on the lead details page?
If you can’t see the Opportunity Details tab on the lead details page, it may be that your admin has either removed or not added the Opportunity Details tab through the Lead Details View Customization (LDVC) feature. Request your admin to navigate to the Lead Details View feature and add ‘Opportunity Details’ under the ‘Tabs’ section.
Any Questions?
Did you find this article helpful? Please let us know any feedback you may have in the comments section below. We’d love to hear from you and help you out!

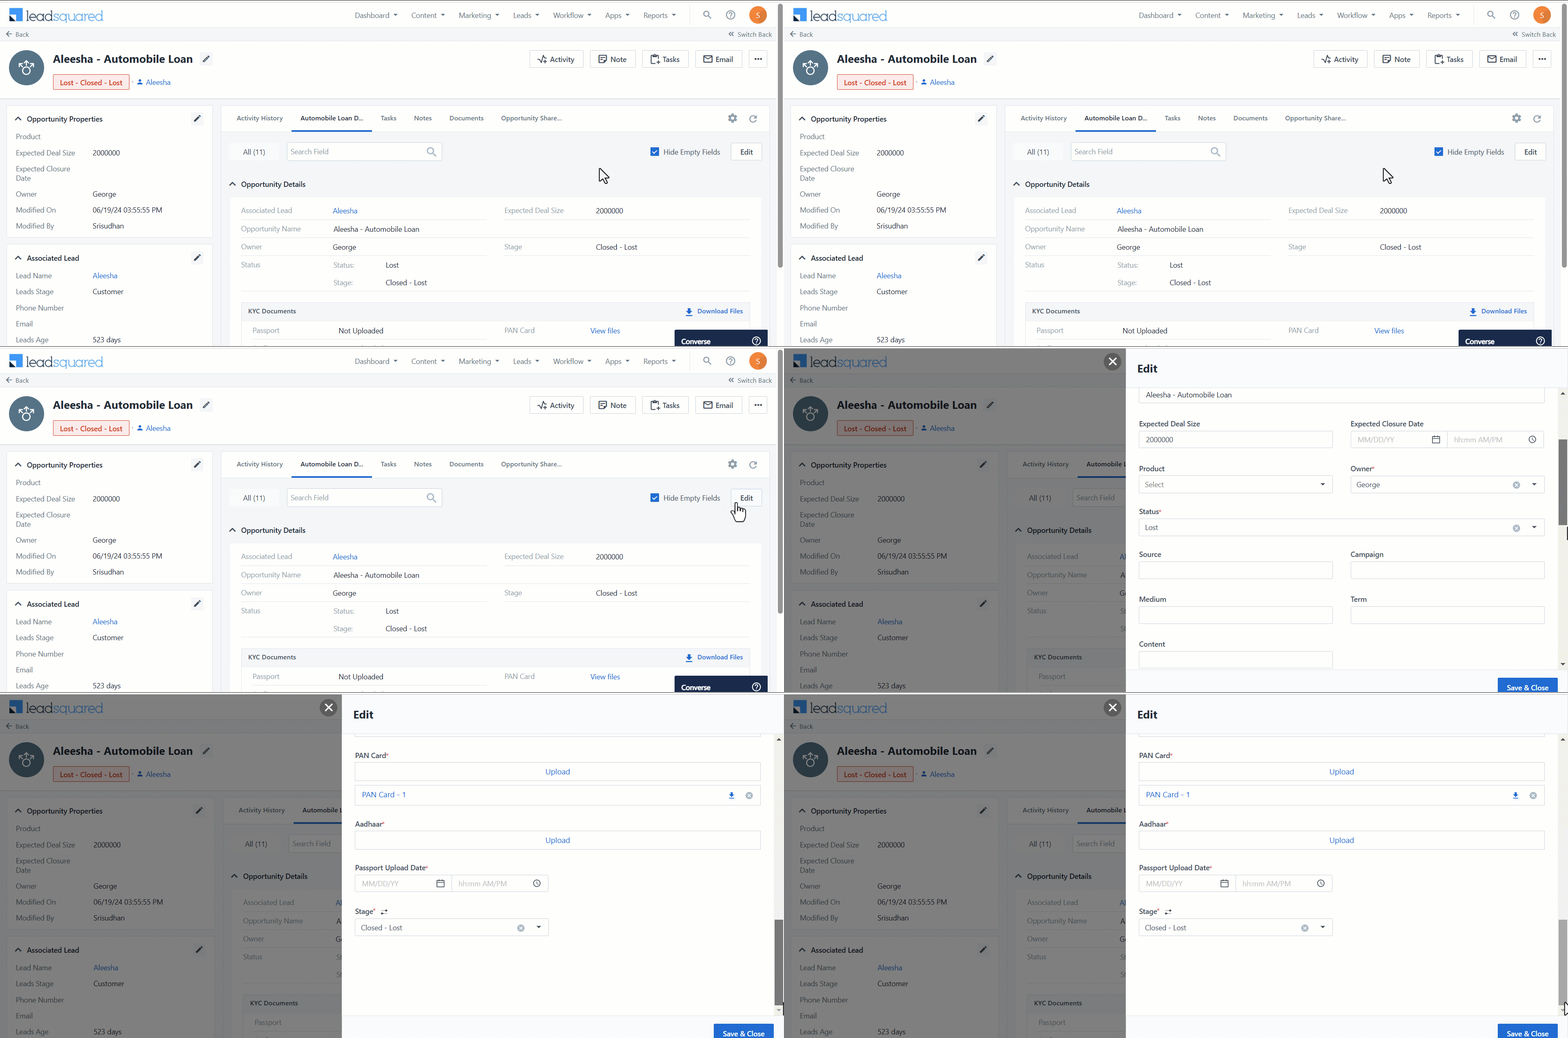 Once you’ve updated the opportunity fields, click Save & Close.




what indicates LOST in the leads PROFILE and INPROGRESS,ACTIVE,etc
Hi Shailendra.
I couldn’t fully understand your query. Could you provide more context? Alternatively, you may contact support@leadsquared.com for prompt resolution.
Ok fine I have attached a picture,
So now you can see an open has been written below leads name so like that there are options like ACTIVE,LOST,etc
Hi Shailendra,
If you’re talking about the opportunity statuses (Open, Won, Lost), these cannot be configured. However, you can configure the opportunity stages within each opportunity status in the Opportunity settings on the Leadsquared Web App. To know more, see Opportunity Configurations. If this does not address your issue, please reach out to support@leadsquared.com with a detailed mail of the problem you’re facing. We’ll get back to you ASAP.