


Get Started
Sales Suite
Field Ops
Marketing
Service CRM
Integrations & Apps
FloStack
Lead Management – Feature Guide
1. Feature Overview
Leads are your potential customers. In LeadSquared, you can track your lead’s journey from creation, through marketing and sales activities, all the way to conversion.
The lead entity is highly customizable. In addition to system fields (first name, email, etc.), you can create custom lead fields (enrollment Id, passport number, etc.) to capture details specific to your business use cases.
Features like lead scoring and prioritization enable you to apply your own business logic to categorize leads based on their suitability, interest, and engagement, and push them further down the sales funnel.
Once a lead is created in your system, you can track activities (website visits, email opens, phone calls, etc.), perform tasks (schedule meetings, demos, site visits, etc.), and use a variety of other features to convert them into customers.
Unique Fields
A lead is created when at least one unique lead field is present from the list of available fields. A unique field will help prevent duplicate lead creations, and also help differentiate leads from each other. To know more about unique fields, refer to How to Make a Custom Field Unique in Your LeadSquared Application.
But in case you’ve created duplicate leads, you can merge them with existing leads, sanitize the existing data and avoid creating them in future. To know more, refer to How to Avoid Creating Duplicate Leads.
2. How to Create Leads
You can create leads in LeadSquared through multiple channels –
- Form Widgets
You can create and embed a LeadSquared Form Widget on your web page or landing page and start capturing leads in minutes. - Landing Pages
LeadSquared’s landing pages provide existing templates that are optimized to help you capture and convert your leads. - Manually
You can add leads manually to LeadSquared, from the Manage Leads page. To know more, please refer to How to Add Leads. - Import Leads
If you are using another lead generation platform to capture leads, then you can import these leads to LeadSquared through CSV files. To know more, refer to How to Import Leads to LeadSquared. - APIs
Capture leads programmatically through APIs. - Portals
LeadSquared’s Portal feature allows you to build your own portal to capture leads, through online forms. - Third-Party Marketplaces
By integrating third-party lead-capture applications (such as MagicBricks, Sulekha, Common Floor, etc.) with LeadSquared, you’ll be able to view all the leads generated and utilize LeadSquared’s functionalities on these leads. - Others
You can also use different marketing channels such as email inboxes, external CRM software, chat-messaging tools, etc., to capture leads.
3. Prerequisites
You must be the administrator of your LeadSquared account to access lead settings.
4. Configuration
4.1 Lead Fields
You’ll have to set-up lead fields to collect the lead’s information. This will help you identify and differentiate a lead from other leads, and help you classify the leads as per your business requirements.
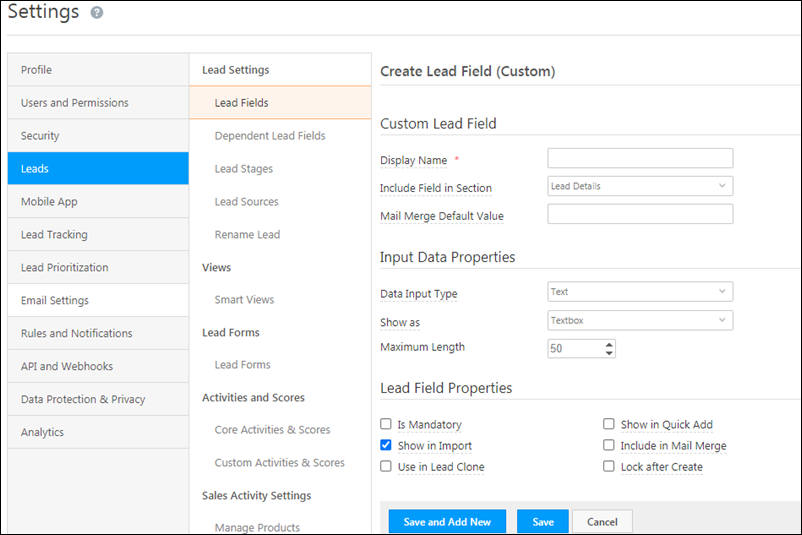
To create a custom lead field –
- From the main menu, navigate to My Profile>Settings>Leads>Create Lead Field.
- On the Create Lead Field page, provide a Display Name for the lead field, and enter all the other details.
- Once you’ve entered all the details, click Save.
- If you want to add another lead field, click Save and Add New.
| Property |
Description | |
| Display Name | The name of the field (first name, second name, email Id, etc.). This field is compulsory. | |
| Include Field in Section | The section in which the lead field will be visible. The options available are Lead Details, Additional Details and Hidden Fields. | |
| Mail Merge Default Value | The default value that’ll be used when the mail merge value is not provided for this field. | |
| Data Input Type | The data type of the lead field. Some of the options available are number, email Id, website, dropdown, boolean, etc. | |
| Show As | The way in which the input field will appear on the LeadSquared user interface. The options are either as a textbox or text-area. | |
| Maximum Length | The maximum number of characters which can be included in the field is 256 characters. | |
| Lead Field Properties | The additional properties which determine how the lead field behaves. Hover your cursor over each option to know more about the field. | |
| Is Mandatory | Marks the field as mandatory. Users won’t be able to create a new lead record without filling this field. | |
| Show in Import | Makes this field available for mapping during lead import through CSV. | |
| Use in Lead Clone | Makes the field available when users try to clone a lead. | |
| Show in Quick Add | Makes this field available when a user uses the Quick Add form to add a lead. | |
| Include in Mail Merge | Includes this field as a mail merge option for email personalization or automation. | |
| Lock after Create | Non-admin users won’t be able to update this field once a lead is created. | |
Note:
- A comprehensive pop-up box of all dependent areas where a lead field is utilized, is displayed when a user tries to delete the field.
- Lead Lists or Quick Filters containing the lead field for inactive users must be deleted by the admins before deleting the lead field itself.
4.2 Lead Stages
Lead Stage represents the current position of your lead in the sales funnel. Leads may be at different levels of engagement with your offers depending upon their awareness, need, interest and budget. The position of a lead in sales funnel based on its level of engagement is called Lead Stage. For more details see, Managing Lead Stages.
By default, LeadSquared is configured with three default Lead Stages –
- Prospect
- Opportunity
- Customer
Lead Stages may vary from company to company and industry to industry. Keeping this variation in mind, LeadSquared allows you to customize and add Lead Stages. To add lead stages –
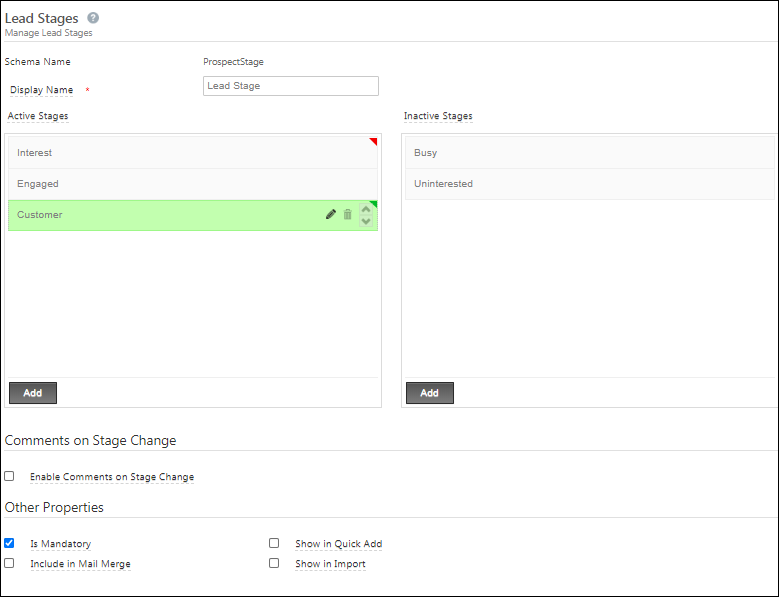
- From the main menu, navigate to My Profile>Settings>Leads>Lead Stages.
- Enter the Display Name for the custom lead field.
- Under Active Stages, click the Add button to add lead stages.
- Under Inactive Stages, click the Add button to add lead stages.
- To edit an existing lead stage, hover your cursor on the right side of the lead stage, and click the
 icon.
icon. - To delete an existing lead stage, hover your cursor on the right side of the lead stage, and click the
 icon.
icon. - Click the
 checkbox against Enable Comments on Stage Change if you want to enable user comments when updating a lead field.
 - Under Other Properties, click the checkbox against the properties that you want to enable. Hover your cursor over each option to know more about that property.
| Properties | Description |
| Is Mandatory | Marks the field as mandatory. Users won’t be able to create a new lead record without filling this field. |
| Show in Quick Add | Includes the field in the quick add lead option to create a new lead. |
| Include in Mail Merge | Includes this field as a mail merge option for email personalization. |
| Show in Import | Enables the field for mapping during lead import through CSV. |
4.3 Lead Sources
Lead sources are the avenues through which you acquire leads. Common lead sources include social media, organic search, trade shows, inbound calls, etc. By default, you’ll find the following lead sources in your account –
- Organic Search
- Referral Sites
- Direct Traffic
- Social Media
- Inbound Email
- Inbound Phone Call
- Outbound Phone Call
- Email Marketing
- Pay per click Ads
These lead sources are relevant to most businesses, and you cannot delete them from your account. However, you can add your own lead sources that suit your business. To know how to add lead sources, and perform other actions, refer to Settings: Managing Lead Sources.
4.4 Lead Forms
Lead forms can be customized to capture lead fields relevant for your business. While creating lead forms, you’ll be able to –
- Create, edit and delete sections in a lead form
- Manage the sequence of different sections
- Manage the position of different fields in a section
- Move a field from one section to another section
- Manage the length of a field displayed in the form
- Hide unused custom fields
By default, LeadSquared is configured with three basic sections – Lead Details, Additional Details and Hidden Details. To create your own sections, rename or delete an existing, refer to Lead Form Customization.
5. Lead Tracking
Lead tracking allows you to track a lead’s activities (views, clicks, etc) on your websites. This section also includes information on landing page domains, tracking URLs (using UTM parameters) and more.
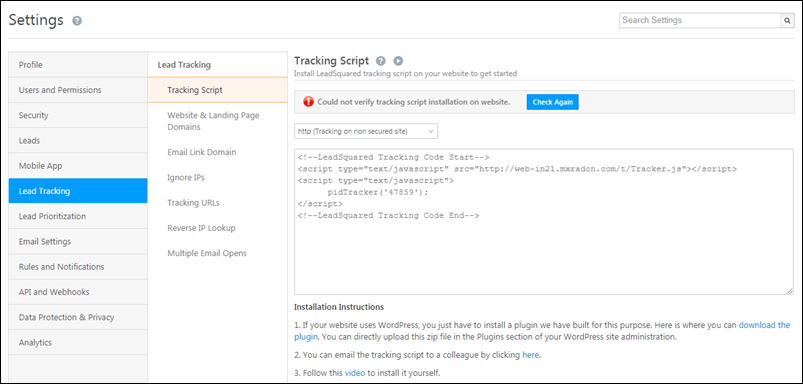
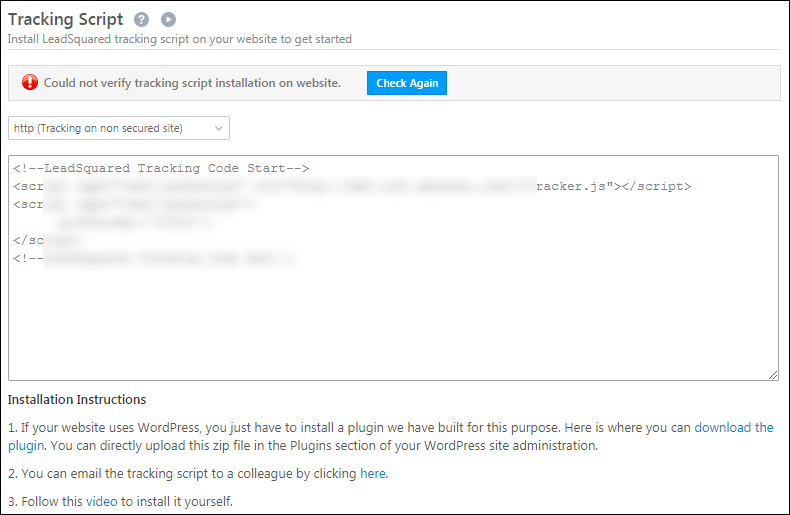
5.1 Tracking Script
Once you install the LeadSquared tracking script on your website, you can track the different sources (such as online ads, social media, organic searches, etc.) through which your leads are visiting your website. You can also track other events that leads perform on your website, such as link clicks, page views, etc. To know how to install a tracking script on your website, refer to How to Deploy the LeadSquared Tracking Script on Your Website?
5.2 Website & Landing Page Domains
You can track website visits on multiple domains (and sub-domains under each domain) in LeadSquared. You can also customize landing page URLs in your own domain and associate multiple sub-domains for your landing pages. To know more, refer to Configuring Multiple Domains in LeadSquared.
5.3 Email Link Domain
LeadSquared encodes the links to webpages are included in the emails you send to your leads, to track who clicked on your emails and the links. After they click the links and visit your website or landing pages, we further track their visits on your web pages. To know more, refer to Domain Settings for Email Links.
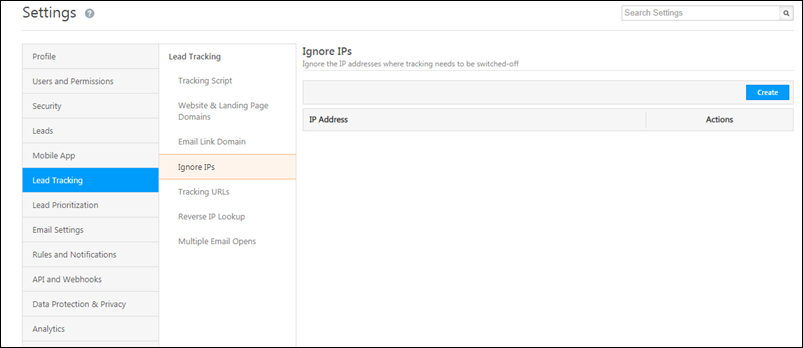
5.4 Ignore IPs
You can ignore IP addresses for various use cases, such as not wanting to track internal users, product-specific visitors, etc. To do this, enter the IP addresses on which you want tracking to be disabled, and click Create once you’re done.
5.5 Tracking URLs
Create tracking URLs for your landing pages with UTM codes to enable multi-dimensional tracking across your campaigns, social media pages and other sources. To know more, refer to How to Use Tracking URL Feature.
5.6 Reverse IP Lookup
By enabling Reverse IP Lookup, you can identify the location details of a lead (such as city, state and country) when they submit on LeadSquared landing pages. For more information, please refer to Reverse IP Lookup.
5.7 Multiple Email Opens
By enabling Multiple Email Opens, you can track multiple email opens for the same lead. To know more, refer to Multiple Email Opens.
6. Lead Prioritization
Through lead prioritization, you can segregate quality leads from dis-engaged leads,and reach out to leads that you can easily convert into customers. To know more, refer to Lead Prioritization.

6.1 Lead Scoring
Lead Score is the measure of Lead activity in response to your marketing offers. An engaged Lead interacts with you online or offline. These interactions are essentially Lead activities with varied level of importance. To know more, please refer to How does Lead Scoring work?
6.2 Lead Quality Criteria
Lead Quality Criteria helps you set rules that would identify leads closest to your ideal customer persona. Leads are evaluated against these rules and assigned a score. This score can be used to filter leads that are best suited for carrying out sales activities. To know more, refer to Lead Quality Criteria – Setup.
6.2 Engagement Scoring
Engagement Score is calculated based on the recent activities of leads. By determining the engagement level of a lead with these activities, you can set rules to determine the score. The score helps you separate engaged from dis-engaged leads. To know more, refer to Setup Criteria of Lead Engagement Scoring.
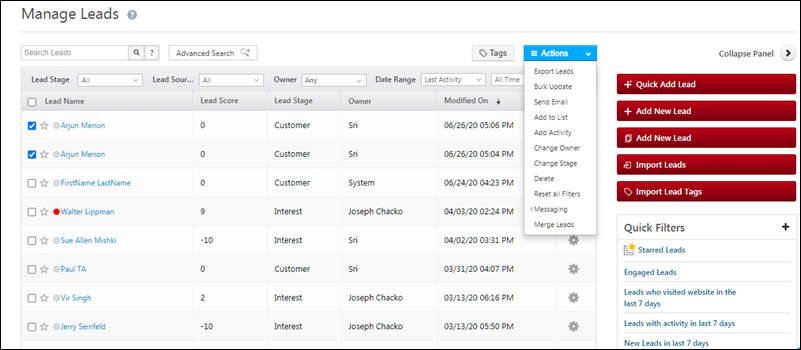
7. Lead Actions
The Manage Leads page is where you can perform all actions on the leads, such as import leads, bulk updates, add to list, add activity, among others. You can use the filtering options, quick search and advanced search to filter leads according to your requirements. You can save quick filters, and also create lists on leads, where you can perform dedicated actions. To know more, refer to
- Leads – Manage Leads
- List Management – Feature Guide
- To access your accounts, leads, activities, and tasks in one place, refer to Smart Views.
7.1 Import Leads
You can import external leads that you’ve captured, to LeadSquared, through a CSV file. To use this feature, navigate to the Manage Leads page and click the Import Leads button. To know more, refer to How to Import Leads to LeadSquared.
7.2 Export Leads
You can export your leads that are available in LeadSquared, from the Manage Leads page or the Smart Views page. The exported leads are sent to your registered email Id in a CSV file. To know more, refer to How to Export Your Leads/Lead Details.
7.3 Merge Leads
If you have created duplicate leads in your account, you can merge them into a single lead. This helps you eliminate multiple leads present with the same details, in your account. To know more, refer to How to Merge Leads in your LeadSquared Account.
8. Customize Lead Details View
Admins can fully customize the Lead Details page to match each team’s unique requirements. This ensures that different teams see the information and actions most relevant to them. You can configure the following:
- Tabs – Choose which System Tabs (e.g., Activity History, Tasks) and Custom Tabs (e.g., KYC Documents, Support Tickets) are visible to your users.
- Actions – Define which actions are available from the Lead Actions dropdown (e.g., Send Email, Call Lead).
- Quick Action Buttons – Add frequently used actions as one-click buttons for easy access.
- Lead vCard – Select the specific lead fields you want displayed in the vCard for a quick snapshot of key details.
9. Object Types
Leads are your potential customers, but businesses often need to capture entities with various personas (students, parents, or school representatives). The Object Type feature facilitates this by allowing you to categorize these entities as distinct objects, each with its own set of fields and forms. This ensures that only relevant information is gathered for each type of entity. Additionally, it provides the flexibility to manage unique stages, workflows, and pipelines for each object type. Reach out to support@leadsquared.com to get this enabled on your account. For those accounts with this feature enabled, the term Lead will be renamed as Object across your LeadSquared iOS application.
Next Steps
You can add activities (such as link clicks, email opens, etc.) on your leads. This will help you track the lead’s journey, and help you take the necessary steps to lead conversion. To know more, refer to Manage Activities.
You can schedule tasks and reminders (such as appointments, phone calls, etc.) on your leads, for your sales users. This will help you keep track of the progress made by your users to take your leads to conversion. To know more, refer to How to Create Tasks and Schedule Reminders.
Any Questions?
Did you find this article helpful? Please let us know any feedback you may have in the comments section below. We’d love to hear from you and help you out!
Hi,
In leadsquared what happens to previous values when lead field values are changed.
Suppose lead field “year” has many values and now I have set as only 2 values. What happens to previous leads ? are they overwritten with default value or kept as it is ?
And if it is kept as it is will they be seen during filtering of leads ? since its still present in the system.
Hi Allan.
We need more context on this. Please give us more details on which lead field you’re referring to.
how can i send country code for phone number
Hi, Amal.
We need more context on this issue. Please reach out to support@leadsquared.com and we’ll get back to you ASAP.
Is it possible to recover deleted leads?
Hi.
Once deleted, leads can’t be restored in LeadSquared. You can view the data of the deleted leads on the The Deleted Leads History Report. Before you delete leads, we recommend you export the leads out of LeadSquared. This will ensure a backup of your leads is always available.
Can we add or Pass fb leads ,more five leads for different projects using the same phone number and name to different owners?
Please let me know if this is possible?
Hi. You can create multiple leads with same phone number, if the phone number is not marked as a unique field. To know more, see How to Make the Phone Number field Unique.
To remove the Phone Number field from being unique,
1. Navigate to Settings>Leads>Lead Fields.
2. Search “Phone Number”.
3. Alongside Phone Number, hover over the actions icon and select Remove Unique.