


Get Started
Sales Suite
Field Ops
Marketing
Service CRM
Integrations & Apps
FloStack
User Roles and Permissions
1. Feature Overview
In Service CRM, there are five default Service Roles, listed below in order of permissions/access –
Admins
They have access to all configurations and features in Service CRM, including login access to the Sales platform, and access to the Users and Permissions page. Admins can create other user role and edit permissions given to all Non-admin roles. Once users are created, Admins add them to service groups and assign them tickets (either manually, or by setting up assignment rules).
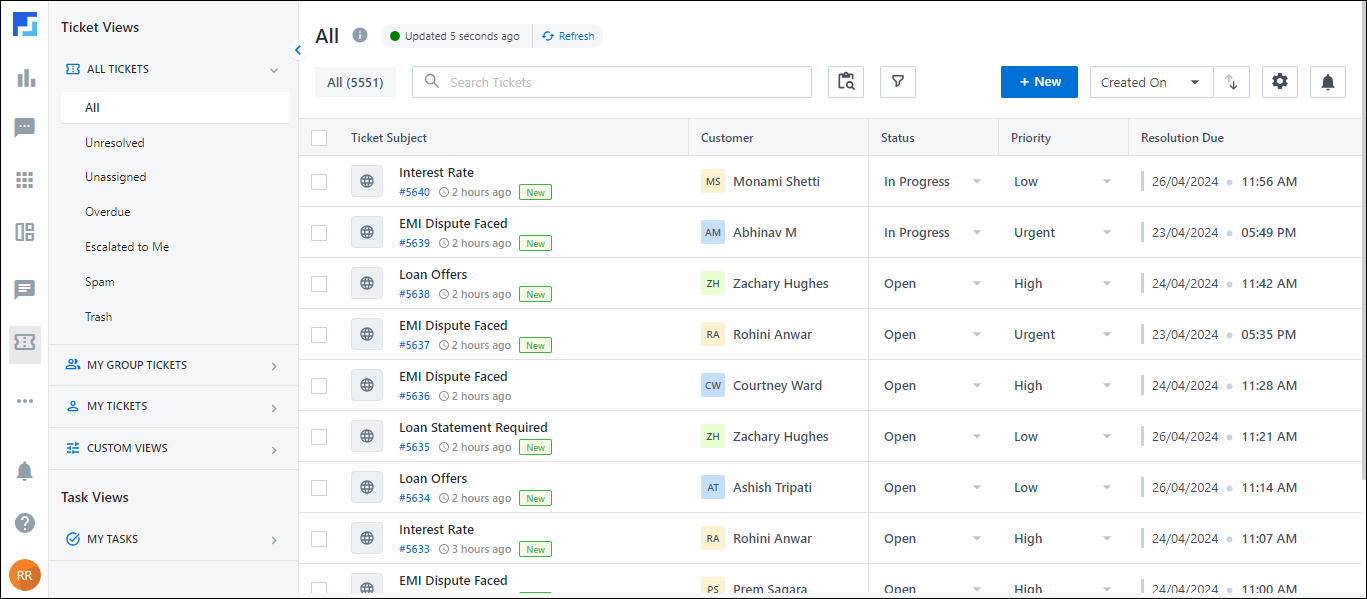
- All Tickets – All the tickets created in the account.
- My Tickets – Only the tickets assigned to you.
- Service Group Tickets – The tickets assigned to a Service Group.
- Unassigned Tickets – Tickets that are unassigned to any user role in the account.
- Other Tickets – Tickets created from other sources (besides email, chat, calls, portals and chat).
Ticket Permissions
| Permissions | All Tickets | My Tickets | Service Group Tickets | Unassigned Tickets | Other Tickets |
| View Tickets | Yes | Yes | Yes | Yes | Yes |
| Update Tickets | Yes | Yes | Yes | Yes | No |
| Delete Tickets | Yes | Yes | Yes | Yes | No |
| Mark Tickets as Spam | Yes | Yes | Yes | No | No |
| Add an Internal Note | Yes | Yes | Yes | Yes | Yes |
| Merge Tickets | Yes | Yes | Yes | Yes | No |
| Export Tickets | Yes | Yes | Yes | Yes | Yes |
| Reply | Yes | Yes | Yes | Yes | No |
| Reply All | Yes | Yes | Yes | Yes | No |
| Forward | Yes | Yes | Yes | Yes | No |
| Bulk Update Tickets | Yes | Yes | Yes | Yes | No |
| Edit Internal Note | Yes | Yes | Yes | Yes | No |
| Assign Tickets | Yes | Yes | Yes | Yes | No |
| Edit Own Internal Note | Yes | Yes | Yes | Yes | No |
| Close Tickets | Yes | Yes | Yes | Yes | No |
| Purge Tickets | Yes | Yes | Yes | Yes | No |
| Resolve Tickets | Yes | Yes | Yes | Yes | No |
| Import Tickets | Yes | Yes | Yes | Yes | No |
| View Dashboards | Yes | Yes | Yes | Yes | No |
| View Reports | Yes | Yes | Yes | Yes | No |
Chat Permissions
| Permissions | All Chats | My Group Chats | My Chats |
| View Chat | Yes | Yes | Yes |
| Assign Chat | Yes | Yes | Yes |
| Add Internal Note | Yes | Yes | Yes |
| End Chat | Yes | Yes | Yes |
| Reopen Chat | Yes | Yes | Yes |
Supervisors
They are typically senior managers overseeing multiple teams within the organization. While they have slightly fewer permissions than Admins, they play a critical role in managing operations. Group managers usually report to Supervisors.
Ticket Permissions
| Permissions | All Tickets | My Tickets | Service Group Tickets | Unassigned Tickets | Other Tickets |
| View Tickets | Yes | Yes | Yes | Yes | Yes |
| Update Tickets | Yes | Yes | Yes | Yes | No |
| Delete Tickets | Yes | Yes | Yes | Yes | No |
| Mark Tickets as Spam | Yes | Yes | Yes | Yes | No |
| Add an Internal Note | Yes | Yes | Yes | Yes | Yes |
| Merge Tickets | Yes | Yes | Yes | Yes | No |
| Export Tickets | Yes | Yes | Yes | Yes | Yes |
| Reply | Yes | Yes | Yes | Yes | No |
| Reply All | Yes | Yes | Yes | Yes | No |
| Forward | Yes | Yes | Yes | Yes | No |
| Bulk Update Tickets | Yes | Yes | Yes | Yes | No |
| Edit Internal Note | Yes | Yes | Yes | Yes | No |
| Assign Tickets | Yes | Yes | Yes | Yes | No |
| Edit Own Internal Note | Yes | Yes | Yes | Yes | No |
| Close Tickets | Yes | Yes | Yes | Yes | No |
| Purge Tickets | No | No | No | No | No |
| Resolve Tickets | Yes | Yes | Yes | Yes | No |
| Import Tickets | No | No | No | No | No |
| View Dashboards | Yes | Yes | Yes | Yes | No |
| View Reports | Yes | Yes | Yes | Yes | No |
Chat Permissions
| Permissions | All Chats | My Group Chats | My Chats |
| View Chat | Yes | Yes | Yes |
| Assign Chat | Yes | Yes | Yes |
| Add Internal Note | Yes | Yes | Yes |
| End Chat | No | Yes | Yes |
| Reopen Chat | Yes | Yes | Yes |
Group Managers
They oversee specific Service Groups (i.e., teams) within the organization. They are responsible for managing the workload of agents in their group, monitoring ticket resolution times, and ensuring service quality. Agents usually report to Group Managers.
Ticket Permissions
| Permissions | All Tickets | My Tickets | Service Group Tickets | Unassigned Tickets | Other Tickets |
| View Tickets | Yes | Yes | Yes | No | Yes |
| Update Tickets | No | Yes | Yes | No | No |
| Delete Tickets | No | No | No | No | No |
| Mark Tickets as Spam | No | Yes | No | No | No |
| Add an Internal Note | Yes | Yes | Yes | No | Yes |
| Merge Tickets | No | Yes | Yes | No | No |
| Export Tickets | No | Yes | Yes | No | Yes |
| Reply | No | Yes | Yes | No | No |
| Reply All | No | Yes | Yes | No | No |
| Forward | No | Yes | Yes | No | No |
| Bulk Update Tickets | No | Yes | Yes | No | No |
| Edit Internal Note | No | No | No | No | No |
| Assign Tickets | No | Yes | Yes | No | No |
| Edit Own Internal Note | No | Yes | Yes | No | No |
| Close Tickets | No | Yes | Yes | No | No |
| Purge Tickets | No | No | No | No | No |
| Resolve Tickets | No | Yes | Yes | No | No |
| Import Tickets | No | No | No | No | No |
| View Dashboards | No | Yes | Yes | No | No |
| View Reports | No | Yes | Yes | No | No |
Chat Permissions
| Permissions | All Chats | My Group Chats | My Chats |
| View Chat | No | Yes | Yes |
| Assign Chat | No | Yes | Yes |
| Add Internal Note | No | Yes | Yes |
| End Chat | No | Yes | Yes |
| Reopen Chat | No | Yes | Yes |
Agents
Agents are the users who actively work on resolving a ticket, and communicate with your customers. They work within assigned service groups and receive tickets based on Assignment Rules.
Ticket Permissions
| Permissions | All Tickets | My Tickets | Service Group Tickets | Unassigned Tickets | Other Tickets |
| View Tickets | Yes | Yes | Yes | Yes | Yes |
| Update Tickets | No | Yes | No | No | No |
| Delete Tickets | No | No | No | No | No |
| Mark Tickets as Spam | No | Yes | Yes | No | No |
| Add an Internal Note | Yes | Yes | Yes | Yes | Yes |
| Merge Tickets | No | Yes | No | No | No |
| Export Tickets | No | No | No | No | Yes |
| Reply | No | Yes | No | No | No |
| Reply All | No | Yes | No | No | No |
| Forward | No | Yes | No | No | No |
| Bulk Update Tickets | No | Yes | No | No | No |
| Edit Internal Note | No | No | No | No | No |
| Assign Tickets | No | Yes | Yes | No | No |
| Edit Own Internal Note | No | No | No | No | No |
| Close Tickets | No | Yes | No | No | No |
| Purge Tickets | No | No | No | No | No |
| Resolve Tickets | No | Yes | Yes | No | No |
| Import Tickets | No | No | No | No | No |
| View Dashboards | No | Yes | Yes | No | No |
| View Reports | No | Yes | Yes | No | No |
Chat Permissions
| Permissions | All Chats | My Group Chats | My Chats |
| View Chat | No | No | Yes |
| Assign Chat | No | No | Yes |
| Add Internal Note | No | No | Yes |
| End Chat | No | No | Yes |
| Reopen Chat | No | No | Yes |
Light Agent
Light Agents function similarly to regular agents but with significantly fewer permissions. They are typically part of backend teams that do not engage directly with customers or handle tickets end-to-end. Instead, they may assist by providing necessary approvals, verifying documents (such as KYC verification teams), and adding internal notes. Light Agents usually cannot update ticket statuses or communicate directly with customers.
Ticket Permissions
| Permissions | All Tickets | My Tickets | Service Group Tickets | Unassigned Tickets | Other Tickets |
| View Tickets | Yes | Yes | Yes | Yes | Yes |
| Update Tickets | No | No | No | No | No |
| Delete Tickets | No | No | No | No | No |
| Mark Tickets as Spam | No | No | No | No | No |
| Add an Internal Note | Yes | Yes | Yes | Yes | Yes |
| Merge Tickets | No | No | No | No | No |
| Export Tickets | No | No | No | No | Yes |
| Reply | No | No | No | No | No |
| Reply All | No | No | No | No | No |
| Forward | No | No | No | No | No |
| Bulk Update Tickets | No | No | No | No | No |
| Edit Internal Note | No | No | No | No | No |
| Assign Tickets | No | No | No | No | No |
| Edit Own Internal Note | No | No | No | No | No |
| Close Tickets | No | No | No | No | No |
| Purge Tickets | No | No | No | No | No |
| Resolve Tickets | No | No | No | No | No |
| Import Tickets | No | No | No | No | No |
| View Dashboards | No | No | No | No | No |
| View Reports | No | No | No | No | No |
Chat Permissions
| Permissions | All Chats | My Group Chats | My Chats |
| View Chat | No | No | Yes |
| Assign Chat | No | No | Yes |
| Add Internal Note | No | No | Yes |
| End Chat | No | No | Yes |
| Reopen Chat | No | No | Yes |
2. Prerequisites
- Service CRM is a paid feature. To enable it, contact your account manager, or write to scsupport@leadsquared.com.
- You must be a Service CRM Admin to create other users.
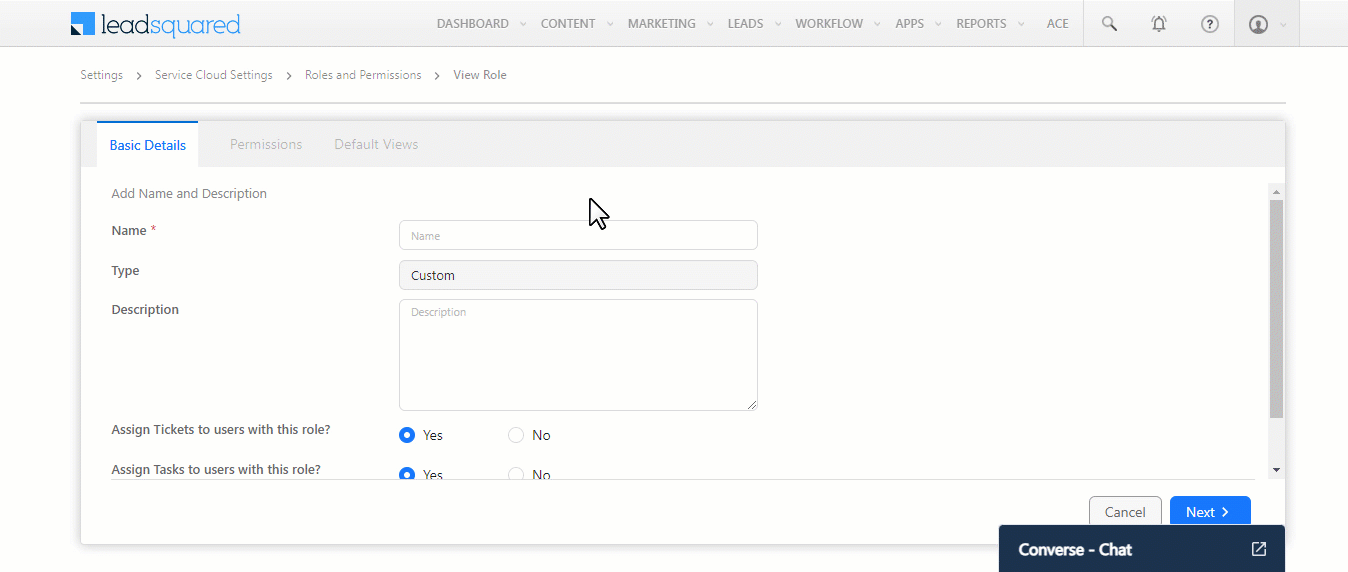
3. Create Custom Service Roles
In addition to the five default Service Roles, you can create custom Service Roles based on your organization’s needs. Examples of custom user roles are Support Managers, Escalation Supervisors, and more. To create custom roles –
- Once you log in to LeadSquared (https://login.leadsquared.com/), navigate to My Profile>Settings>Service Cloud.
- Under User Management, click Roles & Permissions.
- On the Roles and Permissions screen, click Create New Role.

3.1 Basic Details
On this tab, add the following basic user role details. This will help identify the role internally –
- Name – The display name for the user role.
- Type – The role type. This is set to Custom by default.
- Description – A brief description of the user role. This is optional.
- Assign Tickets to users with this role – If you want other user roles to be able to assign tickets to the user role you’re creating, select Yes.
- Assign Tasks to users with this role – If you want other user roles to be able to assign tasks to the user role you’re creating, select Yes.
- Can be tagged in Internal Notes – If you want other user roles to be able to tag the user role you’re creating in Internal Notes, select Yes.
Once you’re done, click Next.
Note:
- You cannot edit a default user role.
- For a custom user role, you can edit and update all the details listed above (except for the Type).
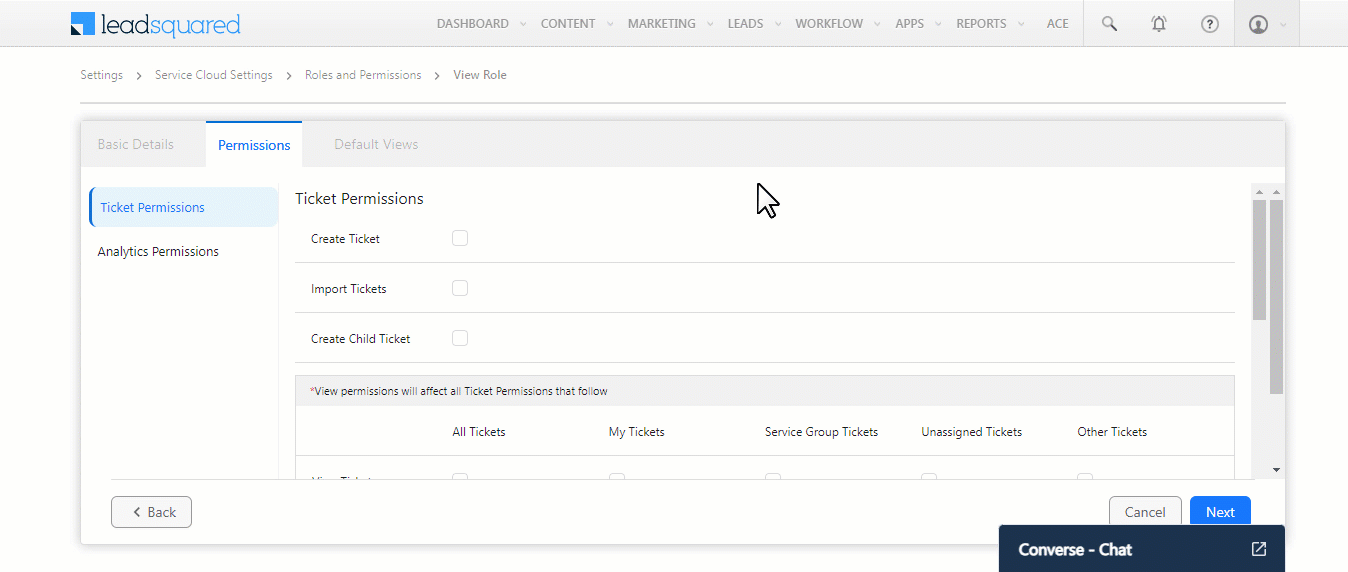
3.2 Permissions
Once a service user role is created, you can configure the permissions to control the access granted to this user role from the Permissions tab –
- Ticket Permissions – Control the actions this user role can perform on a ticket. Enabling a checkbox allows the user role to perform that specific action. For example, enabling the checkbox alongside Import Tickets allows the user to import tickets into LeadSquared. Some actions you can configure are Create Ticket, Create Child Ticket, View Ticket, Update Ticket, Delete Ticket, etc.
- Analytics Permissions – Control whether the user role can view the dashboard and report analytics associated with the tickets created in your account. Enabling a checkbox grants the user role permission to view that specific feature. For example, under All Tickets, if the checkbox alongside View Dashboard is enabled, then this user role can view all the tickets from their Dashboard.
Once you’re done, click Next.
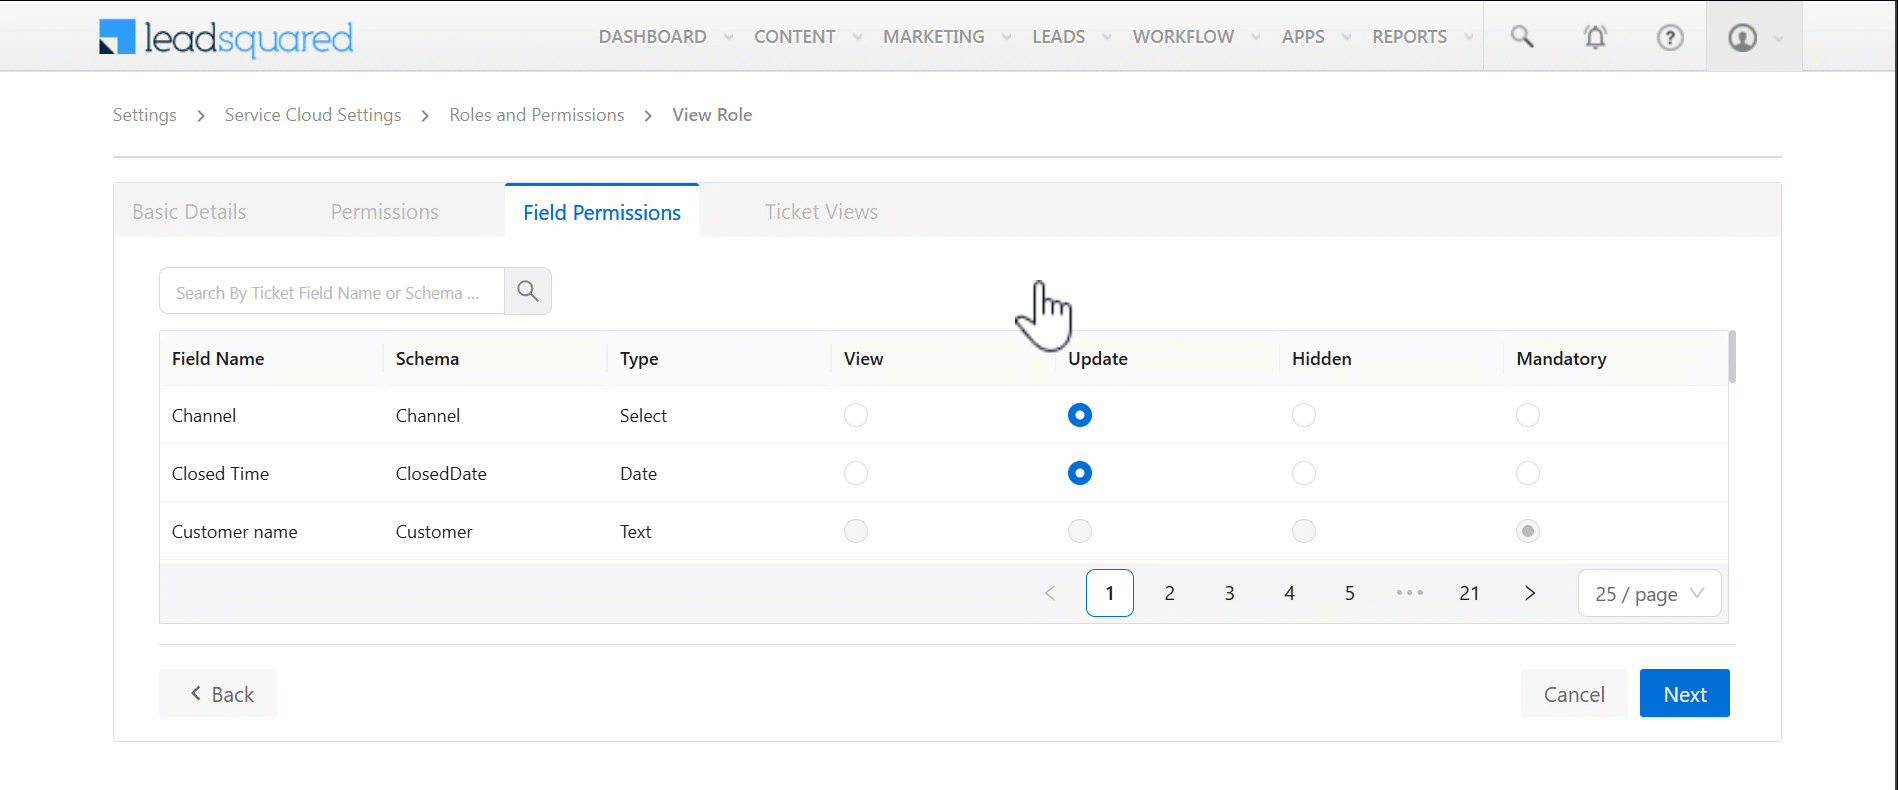
3.3 Field Permissions
This tab lets you control whether a specific field is visible to a user. If it is visible, you can further define the actions the user can perform on it. For example, you can allow agents to view the “To Email” field but restrict them from updating it.
Note:
- To enable this feature on your account, contact your account manager, or write to scsupport@leadsquared.com.
- You can configure Field Permissions only for custom user roles.
You can configure the following permissions –
- View – The user can only view this field.
- Update – The user can view and update this field.
- Hidden – The field is hidden, and the user cannot view it.
- Mandatory – The user must mandatorily update this field when creating a ticket.
Once you’re done configuring the permissions for different fields, click Next.
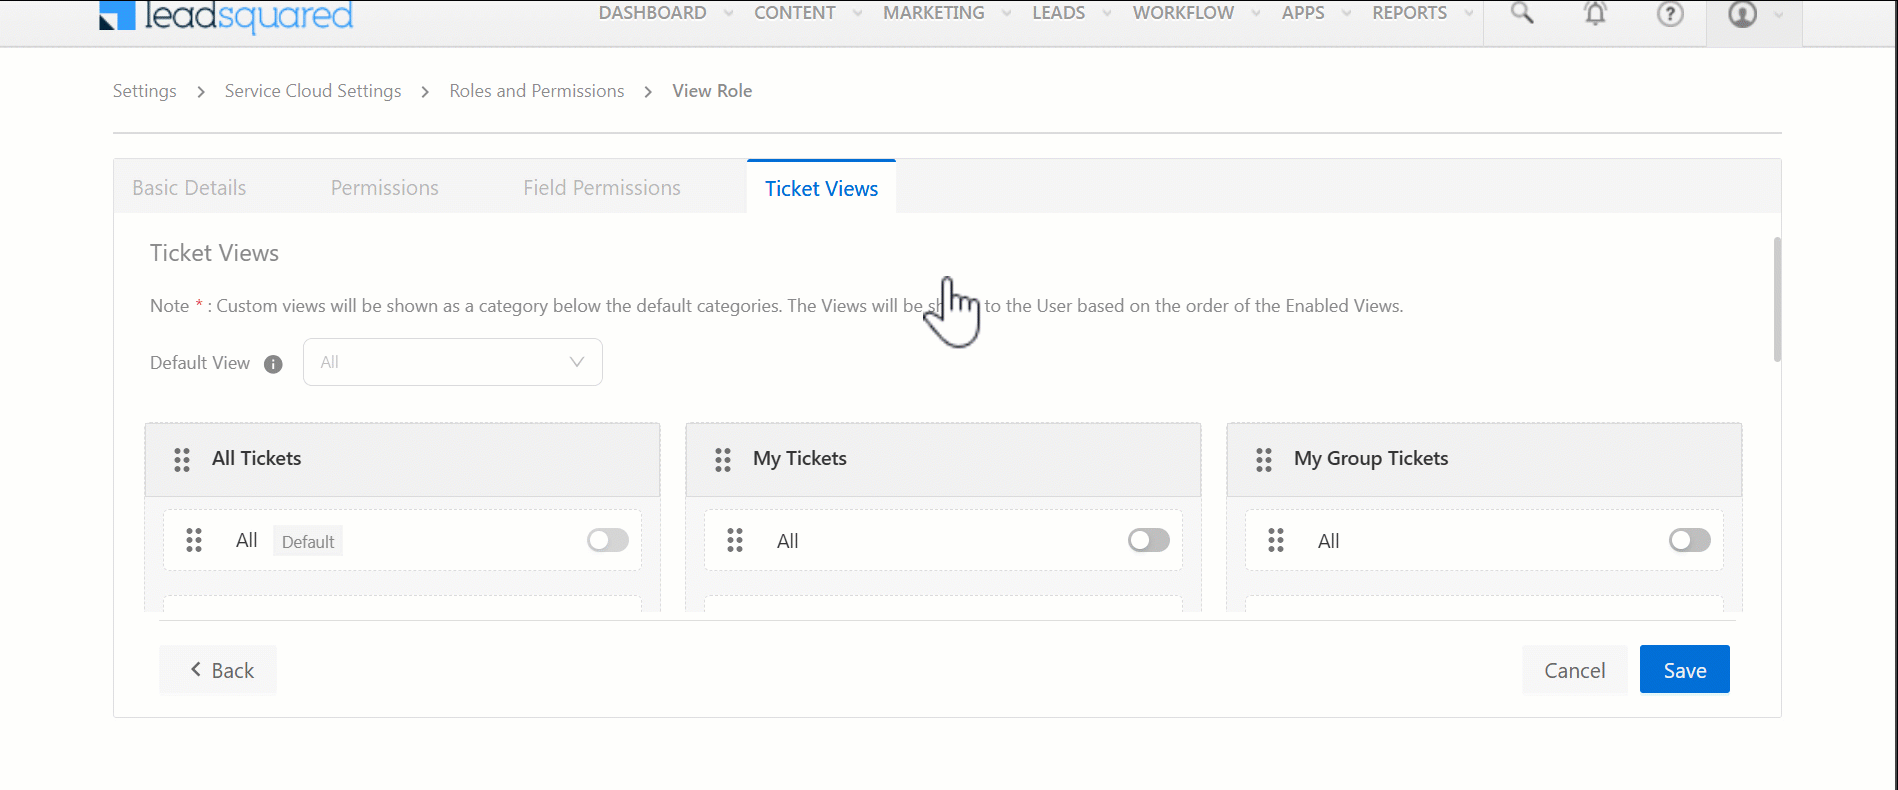
3.4 Ticket Views
Configure the views available to this user role on the Ticket Views page. This controls what the user can see under each Ticket Views tab. For example, if you only enable Unresolved tickets’ permission, the user can only see all the Unresolved tickets on the Ticket Views page, and nothing else.
Here, configure the permissions for the following categories –
- All Tickets – Controls which ticket tab (e.g., All tickets, Overdue tickets, etc.) the user can view among the tickets created at the account level.
- My Tickets – Controls which ticket tab (e.g., Unresolved tickets, Escalated tickets, etc.) the user can view among the tickets assigned to them.
- My Group Tickets – Controls which ticket tab (e.g., Trash, Escalated tickets, etc.) the user can view among the tickets assigned to their Service Group.
- To enable the view against a ticket, enable the
 slider.
 - To reorder the ticket list within a category, drag and drop the tickets in the order of your preference.
- To reorder the list of categories, drag and drop the categories in the order of your preference.
- Additionally, from the Default View dropdown, select the default view the user will see each time they open the Ticket Views page.
- This view will be automatically enabled and applied under the first category you’ve configured.
- This default view cannot be disabled.
- Different default views can be set for different custom user roles.
Once you’re done, click Next.
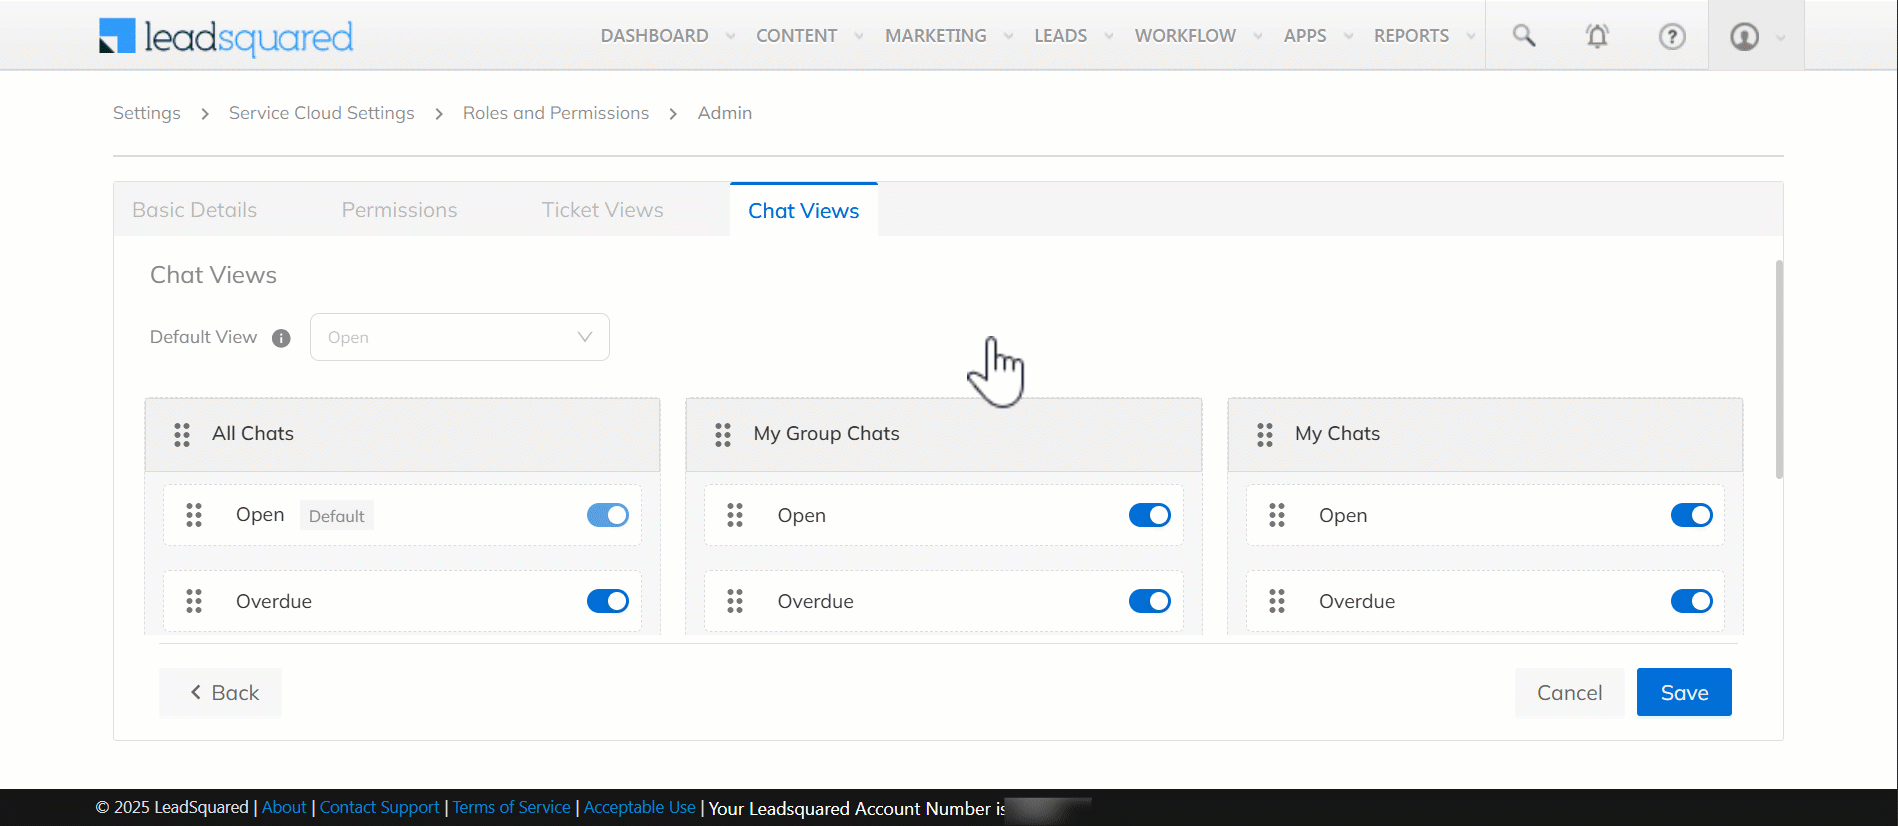
3.5 Chat Views
Configure the views available to this user role on the Service Chat page. This controls what the user sees under each chat tab. For example, if only Overdue and Waiting for Assignment are enabled under My Chats, the agent sees only these chats on that page.
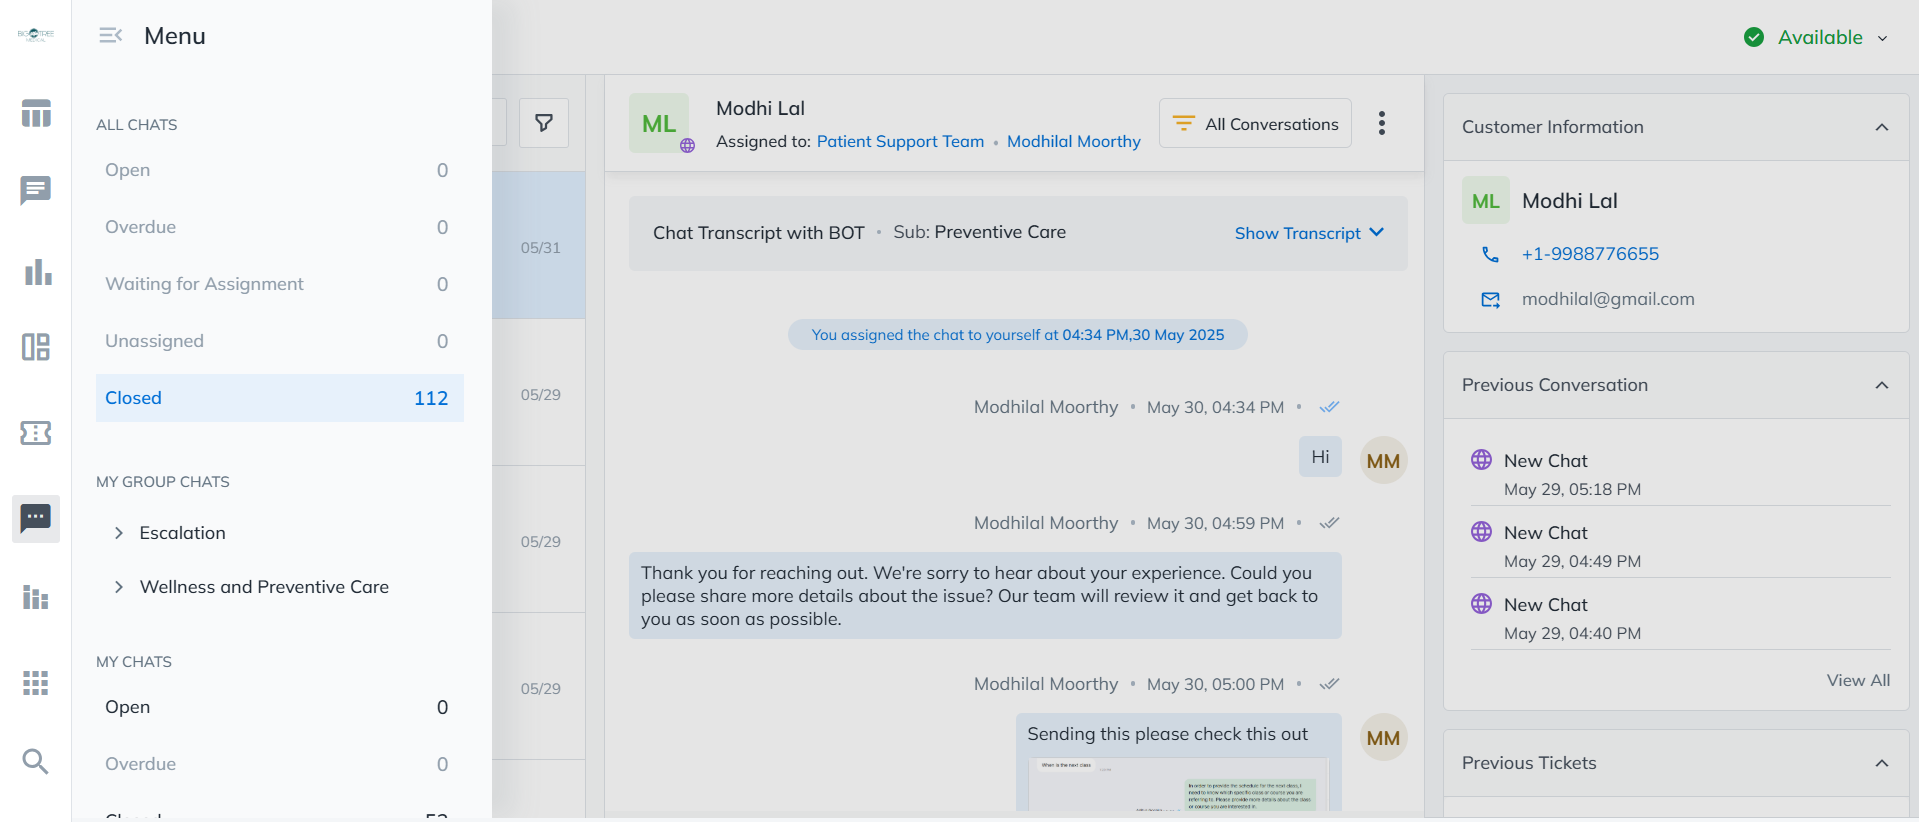
Here, configure the permissions for the following category –
- All Chats – All the Service chats on the user’s account.
- My Group Chats – All the chats assigned to the user’s Service Group.
- My Chats – All the chats assigned to the user.
- To enable the view against a chat type, enable the slider.
- To reorder the chat list within a category, drag and drop the tickets in the order of your preference.
- To reorder the list of categories, drag and drop the categories in the order of your preference.
- Additionally, from the Default View dropdown, select the default view the user will see each time they open the Chat page.
- This view will be automatically enabled and applied under the first category you’ve configured.
- This default view cannot be disabled.
- Different default views can be set for different custom user roles.
Once you’re done, click Save.
3.6 Other Actions
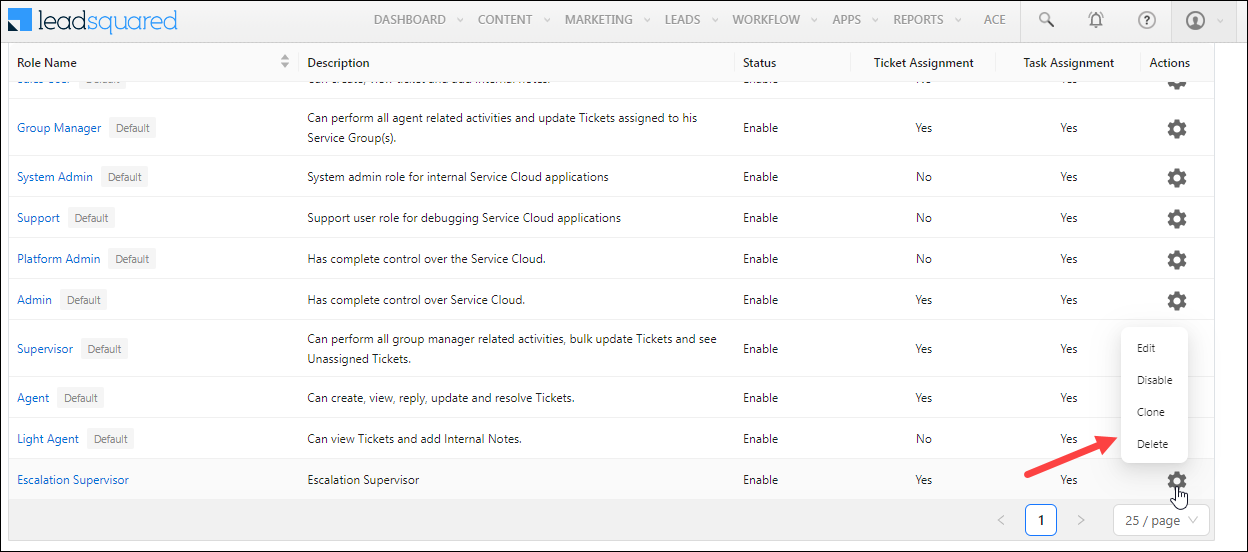
Once a user role is created, you can perform the following actions from the Roles and Permissions screen –
- Edit – Allows you to edit the user role details and permissions.
- Disable – Let’s you disable the user role. Once disabled, this user role cannot access the Service CRM tool.
- Clone – Enables you to clone an existing user role.
- Delete – Deletes the user role.
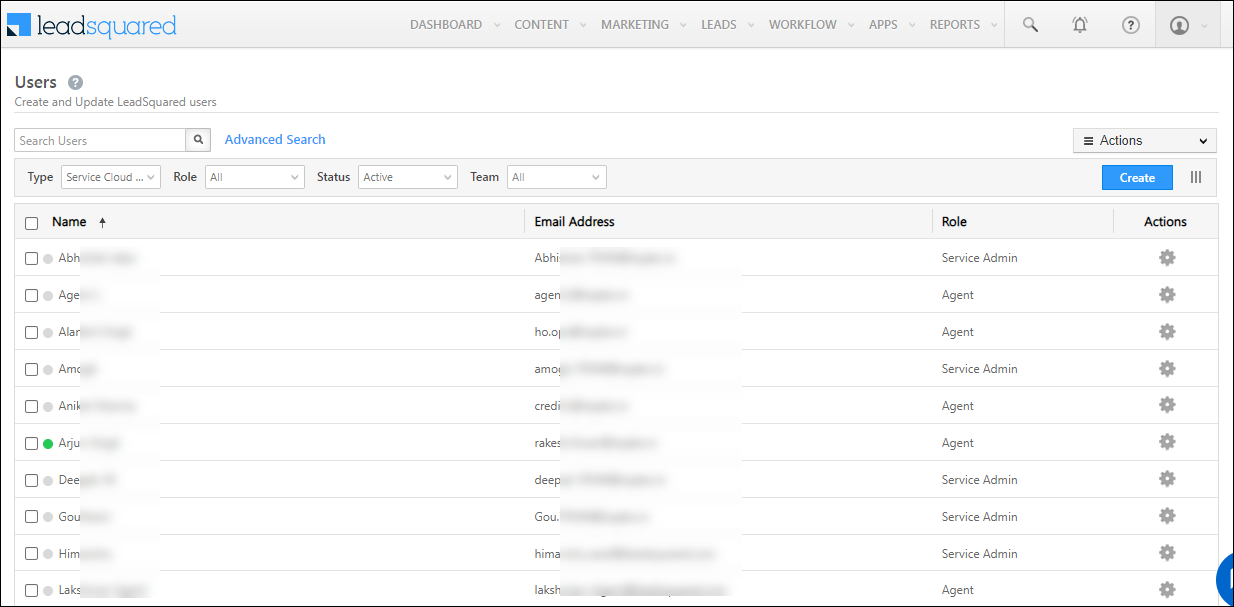
4. Create Service Users
The process of creating users in your account is similar to the process of creating Sales CRM users.
- Once you log in to LeadSquared (https://login.leadsquared.com/), navigate to My Profile>Settings>Users and Permissions>Users.
- Click the Create button, and on the Create user pop-up, enter the following details –
- First Name – The user’s first name (e.g., David).
- Last Name – The user’s last name (e.g., Brent).
- Email Address – The user’s official email address (e.g., david.brent@whogg.com).
- Phone (Mobile) – The user’s phone number.
- User Type – From the list of options, select Service Cloud.
- Role – From the list of options, choose the Service CRM user role you want to assign to the user. You can select from the default or custom roles available on your account.
- Reporting to – Choose the user to whom the new user should report.
- Team – Choose the team you want the user to join.
- To add more users, click Create and Add New. Once you’re done creating users, click Create User. Your Sales User will now be visible in your LeadSquared account.

5. Hybrid Users
The Sales + Service user (Hybrid user) can access both the LeadSquared Sales platform and the LeadSquared Service platform. This user has all the Sales platform capabilities (create and access sales platform users, leads, Smart Views, automation, connectors, etc.) along with all the Service platform capabilities (create and access tickets, Service Groups, Assignment Rules, etc.). This gives the user unrestricted access* to the LeadSquared platform.
Note:
- *Their access can be restricted through the use of Permission Templates.
- This is a paid user role. To enable it on your account, contact your account manager, or write to either support@leadsquared.com or scsupport@leadsquared.com.
To create this user role –
- Once you log in to LeadSquared (https://login.leadsquared.com/), navigate to My Profile>Settings>Users and Permissions>Users.
- Click the Create button, and on the Create user pop-up, enter the following details –
- First Name – The user’s first name (e.g., David).
- Last Name – The user’s last name (e.g., Brent).
- Email Address – The user’s official email address (e.g., david.brent@whogg.com).
- Phone (Mobile) – The user’s phone number.
- User Type – From the list of options, select Sales + Service user.
- Role – From the list of options, choose the Sales Role and Service Role you want to assign to the user. You can select from the default or custom roles available on your account.
- Reporting to – Choose the user to whom you want the current user to report.
- Team – Choose the team you want the user to join.
- To add more users, click Create and Add New. Once you’re done creating users, click Create User. Your Sales User will now be visible in your LeadSquared account.
6. Manage Service Permissions
Once an Agent is created, you can define limits on the number of tickets they can be assigned through Telephony, Chat and Others (Email and manually created tickets). You can also assign them to a Service Group.
This can be configured from the Users screen –
- Navigate to My Profile>Settings>Users and Permissions>Users.
- Alongside the agent for whom you want to define the permission, hover your cursor over
 , and click Edit.
 - On the Edit user pop-up, navigate to the Manage Service Permission tab, and configure the following permissions –
- Telephony – Enable the slider to allow the agent to work on tickets created through the telephony channel. Once you’ve enabled the slider, define the number of tickets this agent be assigned. For example, if you add 3, the agent will only receive up to 3 tickets created through telephony. When one of these tickets is closed, a new ticket created through telephony will be assigned to the agent.
- Chat – Enable the slider to allow the agent to work on tickets created through the chat source. Once enabled, specify the number of tickets this agent can be assigned. For example, if you add 5, the agent will only receive up to 5 tickets created through the chat channel. When one of these tickets is closed, a new ticket created through chat will be assigned to the agent.
- Others – Enable the slider to allow the agent to work on tickets created through other sources (such as email, manual creation, etc.). Once enabled, specify the number of tickets this agent can be assinged. For example, if you add 10, the agent will only receive up to 10 tickets created through these sources assigned to them. When one of these tickets is closed, a new ticket from any of these sources will be assigned to the agent.
- Groups – This displays the Service Groups the agent is currently part of. Click the dropdown to view the list of other Service Groups in your account. You can add this user to any of these groups directly from this screen.
- Telephony – Enable the slider
- Once you’re done, click Save.
Next Steps
- Once users are created, you can add them to Service Groups.
- To define the working hours for these users, refer to Workday Templates.
Any Questions?
Did you find this article helpful? Please let us know your feedback in the comments section below. We’d love to hear from you and help you out!