1. Feature Overview
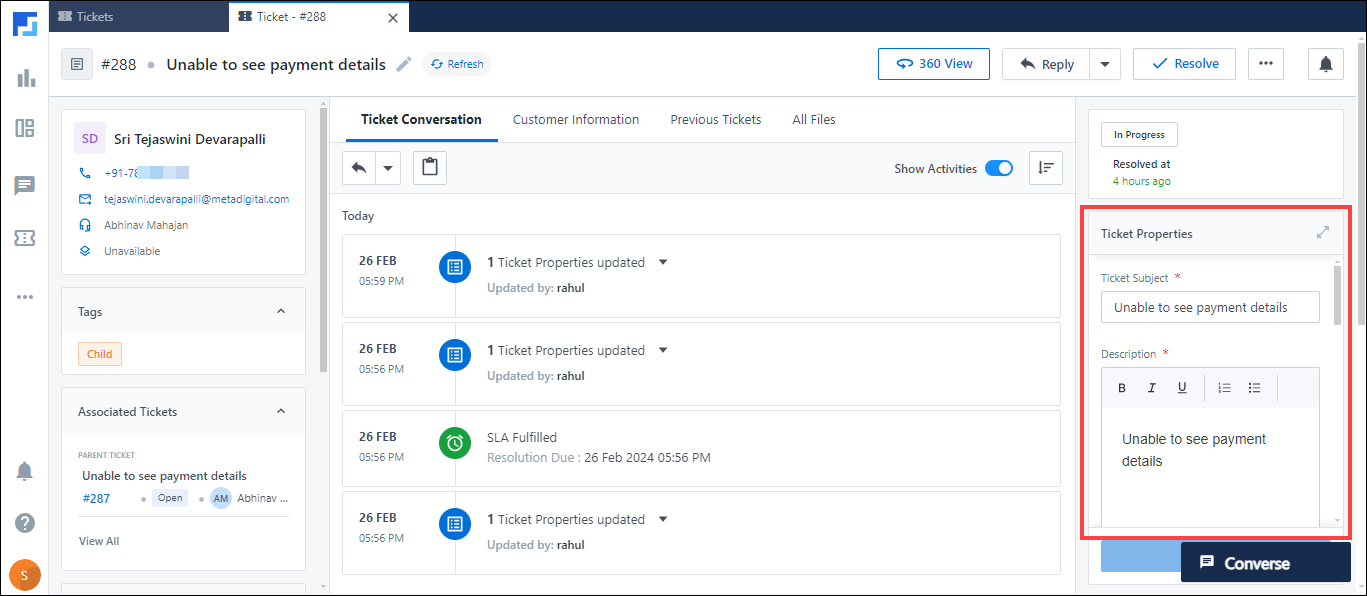
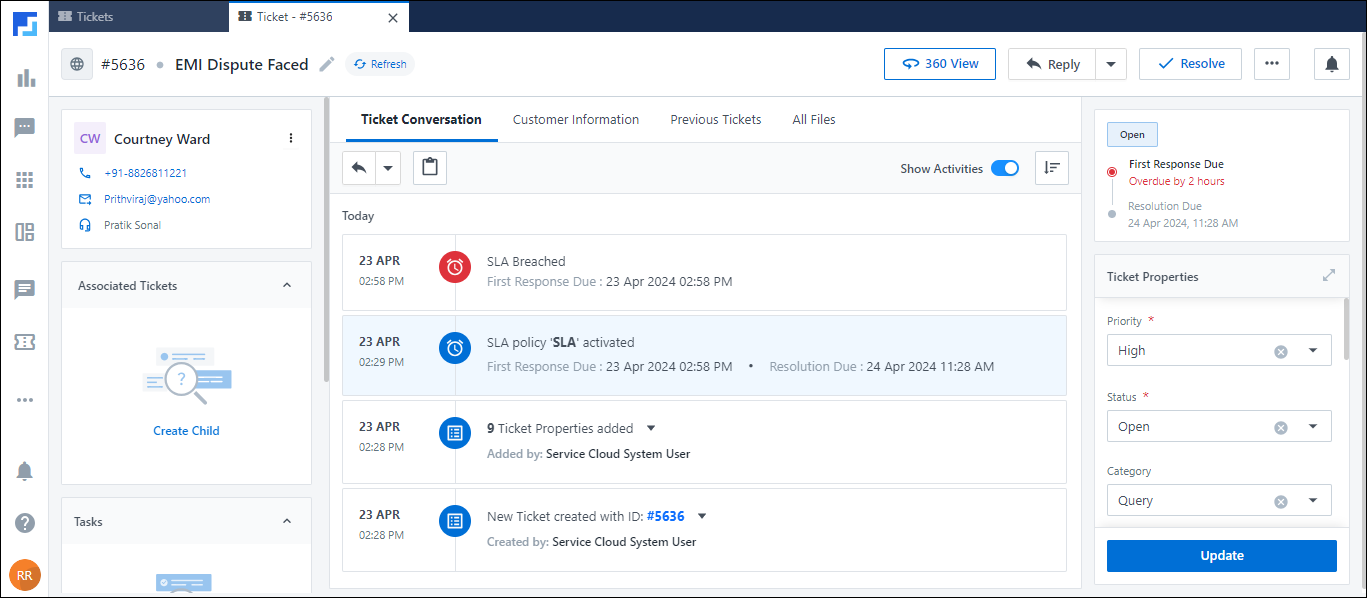
The Ticket Details View presents agents with all the information required to address and resolve tickets. This includes the details of the customer, the ongoing conversations, related issues/tickets, SLA information and more. Admins can customize different sections in the Ticket Details View to provide a tailor-made interface that helps agents manage and resolve tickets efficiently.
2. Prerequisites
- LeadSquared’s Service CRM offering is a paid feature. To enable it on your account, contact your account manager, or write to scsupport@leadsquared.com.
- The Ticket Details vCard configurations listed in this article can only be carried out by Service Platform Admin and Service Admin users.
3. How it Works
You can configure the following sections to align with your team’s requirements –
- Ticket vCard – By default, the vCard displays essential information like Customer Name, Phone, Email, and Ticket Owner. Additionally, you can include up to three custom or system ticket fields in the vCard. Customizing it helps highlight important ticket details.
- Right Panel – The right panel provides additional information (such as the ticket properties, SLA timeline and opportunity details) about the ticket. Your agents can also update the ticket from here. You can configure this using a Default Ticket form, or by integrating a Dynamic LeadSquared form.
- Tabs Configuration – Tabs on the Ticket Details View store different types of information related to the ticket. The default sections are
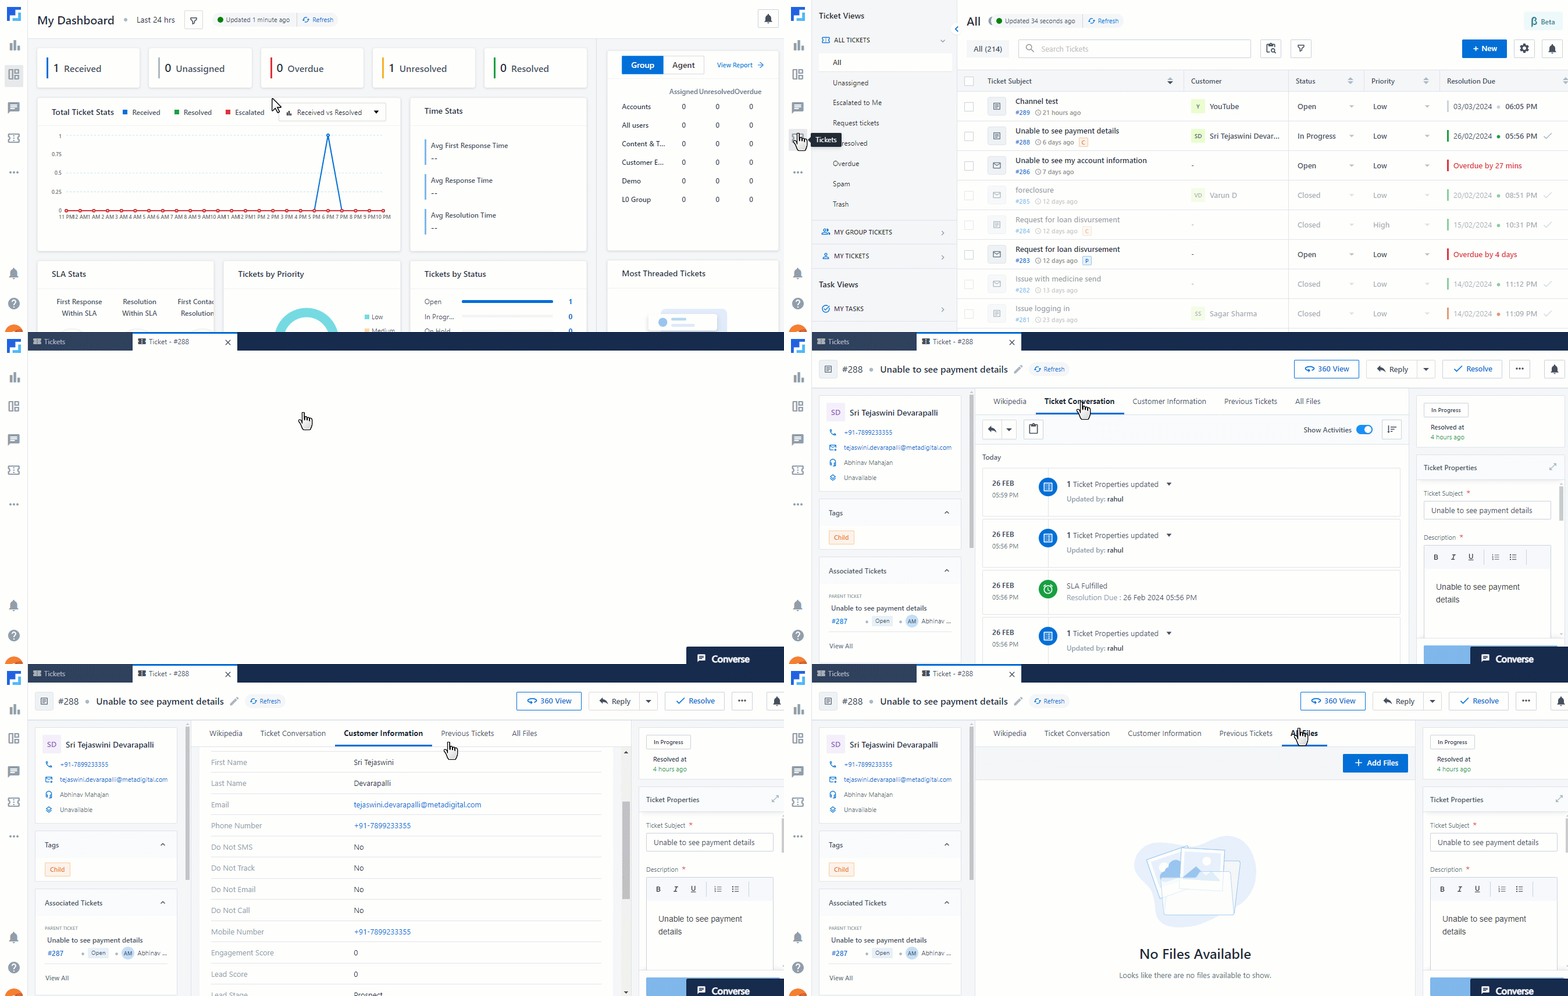
- Ticket Conversation – View the entire email conversation between customers and agents on the current ticket.
- Customer Information – View the Lead Details and Additional Lead Details of the lead (customer) associated with the ticket.
- Previous Tickets – Access all tickets previously raised by the customer.
Besides the default four tabs, you can create up to 16 custom tabs.
4. Configure the Ticket Details View
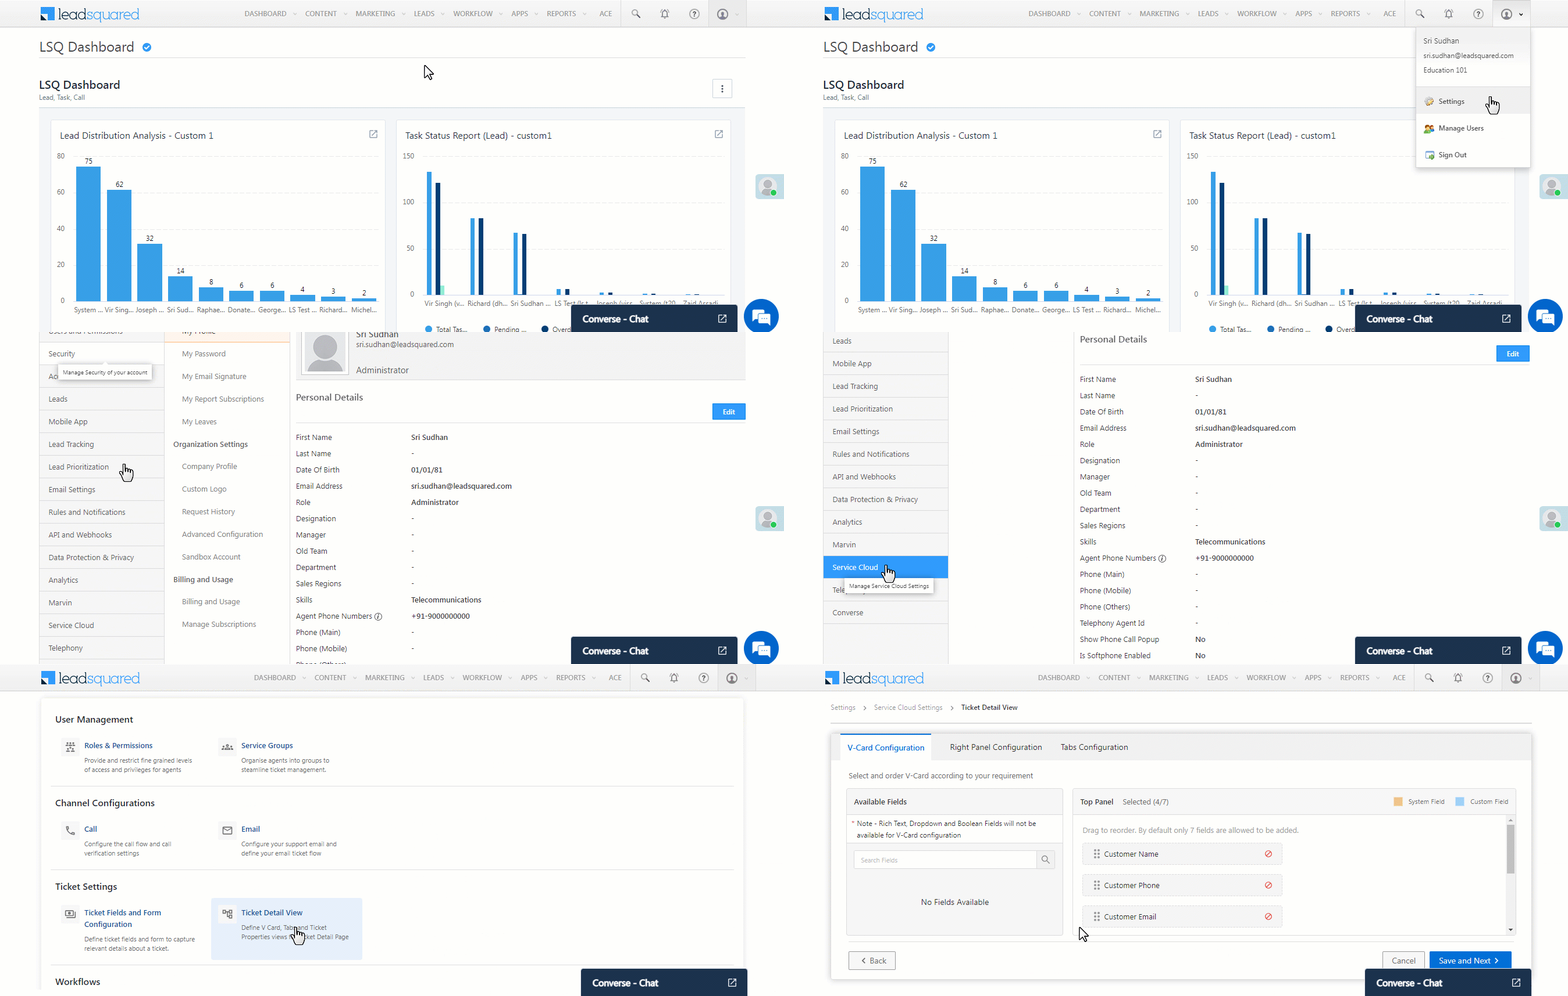
To configure the Ticket Details View on your LeadSquared account (https://login.leadsquared.com/) –
- Navigate to My Profile>Settings>Service Cloud.
- On the Service Cloud Settings screen, under Ticket Settings, click Ticket Detail View.
5. vCard Configuration
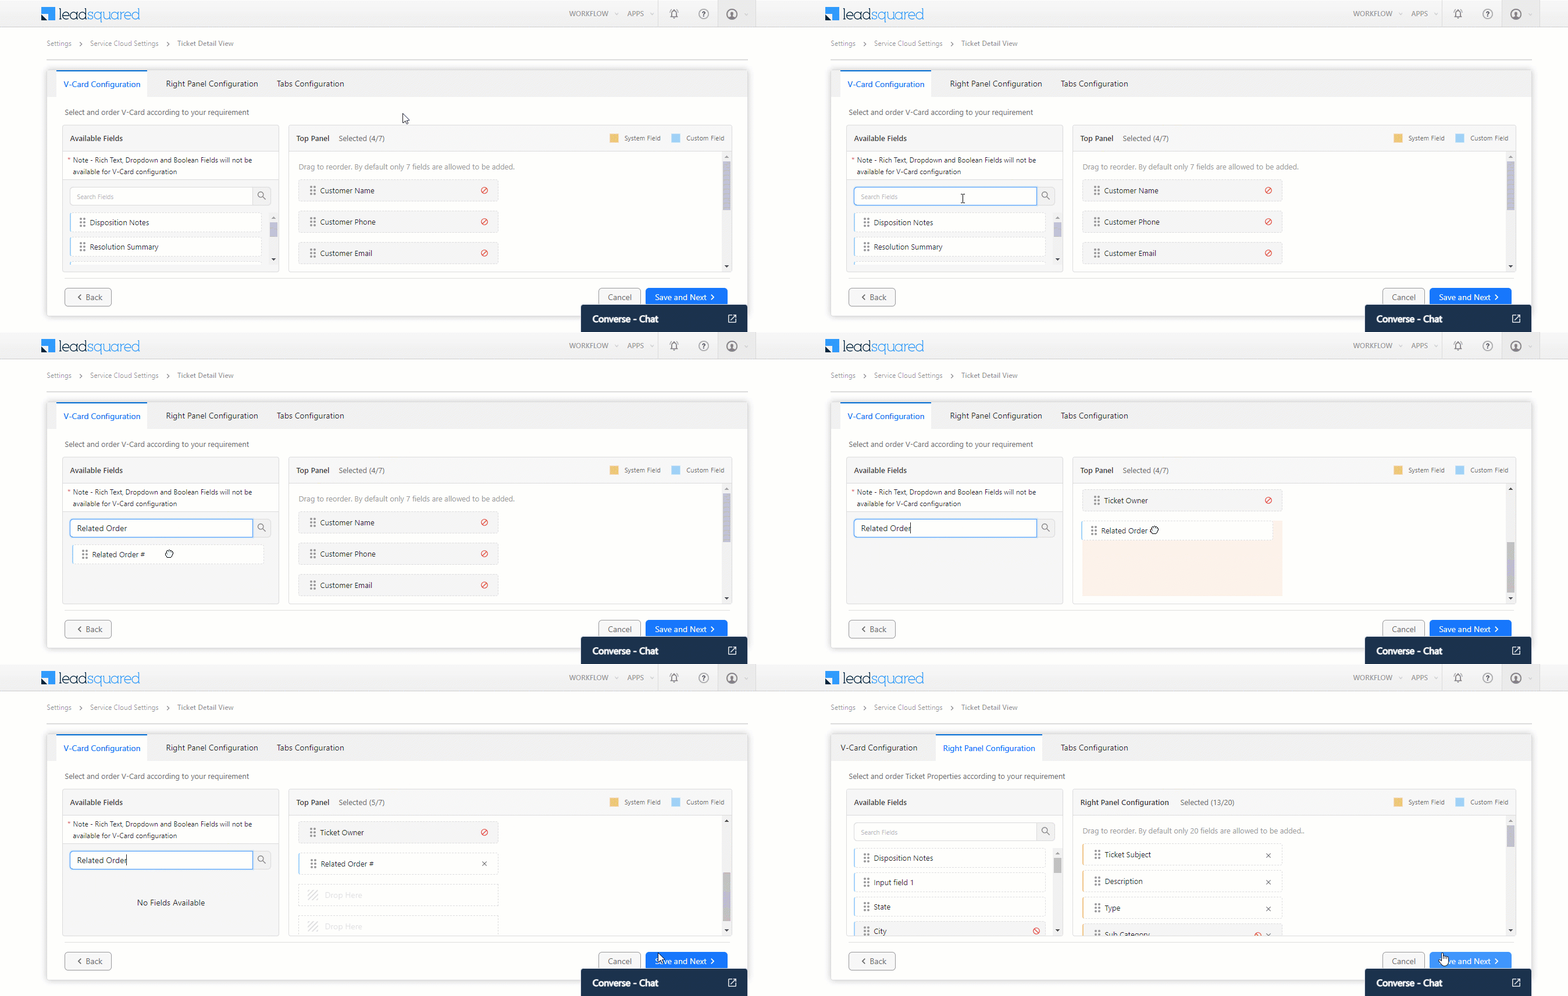
The vCard is present on the left side of the Ticket Details page. It contains the following default ticket fields –
- Customer Name – Displays the customer’s name.
- Customer Phone – Displays the customer’s phone number.
- Customer Email – Displays the customer’s email ID.
- Ticket Owner – Displays the ticket owner details.
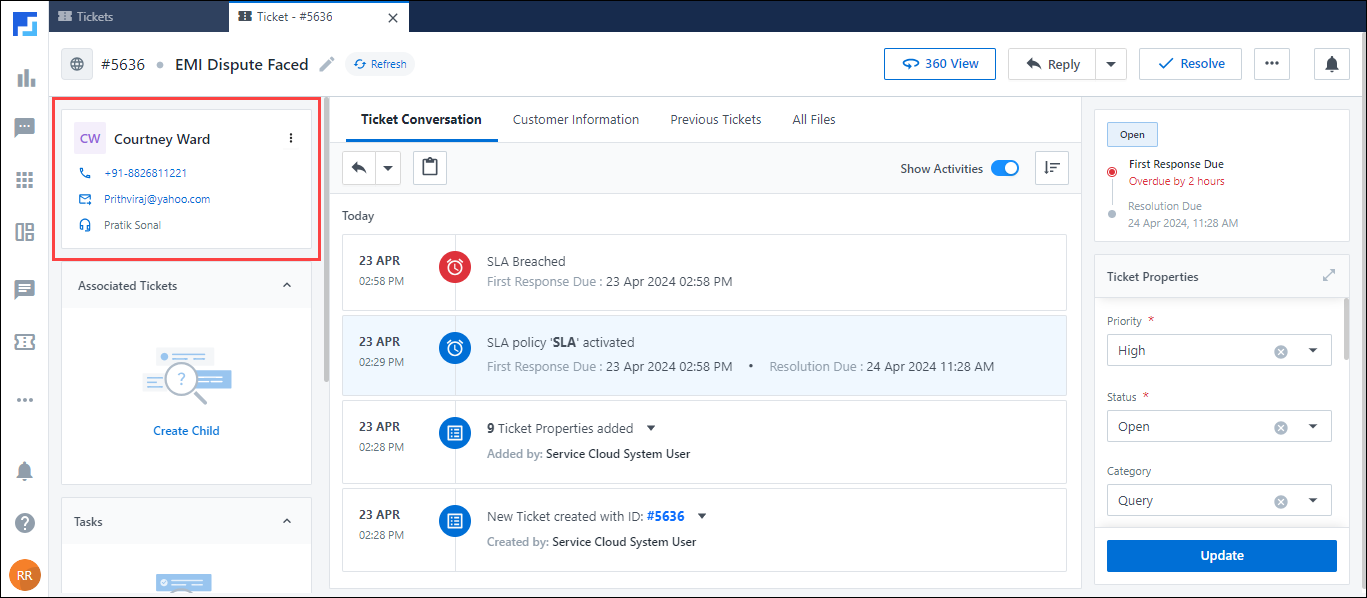
- When configuring the vCard, select from the list of system (marked in yellow) and custom (marked in blue) ticket fields available in your account.
- Under Available Fields, identify the fields you want to add to the vCard, then drag and drop them under the Top Panel.
- Use the search bar to find the ticket field you want to add.
- Once you’re done, click Save and Next.
Note:
- You can only add fields with the following data types to the vCard –
- Text
- Website
- Number
- Phone
- Date
- You can add up to 7 fields in total.
6. Right Panel Configuration
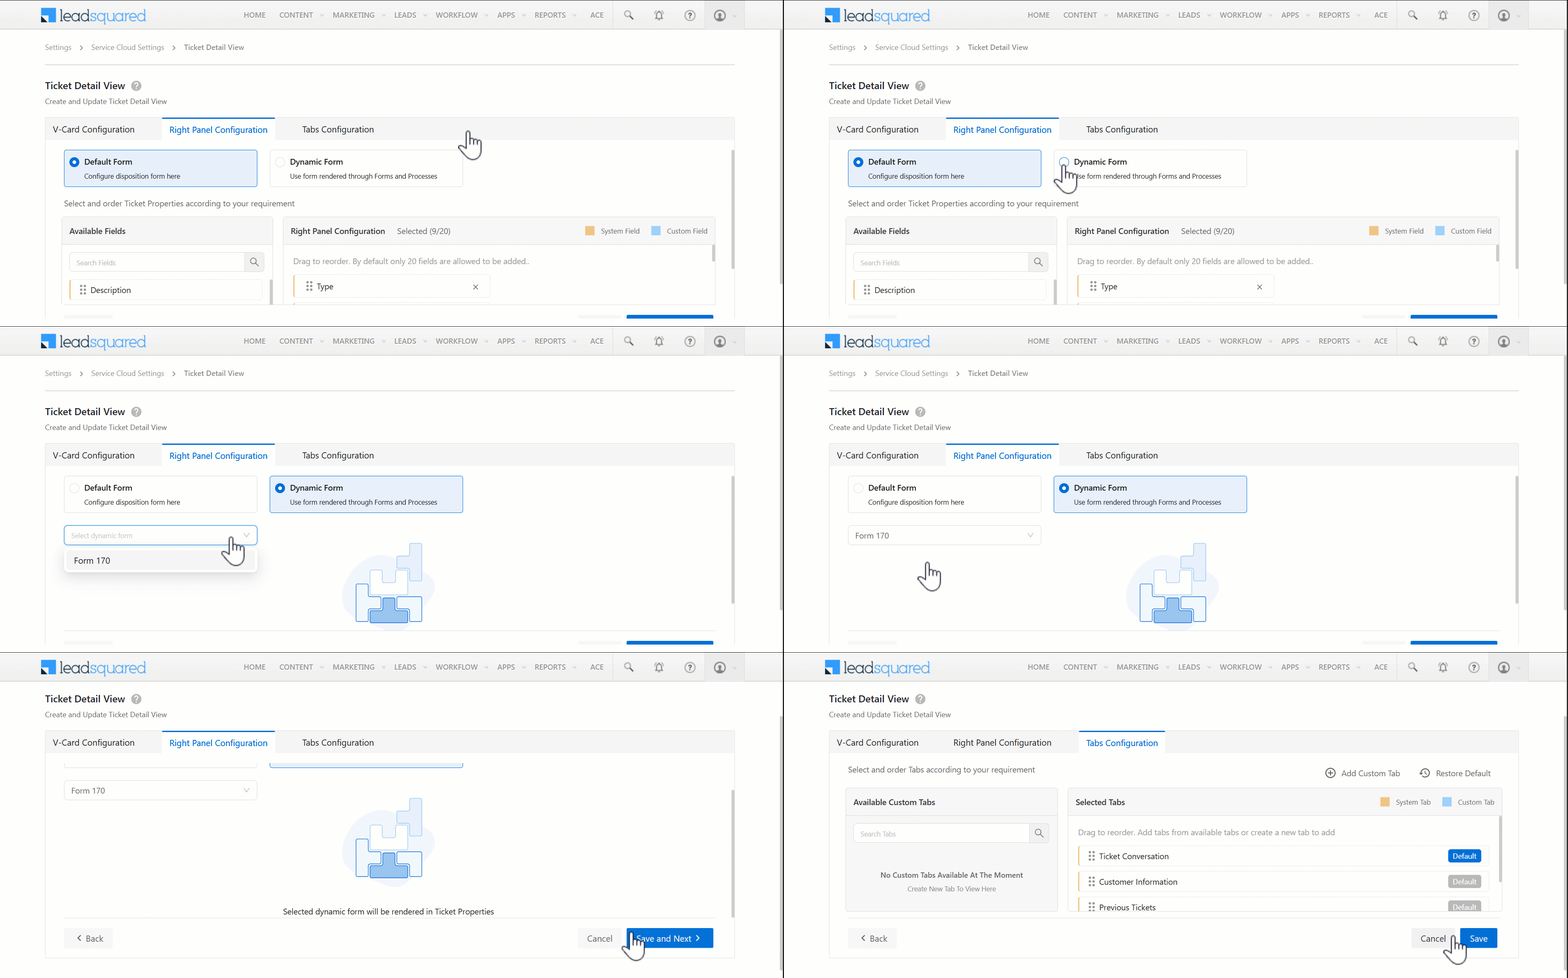
Configure the Right Panel to display ticket properties (e.g., ticket subject, ticket description, etc.). You can choose to configure this by creating a Default Form, or by integrating an existing LeadSquared Dynamic Form.
6.1 Default Form
You can customize the right panel by adding or removing ticket fields to display only the information relevant to your organization.
- When configuring the Right Panel, select from the list of system (marked in yellow) and custom (marked in blue) ticket fields available in your account.
- Under Available Fields, drag and drop the fields you want to add under Right Panel Configuration.
- Use the search bar to find the ticket field you want to add.
- Once you’re done, click Save and Next.
Note:
- You can add up to 20 ticket fields in total.
- You will not be able to add any ticket field in between a Parent-Child field(s) in the right panel. The Parent-Child field(s) must always be listed sequentially.
- If a Parent field (e.g., Country) has a Child field (e.g., State), and that field further has another Child field (e.g., City), then you can only remove the middle Child field (State) AFTER removing the last Child field (City), at the bottom of the hierarchy.
- Conversely, if the Parent field (Country) is removed, then both the corresponding Child field (State) and the next Child field (City) in the hierarchy will get automatically removed.
- When you add a Parent field to the right panel, the corresponding Child field(s) will automatically get added to the panel.
6.2 Dynamic Forms
This allows you to use Dynamic Ticket Forms from your LeadSquared account as the Ticket Capture form in Service Cloud.
Note:
- Forms and Processes must be enabled and configured in your account.
- Only forms created using Ticket Fields or Ticket Activity Fields will show up here.
- Select the Dynamic Form option.
- From the dropdown, select the form you want to integrate with Service Cloud.
- Once you’re done, click Save and Next.
Note:
- There’s no upper limit on the number of fields you can add and display on a dynamic form.
- A dynamic form can render and display dependent lead fields.
7. Tabs Configuration
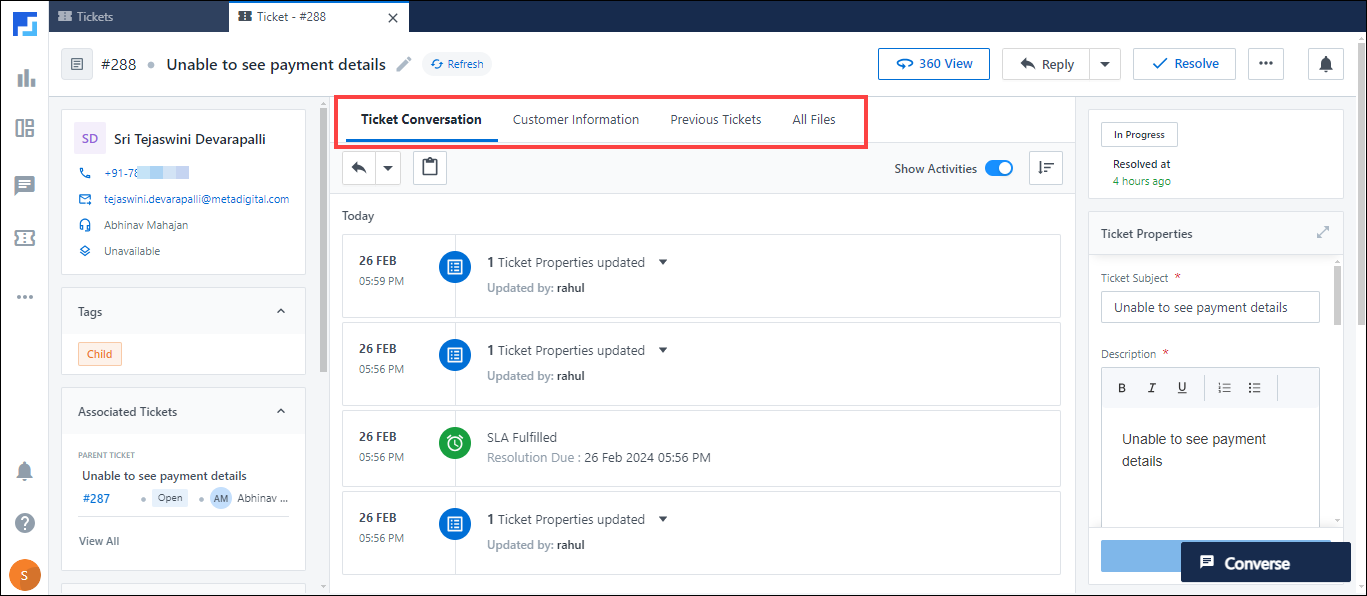
Tabs on the Ticket Details page group and display various ticket-related information, such as the conversation with the customer, customer information, related files and attachments, previous tickets, etc.. The following system tabs are available by default –
- Ticket Conversation – Displays all communication between the customer and an agent regarding the ticket.
- Customer Information – Stores the Lead Details (such as Lead Name, Lead Stage, etc.) and Additional Details (such as Created On, Modified On, etc.).
- Previous Tickets – Lists the previous tickets associated with the email address or phone number of the lead for whom the current ticket was created.
- All Files – Maintains a record of all uploaded files associated with the ticket.
- Default Tab – You can select any tab as the Default tab. When a default tab is selected, it will be displayed to your users whenever they open the Ticket Details page.
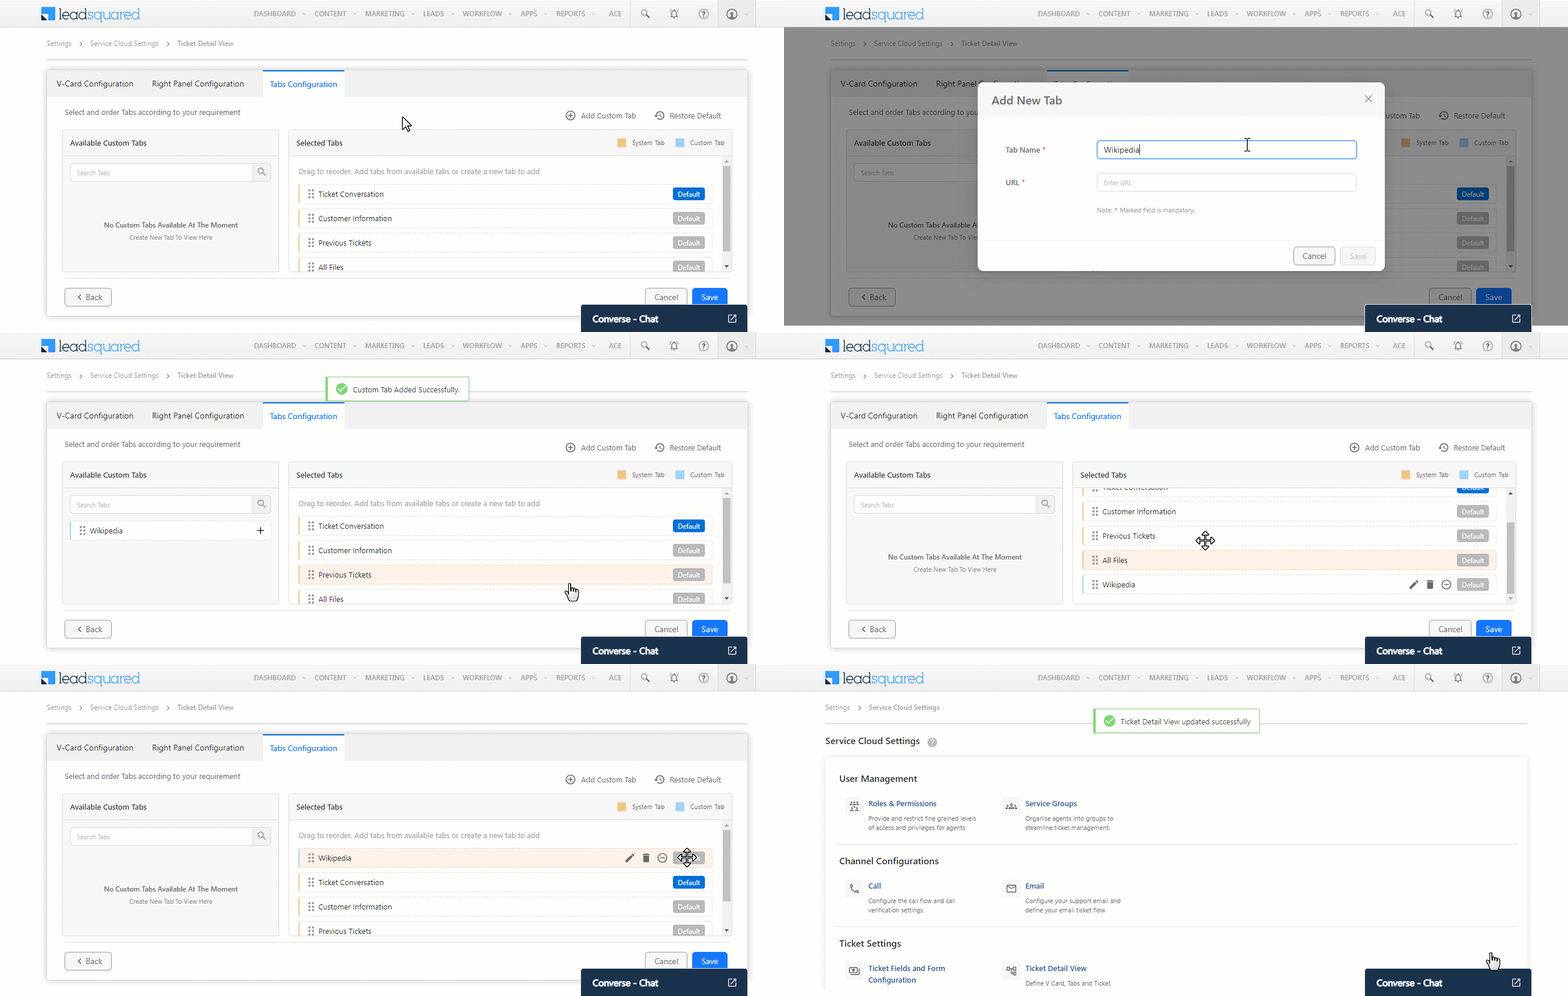
In addition to system tabs (marked in yellow), to create custom tabs (marked in blue) –
- Under Tabs Configuration, click Add Custom Tab.
- On the Add New Tab pop-up, enter –
- Tab Name – The display name for the tab.
- URL – The URL should point to an external resource where you can retrieve and display information on the Ticket Details page. Enter the URL like this https://<yourdomainname>.com/Project/UploadDocuments
- After you’re done, click Save on the Add New Tab pop-up.
- You can reorder tabs by dragging and dropping them in your preferred position. Tabs are arranged in ascending order, so the first tab on the list will become the left-most tab on the Ticket Details page.
- You can select any tab as the Default tab. When a default tab is selected, it will be displayed to your users whenever they open the Ticket Details page.
- To edit a custom tab, click
 .
. - To delete a custom tab, click
 .
. - To remove a custom tab, click
 .
.
- Once you’re done, click Save on the Tabs Configuration screen to complete the Ticket Details View setup process.
8. Access the Ticket Details View
Your agents can access the Ticket Details page here –
- Login to Marvin (https://marvin.leadsquared.com/), and navigate to the Tickets
 tab.
tab. - Open any ticket on the All Tickets screen.
- You’ll now be able to access the Ticket Details screen.
9. Next Steps
Configure and use the customer 360 view to view all your customer-related information (lead, opportunity and ticket data) in a single page.
Any Questions?
Did you find this article helpful? Please let us know any feedback you may have in the comments section below. We’d love to hear from you and help you out!
