


Get Started
Sales Suite
Field Ops
Marketing
Service CRM
Integrations & Apps
FloStack
Forms and Processes – Feature Guide
1. Feature Overview
LeadSquared’s Dynamic Forms feature lets you create intelligent lead capture Forms relevant to your processes and products and build out entire journeys for loan applications, college applications, etc.
For example –
- You can build single or multi-step Forms.
- Choose to capture Leads, Opportunities, Activities, and Tasks in the same Form.
- Customize the sections, tabs, and fields in the form.
- You can collect KYC documents and collect e-signatures from your leads.
- Add a payment gateway on your form to collect and process payments directly from the Form.
- What’s more, you can create rules to show or hide sections, tabs, and fields, populate data or send data to and from other systems, or execute your specific business logic.
Once you publish a Form, you must head over to the Process Designer to choose when and where to display your Dynamic Form on LeadSquared.
When you publish your process, you’ll find your Dynamic Form ready to use at the workplace you’ve selected. Users can simply click to launch the relevant forms or processes and capture all the important data for your business in one smooth flow.
Note:
- You must publish a Process to choose when and where to display your Dynamic Form on LeadSquared.
- This article is only an overview. If you are familiar with Dynamic Forms and Processes, you can continue with the following articles –
2. Example Use Case
These examples illustrate different functionalities you can use, and outcomes you can achieve using the Forms and Process Designer features –
| Industry | Outcomes |
| Finance |
|
| Education |
|
| Real Estate |
|
| Others | Collect vendor information through customized forms. Show/hide fields, sub-forms, and tabs based on vendor services. For example –
|
3. Prerequisites
- You must be an administrator user to create and edit forms.
- You must be an administrator user to use the process designer.
- You must create and publish forms to use in the process designer.
- To access opportunities, you must have the opportunities feature enabled on your account. To enable it, write to support@leadsquared.com.
4. How it Works
For example, you can configure a Dynamic Form to collect information from a lead (personal details, KYC, etc.,) while they’re purchasing a loan product –
Once a Dynamic Form is published, you will need to create a workflow using the process designer. The process designer is an essential step, it will help you –
- Choose the work area (Manage Forms page, Manage Activities page, Smart Views, etc.) where you want to display your forms. For example, once you have published a Dynamic Form for a loan product, you can use the process designer to make it available on the Manage Leads page.
- Set conditions on users (show forms to particular teams, roles, sales groups, etc.) and form field values.
- Chain together multiple forms to create processes.
5. Where Can You Use Dynamic Forms
Dynamic Forms can be deployed in the following places –
- Work areas throughout LeadSquared. For example, Manage Leads page, Manage Activities page, Smart Views, etc.
Note: Dynamic Forms are also enabled on Marvin.
- You can use Dynamic Forms in the Agent Popup function on LeadSquared Telephony to create or update lead and opportunity details.
- You can integrate Mavis DB with your LeadSquared Dynamic Forms to pull data from Mavis based on rules (and real-time user inputs) to populate fields within your forms.
6. Create a Dynamic Form
- From the LeadSquared dashboard, navigate to Workflow>Manage Forms.
- Click the Create Form button.
- Provide a relevant name for the Form, and add choose the fields (Lead Fields, Activity Fields, Opportunity Fields, and Task Fields) you would like to use in your Form. Click Next.
- You can choose to create either a Primary Form or a Sub Form. Click Next.
- Next, choose between a Single Step Form or a Multi Step Form.
- Once you are done, click Create.
- You can now build your Form through the designer.
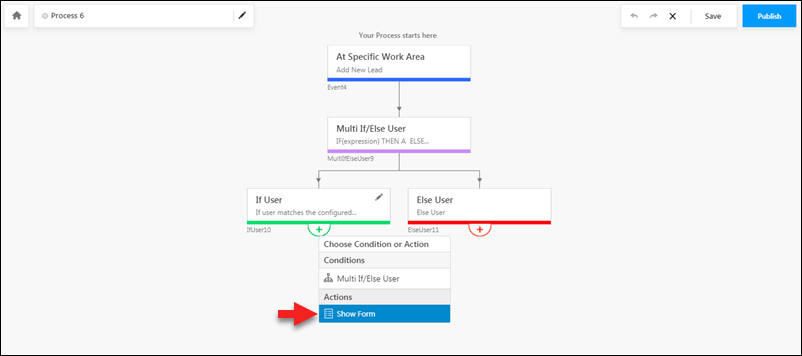
7. Create a Process
- To access the Manage Processes page, navigate to Workflow>Process Designer.
- Click the Create Process button to create a new process.
- Choose a Trigger –
- At Specific Work Area – Choose the page or area you want the process to be initiated from
- On Task Complete – Select work areas where your process should begin.
- Under Conditions, click the Multi If/Else User option to choose which users can see your forms and processes.
- The process will branch out into a Yes path and a No path, click the add icon under each path to continue the process.
- Click the Show Form action to display a published form at any point in your process.
8. Save a Dynamic Form as a Draft
The Save as Drafts feature enables users to save their progress while filling out Dynamic Forms, allowing them to pause and return later to complete and submit the form. Users can save a form as a draft by clicking the ![]() icon on the form.
icon on the form.
Note:
- First, you must navigate to Settings>Advanced Configuration and enable Allow users to save dynamic forms as Drafts.
- This feature is only available in NextGen.
- Drafts created by a particular user are not accessible to another user.
- Once a user logs out, the drafts will no longer be available.
- By default, you can save up to 5 drafts per session. To increase this limit, contact support@leadsquared.com.
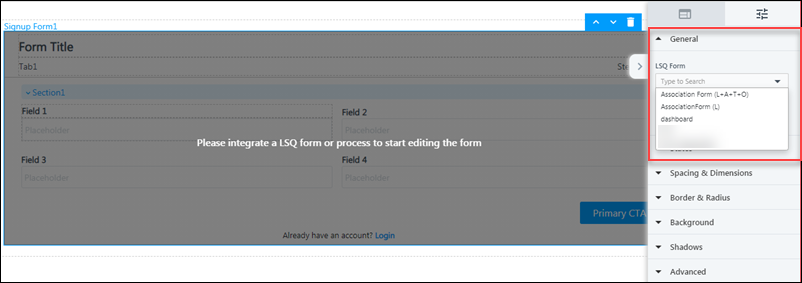
9. Using Forms in LeadSquared Portals
The Forms and Processes features are closely linked with portals. You can create forms or entire application processes to capture information in your portals. These include registration forms for sign-up/login as well as forms to capture leads, opportunities, tasks, and activities. To know more, please refer to LeadSquared Portal Designer – Create Sign Up Forms.
Any Questions?
If you have a question that this article did not answer, please let us know in the comments section below. We’ll be happy to improve the content and help you with any doubts you have.
Where can we access the cumulative form data for all submissions on the form?
Hi, Rohit.
Users/Admin cannot view the cumulative Form data for all the submissions of the given Form. However, the submission data of a given Form on a given Lead can be viewed in ‘Dynamic Form Submission Activity‘ by navigating to Leads>Manage Leads>Lead Details>Activity History.