1. Feature Overview
Many customer tickets are simple queries that don’t require manual intervention but still consume your agent’s time. To handle these efficiently, we’ve built agentic AI Agents that automatically respond to tickets.
Trained on your organisation’s training resources, these agents identify and close tickets where the customer’s question can be confidently answered without human involvement. This reduces agent workload, improves response times, and ensures customers receive quick, accurate resolutions while your team focuses on complex and high-priority issues.
2. Prerequisites
- This is a paid feature. To enable it, contact your account manager or write to sc.support@leadsquared.com.
- To train the AI Agents, you must add and configure your internal training resources using the Auto Response feature.
3. How it Works
The AI Agent identifies and resolves tickets based on the intent and confidence threshold you configure. Trained on your organisation’s internal resources, it uses this data to analyse customer emails and provide accurate, automated responses.
- During setup, select the LeadSquared ticket type (such as Query, Complaint, or Request) you want the AI Agent to handle, and define how confident it must be before responding.
- The AI evaluates each ticket against its training data and only replies when its confidence level meets or exceeds the defined threshold. If it’s below the threshold, the ticket is not addressed by the AI Agent.
- You can also set workday templates and exclusion rules to control when the AI Agent operates and which tickets it ignores.
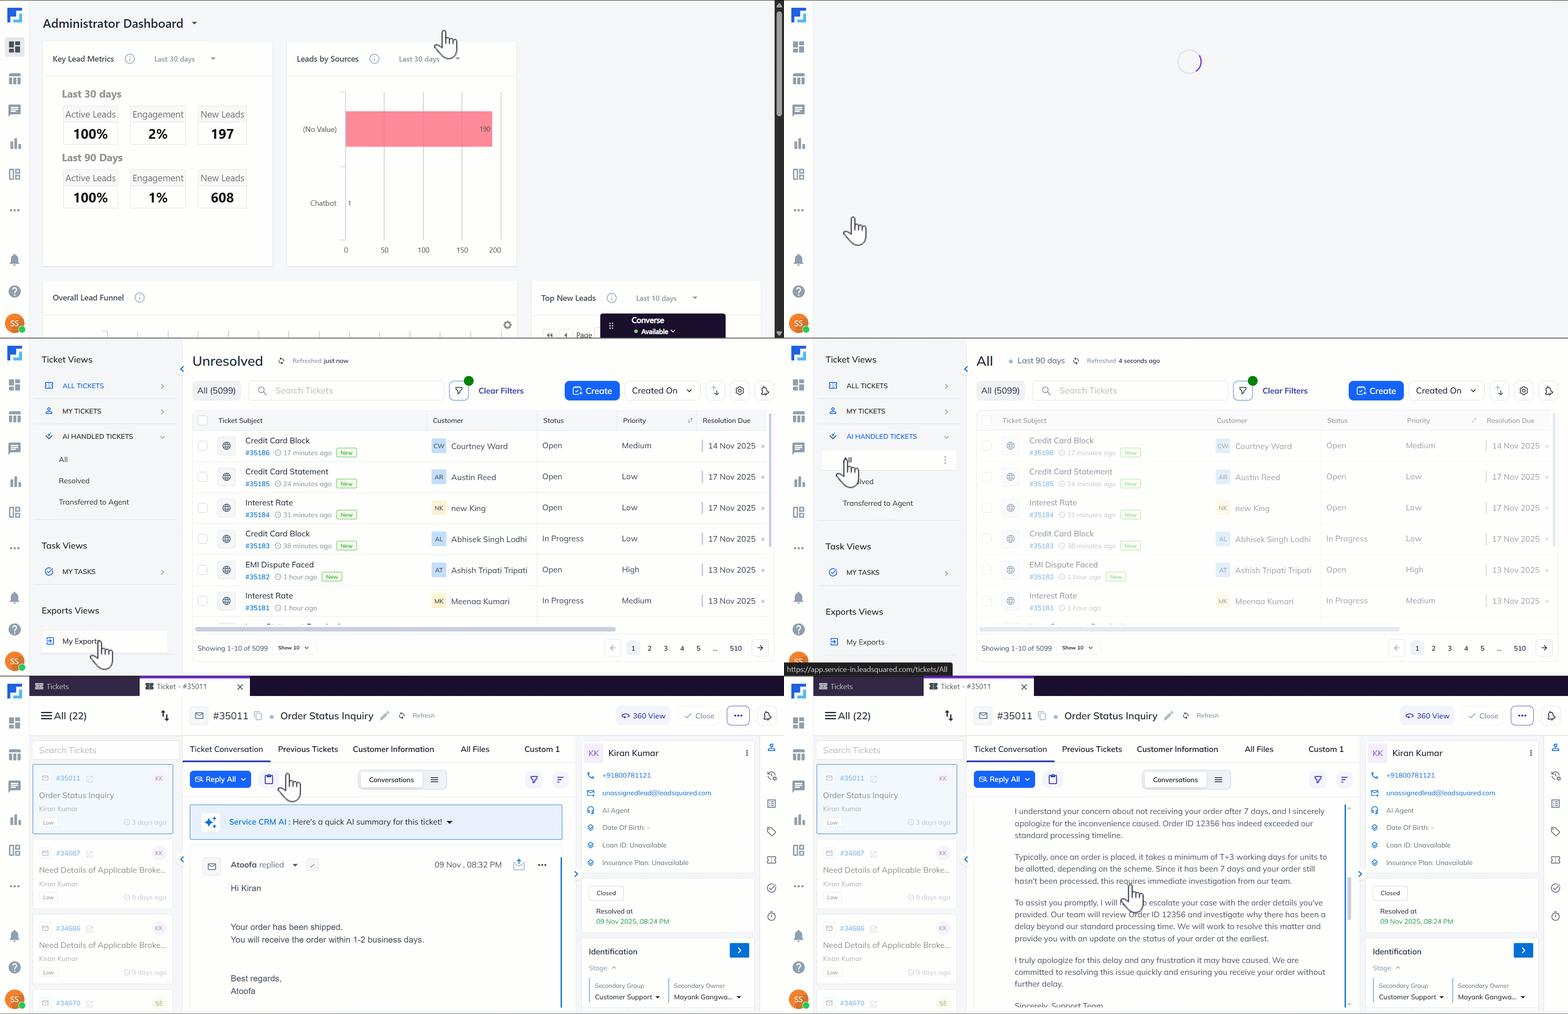
- All AI-handled tickets appear under the AI Handled Tickets tab on the Ticket Views page, and admins can track performance metrics, CSAT scores, and detailed logs from the Service Dashboard.
4. Build an AI Agent
Begin by building the AI Agent –
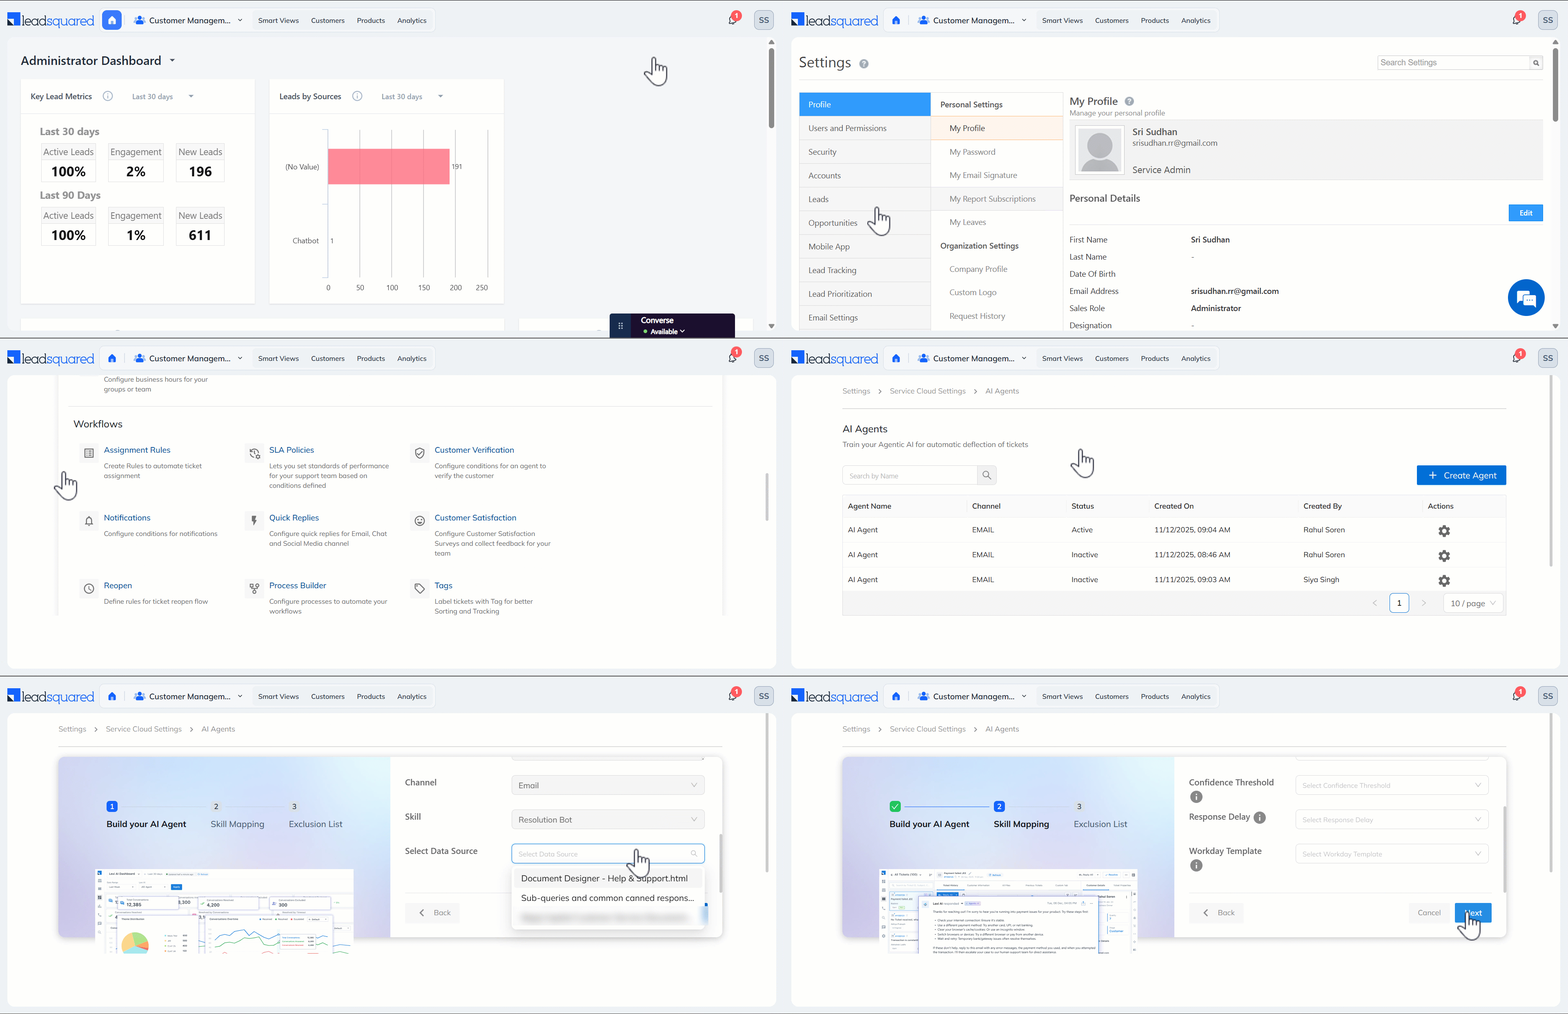
- In your LeadSquared account (app.leadsquared.com), navigate to My Profile>Settings>Service Cloud.
- On the Service Cloud Settings page, under Lexi AI, click AI Agents.
- Click Create Agents, and on the Build Your AI Agent tab, most of the following settings are hard-coded, and it cannot be updated –
- Agent Name – The agent’s name.
- Persona – The agent’s persona.
- Description – The predefined prompt configured for the agent.
- Channel – Currently, only tickets created through emails are supported.
- Skill – The agent’s purpose.
- Select Data Source – From the list of internal resources uploaded to the Auto Response feature, choose the resource you want to use to train the AI Agent.
- Once you’re done, click Next.
5. Skill Mapping
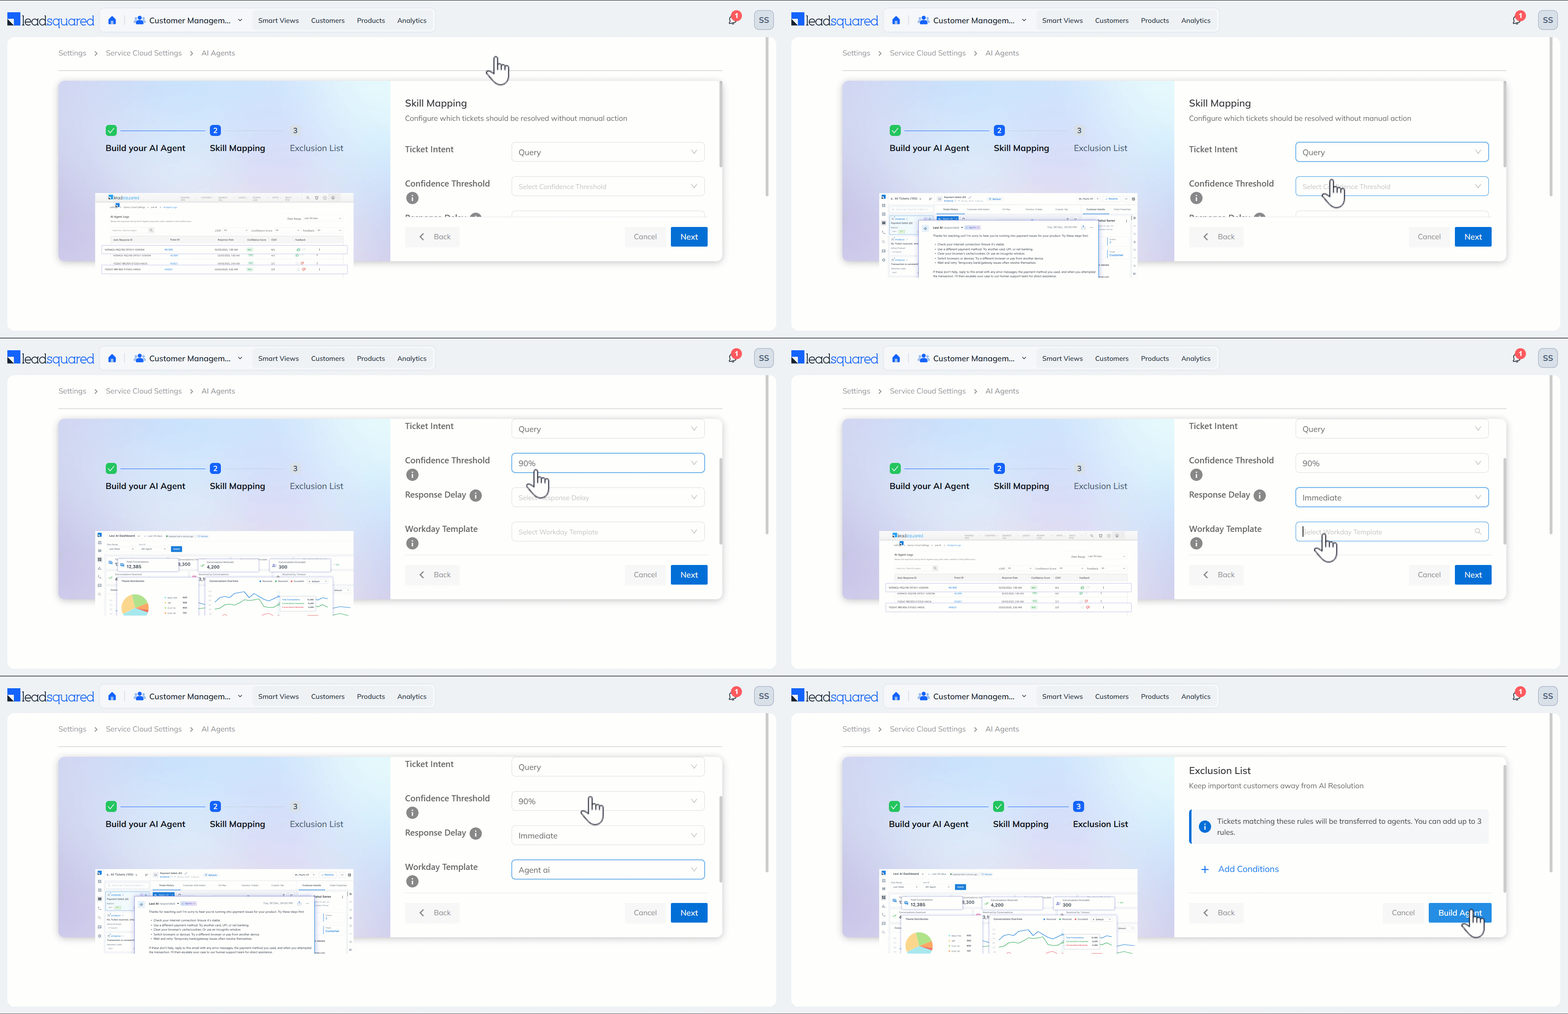
On this tab, configure the following settings and limits that determine when the AI Agent can identify and resolve tickets on its own –
- Ticket Intent – Select the ticket type the AI Agent should identify and resolve. You can choose from Query*, Complaint, or Request type tickets.
- Confidence Threshold – The AI Agent identifies and responds to tickets based on the confidence level^ you set here. A higher confidence level means the AI Agent answers only when it’s extremely sure of being correct.
- Response Delay – Set how long the AI Agent waits before responding to a ticket. We recommend choosing “Immediate” to ensure customers receive instant resolutions.
- Workday Template – Set your AI Agent’s working hours using the Business Hours workday templates configured in your account. This helps align the AI Agent’s responses with business hours, improving availability and customer experience. This setting is optional.
- Once you’re done, click Next.
Note:
- *We recommend selecting Query, as Complaint and Request tickets usually require human intervention to resolve.
- ^We recommend a threshold of 90. This ensures the AI Agent replies when it’s at least 90% confident in its answer.
6. Exclusion List
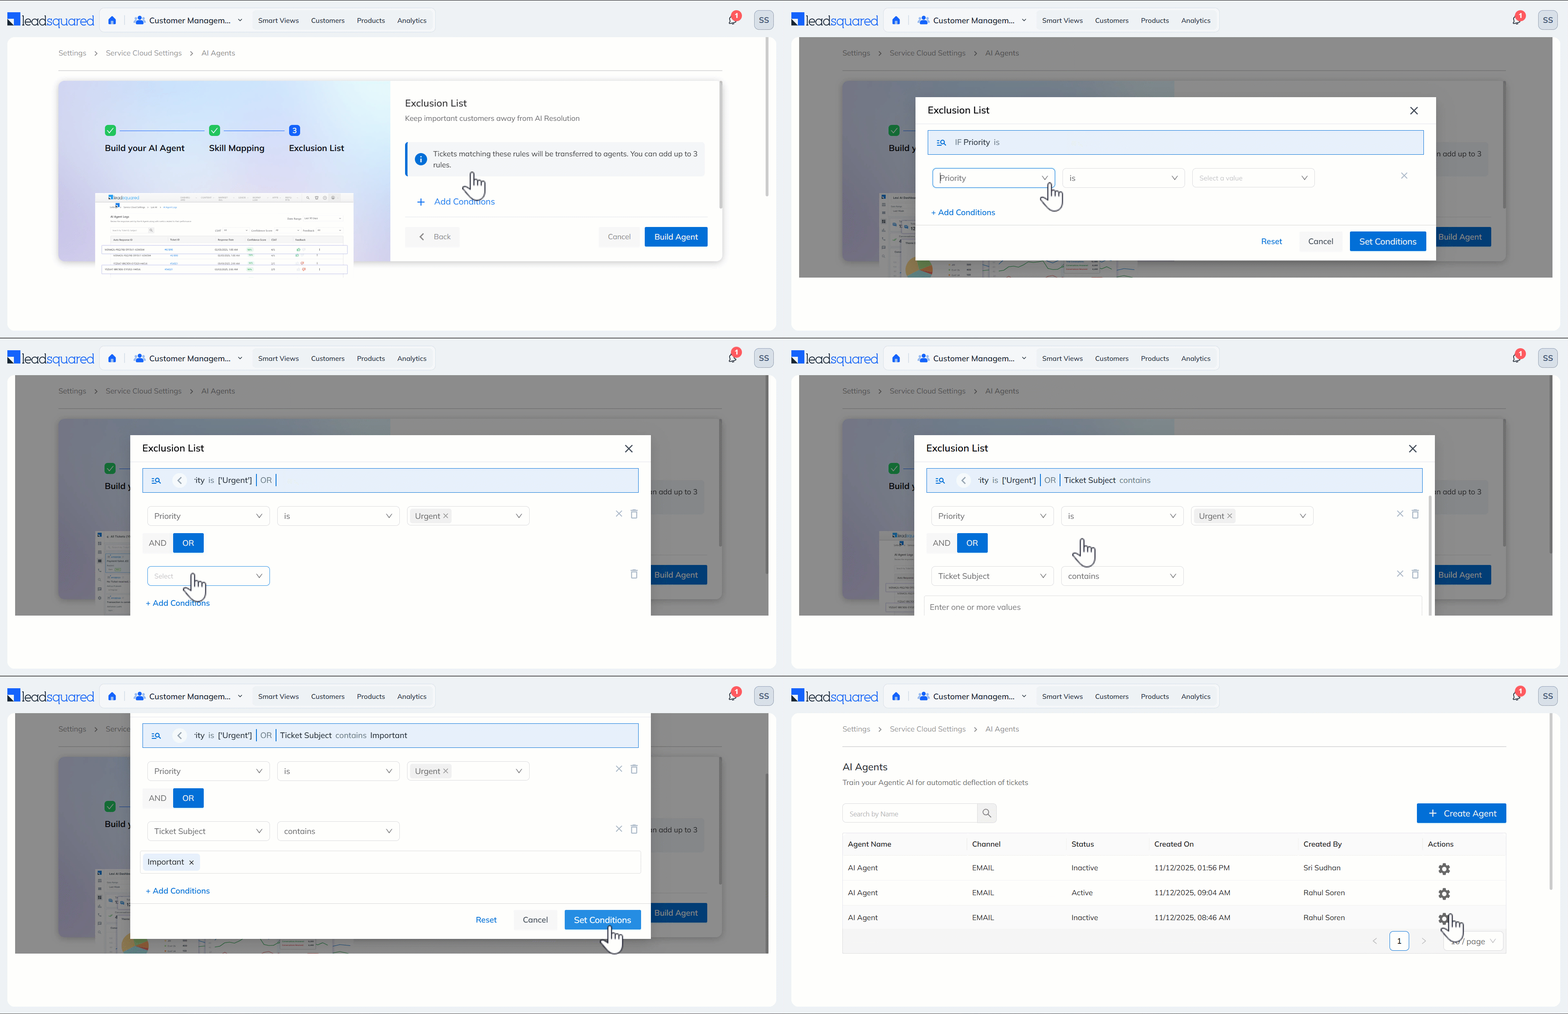
In this tab, you can create an exclusion list to prevent the AI Agent from handling or resolving tickets that meet specific criteria. Tickets matching these conditions are transferred to a human agent.
This step is optional and ensures that critical tickets are always routed to a human agent. For example, you can exclude tickets where the Priority is Urgent or the Ticket Subject contains the word “Important.”
- To create the ticket rule, click Add Conditions.
- On the Exclusion List pop-up, select the ticket fields and set their values. Tickets with these values are excluded.
- You can add multiple conditions.
- Once you’re done, click Set Conditions, and then click Build Agent.
7. Activate the AI Agent
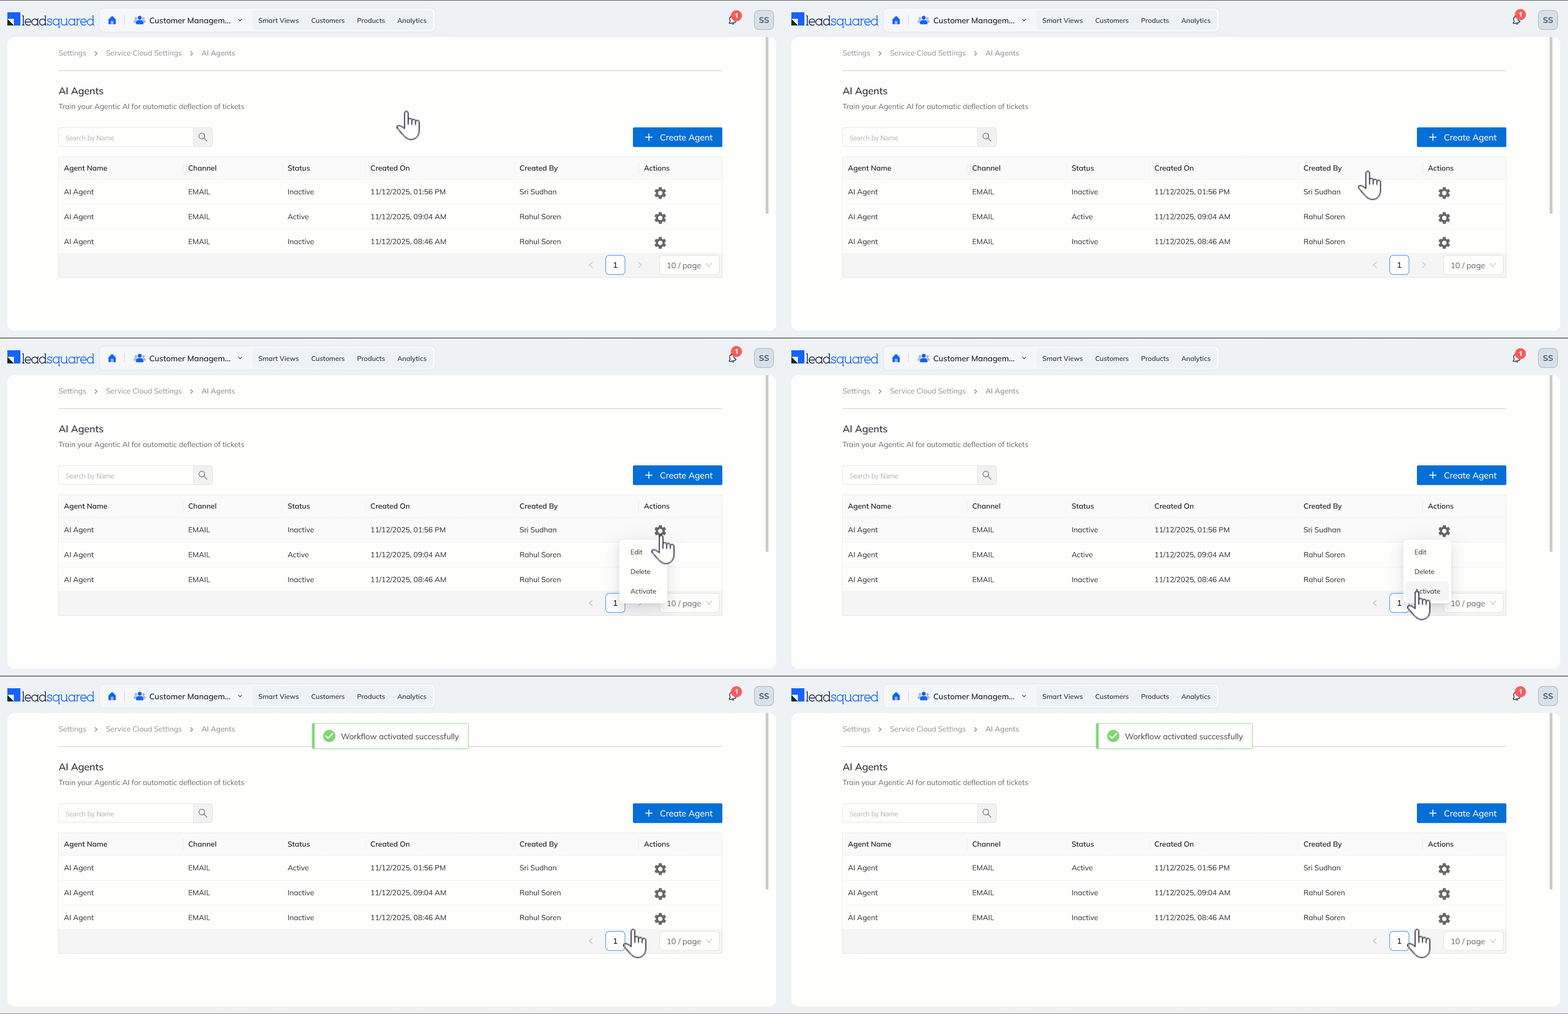
Once you’ve built the AI Agent, you can activate it from the AI Agents screen –
- Next to the AI Agent you want to activate, click the settings icon.
- From the list of options, click Activate.
- You can also perform the following actions on this screen –
- Edit – Modify the settings configured for an AI Agent.
- Deactivate – Turn off an active agent while retaining its configured settings.
- Delete – Remove the agent and permanently delete its configured settings from your system.
8. View Tickets Handled by AI Agents
Once the AI Agent is activated, view the tickets it has handled on the Ticket Views page. These tickets are visible under the AI Handled Tickets tab.
9. View Metrics
9.1 Dashboard
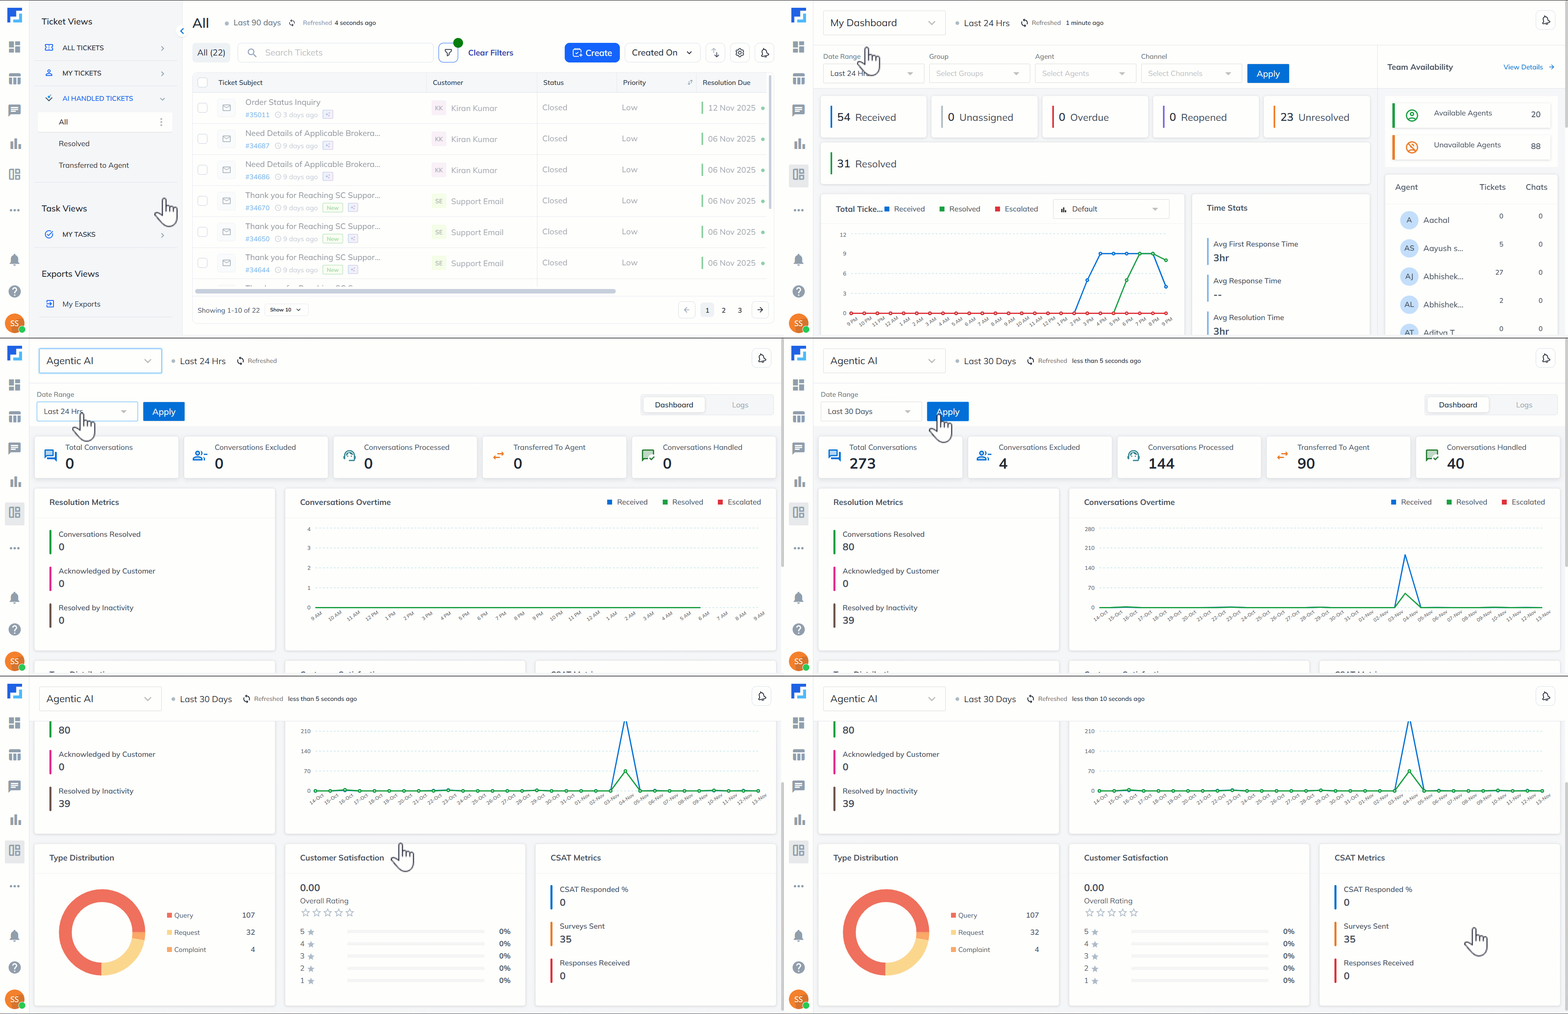
Admins can track and evaluate the AI Agent’s performance directly from the Service Dashboard. To view these metrics, filter the dashboard by Agentic AI.
If the Notify Agents CSAT option is enabled for Email Surveys, CSAT scores for AI-handled tickets are also displayed. This helps you measure customer satisfaction when they interact with the AI Agent.
9.2 Logs
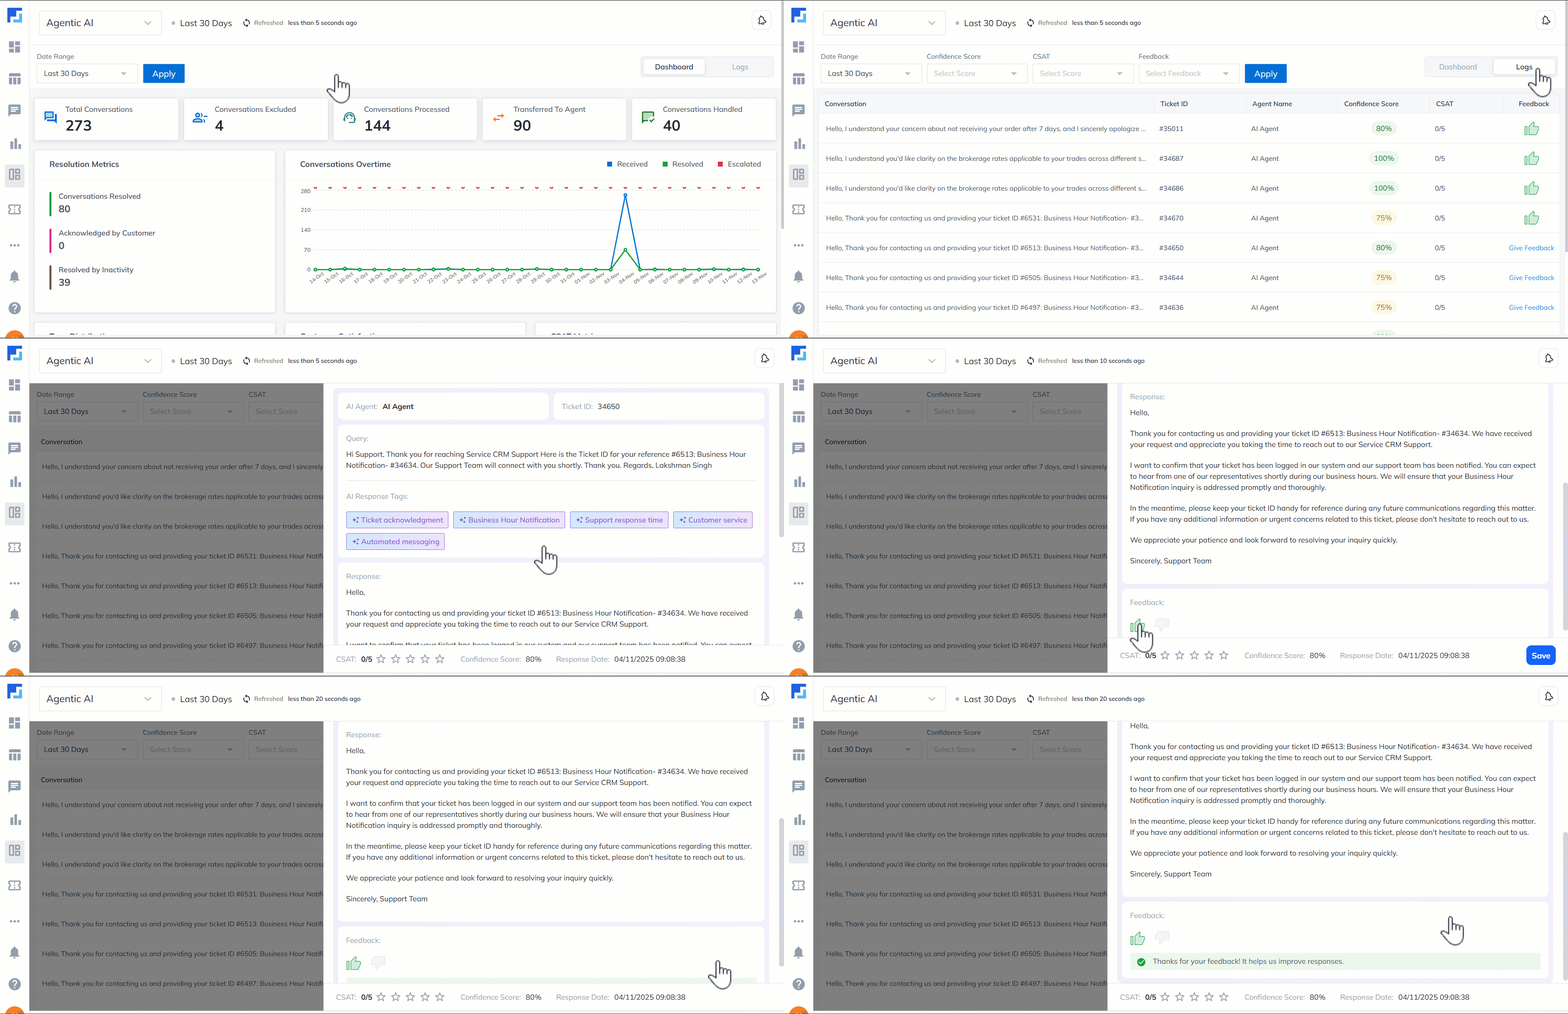
Additionally, you can access detailed logs for every ticket handled by the AI Agent, review each conversation, and rate its accuracy and tone. This helps the system recognise where the AI performs well, identify areas for improvement, and ensure automated resolutions match the quality standards of human agents.
10. Protips
- To keep the AI Agent aligned with your organisation’s latest practices and policies, always train it with updated material. Regularly refresh the resources added to the Auto Response (Powered by Lexi AI) feature and edit and update the bot to use the newest training material.
- To maintain accuracy and reliability, use the Auto Quality Assurance feature with your AI Agent. It regularly audits AI-handled conversations, helping you spot improvement areas and continuously enhance the agent’s performance.
11. FAQs
- What happens when a customer replies to a ticket resolved by the AI Agent?
If a customer is unhappy with the AI Agent’s response or feels the issue is still unresolved, their reply automatically reopens the ticket. It is then assigned to a human agent, who has to work towards resolving it.
Any Questions?
Did you find this article helpful? Please let us know your feedback in the comments section below. We’d love to hear from you and help you out!


