


Get Started
Sales Suite
Field Ops
Marketing
Service CRM
Integrations & Apps
FloStack
Data Protection and Privacy Settings
These settings enable you to meet the privacy requirements of your end users and comply with data protection regulations such as GDPR. They allow your users the choice of sharing or restricting data with your organization and with LeadSquared. The settings available are –
- Cookie Consent
Lets you customize and display a cookie consent banner on your website. - Email Opt-in
Gives your leads the choice to opt-in or out of receiving your emails. - Personal Data Protection
Give leads the ability to access, update and delete their personal data. - Delete Lead Backup (Data Purging)
Allows you to delete lead backup data permanently, in instances where data backups are retained before deletion.
You can access the Data Protection and Privacy Settings by navigating to My Account>Settings>Data Protection and Privacy.

Cookie Consent
As part of the privacy settings, you can allow end users to control whether or not they would like to enable cookies on your website (where the LeadSquared Tracking script has been installed). If an end user chooses to disable cookies then their behaviour on your website won’t be tracked. This means that page views, source, UTM parameters, etc. will not be tracked for that particular session.
Note:
- The cookie consent banner will re-appear if the user starts a new session (closes the previous browser and starts a fresh session).
- The cookie consent banner will only be displayed for lead if the ‘Do Not Track’ lead field is empty. For more information, see Data Privacy – Do Not Track.
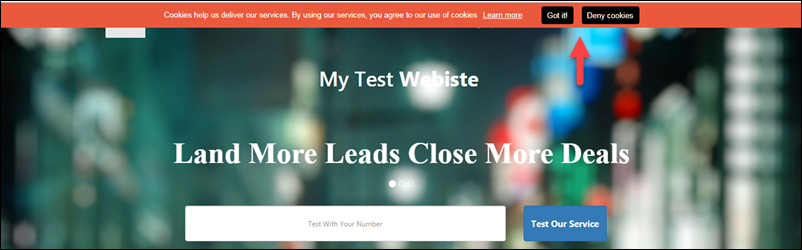
The setting allows you to display a customizable cookie consent banner on your website. It looks something like this –
To enable the cookie consent banner –
- Navigate to My Account>Settings>Data Protection and Privacy>Personal Data Protection.
- Alongside Enable Data Protection and Privacy, click Yes.
- Under Privacy Settings, alongside click Yes.
- Hover the cursor over the settings
 icon and click Edit.
 - Customize your cookie consent banner and then click Save.
Cookie consent banner customization options include –
| Options | Description |
| Mode | Consent mode gives end-users the option of enabling or disabling cookies. |
| Position | Top will display the banner at the top of the webpage while bottom will display it at the bottom. |
| Headline | You can customize the text you want users to see on the headline. You can even modify the text and background colour. |
| Link | You can choose whether or not you want to display a link on the banner. The link is helpful if you want to direct end users to your privacy policy documentation. |
| OK button | Customize how you want users to see the OK button. |
| Close button | Choose whether or not you want to display a close button and how you want it to look. |
Email Opt-in
The Email Opt-in settings are geared toward upholding the privacy rights of your leads.
By using the email opt-in setting together with the email opt-in automation action, you can let your leads decide whether or not they want to receive emails from your organization. Here’s how you set it up –
1. Enable the Email Opt-in Setting
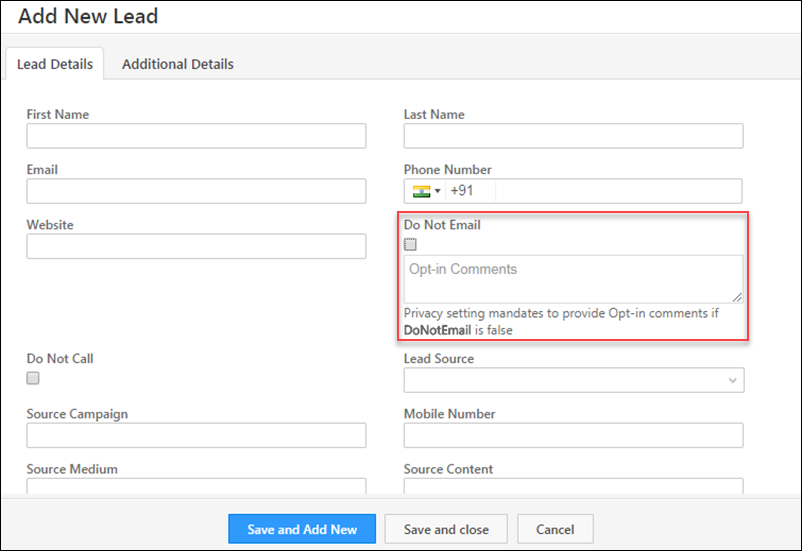
Once you enable this setting, the Do Not Email lead field will automatically be set to True. All leads created from this point on will not receive any emails except the ‘Opt-In Email’ you set up via automation (see step 2).
- Navigate to My Account>Settings>Data Protection & Privacy>Email Opt-in.
- Set Enable Opt-In to Yes.
2. Set up an Opt-in Automation
The automation action, Send Opt-in Email, lets you send an email to leads where they have the option to choose whether or not they want to receive emails and also set their preferences. It looks something like this –

If a lead chooses to opt-in and receive emails, they’ll then get to choose their email subscription preferences and the Do Not Email field is automatically updated to False.
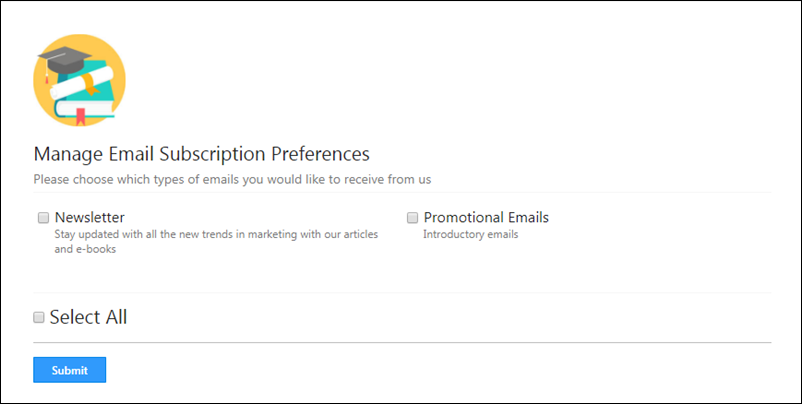
If, on the other hand, a lead chooses to opt-out, the Do Not Email remains True and you can’t send them any emails.
Here’s how you can set up a simple automation to send opt-in emails when new leads are added.
- Navigate to Marketing>Automation and click Create Automation.
- Select a Blank Template, set the trigger to New Lead and click Save.
- Click the Add
 button and under Messaging, select Send Opt-In Email.
 - You use the visual designer or text editor to compose the email. The visual designer already has ready-made templates you can preview and use. For this case, select the Opt-in Emails for New Leads template. Click Use or Edit & Use if you wish to make changes to the content.
- Now click Publish to set the automation live.
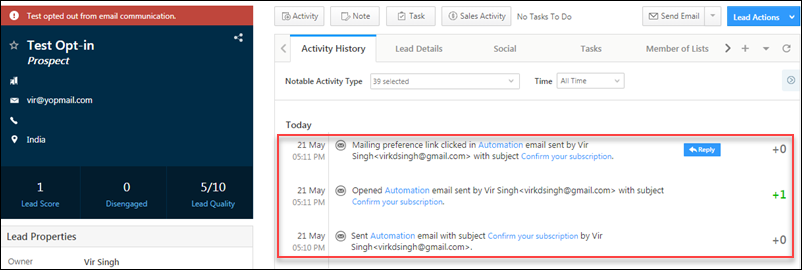
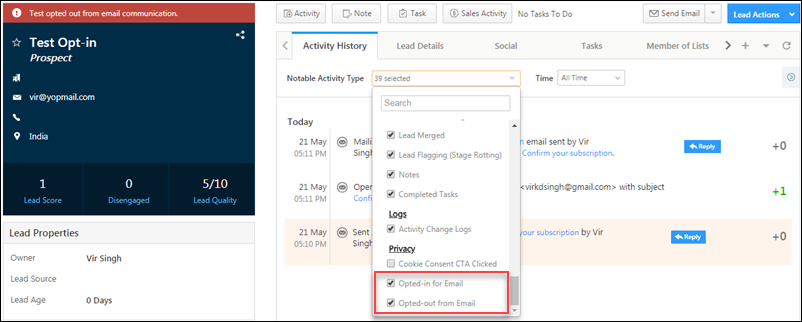
Note: All opt-in and opt-out actions taken by your leads reflect as custom activities with the following details – IP address, Origin, Comments and Date. You can view them on the Lead Details page for a particular lead –
3. Points to Note
- If a lead’s email address is changed and the Email Opt-in settings are Enabled, the Do Not Email field for that lead will be reset to True.
- If a lead’s Do Not Email status is changed manually, through import or through rules or automation, users must enter Opt-in comments.
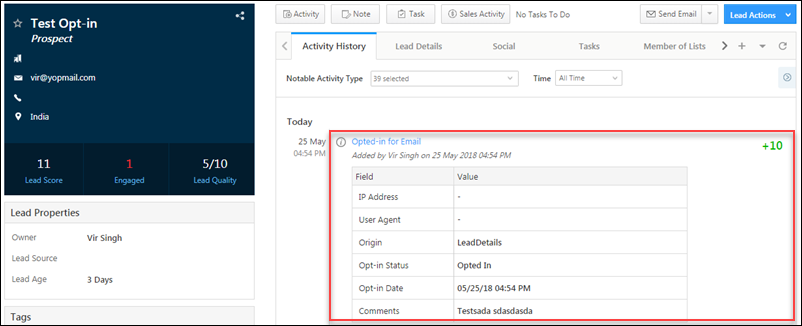
- All opt-in and opt-out activities are tracked. You can view them on the lead details page as shown above. If you can’t see them enable the Opted In for Email and Opted Out for Email activities from the Notable Activity Type drop-down on the Lead Details page.
Personal Data Protection
The personal data protection setting is another LeadSquared feature that helps you comply with GDPR. When enabled, it automatically creates a landing page in your account (in draft status) that you can publish to existing leads and present them with the following options –
- View their data
- Remove their data
- Update their data
- Do Not Track
- Others (comments are available)
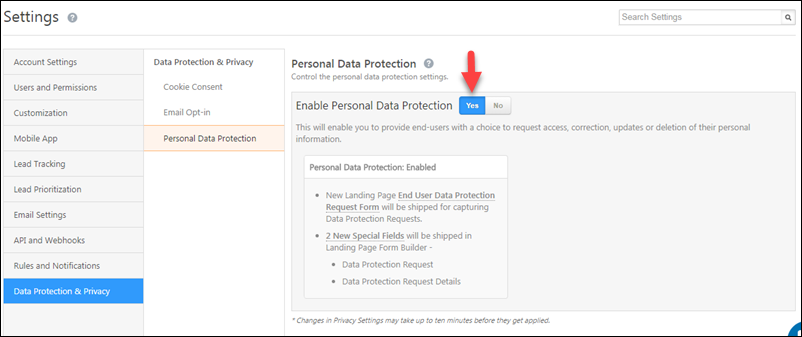
1. Enable the Personal Data Protection Settings
- Navigate to My Account>Settings>Data Protection & Privacy>Personal Data Protection.
- Alongside Enable Personal Data Protection, click Yes.
2. Publish the Landing Page
After enabling the personal data protection setting, a landing page with the name End User Data Protection Request Form will automatically appear in your account.
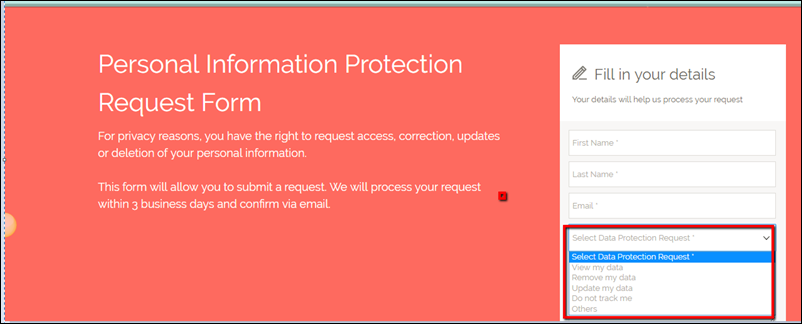
You can edit this page if you want. The form in the landing page will have a Data Protection Request drop-down field where leads can request to view, remove or update their data, make a do not track request or choose the others option and enter comments.
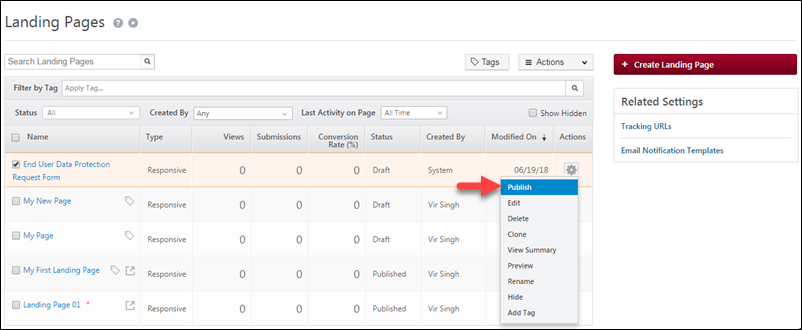
To publish the landing page –
- On the main menu, navigate to Marketing>Landing Pages.
- Hover your cursor over the settingswheel alongside the End User Data Protection Request Form landing page and click Publish.
- On the confirmation box, click Publish.
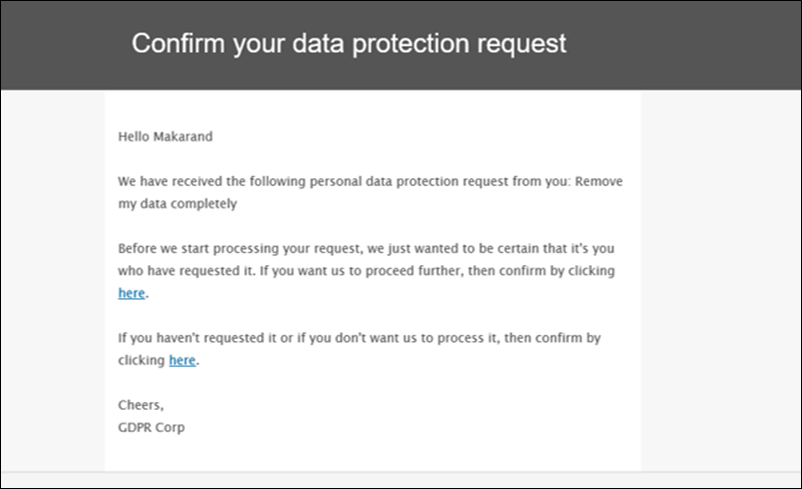
Once a lead submits a request on the landing page, they’ll receive the following confirmation email –
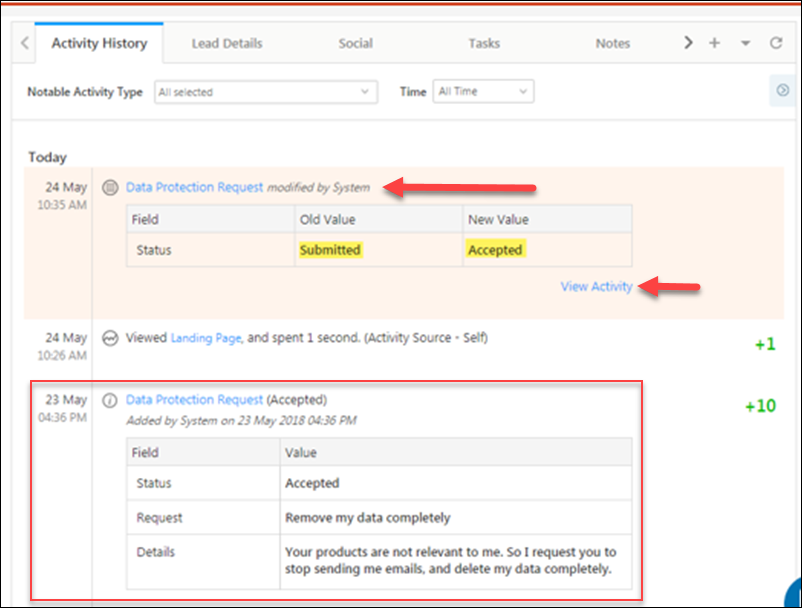
3. Check Activity History
When a lead submits a request on the End User Data Protection Request Form landing page, a ‘Data Protection Request’ activity gets posted on the lead details page. The response to the confirmation email is also visible in the leads activity history.
4. Take Action
Each data protection request submitted by a lead, excluding ‘Do Not Track’, must be manually completed. So a lead requests to view their data, update their data, remove their data or chooses the others option, you have to manually perform the required actions.
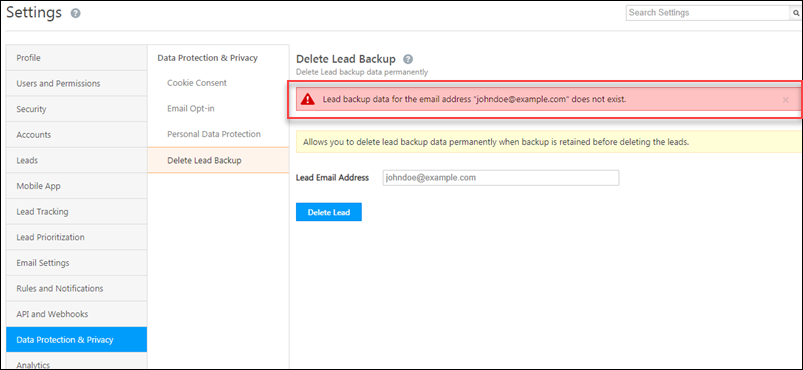
Delete Lead Backup
When leads are deleted from LeadSquared, we still maintain an audit record with the lead’s details. To ensure GDPR compliance and remove all lead data (including the audit data we maintain), you can use the Delete Lead Backup feature.
Enter the lead’s email address and click Delete Lead. On the confirmation pop-up click Yes. If the lead backup exists you’ll see a success message. If the backup doesn’t exist you’ll see a failure message.
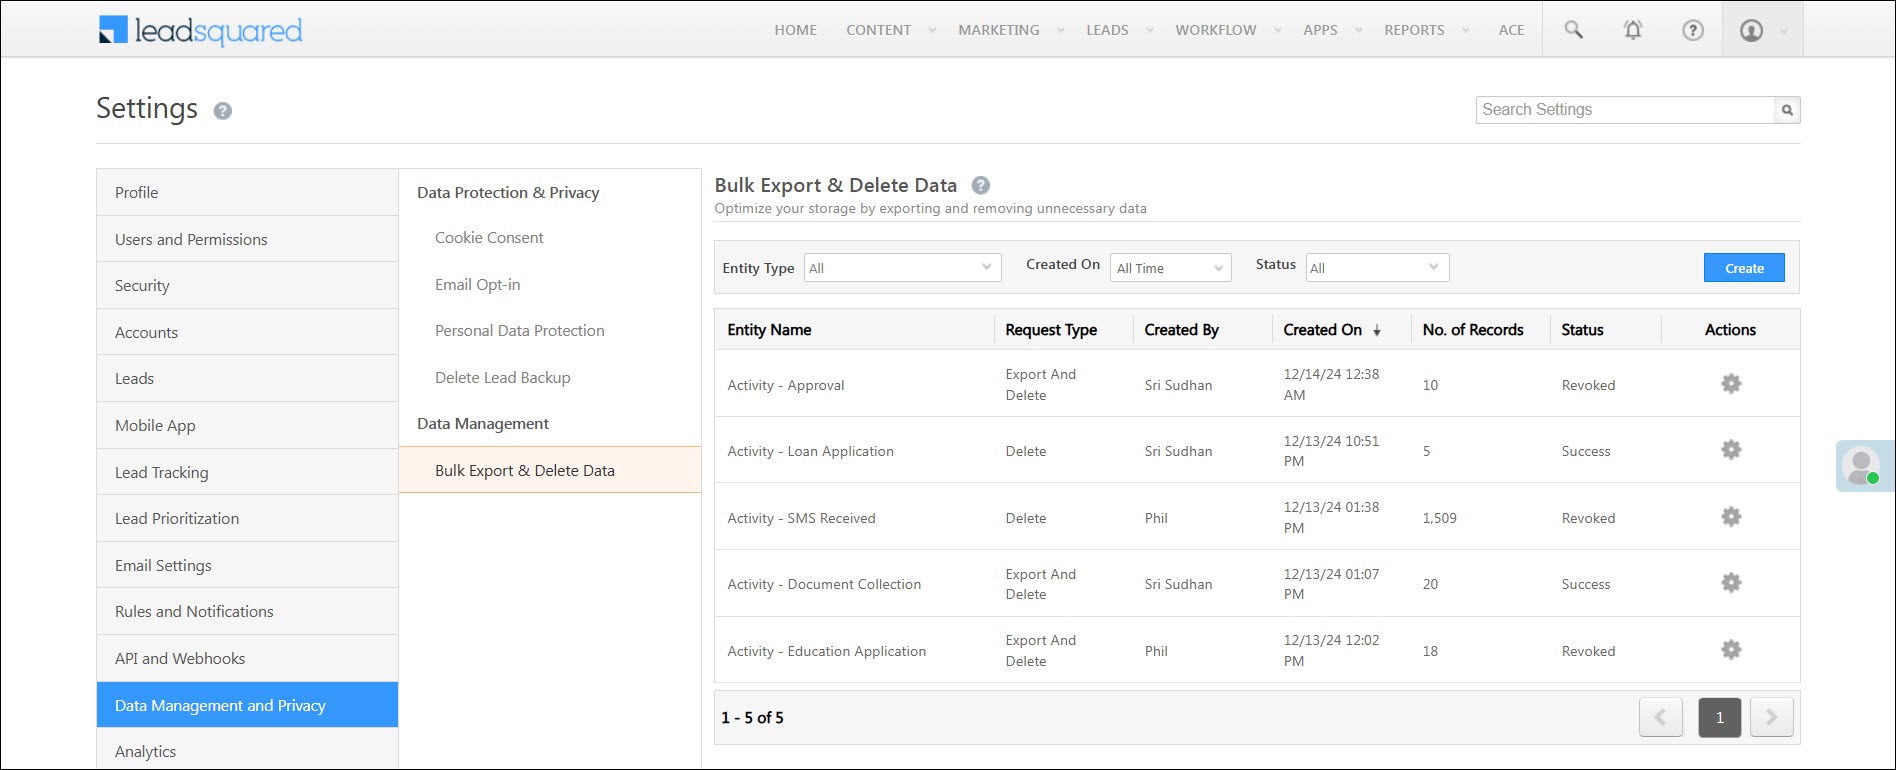
Bulk Export and Delete Data
The Bulk Export and Delete Data feature enables you to efficiently manage and optimize your LeadSquared account storage by exporting and deleting large volumes of activity data in a single action. You can choose to export and delete system and custom activities, or permanently delete them without creating a backup.
You can process up to 200,000 activities in a single request, either by exporting and deleting them together or deleting them directly. If you only want to export activities without deleting them, refer to the Export Activities feature.
Any Questions?
Did you find this article helpful? Please let us know any feedback you may have in the comments section below. We’d love to hear from you and help you out!
How do I remove an agent’s email address who is no longer with the company. I am an admin.
Hi, Jodi. To do this, navigate to My Profile>Settings>Users and Permissions>Users, and alongside the user you want to remove from your account, hover your cursor on the settings icon, and click Deactivate. Hope this screenshot helps –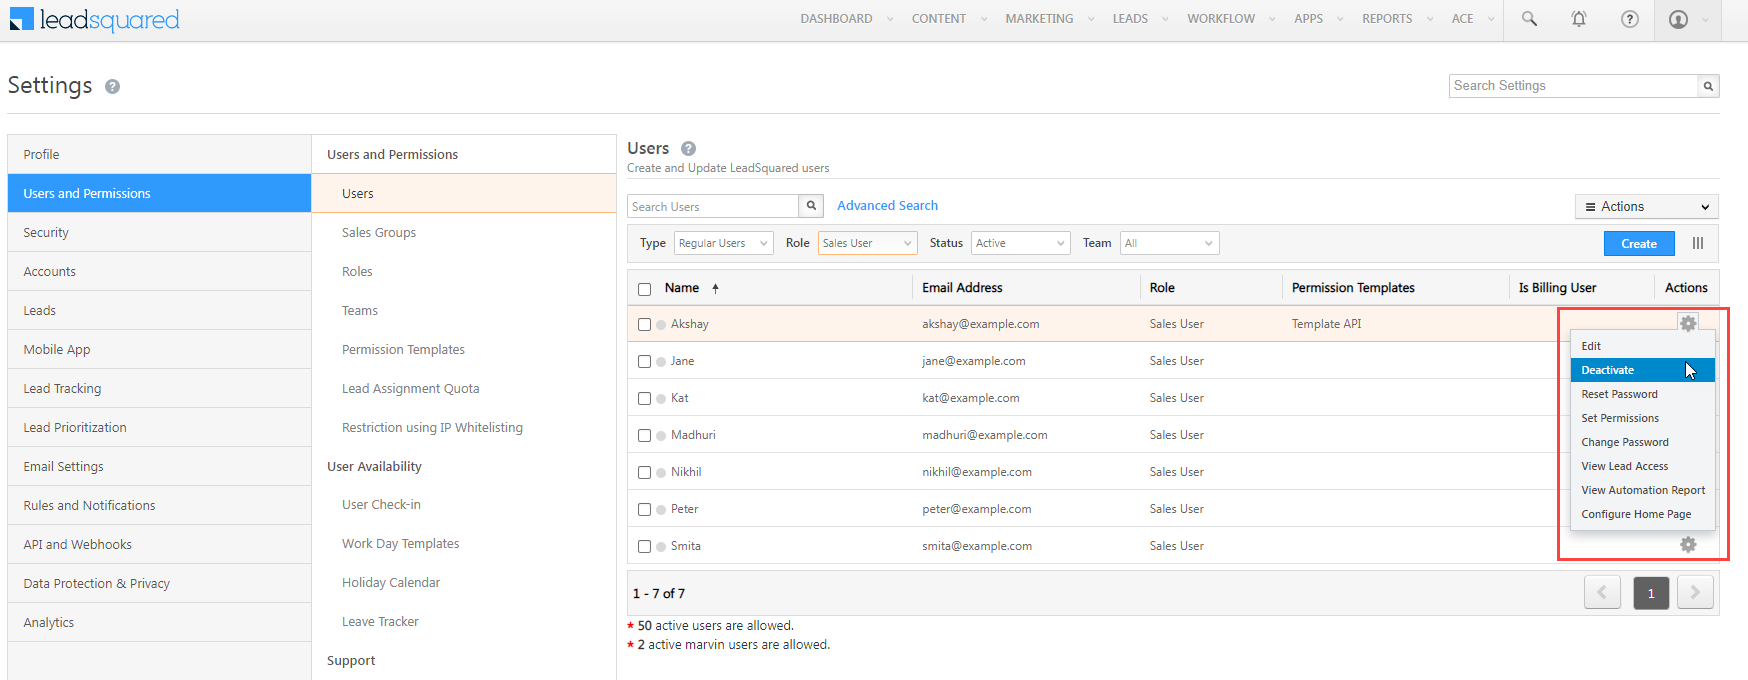
They are already deactivated and I made them obsolete but the agent is still receiving emails. I have access to their inbox and can see the emails coming in.
Okay, this shouldn’t be happening, Jodi. Can you please send a mail elaborating on this issue to support@leadsquared.com? We’ll resolve it asap.
How can we retrieve deleted leads in LSQ. please helps us
Hi Chetan,
There is no way to restore deleted leads. However, you can access the Deleted Leads Report and export the lead details. You can then import the leads back into your account using lead import. Note that the leads you import will be created as new leads in your account, the deleted leads will not be restored. Hope this helps!