


Get Started
Sales Suite
Field Ops
Marketing
Service CRM
Integrations & Apps
FloStack
Universal Telephony Connector – UTC
1. Feature Overview
The Universal Telephony Connector (UTC) enables you to integrate your cloud telephony service provider(s) with LeadSquared –
- Integrate multiple instances/accounts of your telephony provider –
If you have multiple contact centers in different regions (E.g., northern region, southern region, etc.), you can configure each of them as separate tabs. - Integrate multiple telephony providers –
If you’re using two or more telephony service providers, you can now integrate all of them in one place. - Assign to teams –
Assign different instances of one telephony provider or even different providers to teams in your account. For example, you can now assign a northern region telephony instance to your northern region team, a western instance to your western team, and so on. For more information on teams, see LeadSquared Teams.
Note:
- The connector acts as a shell or umbrella under which you can create and configure multiple instances, using either of the following-
- For a list of mail-merge parameters on Click2Call, Agent Panel, and Call Log, refer to this article.
- To diagnose and resolve common telephony configuration issues from within the LeadSquared Application, read this article: Telephony Troubleshooting.
To learn more about LeadSquared telephony integrations, read LeadSquared Telephony – Feature Guide.
2. Prerequisites
- You must be an Administrator user to access the connector configuration.
- Developer experience is required to understand the format of the data and configure the connector with your telephony provider.
- The table below outlines the distinction between APIs/URLs provided by LeadSquared and those provided by your telephony provider. LeadSquared’s APIs/URLs are accessible through the UTC configuration page, while your telephony provider’s APIs must be obtained directly from them. If you encounter any issues with an API, please get in touch with the respective API owner.
LeadSquared APIs Telephony Provider APIs Call Route API (Lead/Opportunity routing) – The Call Route API directs incoming calls from existing leads to the corresponding Lead or Opportunity owner in your LeadSquared account.
Note: LeadSquared does not automatically route calls to owners. Instead, it provides the Lead/Opportunity Owner details to your telephony provider, who then routes the call accordinglyClick2Call API – The Click2Call feature allows your sales reps or agents to initiate outbound calls by simply clicking on a lead’s phone number in the Manage Leads or Lead Details pages Agent Popup API – This API logs all inbound and outbound calls made through your telephony account into LeadSquared, ensuring comprehensive call tracking. Agent Panel URL – Agent Panel URL allows you to embed your provider’s Softphone into LeadSquared. Call Log API – All inbound and outbound calls made through your Telephony account can be logged in LeadSquared by setting up Call Logs Call Disposition – Call disposition allows users to record specific information related to a phone call once it ends. Single Sign–On API – This API enables embedding LeadSquared within your telephony provider’s portal.
3. Installation
Navigate to Apps>Apps Marketplace, search for the Universal Telephony Connector and click Install.
4. Configuration
- Next, hover the cursor over the settings
 icon and click Configure.
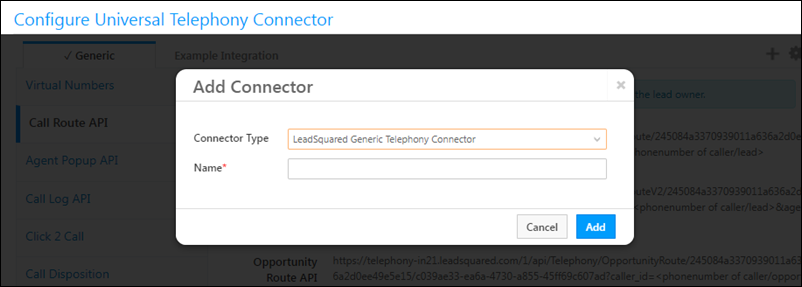
 - Click the Add New Connector button.
- Select the Connector Type (LeadSquared Generic Telephony Connector, Ozonetel V2, etc.).
- Name the connector, then click Add.
Note: You can add a new instance, clone an existing one or delete an instance using the options highlighted below.
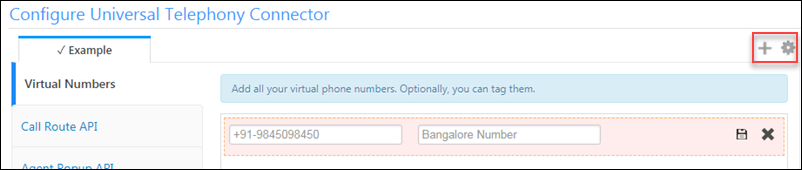
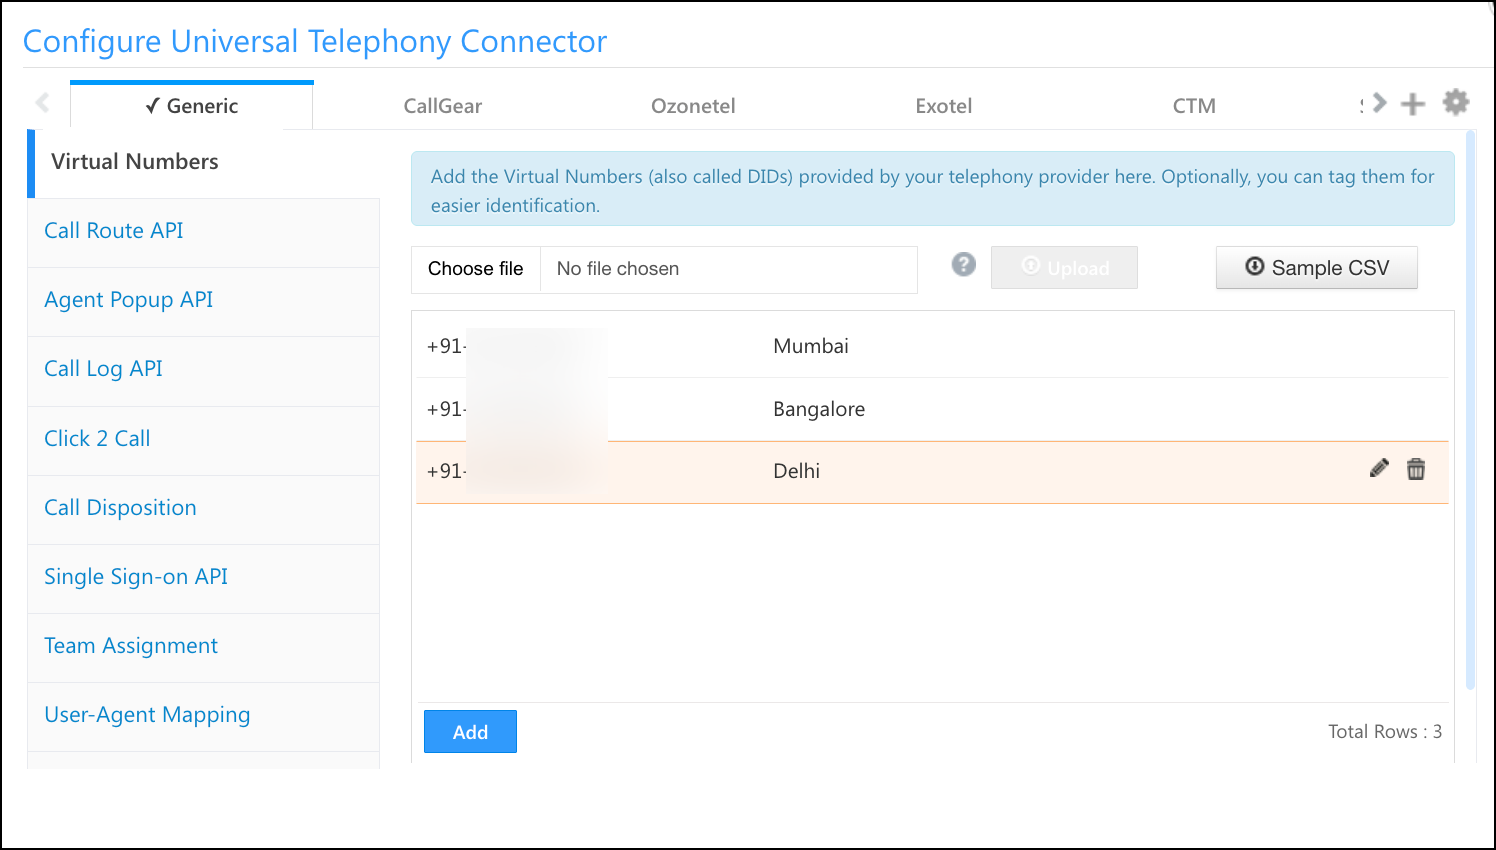
5. Virtual Numbers
Use this section to add one or more virtual numbers (also called DIDs/CLI) for the connector you’re configuring. You can also tag them if you like. Click the Save![]() icon to save a virtual number and click Add to add another number.
icon to save a virtual number and click Add to add another number.
You can even bulk upload virtual numbers through a CSV. We recommend downloading the sample CSV, entering your values in it, and then uploading the file so the format matches what the system expects
Note:
- Bulk upload has a max limit of 1000 records per upload.
- If the virtual number is entered in the correct format <+91-number>, only the tag name will be displayed in the the outbound phone call activity.
6. Call Route API
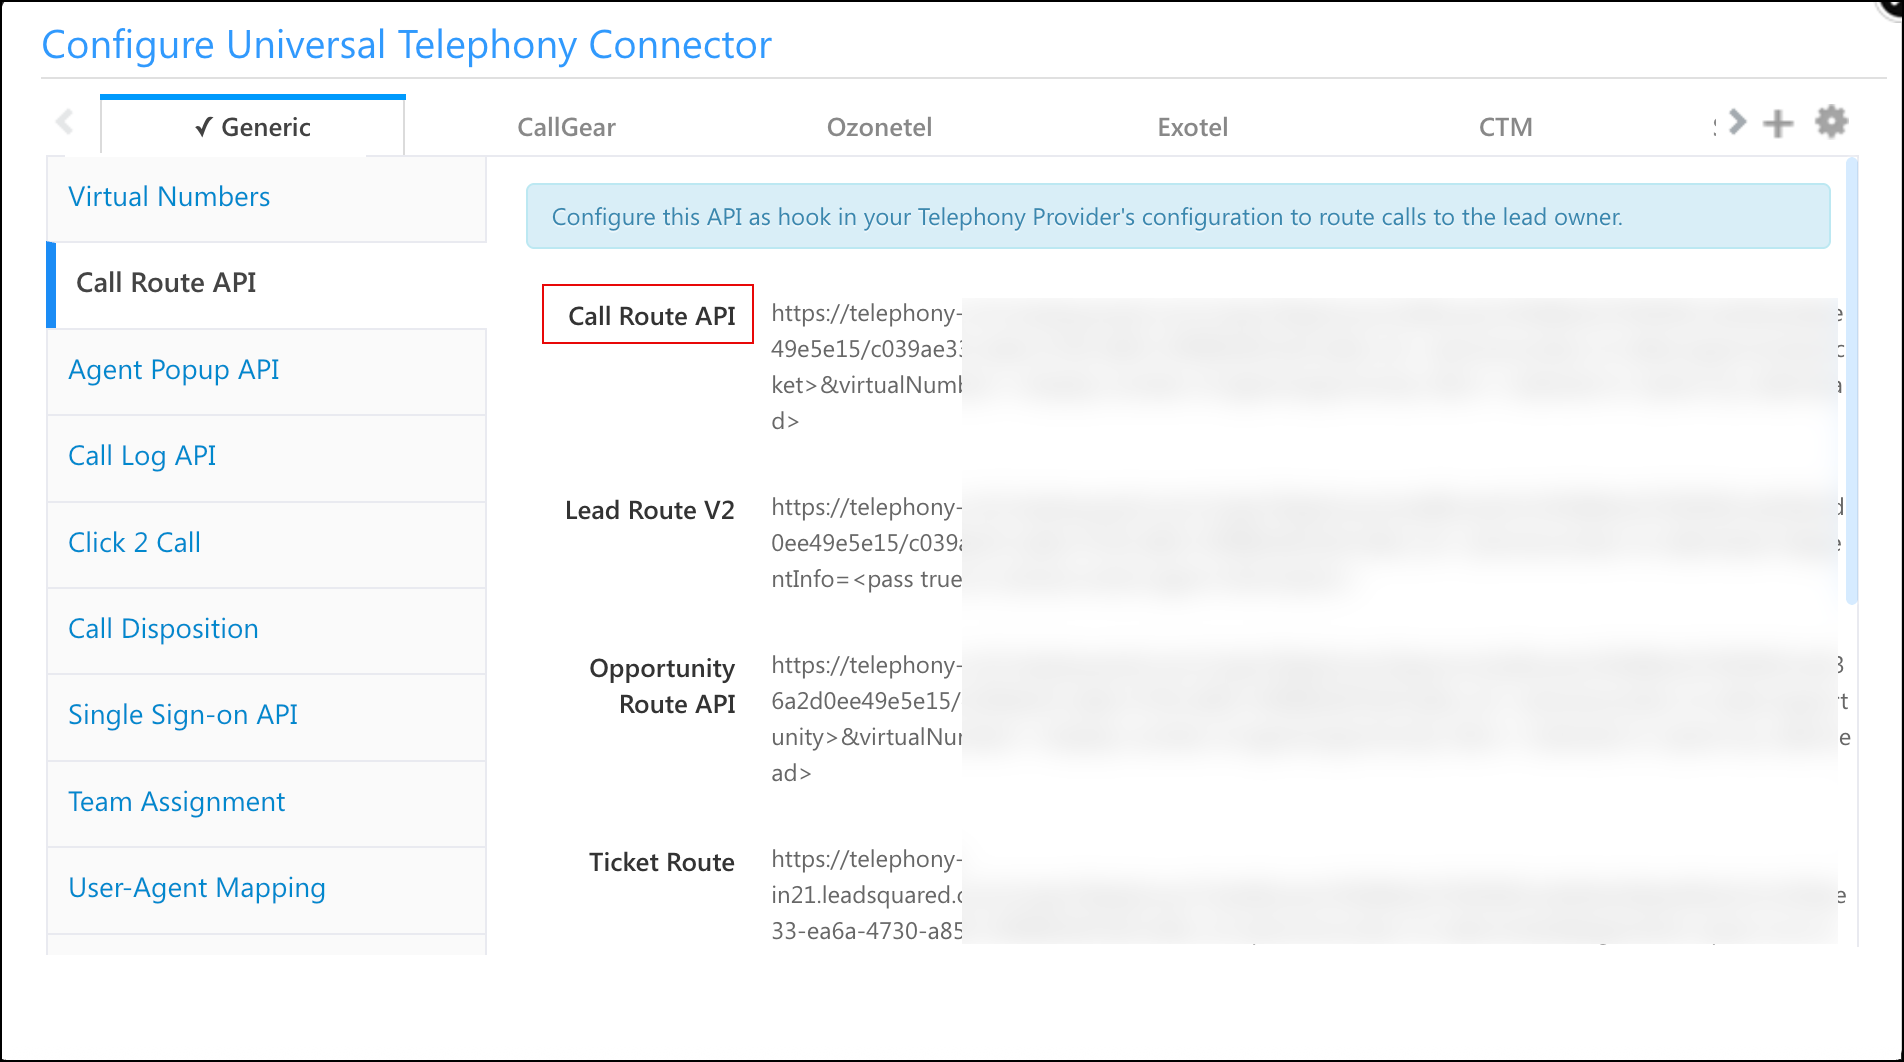
The Call Route API automatically routes incoming calls from existing leads to the respective Lead owner/Opportunity owner in your LeadSquared account. The API must be configured as a hook on your telephony provider’s end.
- Copy the Call Route API (will resolve to Lead, Opportunity, or Tickets) and deploy it in your cloud telephony account.
- Use HTTP GET to send the data. Please refer to the ‘Usage’ section to understand how to send the data.
Note:
- In existing instances, the deprecated Lead Route API has been replaced with Call Route API. In new instances, only the Call Route API will be displayed.
- To add an extra layer of security you can Enable Additional Authentication and pass the generated key-value pair in the request header when calling the API. These additional authentication headers can also be generated for the Agent Popup API and Call Log API.
7. Agent Popup API
Enable real-time call notifications to users in the form of an Incoming Call Popup during an inbound call from a lead (made to your virtual number). The pop-up displays the lead’s details if the lead exists in your account, or displays an empty form that agents can use to capture the new lead.
Note:
- When you select Enable, it allows admin users to enable the Show Phone Call Popup setting for all users in the account. Disabling this setting does not turn it off for all users.
- Incoming calls matching a lead’s secondary phone number will be tracked without creating a duplicate lead.
- If you have multiple leads with the same phone number, you can pass the
LeadIdin the Agent Popup API. This will ensure that the correct lead details appear in the agent popup. For e.g.,"LeadId": "4c70ce73-0732-4977-85a2-fb49a978b85c". - To enable client-side logging, which allows browser events, messages, and errors to be logged to a log stream (e.g., Loggly), contact your account manager or write to support@leadsquared.com.
- You can disable the close icon on the Agent Popup form by enabling Hide Close Option “X”. This feature ensures that agents adhere to specific workflows and processes by preventing accidental popup closures.
Agent Pop-Up API Details
- Copy the Agent Popup API URL from the Agent popup tab and deploy it in your cloud telephony account.
- Use the HTTP POST method to send the data to LeadSquared in JSON format.
- Enable Agent Popup by selecting the checkbox.
Refer to the ‘Usage’ section to understand how to send the data.

Custom Mapping
Telephony providers send us varying data using the Agent pop-up API. Enable custom mapping to map the variables received in the JSON file to the corresponding LeadSquared parameters.
| Property | Sample Value | Description |
| SourceNumber | +919611795983 | For Inbound Call- Lead’s contact number For Outbound Call- User’s Number or Agent’s number. A Hyphen separator is expected in the outbound call number if a country code is being passed; for example, +91-9611795983. |
| DestinationNumber | +919611795980 | For Inbound Call- User’s Number or Agent’s number. A Hyphen separator is expected in the inbound call number if a country code is being passed; for example, +91-9611795983. For outbound Call- Lead’s contact number |
| DisplayNumber | +919020897874 | Virtual(DID) Number provided by the provider |
| StartTime | 2015-08-20 18:26:38 | Start time of the call in IST |
| Status | Answered | Status of the call, can be Answered, Missed, Voicemail |
| IVR | 1 | IVR option to be passed for Opportunity-Virtual Number mapping |
| Opportunity-Telephony MappingId | O$a7131527-55c8-4871-a3bb-7ff74b55555 | Mapping ID passed for Opportunity-based click2calls. |
| Opportunity ID | 83uhd8-uendur-83ehdn | When passed in call log details, activity is posted on the Opportunity. |
| CallSession Id | 080673309211440075398 | Unique Identifier for a call provided by the telephony provider. In case the provider does not provide the identifier, a default identifier will be generated. |
| Agent Id | Test.user@lsqdev.in | Unique Identifier at the provider’s end for identifying an agent. For example, the agent’s phone extension, email ID, or SIP extension. |
| Lead Id | 293847-dhcnj-12333-48fn | Pass to identify the lead directly. this will be given preference over the phone number. |
| Entity Id | Pass to identify the entity directly, takes precedence over the lead or opportunity or ticket ID when resolved. |

Agent Panel Settings
The agent panel enables you to embed a softphone and manage your call center actions directly from your LeadSquared account. Add a custom URL and append mail merge parameters (click the help ![]() icon) to configure the agent panel.
icon) to configure the agent panel.
Note:
- When you Enable Agent Panel, it allows admin users to enable the Is Soft phone Enabled option for all sales users in the account. Disabling this setting does not turn it off for all sales users.
- Agents will be presented with only the relevant Angent Panels based on the team-mapping configuration. If team-mapping has not been configured across any instance, then the mapping from the default instance will be applicable.
- For available Mail Merge fields, read this article.

| Setting | Description |
| Show on Top | Displays the agent panel over any overlapping window (including the agent pop-up). |
| Hide Scale Button | Hides the maximize/minimize buttons on the panel. |
| Panel URL | The source iFrame URL for the panel. Click the help |
| Panel Permissions | Configure iFrame permissions like microphone, camera, geolocation, etc. |
| Panel Title | Customize the display text on the panel title bar. |
| Panel Height | Adjust the default height of the panel (in pixels). |
| Panel Width | Adjust the default width of the panel (in pixels). |
8. Call Log API
All inbound and outbound calls made through your Telephony account can be logged in LeadSquared by setting up Call Logs. These logs will be posted to LeadSquared as incoming/outgoing phone call activities.
You can also enable custom mapping functionality, to map and capture data about each phone call in the relevant LeadSquared activity fields. There are also custom fields available to map additional data provided by your telephony service.
Note:
- When your Telephony provider calls the LeadSquared API, data can be pushed into LeadSquared using POST method in JSON format.
- For this API, the Content-Type has to be set to application/JSON, and the Body should be passed in the raw JSON format.
- The Content-Type application/x-www-form-urlencoded is deprecated but is supported on legacy versions.
- In Custom Mapping, when you select the Custom option (below required, additional), you can use the fields
mx_Custom_10tillmx_Custom 14to store additional data sent by the telephony provider.
Once you’ve finished the configurations, you can check your telephony logs by navigating to My Account>Settings>API and Webhooks>Telephony Logs.
Here are the parameters you can post –
{

"SourceNumber":"9611232123",

"DestinationNumber":"9876543210",

"DisplayNumber":"1000001000",

"StartTime":"2015-08-20 18:26:38",

"EndTime":"2015-08-20 18:26:38",

"Duration":"12",

"Status":"Answered",

"CallNotes":"Enquired about product",

"ResourceURL":"server/filename.extension",

"Direction":"Inbound",

"CallSessionId":"080673309211440075398",

}
| Property | Sample Value | Description | Mandatory |
| SourceNumber | +919611795983 | For Inbound Call- Lead’s contact number For Outbound Call- User’s Number or Agent’s number. A Hyphen separator is expected in the outbound call number if a country code is being passed; for example, +91-9611795983. |
Yes |
| DestinationNumber | +919611795980 | For Inbound Call- User’s Number or Agent’s number. A Hyphen separator is expected in the inbound call number if a country code is being passed; for example, +91-9611795983. For outbound Call- Lead’s contact number |
Yes |
| Duration | 12 | Duration of call in seconds | Yes |
| DisplayNumber | +919020897874 | Virtual(DID) Number provided by the provider | Yes |
| Status | Answered | Status of the call, can be Answered, Missed, Voicemail | Yes |
| StartTime | 2015-08-20 18:26:38 | Start time of the call in IST | Yes |
| *StartTimeUTC | Tue, 05 Jul 2022 10:30:30 GMT | Start time of the call in UTC | No |
| CallSessionId | 080673309211440075398 | Unique Identifier for a call provided by the telephony provider. In case the provider does not provide the identifier, a default identifier will be generated. | Yes |
| EndTime | 2015-08-20 18:26:50 | End time of the call | No |
| CallNotes | Enquired about a product | Additional notes about the call | No |
| ResourceURL | Server/filename.extension | URL of the file with a recording of the conversation | No |
| Direction | Inbound | Inbound or Outbound | Yes |
| IVR | 1 | IVR option to be passed for Opportunity-Virtual Number mapping | No |
| Opportunity-Telephony MappingId | O$a7131527-55c8-4871-a3bb-7ff74b555555 | Mapping ID passed for Opportunity-based click2calls. | |
| Opportunity ID | 83uhd8-uendur-83ehdn | When passed in call log details, activity is posted on the Opportunity. | No |
| Agent Id | Test.user@lsqdev.in | Unique Identifier at the provider’s end for identifying an agent. For example, the agent’s phone extension, email ID, or SIP extension. | No |
| Lead Id | 293847-dhcnj-12333-48fn | Pass to identify the lead directly. this will be given preference over the phone number. | No |
| Call Origin | Web | Specify the lead origin. | No |
| mx_Custom_10 | Additional custom field to send additional data. The display name of the field can be modified on the UI. It can have any string value passed from the provider. | No | |
| mx_Custom_11 | Additional custom field to send additional data. The display name of the field can be modified on the UI. It can have any string value passed from the provider. | No | |
| mx_Custom_12 | Additional custom field to send additional data. The display name of the field can be modified on the UI. It can have any string value passed from the provider. | No | |
| mx_Custom_13 | Additional custom field to send additional data. The display name of the field can be modified on the UI. It can have any string value passed from the provider. | No | |
| mx_Custom_14 | Additional custom field to send additional data. The display name of the field can be modified on the UI. It can have any string value passed from the provider. | No |
9. Click 2 Call API
The Click2Call feature enables your sales reps/agents to place an outbound phone call just by clicking the lead’s phone number (on the Manage Leads or Lead Details pages). If you use the Opportunities feature, click 2 call can be used to call leads from the Opportunity Management and Opportunity Details pages as well.
Depending on the capabilities of your telephony provider, it can be configured using either a server-side API or a client-side script.
Server-side API
This is the default configuration option.
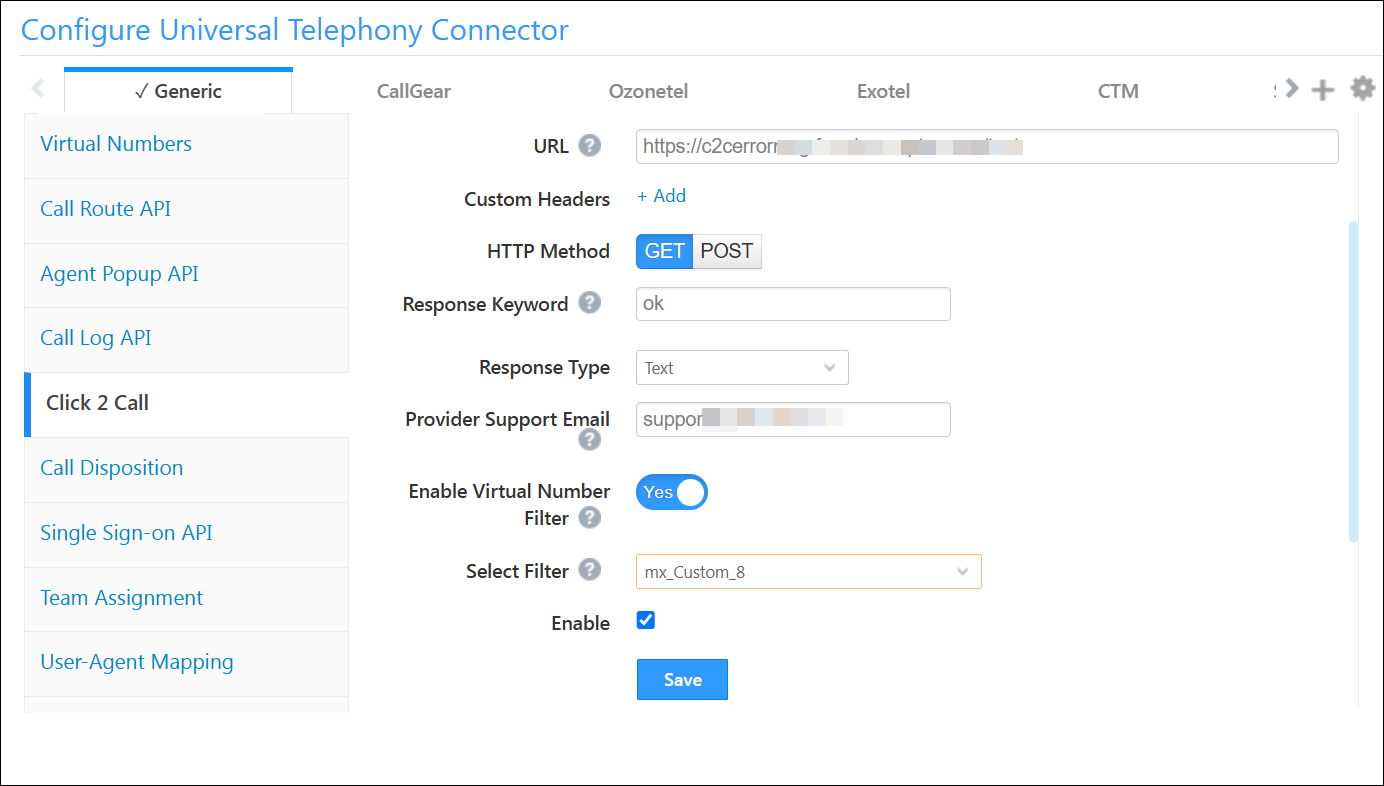
Your telephony provider’s Click2Call API is configured here, and you can append mail-merge parameters (like agent phone number, lead phone number, etc.) to the API URL to facilitate the calling functionality.
-
- Pass the Click2Call API in the URL textbox.
- You may optionally pass custom headers to the API for authentication.
- Select the HTTP method needed by the telephony operators Click2Call API.
- Map a keyword from the response of the Click2Call API. Typically we use a keyword like “success”. This lets our system know that the API request fired correctly and a response was received.
- Choose the format of the API response data (Text, JSON).
- Admins should configure their telephony provider’s email address in the Provider Support Email field. This ensures that agents receive clear guidance when encountering call failures due to either UTC configuration issues or provider-side technical problems.
- You can filter virtual numbers for users by toggling the Enable Virtual Number Filter option. Read this article for more details.
- Click the Enable
 checkbox.
Client-side Script
For telephony providers with JavaScript SDKs, the Click2Call functionality can be configured using a client-side script. The outbound phone call functionality will be handled by the script and the call will be initiated via the browser to the telephony provider.
- Enter the URL of the Javascript file, which must be hosted on the LeadSquared domain (external domains are not supported). The JS file will be published only after an internal review process.
- You can pass data to the script using mail-merge parameters (like agent phone number, lead phone number, etc.).

Note:
- For a sample JS file template, please reach out to your account manager
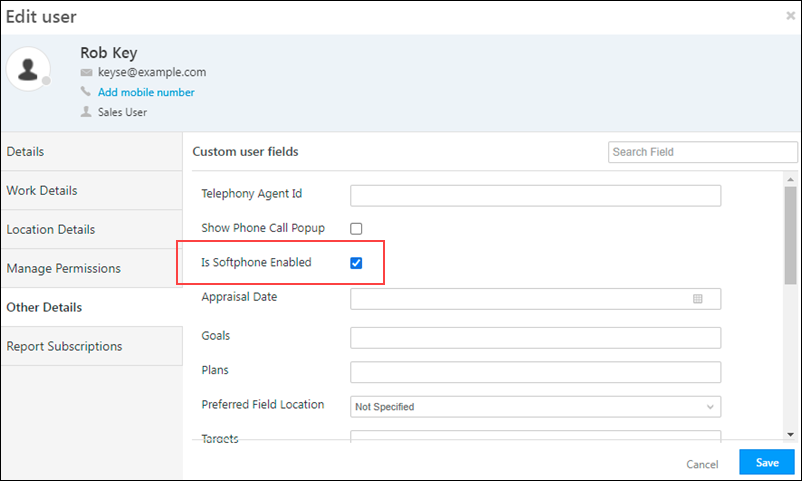
- Additionally, a flag called Is Softphone Enabled must be checked for each agent, in the user settings UI. This also disables the “Agent Panel” for the agents.
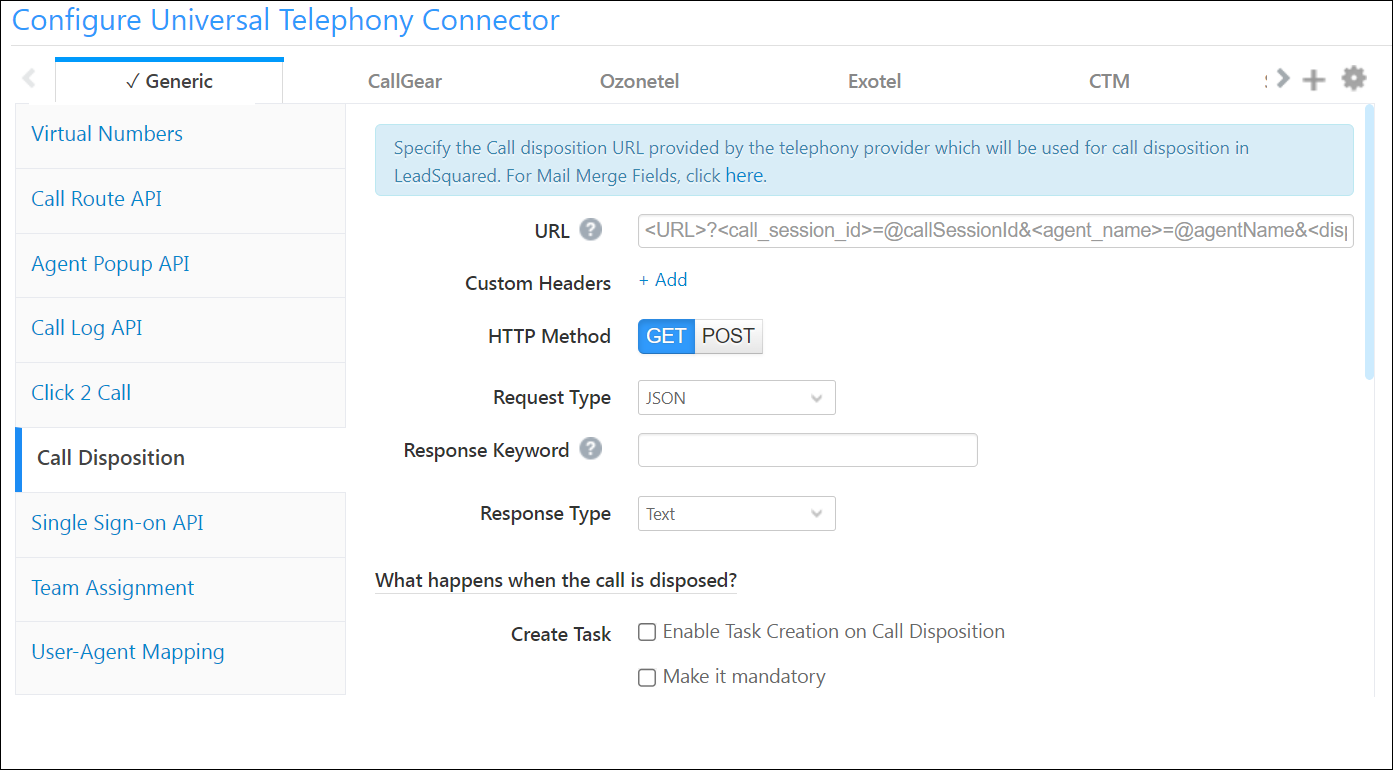
10. Call Disposition
Call disposition lets users enter certain information related to a phone call once it ends.
Note:
- To use this feature, you must first create a Custom lead field in LeadSquared (say ‘Disposition’). For more information, see How to Create Custom Lead Fields.
- Disposition is available only on Lead Fields.
- Only 1 <string> value can be sent to the provider as disposition.
- User Fields can also be mail-merged in the URL and Data Template – contact support@leadsquared.com to enable this feature.
- For available Mail Merge fields, read this article.
When a call has ended the agent can select an appropriate disposition value on the Call/Agent-Notification Popup, dispose of the call, and get ready to receive the next upcoming call.
- Deploy the URL provided by your telephony service in the URL field with the necessary parameters.
- @callSessionId – Call session Id passed by the telephony provider in the agent popup request
- @customerNumber – Lead Phone number
- @virtualNumber – The virtual number of your telephony account
- @dispositionValue – Selected disposition value in the agent popup form*
- @agentNumber – Agent’s phone number
- @agentId – User Id of the agent
- @notes – Notes on the call
- @comments – Comments on the call
- @date – The date of the call
- Select the HTTP method in which your telephony service accepts the data.
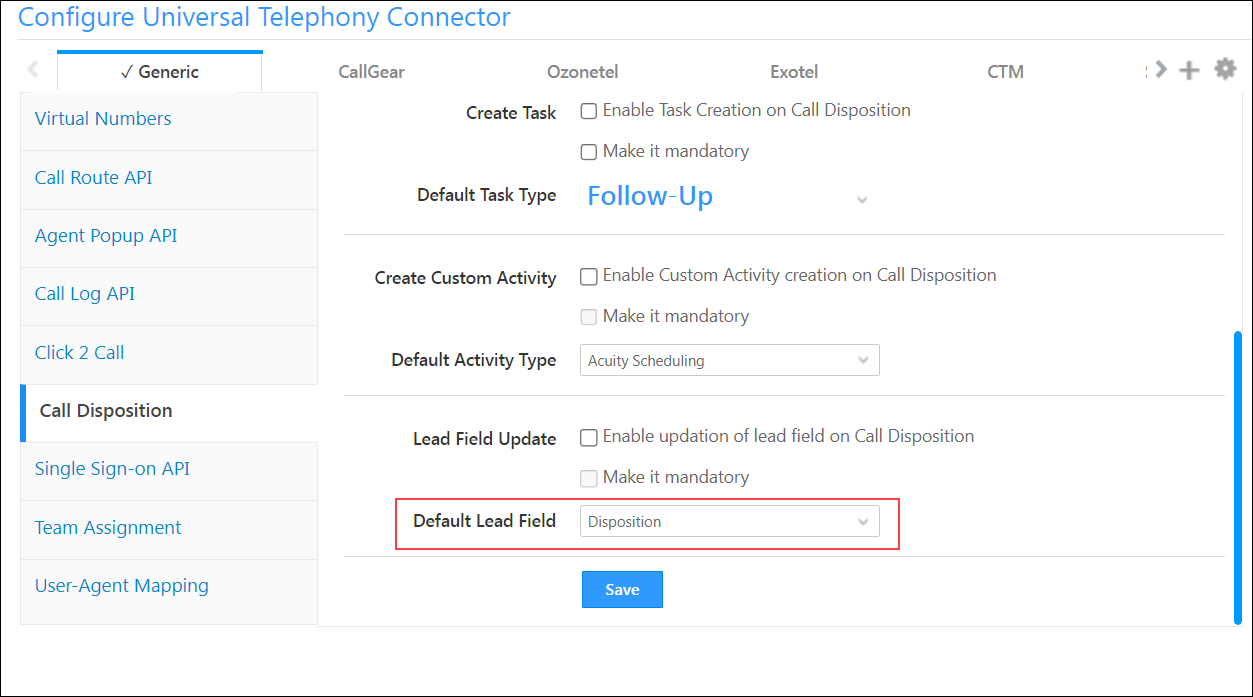
- You can initiate the following actions (and make them mandatory if required) once a call is disposed of –
- Create a task
- Create a custom activity
- Update a lead field
*On Default Lead Field you must map the custom field you have created to capture the disposition value (refer to the Note above). This field can then be mapped with @dispositionValue in the URL (GET request), or in the Data Template (POST request).
11. Single Sign-on API
This API will help you embed LeadSquared within your telephony application. Use the API and the HTTP POST method to send data to LeadSquared in JSON format. To get the leads details, use the Lead Details API.
Please refer to the ‘Usage’ section to understand how to send the data.

Lead/Opportunity Sharing via SSO APIs
Lead or Opportunity Sharing allows agents to temporarily view/edit the information of a lead or Opportunity (during an inbound phone call) that they don’t have access to. For integrations that don’t support the Agent Pop-up functionality, SSO APIs are used for Sharing. Previously, SSO APIs only supported the lead’s phone number to facilitate the identification and sharing of the lead to the agent. Now, the Lead Id is also supported. This will help customers who have leads in their accounts with the same phone number.
Note:
leadIdcan be passed in the Lead Details API URL instead ofleadphonenumber.- Lead sharing can also be enabled through Telephony Settings.
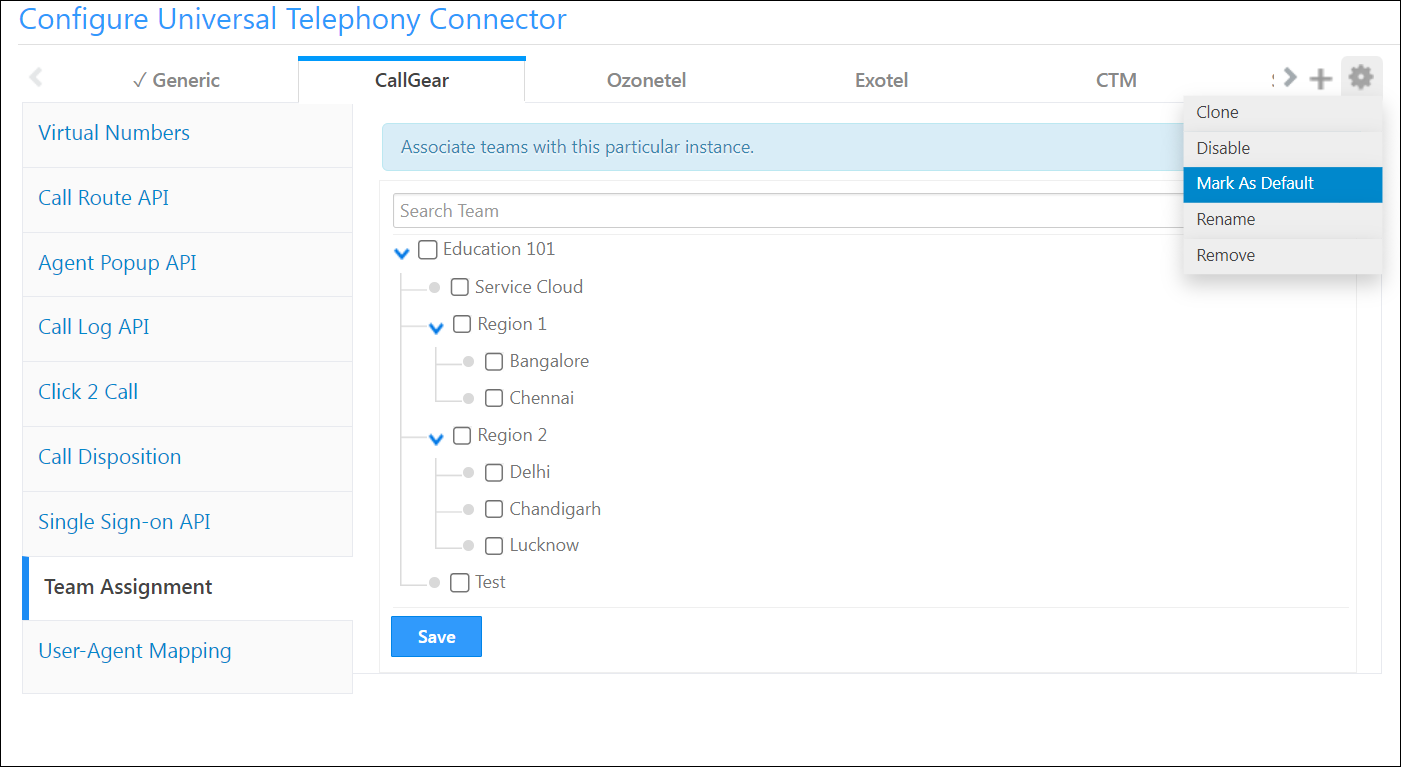
12. Team Assignment
You can assign an instance to one or more teams. While making an outbound phone call (using click2 call), the users in those teams will see the instance(s) assigned to them and can choose to place the calls from any of the virtual numbers created for an instance.
So for example, you can create 2 connector tabs, say ‘Bangalore’ and ‘Chennai’, and assign them to your Bangalore and Chennai teams respectively. Your Bangalore team will then only see the virtual numbers associated with the Bangalore instance tab.

13. User Agent Mapping
Here, you can map each agent/user to a unique identifier. This will be used to identify the correct agent when the ‘Agent’s Phone Number’ or ‘Source Number’ is not stored in LeadSquared.
You may enter any string/alphanumeric value for the Agent Identifier. When calling the Call Log API or Agent Popup API pass this value in the post body like "AgentId":"abcd1234" . The call log posted for the phone call will be updated with the agent/user associated with the Agent Identifier value, even if the source number is not available. Similarly, the user/agent to display the agent popup to will be identified based on the Agent Id value.
You can even bulk upload User-Agent mapping through a CSV. We recommend downloading the sample CSV, entering your values in it, and then uploading the file so the format matches what the system expects. The max limit is 1000 records per upload.

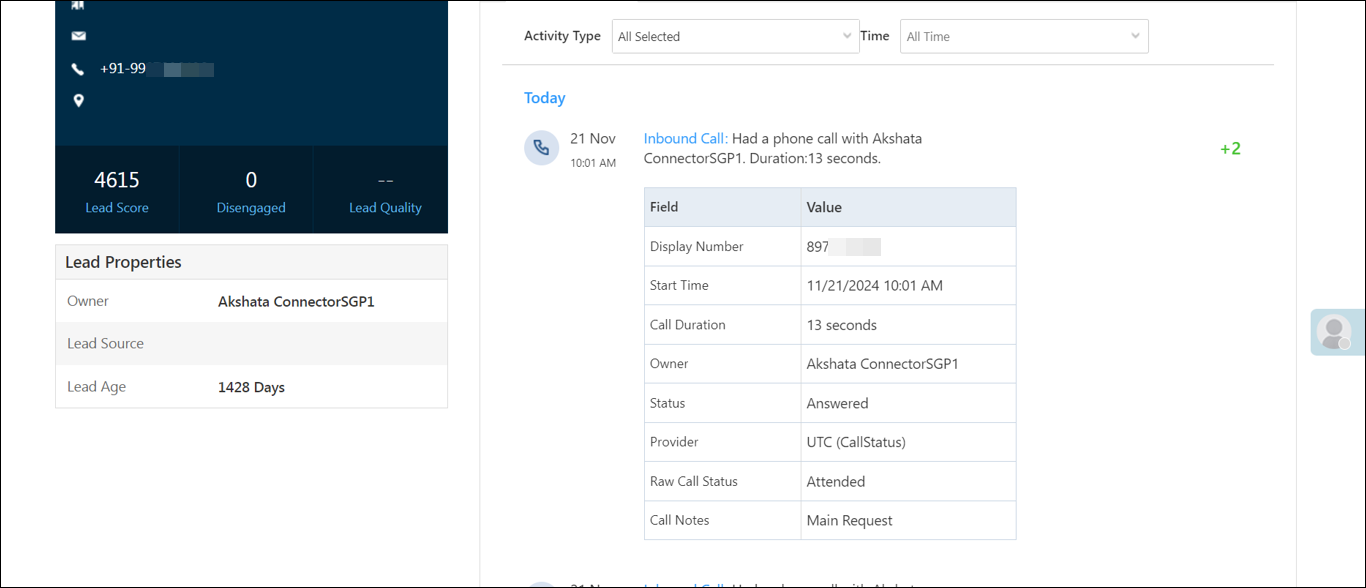
14. Call Status Mapping
UTC supports mapping provider-specific call statuses to LeadSquared-specific statuses. Admins can customize call status mappings and configure multiple statuses as a comma-separated list for Inbound and Outbound calls.
For example, let’s specify Attended as the Provider Status Code for Answered.

Then, the Raw Call Status in the call log will show this mapping after the call ends.
15. Integrate with Opportunities
You can integrate the Universal Telephony Connector (UTC) connector with LeadSquared Opportunities. To know how to do this, please refer to Opportunity Integrations in Telephony.
This will enable you to track phone call interactions with your leads, for each opportunity or potential deal. Completed calls will get posted as activities, against the respective opportunities, on the Opportunity Details page.
Any Questions?
Did you find this article helpful? Please let us know any feedback you may have in the comments section below. We’d love to hear from you and help you out!
I am using call route API in my integration. Earlier, the API response was something like this:
[<country_code>-<number>]
but when i call the api now, the response is only the number without country code (and without square brackets).
Also, if multiple agent numbers are present for an agent, the response looks like this:
1234432112,1112223334
Comma separated numbers without country code.
Can you please validate if these are the expected formats and in case these are changed in future, where can i find the updates.
Also, in these docs, you have mentioned “Usage” docs but i cannot find any link to Usage. Please share that too.
Hi. Based on the behavior you’re describing, it appears that your integration may be using the deprecated LeadRoute API. the older LeadRoute API returned agent numbers without country codes, and multiple numbers were returned as comma-separated values. The current API returns agent numbers with country codes.
Could you please share the API being used so we can confirm which version of the API your integration is calling?
Regarding the “Usage” reference: this is not a separate document. The Usage section is part of the UTC (Universal Telephony Connector) itself. For example, you can find it by scrolling down on the Call Route section within the UTC connector.
Hi, I am using Retrieve Lead by Phone number API. I am not passing country code in the request as it is mentioned in the documentation that you can either pass country code or you can skip, but it is not working for all leads that are saved with country code in LeadSquared, it is only working for those leads which are saved in LeadSquared without country code.
Hi, Pratik. Could you please confirm if you’re using international phone numbers for these leads? When the country code is not explicitly passed in the API request, the system defaults to using the account’s default country code to perform the lookup. If the lead was saved with a different country code, this may result in a mismatch.
If you’re working with international leads, we recommend enabling the Phone Formatting flag under Advanced Settings (navigate to Settings>Profile>Advanced Configuration and enable the New Phone Number Format setting). This ensures consistent formatting and lookup for leads with various country codes.
Let me know if this helps.
Hi team, I want to pass the AgentId in the Call Log API request, but I am not getting how can I get the AgentId value that I can pass in the Call Log API request. Can anyone please help me.
Hi, Pratik. First, you’ll need to get the AgentId from your telephony provider. Next, you can map this Id in the UTC User Agent Mapping section.
Hi Zaid, Sorry I did not get it, can you please explain in bit more detail.
The AgentId is provided by your telephony provider (Such as Exotel, Ozonetel, etc.,). Once you get this AgentId, you can map that Id against the respective user on LeadSquared through the UTC Agent Mapping Section.
For example, in the image below, you can map Akshay with the AgentId you receive from your telephony provider for Akshay.
If you still have concerns, please send an email to support@leadsquared.com. We’ll get in touch with you ASAP.
When calling a number which doesn’t exist as a lead, it creates a new lead in leadsquared. How to associate that lead to a particular user (is AgentId: <user_email> going to work?)
Hi, Irfan, could you clarify your question? Are you asking if an agent can manually place an outbound call to an unknown lead from LeadSquared? If so, this isn’t currently possible. Outbound calls to unknown leads can only be made through automated calling.
I solved it now. But here is the clarification.
When someone calls a new number which is not associated to any lead, the api automatically creates a new lead associated with the new number called. But the lead itself is assigned to system instead of the user to made the call.
How to check instance creation/deletion logs in case an instance gets deleted by someone?
Hi, Rishit. On the LeadSquared Dashboard –
1. Navigate to Settings>Security>Audit Logs.
2. Under Audit Type, select App and Connectors Audit Report.
You should be able to view the logs from here. For reference, read this article – LeadSquared Security Settings – Audit Logs.
Is it possible to get call counts of particular lead, as agent call that lead for 5 times then it will give us the count 5??
Hi Keval, yes, this information is available in the ‘Total Calls’ column of the Call Analysis Report. Hope this helps!
Actually we are not using sierra, without it whether it is possible or not?
Yes it’s possible without SIERA as well. From the Reports Listing page, navigate to Telephony and SMS>Phone Call Metrics by User.
how do i get post call hangup url
Hi, Gayathri. Are you referring to the CallLog URL? You can find it by navigating to Universal Telephony Connector>Call Log API.
If the ozonetel vendor is sending campaign name how to capture it? Currently i have enabled custom mapping in Call log Api section. In that I have given display name as Campaign Name. What should be the mapping key here?
Hi, Aditya. You can find the relevant mapping key by going through the Ozonetel payload. In the following example, the mapping key is CampaignName –
When I pass the ‘AgentName’ parameter with name of employee who has made the call or received the call then I am getting following error response.
{"Status":"Failure","Message":"Invalid UserId Rosesh"}Please guide what needs to be done to fix this.
Thanks
Hi, Nikunj. “AgentName” is a deprecated parameter.
Agents are identified using their phone numbers by default. If you need to identify agents by name or custom values, then you will need to configure the value in the User-Agent Mapping tab. This value can then be passed in the “AgentId” parameter.
Hi,
I have a question regarding ‘Call Log API’. Is it possible to update the call based on the ‘CallSessionId’?
In my case, the first request will have the call details without note and another request for same call log will have note. So, it should update the fields based on the new request received for the given ‘CallSessionId’.
Right now the response is as below
{“Status”:”Success”,”Message”:”Phone Call Logged Successfully”,”ProspectActivityId”:”xxxxx-xxxx-xxxxx-a15e-06xxx7fe6″,”Details”:”Call Log was already processed”}
Please guide how I can achieve this
Thanks
Hi, Nikunj. There’s a V2 API, but it only allows for updating call recording, call duration, and the owner. An activity id will need to be passed mandatorily.
Let us know if this helps.
Thanks Zaid for the update.
Actually we would like to update note and call recording for the activity created by UTC.
Also it’s preferable that Call Log API will handle this rathen than making a new API call.
Please guide.
As of now, if a new call log request comes with the same call session id, it will be ignored as a duplicate.
So, the call note will have to be sent in the first call log request, and the call recording can be updated with the V2 API.
I hope this helps.
Noted. So is it possible to make changes in UTC and instead of ignoring the duplicate call log, it simply updates the record. This can be configurable as well, so the user can decide whether to update or ignore.
Currently, it isn’t possible to make those changes.
I’ve passed our conversation to the product team, and they’ll include this feature request in their product backlog. We’ll let you know when the changes are live. Thank you.
Sure. Please let me know, it would be really helpful.
Thanks
Hi Team,
How to get user agent mapping id while calling click2call API
Hi. The User-Agent Mapping Id is not a mail merge parameter that can be used while calling the Click2Call API.
A list of available parameters can be viewed on the Click2Call configuration tab.
Hello Team, Do we have any parameter for country code? For example, the below c2c URL is for both national and international outbound calls. What parameter should we mention in countrycode?
http://mcube.vmc.in/api/outboundcall?apikey=”&exenumber=”&countrycode=”&custnumber=”&mct=”&wct=”&refid=”&url=”&did=”
Hi Vrindha, we don’t have a parameter for country code. Instead, we have mail merge parameters you can use for phoneNumberWithCC and phoneNumberWithoutCC.
I was trying POST call log API, verified request body is in correct format and content type set tp application/x-www-form-urlencoded, but i get this everytime :
{“Status”:”Failure”,”Message”:”Unexpected character encountered while parsing value: S. Path \u0027\u0027, line 0, position 0.”}
Hi, Mudit. You’re getting an “Unexpected character encountered…” error because the data you’re passing in the request is invalid. Please check the payload and try passing the API again. If the issue still persists, do let us know. Hope this helps!
Found the solution with help of support team.
In case anyone like me stumbles on same issue, I was trying this API from POSTMAN, where you can set body type to x-www-form-urlencoded and POSTMAN will create content-type header for you.
What this document lacks in such case is to clearly explain that Content-Type has to be manually set to application/x-www-form-urlencoded and body payload should go as raw JSON format (the solution)
Thank you for pointing this out, Mudit. The article has been updated accordingly.