


Get Started
Sales Suite
Field Ops
Marketing
Service CRM
Integrations & Apps
FloStack
LeadSquared Zoom Connector
1. Feature Overview
From your LeadSquared account, you can directly make Zoom calls to your leads, using the LeadSquared Zoom Connector. The connector integrates your Zoom account with your LeadSquared account, and once integrated, you’ll be able to –
- Make Zoom calls directly from your LeadSquared account.
- Access call recordings, which are posted to leads as activities.
- Manage your Zoom meetings and webinars through LeadSquared tasks.
- Join meetings from anywhere, through any device such as laptops, desktops and mobile phones.
2. Prerequisites
- You must be the Administrator of your LeadSquared account and your Zoom account.
- All the necessary permissions must be enabled for your Zoom user.
- Call recording on Zoom is a paid feature. You can record calls through LeadSquared only if this feature is enabled on Zoom. To enable it, please get in touch with your sales representative from Zoom.
- To sync your Zoom webinar details with your LeadSquared account, you must first get the Webinar Settings screen enabled on your account. To do this, contact your account manager, or write to marketplaceteam@leadsquared.com.
3. How it Works
You can create and schedule Zoom meetings with your leads, and include your users, directly from LeadSquared. You can do this either manually, or through automation.
For Zoom Meetings –
- Install the connector – Begin by first installing the LeadSquared Zoom Connector on your LeadSquared account.
- Configure the connector on LeadSquared – Post installation, you’ll have to configure the connector with your LeadSquared account.
- Schedule meetings – After configuration, you can schedule Zoom meetings and webinars with individual leads, multiple leads as well as leads in a list.
- View Activities – After the Zoom meeting/webinar is completed, you can view the call details and access call recordings of the meeting on the Lead Details page.
For Zoom Webinars –
- Install the connector – Begin by first installing the LeadSquared Zoom Connector on your LeadSquared account.
- Configure the connector on LeadSquared – Post installation, you’ll have to configure the connector with your LeadSquared account.
- Create webinars – From your Zoom account, create webinars for your leads to join.
- Add Leads – Once a webinar is created, you can then add leads to that webinar from your LeadSquared account. You can choose to add individual leads, multiple leads and/or leads in a list to a webinar.
- View Activities – Once a lead registers and joins a webinar, you’ll be able to view this as an activity, along with details of the webinar, on the Lead Details page.
4. Installation
Install the Zoom Meeting ConnectorM from the LeadSquared App Marketplace.
- On the main menu, navigate to Apps>Apps Marketplace and search for Configure Zoom Meeting Connector.
- Click Install.
- Once installed, hover your cursor over the
 icon, then click Configure.
5. Configuration
To integrate Zoom with LeadSquared –
- Sign in to the connector using your Zoom account credentials.
- Set Up the Zoom Connector in LeadSquared
- Map Fields in the Zoom Connector in LeadSquared
- Configure Default Admin Settings in LeadSquared
- Enable Webinar Settings, and sign in to Zoom to use the webinars feature
5.1 Sign in to the Connector
Once installed, sign in to the Zoom Meeting Connector using your Zoom account credentials. To do this –
- On the Zoom Meeting Connector, hover your cursor over the icon, and click Configure.
- On the Authentication tab, click the Sign in with Zoom button.
- On the Sign In browser window, enter your Zoom account credentials, and click Sign In.
- On the “You are about to add LeadSquared” screen, click Allow. This completes the sign in process.
- Once you’ve successfully signed into your Zoom account, the LeadSquared App will be automatically installed in your Zoom account.
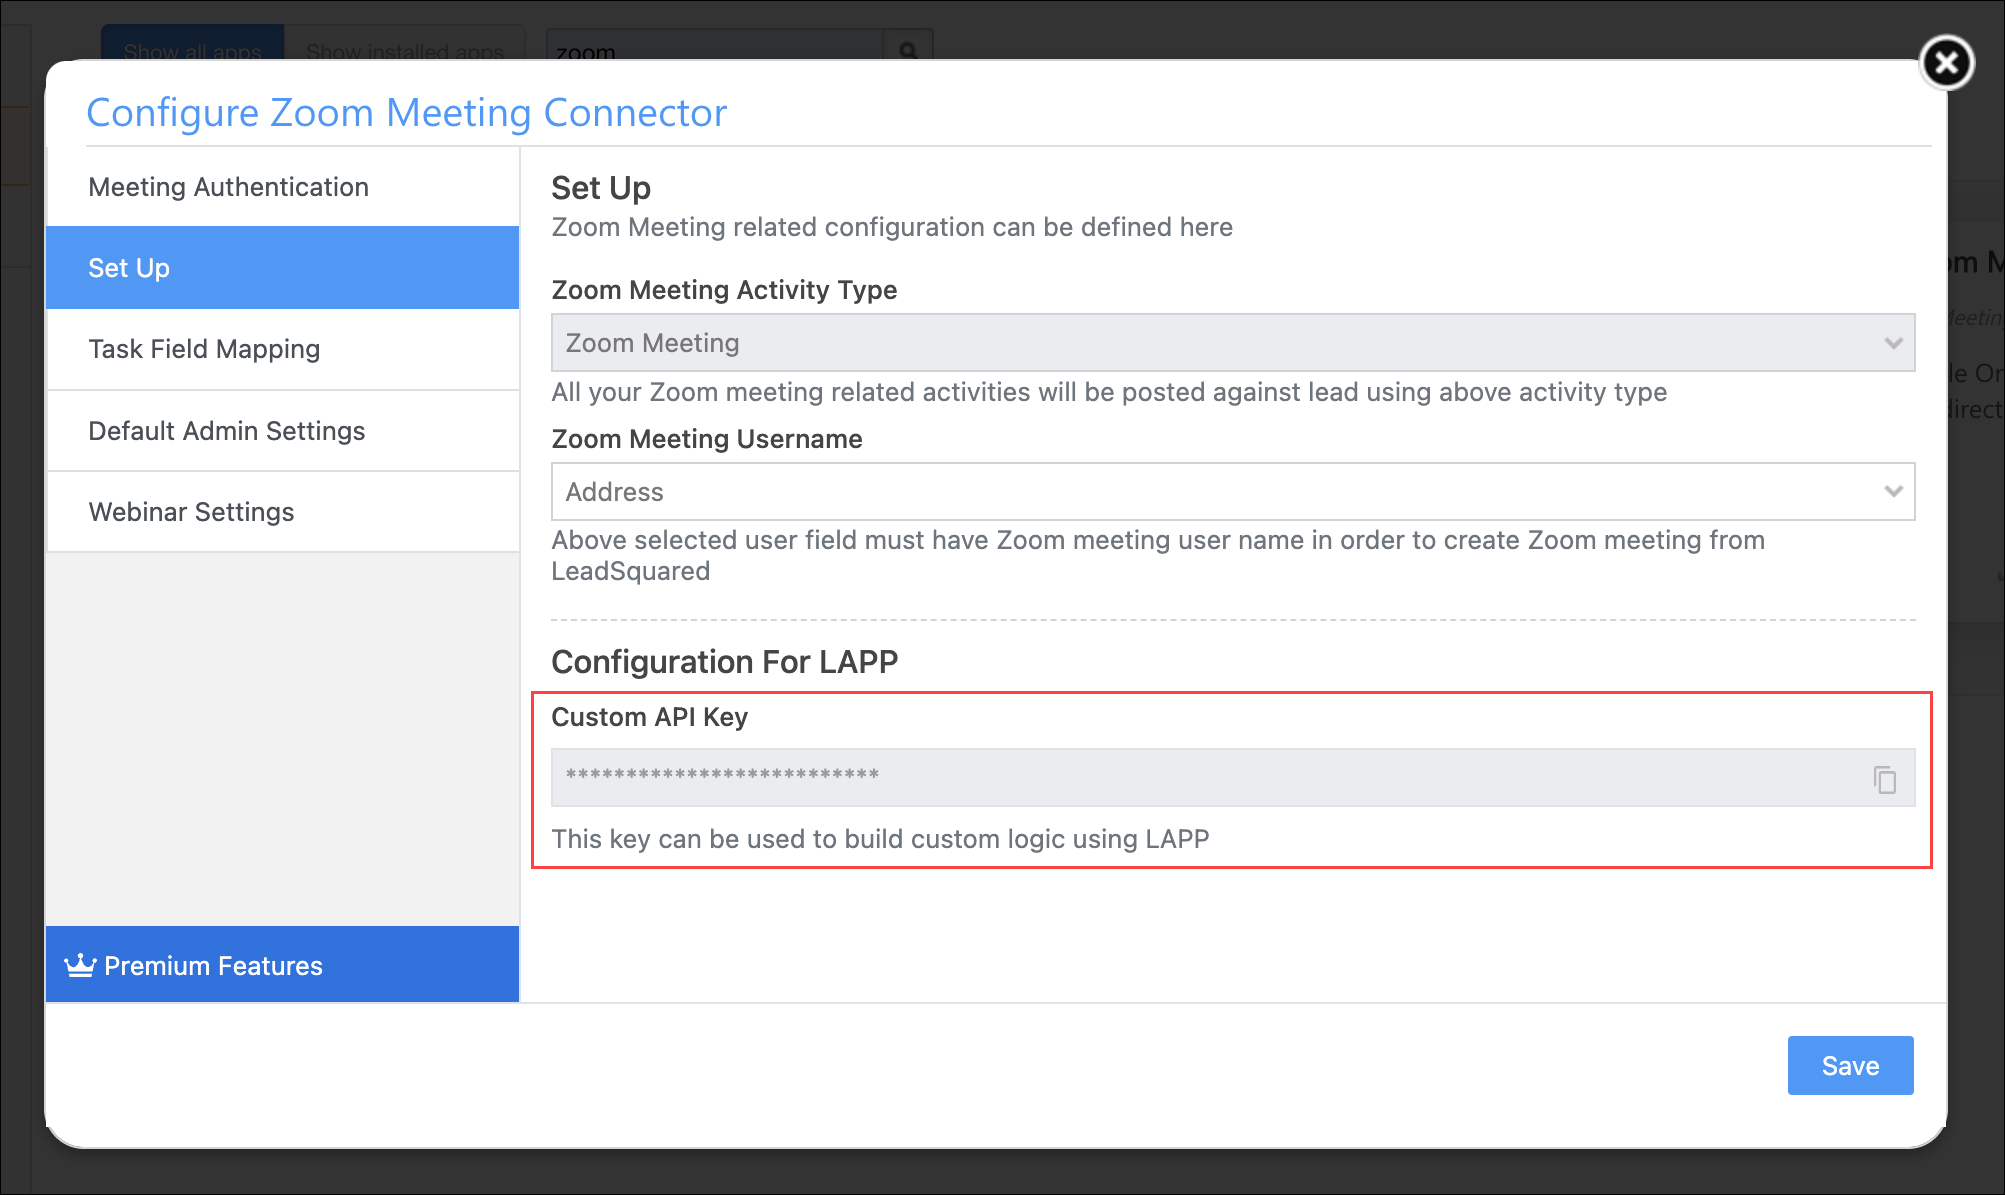
5.2 Set Up your Zoom Connector in LeadSquared
- The Zoom Call Activity is set to Zoom Meeting by default. This is a custom activity created by LeadSquared for Zoom calls, and it cannot be edited.
- For Zoom Username, if you have used the same email Id in your LeadSquared and Zoom account, you can choose Email Address as your option.
- Click Save.
If you’re looking to create Lapps on the Zoom Connector, contact marketplaceteam@leadsquared.com. They’ll enable the setting which will display the custom API key, which you’ll need when creating the Lapp.
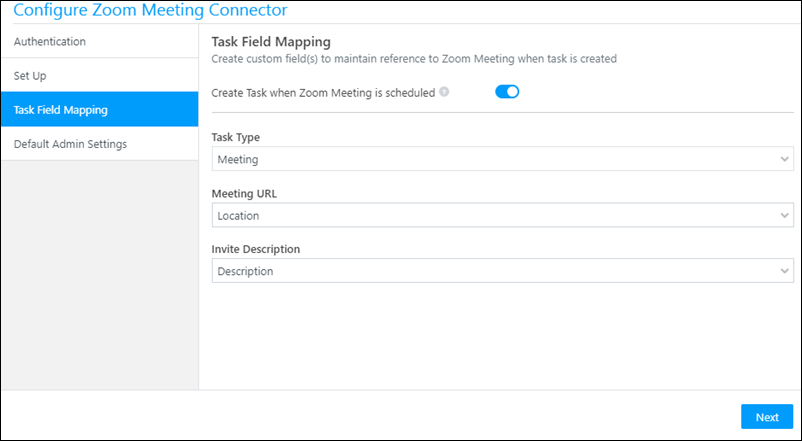
5.3 Map Fields in your Zoom Connector in LeadSquared
Once you sign in to your Zoom account, you must automate task creations in LeadSquared for every Zoom meeting you schedule. In this section, you can map the meeting details to the corresponding task fields in LeadSquared. Once this is done, you can view these tasks and details on the Lead Details and Manage Tasks page, and track them to completion.
- On the Configure Zoom Meeting Connector tab in your LeadSquared account, ensure the
 slider at the top of the page is active.
 - Under Task Type, select the desired task type (we recommend Meeting). This ensures that when you schedule a Zoom meeting, a Meeting task type is created in LeadSquared.
- Under Meeting URL, select Location. Every time you schedule a meeting, your meeting URL gets published directly to LeadSquared.
- Under Invite Description, select Description. This ensures your meeting description gets published to LeadSquared.
- Click Next.
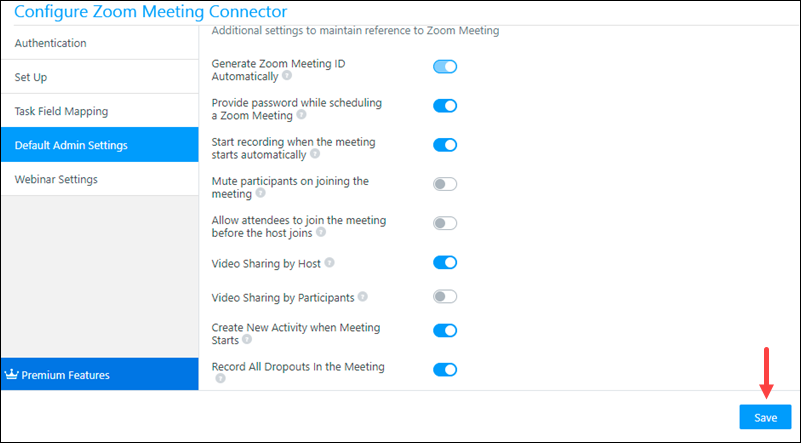
5.4 Configure Default Admin Settings in LeadSquared
- These are additional settings that are available to you. “Generate Zoom Meeting ID Automatically” is enabled by default, and you can’t disable it.
- Enable Start recording when the meeting starts automatically to ensure that all your calls get recorded. The other options can be turned on or off, depending on your requirement.
- Once you’re done, click Save.
- You’ll get a “Configurations Saved” notification on top of your screen.
Note:
- If call recording is configured on your account, and the meeting host ends the call, the call recording stops, and subsequent calls that are placed using the same meeting link will not be recorded.
But if you want to record multiple calls that take place on the same Zoom link, you must enable Record All Dropouts In the Meeting. This will ensure that if the host ends a call (say, at 4:05 PM), and uses the same meeting link to start another call (at 4:20 PM), then both the calls will be recorded and posted as a single activity. - To create and post a new meeting activity when a call starts, please enable Create New Activity when Meeting Starts.
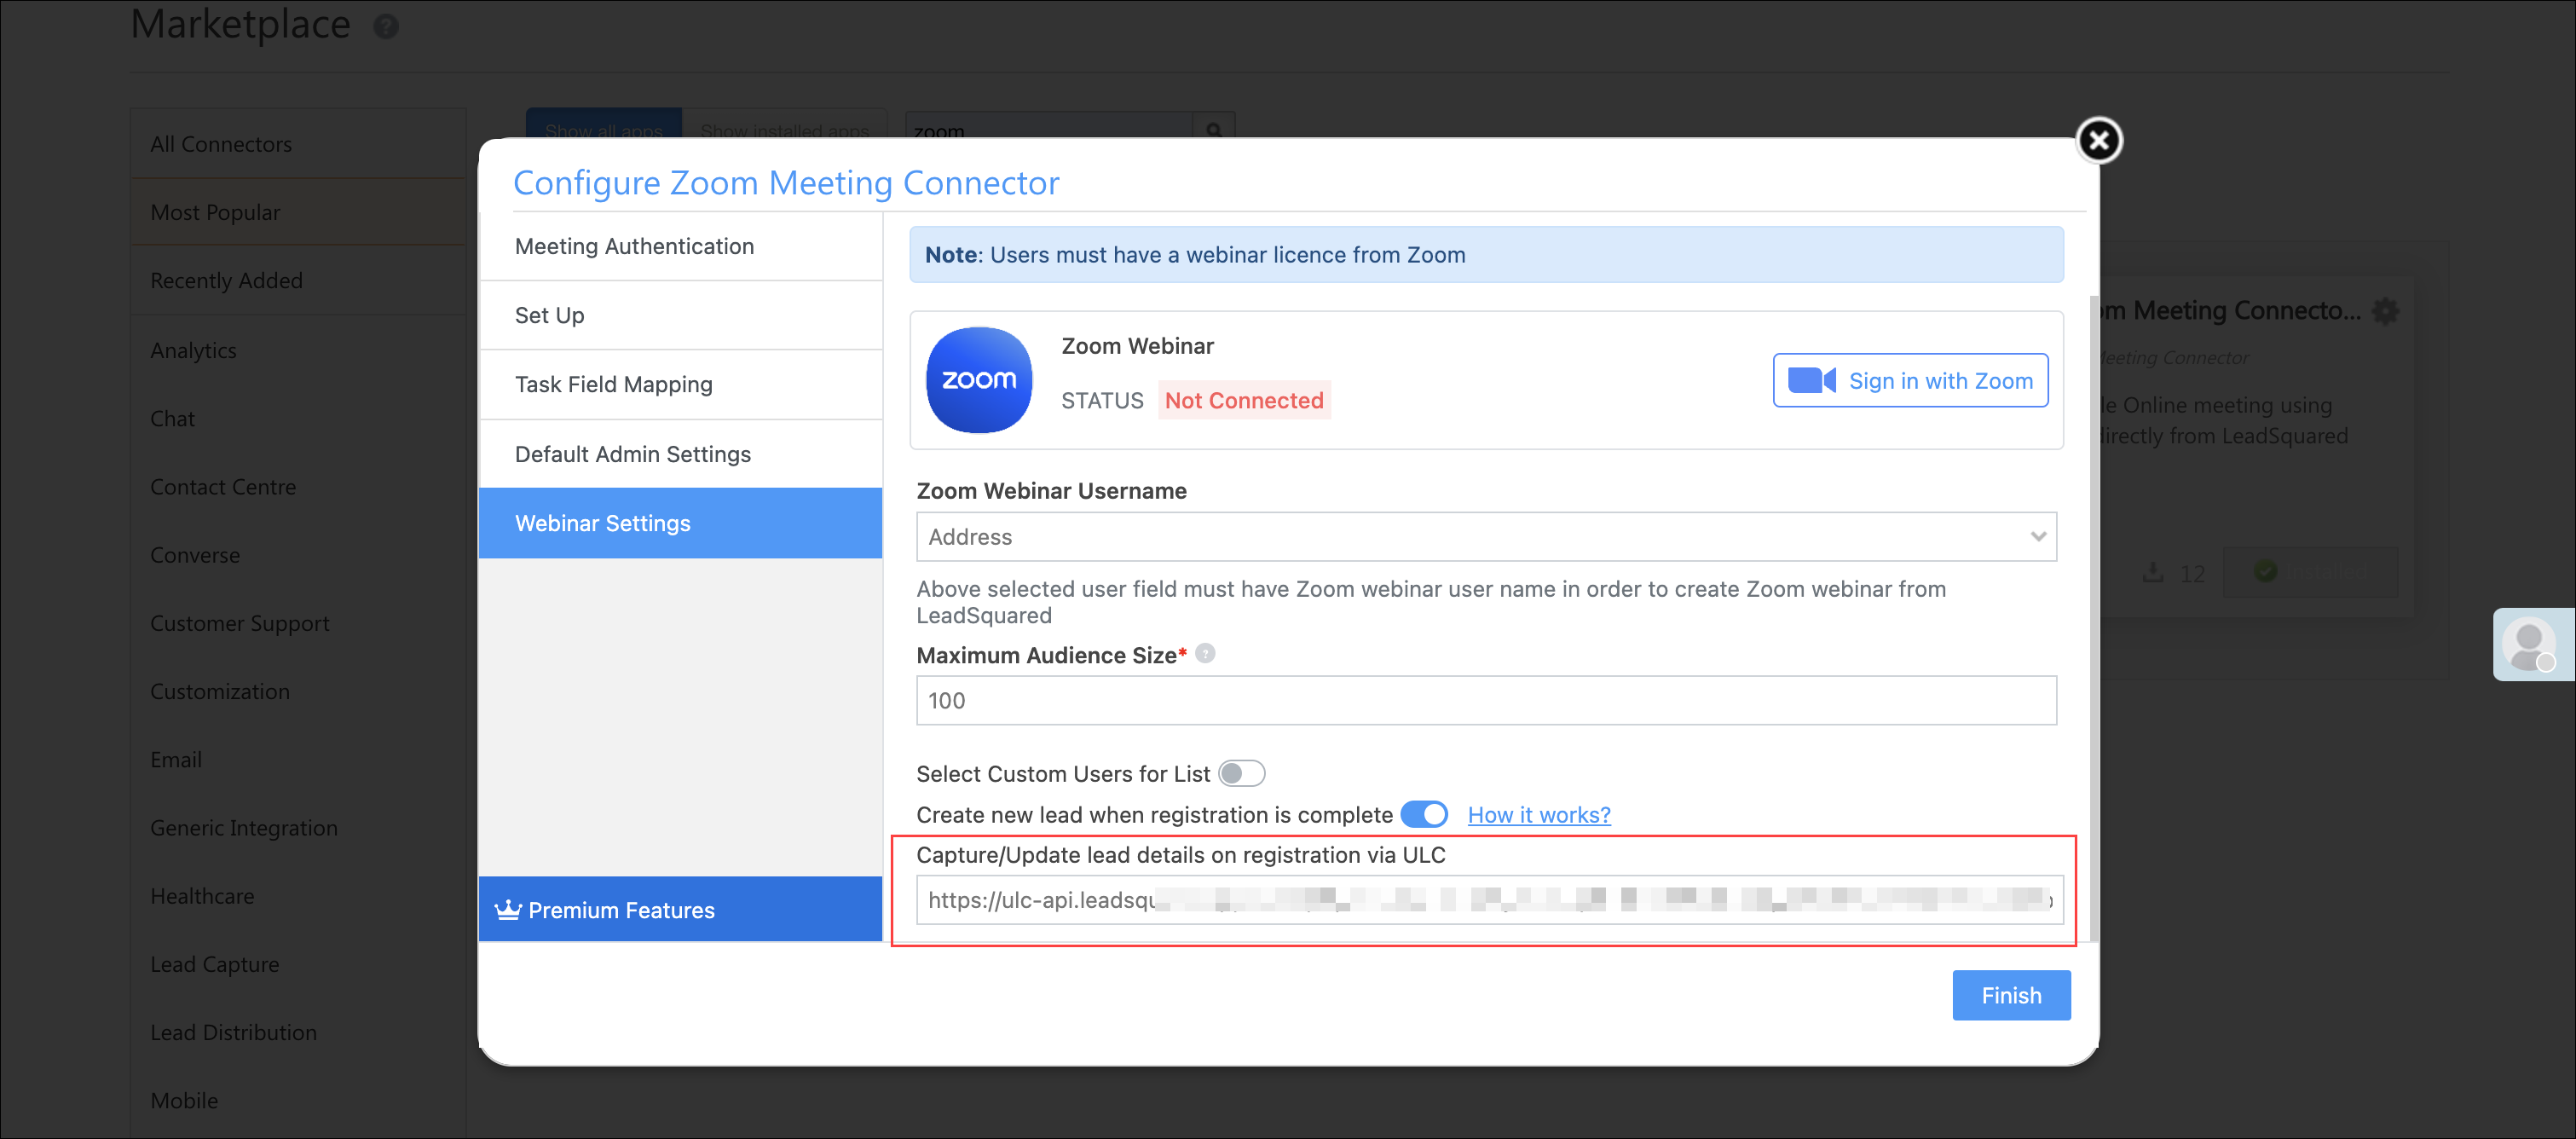
5.5 Enable Webinar Settings
You must have a webinar licence from Zoom to enable these settings on your account. To enable it, toggle the ![]() slider.
slider.
- Sign-in with Zoom – On the Authentication tab, click the Sign in with Zoom button. Then, on the Sign In browser window, enter your Zoom account credentials, and click Sign In. This completes the sign-in process.
- Maximum Audience Size – The maximum number of participants in a webinar. The limit is determined by your Zoom webinar license subscription plan.
- Select Custom Users for List – You can restrict the number of LeadSquared users who can access the webinar feature. To do this, toggle the
 slider, and from the Select Users dropdown list, select the users for whom you want to provide access.
 - Create new lead when registration is complete – To create a new lead in LeadSquared when a participant registers for the webinar, toggle the slider. When leads are captured from your Zoom Webinar registrations, we’ll capture leads with the following webinar registration fields –
| LeadSquared Lead Field Schema Name | Zoom Webinar Registration Field Name |
| FirstName | first_name |
| LastName | last_name |
| EmailAddress | |
| mx_City | city |
| mx_Street1 | address |
| mx_Country | country |
| mx_Zip | zip |
| mx_State | state |
| Phone | phone |
Note: The Webinar Registration form fields will be captured against lead fields only if the schema names in your LeadSquared account are exactly as listed above. If you’ve made any changes to the schema name, or if a schema filed is disabled on your account, the data capture won’t work as intended.
You can obtain an additional webhook URL for the webinars section, which can be used to build a new Universal Lead Capture (ULC) connector. This webhook can be used to create a connector to receive lead registration data regarding Zoom webinars. Along with this data, you can also add other relevant lead data to the leads captured through this webhook URL. To enable this feature on your account, contact your account manager, or mail support@leadsquared.com.
6. Schedule Zoom Meeting
6.1 For Individual Leads
To schedule a Zoom meeting for an individual lead –
- From the LeadSquared main menu, navigate to Leads>Manage Leads.
- On a lead, hover your cursor over the
 icon. From the dropdown list, hover your cursor over Online Meeting, and then click Schedule Zoom Meeting.
 - On the Zoom Meeting pop-up, enter the following details –
- In the Meeting Topic field, enter a relevant name for the meeting.
- Against Schedule, pick a date and time for the meeting.
- Against Timezone, select the timezone in which you want to schedule the meeting.
- You can either retain the default password generated, or change it if necessary.
- Once you’ve entered all the details, click Create.
- Your Zoom meeting URL is generated. You can share this URL with your leads and other external participants.

6.2 For Multiple Leads
To schedule a Zoom meeting for multiple leads –
- From the LeadSquared main menu, navigate to Leads>Manage Leads.
- On the Manage Leads page, select the leads you want to add to the meeting by checking the
 box against their names.
 - After selecting the leads, hover your cursor over the
 button.
 - From the dropdown list, click Online Meeting, and then click Schedule Zoom Meeting.
- On the Zoom Meeting pop-up, enter the following details –
- In the Meeting Topic field, enter a relevant name for the meeting.
- Against Schedule, pick a date and time for the meeting.
- Against Timezone, select the timezone in which you want to schedule the meeting.
- You can either retain the default password generated, or change it if necessary.
- Once you’ve entered all the details, click Create.
- Your Zoom meeting URL is generated. You can share this URL with your leads and other external participants.

6.3 For Leads in a List
To schedule a Zoom meeting for all the leads present in a list –
- From the LeadSquared main menu, navigate to Leads>Manage Lists.
- On the Manage Lists page, against an existing list, hover your cursor over the icon. From the dropdown list, click Online Meeting, and then click Schedule Zoom Meeting.
- On the Zoom Meeting pop-up, enter the following details –
- In the Meeting Topic field, enter a relevant name for the meeting.
- Against Schedule, pick a date and time for the meeting.
- Against Timezone, select the timezone in which you want to schedule the meeting.
- You can either retain the default password generated, or change it if necessary.
- Once you’ve entered all the details, click Create.
- Your Zoom meeting URL is generated. You can share this URL with your leads and other external participants.
6.4 Sending Invites to Leads through Automation
You can send the Zoom meeting details to your leads by setting up an automation that sends them an email containing the details. For this to work, the leads in your system should have a valid email Id and phone number. If you set up the automation with Activity as a trigger, every time a Zoom meeting activity is posted, an email is sent to the lead. To send the Zoom meeting URL and other details via email –
- From the main menu, navigate to Workflow>Automation, and click Create Automation.
- Set up an automation with Activity as the trigger. To know more, refer to Send Emails through Automation.
- From the Select Activity list, choose “Zoom Meeting”.
- Click Save once you’re done.
- Click the Yes
 path icon under the automation, click Messaging, and then click Send Email.
 - Select a template or opt for a blank template, as per your requirement.
- After selecting a template, click Edit & Use.
- On the email editor, you can select mail merge fields to display the details of the upcoming meeting. To understand this better, you can refer to the below example –
Status: @{Activity:Status,} Zoom Topic: @{Activity:mx_Custom_1,} Zoom Meeting URL: @{Activity:mx_Custom_2,} Schedule: @{Activity:mx_Custom_3,} Host: @{Activity:mx_Custom_4,} Number of Attendees: @{Activity:mx_Custom_5,} Meeting Duration (in Minutes)@{Activity:mx_Custom_6,} Recording Share URL: @{Activity:mx_Custom_7,} - Fill in the other details on the template, such as Subject, Email Category, etc. Customize the template as per your preference.
- Click Save, and then click Done.
- Your automation is saved successfully. Every time you create a Zoom meeting invite on a Lead, an email containing the meeting details is sent to the lead.
7. View Zoom Meeting Details
7.1 Zoom Meeting Activities and Tasks
After you have scheduled a Zoom meeting, you can view the meeting details in the Lead Details or Manage Tasks page.
Zoom Meeting Activities
- From the LeadSquared main menu, navigate to Leads>Manage Leads.
- Click on the lead whose meeting is scheduled.
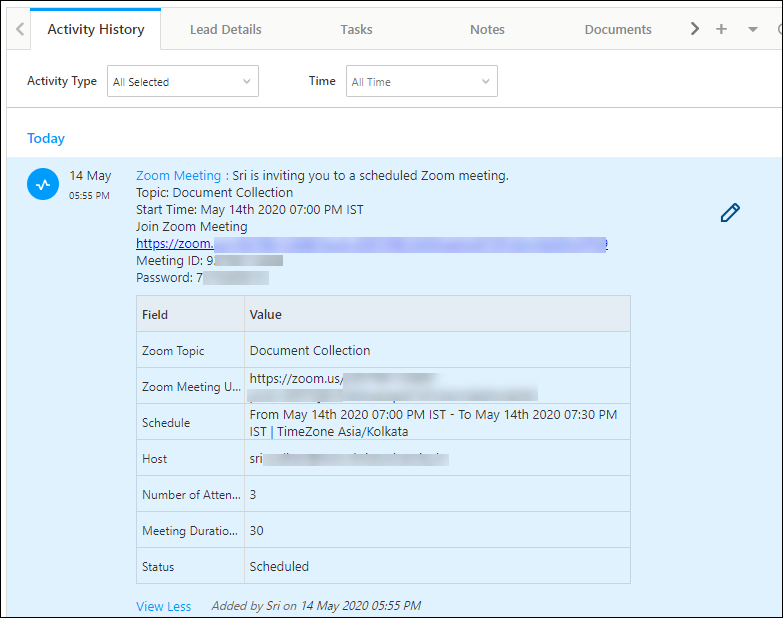
- In the Lead Details page, under the Activity History tab, you can view the meeting details.
- You can edit the meeting details by clicking the
 icon.
icon.
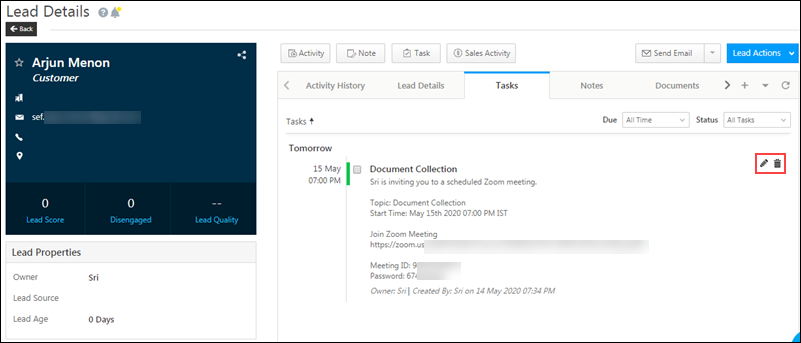
Zoom Meeting Tasks
- From the LeadSquared main menu, navigate to Leads>Manage Leads.
- Click on the lead whose meeting is scheduled.
- On the Lead Details page, click the Tasks tab. You can view the meeting details here.
- You can edit the meeting details by clicking the
 icon.
icon. - You can delete the meeting by clicking the
 icon.
icon.
You can also view the meeting details on the Manage Tasks page
- From the LeadSquared main menu, navigate to Leads>Manage Tasks.
- You can view the task in both Classic List View and Calendar View.
- In both the views, you can hover over the icon to –
- Delete the task
- Change the task owner
- Cancel the task
- Mark the task as complete
- Edit the task
- In List View, you’ll have to click on View Details to view the meeting details
- In Calendar View, you can view the meeting details on the pop-up itself
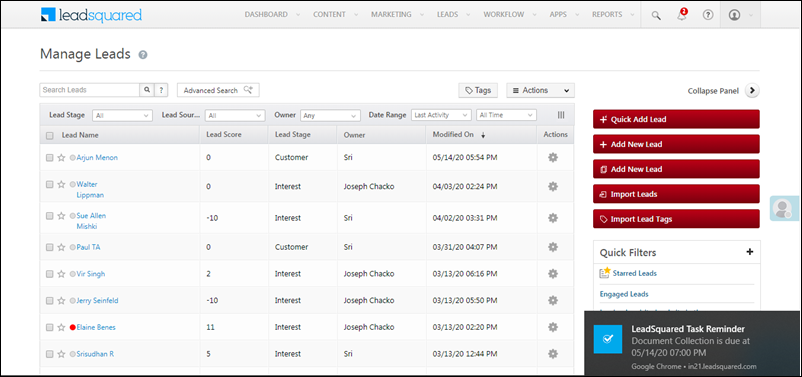
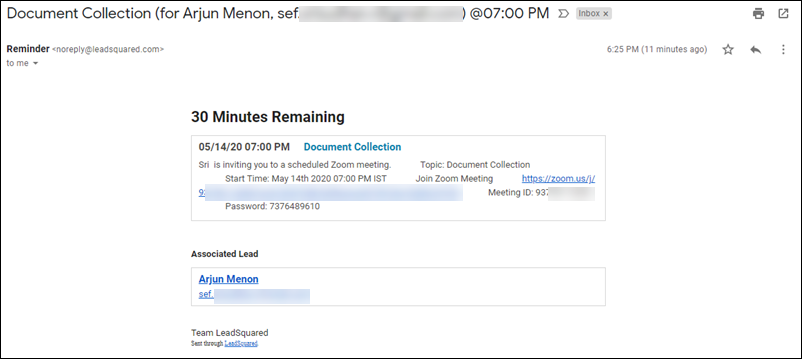
7.2 Meeting Reminder
- A reminder notification is sent to the LeadSquared user who set up the meeting, 30 minutes prior to the meeting.
- An email reminder is sent to all the internal participants from your organization 30 minutes prior to the meeting.
8. Completed Meetings
After the Zoom meeting is completed, you can view the call details and access call recordings.
- From the LeadSquared main menu, navigate to Leads>Manage Leads.
- Click on the lead whose call was completed.
- In the Lead Details page, under the Activity History tab, you can view the recording attachments along with the updated meeting details.
- To access the recording, click the
 icon. This will open a new pop up, where you can access the recording files.
 - You can see the meeting status has changed from “Scheduled” to “Completed”.
- Under the Task tab, you can see the task has been auto-completed.
9. Zoom Meeting Automations
To know more about automations, please refer to Automation Home. Some examples of where you can automate Zoom meetings are –
- Automated demo scheduling based on website form submission.
- Automated scheduling of video meetings based on triggers such as lead triggers, activity triggers, task triggers, etc.
- From the main menu, navigate to Worklow>Automation.
- On the automation page, you can either edit an existing automation, or to create a new automation, click on Create Automation.
- After creating a trigger, click the
 icon, then click Online Meeting, and then click Zoom Meeting.
 - On the Zoom Meeting pop-up, enter the following details –
- Meeting Topic – The name for the Zoom meeting.
- To include lead’s name as part of the meeting topic, click the
 icon, then select the Lead trigger, and select the relevant lead name field.
- To include lead’s name as part of the meeting topic, click the
- Schedule From – The meeting date and time from which the meeting is scheduled, as selected by the lead.
- To use a merge field from the form the lead has filled, click the icon, and then select the field from which the date and time can be mapped.
- To use a merge field from the form the lead has filled, click the
- Schedule To – The meeting date and time to which the meeting is scheduled, as selected by the lead.
- To use a merge field from the form the lead has filled, click the icon, and then select the field from which the date and time can be mapped.
- To use a merge field from the form the lead has filled, click the
- Timezone – The timezone in which the meeting is to be scheduled in.
- Host – The user from .
- Meeting Password – The meeting password that’s been generated for the Zoom meeting.
- Meeting Topic – The name for the Zoom meeting.
- Once you’ve entered the details, click Save.
- To reset the fields to their default values, click Refresh Fields.
- Click Publish once you’re done.
10. Uninstall the Connector in LeadSquared
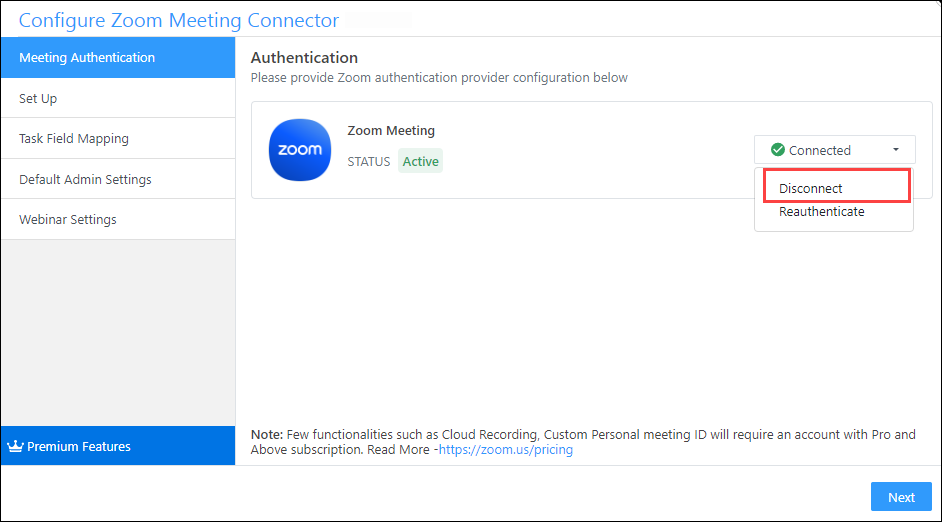
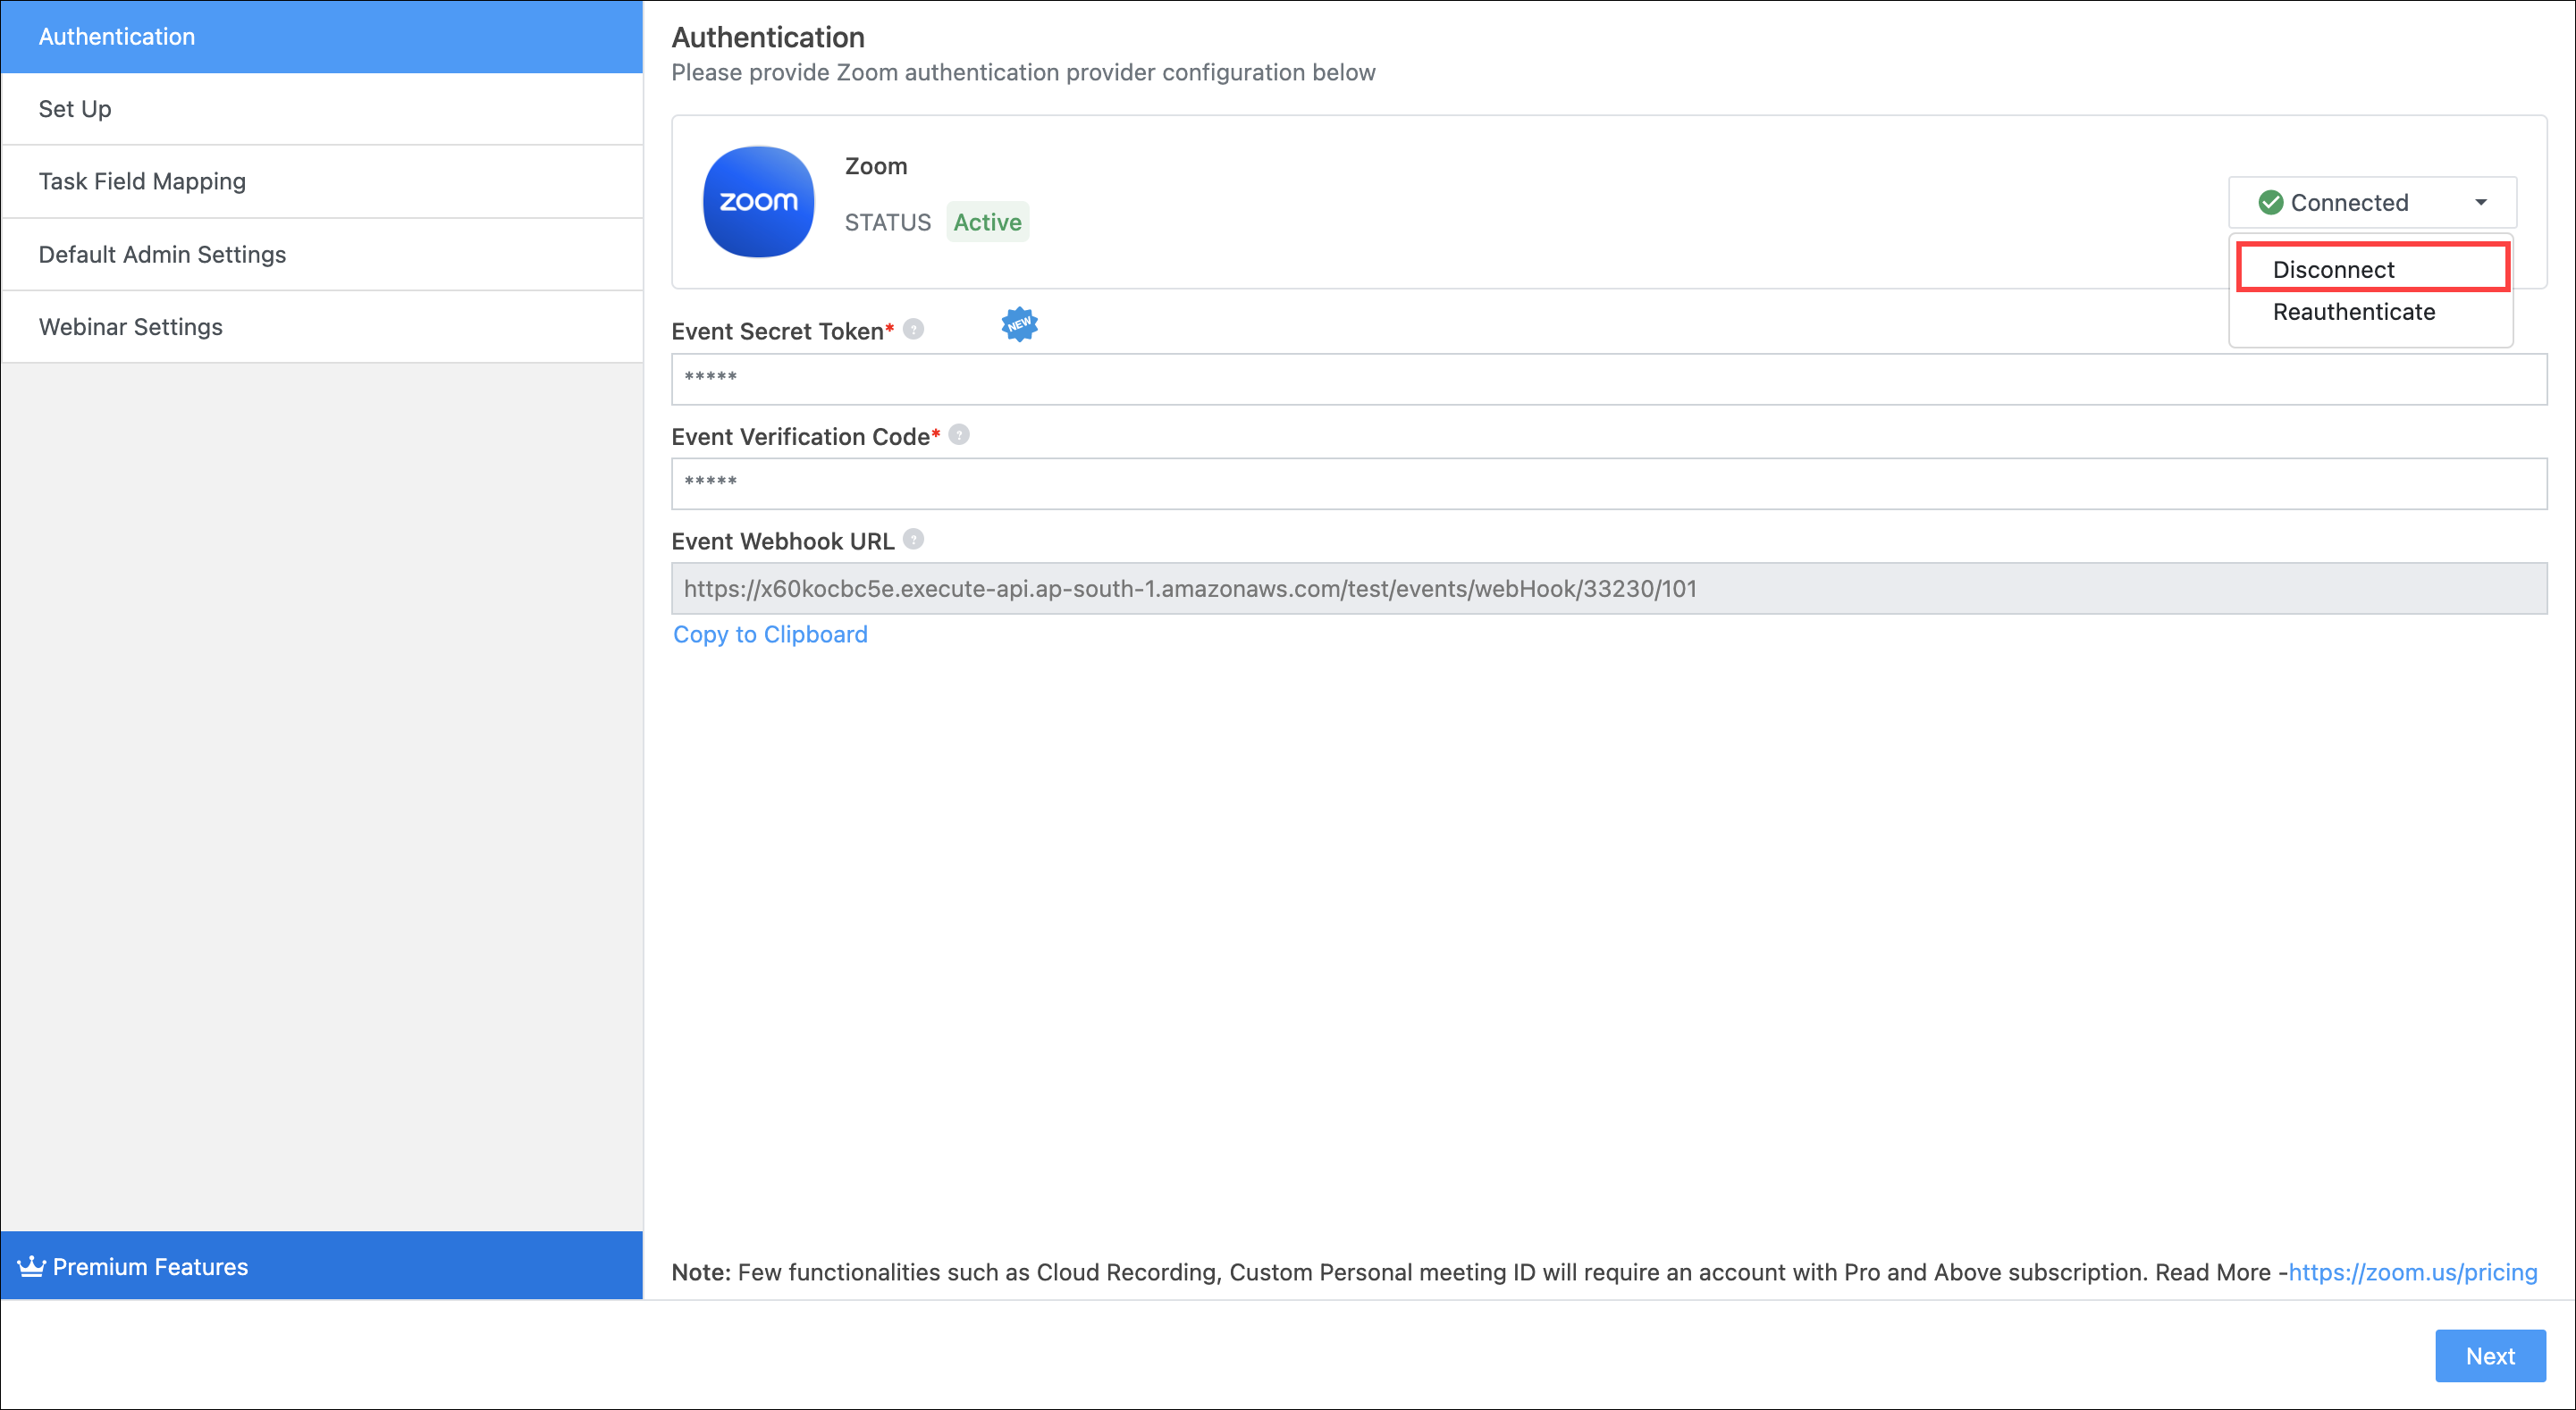
To disconnect your Zoom account from the Zoom connector –
- On the main menu, navigate to Apps>Apps Marketplace and search for Configure Zoom Meeting Connector.
- On the connector, hover your cursor over the icon, and click Configure.
- Click the Connected button, and from the list of options, click Disconnect.
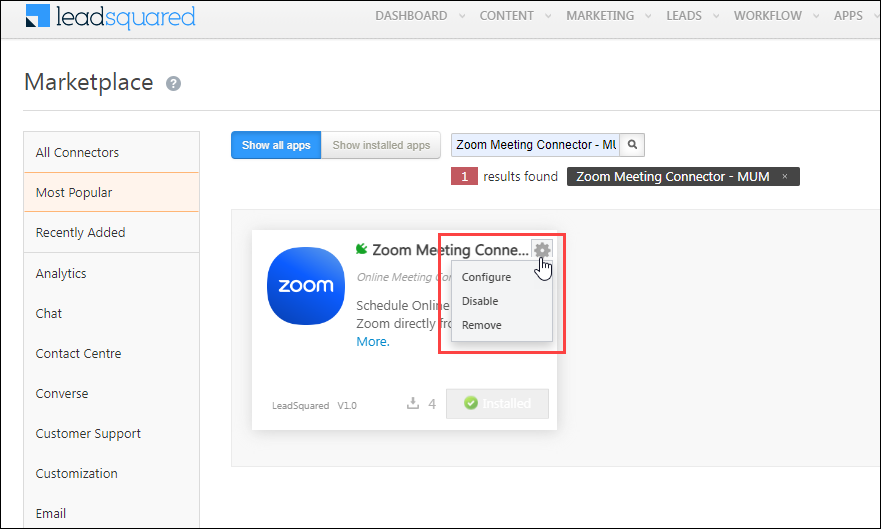
Once the account is disconnected, you can uninstall the connector. To do this –
- On the main menu, navigate to Apps>Apps Marketplace and search for Configure Zoom Meeting Connector.
- On the connector, hover your cursor over the icon, click Disable, and then click Remove. This uninstalls the connector from your LeadSquared account.
11. Remove the App from Zoom’s Marketplace
Removing the LeadSquared app from the Zoom marketplace will result in account disconnection in the Zoom connector in LeadSquared. Once disconnected, the meeting and webinars will not be synced between Zoom and LeadSquared. We will also delete the user id data that’s stored in LeadSquared.
To remove the LeadSquared App from the Zoom Marketplace –
- Login to your Zoom Account, and navigate to the Zoom App Marketplace.
- Click Manage, and from the left-menu, click Added Apps.
- Alternatively, you can search for the “LeadSquared” app.
- Alongside the LeadSquared app, click Remove.
12. How to Raise a Support Ticket
If you’re facing any issue when using the Zoom Connector, contact your account manager, or register a ticket by writing to support@leadsquared.com. To know the support SLA, refer to LeadSquared Support Processes and SLA.
Any Questions?
Did you find this article helpful? Please let us know any feedback you may have in the comments section below. We’d love to hear from you and help you out!
How do you cancel and reschedule the Zoom meeting?
Hi, hope this helps – https://support.zoom.com/hc/en/article?id=zm_kb&sysparm_article=KB0061887