


Get Started
Sales Suite
Field Ops
Marketing
Service CRM
Integrations & Apps
FloStack
LeadSquared Portal Designer – Create Sign Up Forms
1. Feature Overview
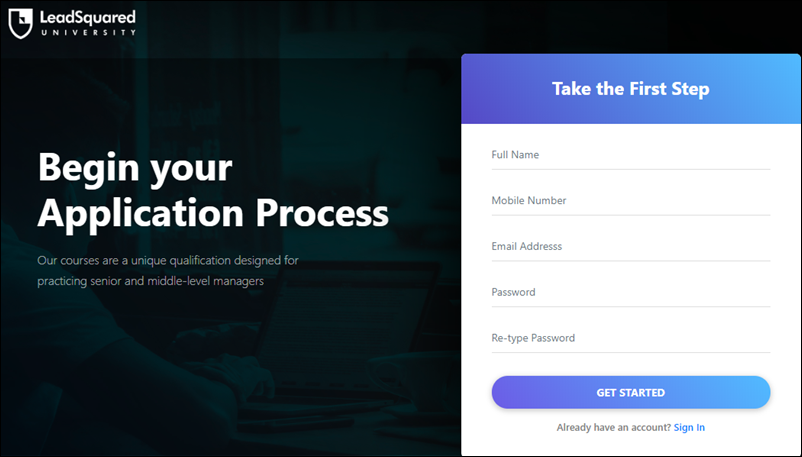
You can use LeadSquared forms to create registration forms (sign-up forms) on your portals. Once you create a registration form and integrate it into the Portal Designer, you can configure it to appear in different states to provide registration, login, forgot password, and reset password functionality.
The most basic registration form consists of a username/email address/phone number field and a set password field, but you can build more complex registration forms as per your requirements.
2. Prerequisites
- You should be an administrator of your LeadSquared account.
- You must have access to the Portal’s license.
- Forms and Processes must be enabled on your LeadSquared account.
3. How it Works
- First, create a portal registration form using the Forms feature.
- Next, integrate the form in your portal and customize its look, feel and behaviour.
4. Types of Portal Registration Forms
Portal registration forms can either have Password-based registration/log-in or OTP-based registration/log-in.
4.1 Password-based Registration Forms
Password-based registration forms can be displayed in the following ‘states’ on your portal –
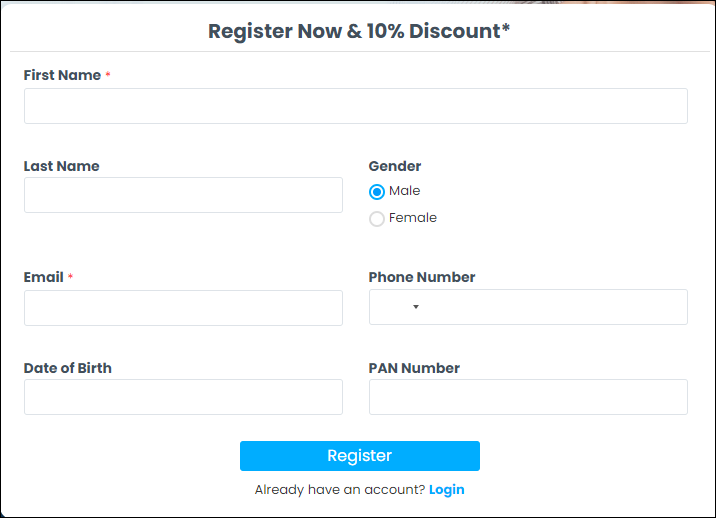
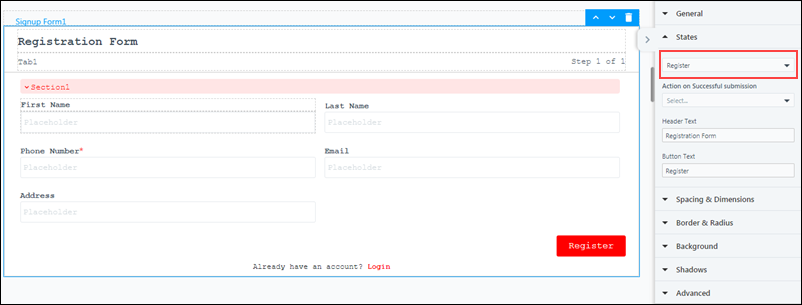
- Register – This state appears when the lead registers on your portal for the first time. All fields added to your form will be visible in this state. Here, the lead must enter their details and provide a password for their profile.
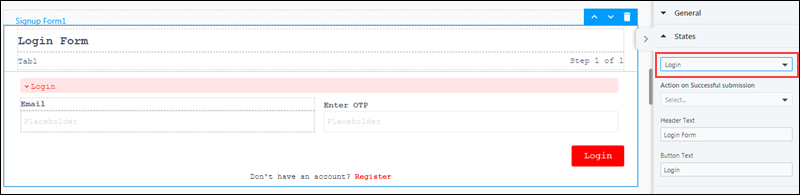
- Login – If a lead has already registered on the portal, they can click the “Already have an account? Login” link. The registration form will now be displayed in the login state, where only the unique field configured (such as email Id, PAN, mobile number, Student Id, Customer Id, etc.) and password field will be visible.
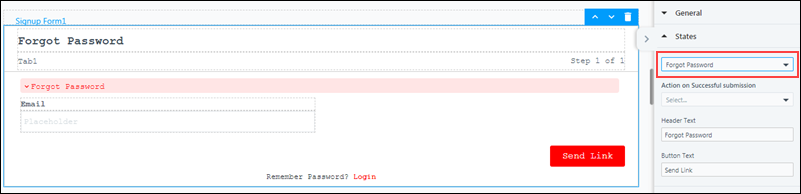
- Forgot Password – If the lead forgets the password they provided at the time of registration, then they can reset the password by clicking the ‘Forgot Password’ link on the form. This will open the Forgot Password state, where the lead must provide the unique login field details (such as email Id, PAN, mobile number, Student Id, Customer Id, etc.), which you have configured as the search key on the form. The system will then identify the email Id linked to this search key, and send a reset password link to that email Id. The lead must click on this link, and provide a new password. To modify the content sent in the forgot password email, see the Email Settings section under LeadSquared Portals Designer.
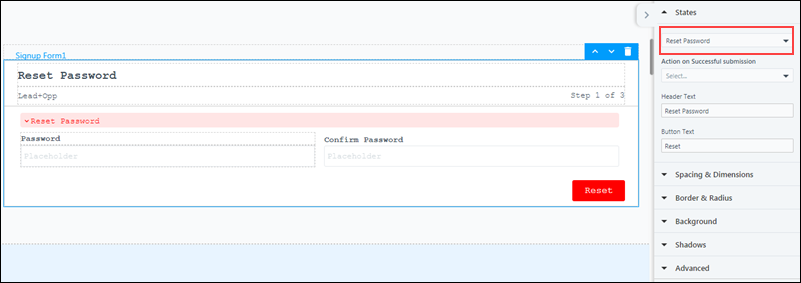
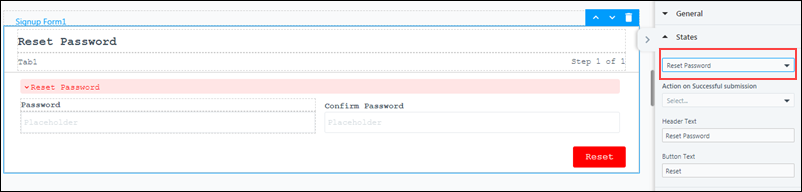
- Reset Password – The link sent to the lead’s email Id, when the lead has clicked on Forgot Password, will open the Reset Password state. Here, the lead must enter a new password for their account, and save the password once they’re done.
4.2 OTP-based Registration Forms
OTP-based registration forms can be displayed in the following ‘states’ on your portal –
Note:
- For the OTP-based registration and login to work in your Registration Form, you must enable OTP Validation on either the Email field or the Phone Number field, while creating the form.
- You must enable Register with OTP under Portal Settings, while creating the form.
- Register – This state appears when the lead registers on your portal for the first time. All fields added to your form will be visible in this state. Here, the lead must enter the OTP sent to their email Id or phone number.
- Login – If a lead has already registered on the portal, they can click the “Already have an account? Login” link. The registration form will now be displayed in the login state, to (on whichever filed the OTP Validation has been enabled) and OTP field will be visible.
5. Create a Portal Registration Form
Forms can be used to create a login to your portal, by enabling password or OTP functionalities. You can also prevent junk leads and spam submissions by enabling the captcha functionality.
5.1 Enable Password and Captcha
- From the main menu, navigate to Workflow>Manage Forms.
- You can select an existing form, or create a new form by clicking Create Form. To know more, refer to How to Create a Form.
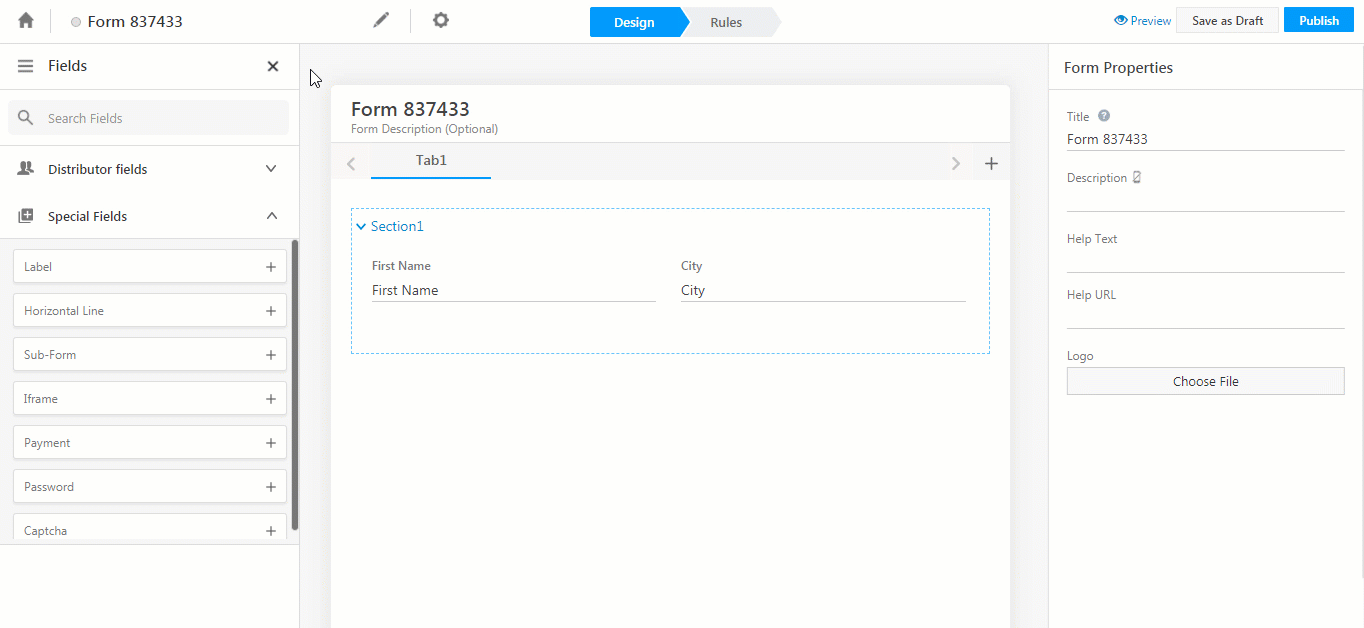
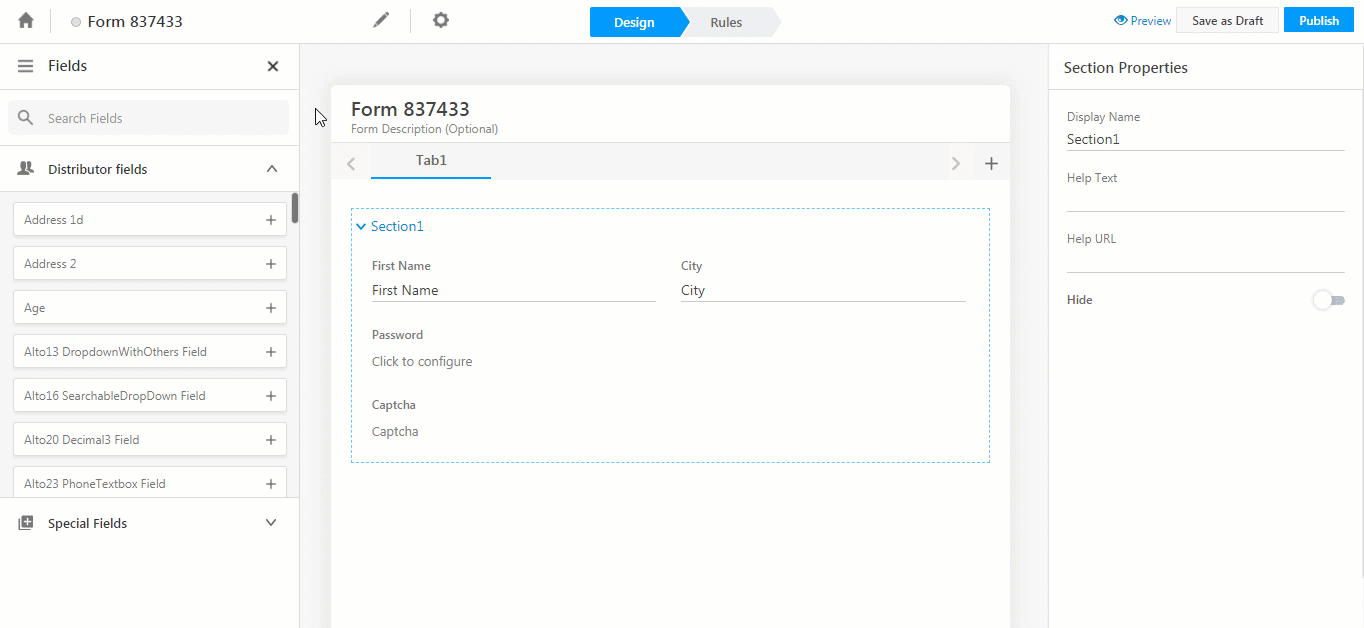
- On the left panel, under Special Fields, click the
 icon against the Captcha and Password fields to add them to your form.
 - On the Forms Designer page, click the
 icon.
icon. - On the Portals Settings tab, against Portal Registration Form, enable the
 slider.
 - Against Search Key for Portal Registration, select a unique field (such as email or phone number). To know more, refer to How to Make a Custom Field Unique.
Note: The search key can be any unique field in your account, which acts as the identifier for your lead’s login. For example, if your search key is set to email, then their email address would be used as their identifier (similar to a username).
- Once you’re done, click Publish.
5.2 Enable OTP and Captcha
- From the main menu, navigate to Workflow>Manage Forms.
- You can select an existing form, or create a new form by clicking Create Form. To know more, refer to How to Create a Form.
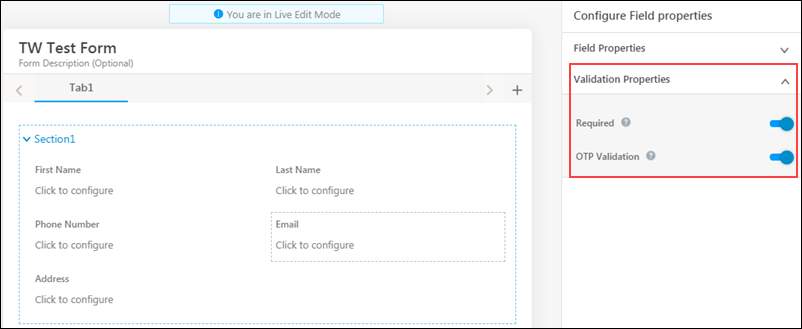
- You must add either the Phone Number or Email address field to your form. Then, click the unique field that you’ve added, and then click Validation Properties on the right side of your screen. Against Required and OTP Validation, enable the sliders.
- You can also choose to enable a dual-login form. You must add either Email/Phone Number or Email/Mobile Number fields to your form. Then, click the unique fields that you’ve added, and then click Validation Properties on the right side of your screen. Against Required and OTP Validation, enable the sliders for both unique fields.
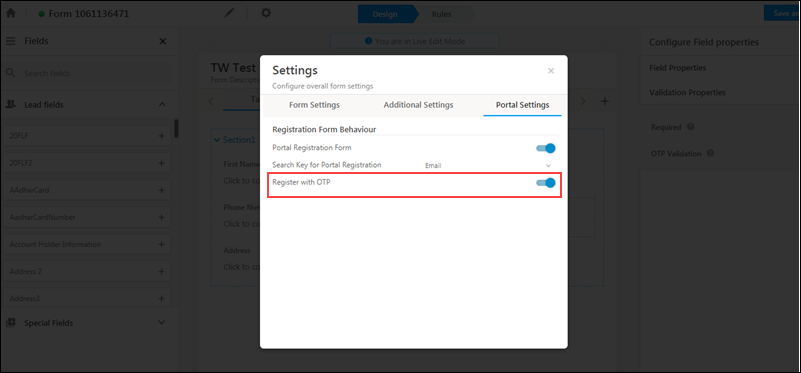
- On the Forms Designer page, click the icon.
- On the Portals Settings tab, against Register with OTP, enable the slider.
- Against Search Key for Portal Registration, select a unique field (such as the email or the phone number). To know more, refer to How to Make a Custom Field Unique.
Note: The search key can be any unique field in your account, which acts as the identifier for your lead’s login. For example, if your search key is set to email, then their email address would be used as their identifier (similar to a username). - Once you’re done, on the left panel, click the icon against Captcha, to add it to your form.
- Once you’re done, click Publish.
When you’re done, click Publish to make your form live. Published forms can be used in the Portal Designer. You can also set up an application process using a series of forms through the process designer.
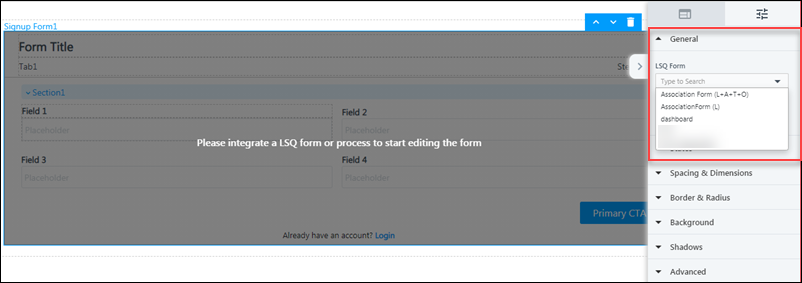
6. Integrate the Form in the Portals Designers
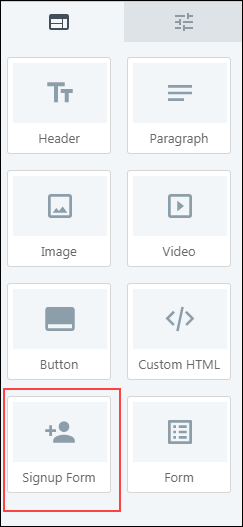
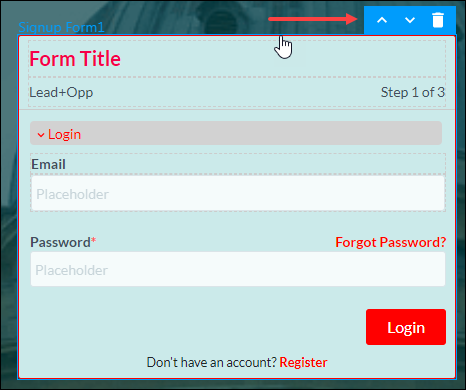
On the Portal Designer page, click the Elements icon ![]() , and then drag-and-drop the Signup Form.
, and then drag-and-drop the Signup Form.
To learn how to build a portal, please refer to LeadSquared Portals Designer.
Under General, under LSQ Form, select the registration form you created in the previous section.
7. Customize Signup Form
The Signup Form can be customized using the following properties –
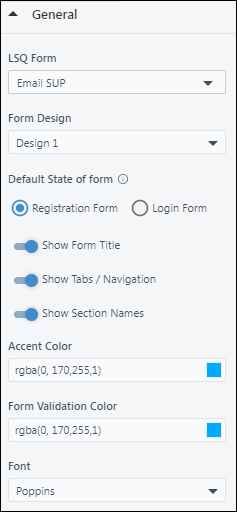
7.1 General
- LSQ Form – From the list of published LeadSquared forms in your account, select the form you want to use as the Signup Form on your Portal.
- Form Design – There are three default form designs available in the Portal Designer. You can select a relevant design from the Form Design dropdown.
- Default State of form – Set the default form state as either Registration (sign-up) form or Login form, depending on how the portal is being used. For new portals, the default state can be set to ‘Registration form’, while for existing portals with a significant number of existing users, you can set it to ‘Login form’.
- Show Form Title – To show the title of the form on your Signup Form, toggle the slider.
- Show Tabs / Navigation – To show the tabs that hold the sections in a form, and to show navigations between different tabs in the form, toggle the slider.
- Show Section Names – To show the names of each section within the form, toggle the slider.
- Accent Color – Select the font colour for section headers and buttons from the gradient screen, or enter the hex code for a specific colour.
- Font – From the dropdown, select the font you want to display on the form.
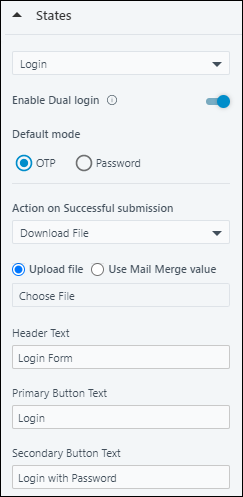
7.2 States
- Selected State – Depending on how the Portal Registration form was configured, you can configure the various actions available on the form, such as Register, Login, Forgot Password and Reset Password.
- Enable Dual Login – Allow your lead to log in using Email and Mobile/Phone number
- Default Mode – Choose to enable login through password or OTP.
- Action on Successful submission – You can configure the following actions on a successful form submission –
- Open External Link – Add an external link, and configure if it opens in the same tab or a new tab.
- Link – If you choose Open External Link as the Action on Successful submission, then add the URL of the website you want your lead to be redirected to, when the form is submitted.
- Link Page – Select the portal page you want the lead to be redirected to on successful submission.
- Page – From the dropdown, select the page or section you want your lead to be redirected to within the portal, when the form is submitted.
- Download File – Enable your leads to download a file (like prospectus, etc.) on submission by uploading it here.
- File – If you choose Download File as the Action on Successful submission, then under File, click Choose File, to choose a file from your Document Library.
- Use Mail Merge Value – Alternatively, you can mail merge a custom field set (CFS) that contains a file, by selecting the CFS from the dropdown.
- Based On Rules – This option allows you to set up rules based on the choices a lead makes. For example, if the lead chooses “City” as “New Delhi”, you can set up a condition that redirects the lead to the portal page for leads in New Delhi. Similarly, if the lead chooses “Course” as “B.Tech”, you can set up a condition to download the prospectus form for B.Tech applicants. To set up rules –
- From the Actions on Successful submission dropdown, select Based on Rules.
- Click Configure Rules, and on the Configure Rules pop-up, rename the rule.
- From any dropdown, choose if you want the condition to be any or all, and set up the base rule.
- From the Then dropdown, select the action you want to be carried out when the condition is satisfied.
- None – No action will be taken on successful submission.
- Open External Link – Add an external link, and configure if it opens in the same tab or a new tab.
- Query String – You can send the value of a particular field (First Name, Mobile field, etc.), by adding a mail merge parameter here. This will ensure that the field value is carried forward to the subsequent pages that have been configured.
- Open in New Tab – This is applicable only for Open External Link and Link Page. To open the new page in a new browser tab, on a successful submission of the form, toggle the slider.
- Header Text – Enter the form’s title here.
- Button Text – Enter the submission button’s display text here.
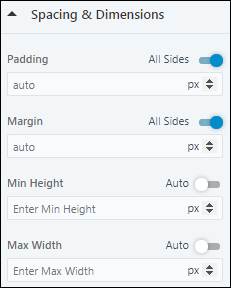
7.3 Spacing & Dimensions
You can customize the space and dimensions of the entire form, as well as each individual section within the form. To customize a section, click on the outer border of that section.
- Padding – Set the padding for the form. If you want the padding dimensions to be applicable on all sides of the layout, against All Sides, toggle the slider.
- Margin – Set the margin width for the form. If you want the margin to be applicable on all sides of the layout, against All Sides, toggle the slider.
- Min Height – Set a minimum height for the form. If you want the height to be applicable on all sides of the layout, against All Sides, toggle the slider.
- Max Width – Set the maximum width for the form. If you want the width to be applicable on all sides of the layout, against All Sides, toggle the slider.
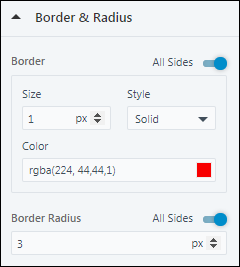
7.4 Border & Radius
- Border – Set the size, style and colour for the border around the form. If you want the border to be applicable on all sides of the selected layout, against All Sides, toggle the slider.
- Color – Set a colour for the form’s border. You can select a colour either from the gradient screen, or enter the hex code for a specific colour.
- Border Radius – Set the radius for the border around the form. If you want the border radius to be applicable on all sides of the layout, against All Sides, toggle the slider.
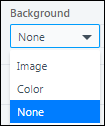
7.5 Background
You can either choose to leave the form’s background blank, or set an image or background colour.
- To set the background colour, from the dropdown, select Color. Then, choose a colour from the gradient screen, or enter the hex code for a specific colour.
- To add an image, from the dropdown, select Image. Then, click Choose Image to choose an image from your Image Library.
- To leave the background blank, from the dropdown, select None.
7.6 Shadows
Set a shadow for the form.
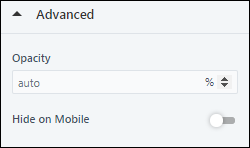
7.7 Advanced
- Opacity – Set the opacity for the form.
- Hide on Mobile – To hide this layout on a mobile device, toggle the slider.
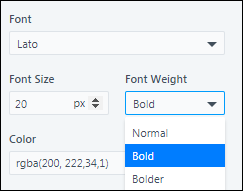
7.8 Typography
Click on any section within the form to access the typography setting.
- Font – Select the font you want to display in that section.
- Font Size – Enter the preferred font size for the font in that section.
- Font Weight – From the dropdown, select how thick or thin you want the font to look.
8. Other Actions
To access the additional actions available on the form, click the form’s outer border.
- To move up the Signup Form, click
 .
. - To move down the Signup Form, click
 .
. - To delete the Signup Form from the page, click
 .
.
9. Login Only Forms – Hiding the Registration Form
If you want your portal to display only login forms, you can now hide the registration/sign-up form. Users will be to login, but won’t be able to register.
Note: You must call the Register User Portal API to register new users.
- Select the Sign-up form, and on the properties panel, click States.
- Choose the Register state.
- On the properties panel, navigate down to the Advanced tab.
- Enable the Hide Registration Form setting
 .
. - If required, edit the CTA and form title, and publish the portal.
10. Troubleshooting
Why Are Dynamic Form Submissions Showing Blank Data, and Form Rules Not Triggering?
- Issue: Dynamic form submissions are appearing with blank data, preventing form rules from being triggered.
- Explanation: This issue usually occurs due to the portal’s form behaviour settings. Specifically, when the setting “Form behaviour when lead duplicate detected” is configured as “Don’t update any fields,” the portal blocks any updates to existing lead data, resulting in blank fields in dynamic form submissions.
- Solution: To resolve this, modify the portal setting to allow field updates when lead duplicates are detected. This will ensure that the dynamic form submissions contain all the necessary data, allowing the form rules to trigger correctly.
Form Changes Are Not Reflecting in the Live Portal
- Issue: Changes made to a form are not reflecting in the Live Portal. This includes:
- New fields not appearing or removed fields still showing
- Form rules and validation updates not applying
- Changes to form layout not visible
- Possible Cause: This is not a portal cache issue. By design, any changes made to a form do not auto-update in the live portal. The updates remain in draft until they are manually published.
- Solution:
- Test your changes in the test environment to verify updates before deployment.
- Publish the updated form manually to apply the changes to the live portal.
- If updates are still not visible, clear browser cache and refresh the portal.
Any Questions?
Did you find this article helpful? Please let us know any feedback you may have in the comments section below. We’d love to hear from you and help you out!