


Get Started
Sales Suite
Field Ops
Marketing
Service CRM
Integrations & Apps
FloStack
pVerify Healthcare Insurance Verification Connector Set-up for Admin Users
1. Feature Overview
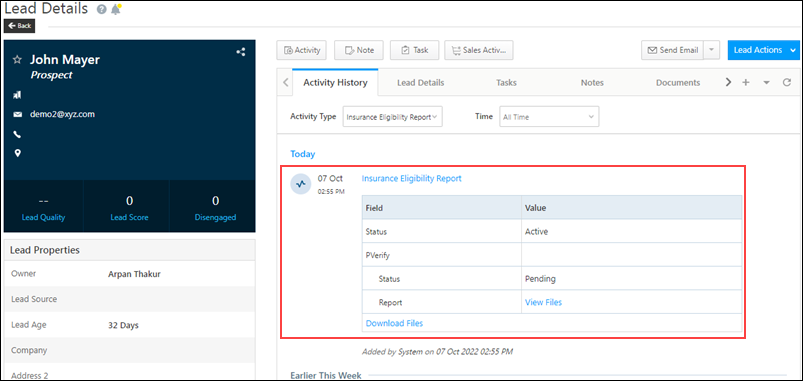
pVerify is a real-time medical insurance eligibility verification service provider. Through this connector, once you’ve synced your LeadSquared and pVerify accounts, you can view and download a lead’s insurance eligibility report directly from LeadSquared. Once installed, this connector enables you to –
- View Comprehensive Reports – Containing all the necessary details like copay amounts, insurance plan details, active or inactive status, network status, etc.
- Download Reports – From the Lead Details page, download the insurance eligibility report as a PDF file.
- Reduces Turnaround Time – Capture copay details and co-insurance details for multiple services (in-office visits, physical therapy, doctor’s lab services, etc.) in a single verification request.
Note:
- This article is to help Admin Users install and configure the connector. If you’re a Sales User looking to access and download the insurance eligibility reports, refer to pVerify Healthcare Insurance Verification Connector Set-up for Sales Users.
- This connector is currently only available for healthcare domain customers in the US.
2. Prerequisites
- You must be the Administrator of your LeadSquared account to install and configure this connector.
- This is a paid connector. To enable it, reach out to your account manager, or write to support@leadsquared.com.
- Create two Custom Lead Fields, and label them as MemberID and NPI. Ensure both these fields are created as number data type fields.
3. How it Works
- Once the connector access is enabled on your account, install the connector and configure connector access for your users.
- Once configured, a webhook URL is generated internally. To obtain the webhook, contact your account manager or write to support@leadsquared.com.
- Next, call the webhook URL from the Custom Lead Action Connector to capture the insurance eligibility details from pVerify, and post it against a lead in your LeadSquared account.
4. Install the Connector
- Navigate to Apps>Apps Marketplace.
- Search for the pVerify Connector, and click Install.
- Alternatively, you can find the connector on the left panel, under Lead Capture.
- Once installed, hover your cursor over
 , and click Configure.
5. Configure the Connector
Once you’ve installed the connector, on the Configure pVerify pop-up, configure the connector access for the non-Admin users in your account. Only users for whom access is granted can view and access the connector (from the Apps main menu).
- Select if you want to grant Connector Access that’s based on the User Role or the values entered in a User Field.
- Based on Role – From the Specify Roles dropdown, select the LeadSquared user roles that can use the connector.
- Advanced (User Level) – From the Advanced (User Level) dropdown, select a user boolean field. Based on the value entered in the selected boolean field, the user can access the connector (e.g., for the user Sam, if the “Is Employee” boolean user field contains the value “Yes”, then this user can access the connector).
- Once you’re done, click Save Details.
6. Create Custom Actions
Once the connector is configured, a webhook URL is generated. Call this webhook URL using the Custom Lead and List Actions Connector, and create a lead action to fetch and display the eligibility report on the Lead Details page.
Note:
- To obtain the connector’s webhook URL, contact your account manager, or write to support@leadsquared.com.
- Before you carry out the steps listed below, create two Custom Lead Fields, and label them as MemberID and NPI. Ensure both these fields are created as number data type fields.
- Navigate to Apps>Apps Marketplace, and search for Custom Lead and List Actions.
- To learn how to install the connector, refer to Installation.
- Alongside the connector, hover your cursor over , and click Configure.
- On the Configure Custom Lead and List Actions pop-up, click the Add Action button. Enter the following details –
- Action Label – Enter a display name for the custom action (e.g., Generate Report).
- Action Type – Select Call an API. We’ll be using the webhook URL to get the report details from your pVerify account.
- Show in Tab – Select Web App.
- Callback URL – Enter the connector’s webhook URL. To obtain this URL, contact your account manager, or write to support@leadsquared.com.
- HTTP Method – Select Post.
- Data* – Pass the parameters listed below to generate the report –
{

"name": "@{Lead:FirstName,}",

"email": "@{Lead:EmailAddress,}",

"phone": "@{Lead:Phone,}",

"leadId": "@{Lead:ProspectAutoId,}",

"dob": "@{Lead:mx_Date_of_Birth,}",

"lastName": "@{Lead:LastName,}",

"npi": "@{Lead:mx_npi,}",

"memberId": "@{Lead:mx_MemberId,}"

}
Once you’re done, click Save. This completes the connector installation and configuration.
Next Steps
Once the connector is installed and configured, to view the insurance eligibility reports, refer to pVerify Healthcare Insurance Verification Connector Set-up for Sales Users.
Any Questions?
Did you find this article helpful? Please let us know any feedback you may have in the comments section below. We’d love to hear from you and help you out!