


Get Started
Sales Suite
Field Ops
Marketing
Service CRM
Integrations & Apps
FloStack
Custom Lead and List Actions Connector
1. Feature Overview
This LeadSquared connector allows you to extend LeadSquared’s functionality and create Custom Actions (in addition to the actions available by default) on a lead, group of leads, or a list.
For example, you can create Custom Actions to –
- Post/retrieve lead data from external systems.
- Make a phone call to a number stored in a custom field.
- Send all the phone numbers of the leads in a list to a call center application for automated dialing.
- Trigger a data post on a custom Webhook.
- Send a custom notification to the Lead Owner.
- Show all support tickets stored in external systems (like Zendesk, Freshdesk, etc.) associated with the Leads and display it as a separate window or pop-up.
Note:
- Custom actions will reflect on Smart Views, Manage Leads, Manage Lists, and Lead Details pages.
- Custom actions will reflect on the LeadSquared mobile app as well.
- This is not a paid connector.
2. Prerequisite
You must be the administrator of your LeadSquared account.
3. How It Works
The connector enables you to create a custom action using a callback URL with mailmerge parameters (such as @{Lead:OwnerId, }, @{Lead:Company, }, etc.). You can also configure Iframe attributes to define how your action will be displayed on the Manage Leads and Lead Details page. You can use this to create single as well as bulk actions. To use the Custom Lead and List Actions connector on your account –
- Install the connector
- Configure the connector
- Use the new custom action (on the Smart Views, Manage Leads, Manage Lists, and Lead Details pages)
4. Install the Connector
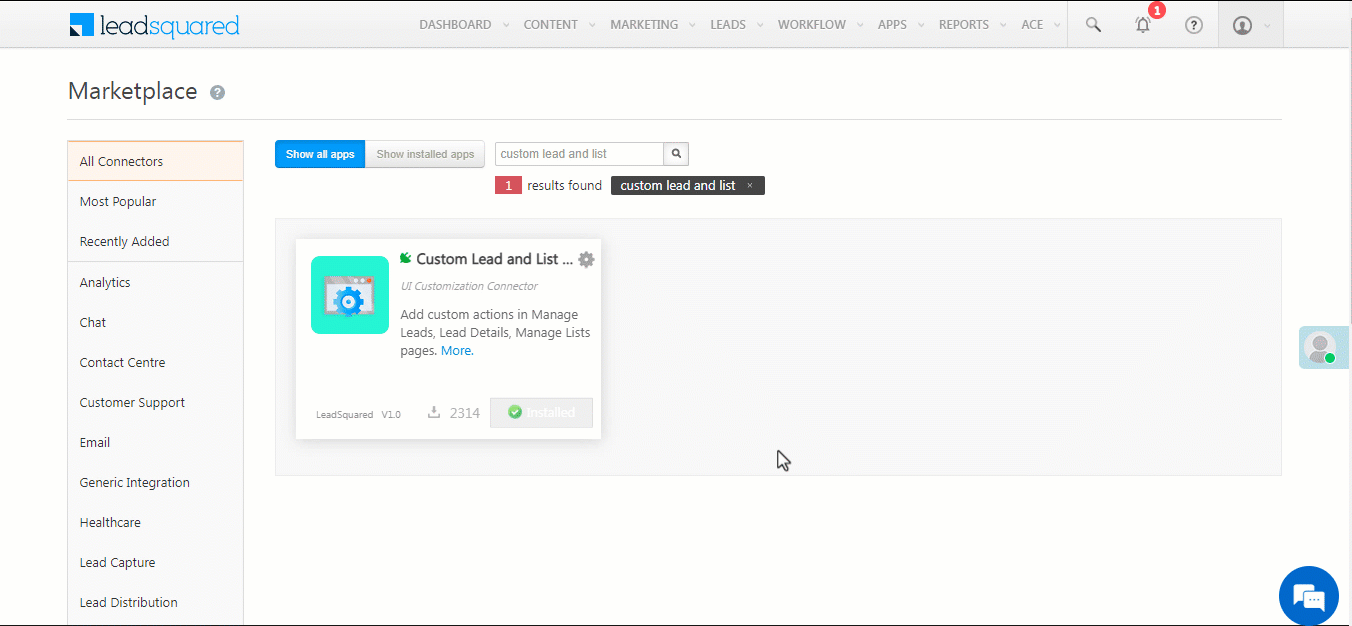
- From the main menu, navigate to Apps>Apps Marketplace.
- In the search box, type “Custom Lead and List Actions”, and click the
 icon.
icon.
- Alternatively, from the left panel, click UI Customization. The Custom Lead and List Actions connector is listed on this page as well.
- On the Custom Lead and List Actions connector, click Install.
5. Configure the Connector
- Once the Custom Lead and List Actions connector is installed, hover your cursor over the
 icon, and click Configure.
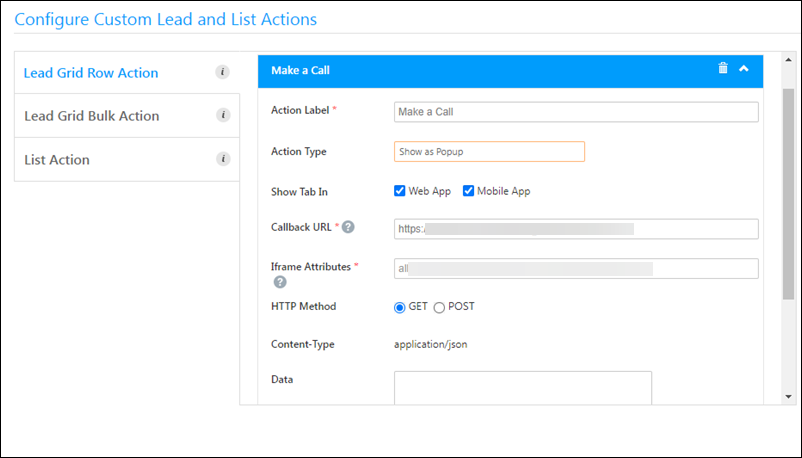
 - On the Custom Lead and List Actions pop-up, select the area you want the action to appear from the left panel –
- Lead Grid Row Action – Allows you to add a custom action to the lead which is available from the Lead Details and Managed Leads features.
- Lead Grid Bulk Action – Allows you to add a custom action that can be applied for multiple leads from the Managed Leads feature.
- List Action – Allows you to add a custom action that can be applied to leads in a list. This is available from the Managed Lists feature.
- Click Add Action.
| Attribute | Description |
| Action Label | The display name of the action. This attribute is mandatory. |
| Action Type | Three action types are available –
|
| Show Tab In | To make the tab visible on your Web App and/or Mobile App, click the |
| Callback URL | Enter the HTTPs URL which will be rendered as a custom action. The URL should be of an action that accepts LeadSquared mail merge fields as parameters and passes them to an external application (e.g., a support system, another CRM or marketing system, another LeadSquared account, etc.) to get the data. Click the question mark |
| Iframe Attributes | Pass Iframe attributes you want to render on the pop-up. Applicable only for the Show as Popup action type. |
| HTTP Method | GET and POST methods are supported. |
| Content-Type | application/JSON is the only supported content type. |
| Data | You can pass any data here in JSON format. |
Once you’re done, scroll to the bottom and click Save.
Note:
- To delete an existing custom action, click the
 icon against the action’s name.
 - To edit an existing custom action, on the Configure Custom Lead and List Actions pop-up, click the
 icon and makes changes, and click then Save.
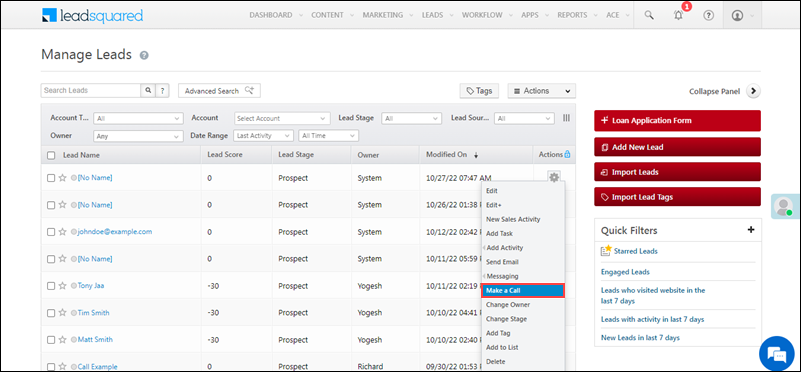
6. Use the Custom Row Action
- From the LeadSquared main menu, navigate to Leads>Manage Leads.
- Against an existing lead, hover your cursor over the icon, and select the custom action from the dropdown list.
Note: The Custom Row Action will reflect on the Lead Details page as well.

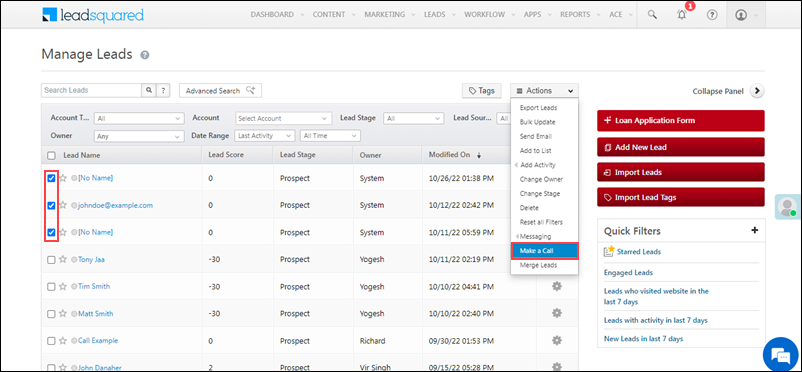
7. Use the Custom Bulk Action
Follow the same steps as in Lead Grid Row Action to create the actions.
To view the custom bulk action –
- From the LeadSquared main menu, navigate to Leads>Manage Leads.
- Select the leads you want to view the bulk action for, by clicking the
 checkbox.
 - Hover your cursor over the
 button, and select the custom action from the dropdown list.
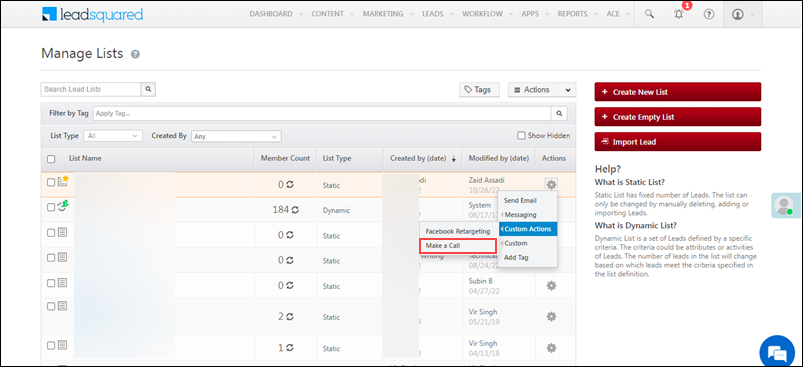
8. Use the Custom List Action
Follow the same steps as in Lead Grid Row Action to create the actions.
To view the custom list action –
- From the LeadSquared main menu, navigate to Leads>Manage Lists.
- Against an existing list, hover your cursor over the icon, and select the custom action from the dropdown list.
Troubleshooting
The custom action is not visible on the Manage Leads/Manage Lists page even though it’s added in the connector –
This may be caused by a caching issue or if the action is hidden on the Lead Details View Customization (LDVC).
- If it’s a caching issue, try the URL – https://in21.leadsquared.com/LeadManagement?cc=1. This will force reset the cache.
- If you’re using the Lead Details View Customization (LDVC) feature, ensure the action is added under the Actions tab of the view.
If you still face issues, contact us at support@leadsquared.com.
Any Questions?
Did you find this article helpful? Please let us know any feedback you may have in the comments section below. We’d love to hear from you and help you out!
Hey, we tried configuring the connector but could not achieve our use case.
We want to send bulk leads from LSQ to a third party marketing application.
The documentation above clearly states this is possible with Custom Bulk Action.
Please help out here.
Attached a screenshot for further context.
Hi Om,
We have to test the callback URL and data you’re trying to post. We’ve already informed our support team about this. Please reach out to support@leadsquared.com and we’ll get back to you ASAP.
Is this connector chargeable??
Hi, Inderpreet. No, this is not a paid connector.