


Get Started

Sales Suite
Field Ops
Marketing
Service CRM
Integrations & Apps
FloStack
Lead Details Page

1. Feature Overview
The Lead Details page is the complete record of a single lead in LeadSquared. It brings the lead’s profile, activity history, opportunities, tasks, tickets, documents, and notes together on one screen, so you always have the full context for the lead you’re working.
Use this page to follow a lead’s journey from creation to conversion, and to act on the lead directly, such as logging an activity, sending an email, creating a task, or changing the stage or owner. Because your whole team works from the same view, everyone stays aligned on where the lead stands and what needs to happen next.
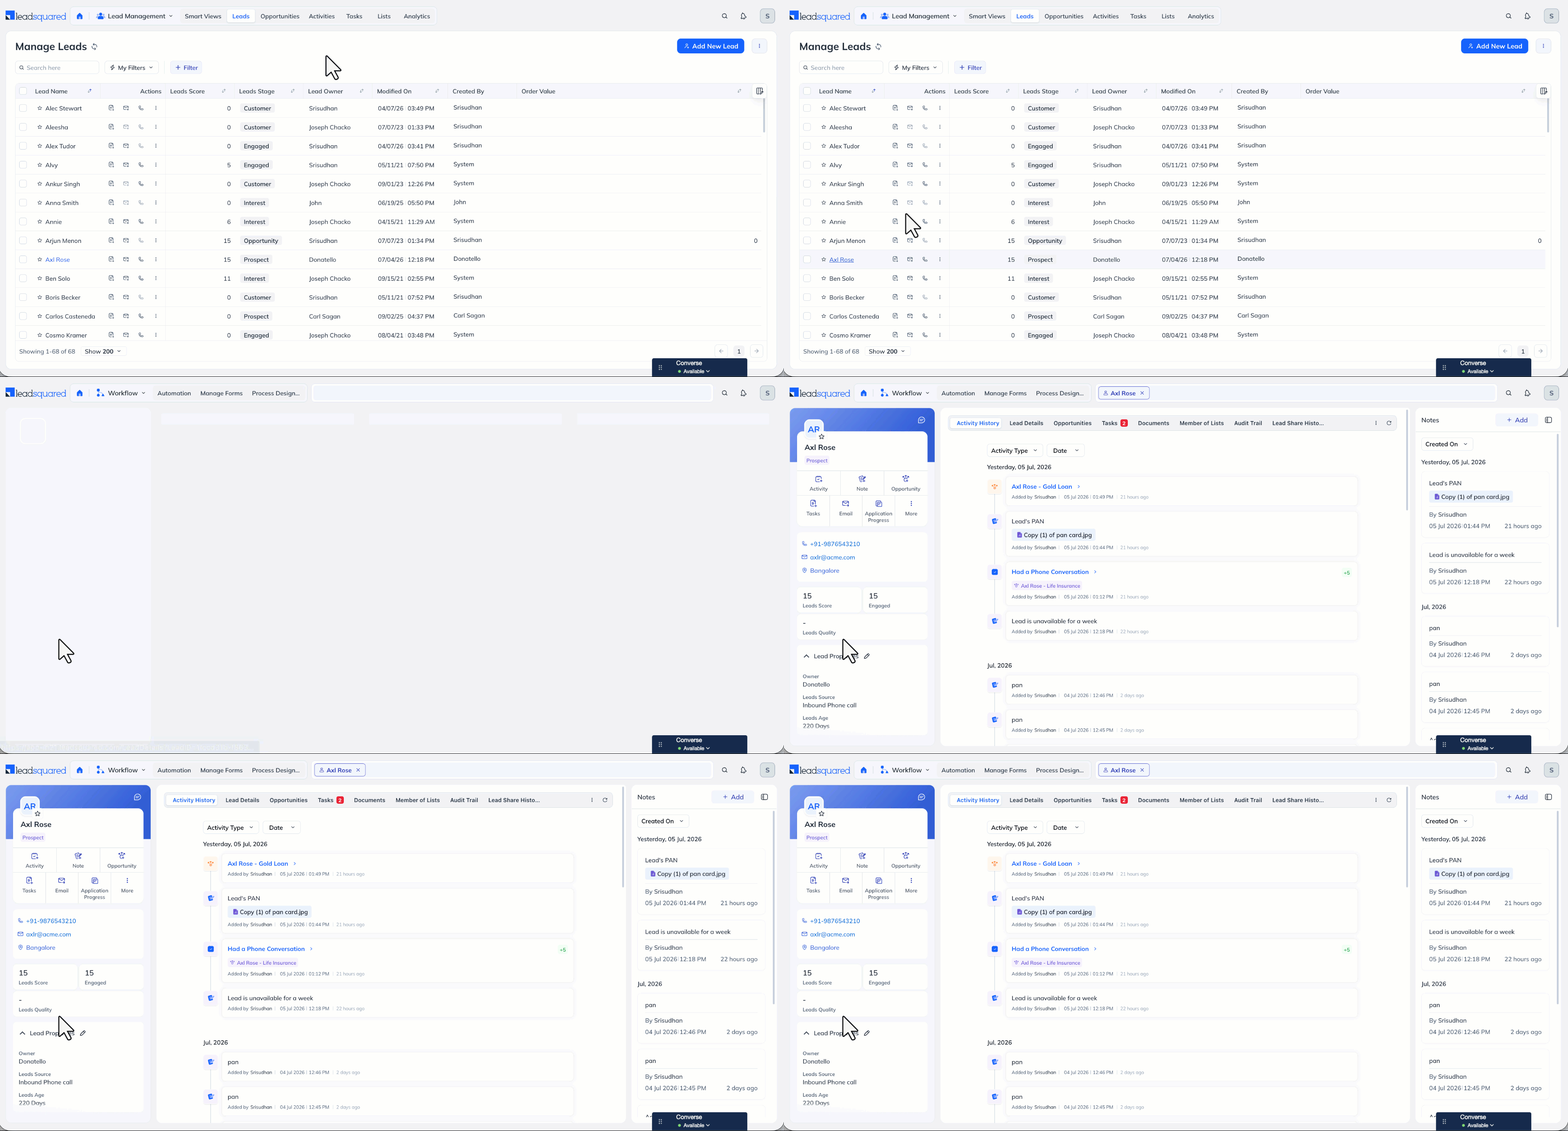
To open the Lead Details page, from the main menu, navigate to Lead Management>Leads, and click an existing lead.
Note:
- Administrators can rearrange the vCard, tabs, actions, and Notes panel, and assign different layouts to different teams. To know more, refer to Customize the Lead Details Page/View (LDVC).
2. Prerequisites
- The actions you can perform on this page depend on your Permission Template. To configure templates, from the main menu, navigate to My Profile>Settings>Users and Permissions>Permission Templates. To know more, refer to Permission Templates.
- To view and add opportunities, the Opportunities feature must be enabled in your account. To enable it, write to support@leadsquared.com.
- Some tabs and actions (such as Audit Trail, Lead Share History, Call, and Messaging) are available only when the related feature or integration is enabled in your account.
- If you use LeadSquared’s Service CRM, you can display the support tickets created on the lead in a custom tab, so your agents can view and open the lead’s tickets without leaving the page. To set this up, Service CRM and the Custom Tab Connector must be enabled on your account. To know more, refer to Display Support Tickets on the Lead Details Page.
3. How it Works
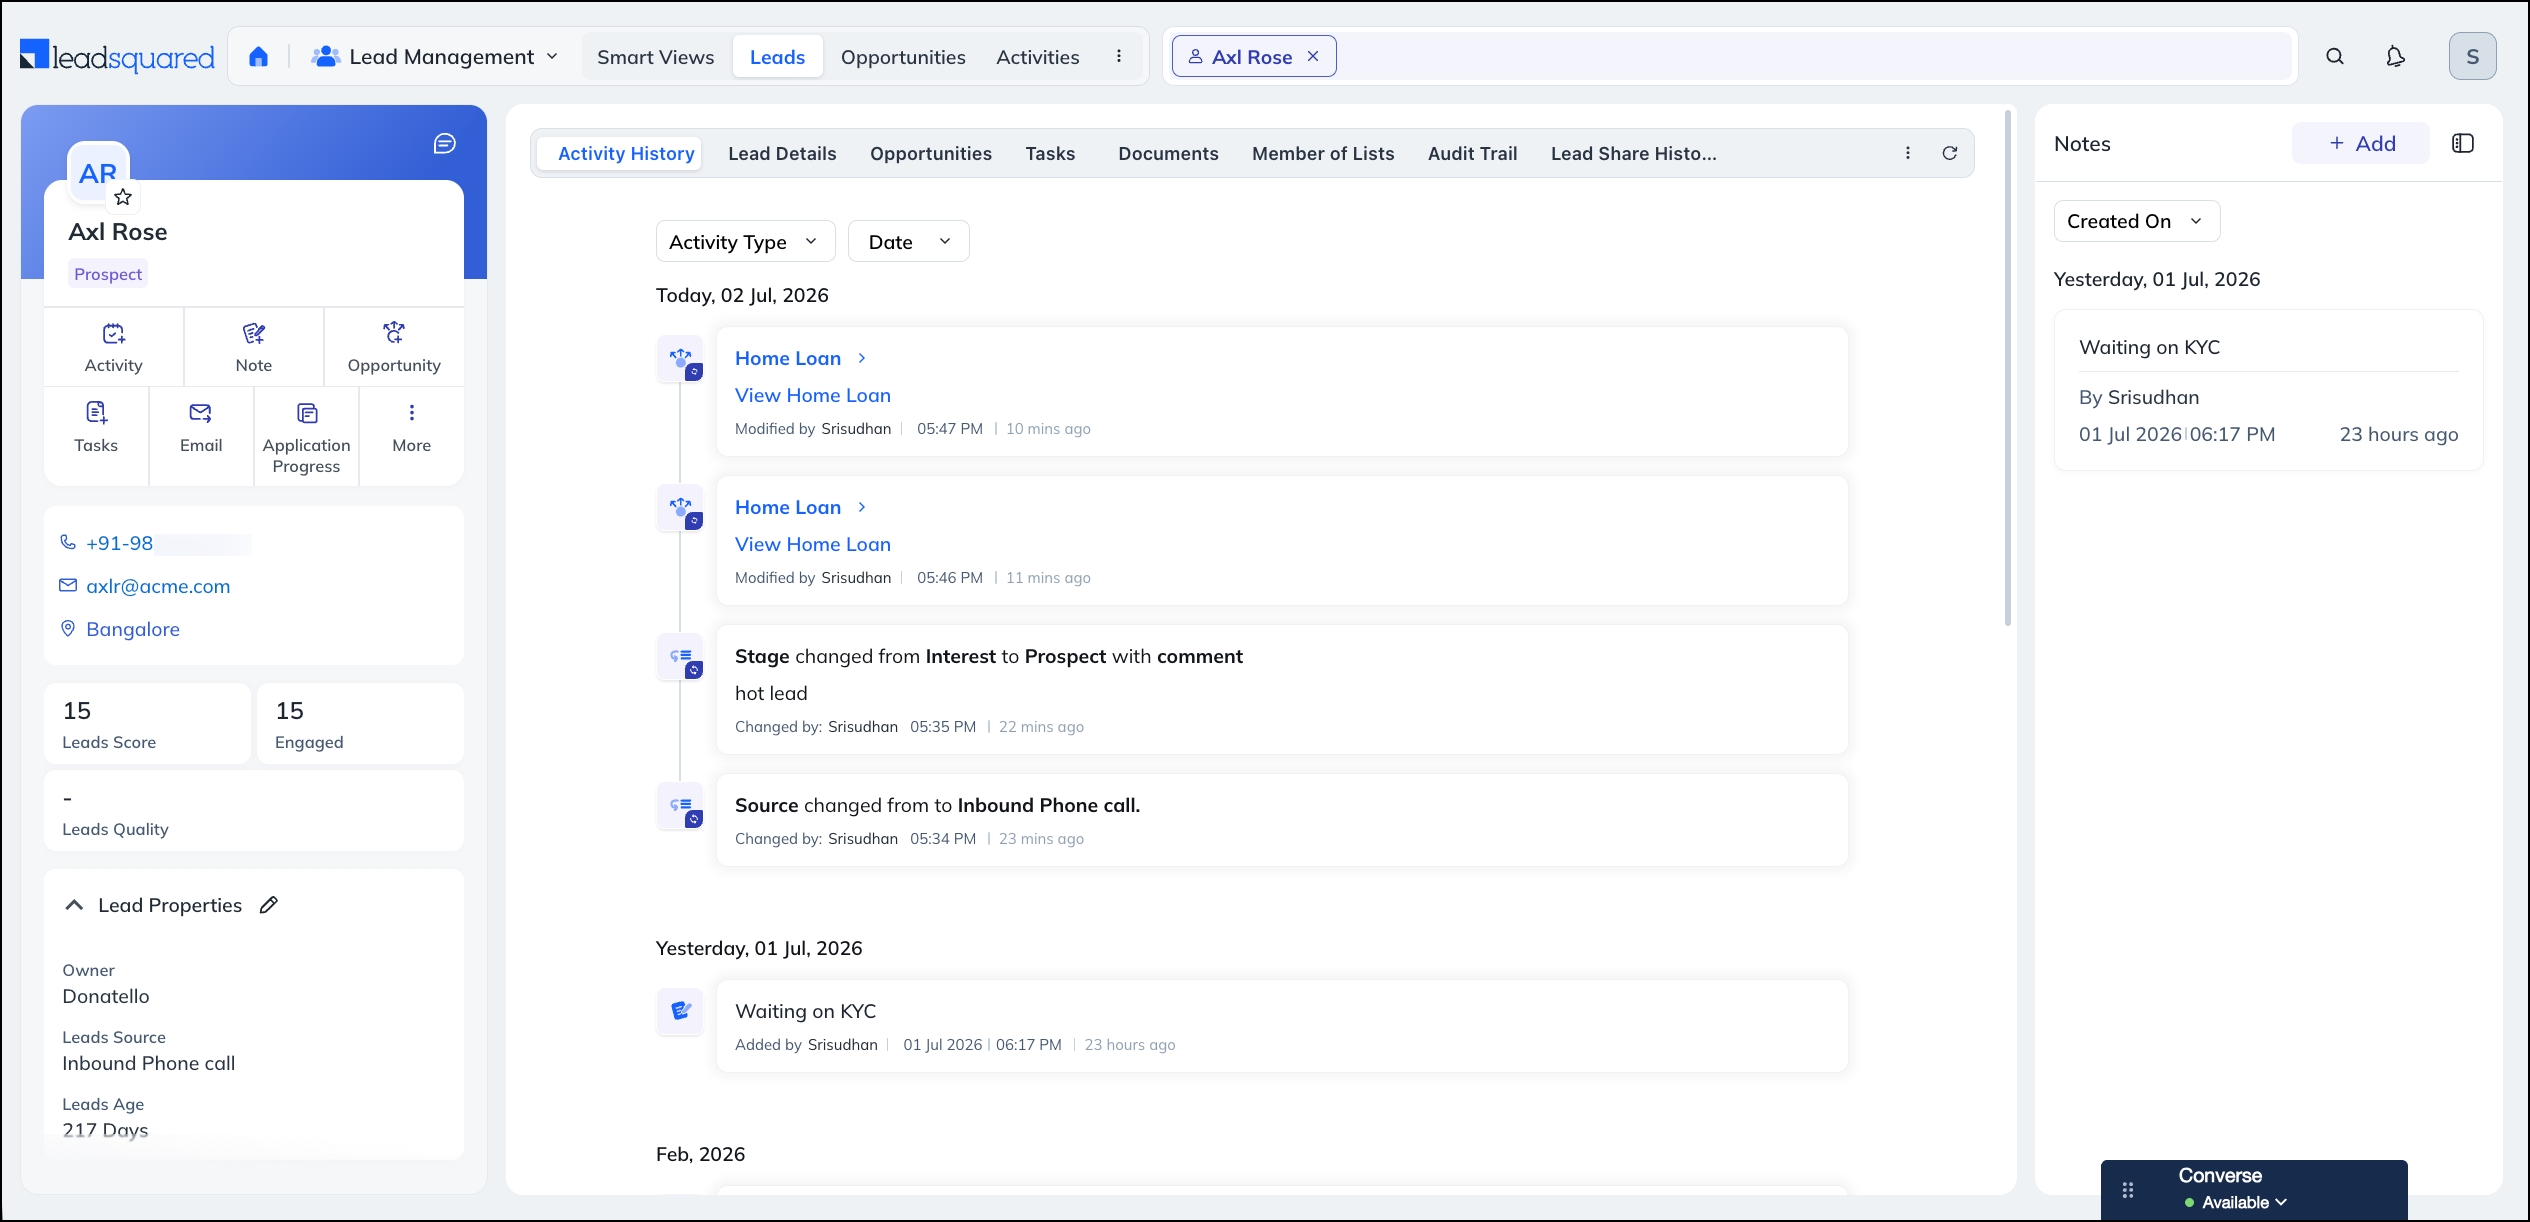
You land on this page whenever you open a lead, whether from Manage Leads, Opportunity page, Tickets page, a Smart View, Quick Search, a list, or an automation alert. The page is organized into three regions that work together –
- Left panel (vCard) – A snapshot of who the lead is: name, stage, contact details, and health signals such as Lead Score, engagement status, Lead Quality, and Age. Use it to size up the lead at a glance and launch the most common actions.
- Tabs – The working area in the center, where you review and update the lead’s full record: activity timeline, lead fields, opportunities, tasks, documents, lists, and audit history.
- Notes panel – A running log of context for the team, always visible on the right.
A typical flow looks like this –
- Review the vCard to understand the lead’s stage and health, and decide how to prioritize the lead.
- Scan the Activity History timeline to see what has happened so far.
- Open the relevant tab to view or update details, such as editing lead fields, checking tasks, or reviewing documents.
- Take an action from the vCard, such as adding an activity, sending an email, creating a task, or changing the stage or owner.
- Add a note so the rest of the team stays informed.
Every change is recorded as it happens. Stage and field changes appear in the Activity History timeline, and, where enabled, in the Audit Trail, so there’s always a clear record of who changed what, and when.
4. Access Multiple Leads with App Tabs
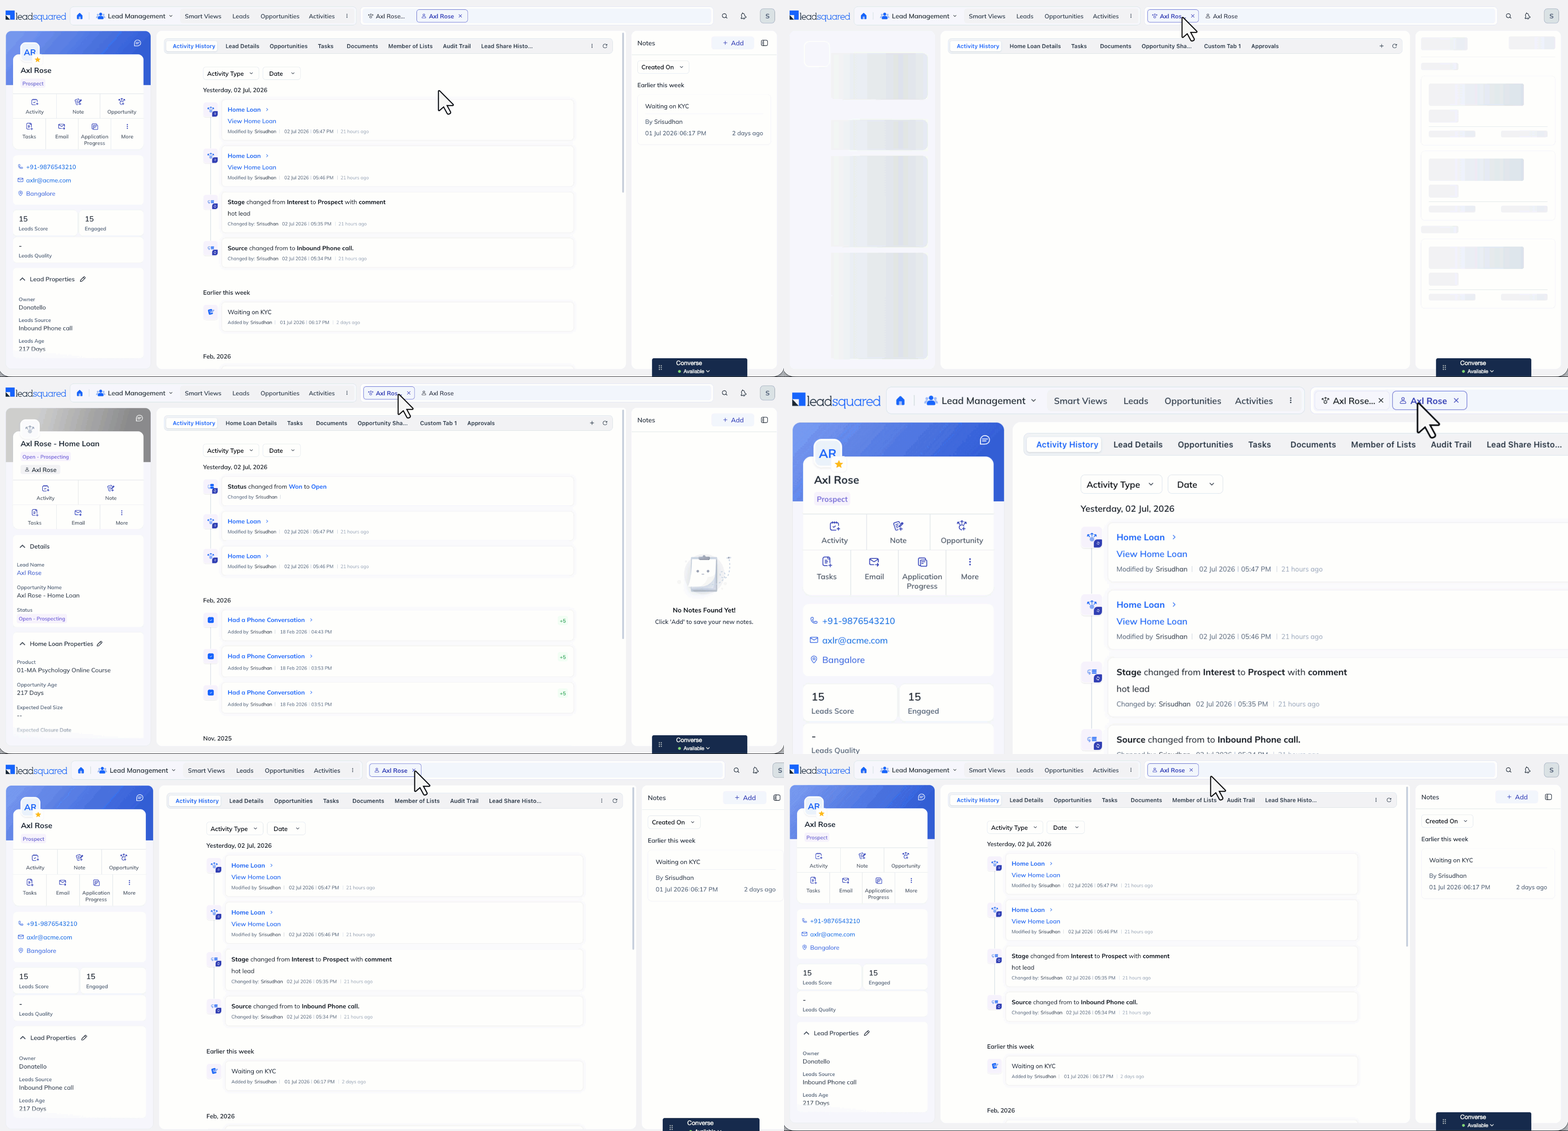
You can open multiple records at the same time using App Tabs. Each open lead, opportunity, account, or ticket appears as a tab in the top navigation bar, so you can switch between records without navigating back and forth. To close a record, click the x icon on the tab.
To know more, refer to App Tabs – Feature Guide.
5. vCard
The vCard shows the lead’s identity – name, stage, phone number, email address, and location – and lets you act on the lead without leaving the page.
- The lead’s stage appears as a pill below the name (for example, Prospect). To know more, refer to Managing and Configuring Lead Stages.
- To mark the lead as important, click the
 icon next to the lead’s name.
 - If Converse is enabled on your account, you can chat with the lead by clicking the
 icon.
icon. - To edit the fields shown on the vCard or share the lead’s information over email, hover your mouse over More, then select Edit VCard or Share Via Email.
To add or remove vCard fields for your account, navigate to My Profile>Settings>Leads>Lead Forms, and from the Select form to edit dropdown, select Lead vCard. To know more, refer to How to Use and Customize the Lead Details vCard?
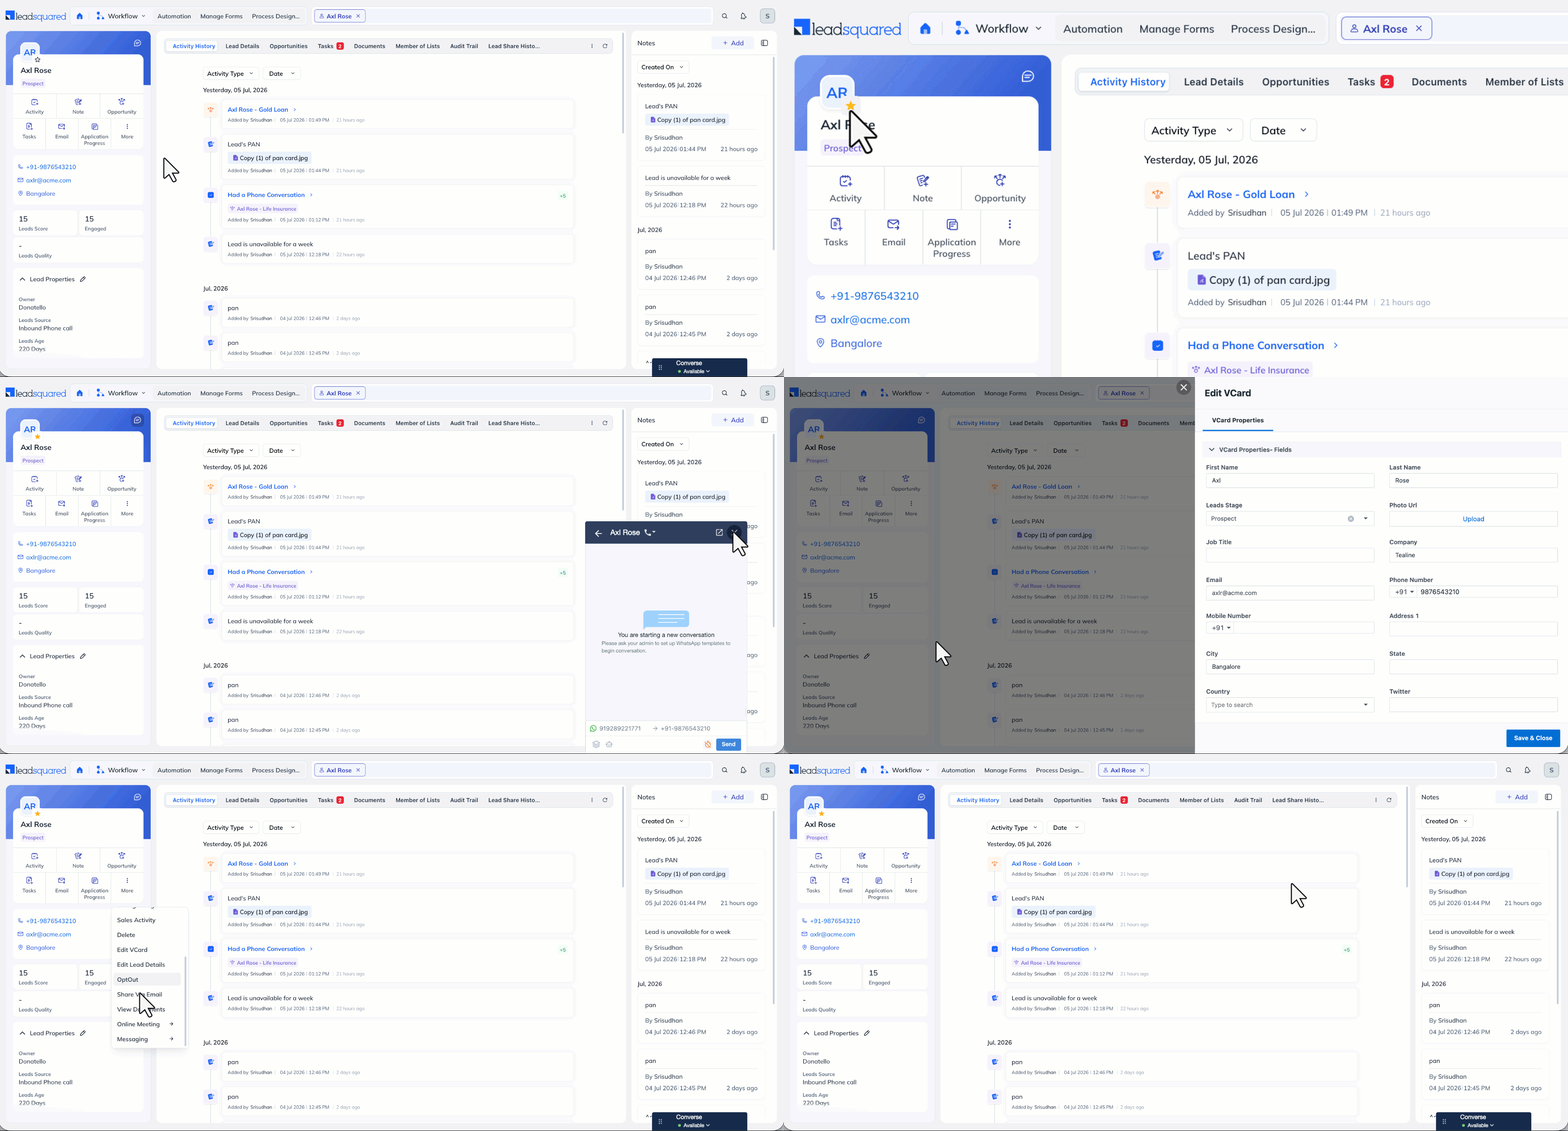
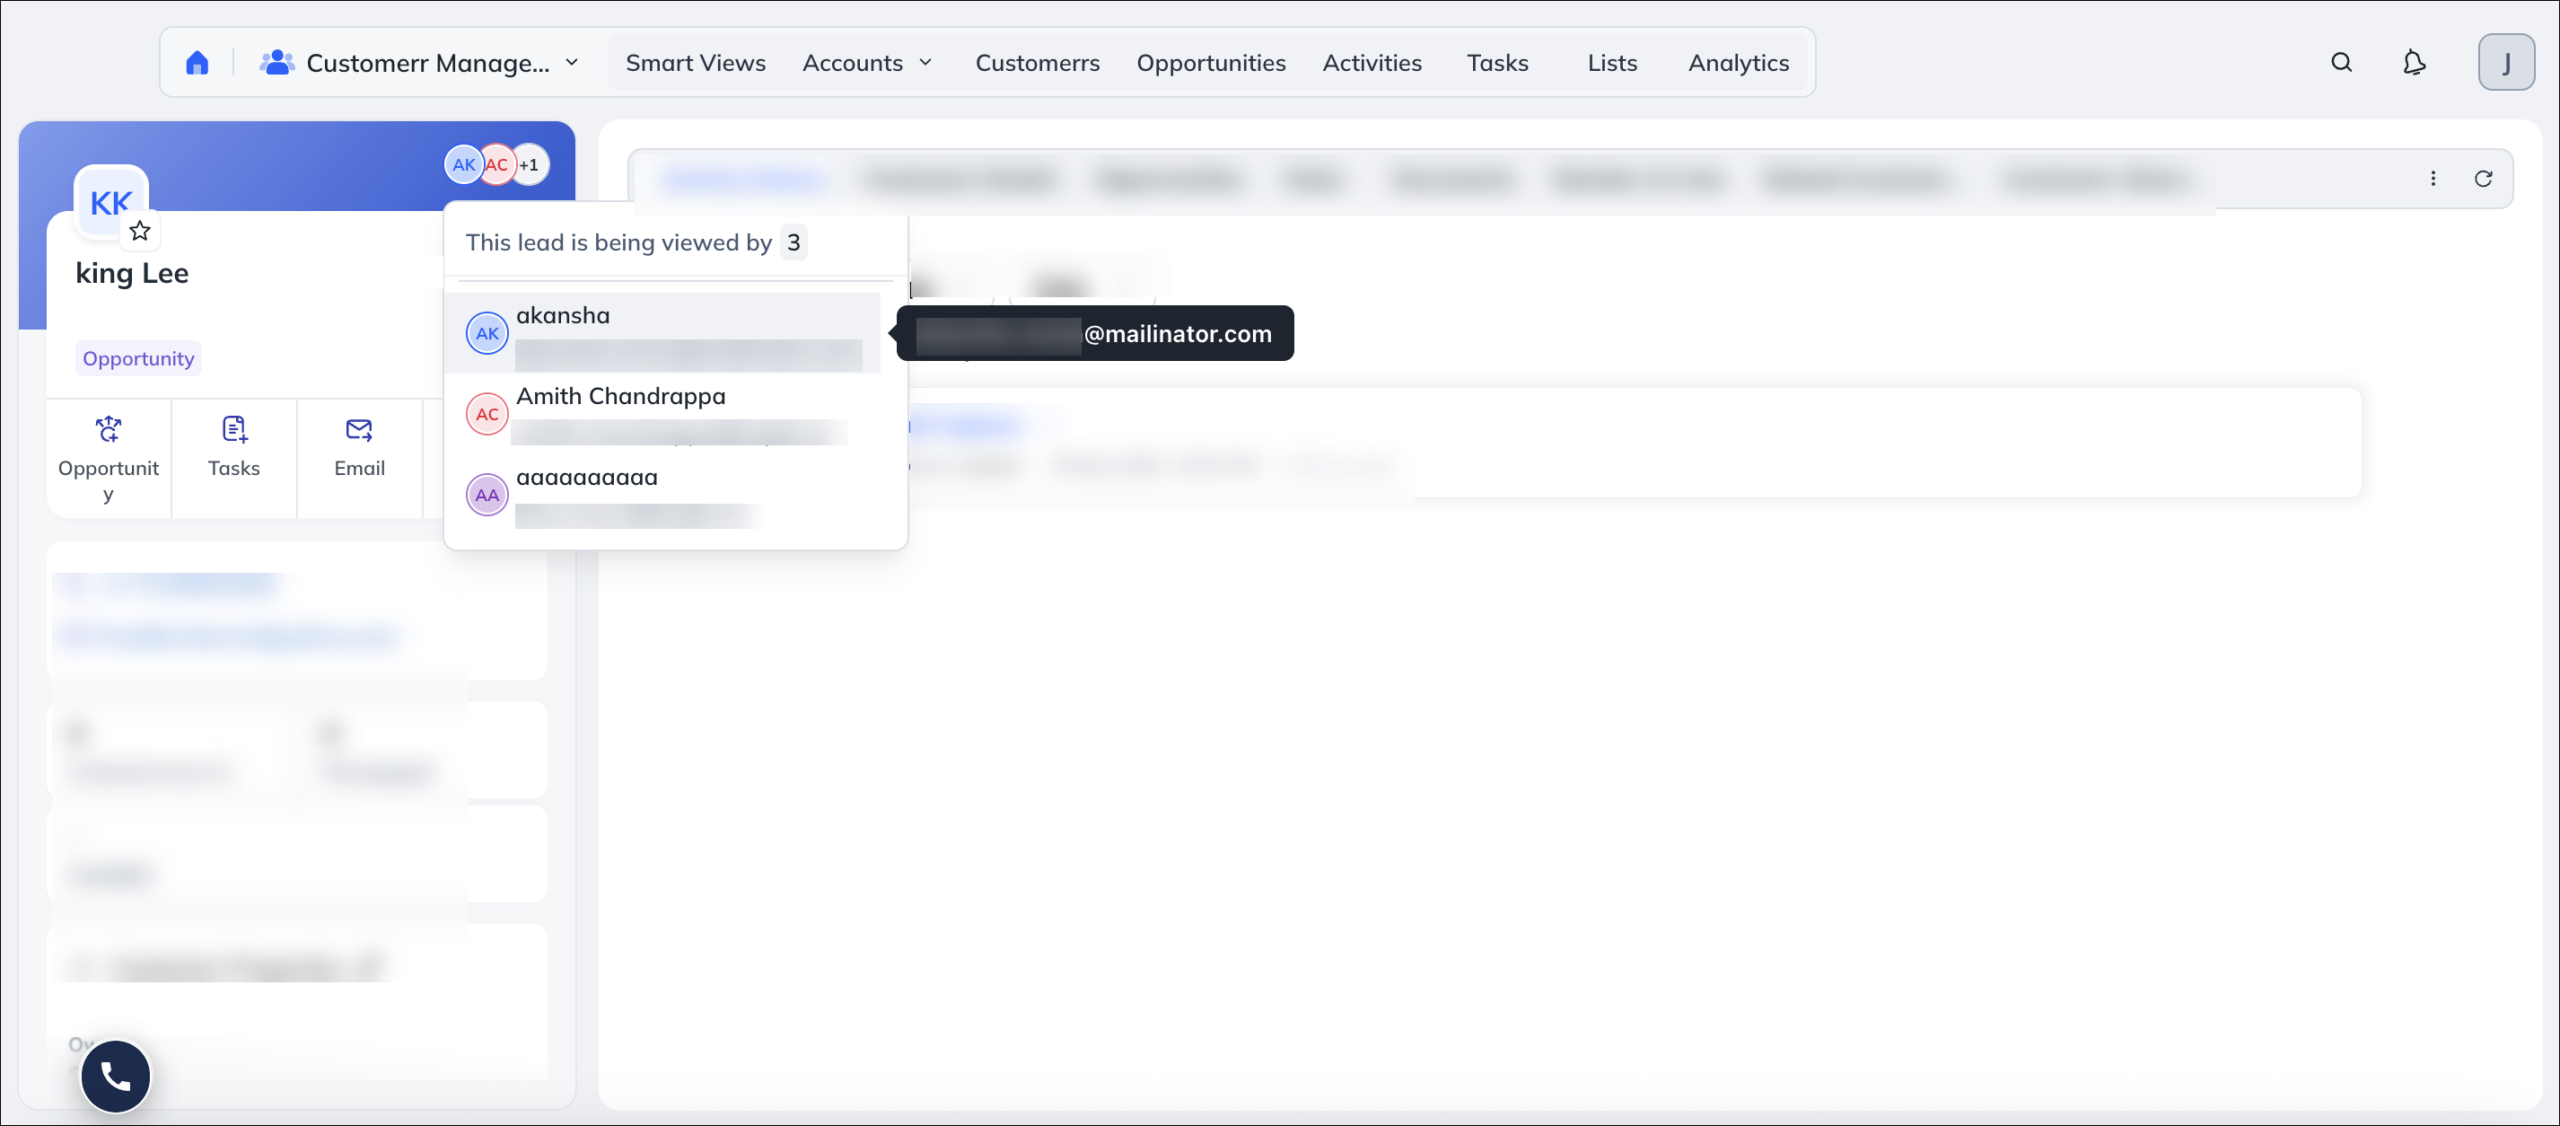
If multiple users have the same lead open at the same time, avatars appear at the top of the vCard, showing who else is currently viewing the lead. This gives your team visibility into ongoing activity, helping them avoid duplicate work and conflicting updates on shared records.
5.1 Quick Actions
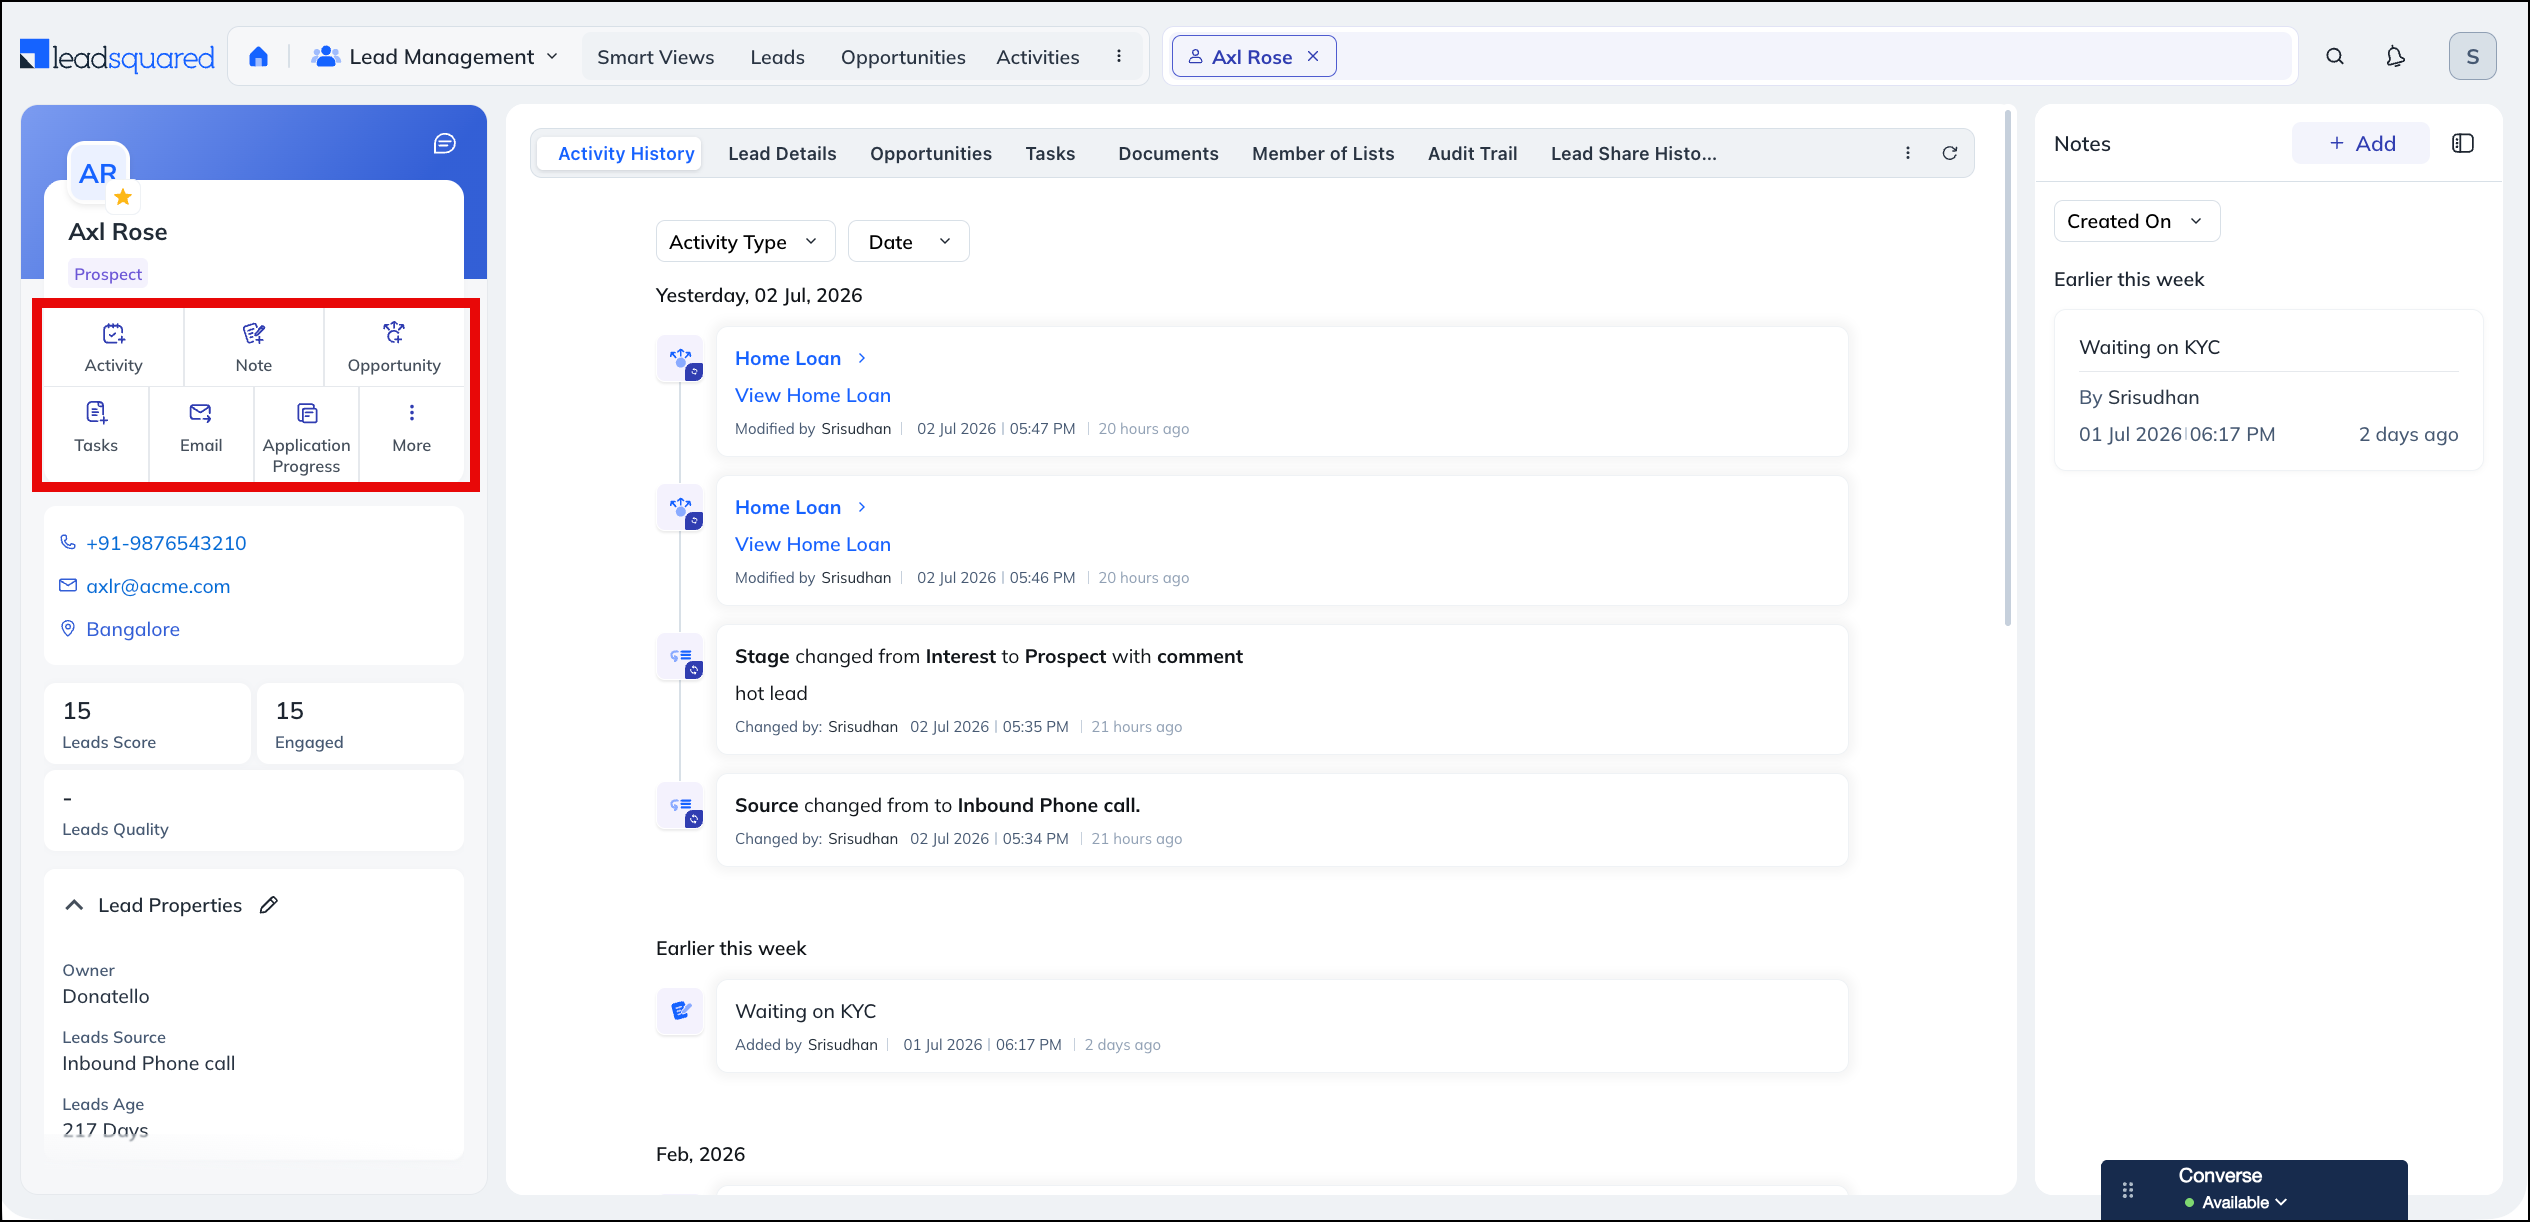
Below the lead’s identity, the vCard shows quick-action buttons for the most common tasks –
- Activity – Add a notable activity to the lead (see section 19.1).
- Note – Add a note to the lead (see section 19.2).
- Opportunity – Add an opportunity to the lead (see section 19.3).
- Tasks – Create a task for the lead (see section 19.4).
- Email – Send a one-to-one email to the lead (see section 19.5).
- More – Access all other lead actions (see section 19.6).
Note:
The quick actions available on the vCard depend on your account’s configuration. For example, you may also see buttons that launch forms and processes specific to your organization (such as Application Progress in the image below).
5.2 Lead Insights
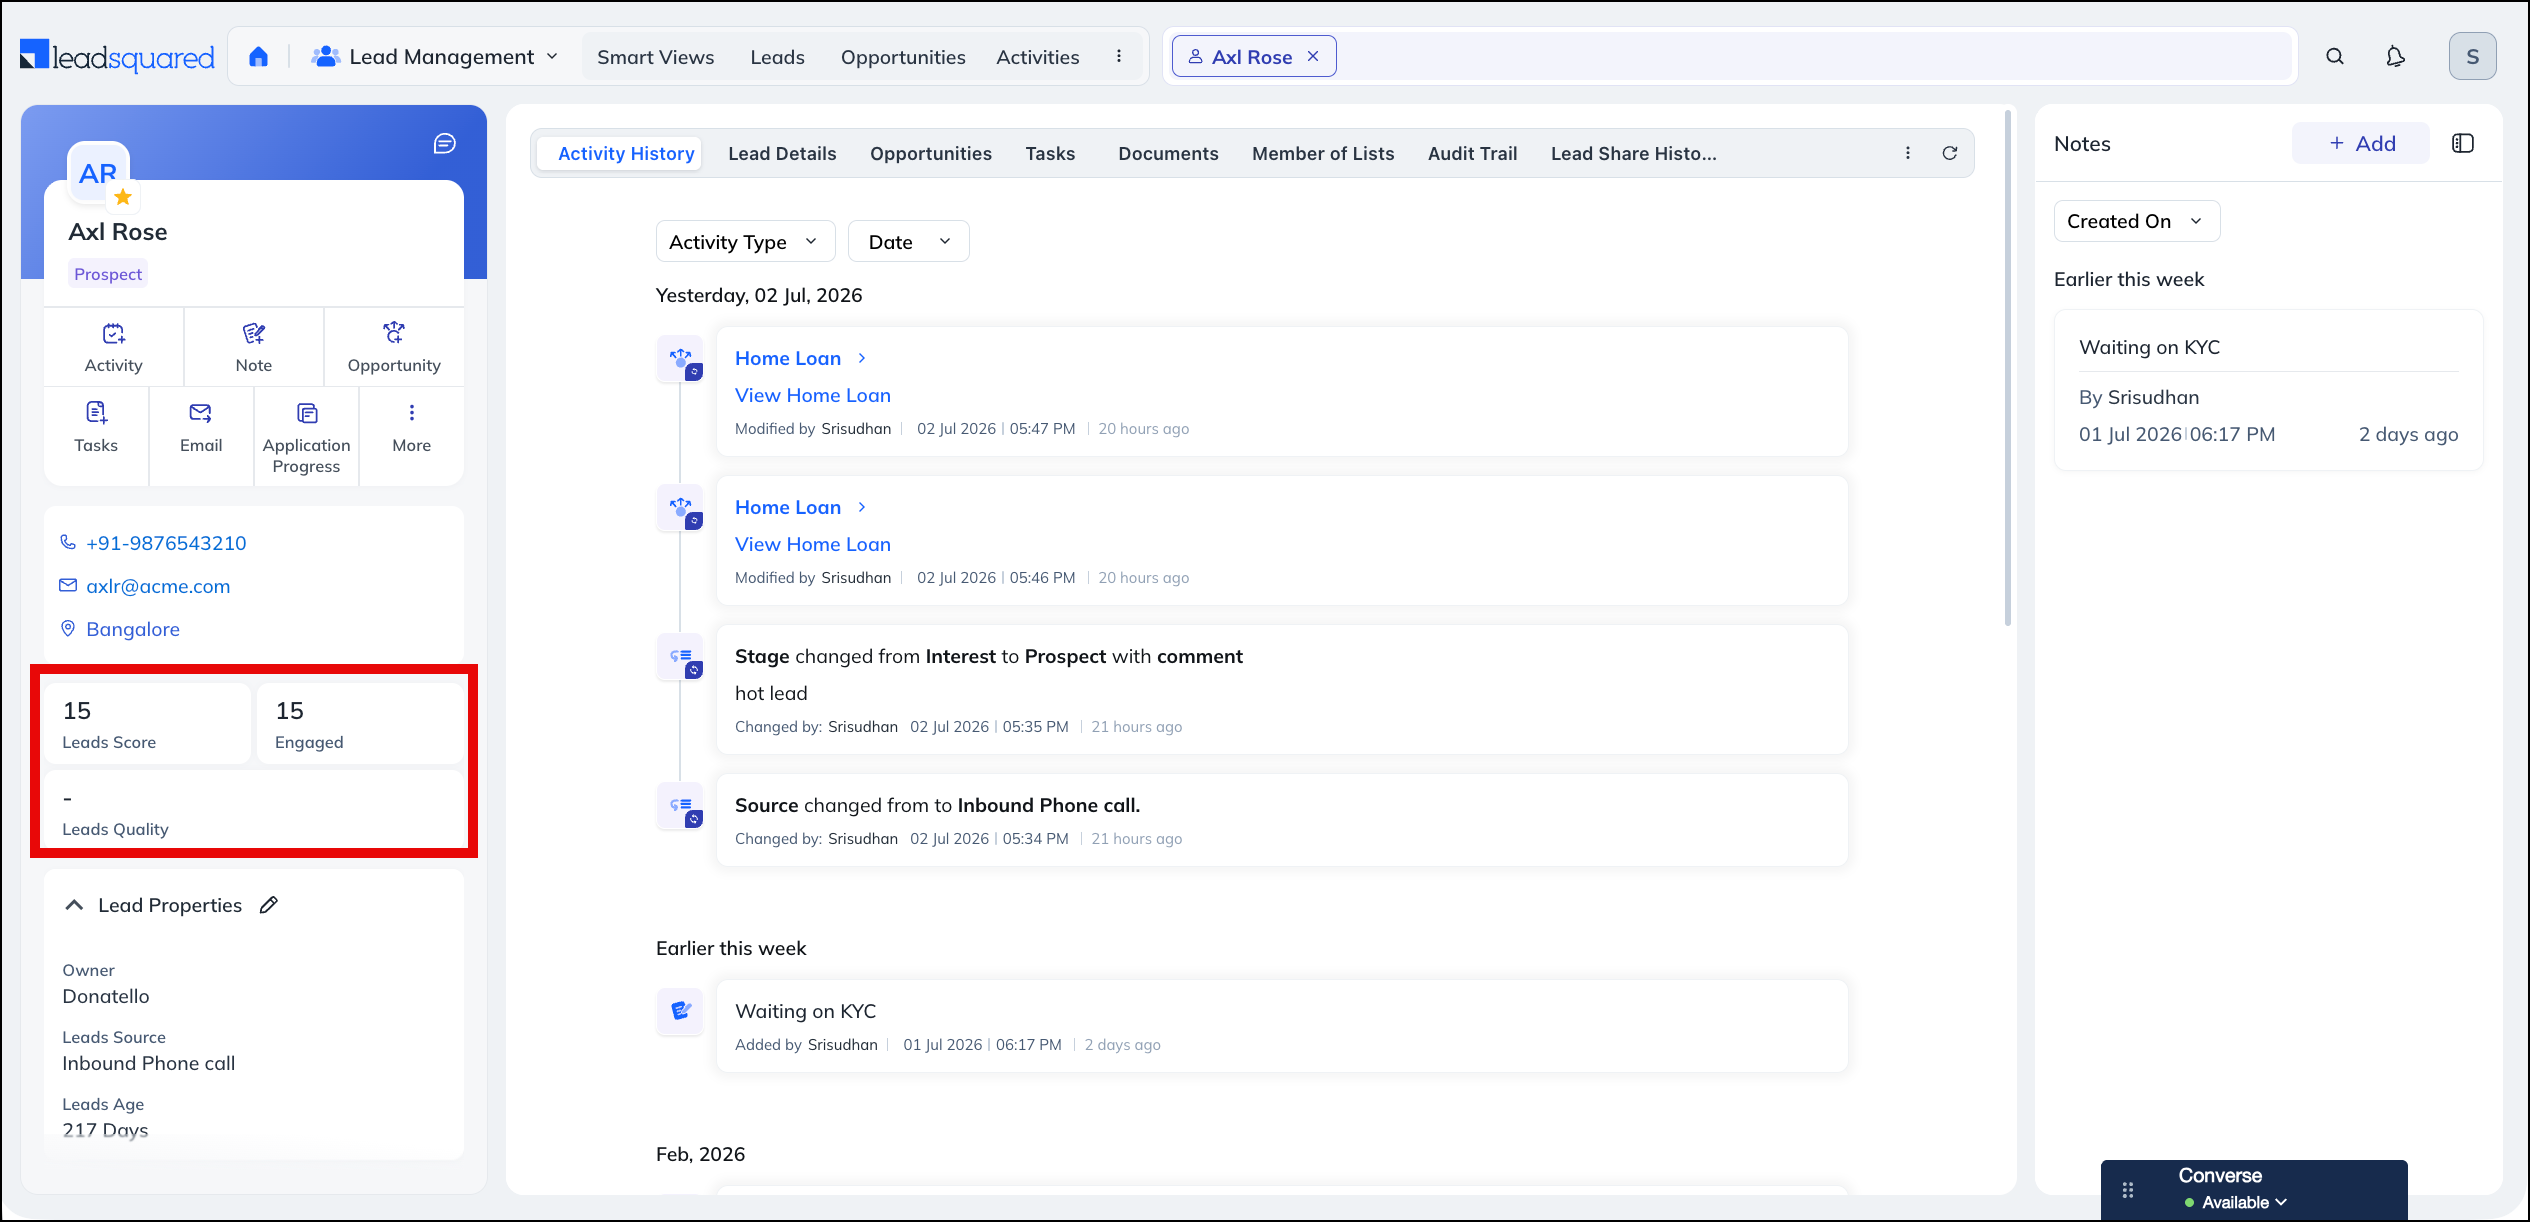
The vCard displays insight tiles that summarize the lead’s quality and engagement at a glance. These are Lead Score, Disengaged, Lead Quality, and Age.
- Lead Score – The score assigned to a lead based on the interest they’ve shown and how relevant they are to your business, so you can distinguish important leads from others. To know more, refer to How does Lead Scoring Work?
- Engaged – Reflects the lead’s engagement level based on your engagement-scoring criteria. To know more, refer to Setup Criteria of Lead Engagement Scoring.
- Leads Quality – A quality score between 0 and 10 that evaluates the lead against your ideal customer profile, helping you prioritize the leads most likely to convert. To know more, refer to Lead Quality Criteria – Setup.
5.3 Lead Properties
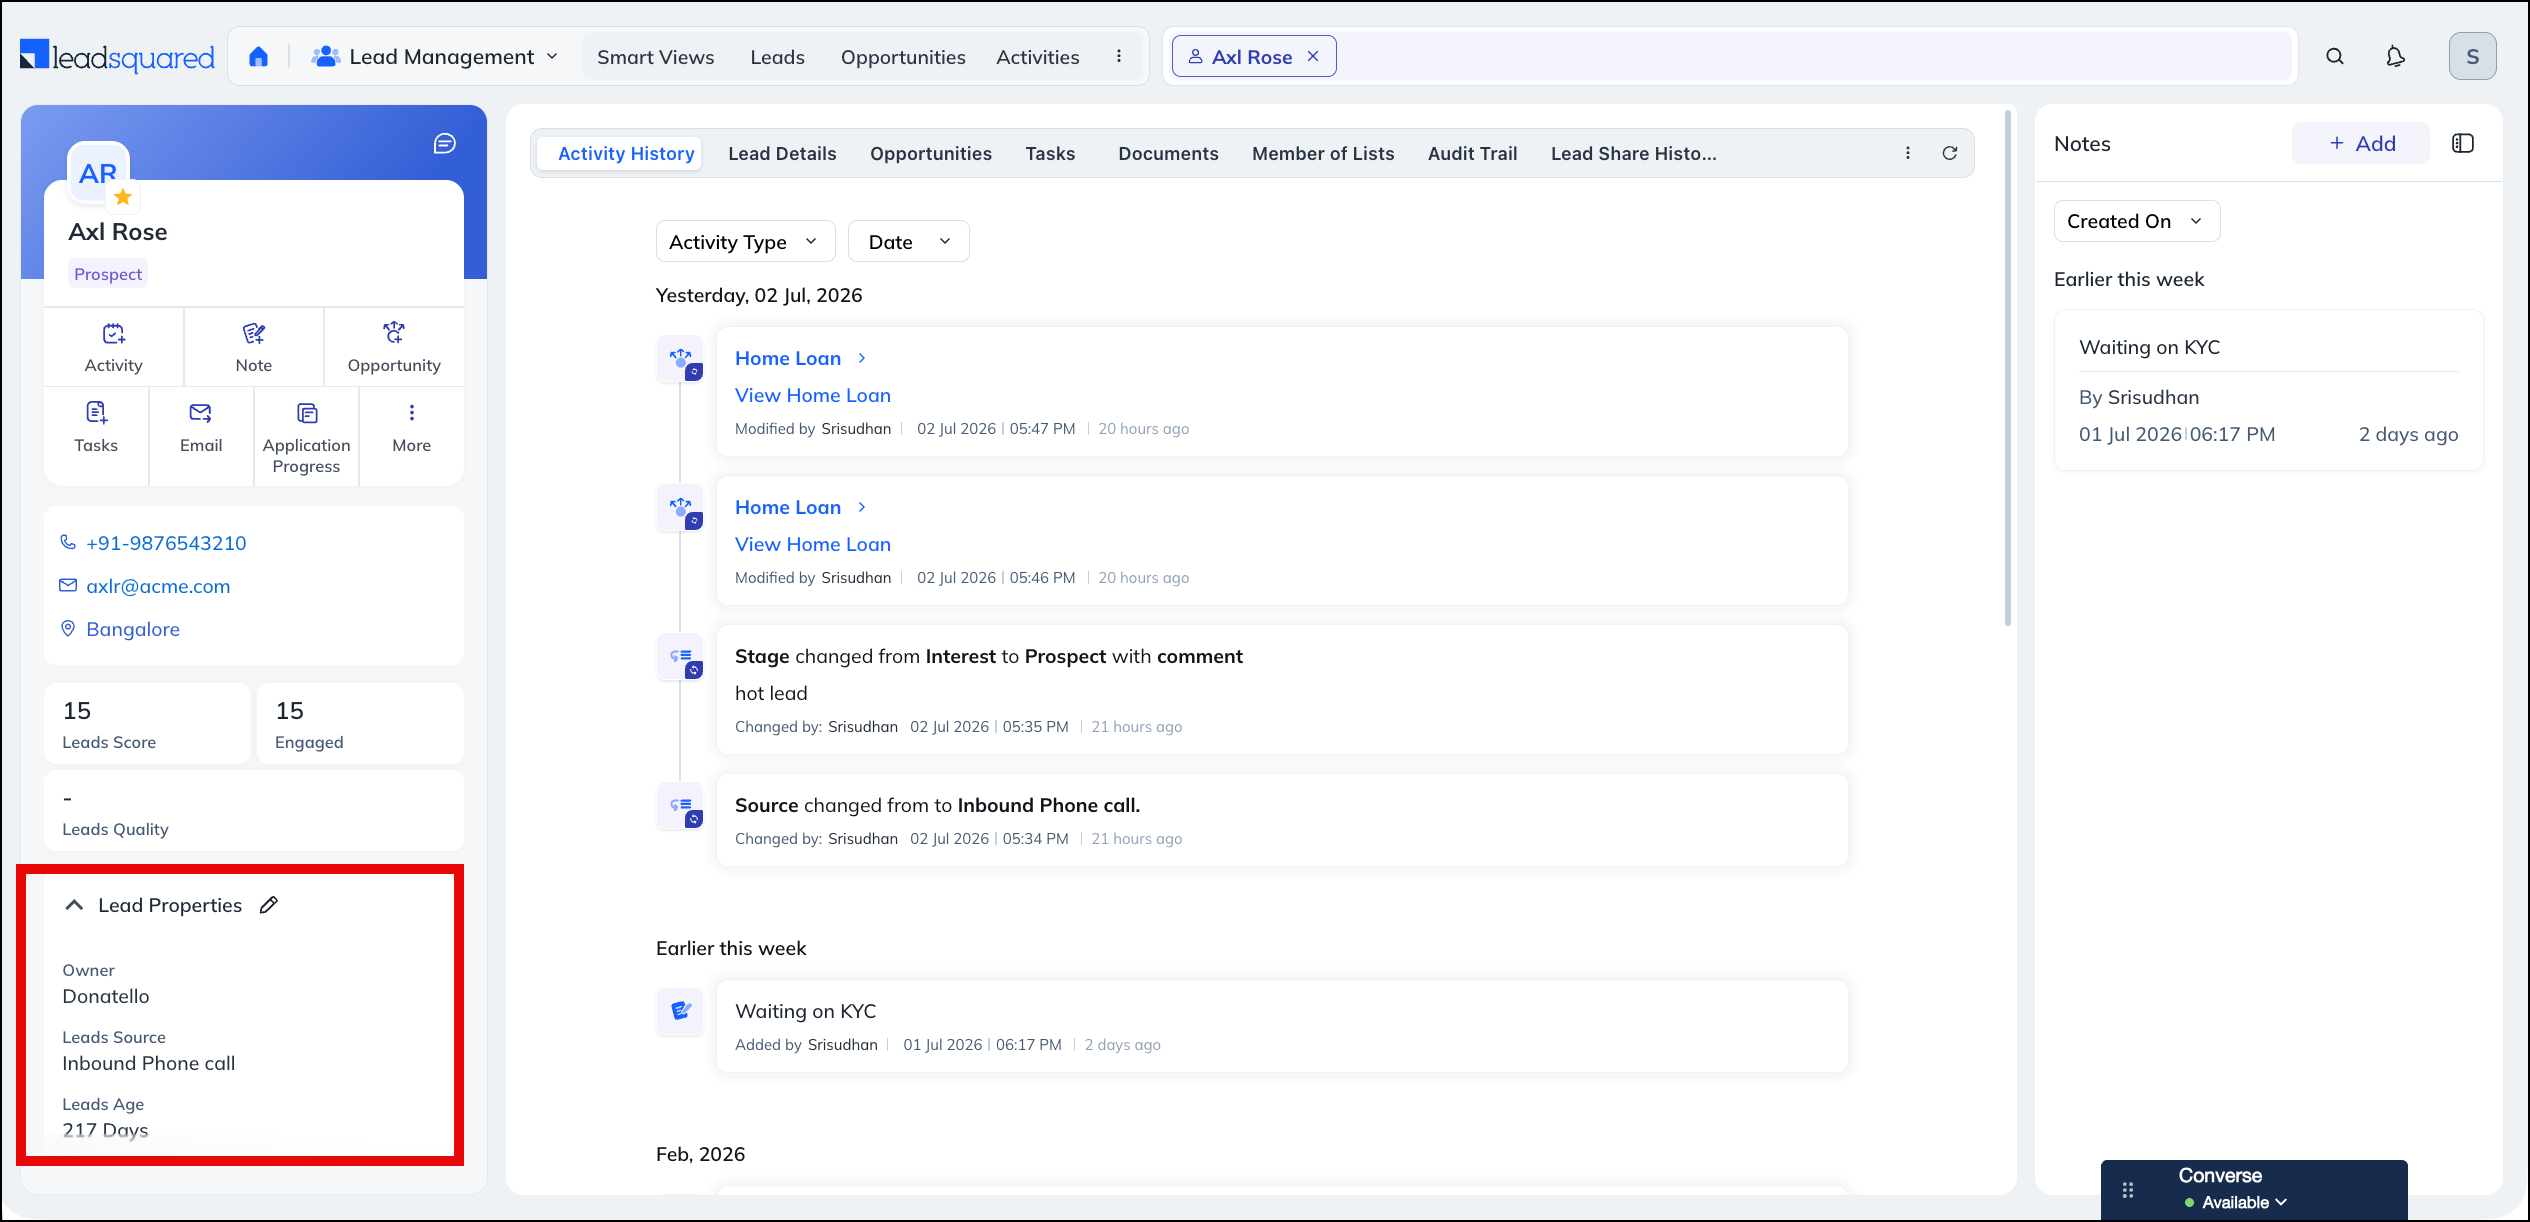
The Lead Properties section appears below the insight tiles. Here you can view the –
- Owner
- Lead Source
- Leads Age
To edit lead properties, click the  icon in the section header. Once you’ve updated the details, save your changes.
6. Lead Details Tabs
The tabs in the center of the page organize the lead’s full record. Use the  icon to reload tab data, and the
  icon to reach tabs that don’t fit in the bar. The tabs you see, and their order, depend on your account’s configuration.
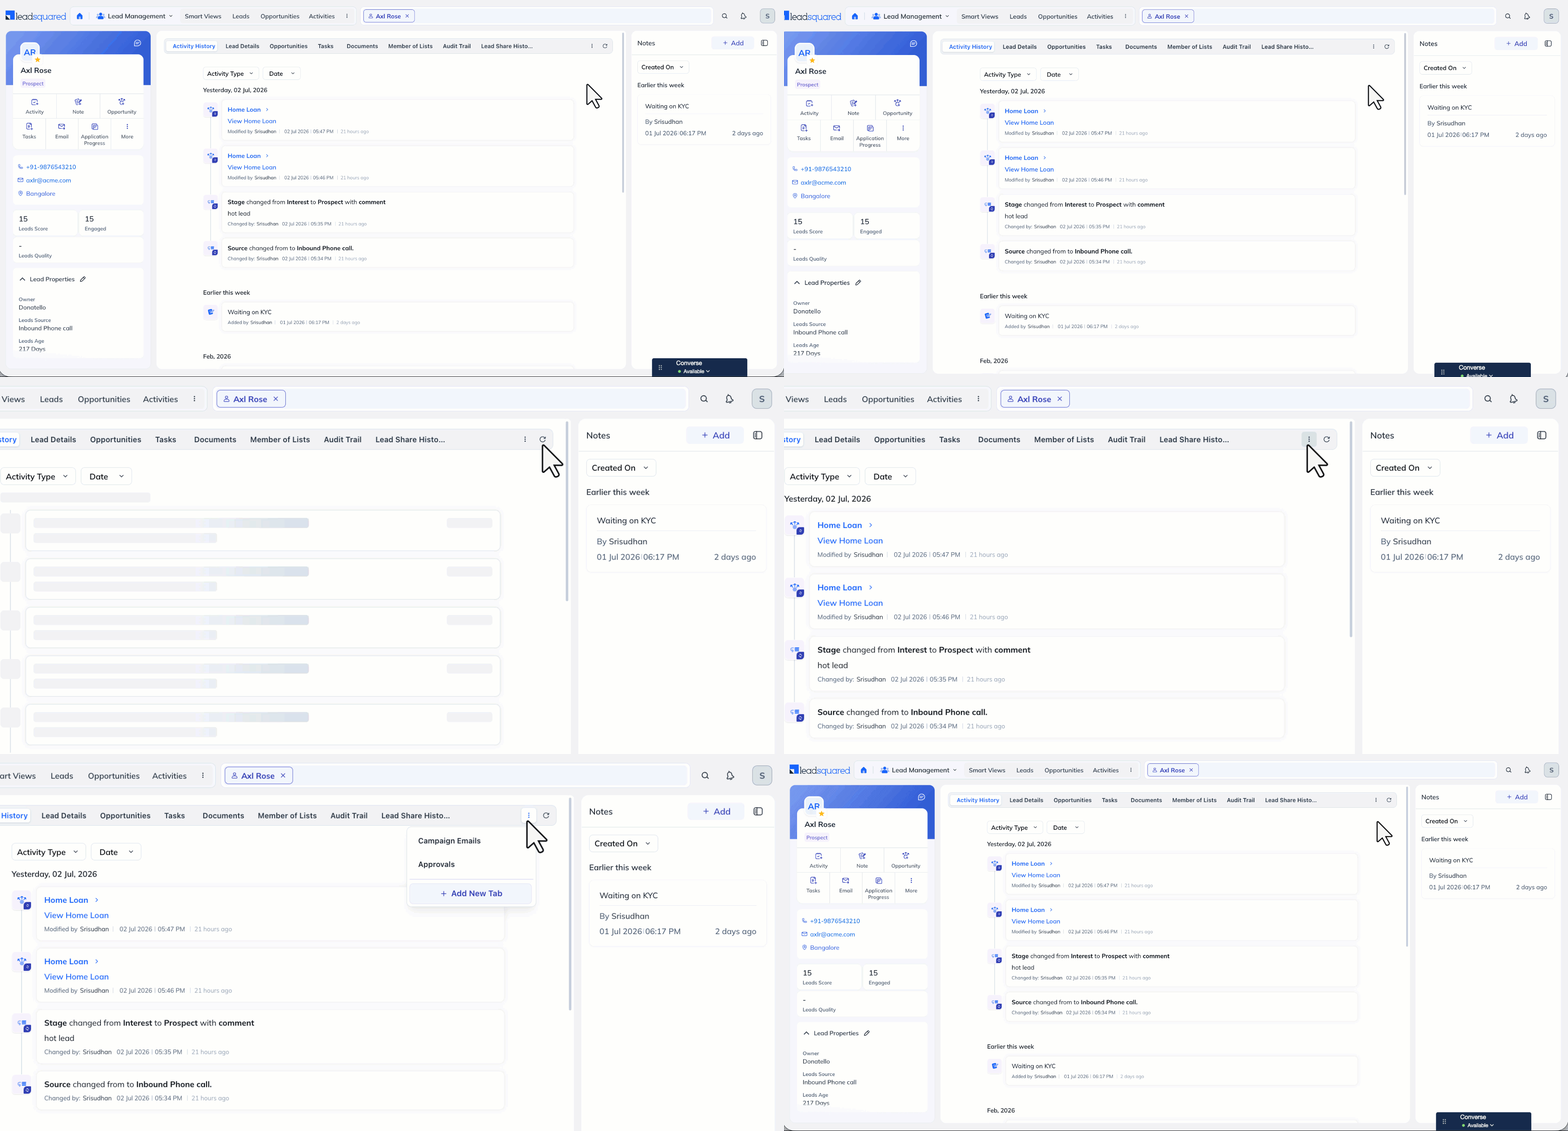
7. Activity History Tab
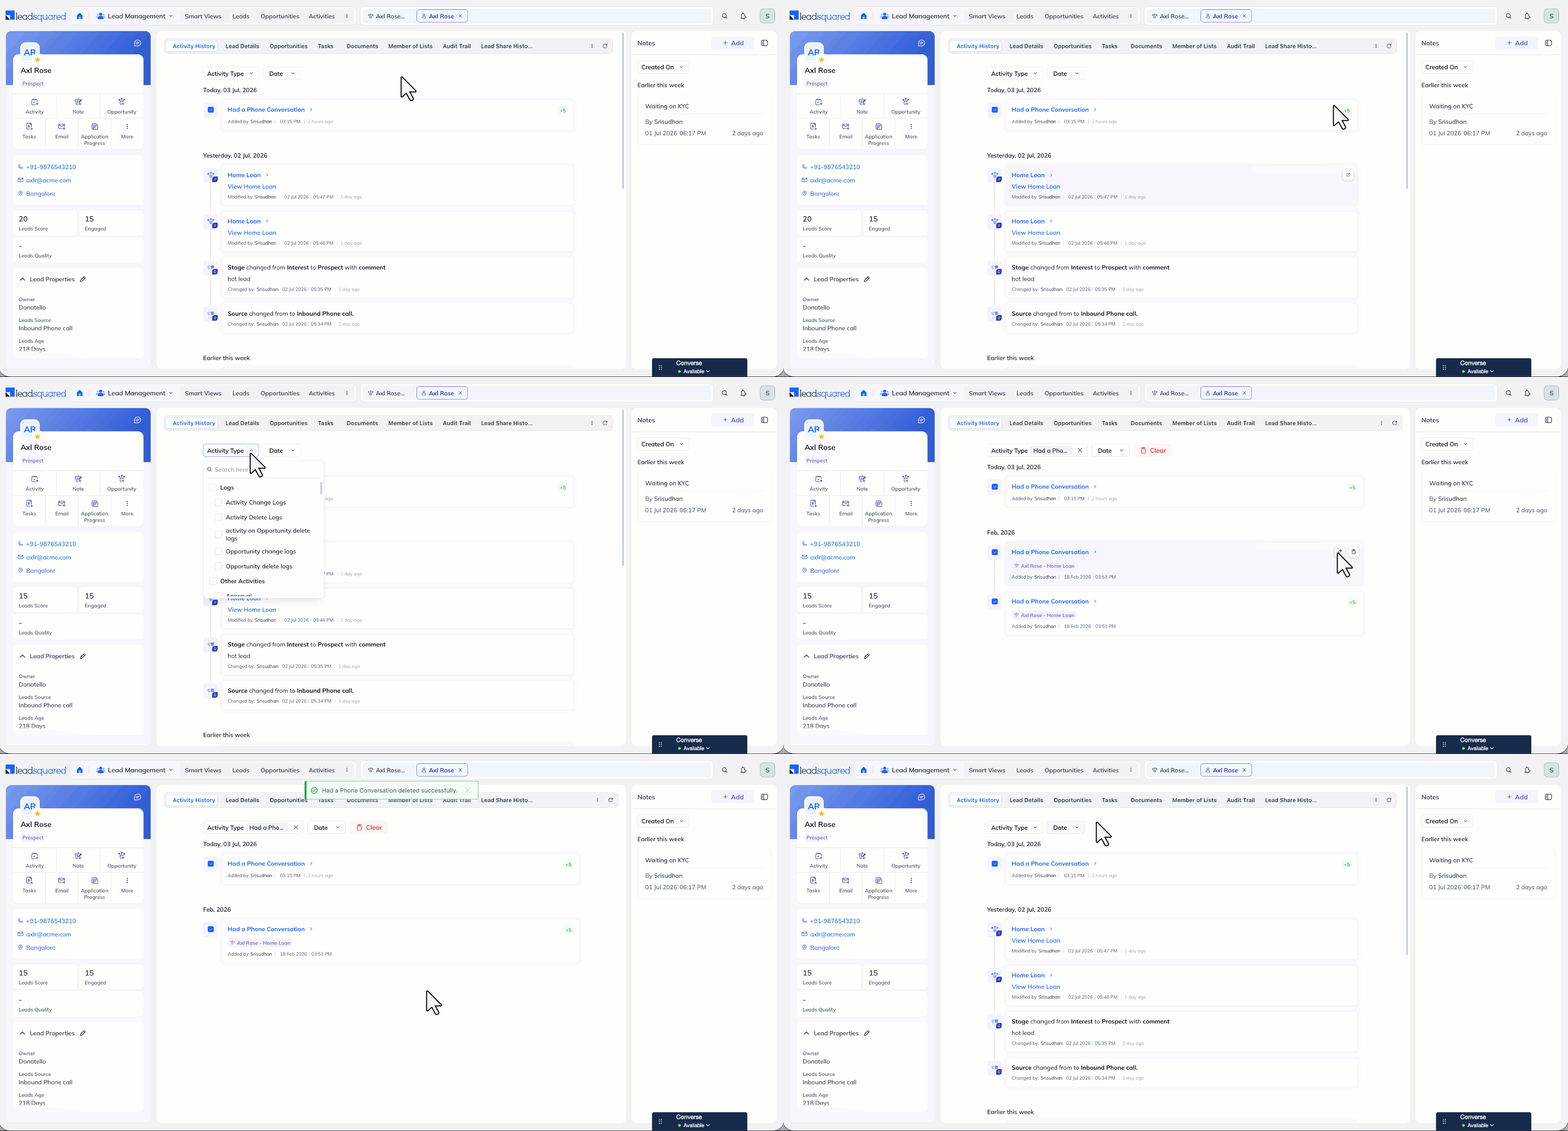
The Activity History tab is the lead’s complete timeline. It consolidates activities on the lead and on its opportunities in one place, grouped by date, with the most recent first. Each entry shows who added it and when, and, where applicable, the Lead Score the action added or subtracted.
The timeline captures more than logged activities –
- Stage changes appear along with any comment added while changing the stage (for example, “Stage changed from Interest to Prospect”).
- Changes to lead fields (such as Source) appear with the old and new values.
- Owner changes made through automations appear along with the automation name and action name.
To narrow the timeline –
- Use the Activity Type dropdown to display only specific activity types. For example, view all your email activities (Emails Opened, Emails Clicked, Emails Bounced, and so on) in one place.
- Use the Date dropdown to restrict the view to a time range.
You can act on individual entries –
- Edit – Hover over the activity entry and click the icon.
- Delete – Hover over the activity entry and click the
 icon.
icon. - Open – For opportunity activities, hover over the entry and either click the View option or click the
 icon to go to the Opportunity Details page
- Activities on leads (
 ) and on opportunities (
 ) are shown with different indicators.
- Activities on leads (
In addition to default activities, you can create custom activities for your unique requirements. To know more, refer to How to Add a Custom Activity.
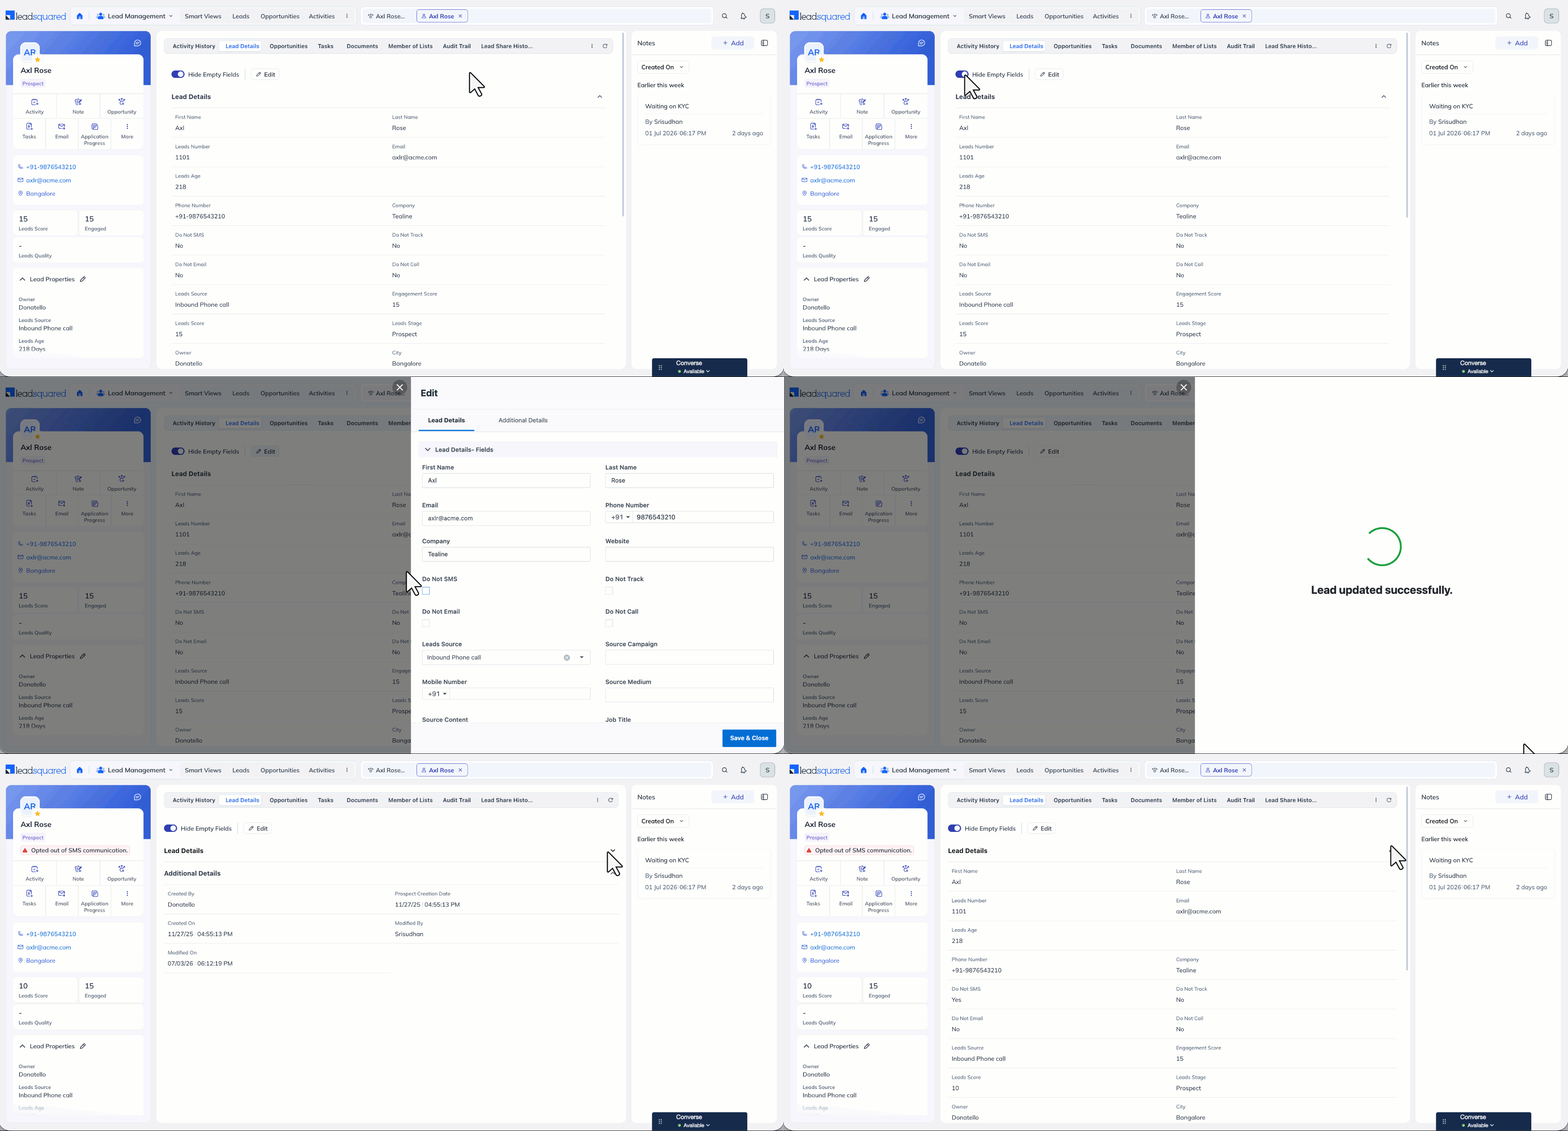
8. Lead Details Tab
Under the Lead Details tab, you can view and edit all the lead’s fields, such as first name, last name, phone number, email address, and company, organized into collapsible sections.
- To hide fields that have no values and get a cleaner view, enable Hide Empty Fields.
- To edit the lead’s fields, click Edit, make your changes, then save them.
Note:
This tab mirrors your Create Lead Form configuration. The fields, their order, and their visibility appear the same as in the form. To know more, refer to Configure Create Lead Form.
Under Additional Information, at the bottom of the tab, you can view –
- Who created the lead
- The prospect creation date and lead creation date
- Who last modified the lead details
- The date the lead details were last modified
To know more about the two creation dates, refer to What’s the difference between Prospect Creation Date and Lead Created On Date?
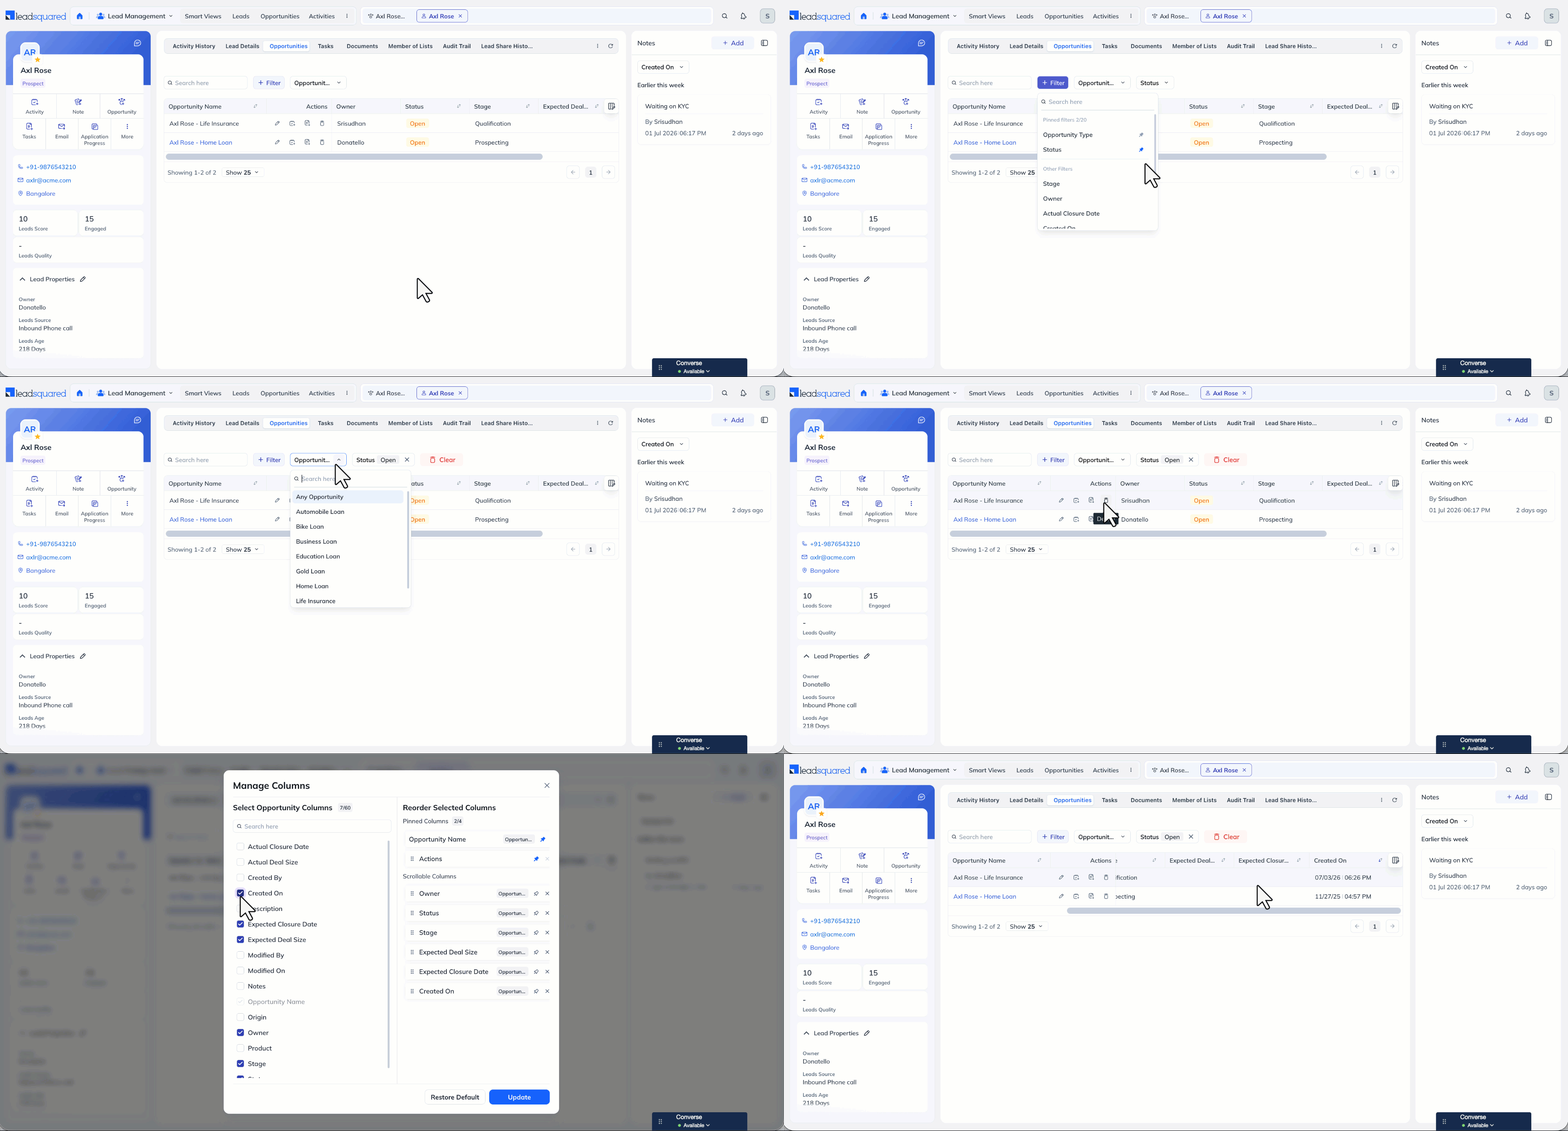
9. Opportunities Tab
The Opportunities tab lists the potential deals associated with the lead. If a lead has multiple opportunities (inquiries, applications, and so on), you can view them all here in a grid, along with details such as the Opportunity Type, Owner, Status, and Stage. To open an opportunity, click its name, this takes you to the Opportunity Details page. To add or remove columns from the grid, click the  icon on the right.
To find a specific opportunity –
- Use the search bar to search for an opportunity by name.
- Use the Opportunity Type dropdown to display only opportunities of a specific type.
- Click Filter to filter the grid by other fields, such as Status, Stage, Owner, Actual Closure Date, and Created On. To keep a filter handy, click the pin icon alongside it, you can pin up to 20 filters.
You can also act on an opportunity directly from the grid. Under the Actions column, use the icons alongside the opportunity to edit it, add activities or tasks to it, or delete it.
To add an opportunity from this page, see section 8.3. To know more about the feature, refer to Opportunity Management – Feature Guide.
10. Tasks Tab
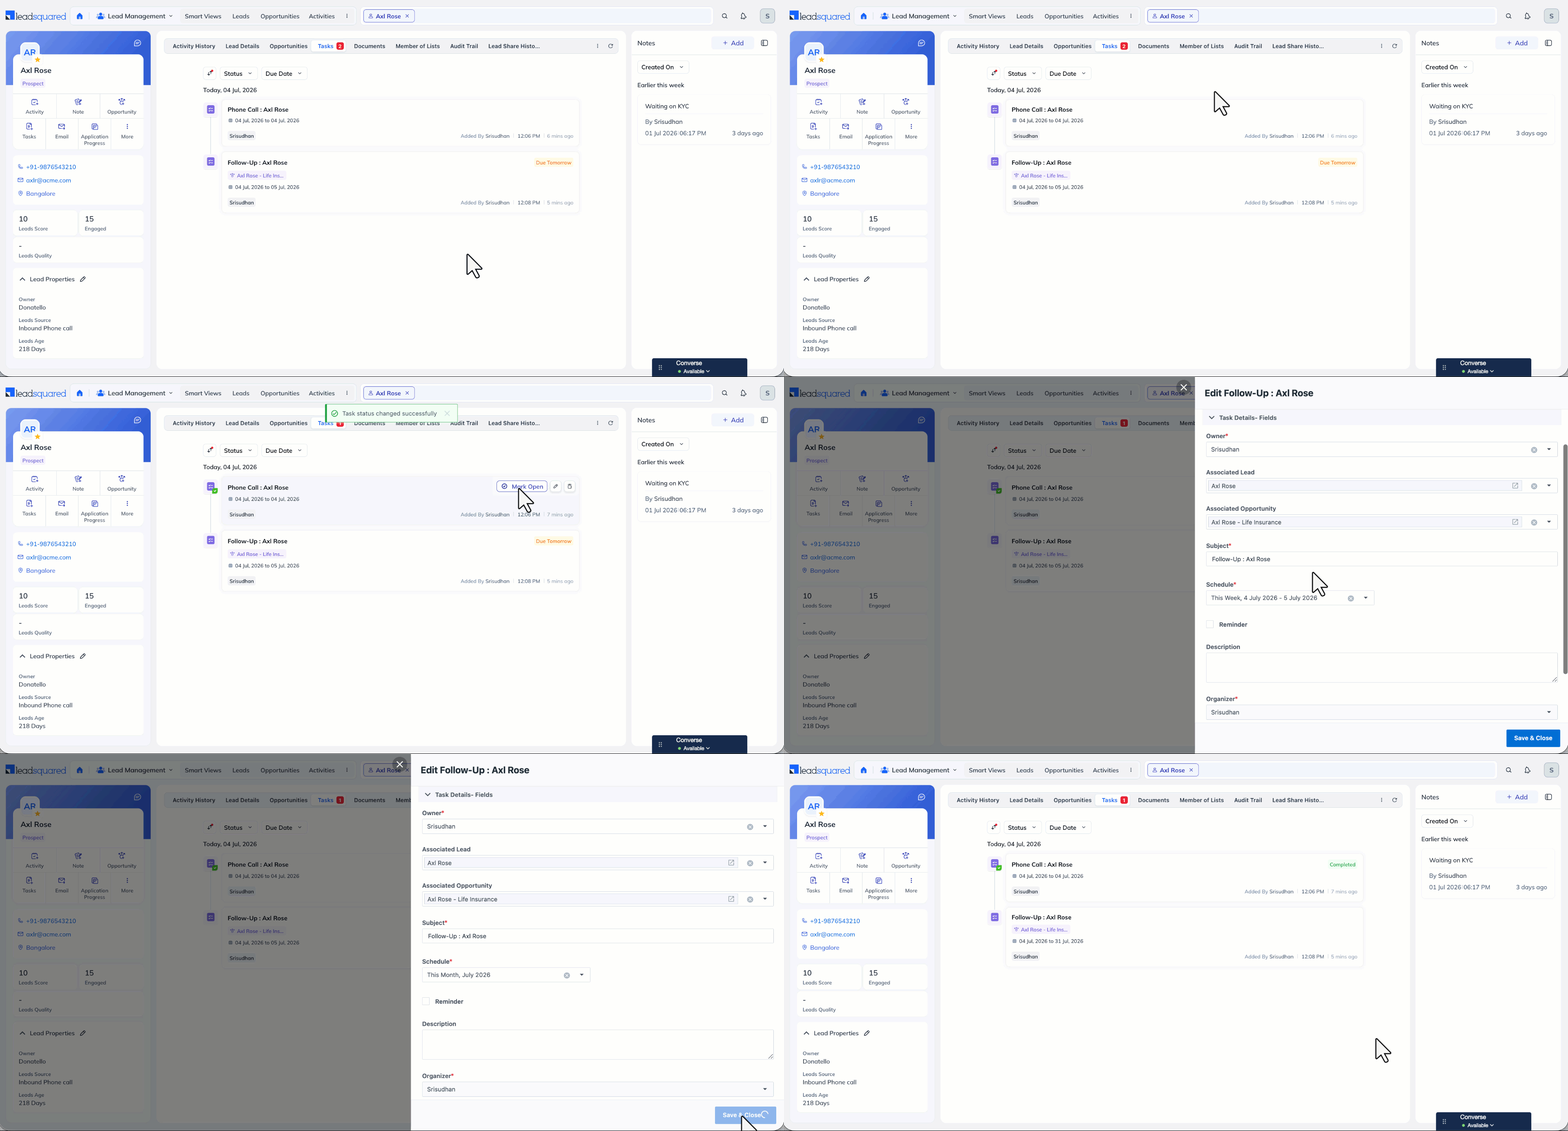
The Tasks tab shows the tasks on the lead and on its opportunities, grouped by date. Each task shows its schedule, owner, who added it and when, and a due indicator (for example, Due Tomorrow). Tasks added to opportunities also show a link to the opportunity. A count badge on the tab shows the number of open tasks, so pending work is visible even before you open the tab.
To narrow the list, use the sort icon and filter by –
- Status – The current status of the task (Completed, Overdue, Pending, and All Tasks).
- Due Date – The date the task is due (yesterday, last 7 days, custom date, and so on).
To act on a task, hover over it, then –
- To complete it, click Mark as Complete.
- To edit it, click the edit icon, then save your changes.
- To delete it, click the delete icon, then confirm.
11. Documents Tab
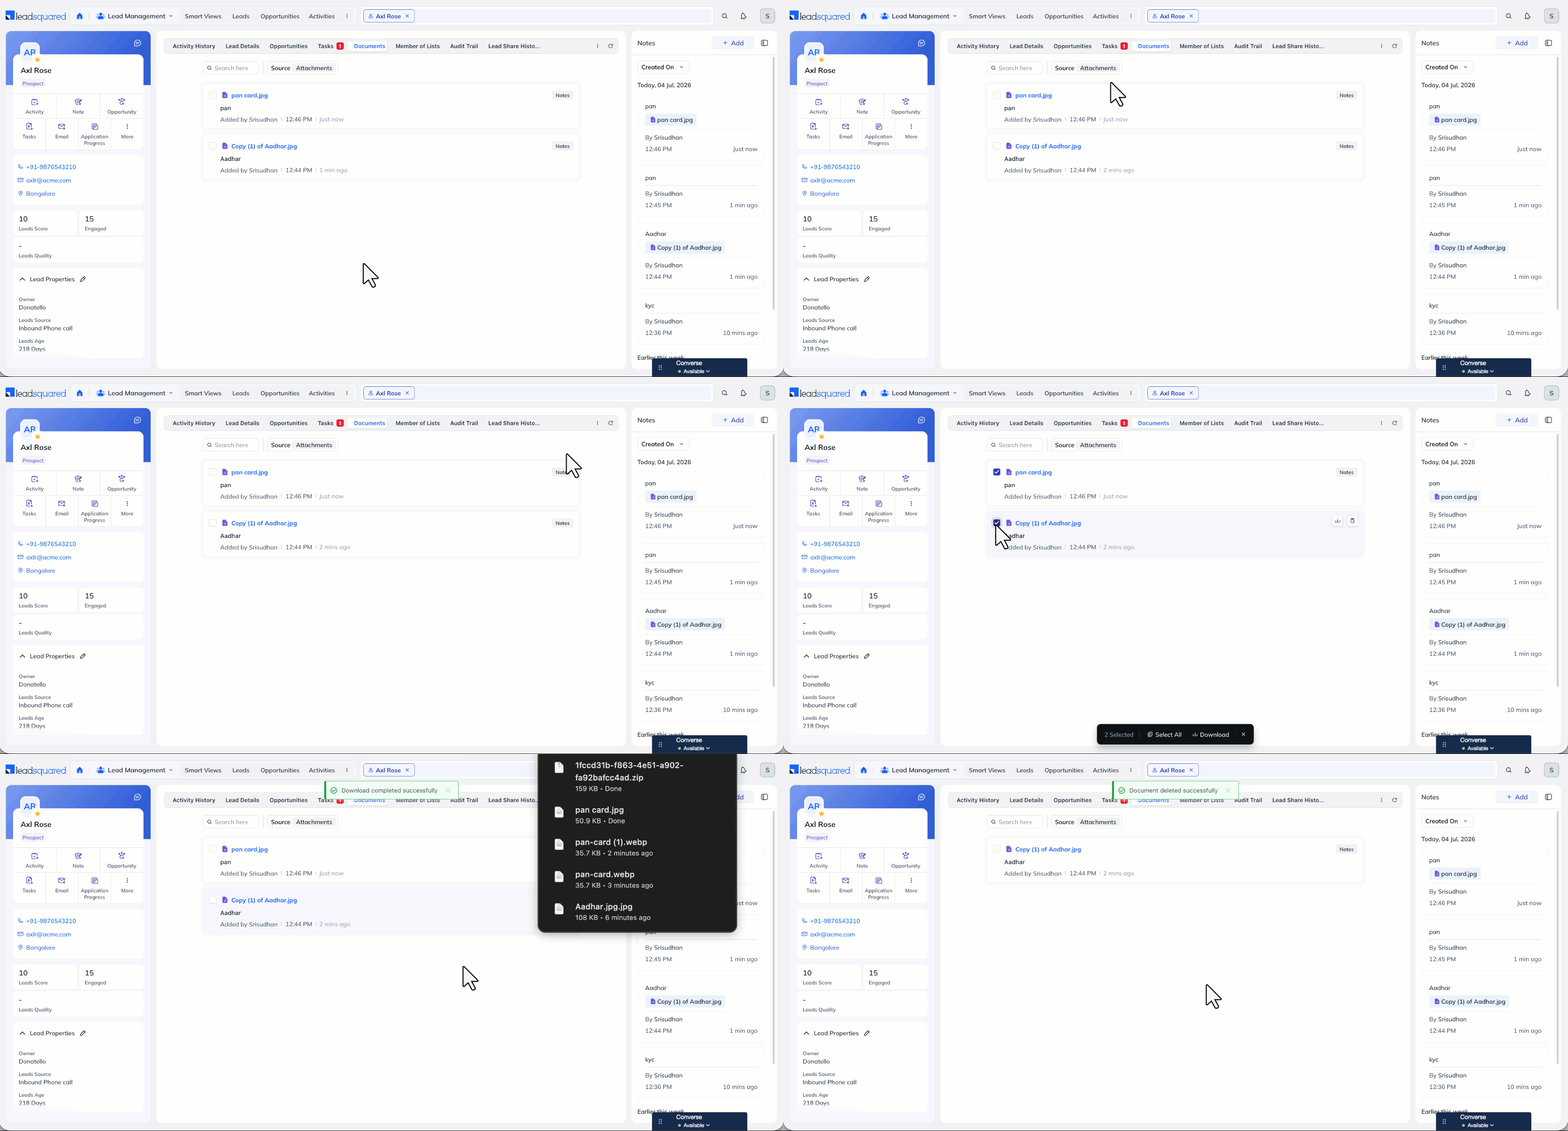
The Documents tab lists all the files attached to the lead in one place. Use the search bar to find a document, and the Source filter to switch between –
- Attachments – Files attached to the lead through Activities and Notes.
- Custom Field Set Files – Files uploaded through the lead’s custom field sets (for example, KYC documents). Each entry shows the field the file was uploaded to, who added it, and whether it belongs to the lead or to an opportunity.
You can also –
- Download – Hover over an individual document or select the checkboxes for multiple documents you want, then click Download.
- Delete – Click the delete icon next to the document you want to remove. You can only delete documents added through the Attachments source from the documents tab. To remove documents from Custom Field Sets, edit the lead details tab.
You can open documents in a new browser tab, which makes it quicker to verify documents against the lead’s details when you review large volumes. To view a lead’s documents and images as a slideshow, refer to View a Lead’s Documents/Images in a Slideshow.
12. Member of Lists Tab
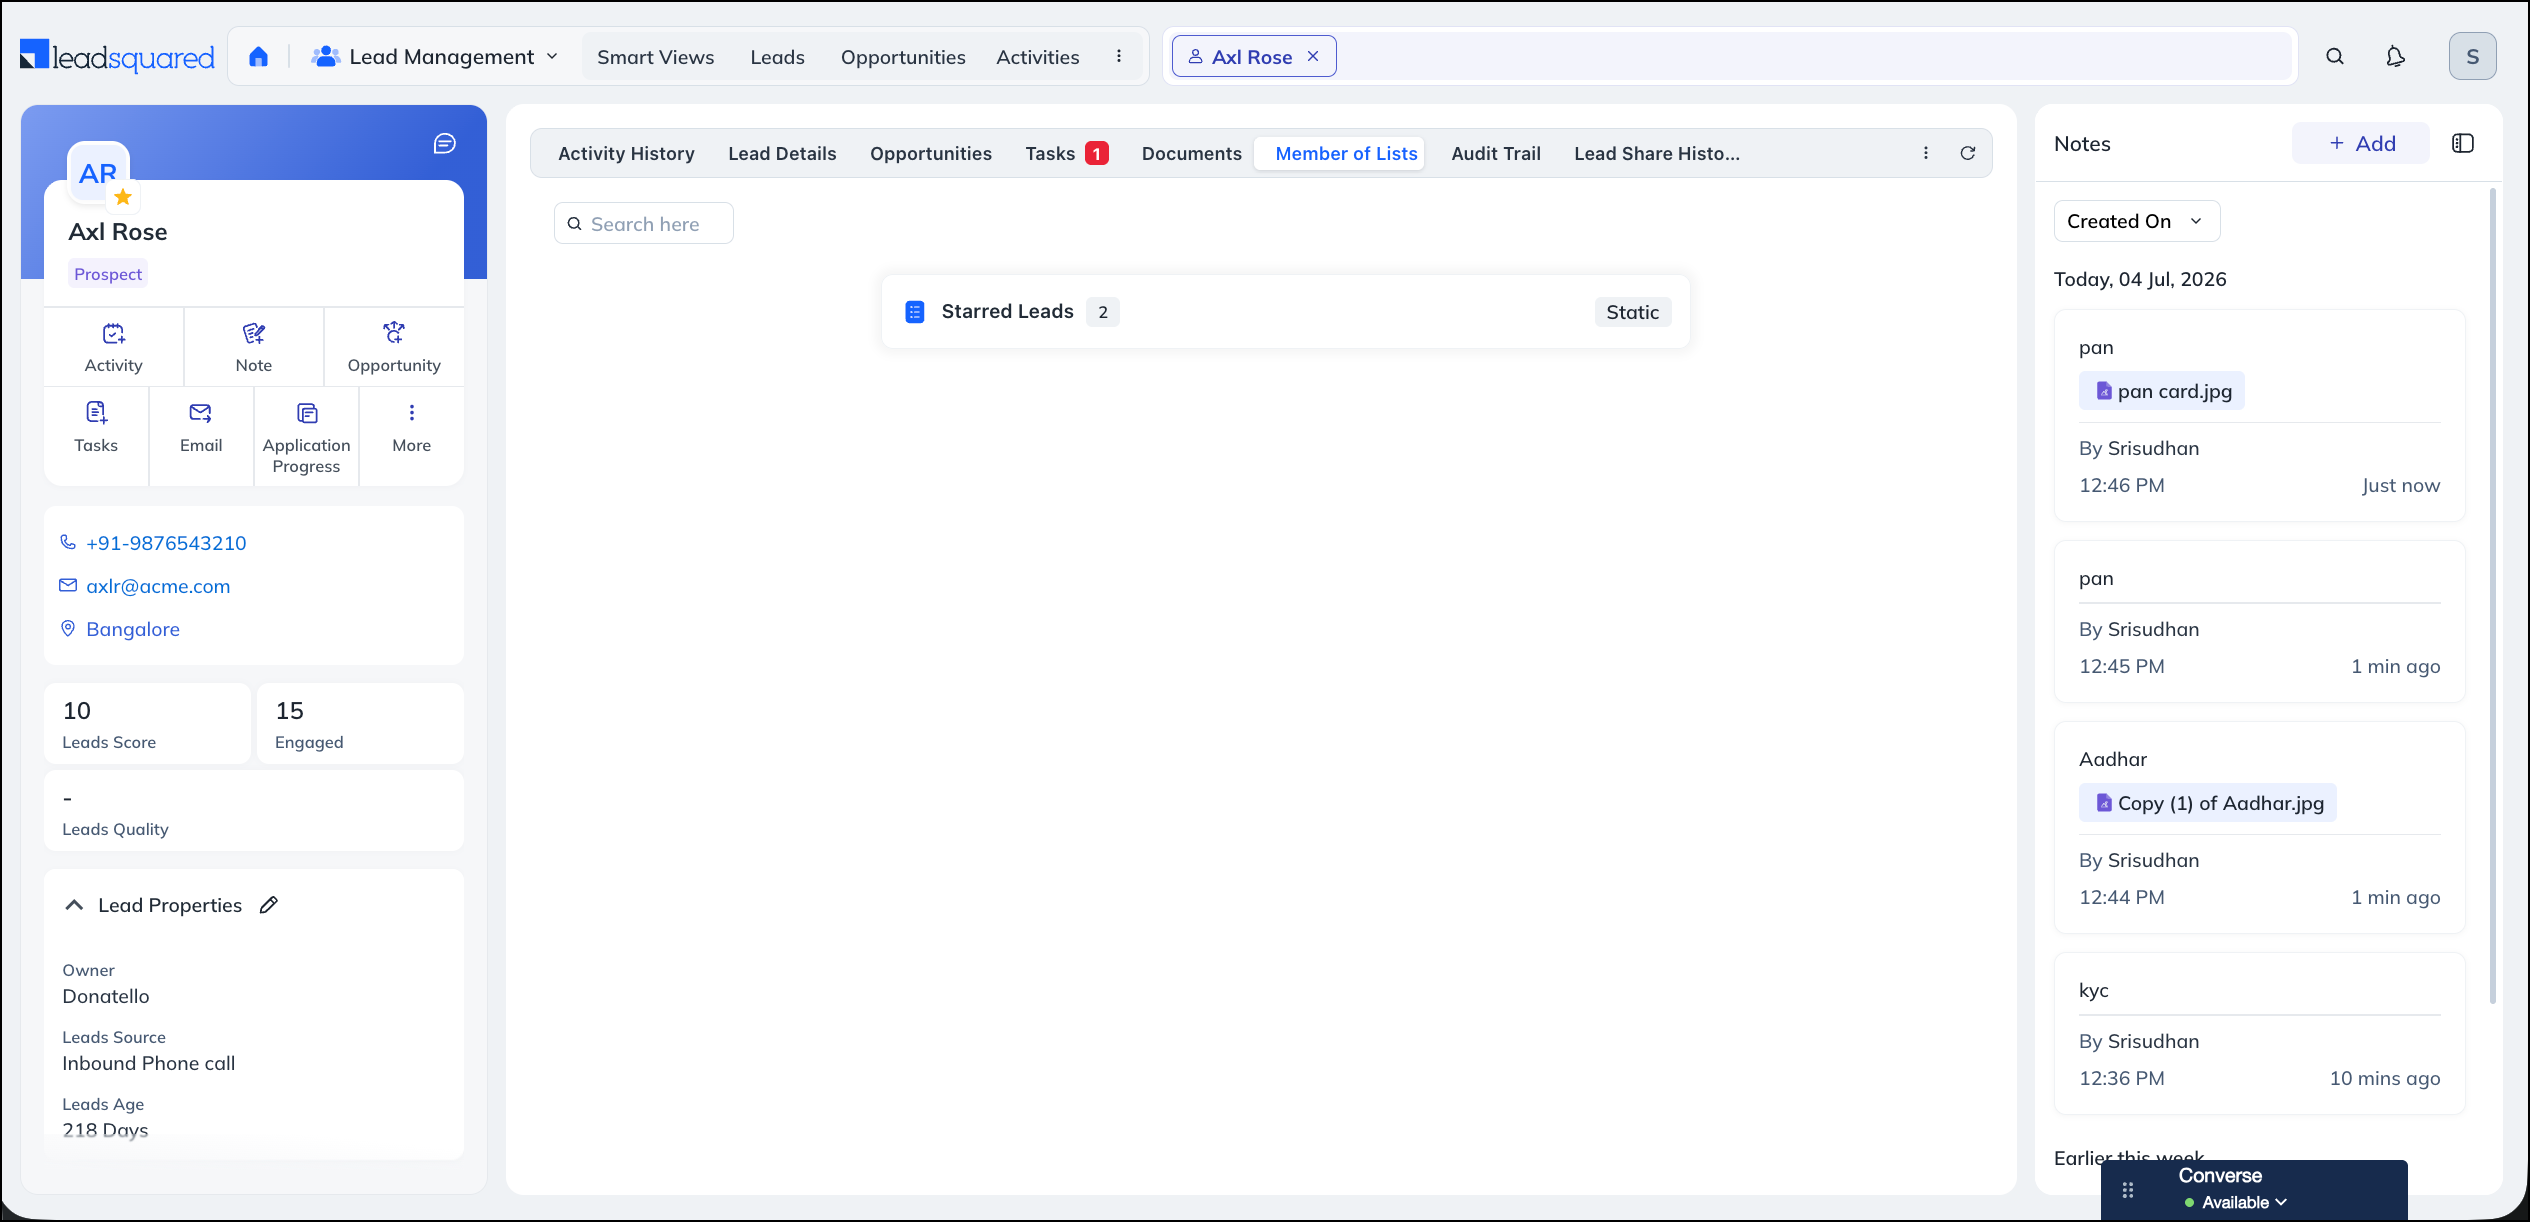
The Member of Lists tab shows all the lists the lead belongs to. Click any list to open the List Details window. To know more, refer to List Actions.
13. Audit Trail Tab
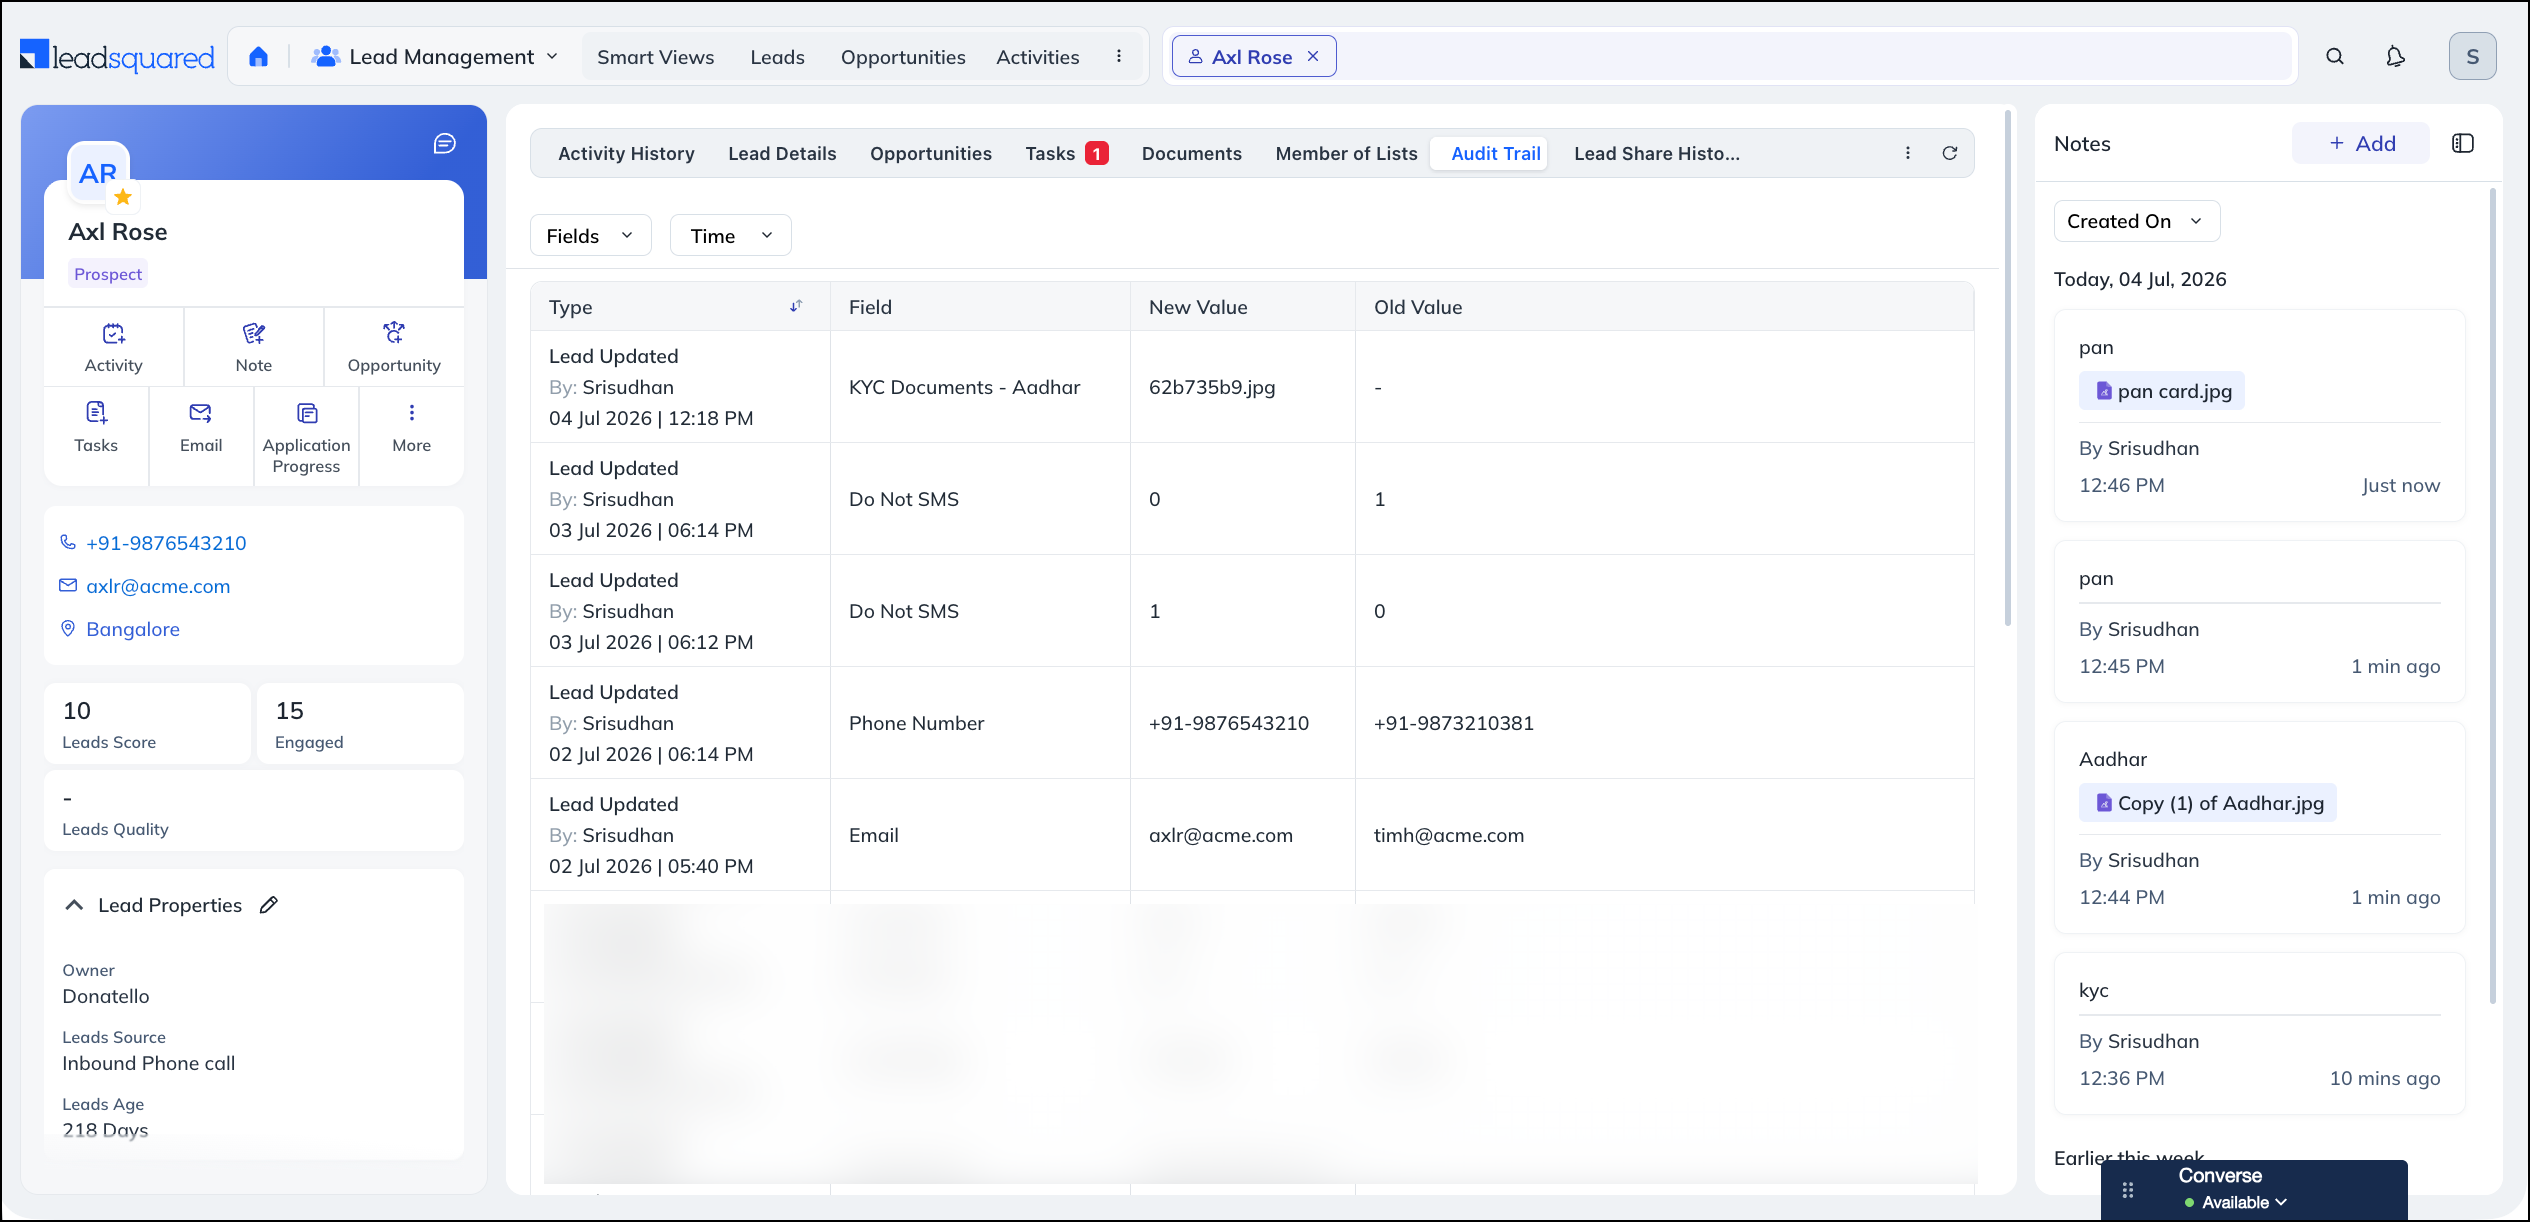
The Audit Trail tab tracks every change made to the lead, whether by a user or by the system (automations, rules, and so on). For each change, it shows the fields that changed, the time stamp, and who or what made the change. This gives you a reliable record for compliance and troubleshooting. To know more, refer to Lead Field Audit. To enable this feature, write to support@leadsquared.com.
14. Lead Share History Tab
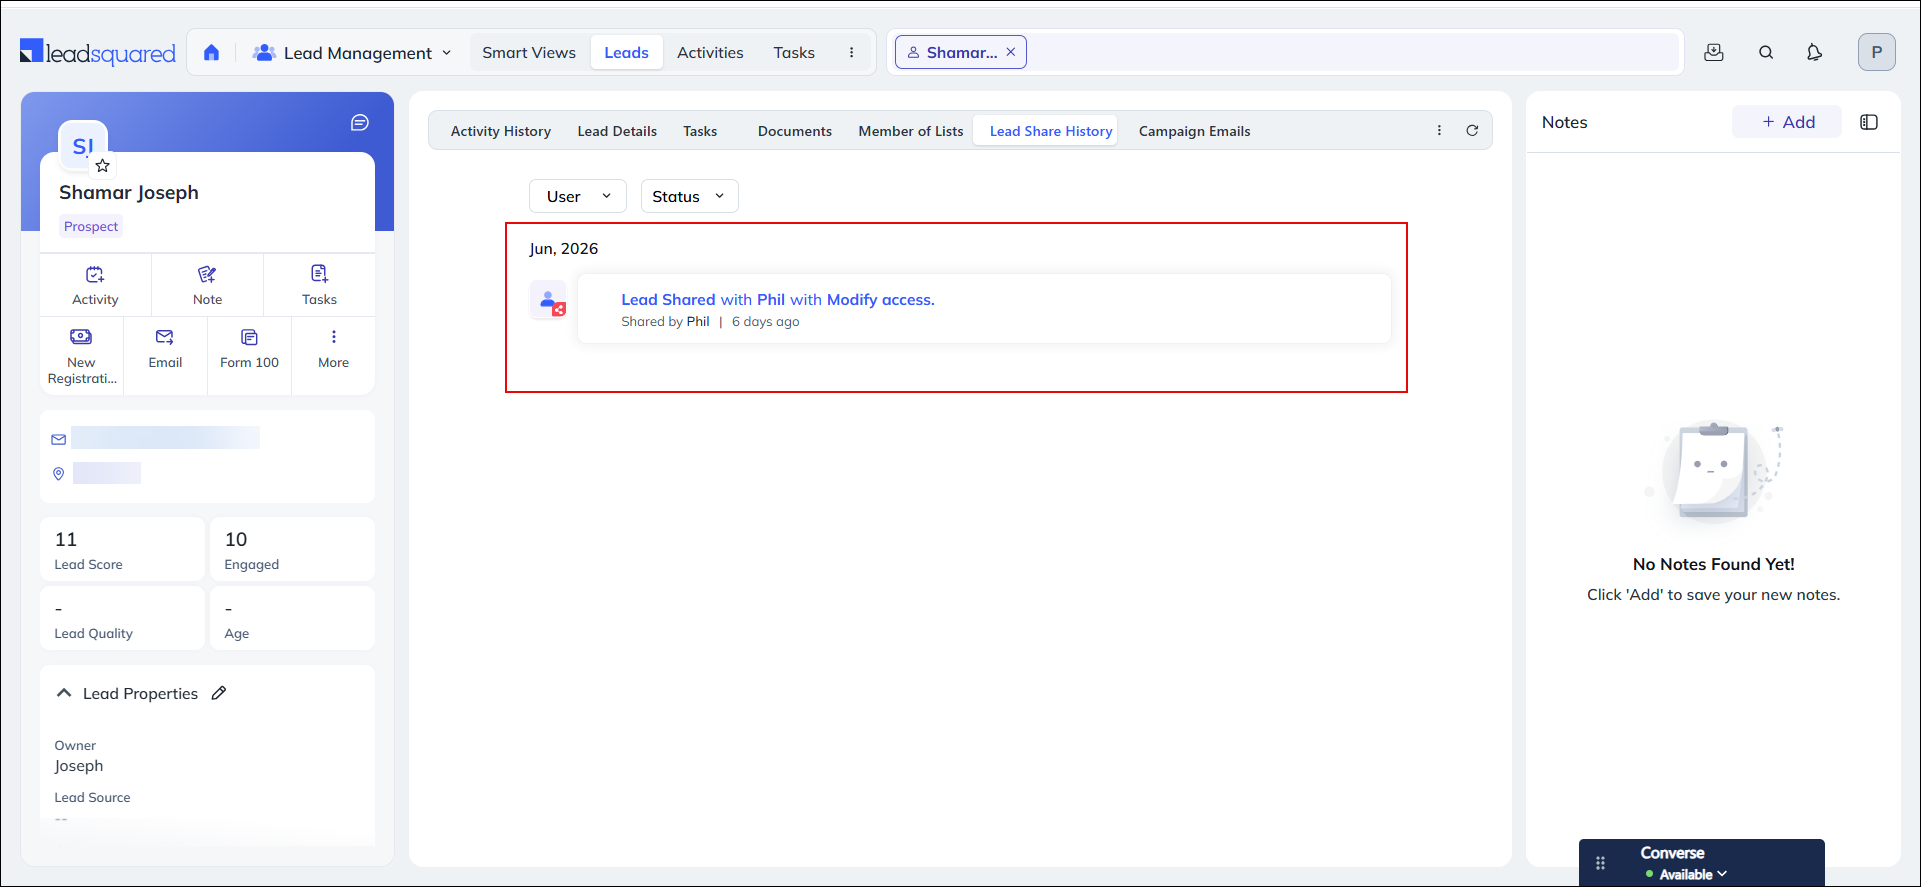
The Lead Share History tab shows a timeline of when the lead was shared. Each entry shows who the lead was shared with, the access granted (for example, Modify access), who shared it, and when. To narrow the view, use the User and Status filters. To enable this feature, write to support@leadsquared.com.
To share a lead for a fixed period, refer to How to Share Leads for a Limited Duration.
15. Campaign Emails Tab
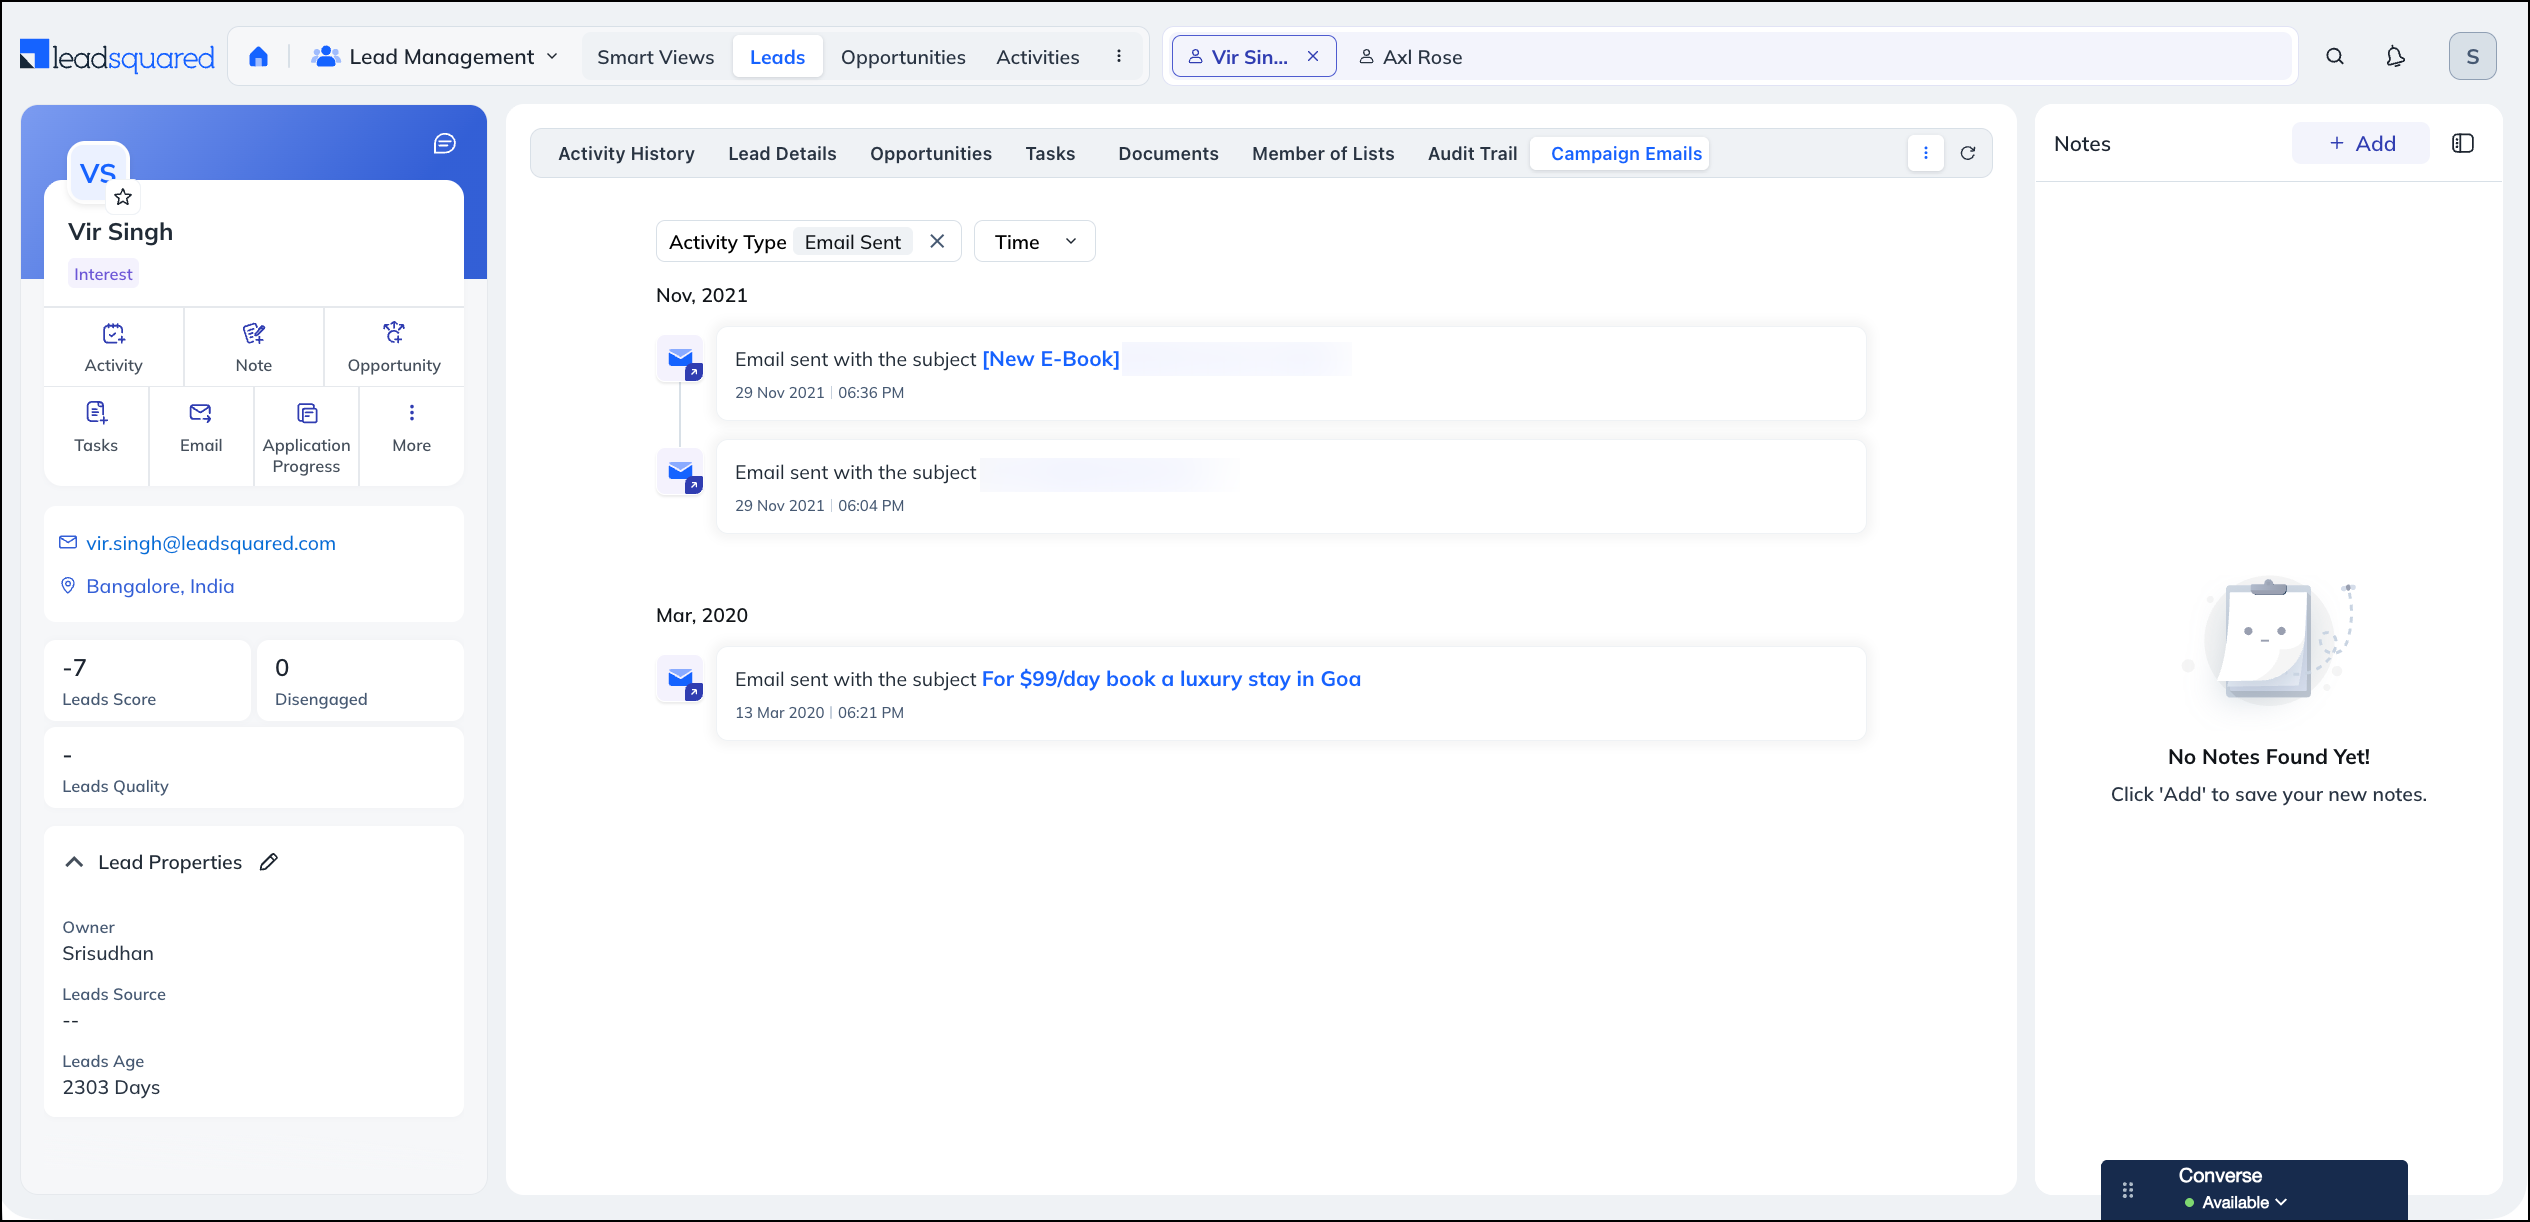
The Campaign Emails tab shows the email campaigns posted on the lead, so you can review the lead’s campaign touchpoints without filtering the full Activity History timeline. To narrow the view, use the Activity Type filter (set to Email Sent by default) and the Time filter.
The emails are grouped by month, and each entry shows the email’s subject and when it was sent, click the subject to view the email.
To know more about creating and sending campaigns, refer to Email Campaign – Feature Guide.
16. Add a New Activity Tab
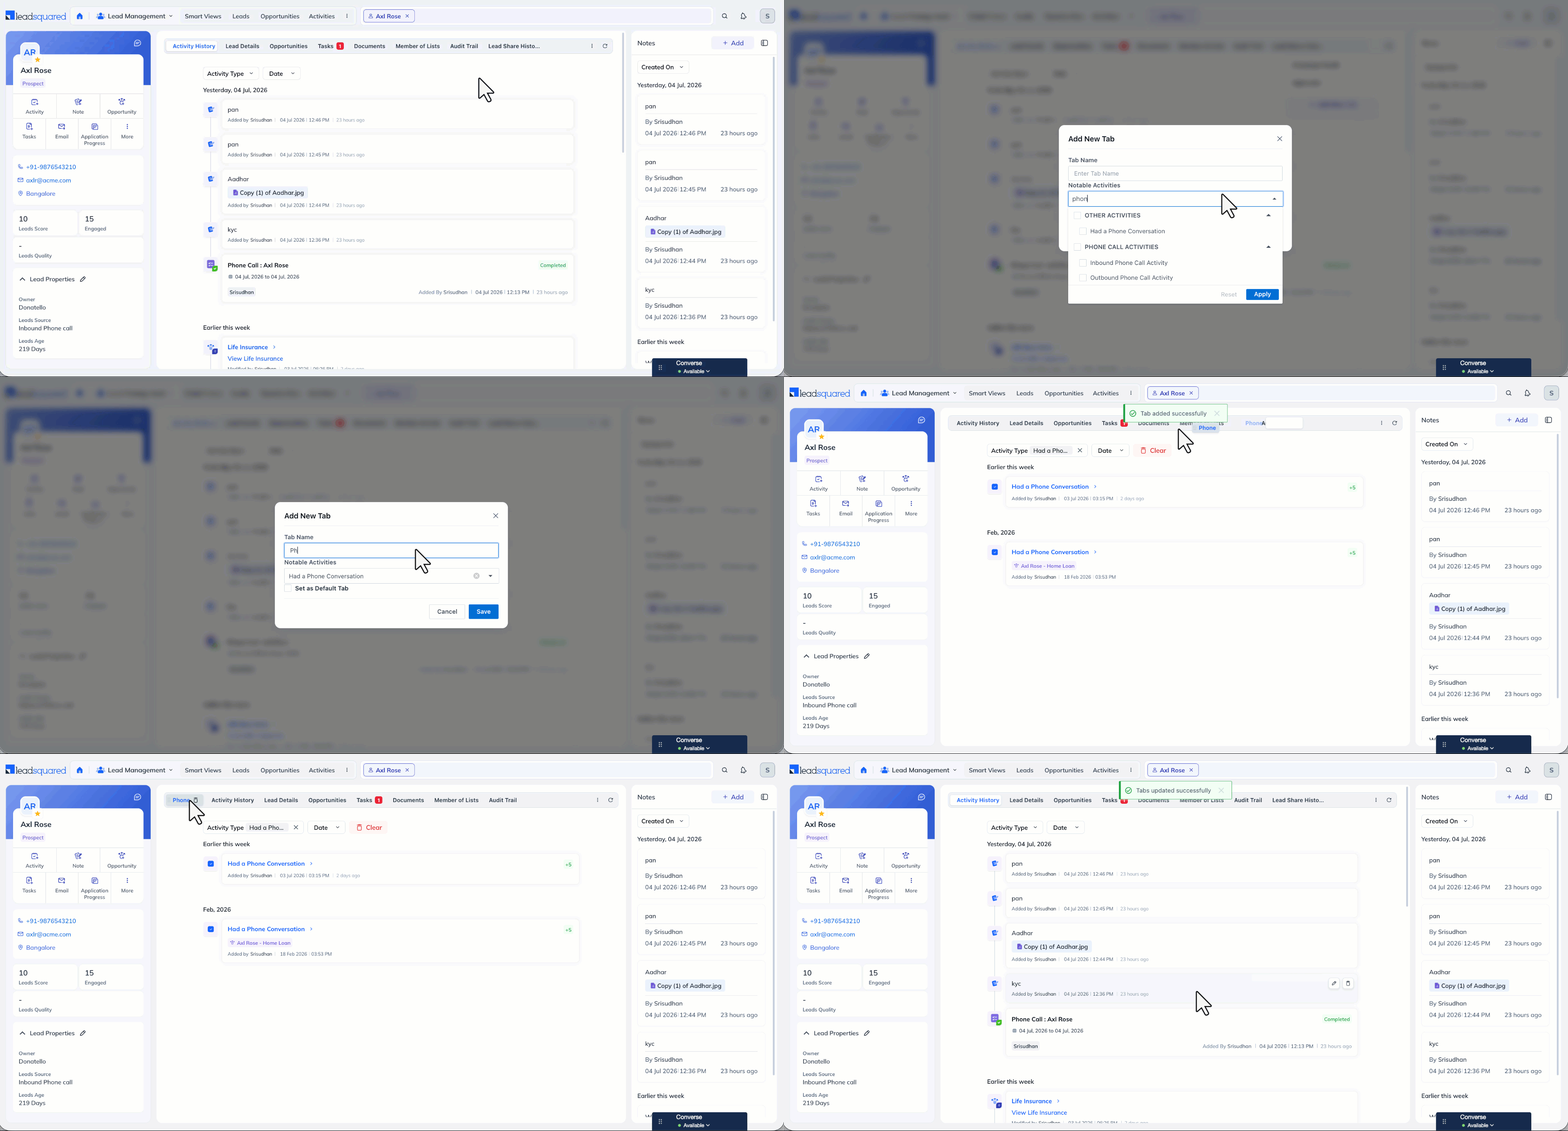
You can create your own tabs that display only the notable activities you choose. This gives you a focused view of the activity types you track most often, without filtering the full timeline each time. Tabs you create appear in the overflow (⋮) menu on the tab bar.
To add a new activity tab –
- On the tab bar, click the ⋮ icon, then click + Add New Tab. The Add New Tab pop-up opens.
- Under Tab Name, enter a name for the tab.
- From the Notable Activities dropdown, select the checkboxes for the activities you want the tab to display, then click Apply.
- To open this tab by default when you visit the Lead Details page, select Set as Default Tab.
- Click Save.
To delete an activity tab, click the icon next to the tab.
17. Custom Tabs
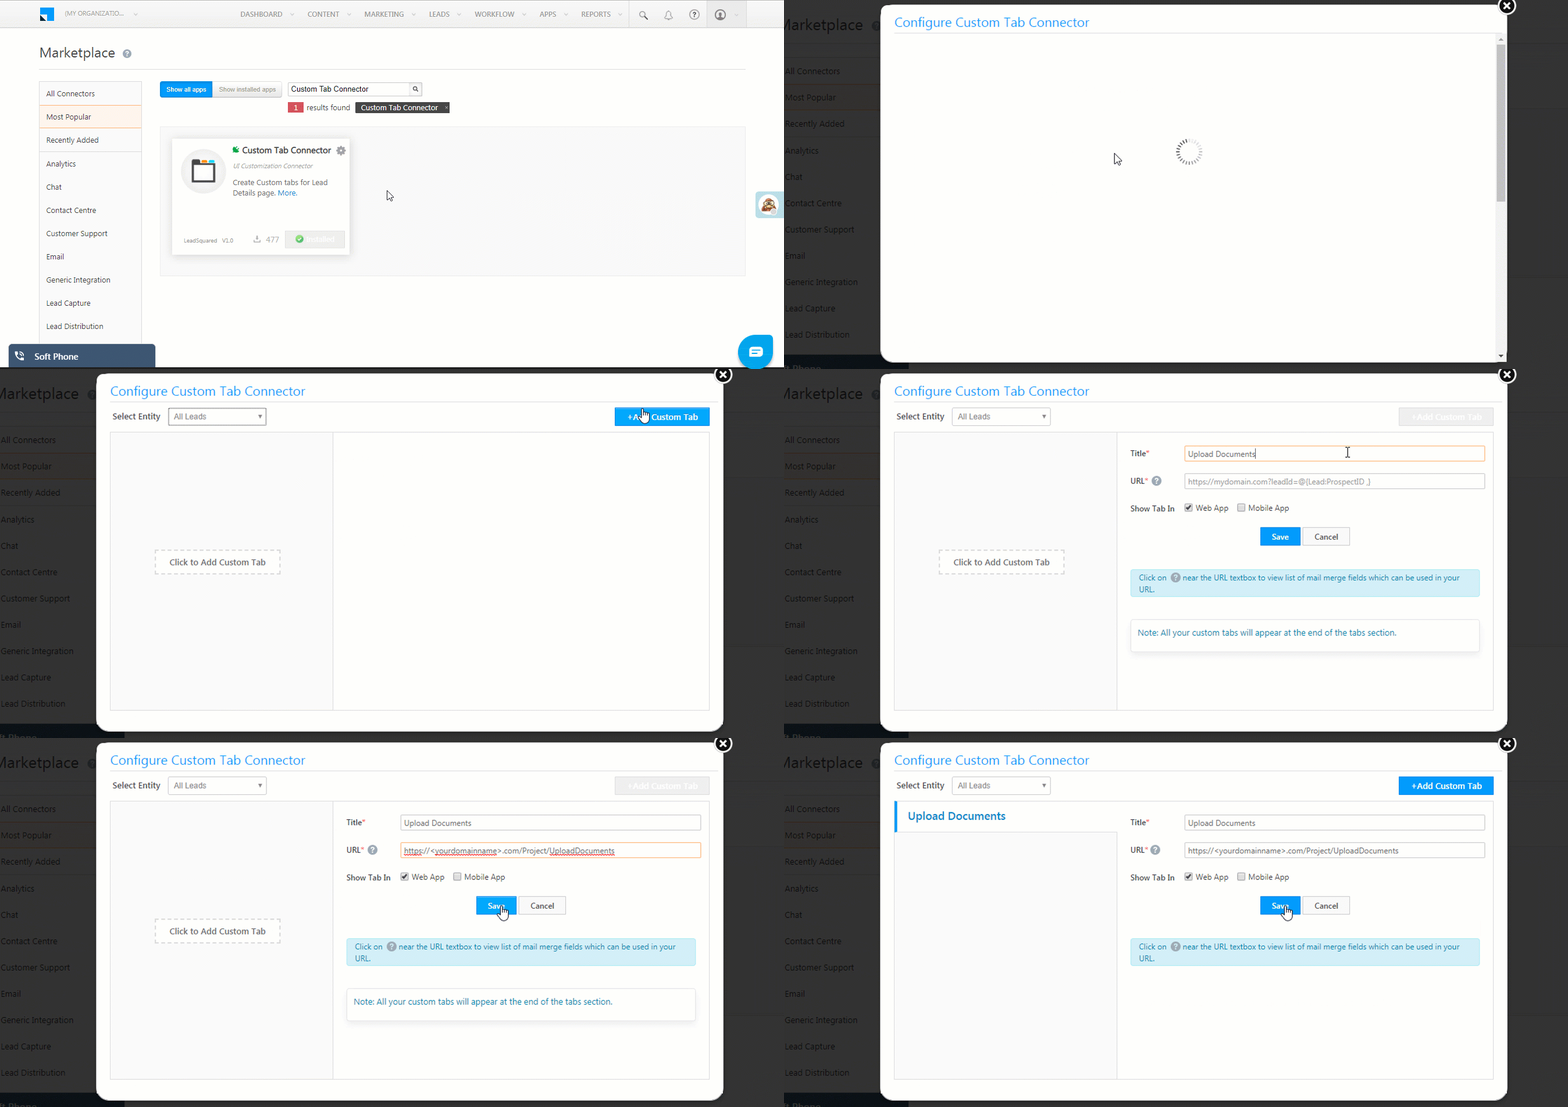
Along with the default tabs, you can add custom tabs to the page, for example, tabs that fetch and display data from external sources and third-party vendors (such as Zendesk and Freshdesk).
The example below shows an ‘Upload Documents’ tab where users can upload identification documents for leads. To know how to create custom tabs, please refer to Custom Tab Connector.
18. Notes Panel
The Notes panel, on the right side of the page, is a running log of context for the team – call summaries, reminders, next steps, and anything else worth remembering. Notes are grouped by time period, and each note shows who added it and when.
18.1 Add a Note
- Click + Add.
- On the pop-up, under Description, enter your note.
- To attach a document, click Add Attachment.
- The following file formats are supported: csv, xls, xlsx, doc, docx, ppt, pptx, txt, ics, mp3, wav, mp4, mov, avi, jpeg, jpg, png, gif, pdf, zip, gz, 7z.
- The maximum file size is 10 MB.
- Click Save.
18.2 Modify an Existing Note
- Edit – Hover over the note, select Edit Note from the options menu, then click Save.
- Delete – Hover over the note, select Delete Note from the options menu, then click Confirm.
To change the order, use the sort dropdown (for example, Created On). To collapse or expand the panel, click the  icon.
icon.
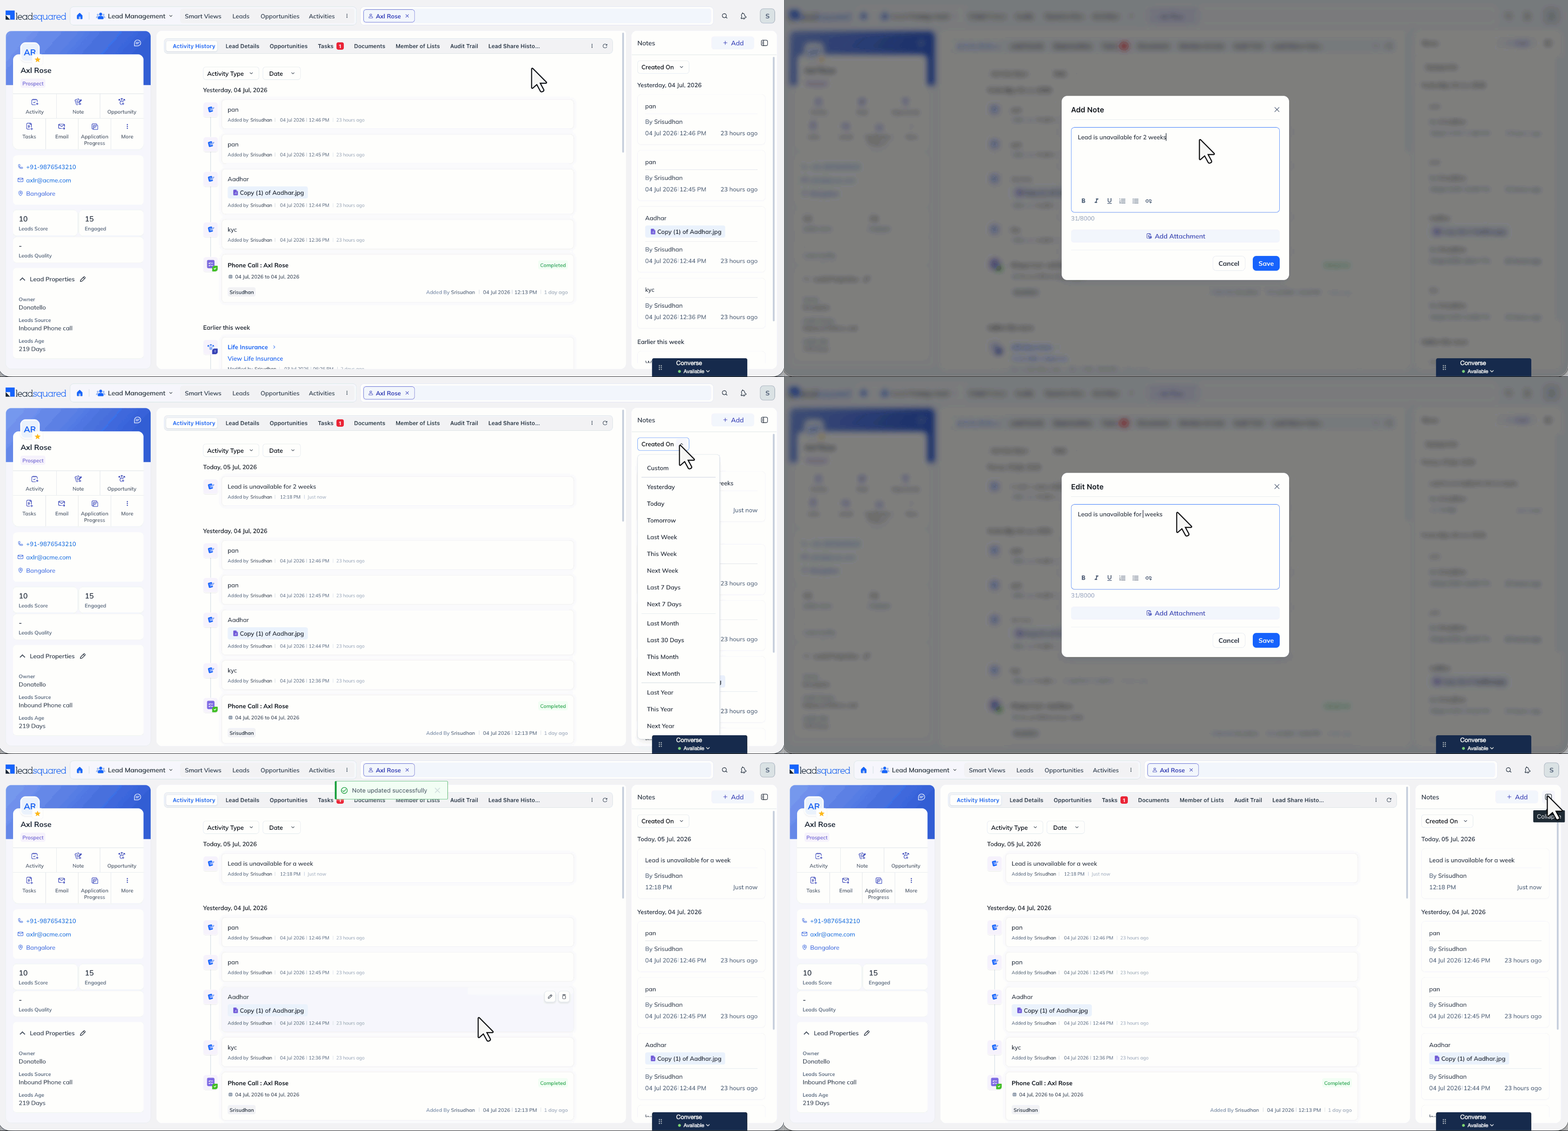
19. Actions
The most common actions are available as quick-action buttons on the vCard, and everything else is grouped under More. This section covers each action in the order it appears on the vCard.
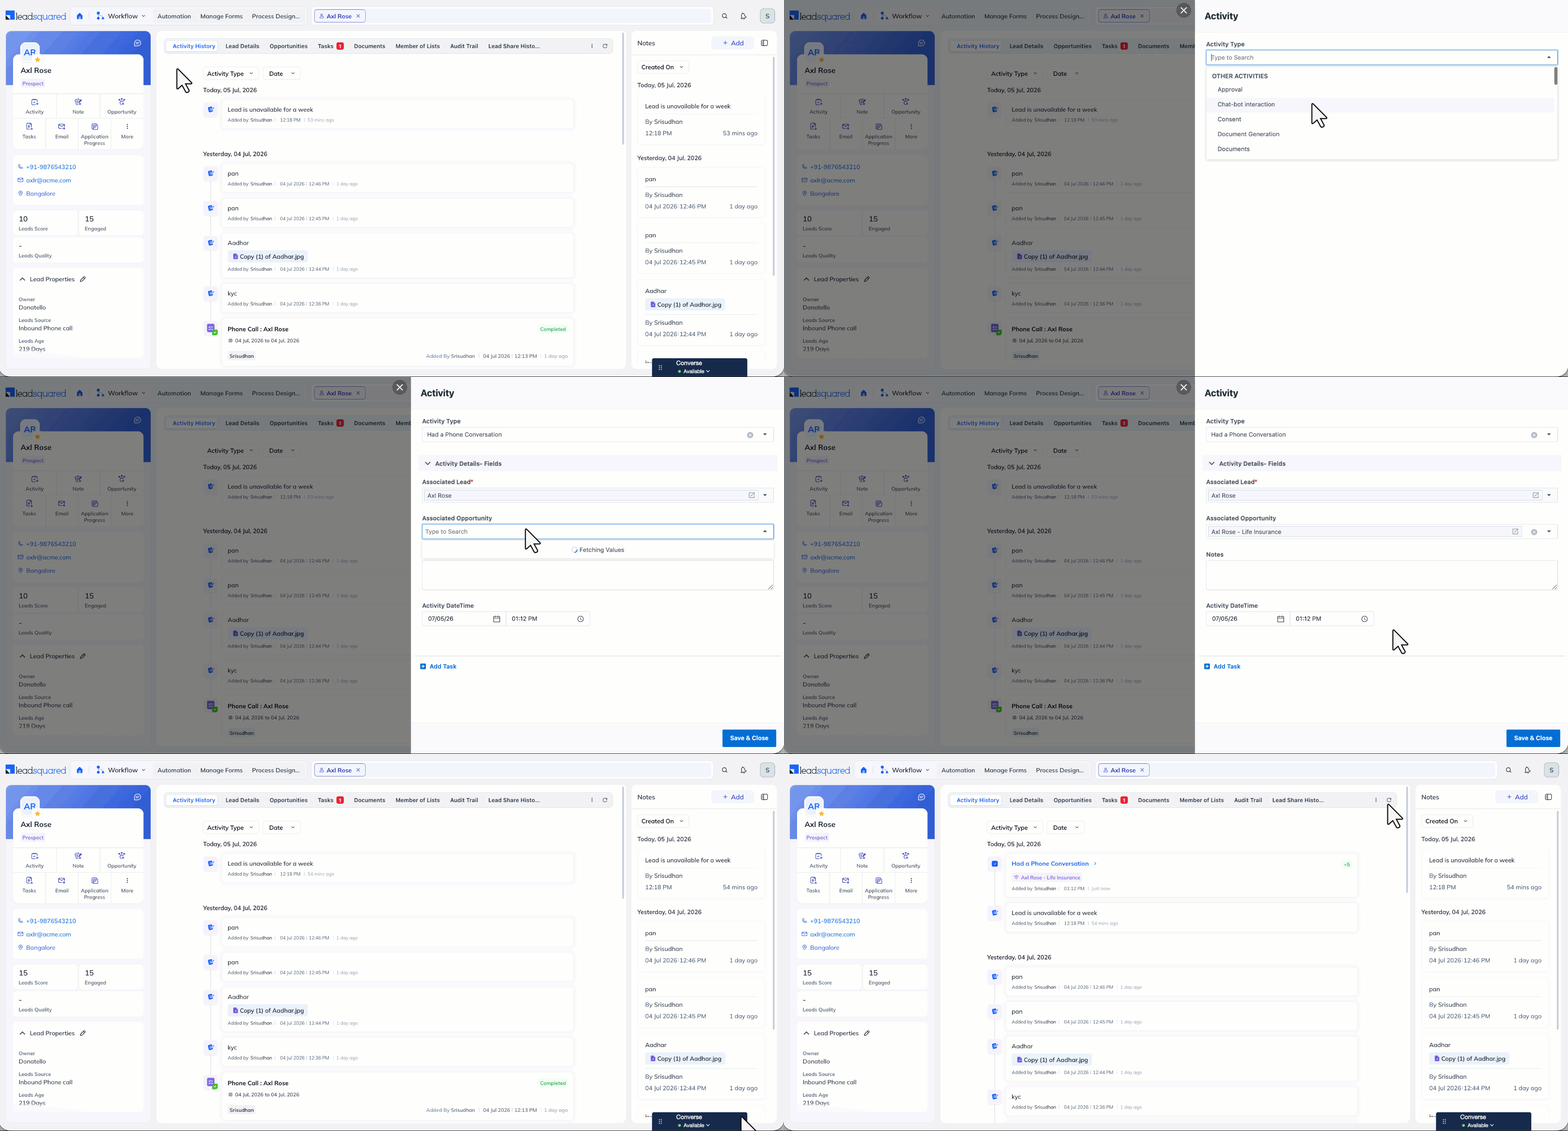
19.1 Add Activities
Activities record the interactions and events that make up the lead’s journey. You can add activities to a lead and to an opportunity. For example, for an insurance seller, lead activities might be “Received Health Insurance Premium – First Installment” and “Sent Health Insurance Scheme Documents”, while an opportunity activity might be “Set Up Phone Call for Vehicle Insurance”.
To add an activity –
- Click Activity on the vCard. The Activity pop-up opens.
- Select the activity from the Activity Type
- Enter the required fields.
- If required, add opportunities and tasks to the lead.
- Click Save & Next. You’ll get a confirmation once the activity is added.
To know more, refer to How to add Activity to Lead(s) and the Activities section on Opportunity Details.
19.2 Add Notes
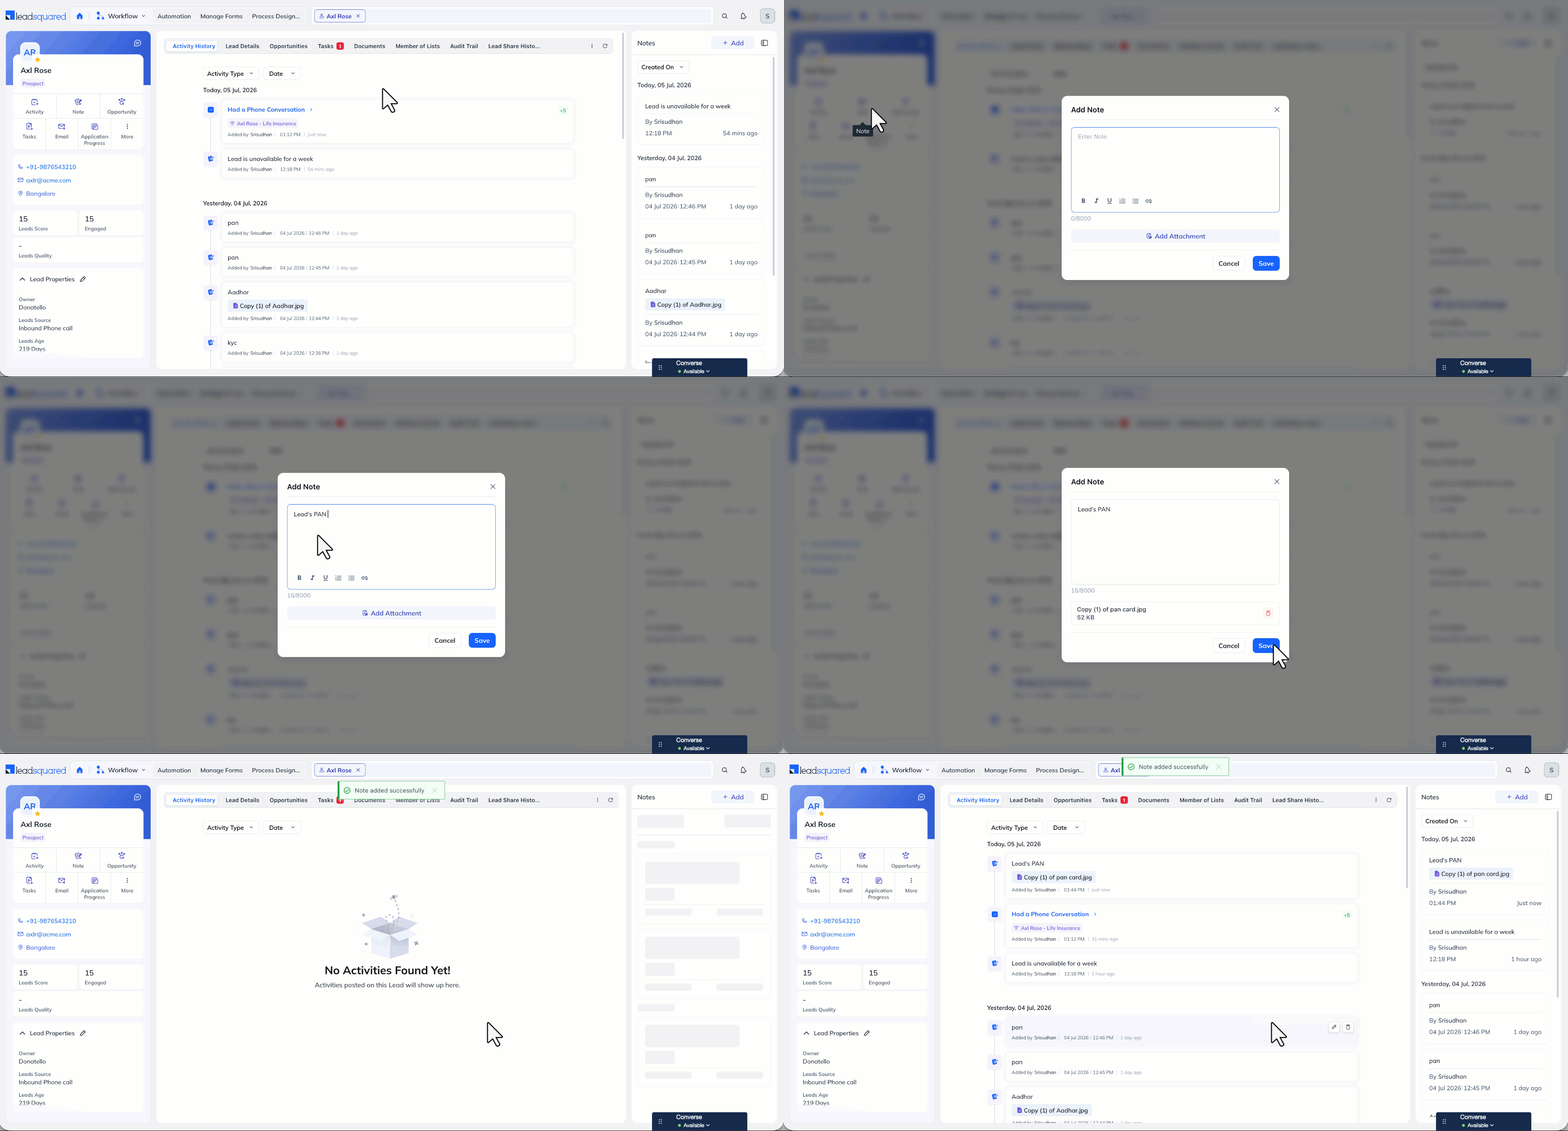
Adding notes keeps all stakeholders up to date on the lead’s lifecycle. To add a note –
- Click Note on the vCard (or + Add in the Notes panel).
- On the pop-up, under Description, enter your note.
- To attach a document, click Add Attachment.
- The following file formats are supported: csv, xls, xlsx, doc, docx, ppt, pptx, txt, ics, mp3, wav, mp4, mov, avi, jpeg, jpg, png, gif, pdf, zip, gz, 7z.
- The maximum file size is 10 MB.
- Click Save. You’ll get a confirmation once the note is added.
19.3 Add Opportunities
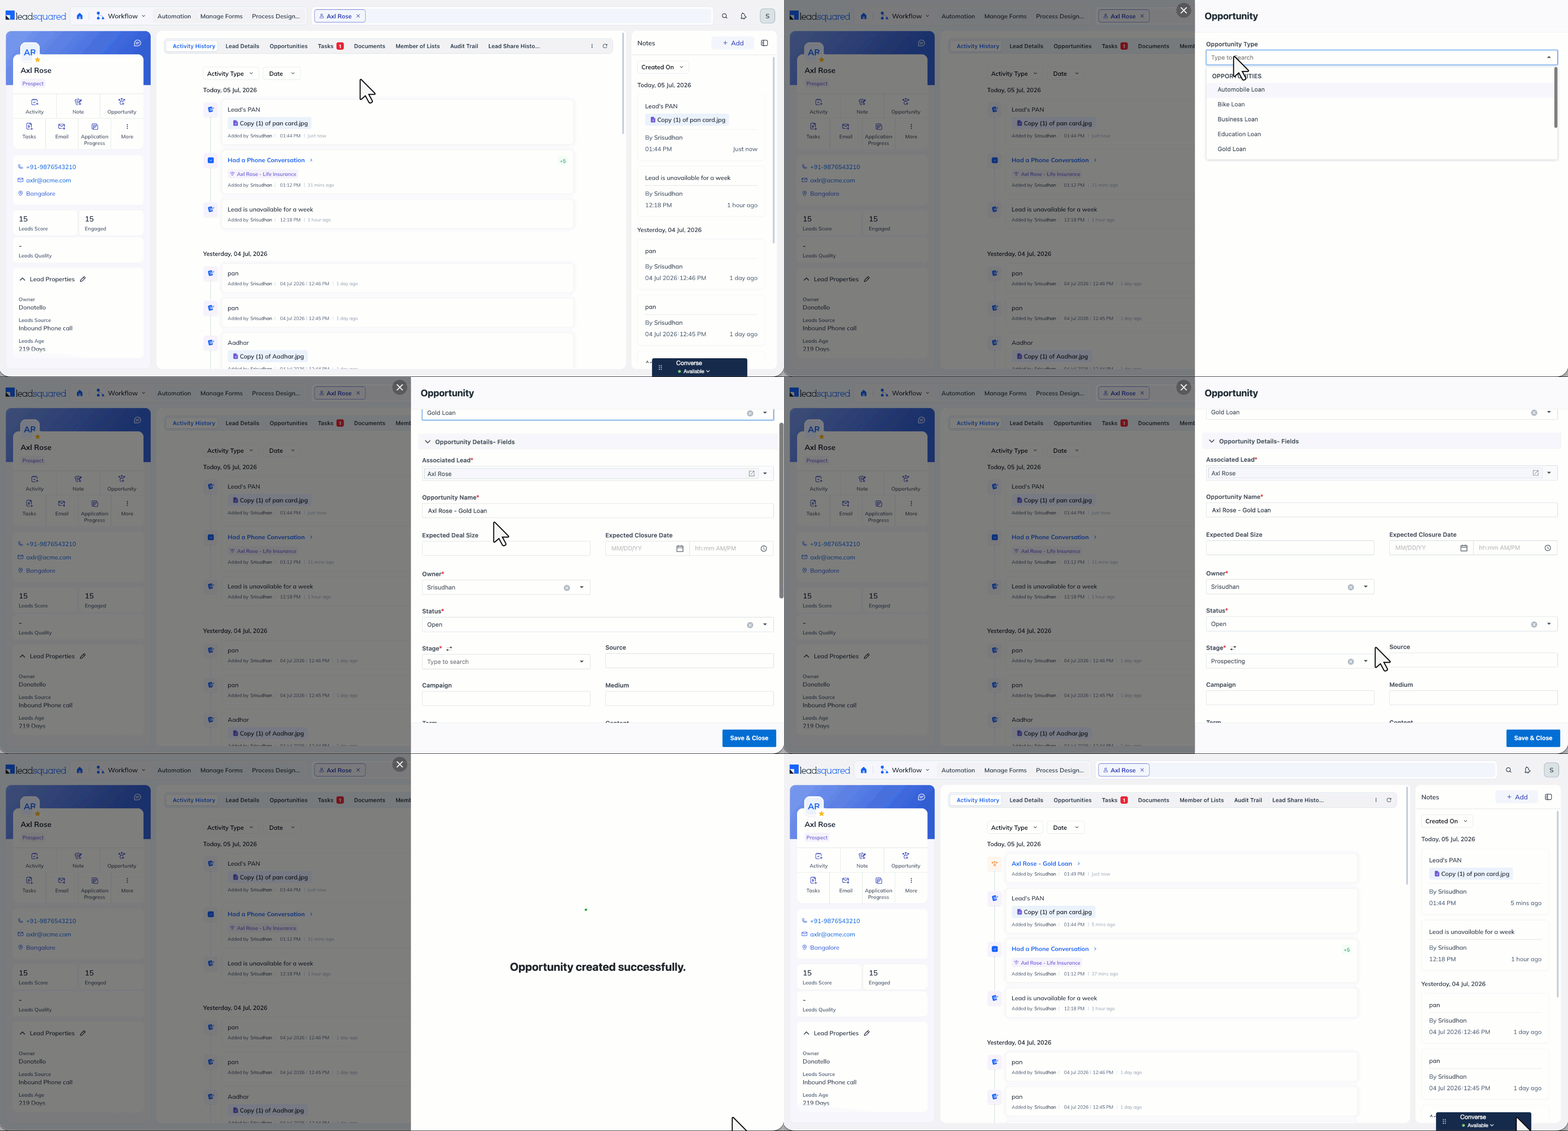
Opportunities represent potential future deals from existing leads. To add an opportunity –
- Click Opportunity on the vCard.
- On the Add Opportunity pop-up, select the Opportunity Type.
- Enter the required details on the form.
- Click Save & Close. You’ll get a confirmation once the opportunity is added.
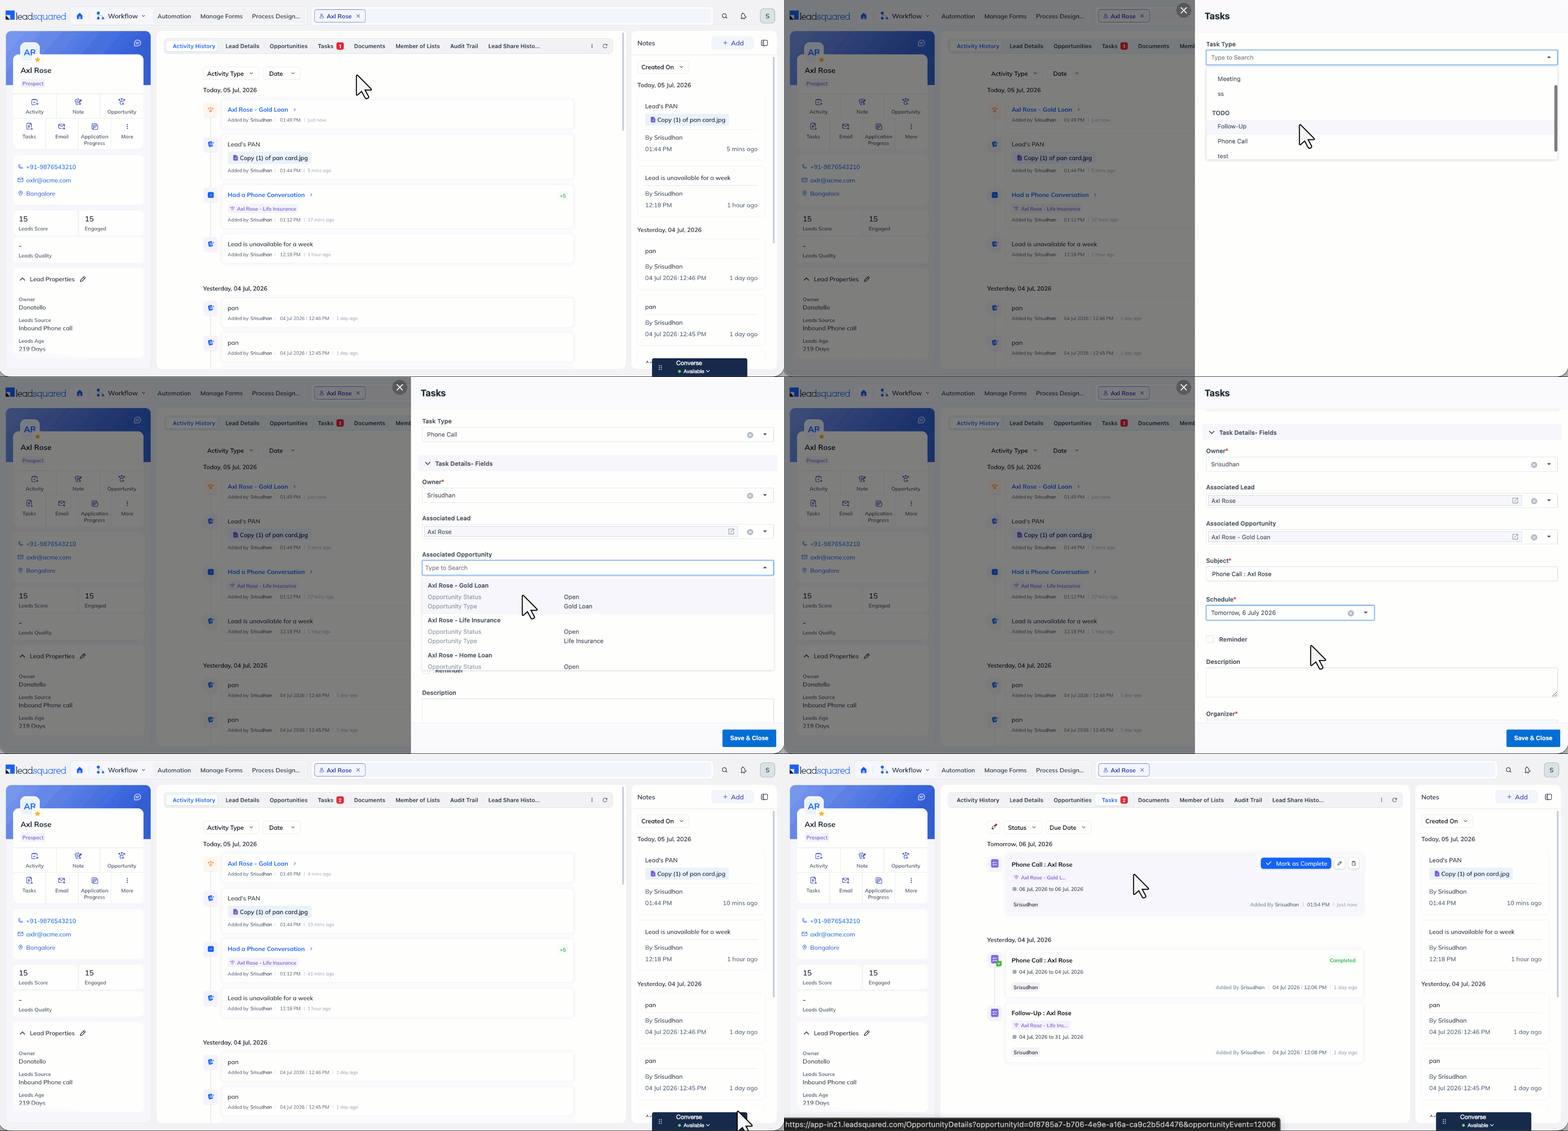
19.4 Add Tasks
Create tasks to move the lead’s journey forward. You can add tasks to a lead and to an opportunity. For example, for an insurance seller, a lead task might be “Mail Health Insurance Policy Documents” and an opportunity task might be “Inspect Lead’s Vehicle for Motor Insurance”. To add a task –
- Click Tasks on the vCard.
- From the list of task types, select the task you want to create.
- On the Create Task pop-up, enter the required details.
- If required, add the relevant Opportunity.
- Click Add. You’ll get a confirmation once the task is added.
To know more, refer to How to create Tasks and schedule Reminders?
19.5 Send Email
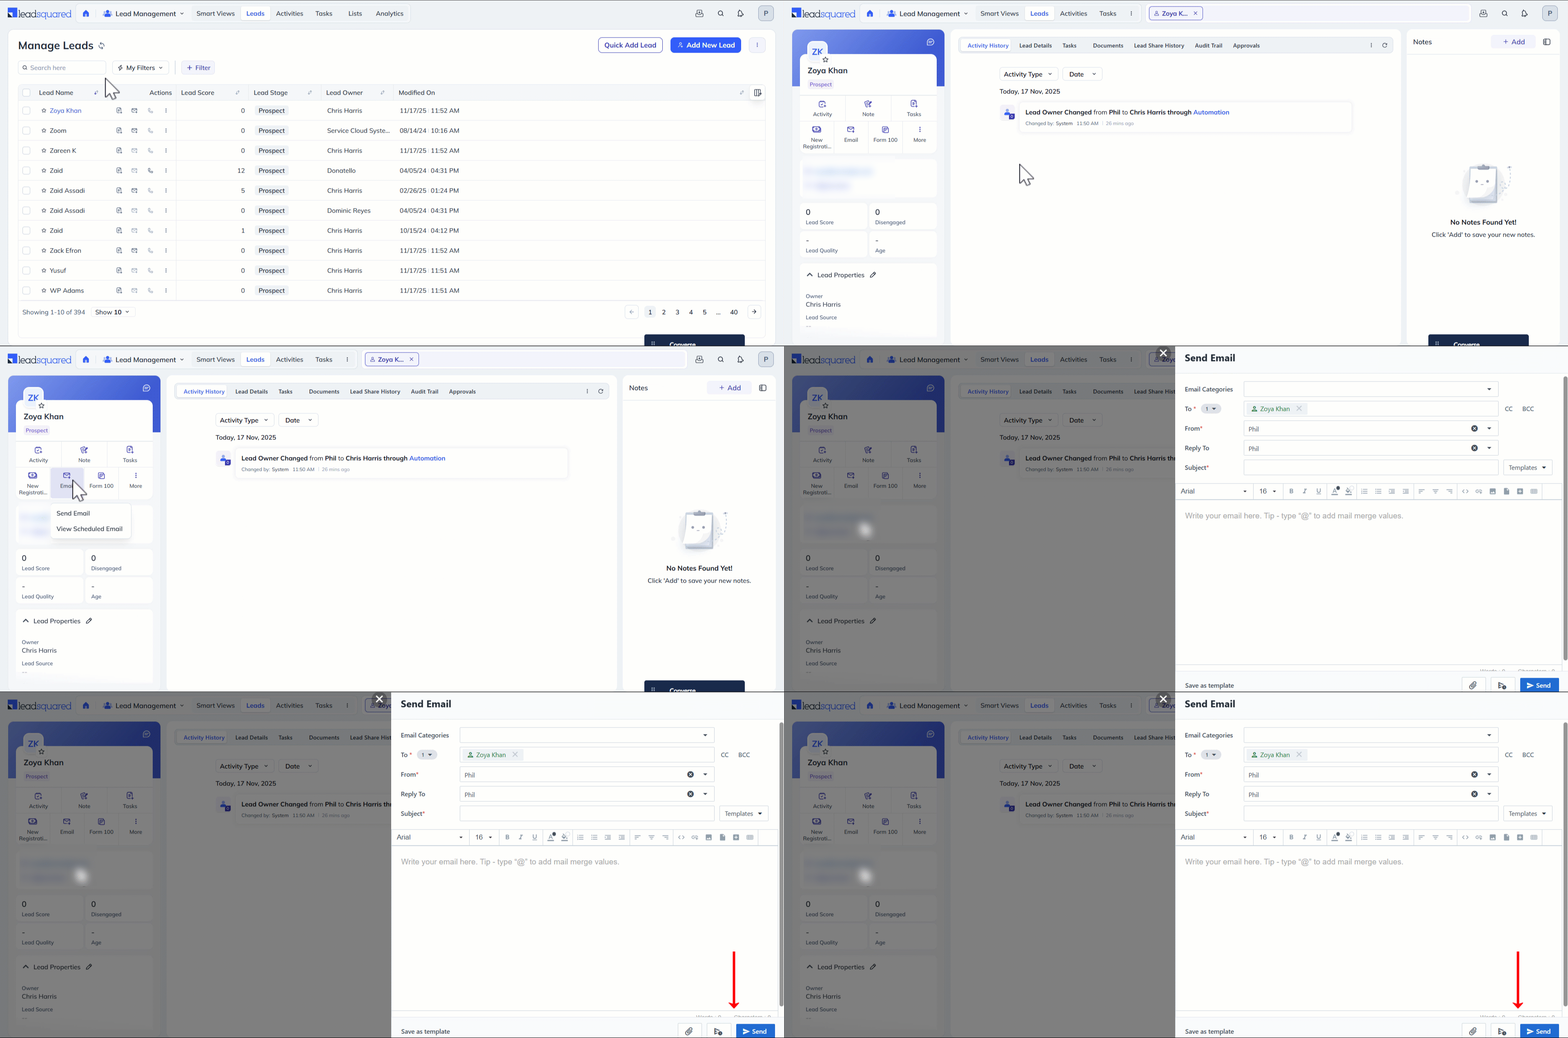
To send a one-to-one email to the lead, click Email on the vCard, then select Send Email. Compose your email on the Send Email pane, then click Send, or click the schedule icon to send it at a later time.
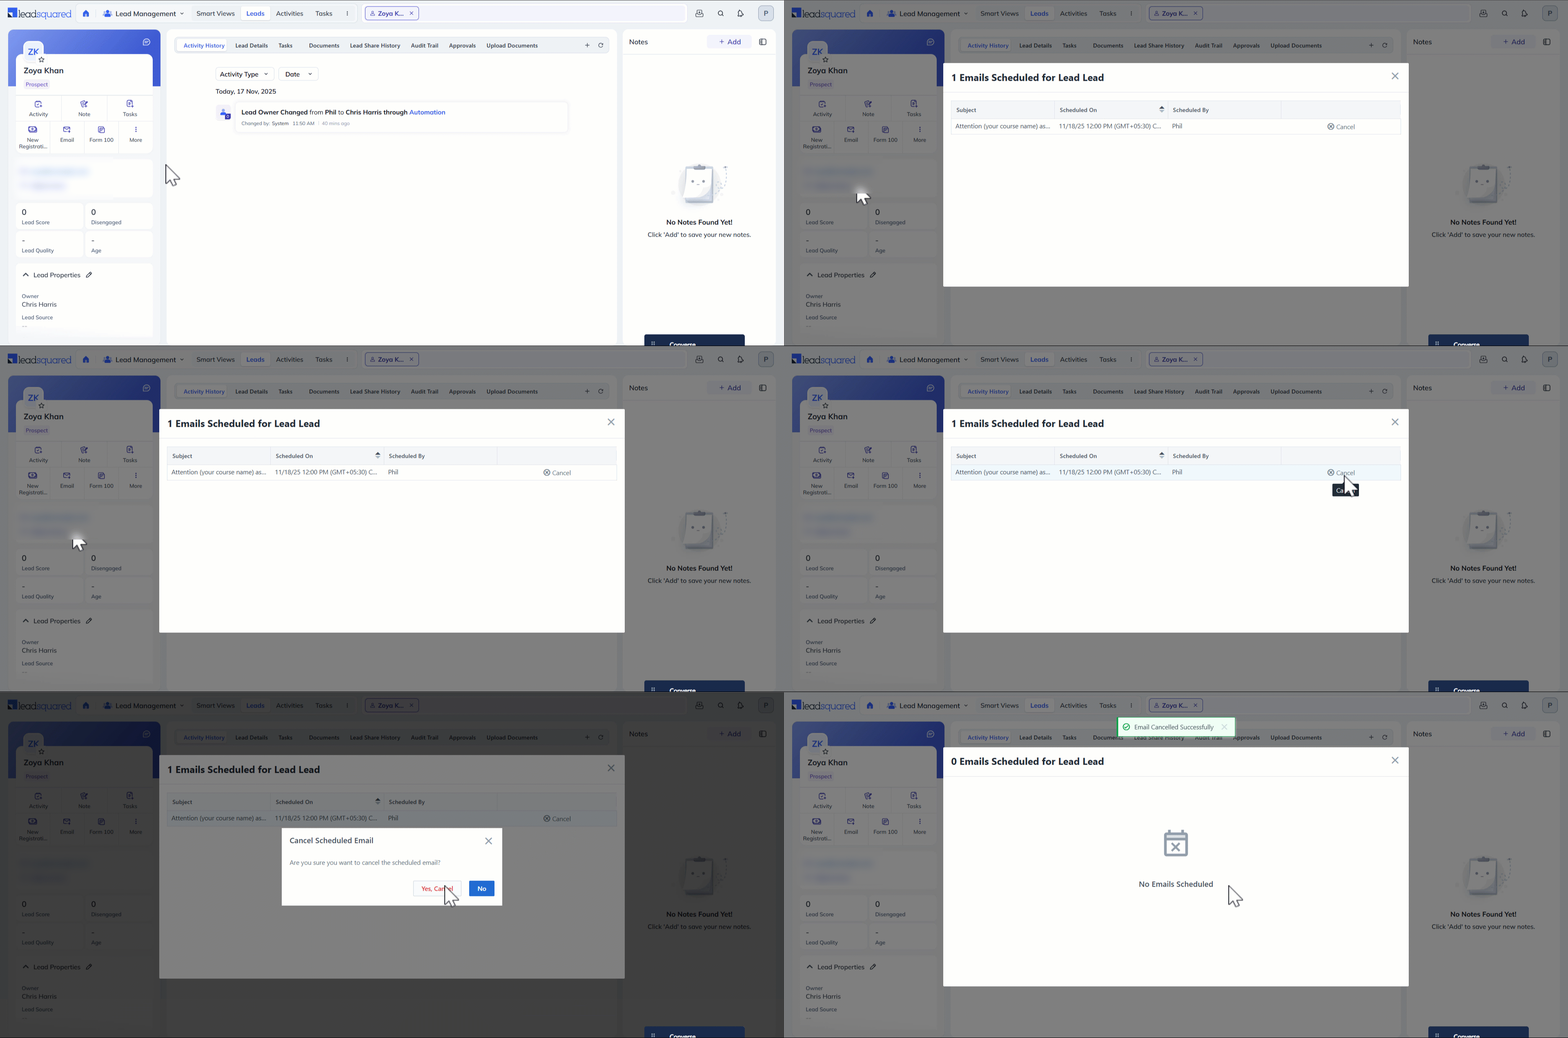
To view or cancel the emails you’ve scheduled, click Email, then select View Scheduled Email.
To know more, refer to Send Quick Emails.
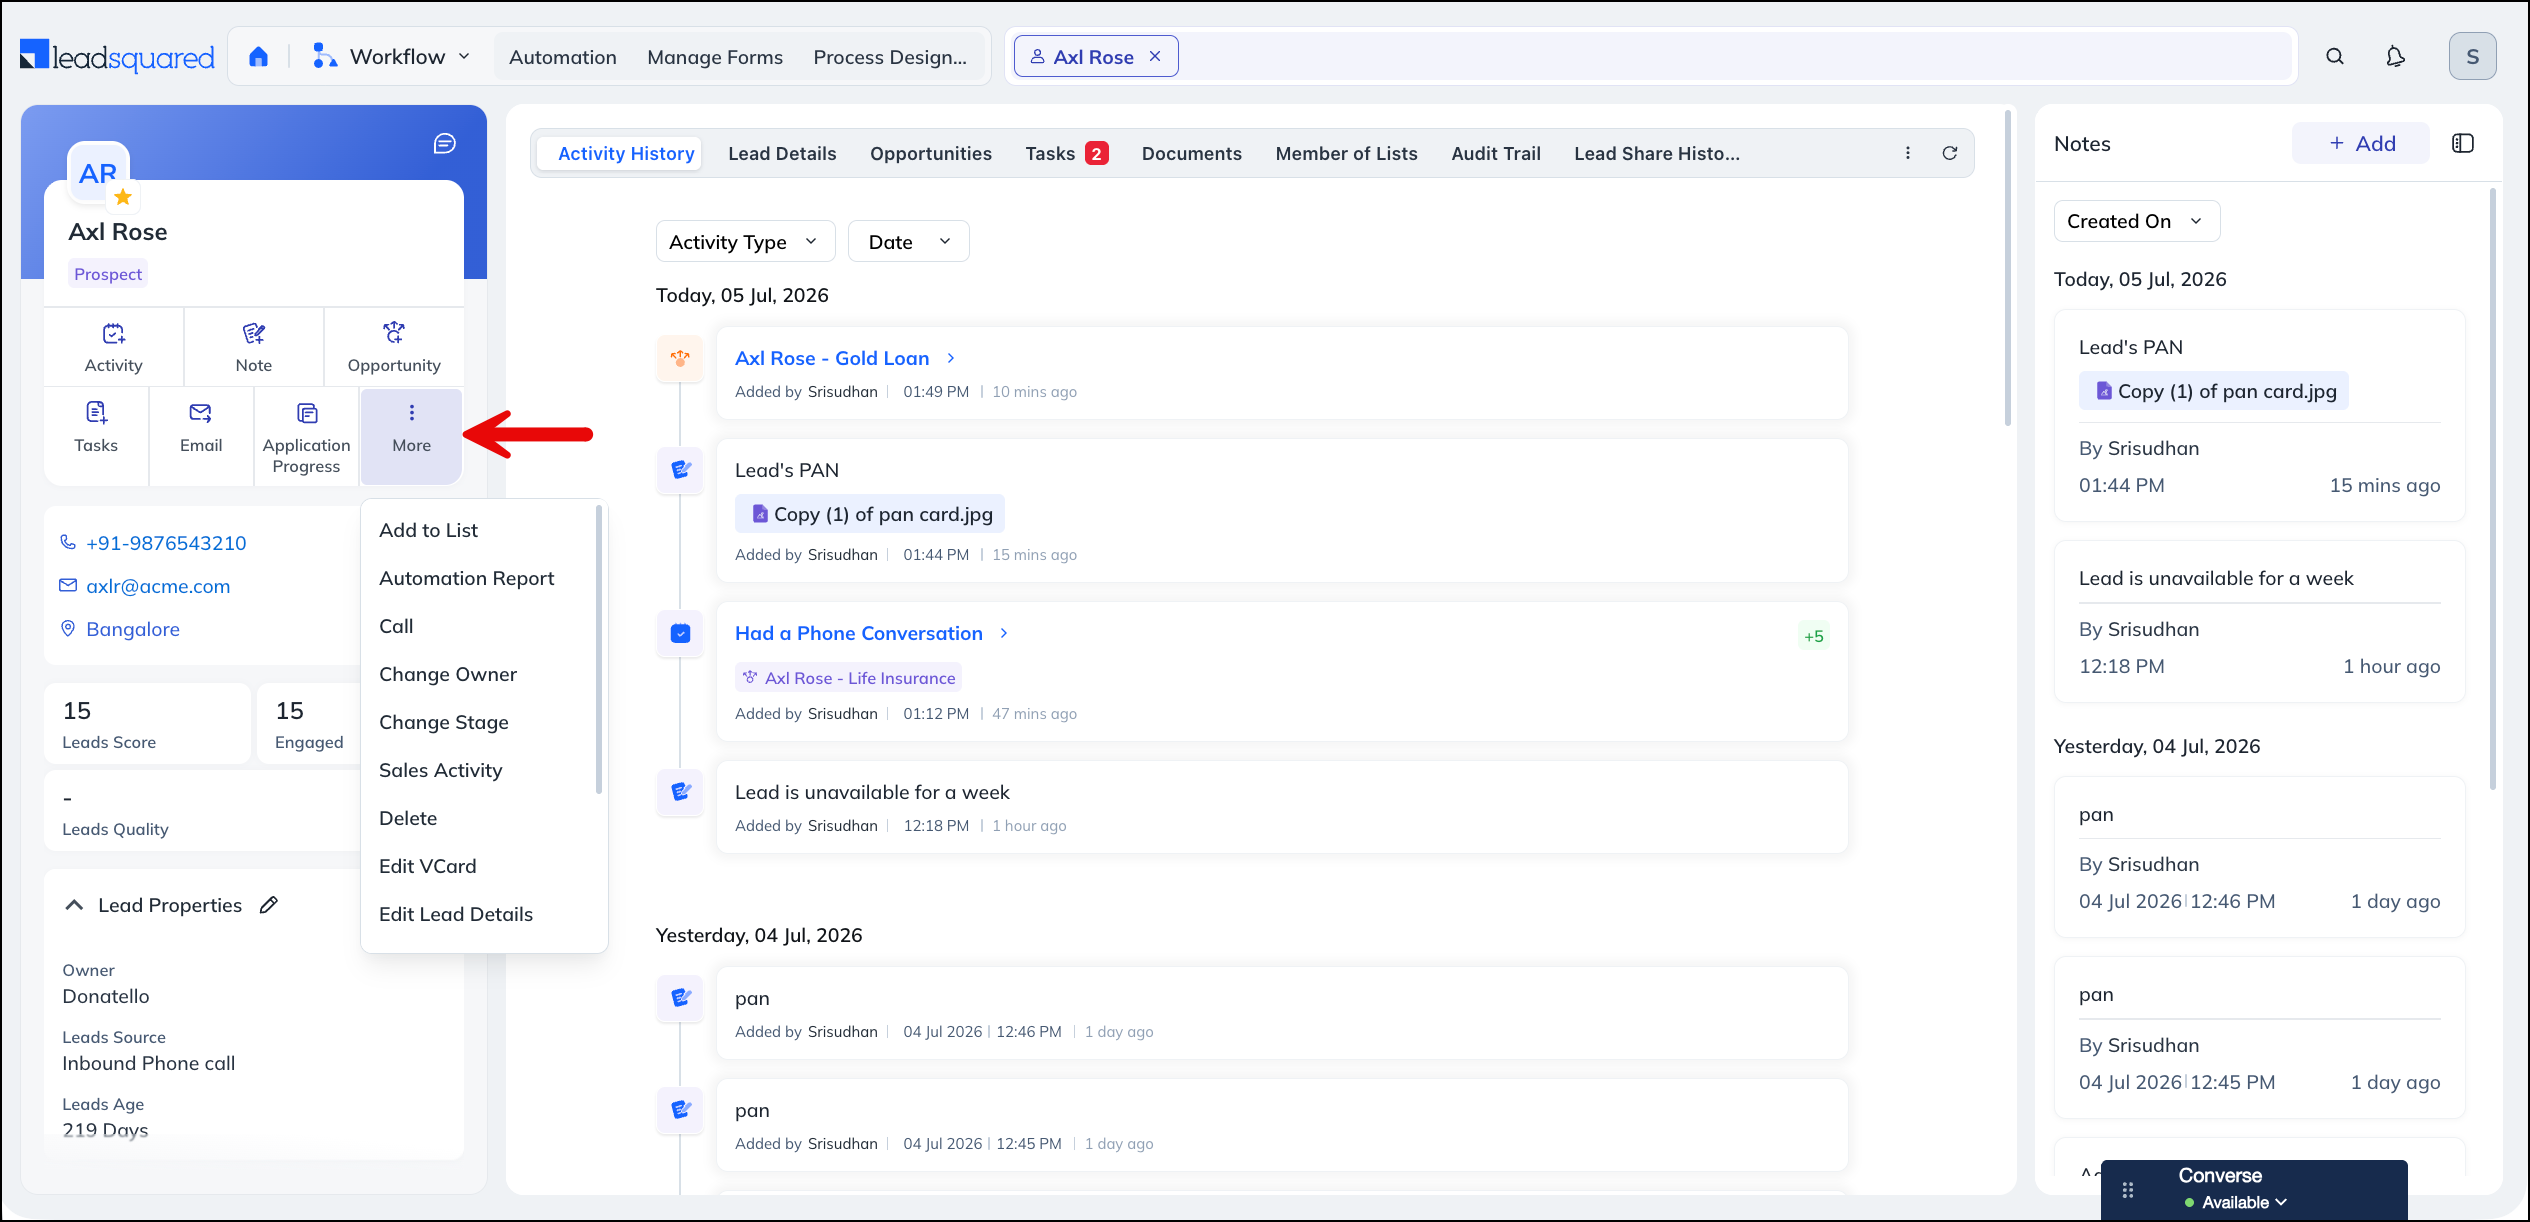
19.6 More Actions
You may also see buttons that launch forms and processes specific to your organization if configured on the account.
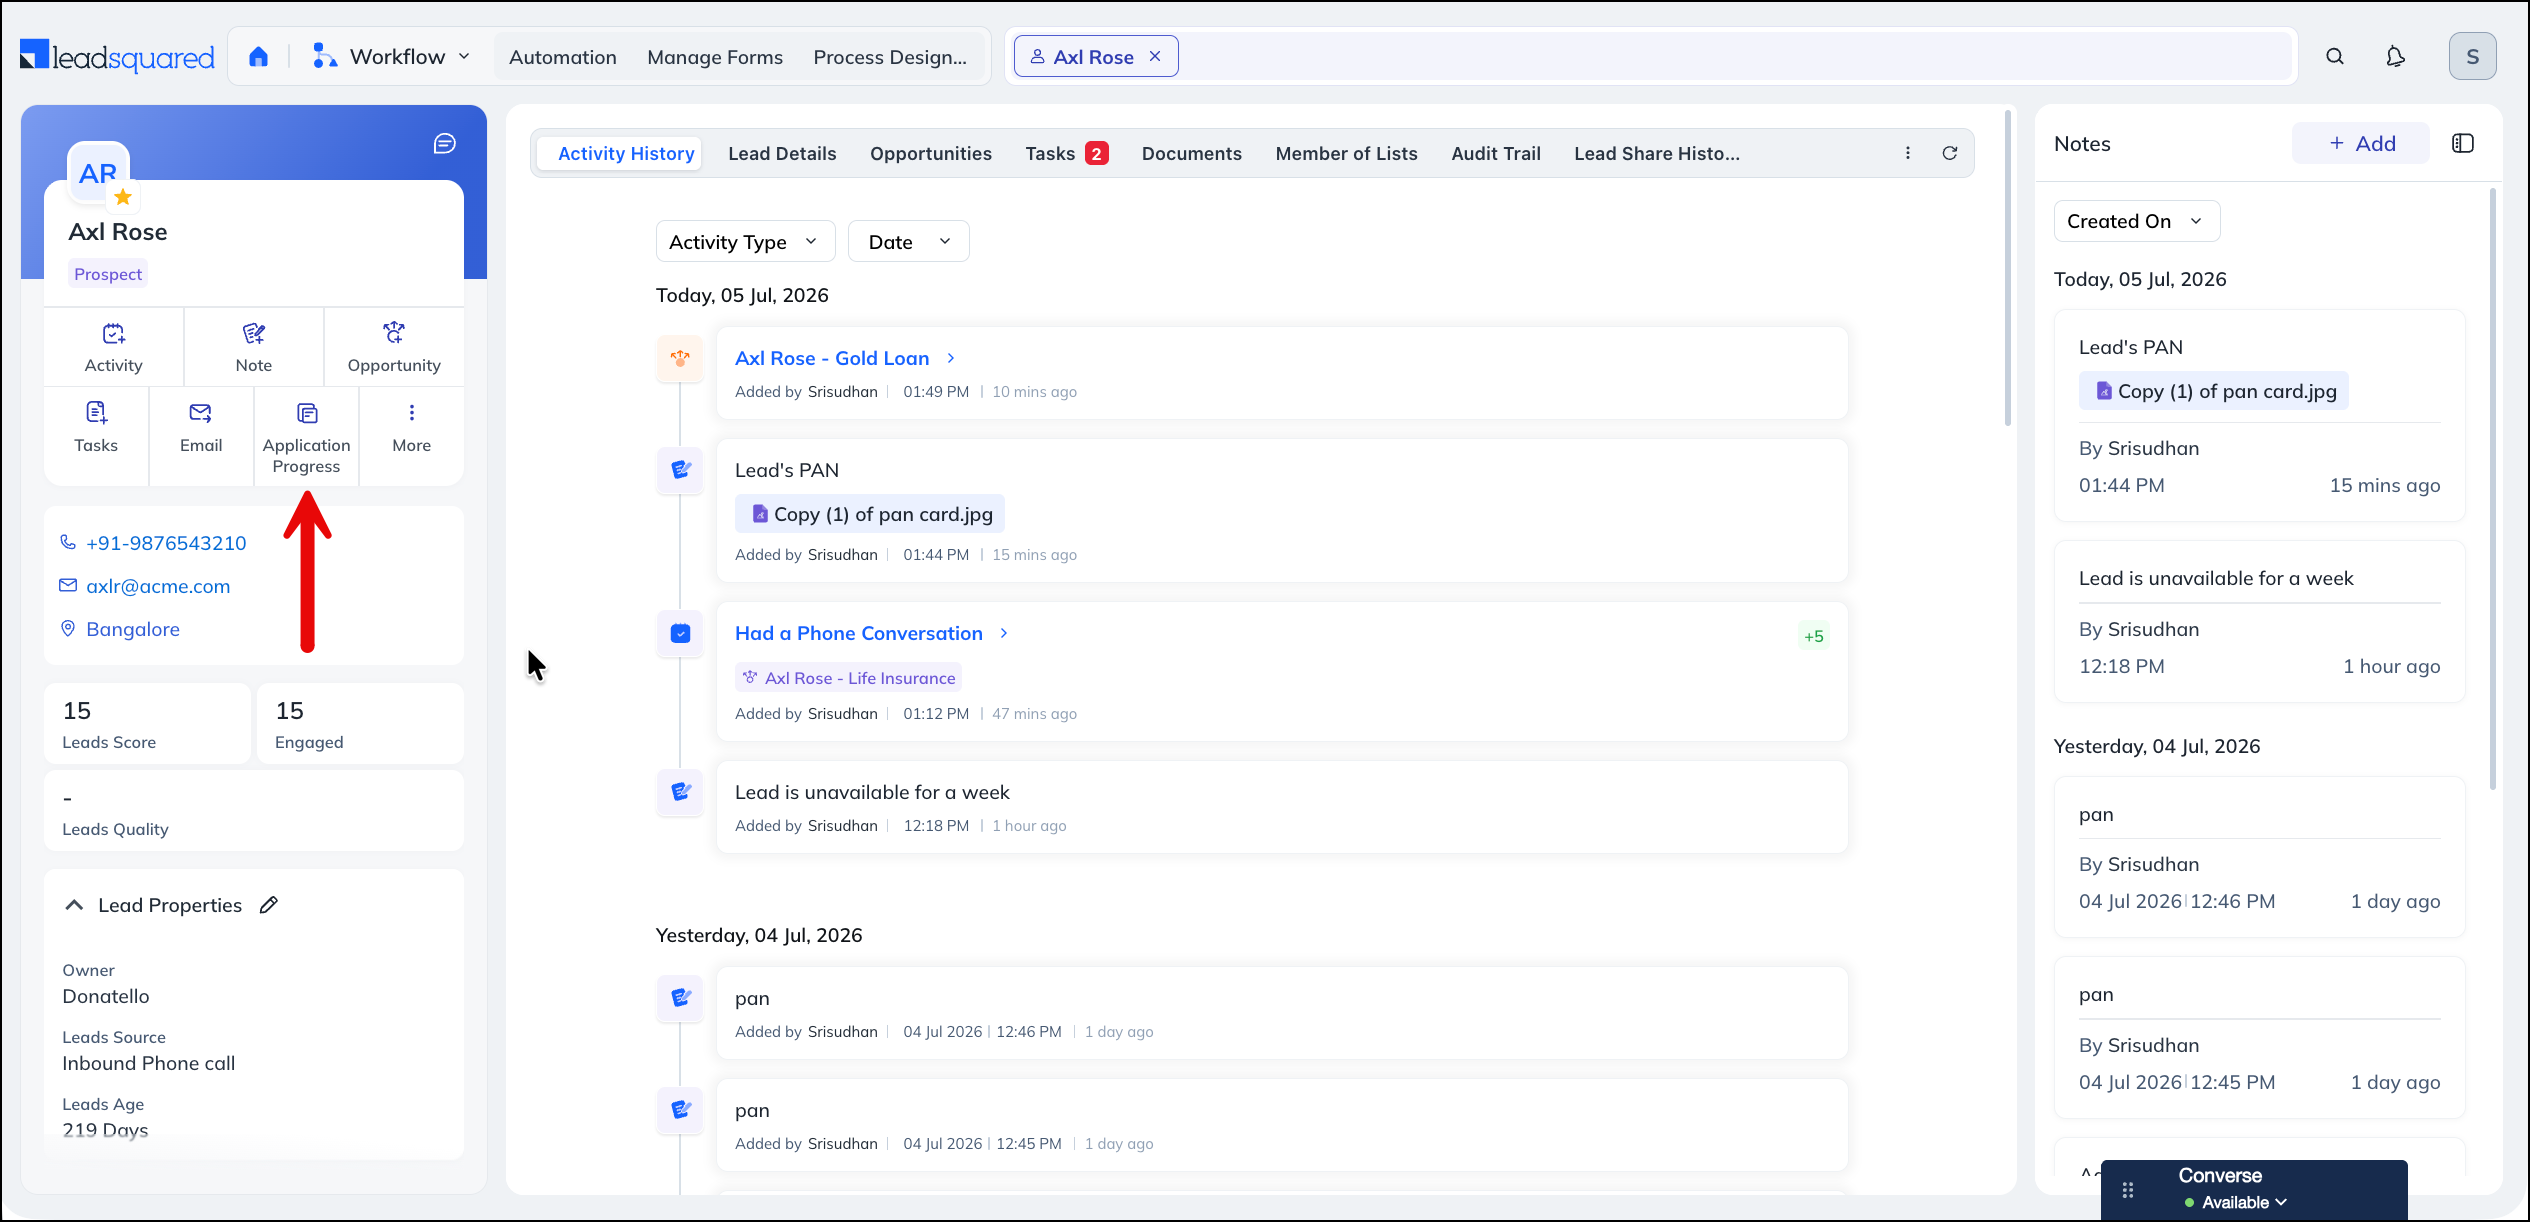
Click More on the vCard to access all other lead actions –
- Add to List – Add the lead to an existing list. To know more, refer to List Actions.
- Automation Report – View the automations the lead is or was a part of.
- Call – Call the lead through your connected telephony provider.
- Change Owner – Assign the lead to a different owner. To know more, refer to How to Manually Assign or Change the Ownership of Leads?
- Change Stage – Move the lead to a different stage, with an optional comment. The change is recorded in the Activity History. To know more, refer to Managing and Configuring Lead Stages.
- Sales Activity – Log a sales activity (such as a payment or deal closure) against the lead.
- Delete – Delete the lead. To know more, refer to How to Delete Leads?
- Edit VCard – Edit the fields displayed on the vCard.
- Edit Lead Details – Edit the lead’s fields directly.
- OptOut – Opt the lead out of email communication.
- Share Via Email – Share the lead’s information with other users over email.
- View Documents – Open the documents uploaded to the lead (see section 6.5).
- Online Meeting – Schedule an online meeting with the lead (for example, over Zoom).
- Messaging – Message the lead through your connected messaging channels (for example, WhatsApp or SMS).
Note:
The actions available under More depend on the features and integrations enabled in your account and on your Permission Template, so you may see a different set of options.
FAQs
1. Character Limit Error in Lead Notes or Lead Activity Stream
- Issue – A “Character Limit Exceeded” error appears even when the character count is within the allowed limit.
- Cause – Pasting text from Word (.docx) or .aspx files can include hidden HTML formatting (fonts, styles) that inflates the actual character count beyond what is displayed.
- Solution –
- Method 1: Paste as plain text. In Chrome, accept the pop-up to remove formatting when pasting.
- Method 2: Clear formatting manually. Right-click the text inside the Notes field and select Clear Formatting before saving.
2. Why do activity times appear differently in the Activity History?
Activity History displays two timestamps because we maintain two separate fields for activities:
- Created On Time – The system-generated timestamp recorded when the activity is created. It always reflects the time of creation and appears on the left side of the activity entry.
- Activity Date Time – A user-defined timestamp available in the activity form. It appears below the activity in the history and can reflect the current time or a past time, depending on how it was recorded.
This distinction helps you tell when an activity was logged versus when it actually took place.
Any Questions?
Did you find this article helpful? Please let us know any feedback you may have in the comments section below. We’d love to hear from you and help you out!
what does the score mean on Lead Score?
Hi, Savannah.
The lead score is the sum of all the activity points throughout the lead’s history that tells you how active/engaged your leads are. To know more about lead scores, refer to How does Lead Scoring work?
Hi how can I hide lead age for sales users?
Hi Vignesh,
There are 2 ways you can do this –
1. Create a Permission Template to hide/mask the lead age field. Then apply the template to the set of sales users you want to hide the field from.
2. Create a customized view of the lead details page and assign the view to teams in your LeadSquared account.
Hope this helps!
Hi Team,
Thanks for the reply. I appreciate.
But lead age is not reflecting in the field. PFA.
Hi, Vignesh. Sorry, we realised that since Lead Age is a calculated field, it cannot be masked using Permission Templates. Instead, you can hide the Lead Age from the Lead vCard form. To do this, navigate to My Profile>Leads>Lead Forms, from the dropdown, select the Lead vCard form, and under Lead Properties, drag the Lead Age field to the Hidden Field section, present on the right. After you Save the form, the Lead Age field will be hidden on the Lead Details page..png)
How to Find Lead Account No.
Hi, Sujith. Thank you for your question. Are you trying to find your LeadSquared account number? If yes, please refer to https://help.leadsquared.com/how-do-i-find-my-leadsquared-account-number/
Instead, if you’re trying to find the Lead Number, then navigate to the Manage Leads page, and click the Select Column/Column Customization icon (it’s the three vertical-lines icon alongside the filters). On the Select Lead Fields to view in grid pop-up, search for and select Lead Number. The Lead Number will now be displayed along with your Leads, on the Manage Leads page.