1. Feature Overview
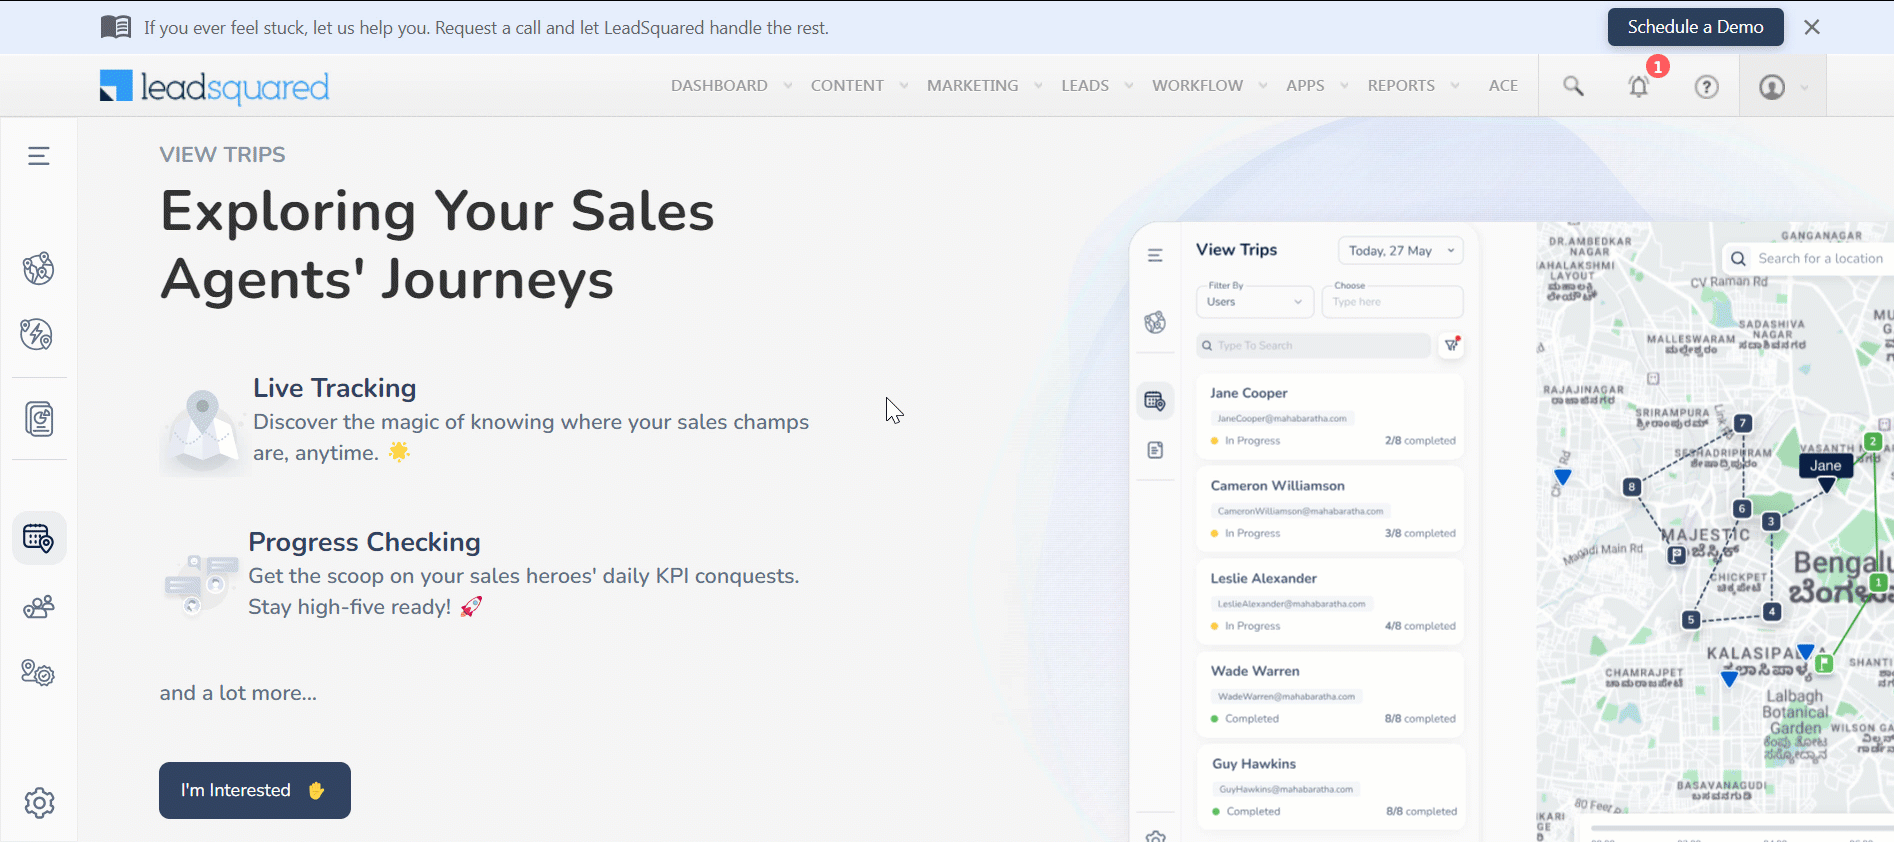
Journeys addresses sales planning and scheduling use cases like Beat Planning or Permanent Journey Planning (PJP) across industries. Sales representatives or teams are often assigned specific geographic areas or customer segments they are responsible for. Beat planning or PJP involves determining the most effective way to cover these areas to maximize sales opportunities. This includes considerations such as the location of potential clients, the density of businesses or customers in a given area, and the travel efficiency of the sales team.
Journeys enables all sales users to create a Plan (Beat Plan, PJP etc.) in just two simple steps by defining the plan duration (i.e. Start Date & End Date) and adding the relevant leads. Users can also send plans for approval to their respective managers if required. Once a plan is published or approved, the configured To-Dos will be created against the added leads. The plan execution can then be tracked through My Trips, Tasks, Task Smart Views, etc., on the LeadSquared mobile app.

2. Prerequisites
- Admins must first set up the user hierarchy for the account.
- Users must have the latest version of the LeadSquared mobile app installed on their devices. To know more about using Journeys on the LeadSquared mobile app, refer to Journeys on the Mobile App.
- To enable this feature, reach out to support@leadsquared.com.
3. How It Works
Admins must first enable and configure Journeys on the Web application. Once configured, sales users can create plans on the mobile app and submit them for approval to their managers, if required. Once managers approve the plans, they will be reflected on the following pages on the mobile app –
- Tasks
- Task Smart View
- Task Counter (CASA)
- My Trips (only if the planned leads have a location tagged to them)
Users can then follow their plans while performing their assigned tasks.
4. Journeys Settings
Settings on Journeys can only be configured by Admin users.
- From the main menu, navigate to Apps>Journeys and on the bottom left corner of the page, click
 .
. - On the Settings page, click Journeys.
- Configure the following settings and once you’re done, click Confirm.
4.1 Define Default To-Do Task Type
You must first define the default To-Do task type here. Alongside the setting, click the To-Do Task Type dropdown and select the relevant task type. Appointments are not supported as task types on Journeys since they require a specific start and end time which may clash with the other tasks of the day.
Note:
- Plans cannot be published until a To-Do Task type is defined by the Admin.
- Ensure that the To-Do Task Type chosen here is not restricted for creation under Permission Templates for the Journey users. The task configured here must not be deleted from the platform settings as it may impact the task creation after plan approval.
4.2 Approvals
If you enable this setting, all the plans created by users will be displayed to their respective managers for approval. Managers can approve or reject these plans. Only the plans approved by managers will be added to the users’ tasks. To allow managers to remove any lead from a user’s plan, alongside Allow Managers to remove leads from plans, click ![]() .
.
Note:
- Admin users and Sales Managers can approve or reject the plans made by all users. Sales users also have access to these plans based on their hierarchy. For example, if Sales User X is acting as a manager to two other sales users – User Y and User Z, X can approve or reject the plans of users Y and Z, but not anyone else.
- Approvals is an optional setting.
- Changing the user hierarchy after setting up Journeys will result in loss of data.
- While managers can be allowed to remove leads from plans, they cannot add leads to a plan.
- Once enabled, Approvals cannot be disabled again.
4.3 Define Quota
Configure the minimum number of leads to be covered by a sales user in a single day under Define Quota. By default, the quota is 10 leads per day and gets applied to all the users creating a plan. This is an indicative value and does not restrict the user from adding more or less than the defined quota. The quota can range from 1 to 40 leads per day.
5. Manage Approvals
If you’ve enabled the Approvals setting, you can manage your users’ plans on the Manage Approvals page. If Approvals are disabled, you can only view your users’ plans on this page but cannot approve or reject them.
- On the left side of the Journeys page, click
 .
. - Under Pending, you can view all the plans you haven’t approved or rejected yet.
- To filter specific plans, click and choose relevant filters.
- To view the details of a plan, click on it. The number of leads added on the plan for each day will be visible on the calendar. Click on a day’s lead count to view added leads.
- To view the lead’s details, click on the lead name. You will now be directed to the Lead Details page on a new tab.
- If Allow Managers to remove leads from plans setting is enabled in your account, you can remove any lead from the plan on this pop-up window. To remove a lead from the plan, alongside the lead’s name, uncheck the checkbox. Then, click Update.
- Once you’re done reviewing the plan, click Approve or Reject. If you click Reject, you must write a comment on why you’ve rejected the plan. Approved and rejected plans move from Pending to the All section. In All, view all plans, including Pending, Approved, and Rejected ones.
Note:
- Only Admins, Sales Managers, and Sales Users (who have other users reporting to them) will be able to access this page.
- Plans must be approved/rejected on or before their start date. For instance, if a user’s plan begins on February 3rd, the manager must approve it by that date at the latest. If no action is taken by the 3rd, the plan will automatically expire.
6. Add Journeys to Mobile App
Once you’re done configuring the Journeys settings, add it to the mobile app’s navigation menu.
- On the side panel of the CASA landing page, click
 . Then, alongside the menu you want to add Journeys to, click
  .
. - On the right side of the page, click Side Navigation.
- To add Journeys to the mobile app’s navigation bar, under Available Menu Tabs, alongside Journeys, click
 .
. - To rearrange the tabs, drag and drop them in the desired order.
- Once you’re done building the menu, click Publish.
Any Questions?
We’d love to answer your questions or hear your own unique use cases. Feel free to share your experiences in the comments section below.


