


Get Started
Sales Suite
Field Ops
Marketing
Service CRM
Integrations & Apps
FloStack
Mobile Cloud Calling
1. Feature Overview
The LeadSquared Mobile Cloud Calling connector allows you to make calls to your leads over the internet, through the LeadSquared mobile app. The features of this connector are –
- You can enable mobile cloud calling through your existing telephony provider by configuring APIs.
- You can initiate cloud calling to your leads via your mobile app. This will eliminate your dependency on patchy mobile network coverage and other connectivity issues.
- View lead details when a virtual call is received or initiated via the mobile app.
- Track virtual missed calls, received via the mobile app. Also, record calls with 100% reliable call recordings and dispositions.
Note: Using this connector, you will only be able to place cloud calls through the LeadSquared mobile app.
2. Prerequisites
- You must be the Administrator of your LeadSquared account.
- Your account plan must support telephony integration.
- There’s an API dependency on your Telephony Provider. Before configuring the connector, there are certain additional APIs required from your Telephony Provider. Please write to support@leadsquared.com, or reach out to your telephony partner account representative to make sure if the integration is possible with their telephony provider. Please refer to Click to Call Set-up, Incoming Agent Pop-up and List All DID Numbers sections to know more. (The APIs for Ozonetel are available. Please refer to the Sample APIs For Ozonetel section to know more).
- Install and configure the LeadSquared Call and SMS Tracker App.
- You must have the updated LeadSquared Apps on your mobile devices –
- LeadSquared Android App – v11.4 or above.
- LeadSquared iOS App – v9.5 or above.
- This is a paid feature. To enable it on your account, write to support@leadsquared.com or reach out to your Customer Success Executive.
Your telephony partner must provide the following APIs, to integrate with the Generic Mobile Cloud Calling connector. These APIs are part of the prerequisites.
1. Click2Call – GET/POST API for Click2Call (The GET as well as POST format will work)
This API will ensure that a cloud call is placed successfully from your user to your lead, from the LeadSquared mobile app.
Sample API –
Method – GET/POST
https://<Base API URL>/click2call?api_key=XXXX&username=XXXX&agentID=@{User:TelephonyAgentId,}&campaignName=@VirtualNumber&customerNumber=@CustomerNumber
Success Response: {"status":"success", “message”: “call initiated successfully” "monitorUcid":"9179160xxxxx","callStartTime":"2020-xx-xx xx:xx:xx"}
Response
If DND: {“status”: “error”,”message”: “Customer number is in DND”}
Customer number format should be +91-95XXXXXX or 95XXXXXXX (Without country code).
2. Get Incoming Call session by Agent Number (for the Agent Pop-up API)
This API retrieves the lead’s mobile number from which an incoming call is received on your user’s mobile device. This enables LeadSquared to show an agent pop-up, from where your users can capture the lead’s details.
Sample API –
Method – GET/POST
Input Parameters –
- Authentication credentials (apiKey or userName)
- agentPhoneNumber (In request parameter, the agent Phone Number can be passed to API as a query parameter or in the request body)
Request: https://<Base API URL>PullAPI?apiKey=KKxxxxxxx&userName=demouser&agentPhoneNumber=984xxxxxxx
Success Response: {“status”:”success”,”customerNumber”:”984xxxxxx”,”monitorUcid”:”9179160xxxxx”,”callStartTime”:”2020-xx-xx xx:xx:xx”}
Response
- If the userName field is empty: { “status”: “error”,”message”: “userName should not be empty”}
- If the apiKey field is empty: { “status”: “error”,”message”: “apiKey should not be empty”}
- If the agentPhoneNumber field is empty: { “status”: “error”,”message”: “agentPhoneNumber should not be empty”}
- If invalid userName or apiKey: { “status”: “error”,”message”: “userName or apiKey is Invalid”}
- If invalid agentPhoneNumber: { “status”: “error”,”message”: Invalid Agent Phone Number”}
- If maxLimit Exceeded: { “status”: “error”,”message”: “max limit exceeded”}
- If No Data Found: {“status”:”error”,”message”:”There is no call at this moment with this Agent PhoneNumber”}
3. List of All DID/Virtual numbers for a Particular Account
We will be calling this API to sync all the DID number on our platform with a defined frequency, for example, once every 4 hours.
GET/POST: https://<Base API URL>/LeadSquare/PullDIDNumbers.php
Response: {“status”:”success”,”did_list”:[“984xxxxxx”, “94544545XX”]}
3. How it Works
- Install the Mobile Cloud Calling connector
- Set-up the Click To Call API
- Set-up the Incoming Agent Pop-up API
- Set-up the List All DID Numbers API
- Place a cloud call to your lead
4. Installation
- On the main menu, navigate to Apps>Apps Marketplace and search for Mobile Cloud Calling connector.
- Alternatively, you can find the connector on the left panel, listed under Mobile.
- Click Install.
- Once the connector is installed, hover your cursor over the settings icon, and click Configure.
- On the Prerequisites screen, depending on your requirements, you can choose either Mobile App Calling – Both Default and Cloud Calling Enabled or Mobile App Calling – Only Cloud Calling Enabled.
- Mobile App Calling – Both Default and Cloud Calling Enabled – From the LeadSquared mobile app, you can place cloud calls as well as regular calls through your service provider (such as Airtel, Vodafone, etc).
- Mobile App Calling – Only Cloud Calling Enabled – From the LeadSquared mobile app, you can only place cloud calls.
- Then, from the User Field Containing Virtual Number(DID) dropdown, select the custom user field that contains the DID number. To know how to create user custom fields to add virtual numbers for your users, see Manage User Custom Fields.
- Once you’re done, click Next.
5. Click to Call Set-up
You must then configure the Click to Call API. This API is called when your users tap the CloudCall ![]() option on the LeadSquared mobile app. This API will ensure that the call is placed successfully to the lead, from your user.
option on the LeadSquared mobile app. This API will ensure that the call is placed successfully to the lead, from your user.
Below is an example of the sample API request and response –
- Request (Method – GET) –
https://telephonyProvider.leadsquared.com/CallManagement.svc/InitiateCall?AccessKey=@{User:AccessKey,}&SecretKey=@{User:SecretKey,}&LeadID=@{Lead:ProspectID,}&LeadPhone=@{Lead:Phone,}&LeadMobile=@{Lead:Mobile,}&AgentPhone=@{User:PhoneMobile,}&UserID=@{User:UserId,} - Response –
{"status": "success", "data": "Call initiated successfully"}
To set-up the Click to Call API, you must complete the following steps –
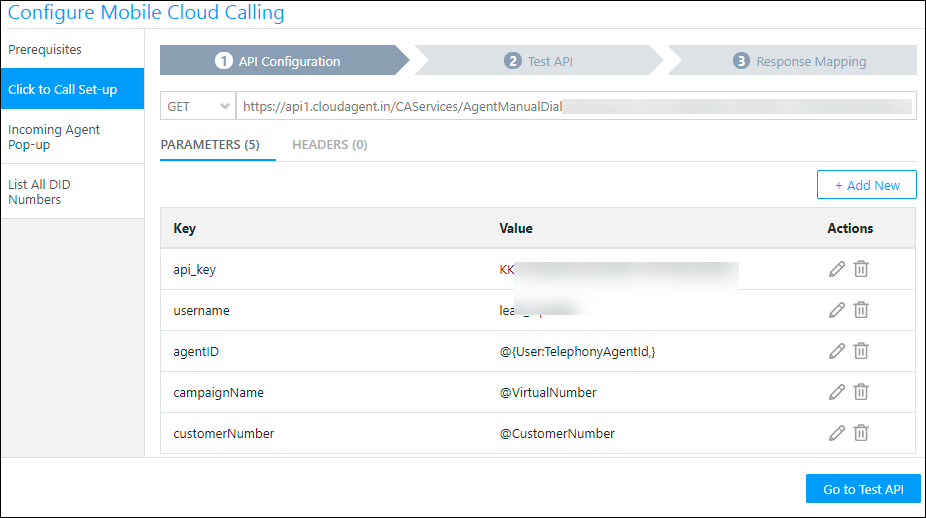
5.1 API Configuration
- On the Configure Mobile Cloud Calling pop-up, navigate to the Click to Call Set-up screen.
- From the dropdown, select the HTTP method.
- Enter the API request URL in the Enter request URL box.
- You can use mail merge parameters in the API as shown in the example above.
- Map the query parameters to the relevant values (lead or user fields). To do so, for that particular Key-Value pair, under Actions, click
 . Then, click the value, and from the dropdown, select the relevant value. Once you’re done, click
  .
.
- To delete an existing Key-Value pair, against the corresponding pair, under Actions, click
 .
. - To discard configuring a Key-Value pair, click
 .
.
- To delete an existing Key-Value pair, against the corresponding pair, under Actions, click
- To add a new Key-Value pair to the API request URL, click the Add New button.
- Once you’re done, click Go to Test API.
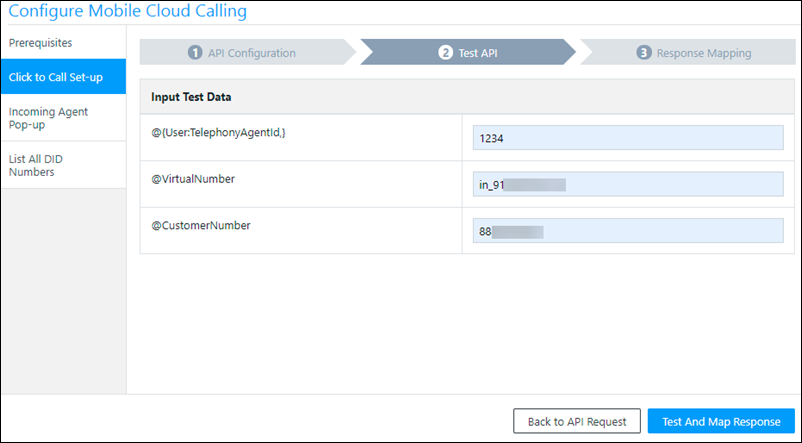
5.2 Test API
Test the mail merge parameters that are present in the API, by providing sample values for each parameter. This is to ensure the API’s behaviour is correct when actual LeadSquared data is mapped to it in the live environment. To test the API –
- For each mail merge Input Test Data fields, provide a relevant sample value.
- Then, click Test and Map Response. This will automatically test the API and map the responses.
To make changes to the API, and to add or remove parameters, click Back to API Request.
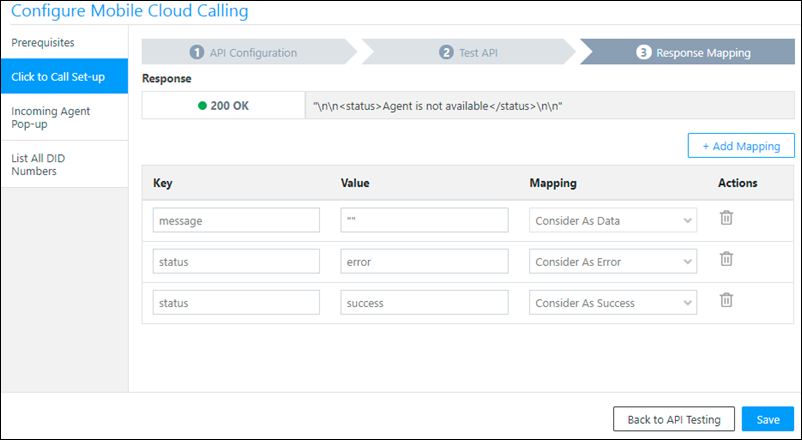
5.3 Response Mapping
To help LeadSquared make sense of the API response, map the response parameters as data, success, or errors. This will help the system identify success or error responses.
To configure and map the responses –
- To map a response, click the Add Mapping button.
- Under the Key and Value fields, enter relevant key-value responses.
- To delete an existing Key-Value pair, against the corresponding pair, under Actions, click .
- To delete an existing Key-Value pair, against the corresponding pair, under Actions, click
- Then, from the Mapping dropdown, select the correct outcome for that particular response. You can choose Consider as Success, Consider as Error or Consider as Data.
- To map additional responses, click the Add Mapping button.
- Once you’re done, click Save.
6. Incoming Agent Pop-up
For Incoming Agent Pop-up to work, you must install the LeadSquared Call and SMS Tracker App, and configure the following setting –
- Navigate to the Settings screen, and tap Call and SMS.
- On the Call Settings screen, enable the following settings –
- Show lead identification popup
- Show popup for unknown numbers
- Once you’re done, the settings will be applied.

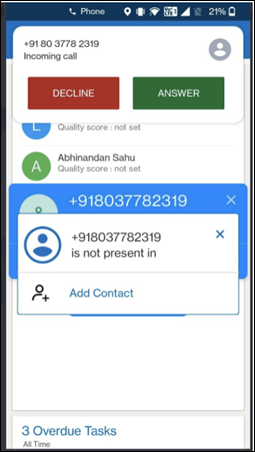
Once these settings are enabled, the Incoming Agent Pop-up API fetches and displays the lead’s details (based on the incoming call Phone Number) as a pop-up.
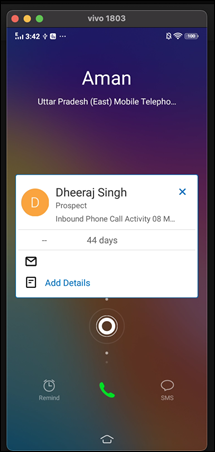
If the lead doesn’t exist in LeadSquared, the pop-up displays “is not present in”, along with the DID number. You have the option to Add Contact (lead) in LeadSquared. Note that this is the DID number (and not the lead’s Phone Number). You are advised to obtain the lead’s Phone Number from the lead.
Below is an example of the sample API request and response –
- Request (Method – GET) –
https://providerapi/LeadSquared/PullAPI.php?apiKey=KKxxxxxxx&userName=demouser&agentPhoneNumber={{Agent_Number}} - Response –
{"status":"success","customerNumber":"984xxxxxx","monitorUcid":"9179160xxxxx","callStartTime":"2020-xx-xx xx:xx:xx"}
The steps to configure the API, test the API and map the responses are the same as the steps for the Click to Call API. Please refer to the Click to Call Set-up section to carry out these steps.
7. List All DID Numbers
This API ensures that the user sees the Agent Pop-up only for calls received through the DID Number associated with their account. Since lead calls will be routed through the DID Number, the Agenet Pop-up will show up only for calls made by leads. This will prevent calls from non-leads, and other non-critical calls, from taking up your users time. This will also ensure that the API is deployed only for calls received from authorized DID/virtual numbers, and will reduce the overall load time, by not being deployed for calls being received from other numbers.
Below is an example of the sample API request and response –
- Request (Method – GET) –
https://providerapi/LeadSquare/DIDNumbers?apiKey=KKxxxxxxx - Response –
{"status":"success","did_list":["984xxxxxx", "94544545XX"]}
The steps to configure the API, test the API and map the responses are the same as the steps for the Click to Call API. Please refer to the Click to Call Set-up section to carry out these steps.
8. Initiate Cloud Call
Once you’ve installed and configured the connector, your users can make and receive cloud calls. The following steps are uniform across Android and iOS devices.
- Open the LeadSquared mobile app, and navigate to the Leads screen.
- For the lead you want to call, tap on the lead, or swipe the lead card.
- On the Lead Details page, tap the
 icon, or tap the lead’s phone number.
 - From the options, tap Cloud Call Lead, and wait for the call to initiate.
- Once the call is completed, the call details are available on the Activity History tab.
Once the call is completed, an outbound call activity is created on the Lead Activity History screen. If you haven’t installed the Universal Telephony Connector yet, install it and set up Call Log API. All inbound and outbound calls made through your Telephony account can be logged in LeadSquared by setting up Call Logs. These logs will be posted to LeadSquared as incoming/outgoing phone call activities.

9. Mobile Cloud Connector Mail Merge Fields
This section lists the various mail merge fields available in the Mobile Cloud Calling connector.
| Mail merge | Expected value | Description |
@AssociatedPhoneNumberInE164 |
+918050004000 |
User phone number in E164 format, i.e. with country code (CC), but without ‘-‘ (hyphen). |
@CustomerNumberInE164 |
+916565656565 |
Lead phone number in E164 format, i.e. with country code (CC), but without ‘-‘ (hyphen). |
@CustomerNumberWithoutCountryCode |
6565656565 |
Lead phone number without country code (CC). |
@CustomerNumber |
+91-6565656565 |
Lead phone number with country code (CC). |
@VirtualNumber |
+91-8050004000 |
Virtual Number with country code (CC). |
@OpportunityId |
oppId |
Opportunity ID |
@AssociatedPhoneNumberWithoutCountryCode |
8050004000 |
User phone number without country code (CC). |
9.1 Lead Mail Merge Fields
Note: Custom fields created for leads are not displayed here.
| Field | Description |
@{Lead:mx_Alternate_Number, } |
Lead alternate number |
@{Lead:Groups, } |
Lead sales groups |
@{Lead:Longitude, } |
Lead location – longitude |
@{Lead:Latitude, } |
Lead location – latitude |
@{Lead:SourceIPAddress, } |
Lead source IP address |
@{Lead:SourceReferrerURL, } |
Lead source referrer URL |
@{Lead:ConversionReferrerURL, } |
Lead conversion referrer URL |
@{Lead:LeadAge, } |
Lead age |
@{Lead:GTalkId, } |
Lead Google Talk ID |
@{Lead:TwitterId, } |
Lead Twitter ID |
@{Lead:FacebookId, } |
Lead Facebook ID |
@{Lead:LinkedInId, } |
Lead LinkedIn ID |
@{Lead:SkypeId, } |
Lead Skype ID |
@{Lead:GooglePlusId, } |
Lead Google Plus ID |
@{Lead:CurrentOptInStatus, } |
The lead’s current opt-in status |
@{Lead:OptInDate, } |
Lead opt-in date |
@{Lead:OptInDetails, } |
Lead opt-in details |
@{Lead:LastOptInEmailSentDate, } |
Lead’s last opt-in email date |
@{Lead:PhotoUrl, } |
Lead photo URL |
@{Lead:SourceReferrer, } |
Lead source referrer |
@{Lead:SourceContent, } |
Lead source content |
@{Lead:FirstLandingPageSubmissionDate, } |
Lead first landing page submission date |
@{Lead:FirstLandingPageSubmissionId, } |
Lead first landing page submission ID |
@{Lead:RelatedLandingPageId, } |
Lead related landing page ID |
@{Lead:SourceMedium, } |
Lead source medium |
@{Lead:LastVisitDate,} |
Lead last visit date |
@{Lead:NotableEventdate, } |
Lead last notable activity date |
@{Lead:NotableEvent, } |
Lead last notable activity |
@{Lead:SourceCampaign, } |
Lead source campaign |
@{Lead:CreatedByName, } |
Lead created by |
@{Lead:ModifiedByName, } |
Lead modified by |
@{Lead:ProspectActivityName_Max, } |
Lead last activity |
@{Lead:ProspectActivityDate_Max, } |
Lead last activity date |
@{Lead:EngagementScore, } |
Lead engagement score |
@{Lead:Origin, } |
Lead origin |
@{Lead:Revenue, } |
Lead order value |
@{Lead:MailingPreferences, } |
Lead mailing preferences |
@{Lead:ProspectActivityDate_Min, } |
Lead first activity date |
@{Lead:Web_Referrer, } |
Lead web referrer |
@{Lead:Web_RefKeyword,} |
Lead web referrer keyword |
@{Lead:LeadLastModifiedOn,} |
Lead recently modified on |
@{Lead:QualityScore01, } |
Lead quality score, 01 |
@{Lead:TimeZone, } |
Lead time zone |
@{Lead:ProspectActivityId_Min, } |
Lead first activity ID |
@{Lead:ProspectActivityId_Max, } |
Lead last activity ID |
@{Lead:DoNotSMS, } |
Do Not SMS lead |
@{Lead:Score, } |
Lead score |
@{Lead:ProspectStage, } |
Lead stage |
@{Lead:DoNotTrack, } |
Do not track lead |
@{Lead:DoNotEmail, } |
Do not email lead |
@{Lead:DoNotCall, } |
Do not call lead |
@{Lead:JobTitle, } |
Lead job title |
@{Lead:Company, } |
Lead company |
@{Lead:StatusCode, } |
Lead status code |
@{Lead:Website, } |
Lead website |
@{Lead:Mobile, } |
Lead mobile number |
@{Lead:Phone, } |
Lead phone number |
@{Lead:Notes, } |
Lead notes |
@{Lead:Source, } |
Lead source |
@{Lead:EmailAddress, } |
Lead email |
@{Lead:LastName, } |
Lead last name |
@{Lead:FirstName, } |
Lead first name |
@{Lead:ProspectAutoId, } |
Lead identification number |
@{Lead:PageViewsPerVisit, } |
Lead page views per visit |
@{Lead:OwnerIdEmailAddress, } |
Lead owner email |
@{Lead:OwnerIdName, } |
Lead owner |
@{Lead:mx_Zip, } |
Lead location – zip |
@{Lead:mx_Country, } |
Lead location – country |
@{Lead:mx_State, } |
Lead location – state |
@{Lead:mx_City, } |
Lead location – city |
@{Lead:mx_Street2, } |
Lead location – street address 2 |
@{Lead:mx_Street1, } |
Lead location – street address 1 |
@{Lead:RelatedProspectId, } |
Lead related prospect ID |
@{Lead:AvgTimePerVisit, } |
Lead average time per visit |
@{Lead:ProspectID, } |
Lead prospect ID |
@{Lead:TotalVisits, } |
Lead total visits |
@{Lead:LeadConversionDate, } |
Lead prospect creation date |
@{Lead:ModifiedOn, } |
Lead modified on |
@{Lead:ModifiedBy, } |
Lead modified by ID |
@{Lead:CreatedOn, } |
Lead created on |
@{Lead:CreatedBy, } |
Lead created by ID |
@{Lead:OwnerId, } |
Lead owner |
@{Lead:DeletionStatusCode, } |
Lead deletion status code |
@{Lead:StatusReason, } |
Lead status reason |
9.2 User Mail Merge Fields
Note: Only the fields mx_Custom_1 to mx_Custom_10 are listed here. Other custom user fields will not appear, as they are created based on specific requirements.
| Field | Description |
@{User:Availability, } |
User availability |
@{User:IsCheckInEnabled, } |
Is user check-in enabled |
@{User:State, } |
User’s state |
@{User:PhoneOthers, } |
User’s other phone numbers |
@{User:PhoneMobile, } |
User’s phone (Mobile) |
@{User:PhoneMain, } |
User’s phone (Main) |
@{User:AutoUserId, } |
User identification number (Auto ID) |
@{User:TemplateNames, } |
Permission templates |
@{User:mx_Custom_10, } |
Custom 10 |
@{User:mx_Custom_9, } |
Custom 9 |
@{User:mx_Custom_8, } |
Custom 8 |
@{User:mx_Custom_7, } |
Custom 7 |
@{User:mx_Custom_6, } |
Custom 6 |
@{User:mx_Custom_5, } |
Custom 5 |
@{User:mx_Custom_4, } |
Custom 4 |
@{User:mx_Custom_3, } |
Custom 3 |
@{User:mx_Custom_2, } |
Custom 2 |
@{User:mx_Custom_1, } |
Custom 1 |
@{User:TelephonyAgentId, } |
Telephony Agent Id |
@{User:ZipCode, } |
User location – zip Code |
@{User:Country, } |
User location – country |
@{User:City, } |
User location – city |
@{User:EmployeeId, } |
User Employee ID |
@{User:longText, } |
Long text |
@{User:dateTime, } |
User date-time |
@{User:Test, } |
Test |
@{User:number, } |
number |
@{User:mx_Custom_Gender, } |
Gender |
@{User:ImportId, } |
Import ID |
@{User:DateOfResignation, } |
Date Of Resignation |
@{User:DateOfJoining, } |
Date Of Joining |
@{User:DateOfBirth, } |
Date Of Birth |
@{User:IsCheckedIn, } |
Is user checked in |
@{User:IsEmployee, } |
Is user Employee |
@{User:IsSoftPhoneEnabled, } |
Is SoftPhone enabled |
@{User:IsWorkingToday, } |
Is user working today |
@{User:TeamId, } |
User’s team ID |
@{User:WorkDayTemplateId, } |
User’s work day template |
@{User:HolidayCalendarId, } |
User’s holiday calendar |
@{User:LastCheckedIpAddress, } |
User’s last checked IP address |
@{User:CheckinCheckoutHistoryId, } |
User’s checkin-checkout history ID |
@{User:LastCheckedOn, } |
User last checked on |
@{User:IsAdministrator, } |
Is user an administrator |
@{User:DeletionStatusCode, } |
User deletion status code |
@{User:StatusReason, } |
User status reason |
@{User:StatusCode, } |
User status code |
@{User:AssociatedPhoneNumbers, } |
User associated phone numbers |
@{User:Signature_Text, } |
User signature text |
@{User:Signature_Html, } |
User signature HTML |
@{User:DateFormat, } |
User date format |
@{User:TimeZone, } |
User timezone |
@{User:IsBillingUser, } |
Is Billing User |
@{User:IsAgencyUser, } |
Is Agency User |
@{User:CreatedBy, } |
User created by |
@{User:IsDefaultOwner, } |
Is Default Owner |
@{User:SessionID, } |
User session Id |
@{User:TMP_ForgotPassword, } |
TMP Forgot Password |
@{User:AuthToken, } |
User AuthToken |
@{User:Password, } |
User password |
@{User:EmailAddress, } |
User email address |
@{User:LastName, } |
User last name |
@{User:MiddleName, } |
User middle name |
@{User:FirstName, } |
User first name |
@{User:IsEmailSender, } |
Is user email sender |
@{User:Address, } |
User address |
@{User:OfficeLocationName, } |
User office location name |
@{User:AvailabilityStatus, } |
User availability status |
@{User:Skills, } |
User skills |
@{User:SalesRegions, } |
User sales regions |
@{User:Department, } |
User department |
@{User:Team, } |
User old team |
@{User:Designation, } |
User designation |
@{User:PhotoUrl, } |
User photo URL |
@{User:Groups, } |
User sales groups |
@{User:UserID, } |
User Id |
@{User:ManagerUserId, } |
Manager Name |
@{User:UserType, } |
User type |
@{User:IsPhoneCallAgent, } |
Is User a phone call agent |
@{User:ModifyAllLeadsOfGroup, } |
Modify All Leads Of Group |
@{User:ViewAllLeadsOfGroup, } |
View All Leads Of Group |
@{User:Role, } |
User role |
@{User:ModifiedOn, } |
User modified on |
@{User:ModifiedBy, } |
User modified by |
@{User:CreatedOn, } |
User created on |
9. Provider Set-up Guides
Read the articles below to configure specific telephony providers for LeadSquared Mobile Cloud Calling –
Any Questions?
Did you find this article helpful? Please let us know any feedback you may have in the comments section below. We’d love to hear from you and help you out!
Can it be selectively enabled for small set of users.?
Hi Atul, Mobile Cloud Calling can’t be enabled for just a subset of users. It can only be enabled for all users in your account.
Instructions not clear, trying to integrate knowlarity. Please improve Agent popup instruction section
Hi, Anindya. The integration steps for Knowlarity are hosted on a separate document. Did you get a chance to go through it – https://f2.leadsquaredcdn.com/t/t20170817174751/content/common/documents/Knowlarity%20Set-up.pdf
If you still have questions, please let us know and we’ll resolve them for you.
Good instructions!
Thank you, Linda!