1. Feature Overview
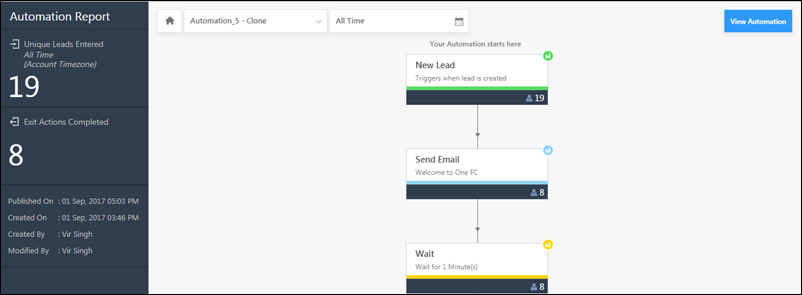
Once you’ve published an automation, you can check its performance in real-time by accessing the automation report. You’ll get insights into leads who’ve –
- Entered the automation.
- Transitioned through the various steps (action cards) or taken a certain course of action.
- Exited the automation successfully or stalled at a certain step.
You can use this real-time feedback to tailor your automations to ensure you’re reaching your goals.
Note: This report shows the performance of the entire Automation. You can also check how an Automation has executed on a specific Lead, Opportunity, or Account through –
2. Accessing the Automation Report
To access the report –
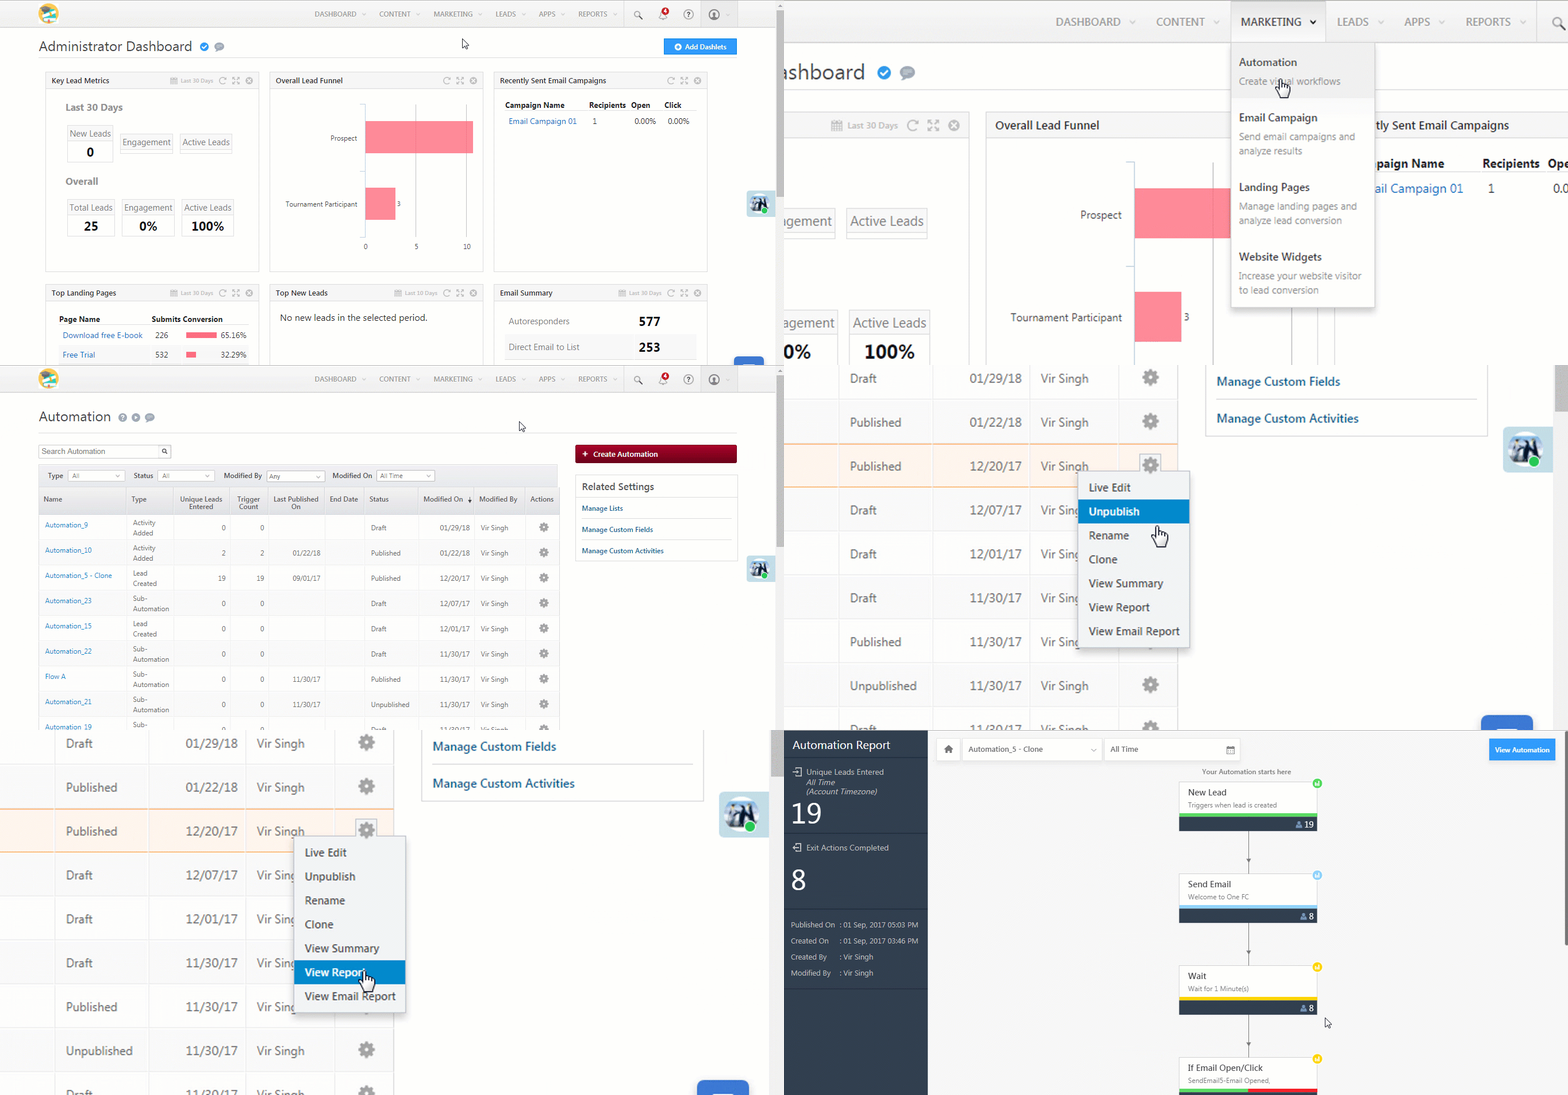
- From your dashboard, navigate to Marketing>Automation.
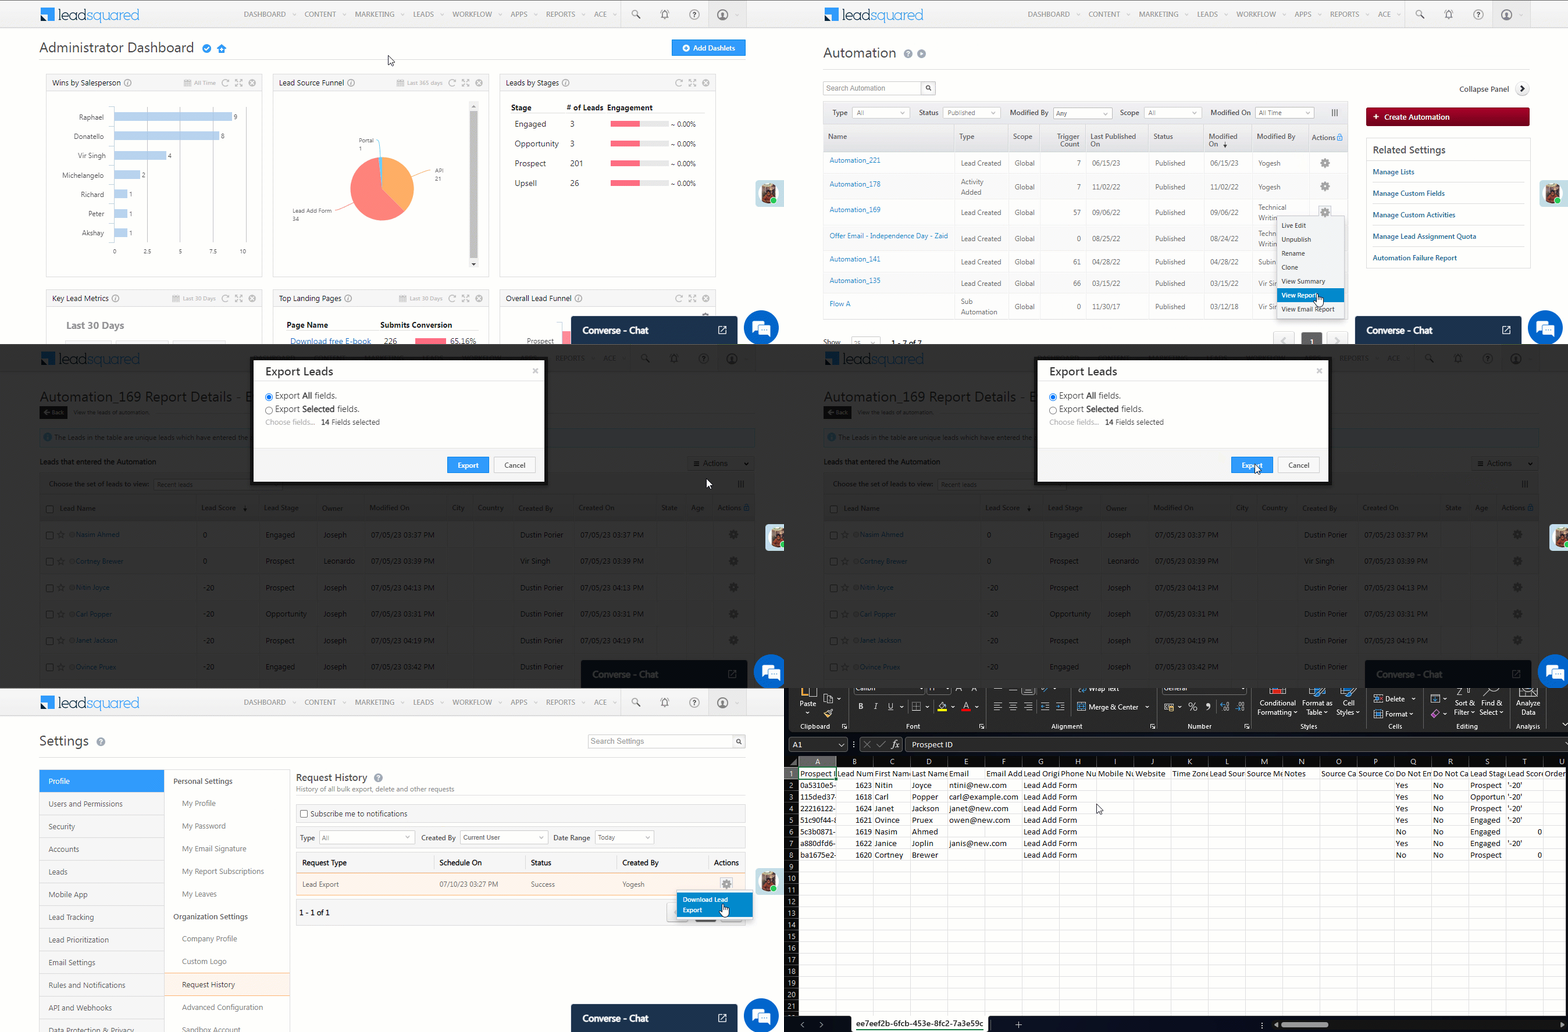
- In the automation listing grid, hover the mouse over the wheel icon alongside the automation you want to view the report for, then click View Report.
3. Report Insights
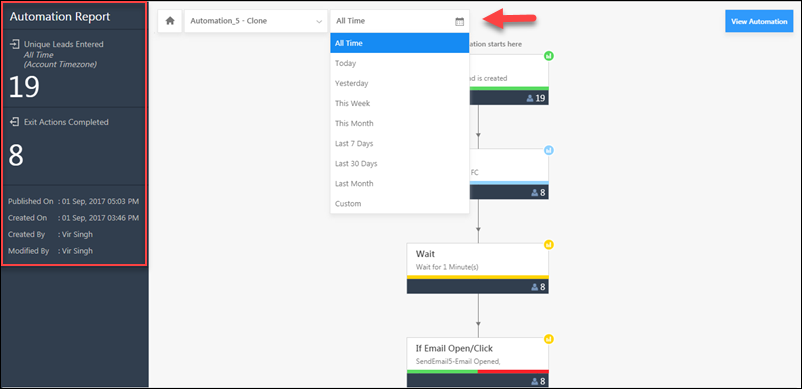
The left side of the automation report page tells you how many unique leads have entered your automation based on the trigger you’ve set. It shows you how many leads have exited or transitioned through the steps or stages and also gives you the created on and published on date and time of the automation.
You can also apply date filters to view leads entering or transitioning through the automation within a specific time frame.
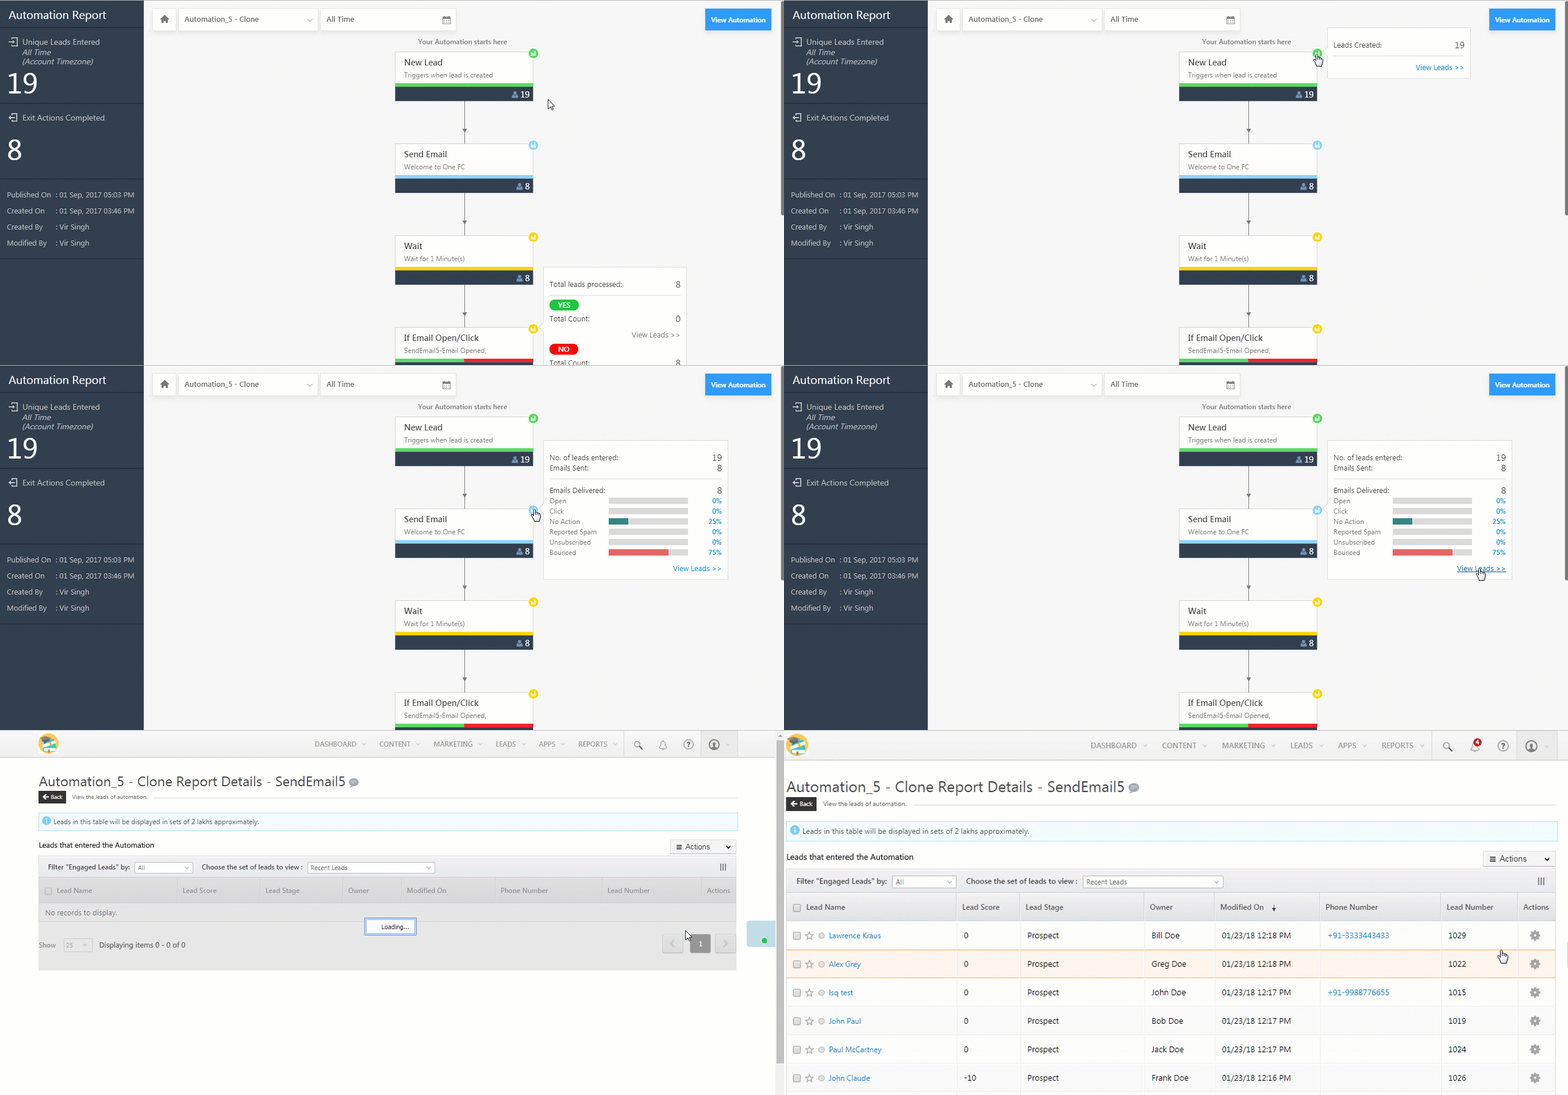
You can also view metrics on each automation card and the specific leads at a certain stage of the automation. To do so, click the graph icon alongside the automation card. Then click View Leads to see the list of leads who are at that particular step in the automation –
4. Export Lead List for an Automation Card
To view and export the list of leads that have entered a specific card in a published automation –
- Navigate to the published automation, hover your cursor over
 , and click View Report.
 - On the automation card for which you want to view the list of leads, click the bar graph icon
 , and then click View Leads.
 - On the Automation_ Report Details page, hover your cursor over
 , and click Export Leads.
- If needed, you can select specific leads to export by clicking the checkbox
 next to their names.
- If needed, you can select specific leads to export by clicking the checkbox
- On the Export Leads pop-up, select the lead fields you want to export, and click Export.
- To view the export status, on the Export Report pop-up, click “here”. This will redirect you to the Request History page.
- Once the export request status is successful, hover your cursor over
 , and click Download Lead Export. You can view the lead list that was exported.
Note:
- The card-wise list of leads, opportunities and accounts in the automation report will only store data for the previous 90 days. This applies to ‘User’ and ‘At Regular Interval’ automations as well.
- The count of leads that entered each card will still be visible after 90 days. The lead list, however, will not display data prior to the last 90 days.
5. Email Reports
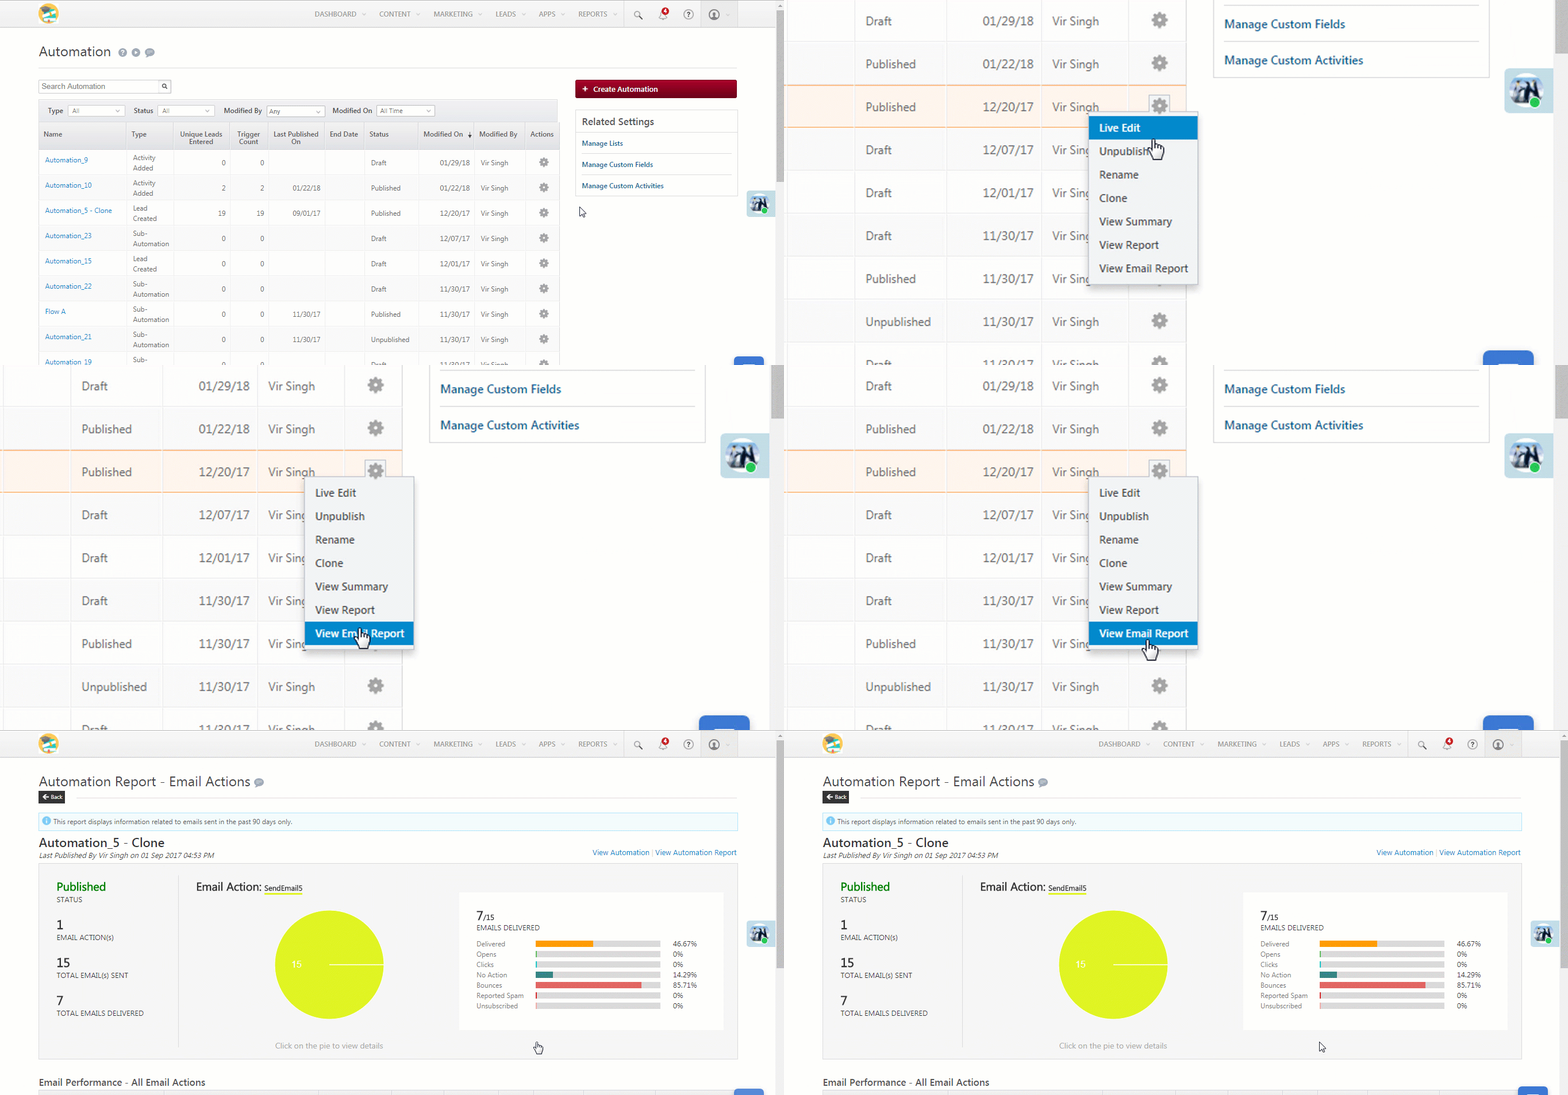
You can view email reports for automations that contain Send Email action cards –

The report gives you detailed information on your emails, including delivery rates, bounce rates, open rates, click rates and lots more.
You’ll see the View Email Report option for these automations when you hover the mouse over the wheel icon alongside the automation on the grid.
6. Export Lead List from an Email Report
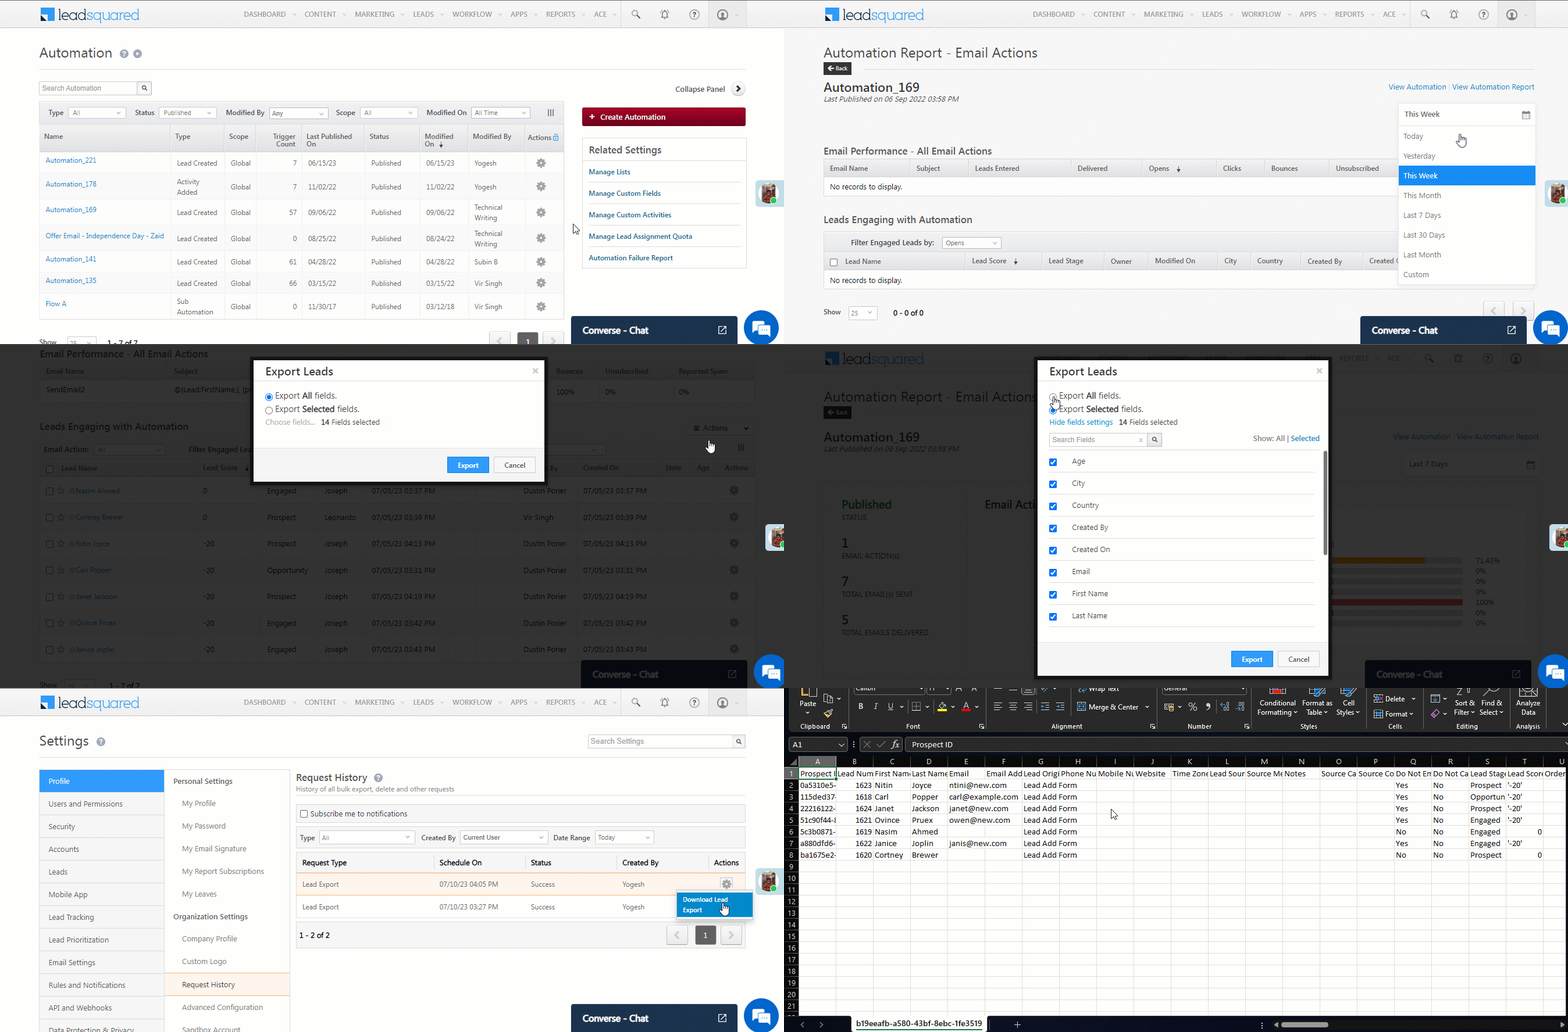
To export the lead list from the Email Report –
- Navigate to the published automation, hover your cursor over
 , and click View Email Report.
 - Click
 , and select the date range for which you want to export the leads.
 - Then, hover your cursor over
 , and click Export Leads.
- If needed, you can select specific leads to export by clicking the checkbox
 next to their names.
- If needed, you can select specific leads to export by clicking the checkbox
- On the Export Leads pop-up, select the lead fields you want to export, and click Export.
- To view the export status, on the Export Report pop-up, click “here”. This will redirect you to the Request History page.
- Once the export request status is successful, hover your cursor over
 , and click Download Lead Export. You can view the lead list that was exported.
7. Lead, Opportunity, and Accounts Automation Reports
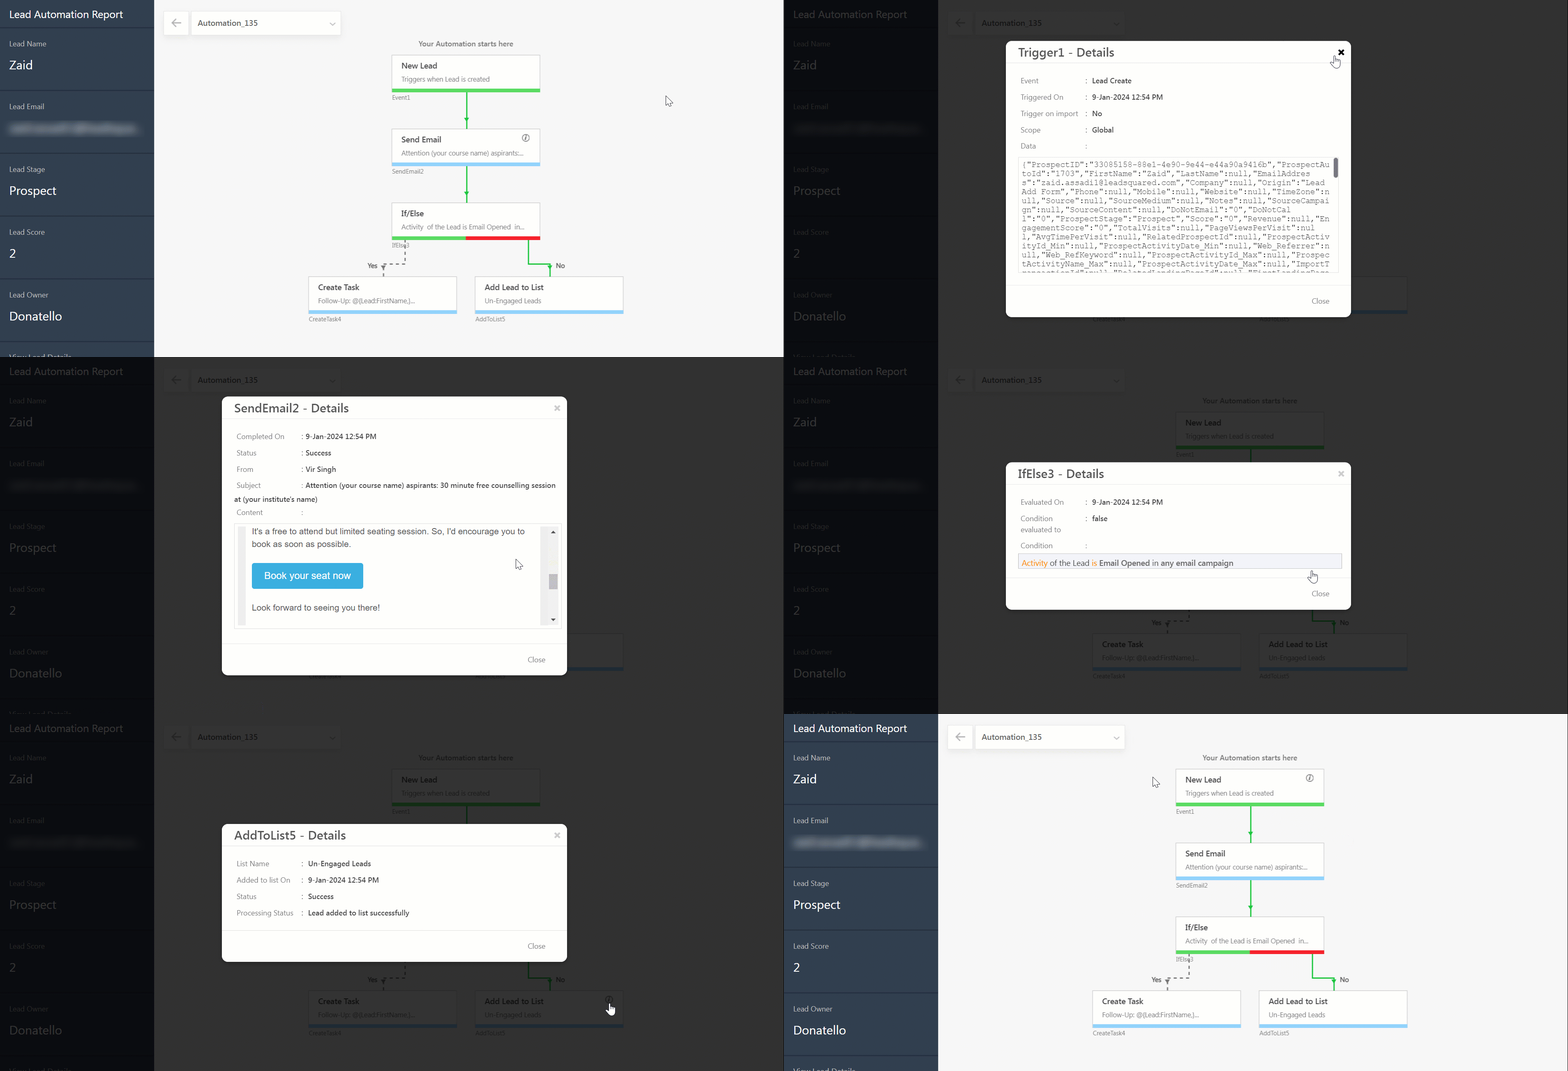
The Lead, Opportunity, And Automation-Level Automation Report displays how an Automation has executed on a specific lead, opportunity, or account. The report provides a timestamp for when each event was triggered and the completion time of each action card, and the resulting outcomes.
7.1 Lead Automation Report
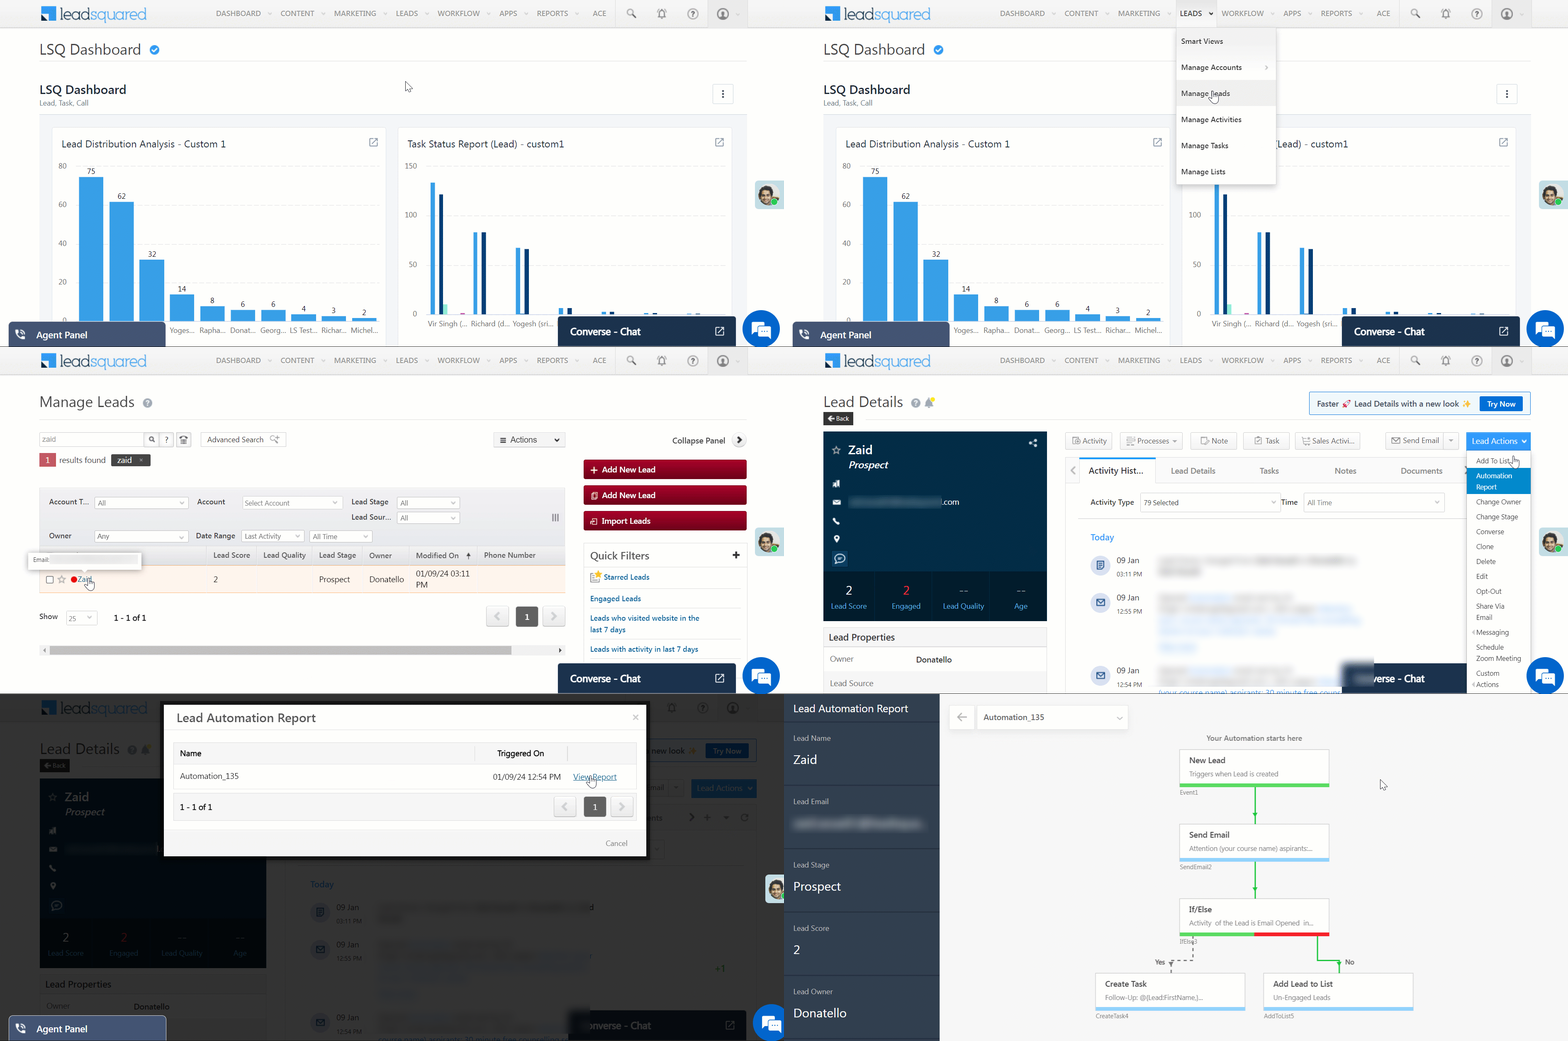
To access the automation report for a particular lead –
- Navigate to Leads>Manage Leads>Lead Details Page.
- Under the Lead Actions menu, click Automation Report.
- All Automation executed on the lead will be displayed; open a report by clicking View Report.
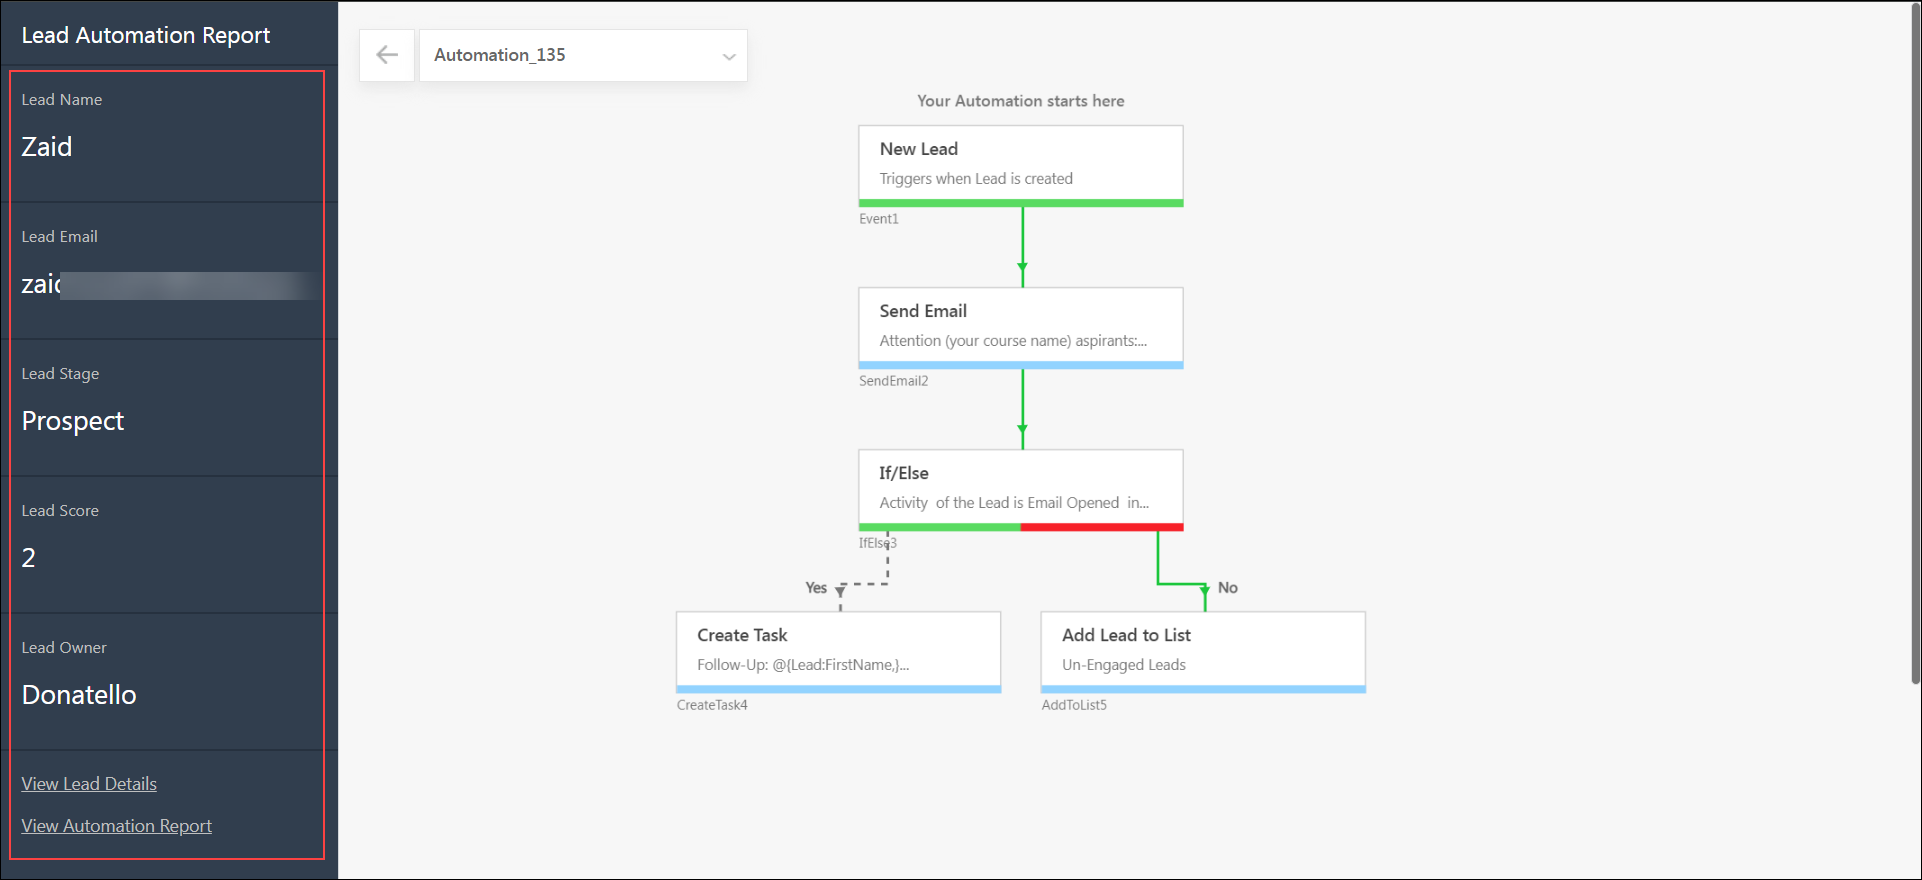
The basic details about the lead are provided on the left side of the report page. You will also find links to the Lead Details page and to view the entire Automation Report.
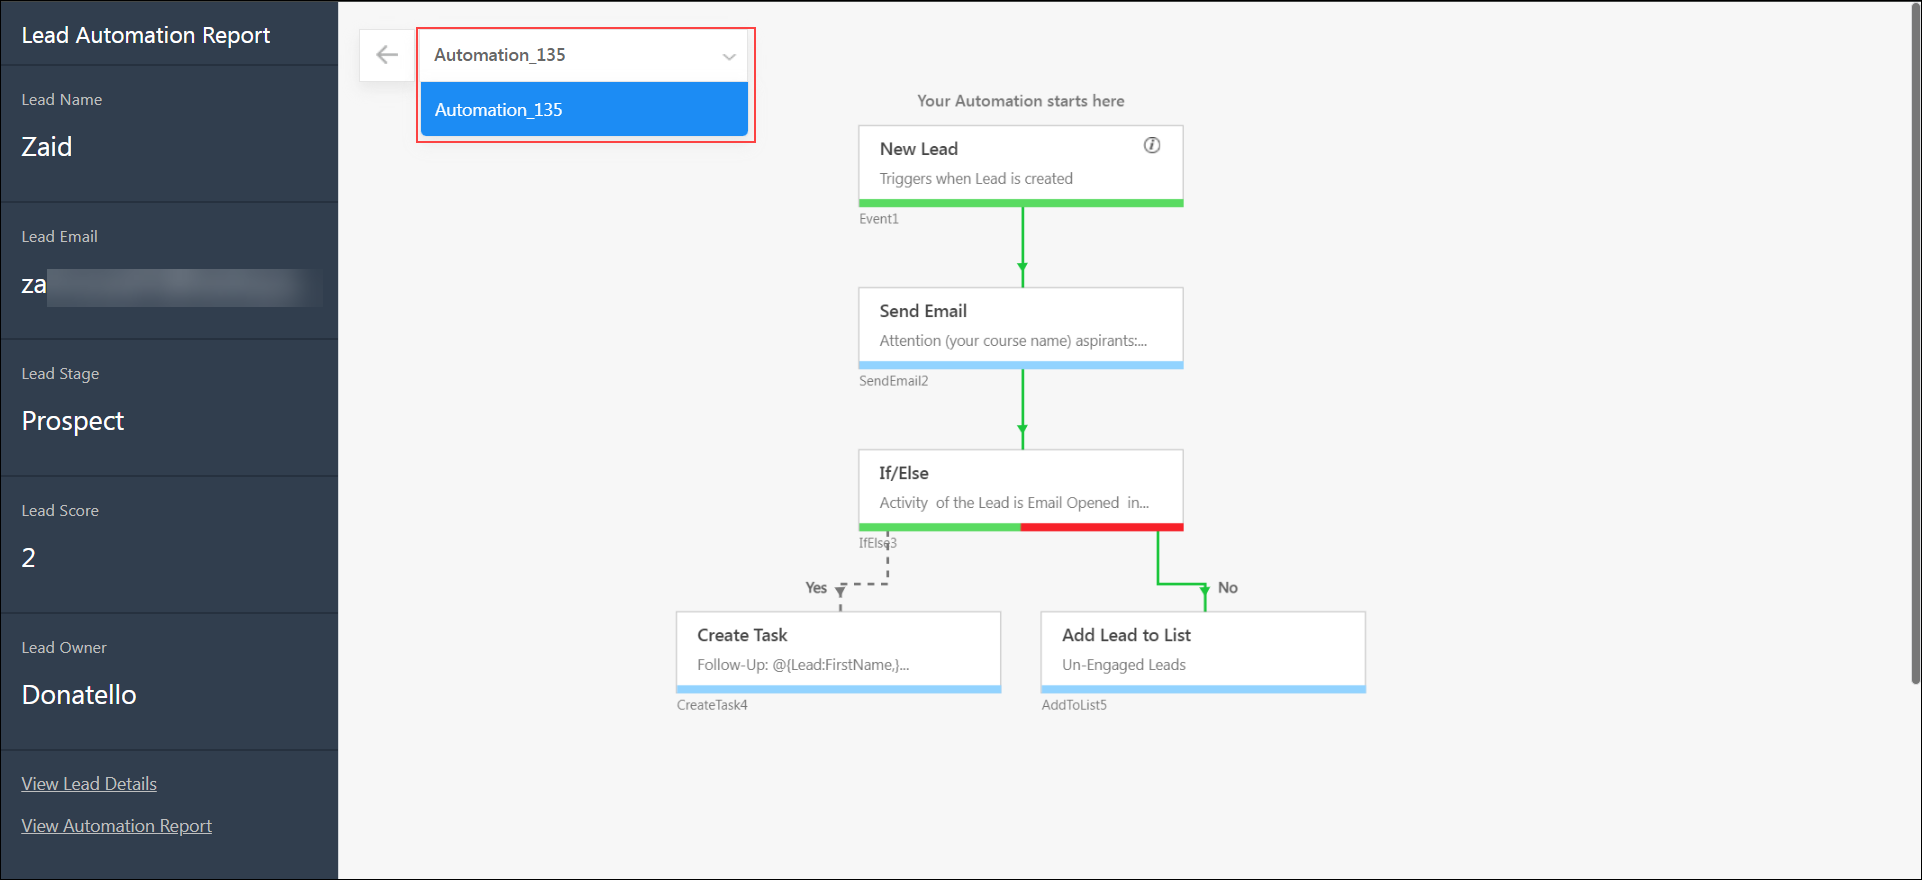
On this drop-down, all Automation executed on the respective lead will be displayed.
You can click on the info icon next to the trigger and action cards to see how the Automation was executed on the lead at each stage.
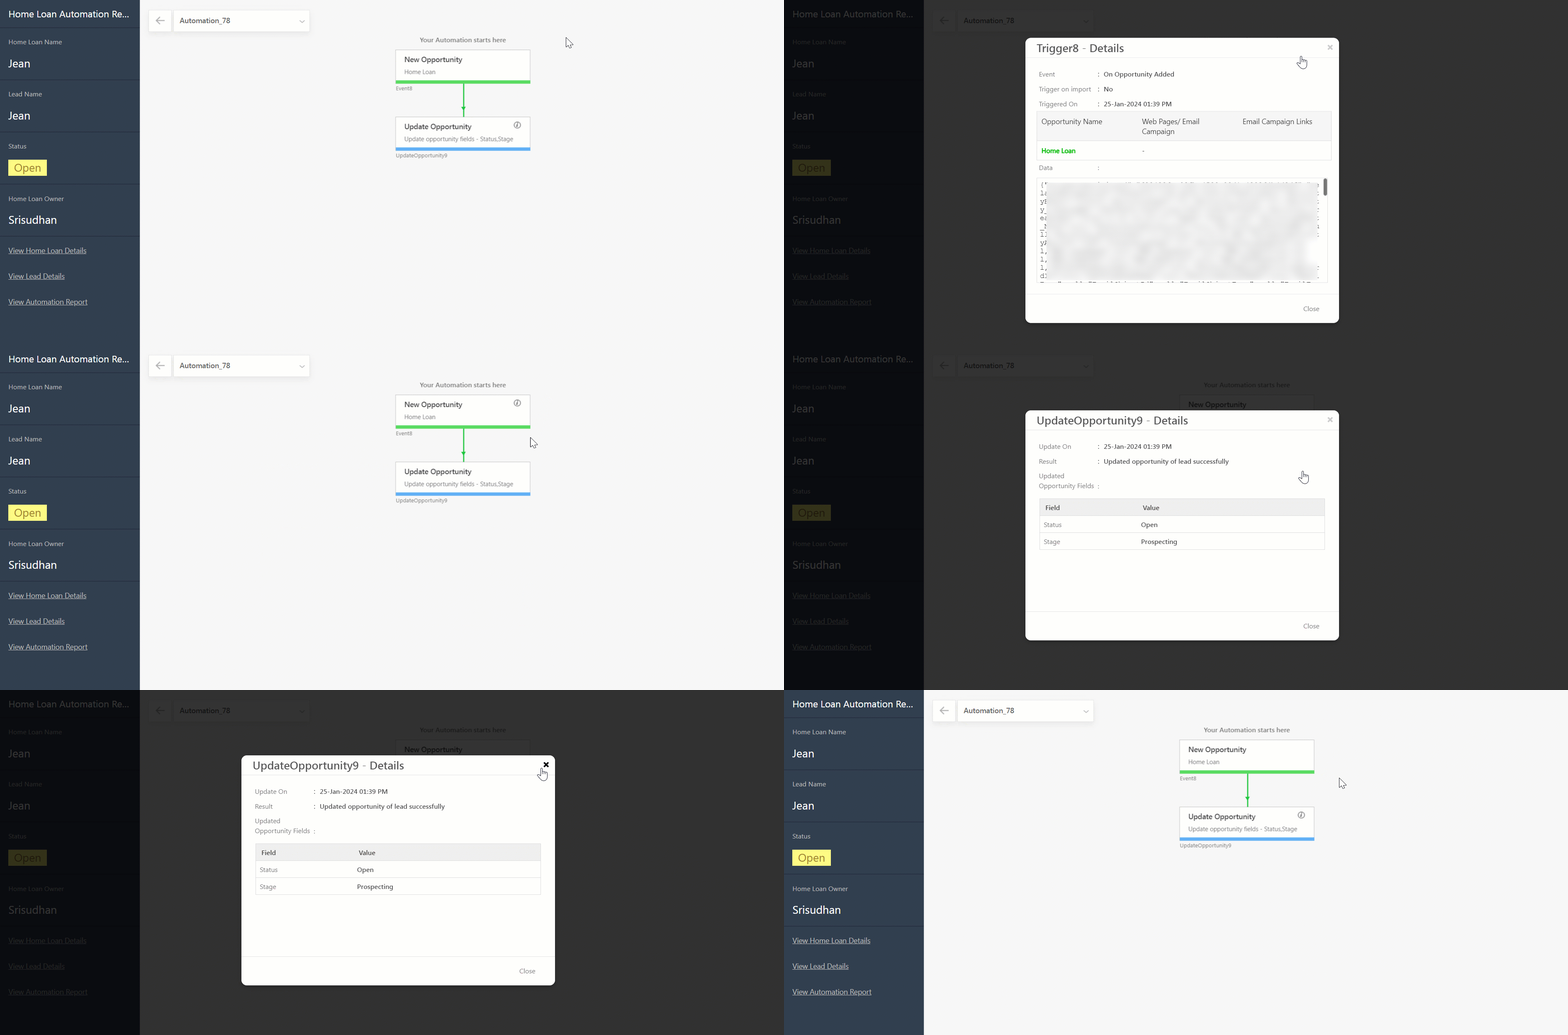
7.2 Opportunity Automation Report
To access the automation report for a particular Opportunity-
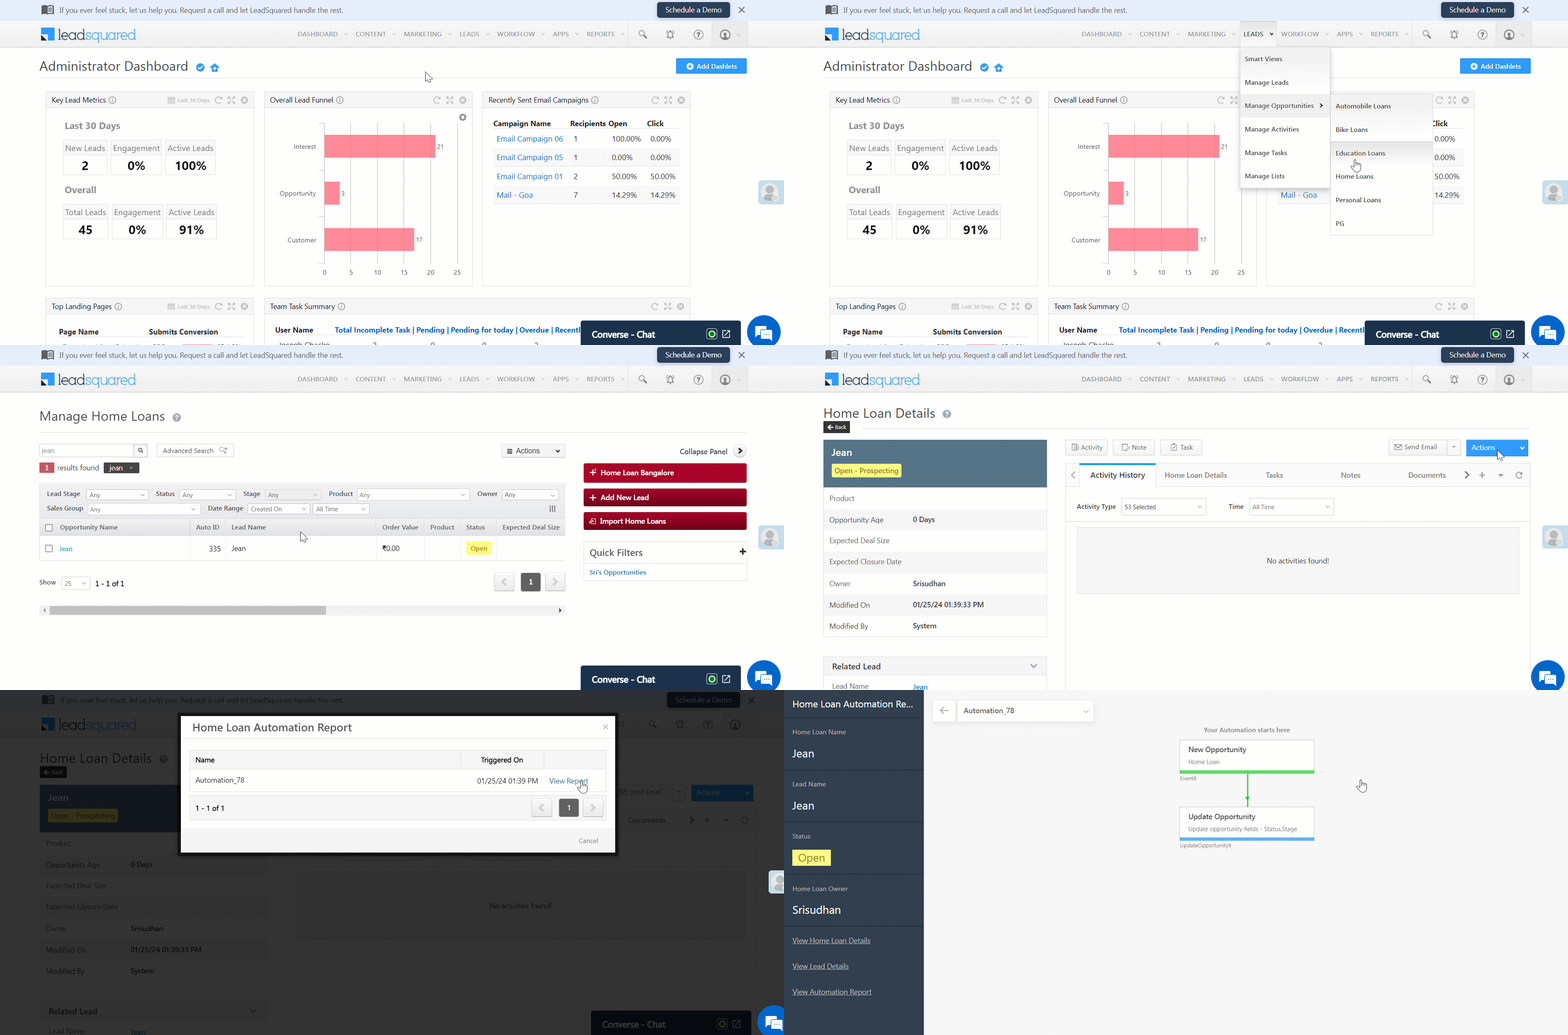
- Navigate to Leads>Manage Opportunities>Opportunity Type>Opportunity Details Page.
- Under the Actions menu, click Automation Report.
- All Automation executed on the Opportunity will be displayed; open a report by clicking View Report.
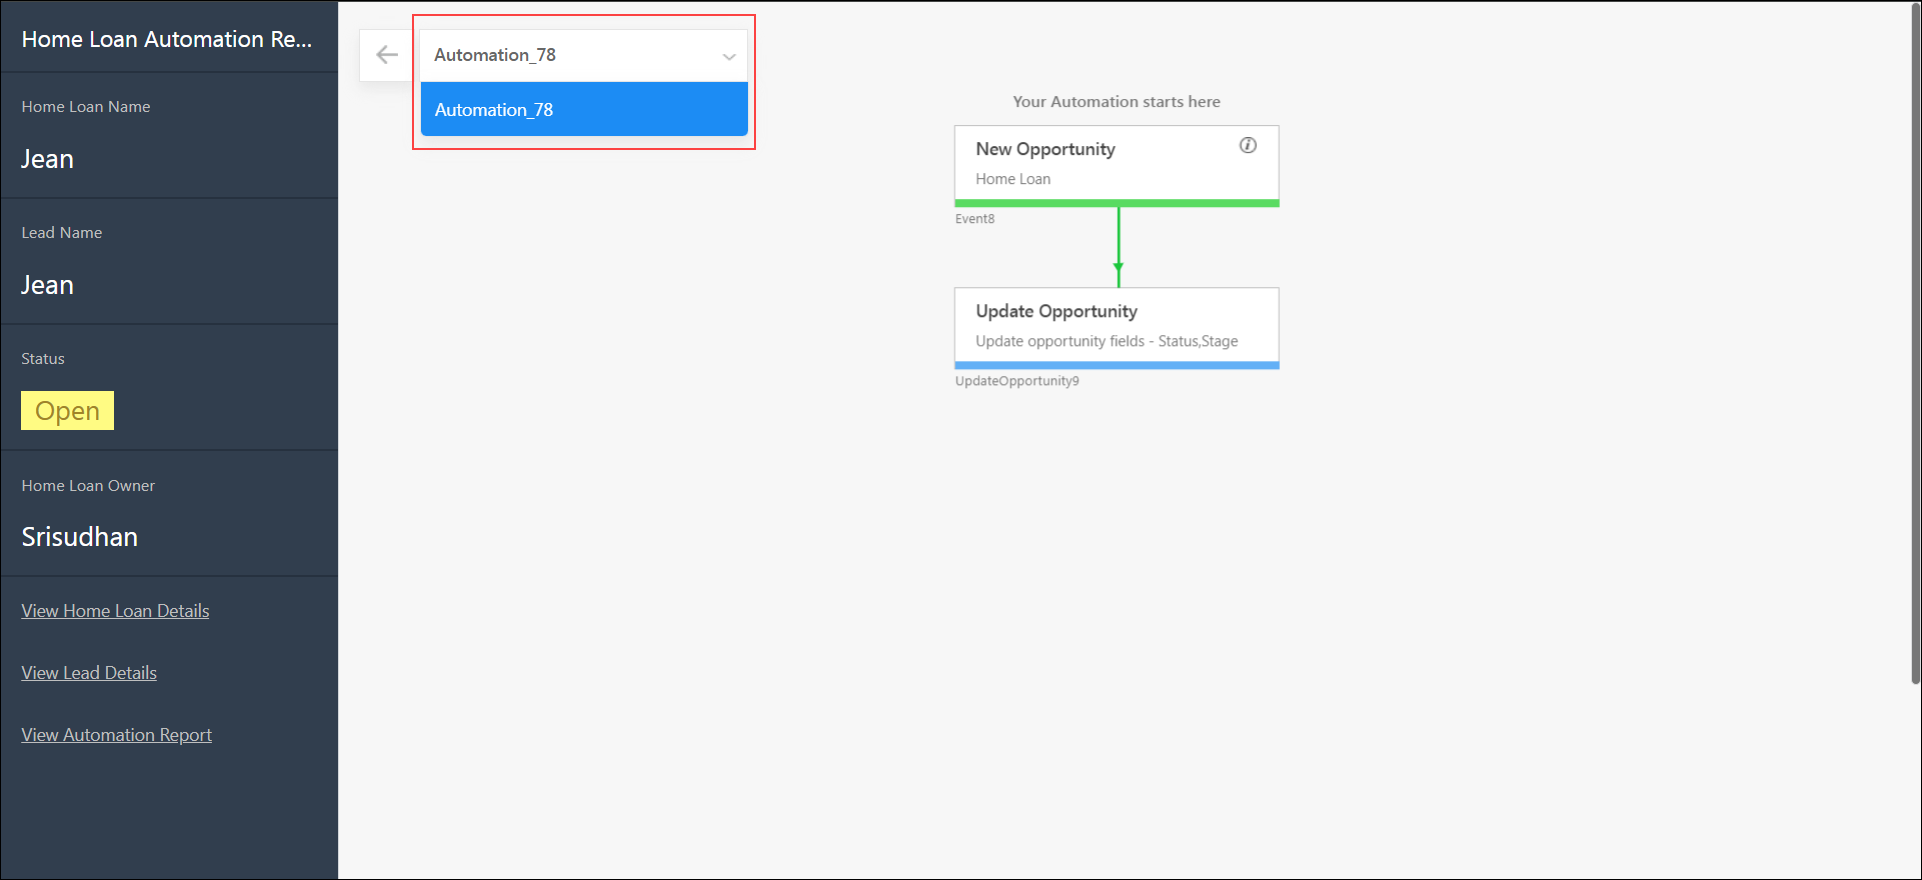
The basic details about the Opportunity are provided on the left side of the report page. You will also find links to the Opportunity Details page, Lead Details page, and the link to the entire Automation Report.
On this drop-down, all Automation executed on the respective Opportunity will be displayed.
You can click on the info icon next to the trigger and action cards to see how the Automation was executed on the Opportunity at each stage.
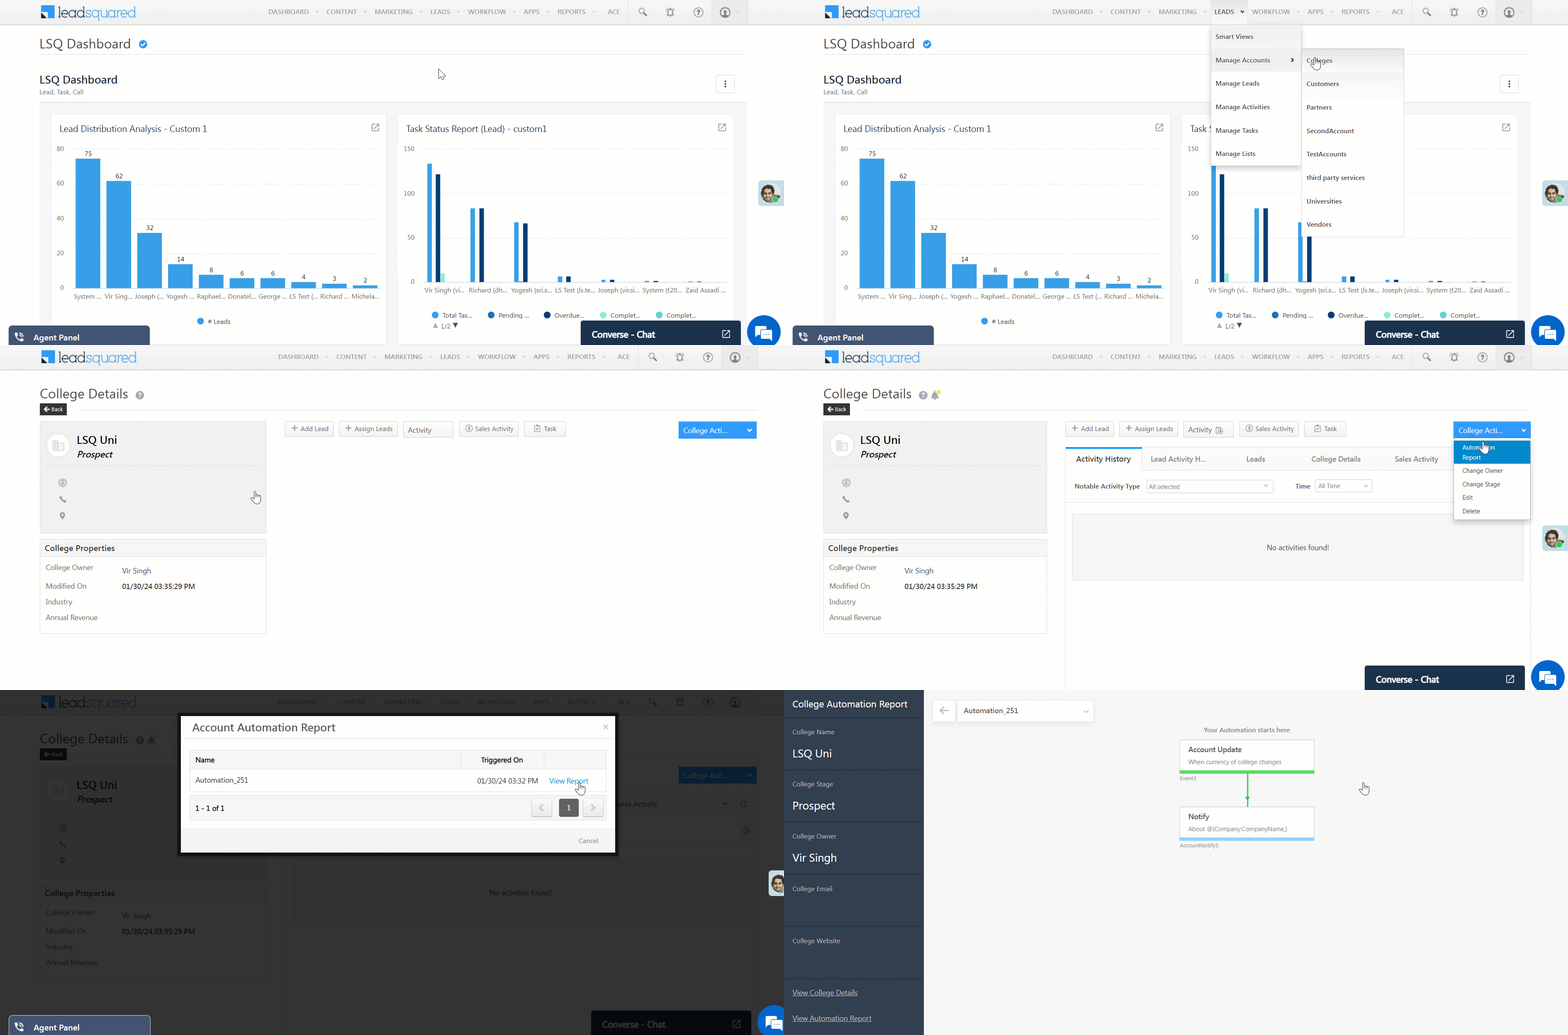
7.3 Account Automation Report
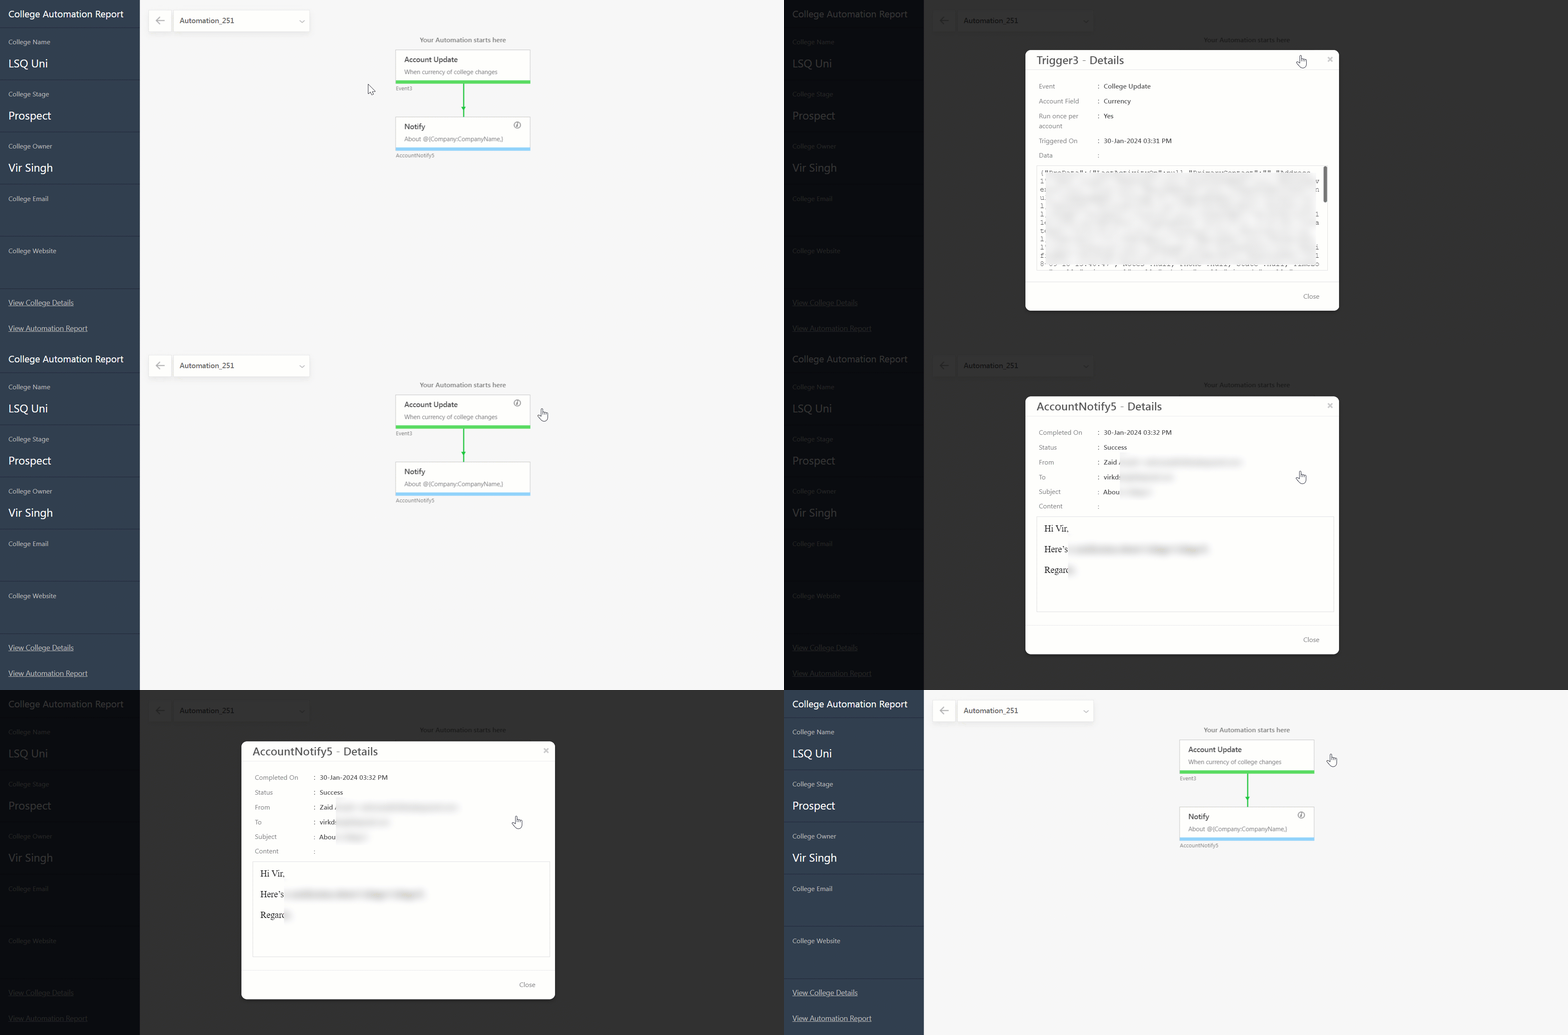
To access the automation report for a particular Account-
- Navigate to Leads>Manage Accounts>Account Type>Account Details Page.
- Under the Actions menu, click Automation Report.
- All Automation executed on the Account will be displayed; open a report by clicking View Report.
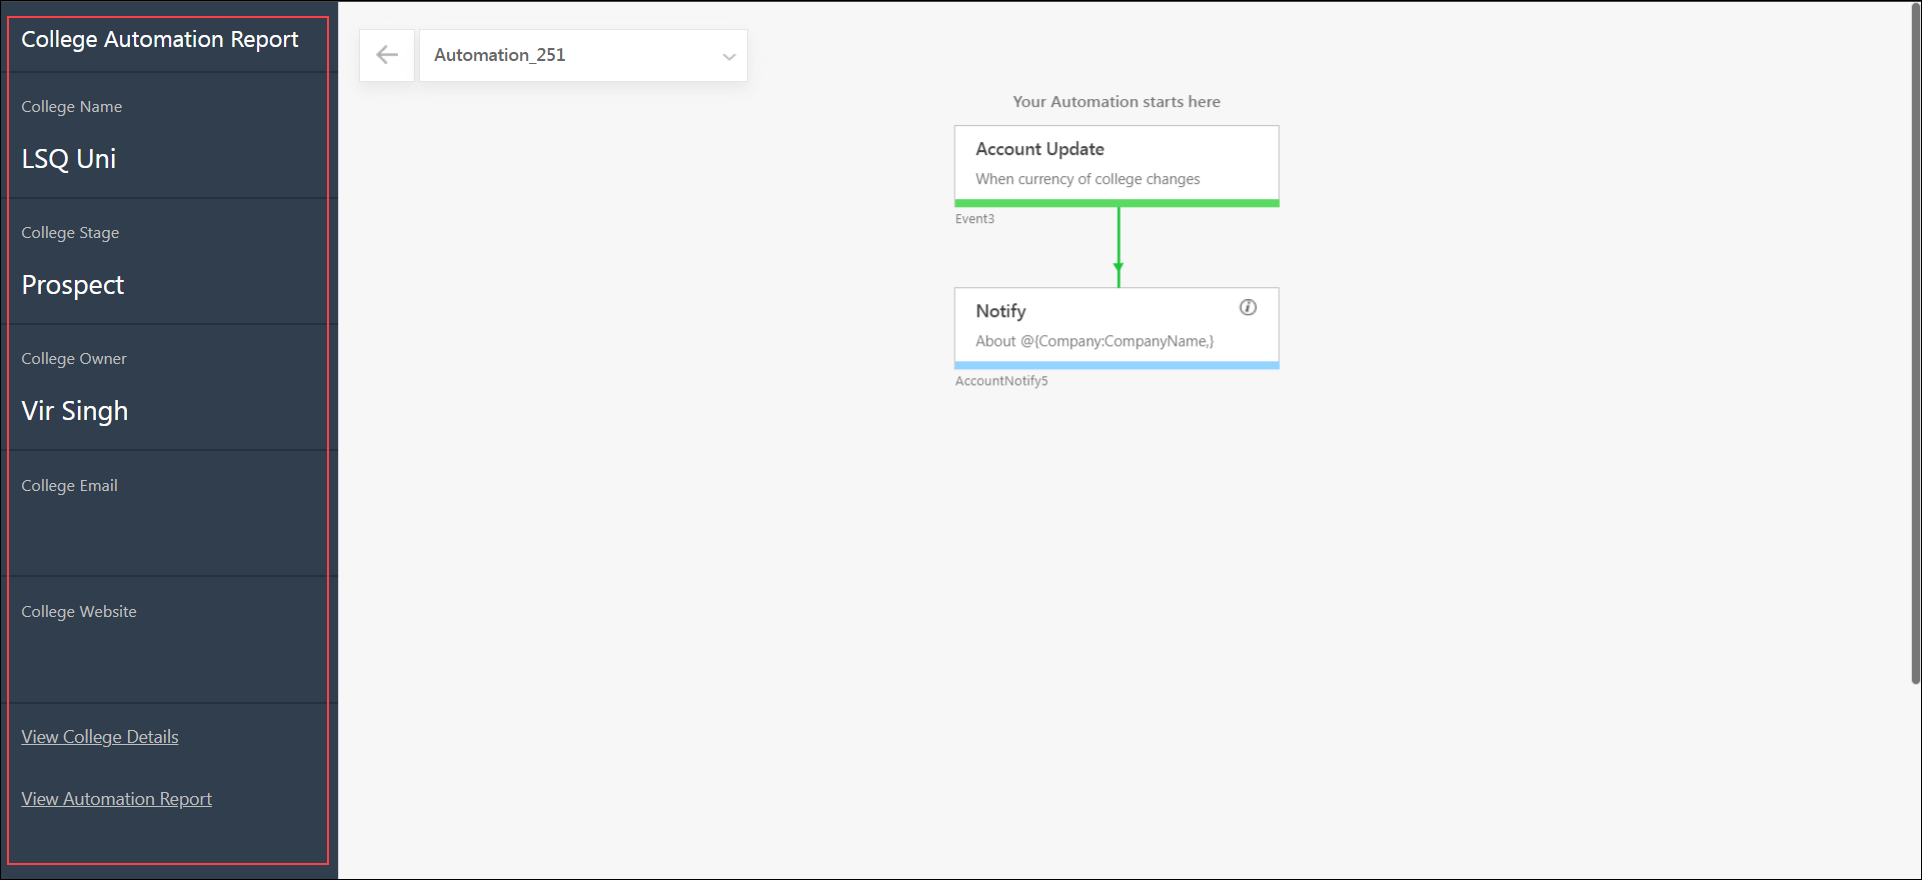
The basic details about the Account are provided on the left side of the report page. You will also find links to the Accounts Details page, and the link to the entire Automation Report.
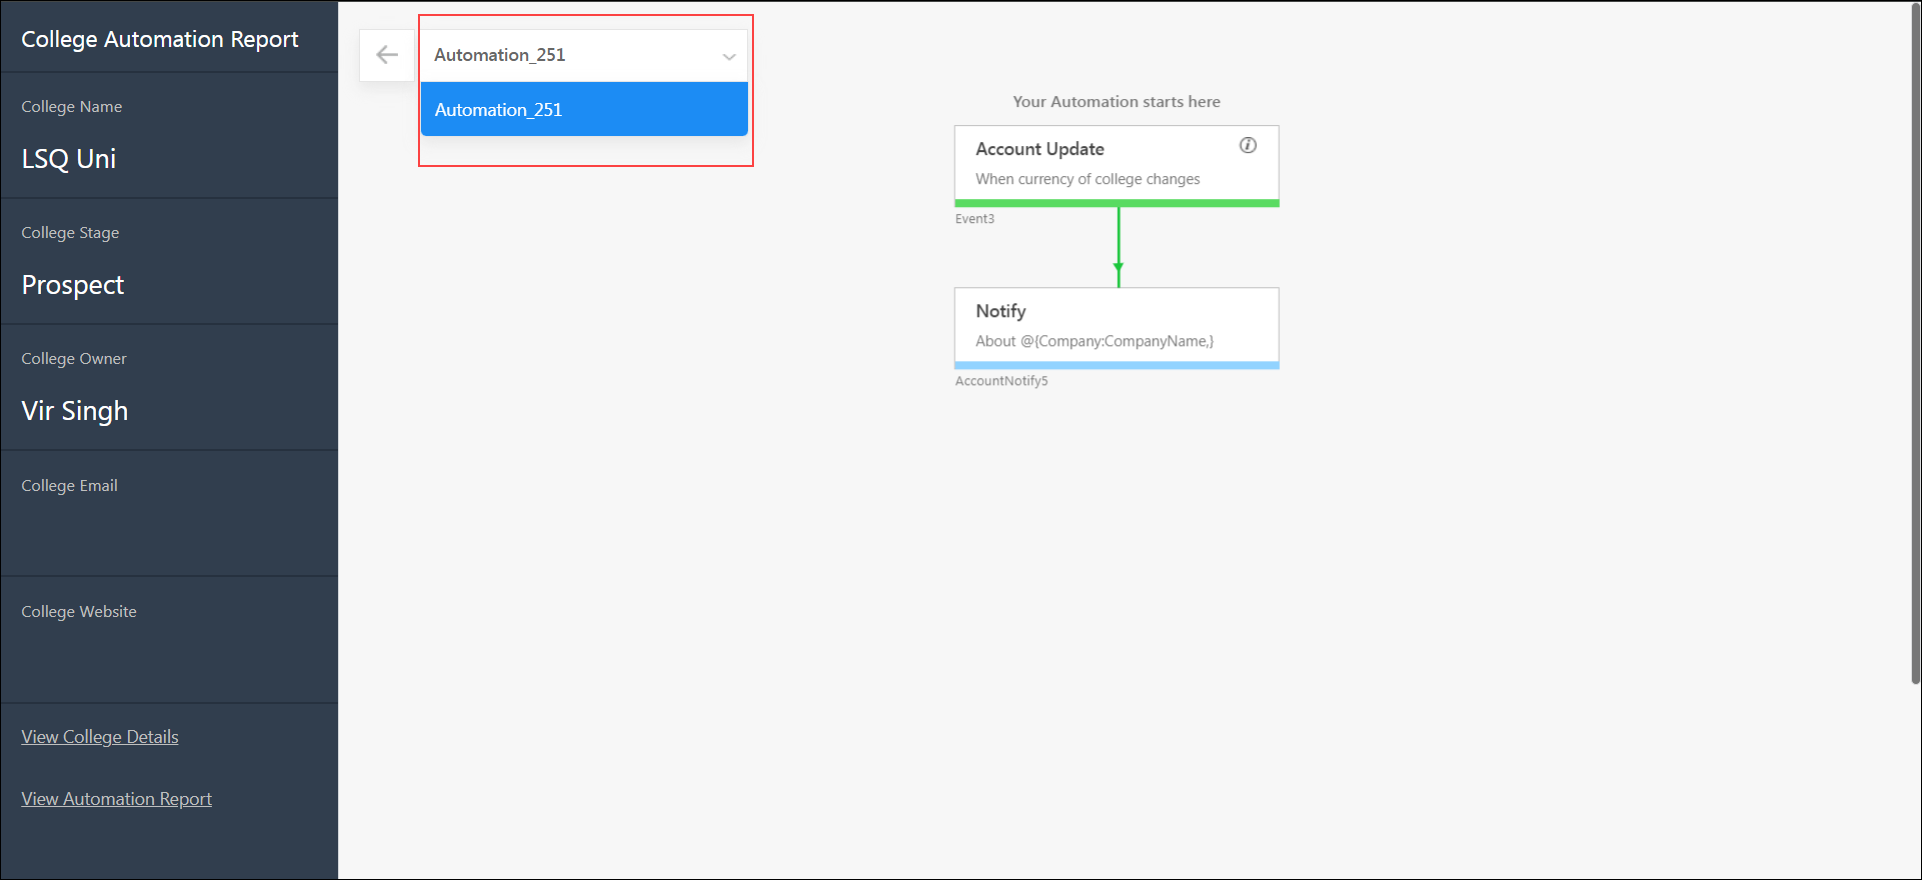
On this drop-down, all Automation executed on the respective Account will be displayed.
You can click on the info icon next to the trigger and action cards to see how the Automation was executed on the Account at each stage.
8. Troubleshooting
Unable to Create Opportunity via Automation
- Issue: Why am I getting the following error message when I try and create an opportunity via automation – “Duplicate detection engine failed marked opportunity duplicate but failed to return conflicted Opportunity Id. Failure message: field value for field name: ‘mx_custom_19’ of datatype: ‘String’ is mandatory”.
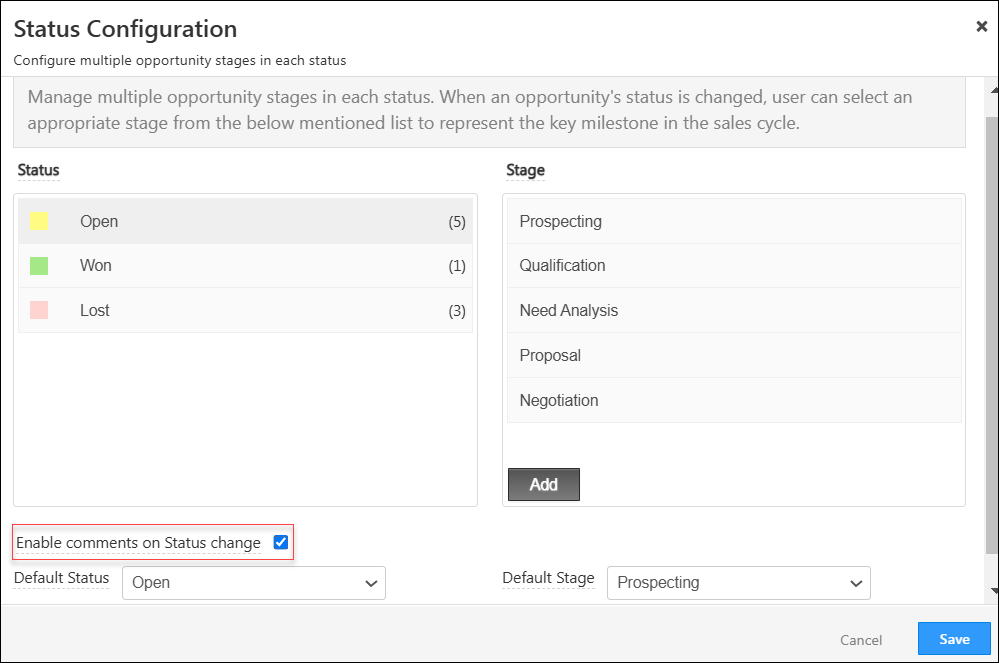
- Root Cause: The issue occurs because the option to Enable comments on status change is enabled in the Opportunity type configuration. Due to this, the ‘Comment’ field which is “mx_custom_19” is mandatory, and you must add a comment when changing the status of the opportunity. “mx_custom_19” is a system-reserved field used to capture comments on stage changes under “Opportunity Status.”
- Solution: To resolve the issue –
- Provide a value for the ‘Comment’ field while creating the opportunity through automation.
- If you don’t want to mandate comments on status changes for the opportunity, disable the Enable comments on status change setting for the Opportunity Type.
9. FAQs
What does “Exit Actions Completed” mean in the Automation Report?
The Exit Actions Completed count in the Automation Report refers to leads who have successfully completed all steps in the automation, reaching the final card.
This is not the same as the Remove Leads from Automation condition set in the trigger. That condition is used to stop a lead from entering or progressing further in the automation based on specific criteria. It does not contribute to the “Exit Actions Completed” number.
Why is the number of leads in “Exit Actions Completed” lower than the number who entered the automation?
Not all leads who enter an automation will reach the final step. The Exit Actions Completed metric only counts leads who completed the entire flow and reached the last step. If a lead exits the automation earlier, due to a conditions set in the trigger, in other condition cards, or via another exit path, they will not be counted in this metric.
Why can’t I see the automation report for a specific lead or opportunity? / Automation report missing for lead or opportunity / Can’t find triggered automation for a lead
If you’re unable to find the automation report for a specific lead or opportunity, it’s usually due to one of the following reasons:
- Mismatch in trigger type and details page
Automations are triggered either by leads or by opportunities:- If the automation has a lead-based trigger, its report will appear on the Lead Details page.
- If it has an opportunity-based trigger, it will appear on the Opportunity Details page.
Check that you’re viewing the report on the correct entity page.
- Data older than 90 days is not retained
Automation reports are only available for automations that were triggered in the last 90 days from today. If the automation ran before that, its report will no longer be visible.
Any Questions?
Do you have questions or issues with the content of this article? Let us know in the comments section below. We’ll get back to you ASAP!



can add these email automation reports to dashboard
Hi, Martec. This is currently not supported, but a workaround might be possible. Please contact your account manager, and explain the use case to them. They might be able to help you out.
Can you change the timeframe for the Email Report?
Hi, Elizabeth. We currently don’t support modifying the timeframe for Automation Email Reports. As a workaround, from the Automation View Report screen, you can change the date filters.
We are currently working on a feature that will allow you to change the timeframe for Automation Email Reports. Please keep checking the Product Updates page, where we’ll post an update once the feature is live. Hope this helps!
Can we increase the automation email reporting for beyond 30 days? If I am correct, it only shows results for leads who entered in the automation within the 30 day timeframe. With longer automations you don’t even seen emails that are sent to leads beyond 30 days after entering. Am I missing something?
Hi. This restriction is mainly in place for performance reasons. That said, your point makes complete sense, especially for longer-running automations. I’ll pass this feedback along to the product team so they can look into it for future improvements.
How to download automation report -email actions?
Hi Nihit,
On the Automation Report – Email Actions (View Email Reports) screen, you can export the list of leads by clicking the ‘Export Leads’ option under the ‘Actions’ menu. This feature wasn’t available at the time of your comment. Hope this helps!