


Get Started
Sales Suite
Field Ops
Marketing
Service CRM
Integrations & Apps
FloStack
Approvals Connector
1. Feature Overview
Leadsquared’s Approvals Flow Connector lets Admins set up seamless approval workflows between users and their respective managers, based on specific criteria. For example, an Admin can configure conditions necessitating approval for loan applications exceeding a threshold. In such cases, when a user inputs an amount surpassing this threshold, the relevant manager(s) will receive notifications, allowing them to either approve or reject the loan application.
2. Prerequisites
- You must be the Administrator of your LeadSquared account to install and configure this connector.
- This is a paid connector. To enable it, reach out to your account manager, or write to support@leadsquared.com.
- You must enable Lead Sharing. To enable this, contact support@leadsquared.com.
- You must enable Opportunity Sharing on the Advanced Configuration page.
- To use the Approvals feature on Opportunities, you must install the Custom Opportunity Tab connector. The Approval request will appear in the custom Opportunity tab.
3. UseCase
The Approvals feature can be used across industries –
| Industry | Use-case |
| Manufacturing |
|
| Lending |
|
| Education |
|
| Generic |
|
Example Use-case
In this article, we’ll set up an Approval Flow based on the following use case –
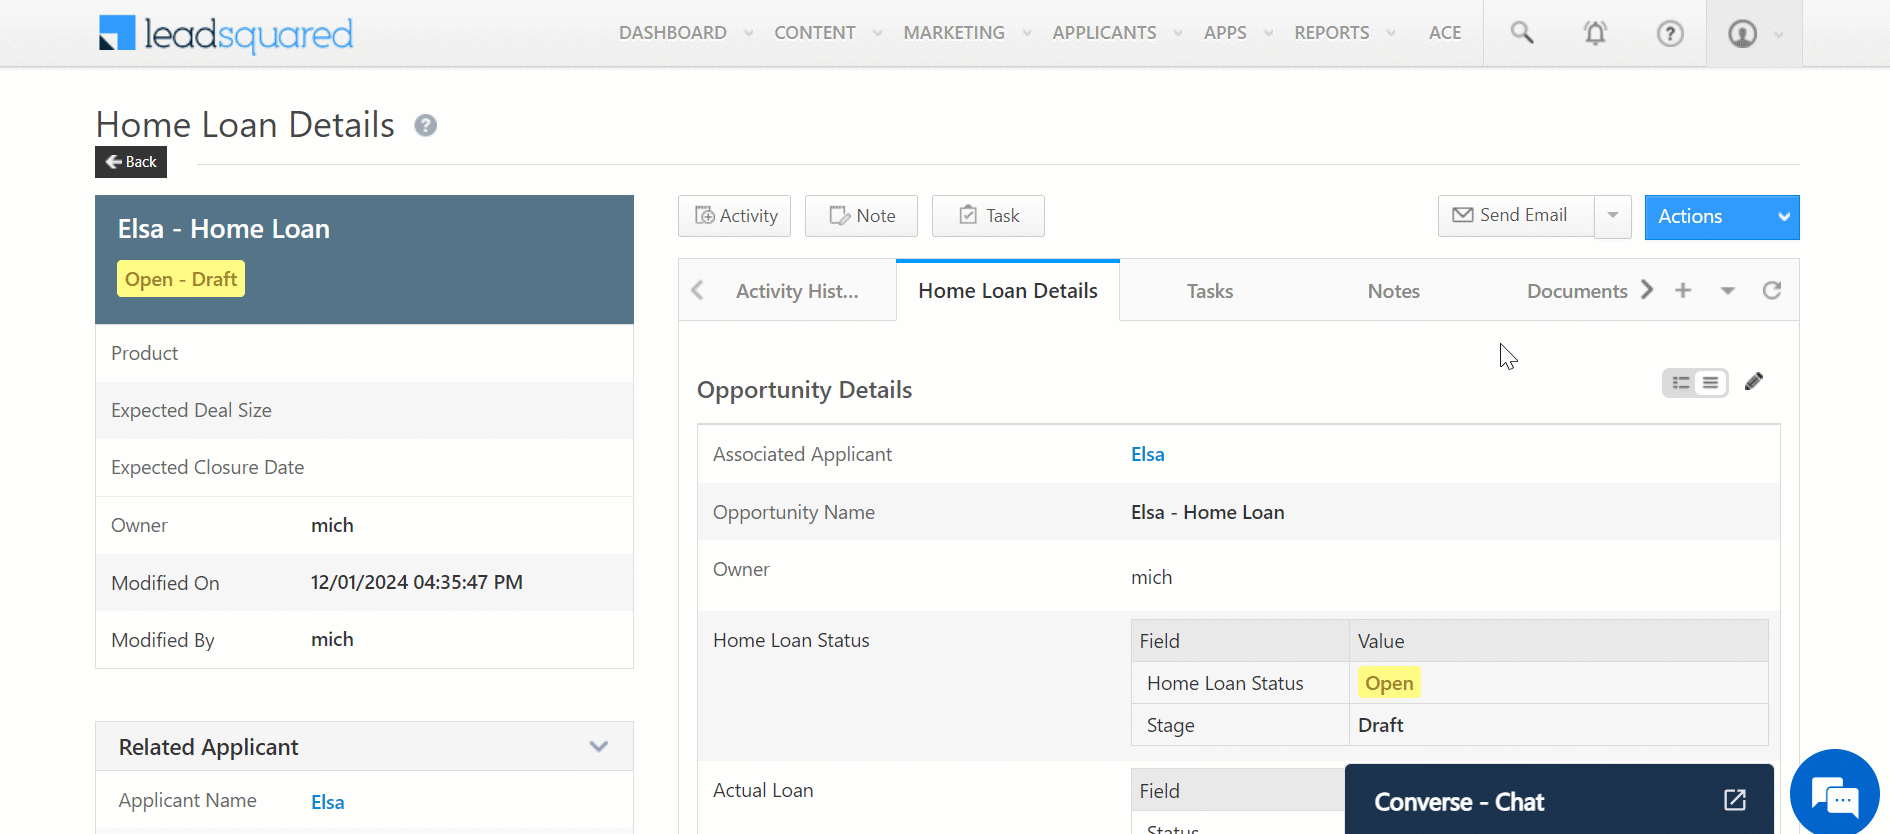
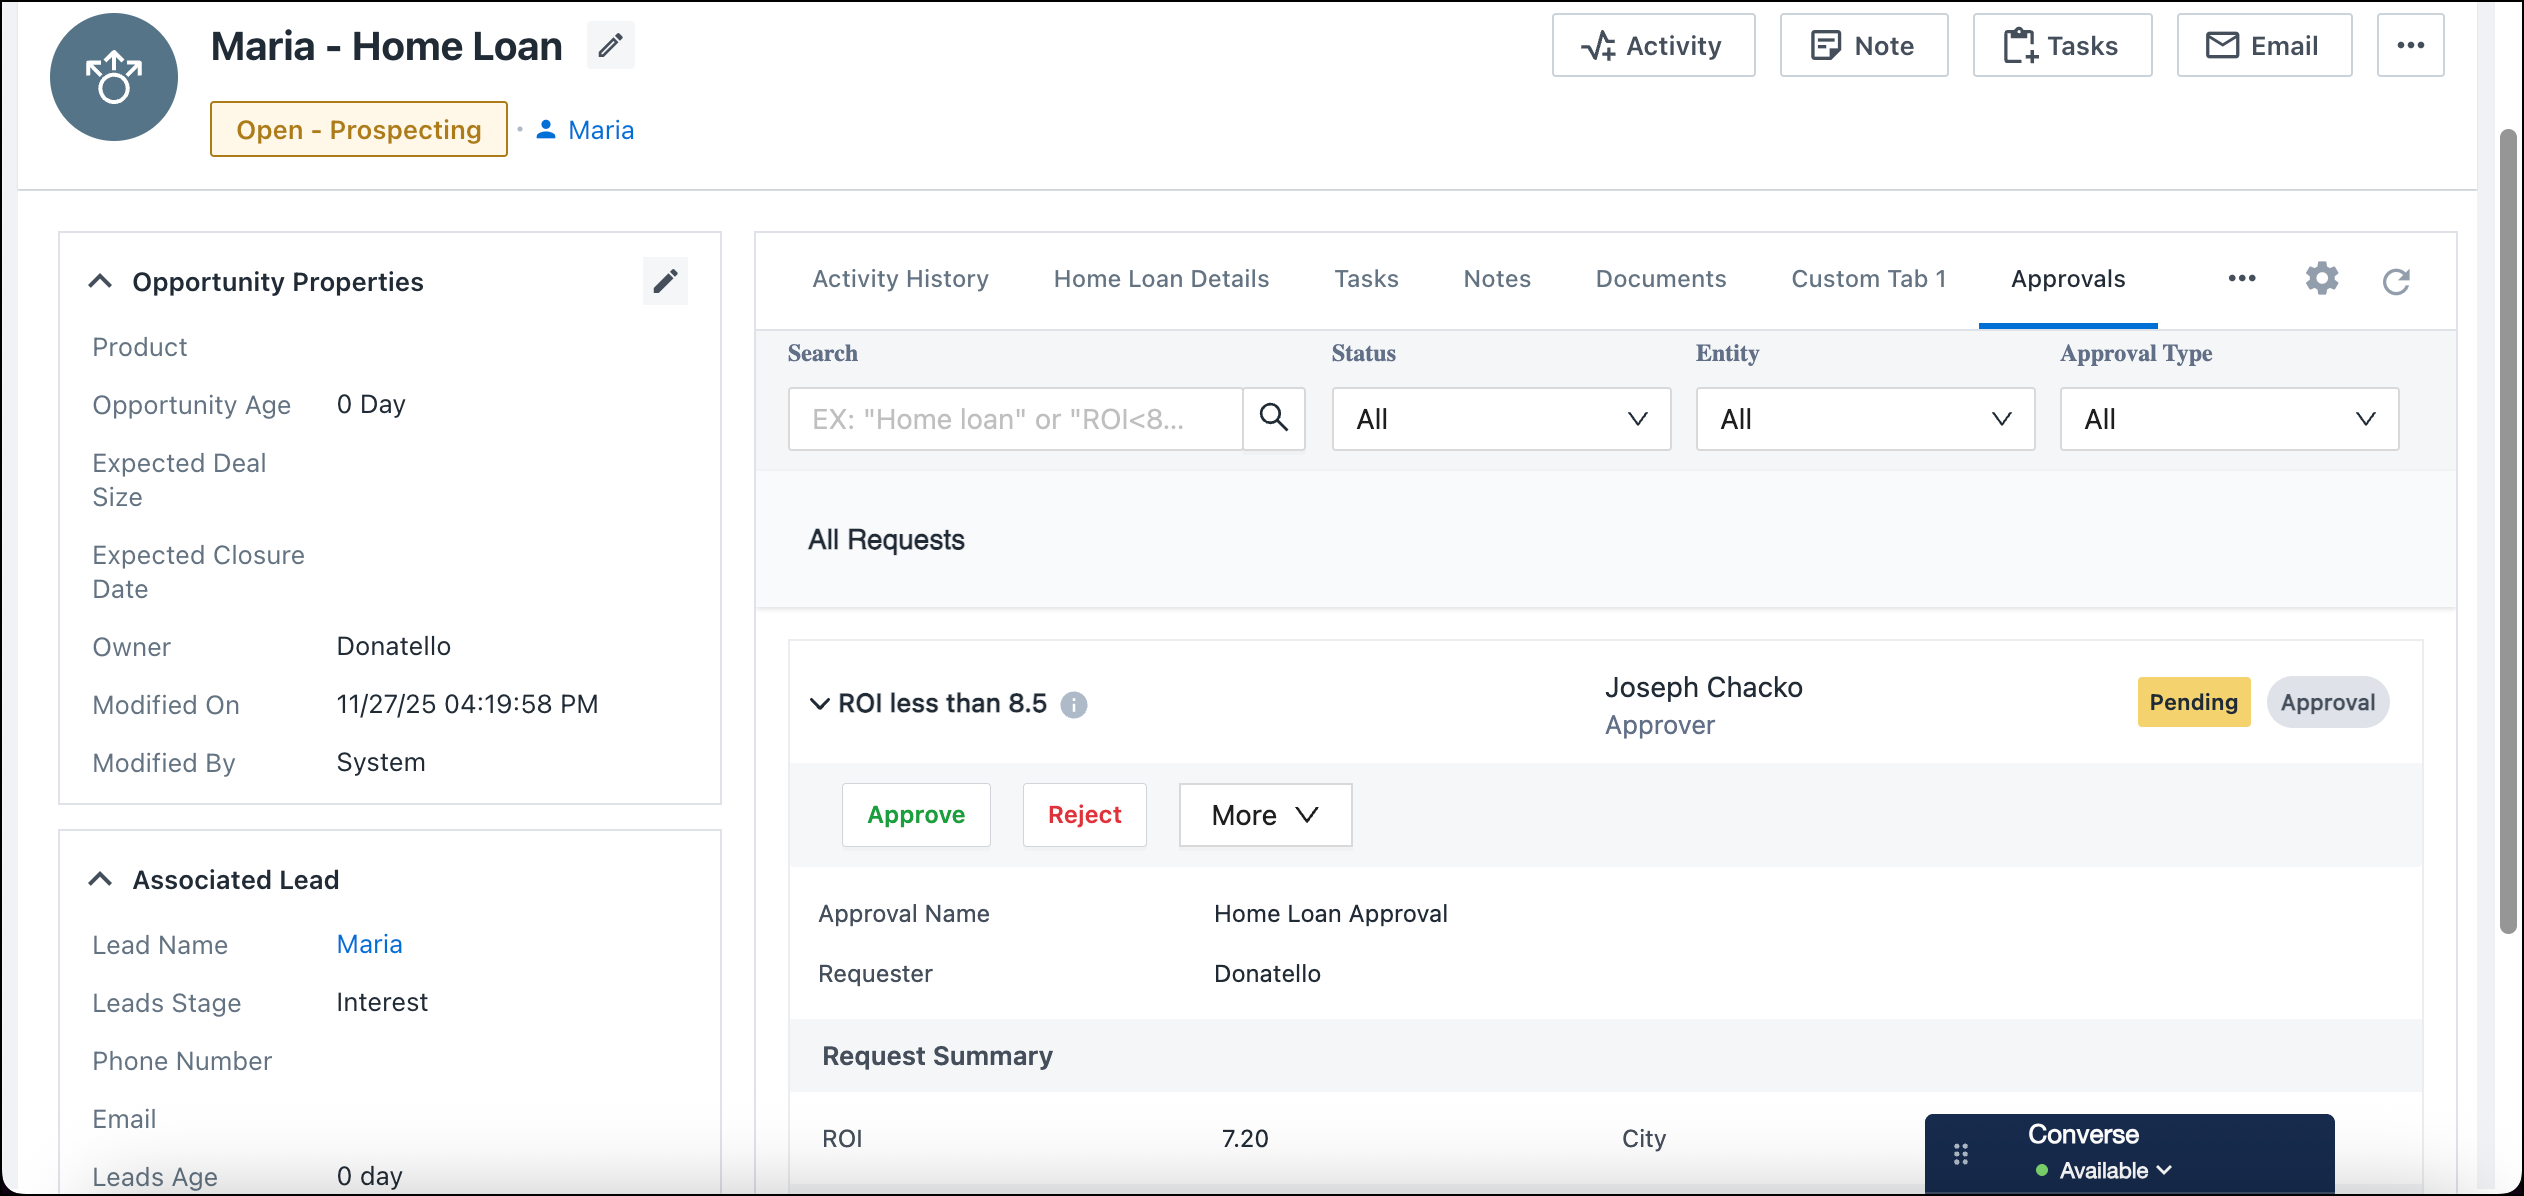
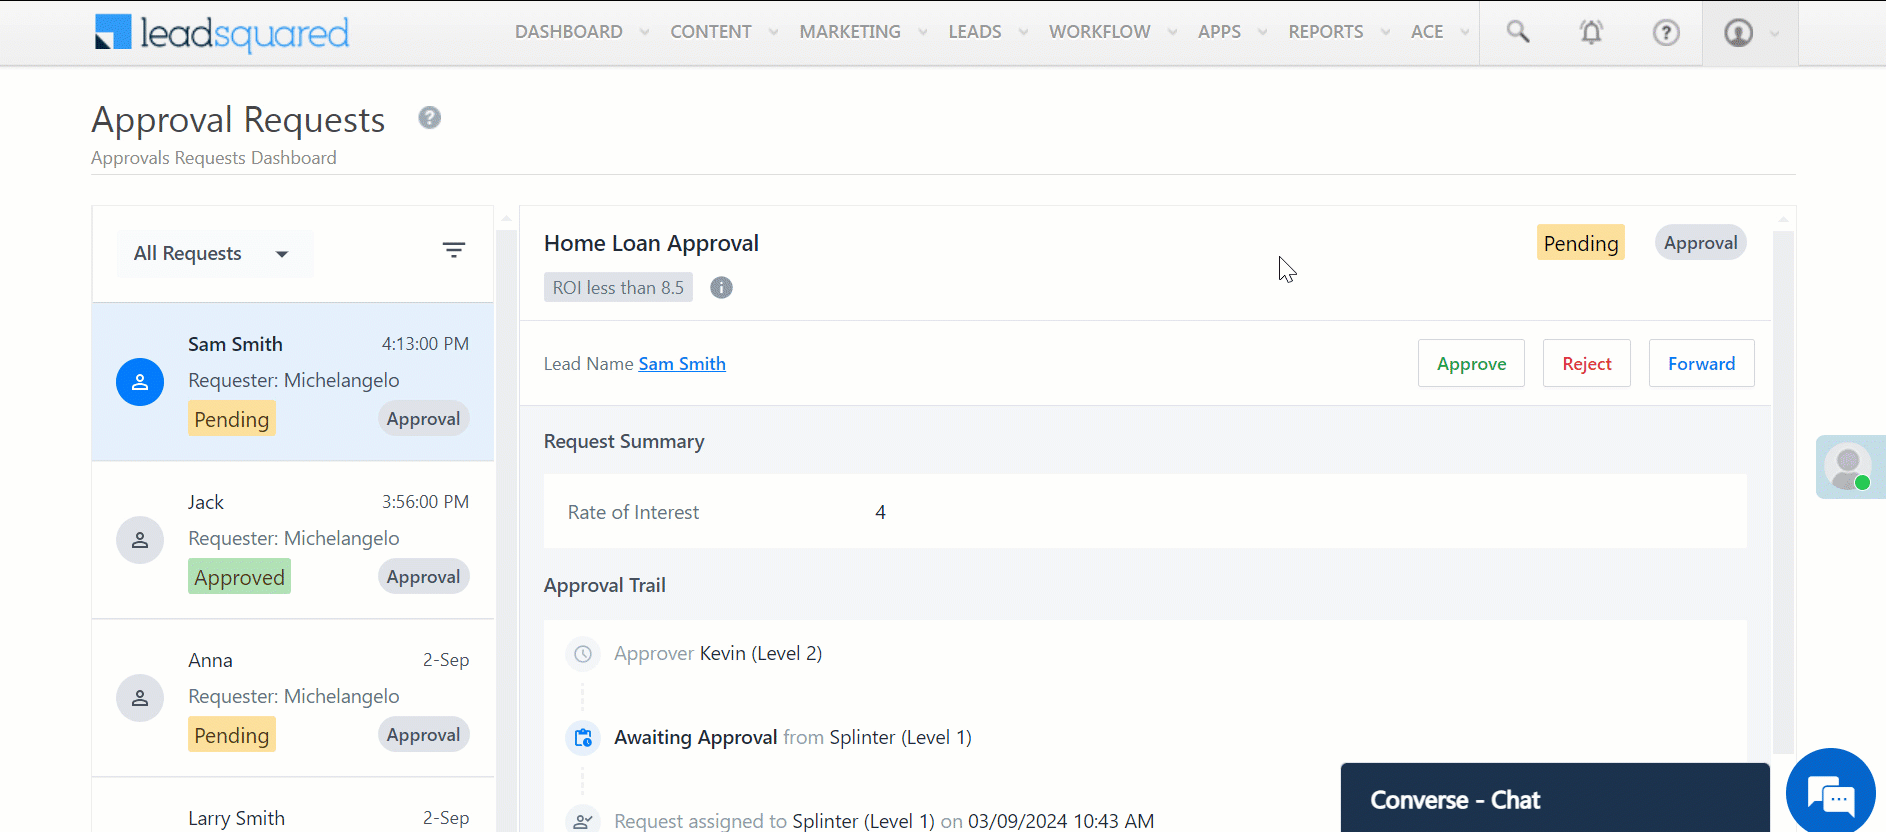
The Approval Flow triggers whenever the requested Rate of Interest on a home loan application from Bangalore is below 8.5%. The system will first notify the user’s L1 manager, and then the L2 manager of the approval request. If both managers approve the application, the Home Loan Status is marked as Won (or approved). Conversely, if either manager rejects the application, the Home Loan Status is marked Lost (or rejected).
4. Install and Configure Approvals Connector
Follow these steps to install and configure the Approval Flow Connector –
4.1 Install the Connector
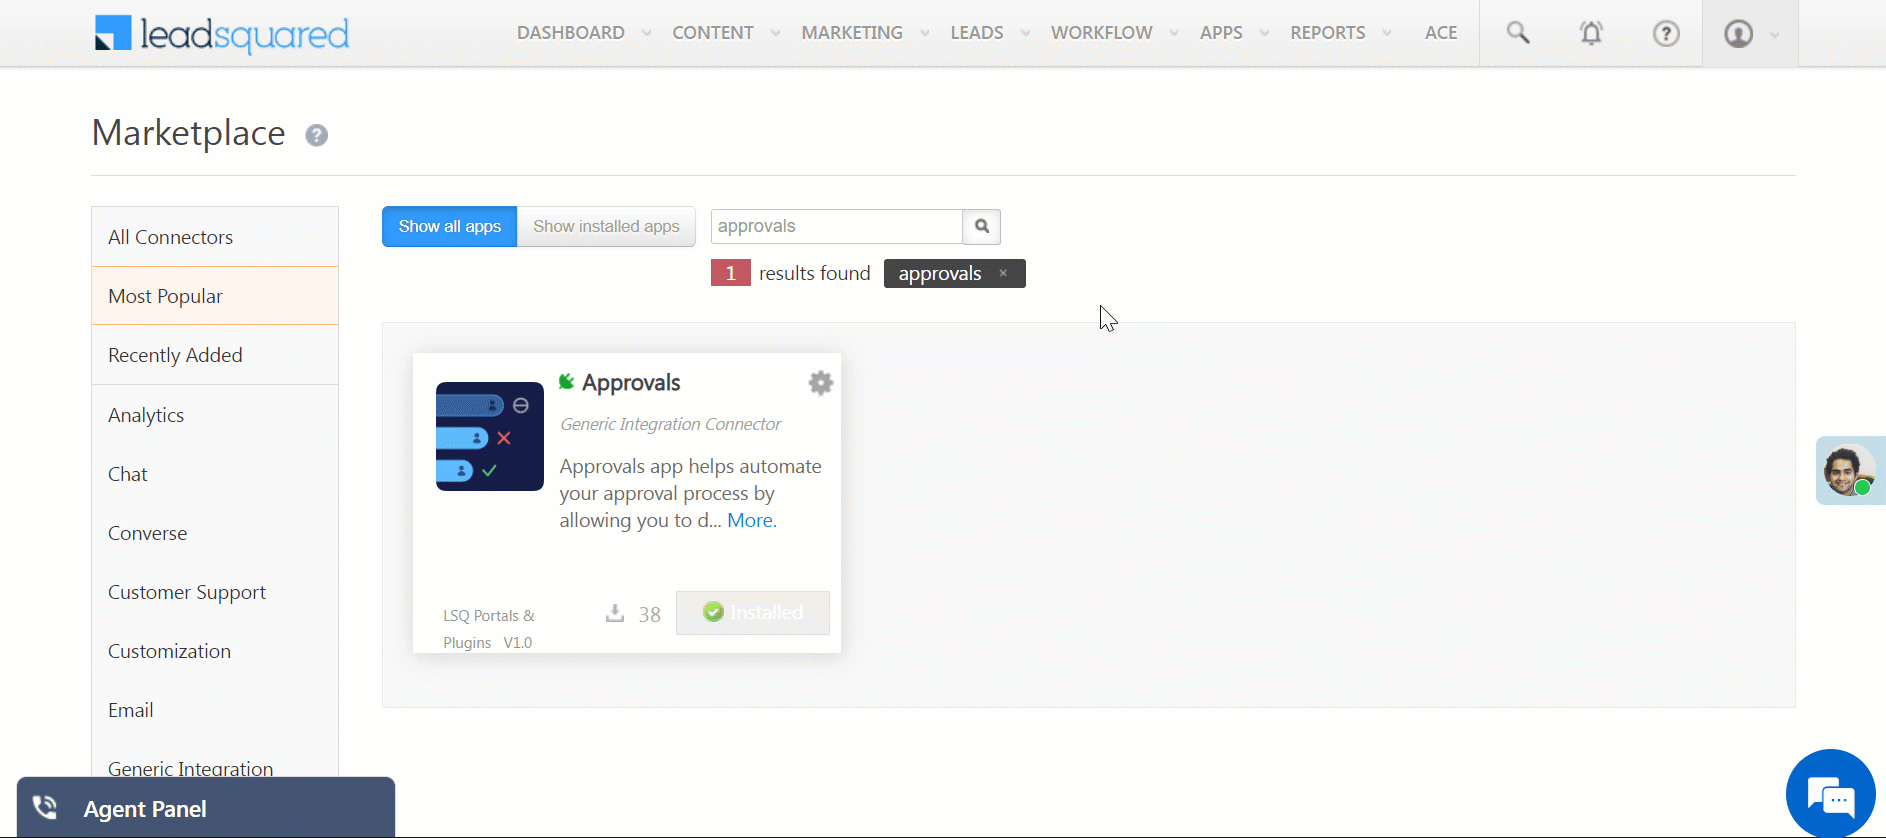
- Navigate to APPS>Apps Marketplace and search for Approvals.
- Alternatively, you can also find the App under the Generic Integration sub-category.
- Click Install.
4.2 Configure the connector
You can configure the following settings –
4.2.1 Deviation Tagging
Note: This option is only relevant for Loan Origination System (LOS) features. Customers who aren’t using this feature can ignore this setting.
When enabled, users can tag a flow as either an Approval or a Deviation. In lending processes, deviations occur when a loan application doesn’t meet one or more standard criteria (e.g., age, credit score, etc.) but is still eligible for review and approval. Tagging a flow as a Deviation helps lenders track and process such cases separately.
4.2.2 Opportunity-Level Approvals (Custom Opportunity Tab Requirement)
To use the Approvals feature on Opportunities, you must install the Custom Opportunity Tab connector. The Approval request will appear in the custom Opportunity tab.
Once you install the connector, obtain the Connector ID of this tab and enter the ID in this page (Contact support@leadsquared for help).
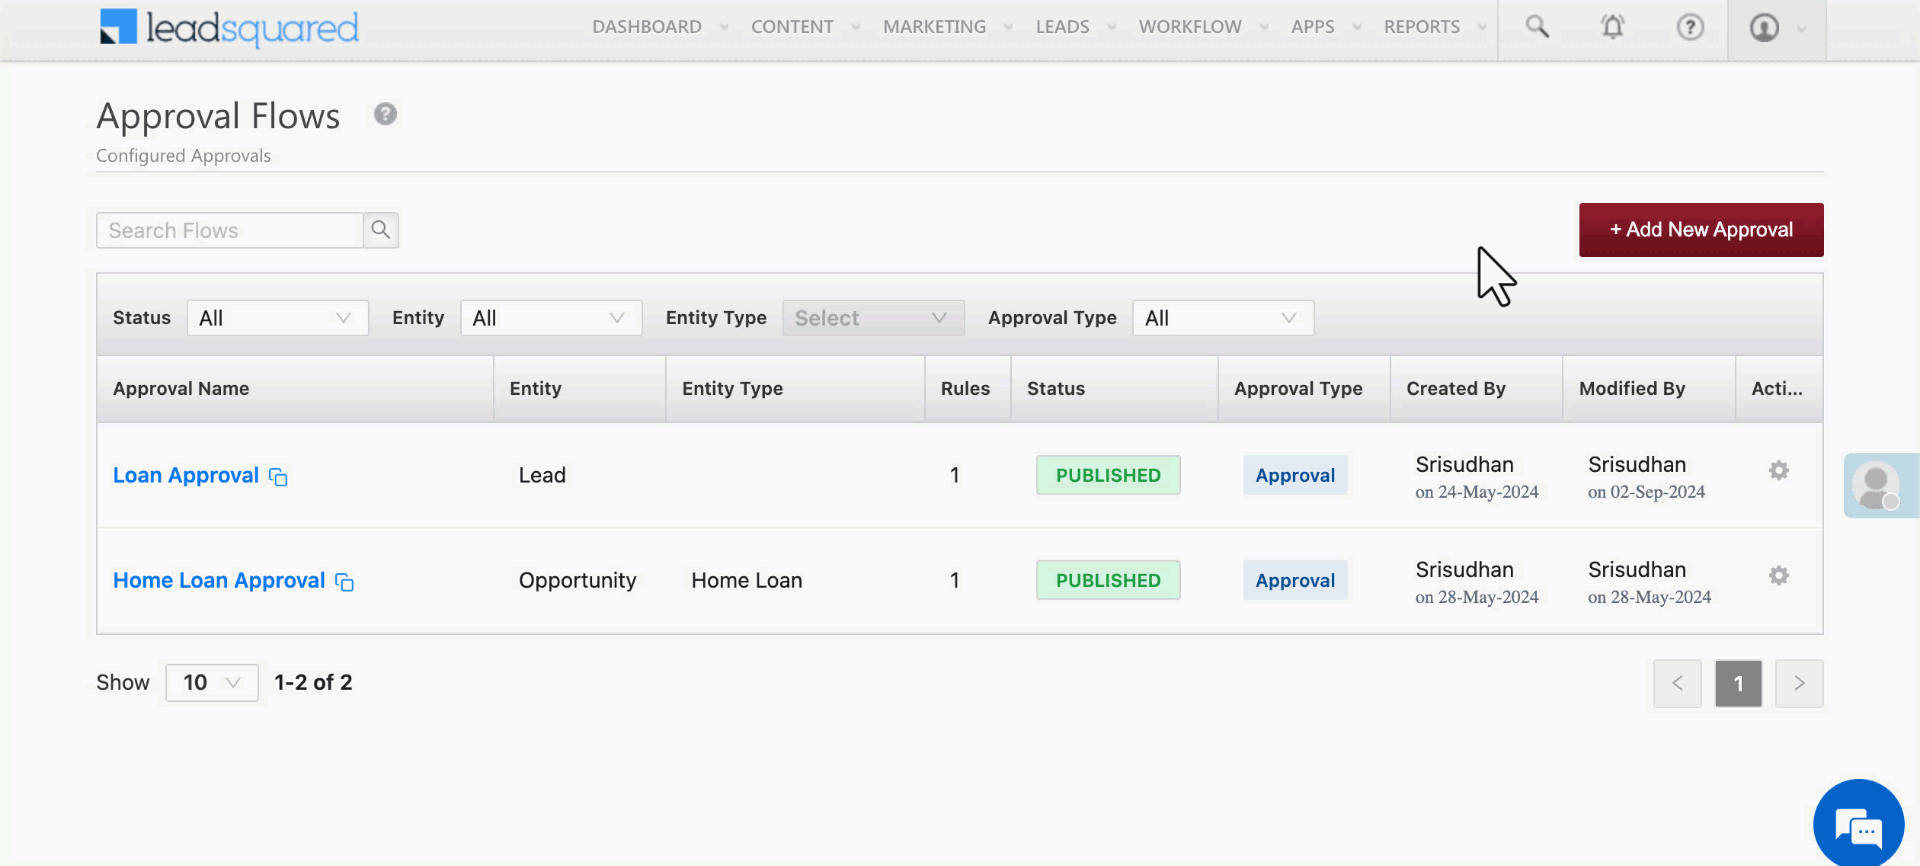
5. Create and Configure Approval Flows
Follow these steps to create and configure your Approval Flows –
5.1 Enter Basic Details about the Approval Flow
- Navigate to APPS>Approval Flows.
- Click + Add New Approval.
- Approval Flow Name – Give your Approval Flow a name.
- Approval Type – Select either Approval or Deviation (Deviation is relevant only for the Loan Origination System feature).
- Trigger Entity – Select a Trigger Entity from these options –
- Leads – Select this option to trigger the Flow on Leads.
- Opportunities – Select this option to trigger the Flow on Opportunities.
- Opportunity Type – Select the Opportunity Type.
- Primary Field – Only changes made to this field will trigger an approval, provided the other conditions are met.
- Requestor – It lists all custom user-type fields from Opportunity Type (e.g., Sales User, Credit User, Operations User). Whatever value exists in that field during the trigger becomes the requester. If the field is not selected, then default requester is the Opportunity Owner.
- Activities – Select this option to trigger the Flow on Activities.
- Activity Type – Select the Activity Type.
- If the chosen Activity is linked to an Opportunity, then select the respective Opportunity Type (this step is optional).
- Primary Trigger Field – Once you’ve selected a Trigger Entity, you must select a Trigger Field within that Entity. The Approval Flow will trigger based on the value entered into this field.
- Approval Trigger On – Decide when to activate this flow –
- Record Creation – When lead details are initially created.
- Record Edit – When the details are edited post-lead creation.
- You can choose to select both of the above options.
- Description – Give a brief description of the Approval flow; this step is optional.
- Allow Discasrding a Request – Discard lets approvers close an approval request without approving or rejecting it. If multiple approvers exist, the first person to discard ends the flow.
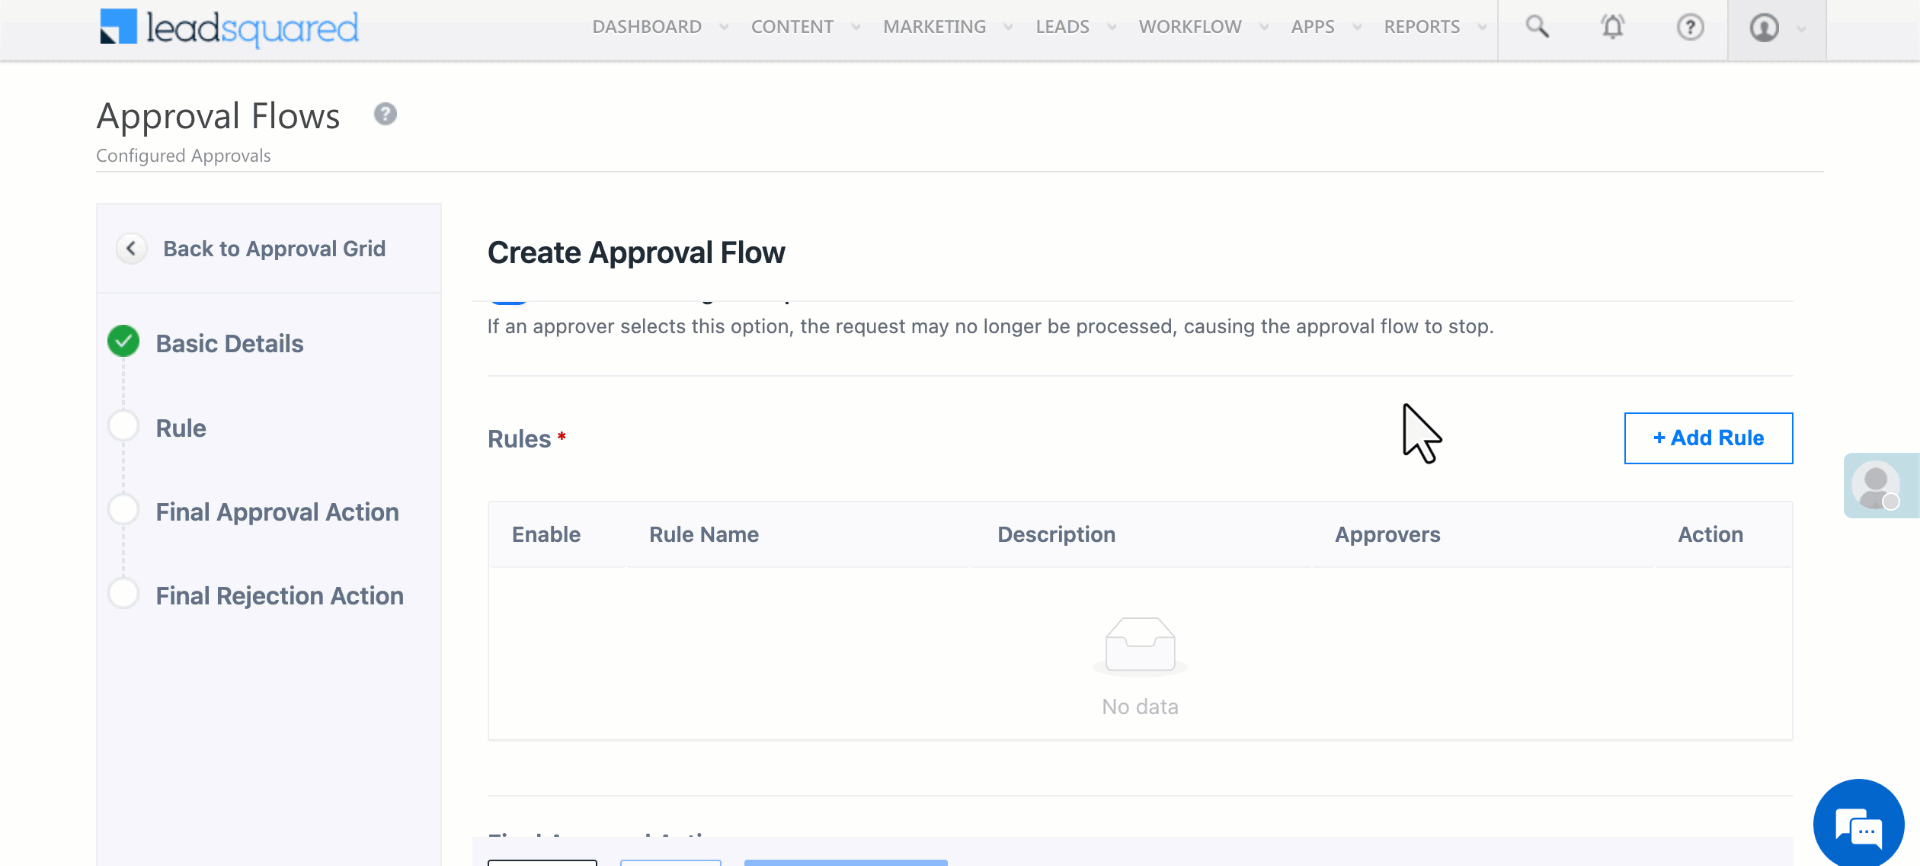
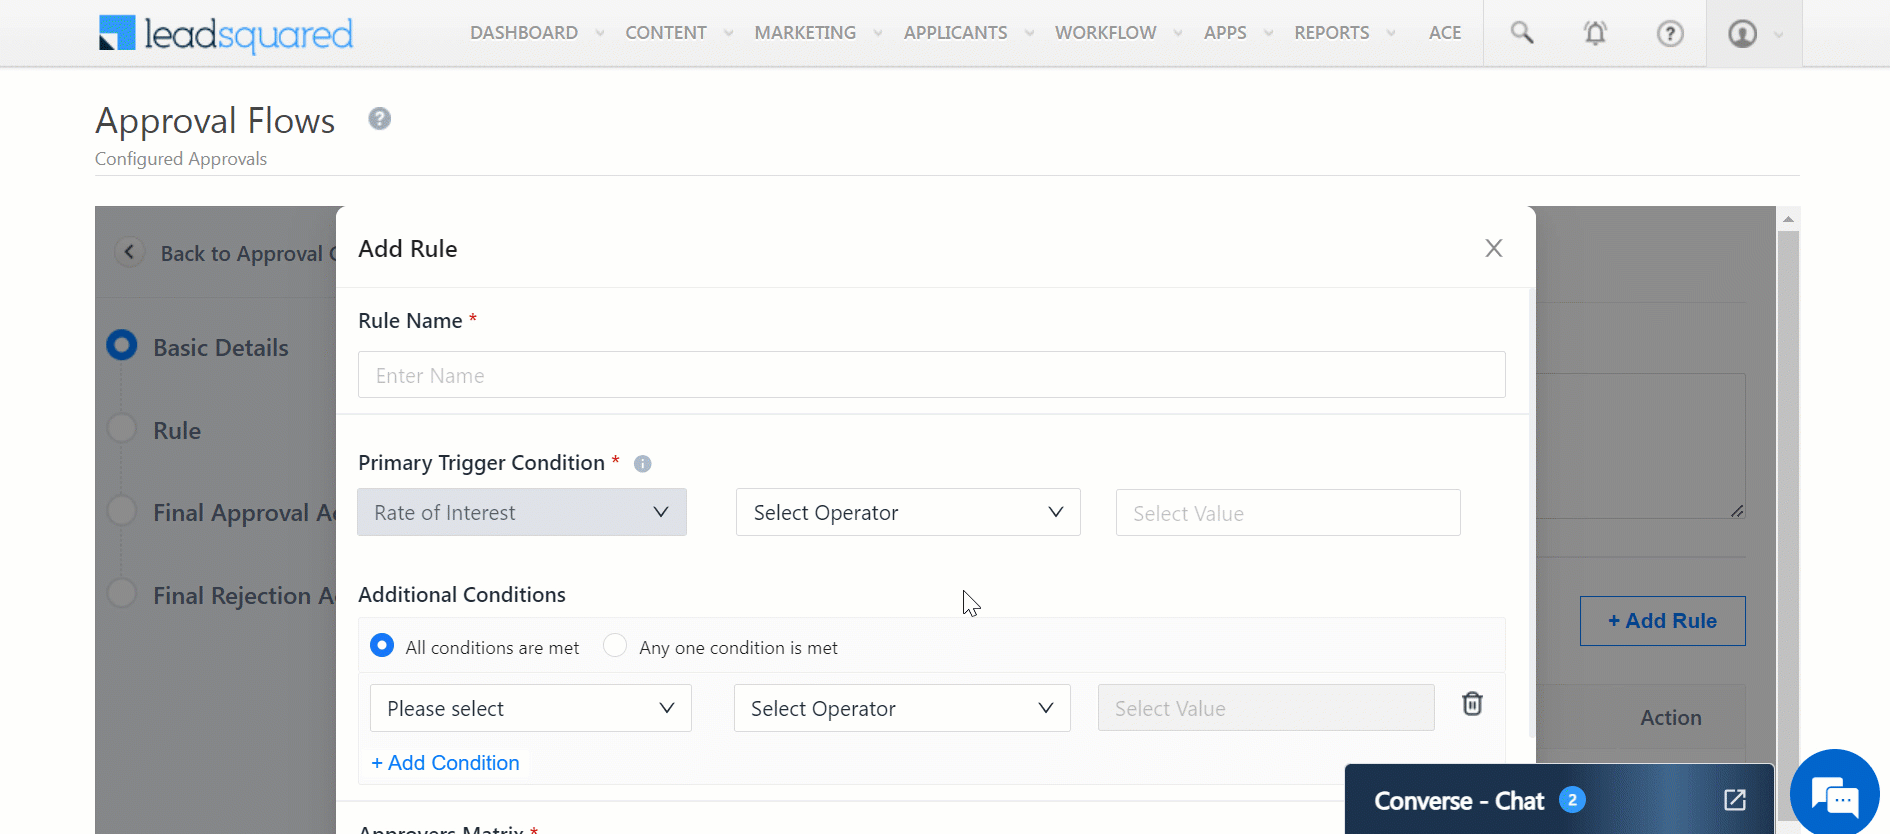
5.2 Add Rules to Your Approval Flow
Click on the + Add Rule button and enter the following details on the Approval Rule –
- Rule Name (mandatory step) – Give your Rule a name.
- Primary Trigger Condition (mandatory step) – Choose a condition that compares the value in the Primary Trigger Field (from the earlier section) with a specific threshold triggering the Approval Flow. For example, if the primary Trigger Field, Rate of Interest, is Less Than 8.5, the Approval Flow will be triggered.
- Additional Conditions (optional step) – Specify one or more additional conditions that must be met to trigger the Approval flow. You can specify if all the additional conditions must be met, or if any one condition should be met. For example, City Equals To Bangalore. You can create a maximum of 10 additional conditions in a rule.
- Approver Matrix (mandatory step) – Select the Approvers for the flow, with a maximum limit of 6 approvers.
- Level Managers – A Level 1 Manager is the immediate manager of the user as described in the Manage Users page. A Level 2 Manager is the manager of the Level 1 Manager, and the hierarchy continues accordingly until Level 6.
- Specific users – Specific users on LeadSquared.
- Teams & Sales Group – When you select a Team or Sales Group as an approver, you’ll see a new field called Assignment Method, which lets you choose one of the following options:
- All Users – The request is sent to all users in the selected Team or Group. Any member can self-assign and approve the request.
- As per Hierarchy – The system automatically assigns the request to the relevant user based on their reporting hierarchy.
- For example, if the approver is set to the CXO Team, the system checks the requester’s reporting structure and assigns the request to the CXO who falls within that hierarchy. This is useful when user hierarchies differ across departments or when the exact approver level (L1, L2, etc.) may vary.
- User Fields – It lists all custom user-type fields from the Opportunity Type. Whatever value exists in the user field at the time the request is triggerd will be the approver.
- Default Approver (mandatory step) – Specify a default Approver. A request will get assigned to the default approver if an approver is not found at any level as per the Approver Matrix.
- Once done, click Save.
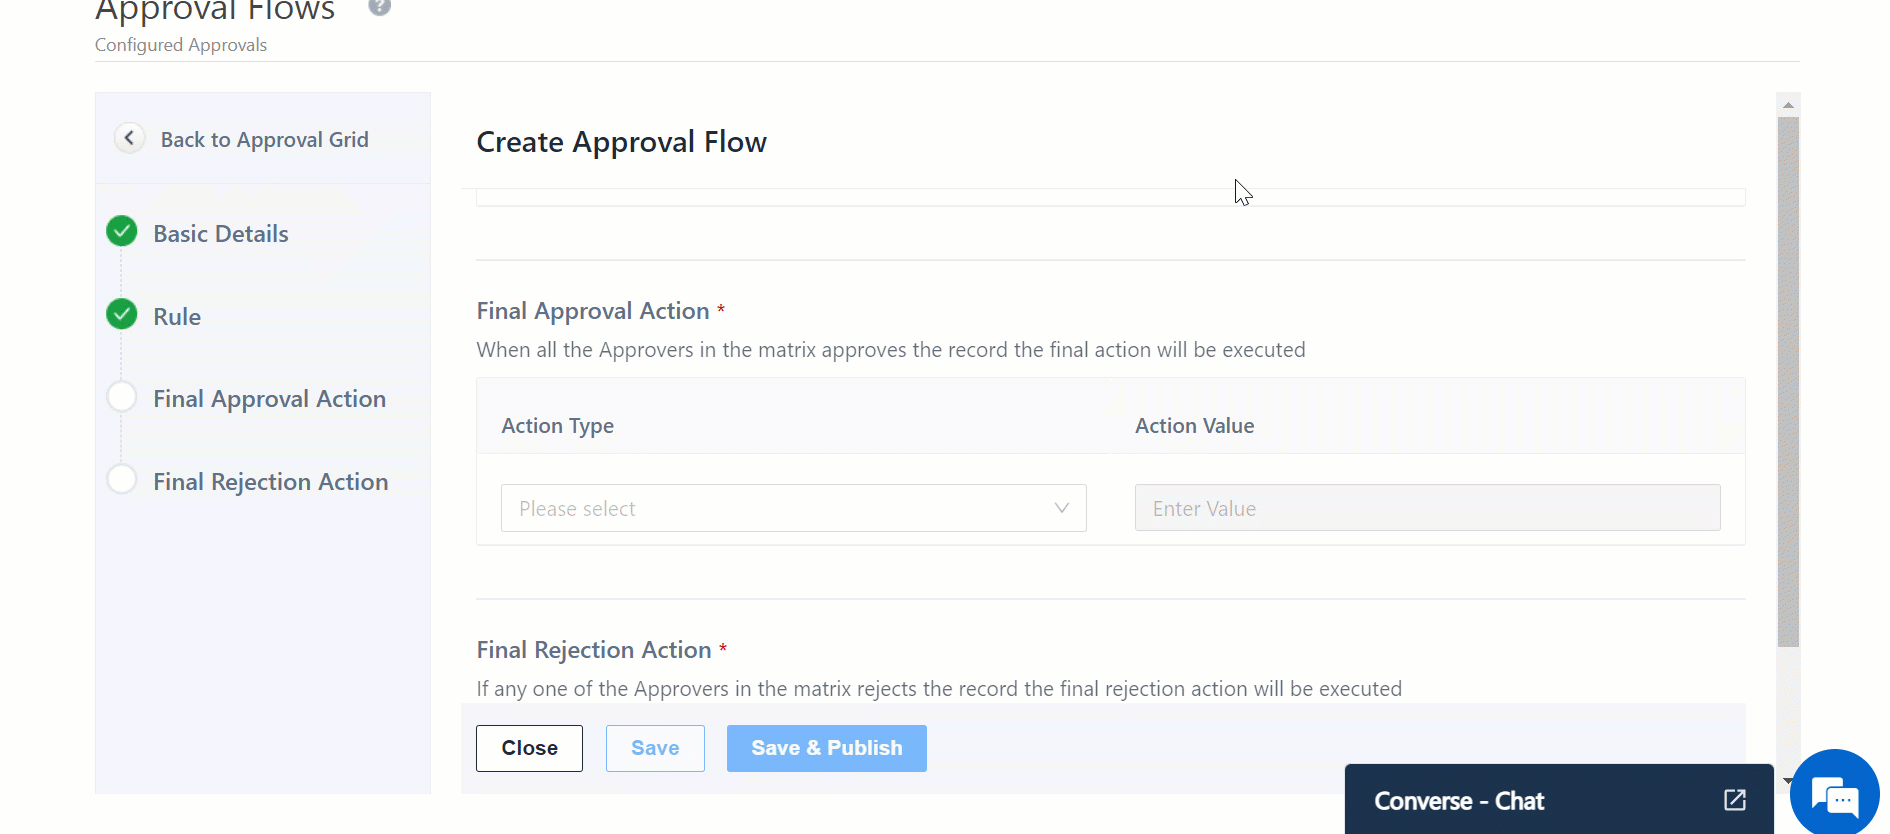
5.3 Final Approval and Rejection Action
In this step, we will specify the resulting action when the manager(s) approve or reject the Approval Request.
5.3.1 Final Approval Action
If the request is approved, then under Action Type, we will select the Home Loan Status field and select the Action Value as Won.
5.3.2 Final Rejection Action
If the request is rejected, then under Action Type, we will select the Home Loan Status field and select the Action Value as Lost.
Once done, click Save & Publish.
6. Approval Flow
When a user triggers the Approval Request, the approver(s) will receive a notification on the LeadSquared platform and through email to approve or reject the request. Approvers can take one of three actions, depending on their role and configuration:
- Approve or Reject
- Forward Approval
- Assign to Me
- Return Request
- Discard Request
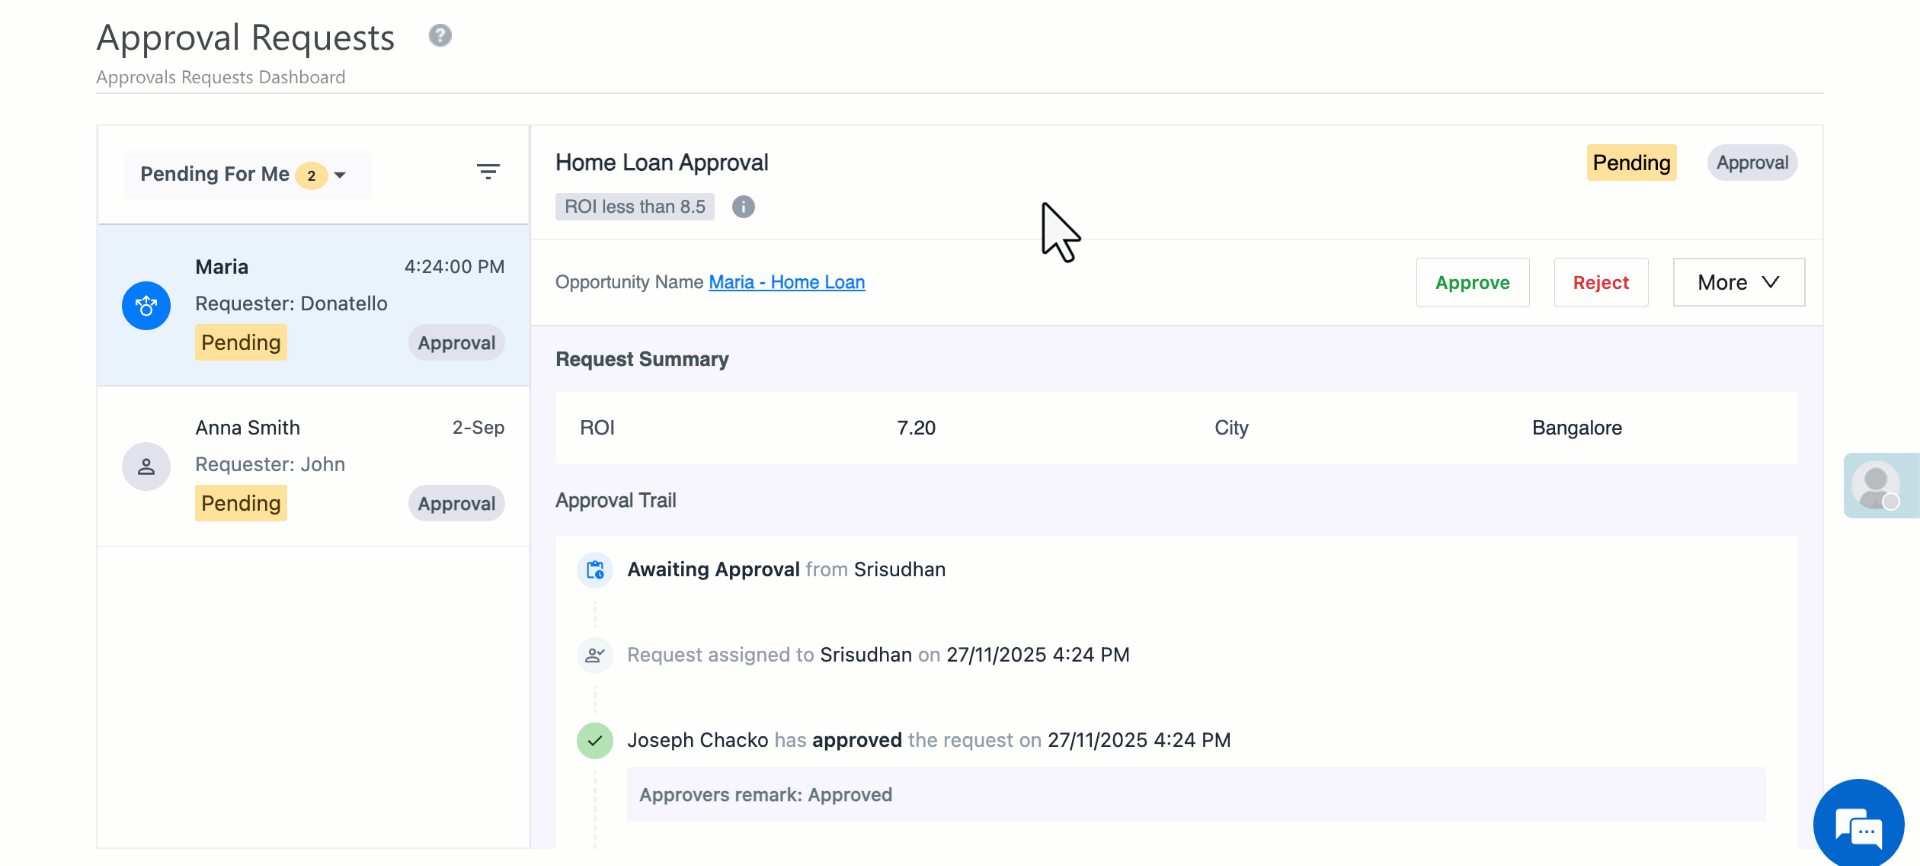
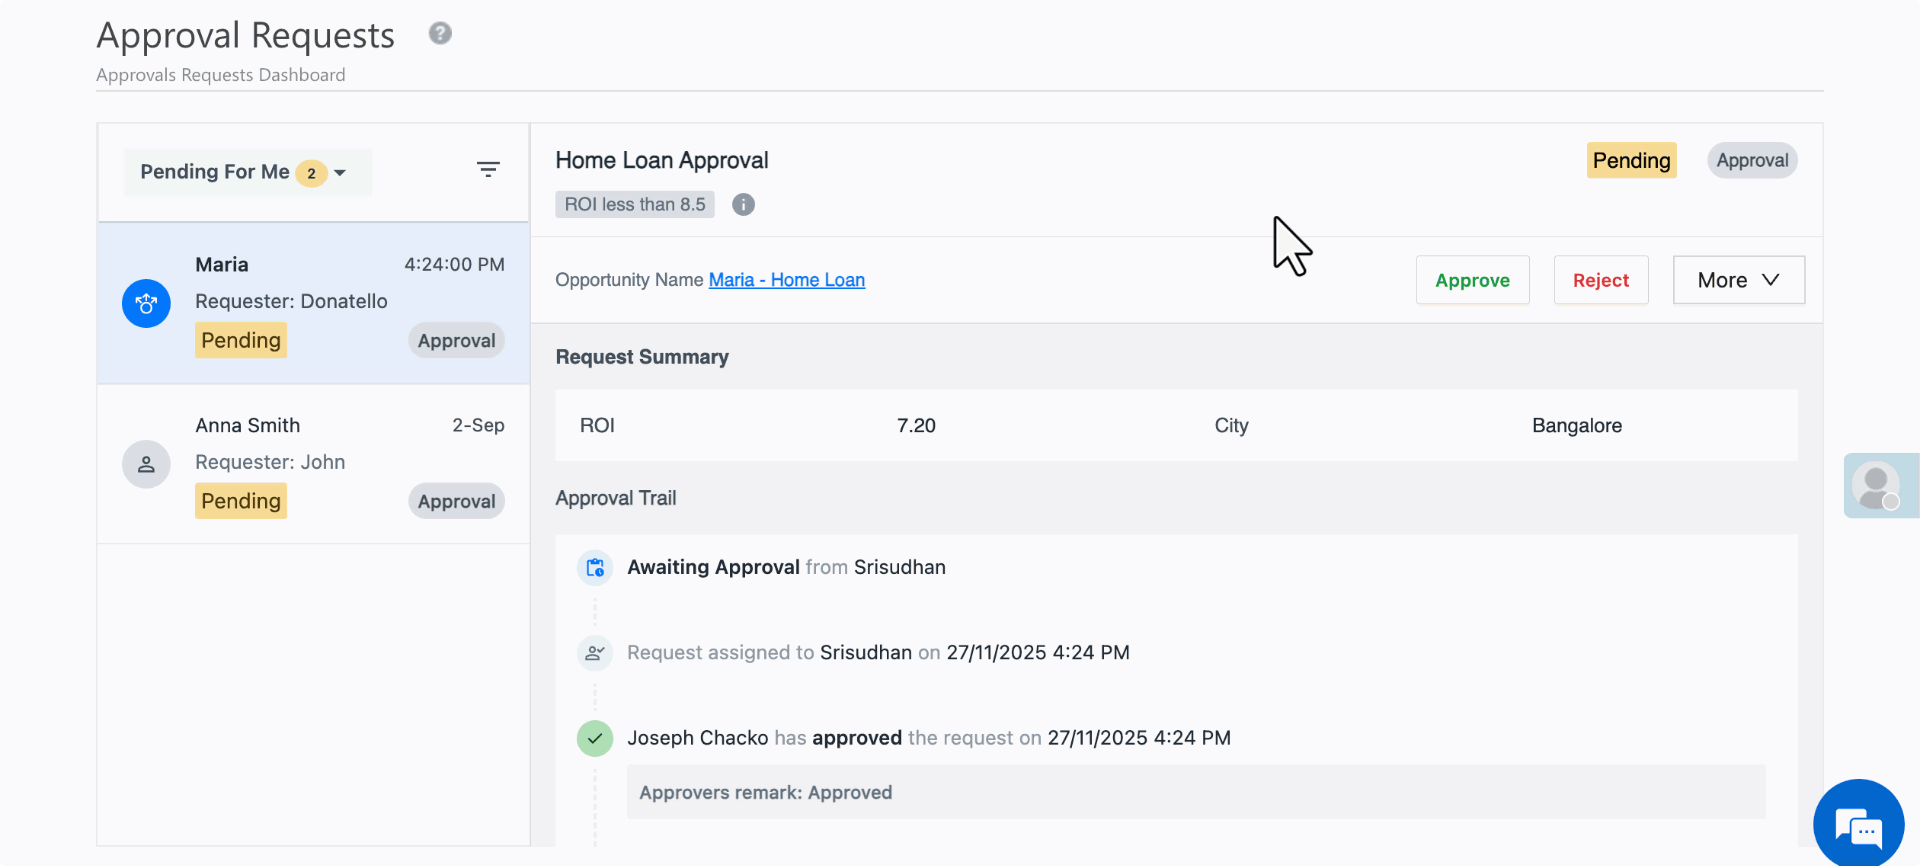
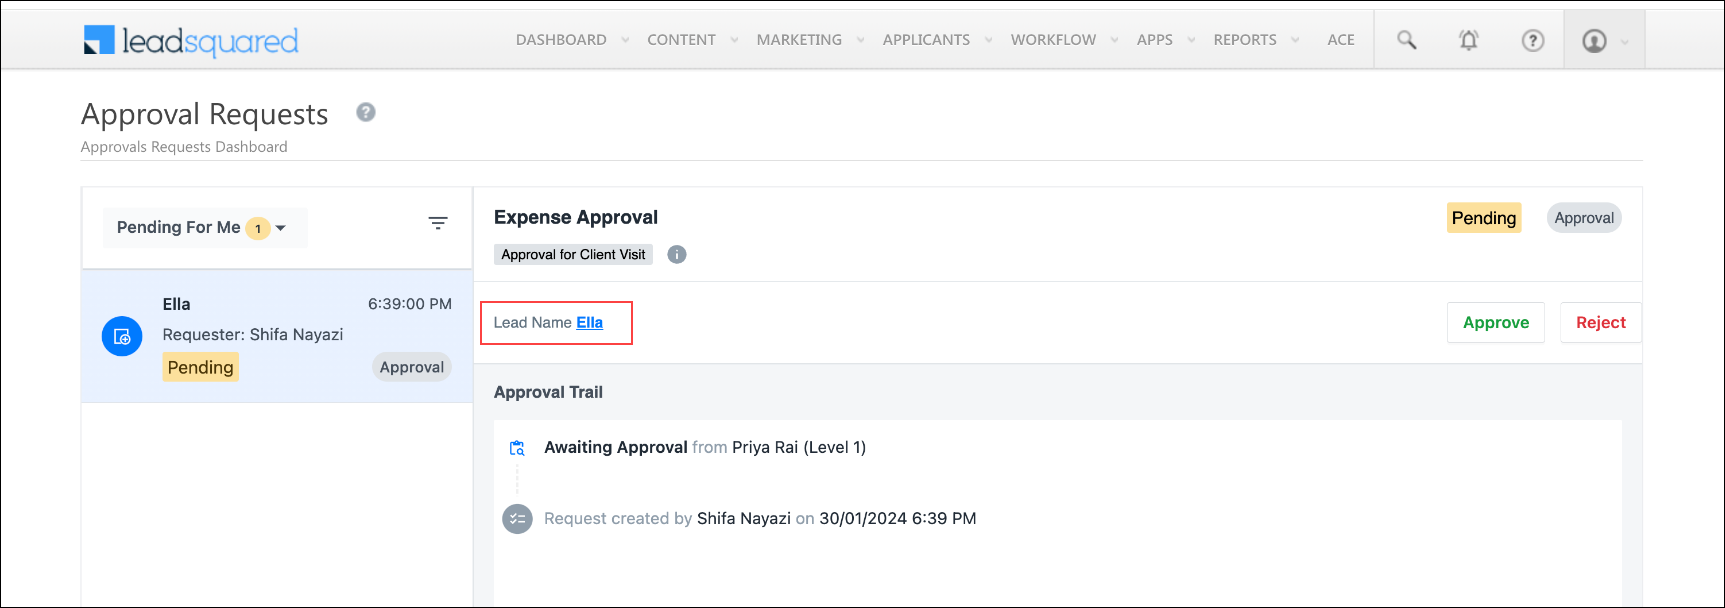
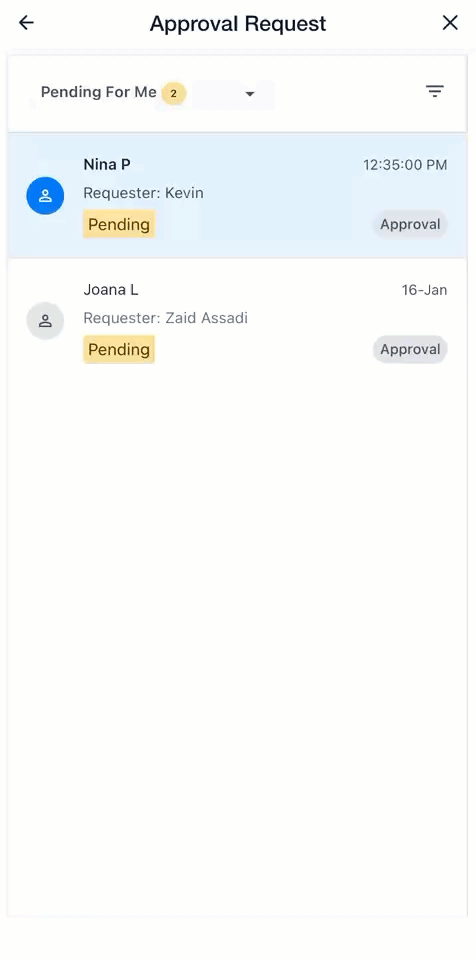
6.1 Approve or Reject an Approval Request
When a user triggers an approval flow, the assigned approver(s) receive a notification within the LeadSquared platform and via email to act on the request.
To review and take action:
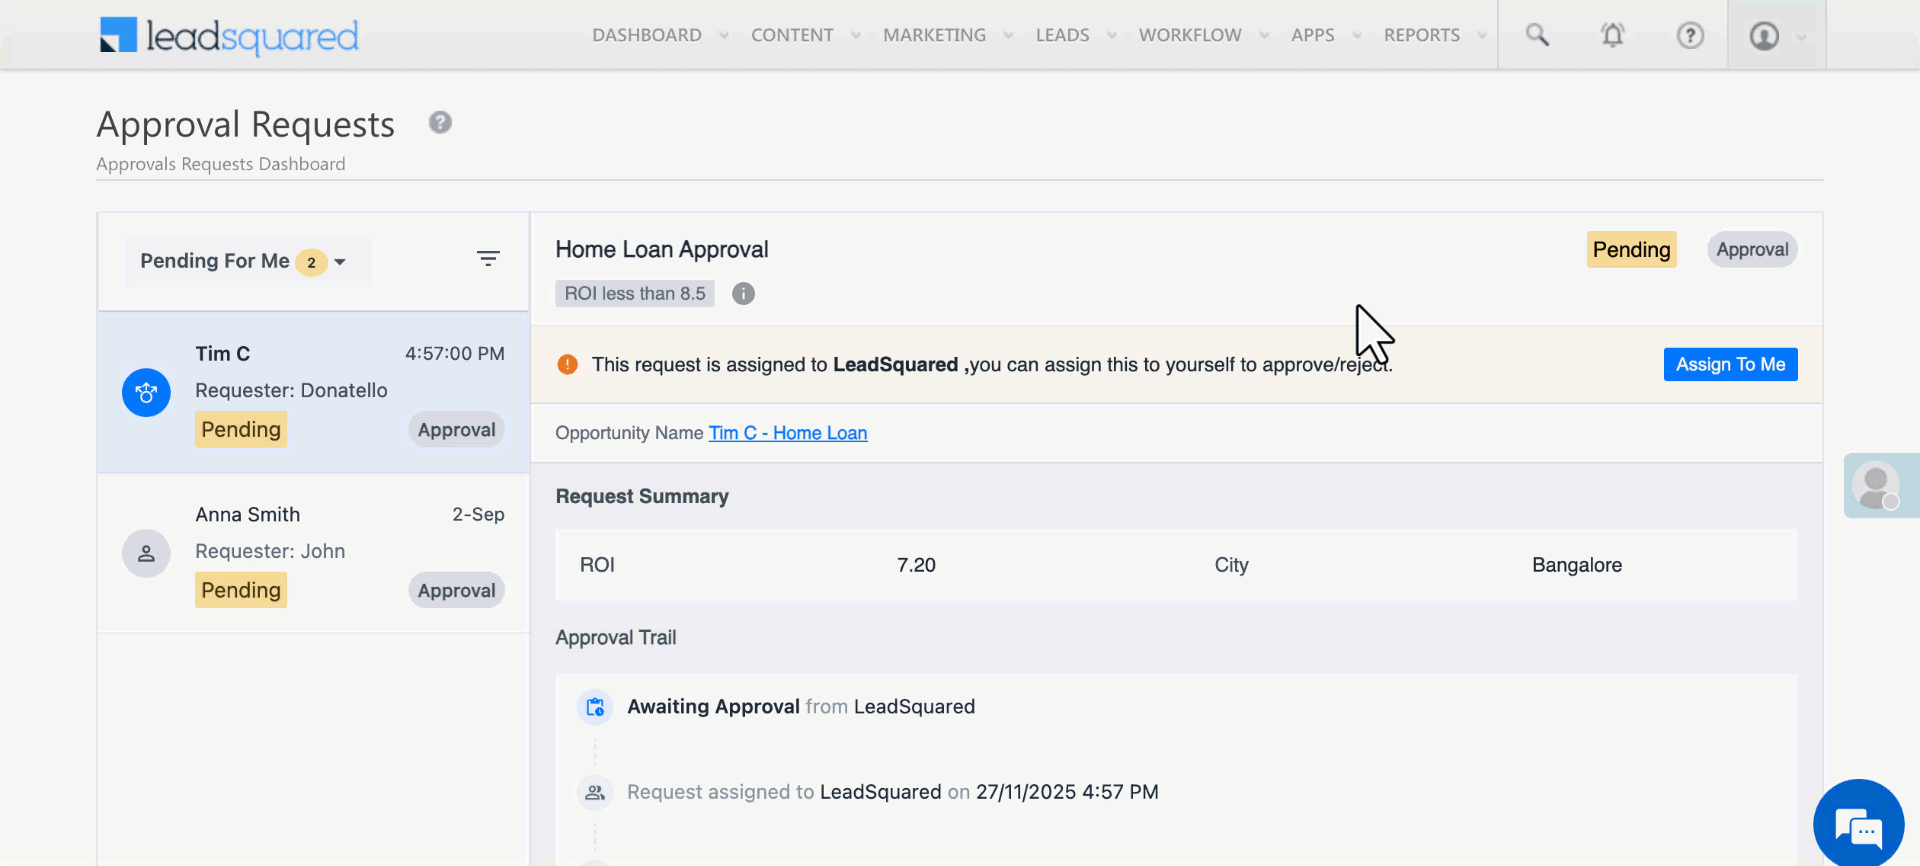
- Navigate to Apps>Approval Requests.
- You’ll see all requests categorized as Pending, Approved, or Rejected.
- On a pending request, click Approve or Reject.
- Add a remark and click Submit.
Approval Flow Behavior:
- If a first-level approver rejects the request, it’s closed and no further approvers are notified.
- If a first-level approver approves, the next approver in the flow is notified to review it.
6.2 Forward an Approval Request
Approvers can forward an approval request to another user when the request requires review or action from someone else.
To forward a request:
- In the More dropdown, select Forward on a pending request.
- Select the user to whom you want to forward the request.
- Add a remark explaining the reason for forwarding.
- Click Submit.
Once forwarded, the selected user becomes the active approver for that request. The original approver can still view the request status but cannot take further action unless it’s reassigned.

6.3 Assign to Me (for Team or Sales Group Approvals)
When an approval flow is configured to assign requests to All Users within a Team or Sales Group, the request appears in every member’s Approval Requests list.
Any member can take ownership by clicking Assign to Me.
Behavior details:
- Once a user clicks Assign to Me, the request is locked for that user, and other members see a message like:
“<User Name> has self-assigned this request.” - The assigned user can either Approve, Reject, or Assign Back to Team if they want to return it to the group pool.
- After being assigned back, the request becomes visible and available for self-assignment to all team or group members again.
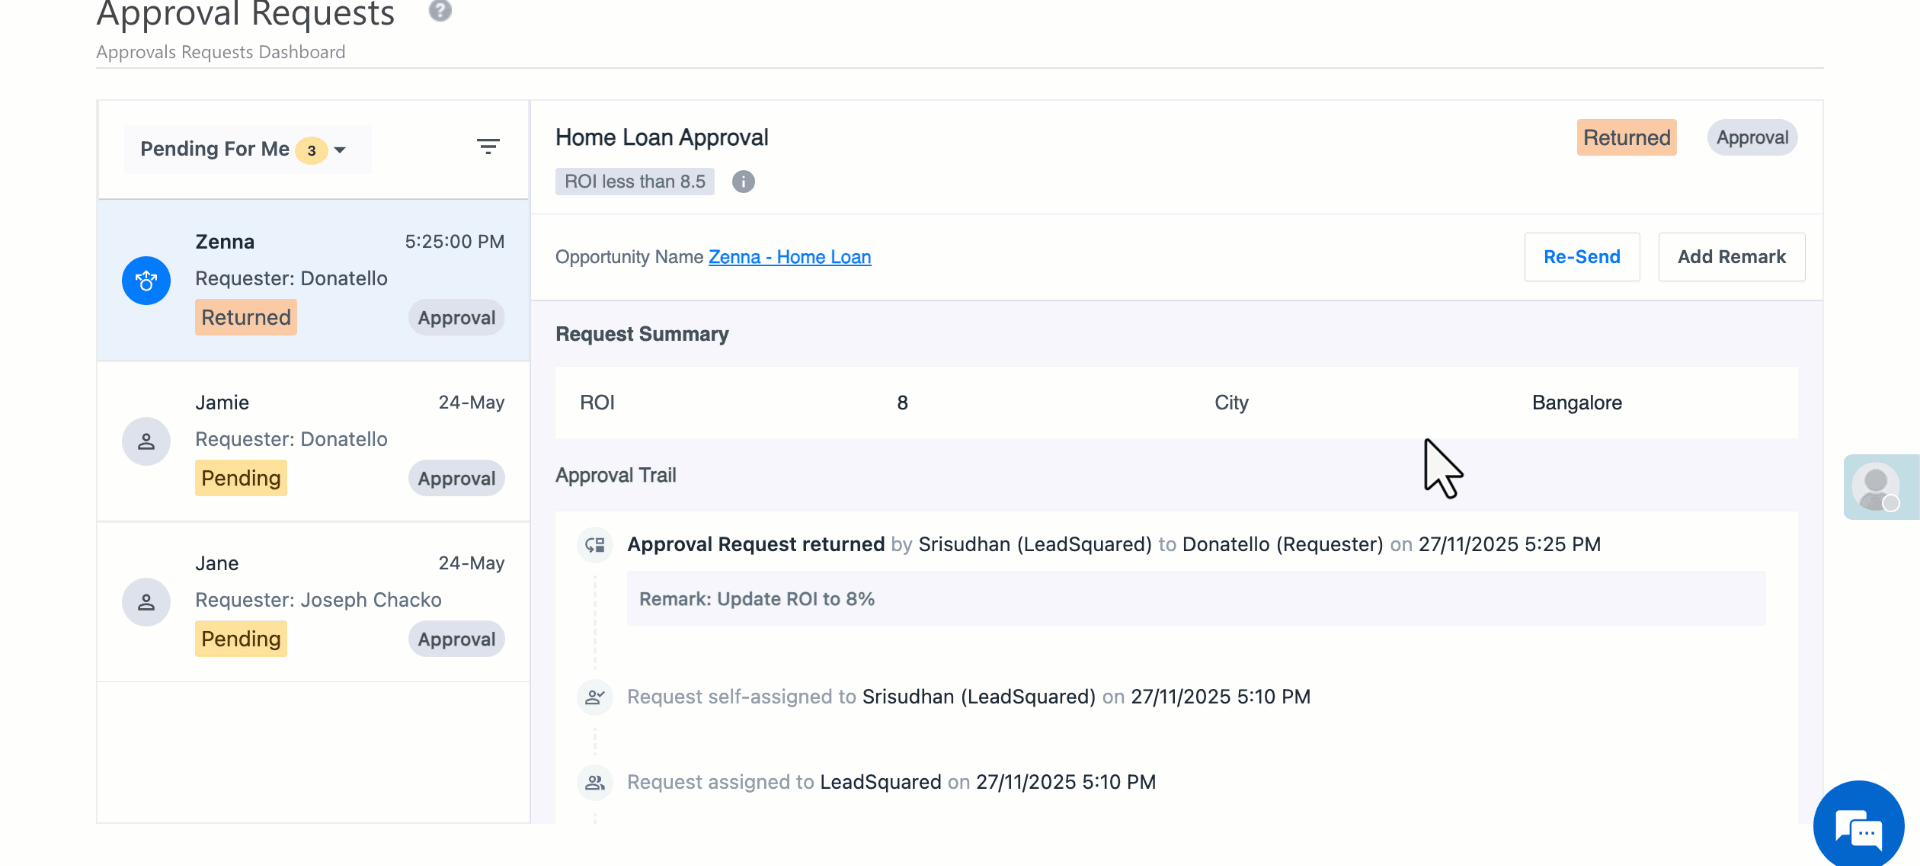
6.4 Return a Request
Return is an action that lets approvers send the request back to the requester instead of rejecting it.
Typical Use Cases
- Correction Required
- Loan amount incorrectly entered (e.g., 1 Cr 10L vs 1 Cr 1L). Approver returns with remark: “Correct loan amount.”
- Modification on rates
- Customer wants 9.8% ROI. But the business needs the interest to be at 10%, so the Approver returns stating: “Update ROI to 10%.”
Once corrected, requester clicks Resend, and the request goes back to the previous approver.
6.5 Discard a Request
Discard lets approvers close an approval request without approving or rejecting it. If multiple approvers exist, the first person to discard ends the flow.

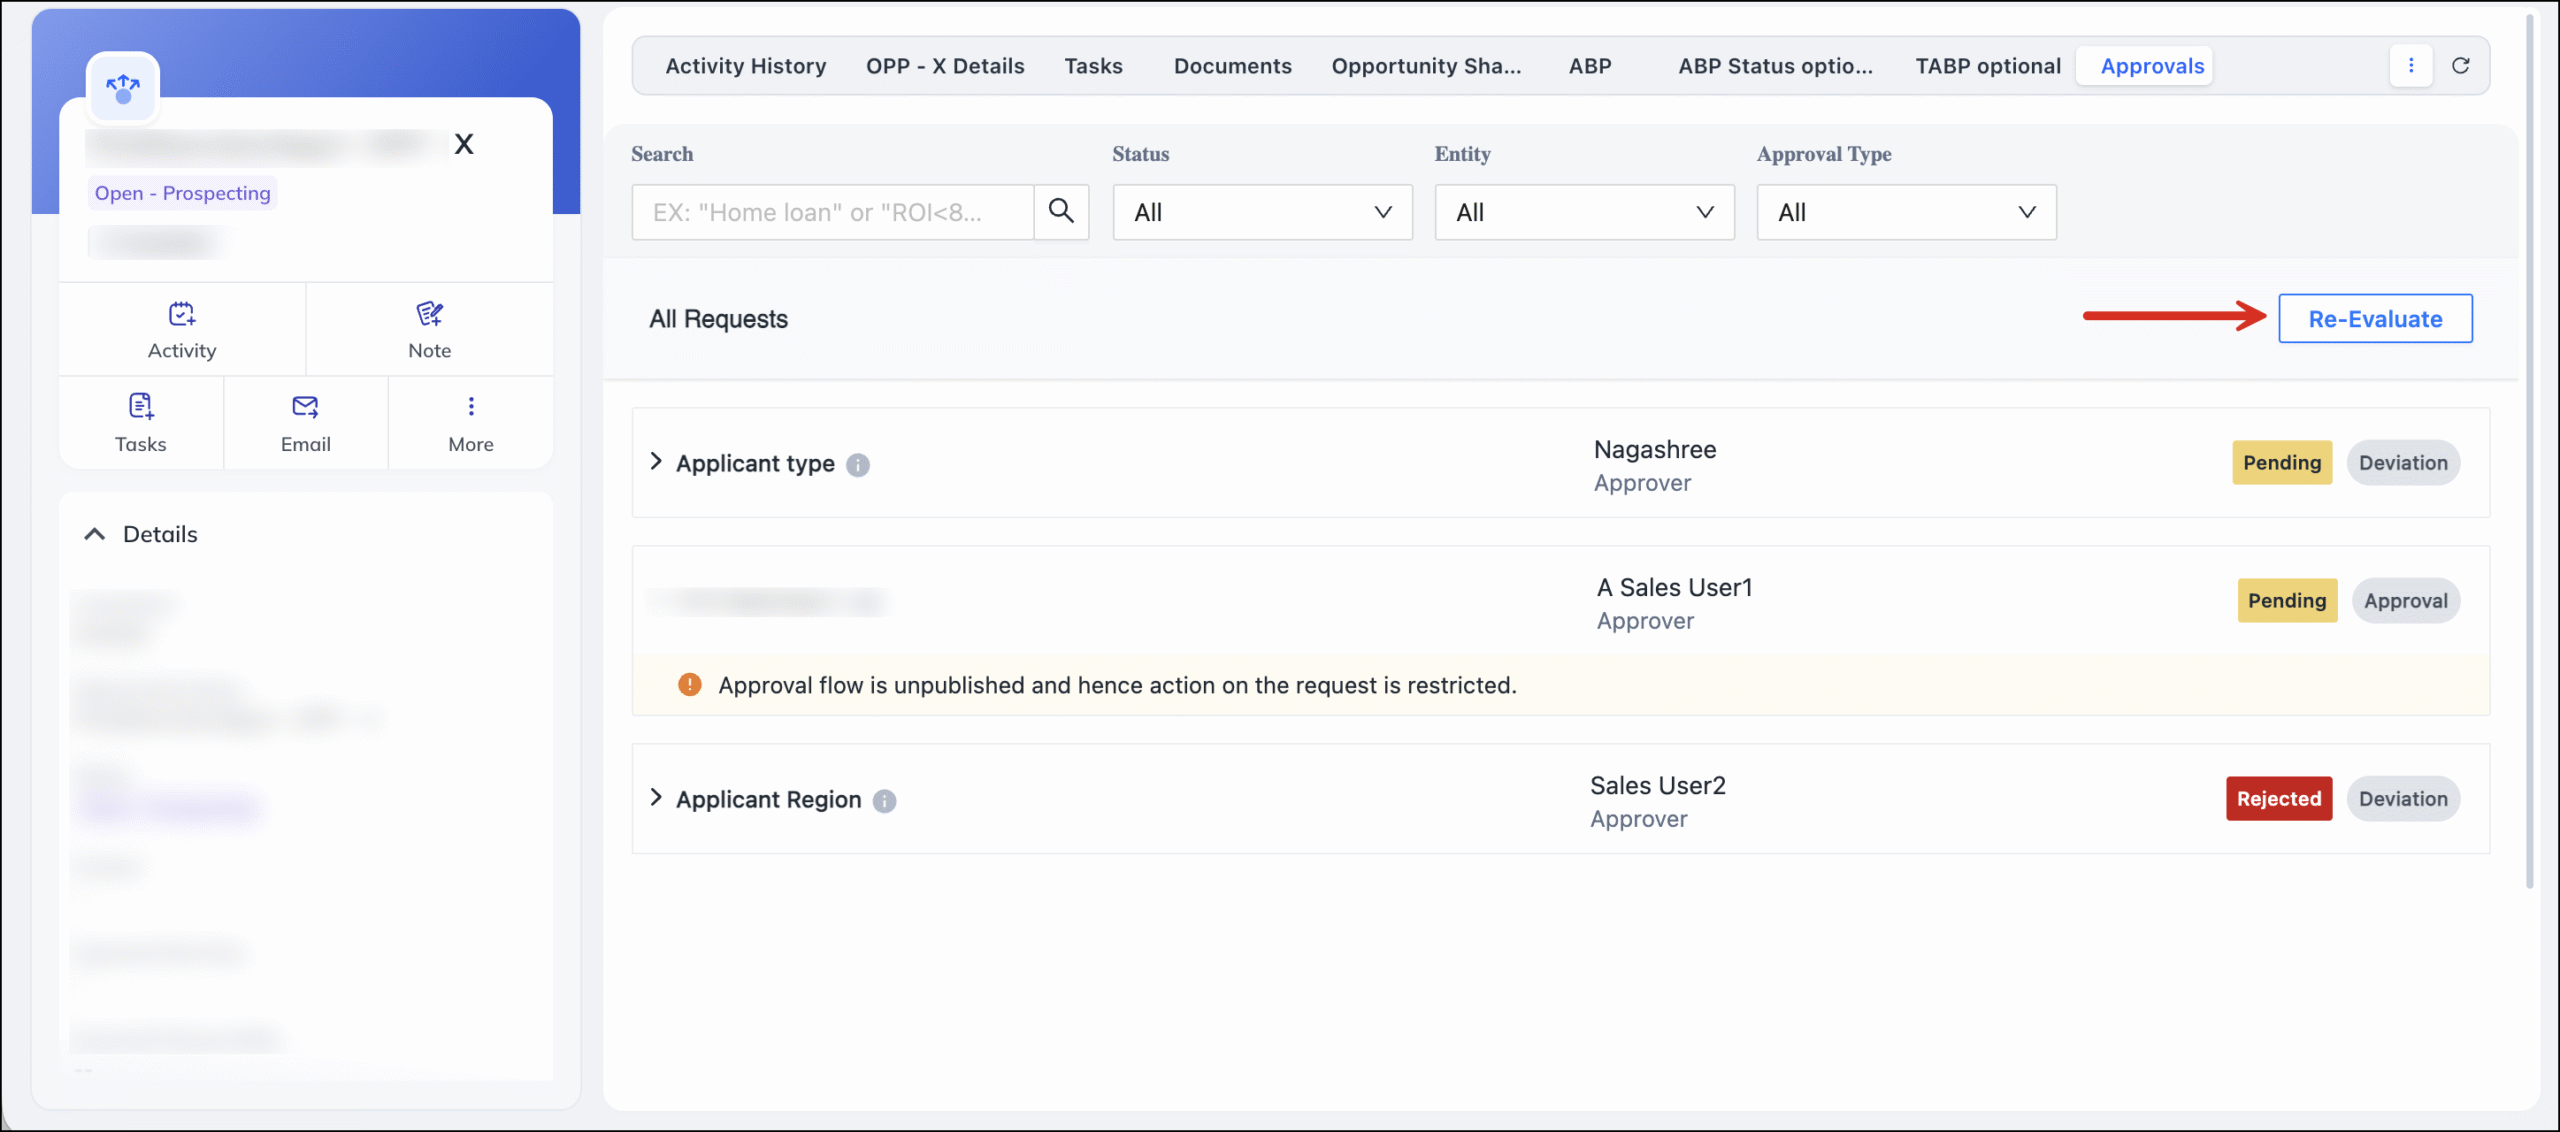
7. Re-Evaluate Approvals and Deviations
The Re-evaluate option allows users to validate whether the approvals or deviations currently triggered on an opportunity are still relevant based on the latest rules.
Use case
Over time, admins may:
- Modify approval/deviation rules
- Delete rules
- Add new conditions
- Change thresholds
For example, a customer had agreed for a loan of Rs. 50,00,000 but re-estimates and comes back with a request of Rs. 55,00,000
This can cause existing approval requests on an opportunity to become obsolete, incorrect, or missing. The Re-evaluate button ensures that the opportunity always reflects the correct and updated approval flow.
Impact
- Maintains data accuracy when rules are edited.
- Prevents approvers from seeing outdated or invalid requests.
- Ensures that all approvals on an opportunity match the latest business policies.
- Reduces manual cleanup when rules evolve.
How It Works
From the Approvals tab on an opportunity, users can click Re-evaluate.
When re-evaluation is triggered, the system performs the following automatically:
1. Deletes obsolete items
Any approval requests or deviation-based approval activities that are no longer valid (due to rule change or rule deletion) are removed.
2. Regenerates correct activities
If new or updated rules are now applicable, the system:
- Creates fresh approval requests
- Creates linked approval activities
3. Ensures rule accuracy
The updated set of approvals now reflects the current active approval rules and conditions.
8. Approval Request Summary
By default, the request summary displays the field defined in the Primary Field/Condition. However, you can add more fields by navigating to the Approval Flow, clicking Options>Request Summary, and selecting the additional fields you want to include.
9. Approval Summary
Once an Approval Flow is Published, you can navigate back to the Approval flow to view the flow’s summary, make changes, unpublish, or rename the flow.
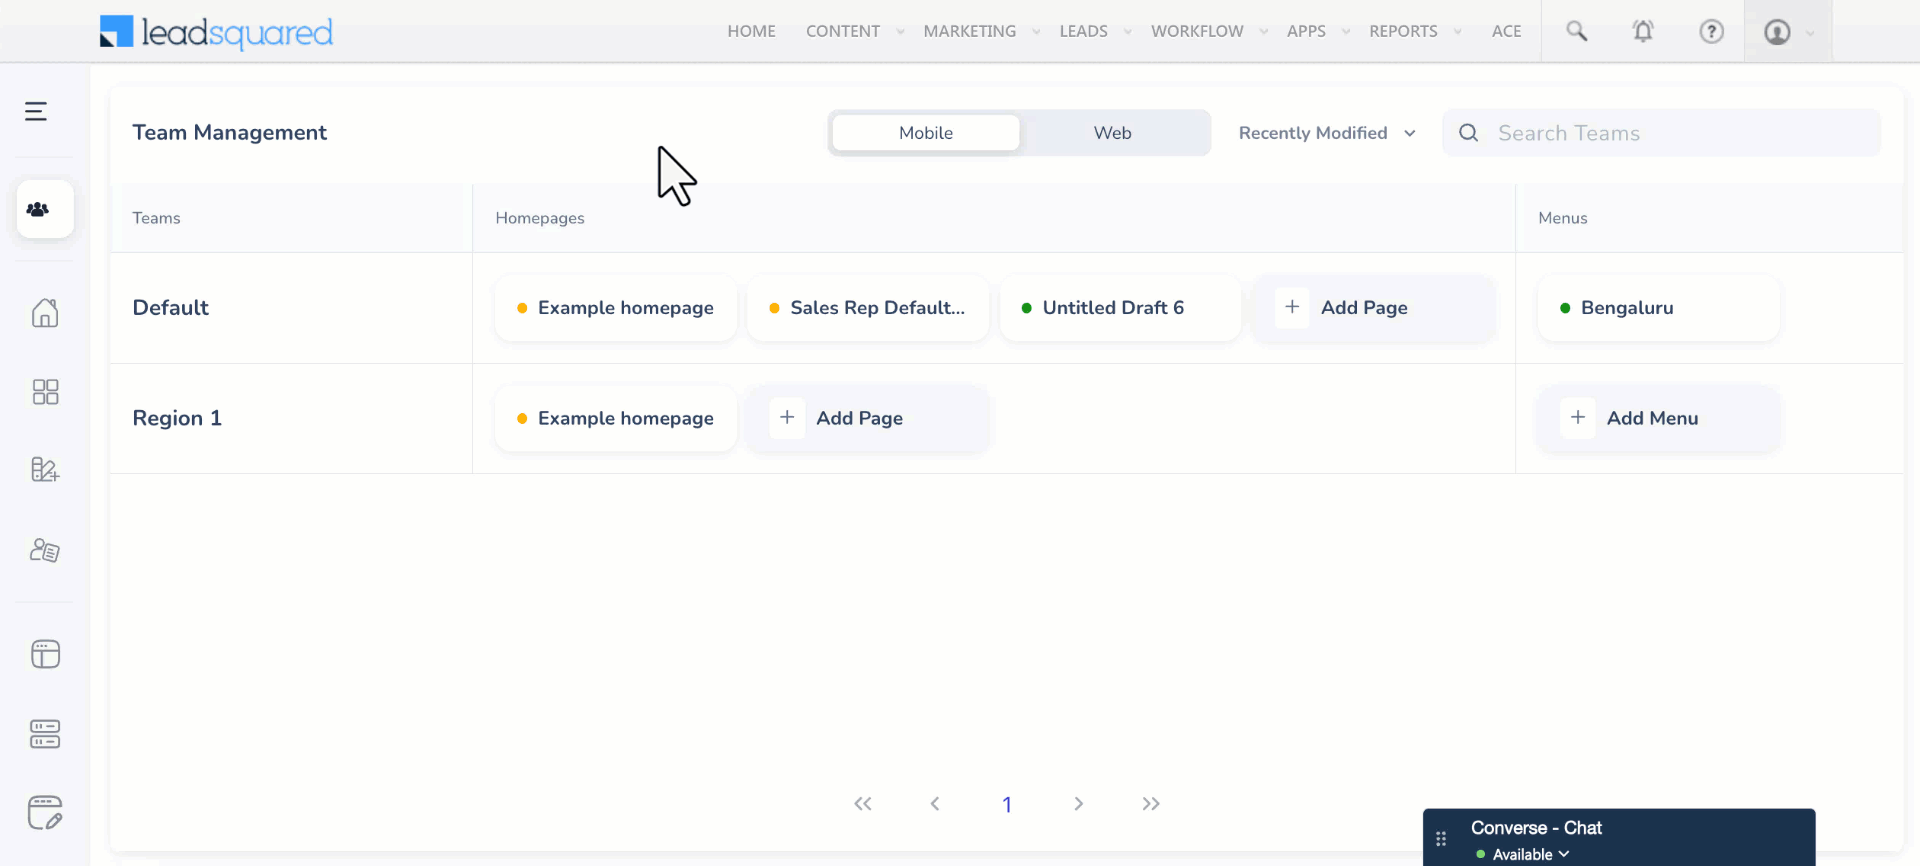
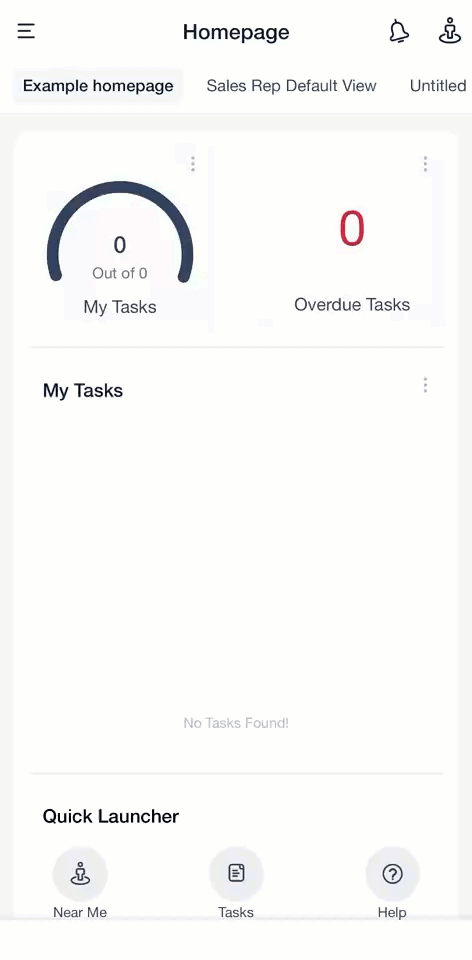
10. Enable Approvals on the LeadSquared Mobile App
Approvals can also be accessed and managed directly from the LeadSquared Mobile App. Follow the steps below to enable the Approvals section on mobile.
1. Add the Approvals Screen in CASA
The Approvals module for mobile is configured through CASA, not directly from the mobile app.
To make Approvals visible on mobile:
- Navigate to CASA.
- Create or Edit a Menu.
- Create a New Tab on the Bottom or Side Navigation.
- Configure the following
- Icon – Select an appropriate icon for the app
- Label – Enter the label/name for the tab
- Navigate To – Select the External option
- Launch – Copy and paste one of the following URL based on your region:
- India Region –
https://apv-ui.lending.leadsquared.com/approvalRequestDashboard?X-LSQ-AccessKey=@{User:AccessKey,}&X-LSQ-SecretKey=@{User:SecretKey,}&userId=@{User:UserId,}&userFullname=@{User:FullName,}&orgShortCode=@{Account:ShortCode,}&X-LSQ-Mobile-AuthKey=@{User:DynamicToken,}&X-LSQ-Mobile-RegionId=@{User:RegionId,} - Singapore Region –
https://apv-ui-sgp.lending.leadsquared.com/approvalRequestDashboard?X-LSQ-AccessKey=@{User:AccessKey,}&X-LSQ-SecretKey=@{User:SecretKey,}&userId=@{User:UserId,}&userFullname=@{User:FullName,}&orgShortCode=@{Account:ShortCode,}&X-LSQ-Mobile-AuthKey=@{User:DynamicToken,}&X-LSQ-Mobile-RegionId=@{User:RegionId,}
- India Region –
- Publish the changes.
Once published, the Approvals option becomes available in the mobile app for all users.
2. Log in to the LeadSquared Mobile App
After publishing:
- Open the LeadSquared Mobile App.
- Log in with your regular credentials.
- You will now see Approval Requests in the navigation (based on where you added it).
3. Mobile Capabilities
Approvers can perform all approval actions directly from the mobile interface, including:
- Approve
- Reject
- Forward
- View approval trail
- Return or discard (where applicable)
This ensures that approval workflows continue smoothly even when users are away from the web platform.
Any Questions?
Did you find this article helpful? Please let us know any feedback you may have in the comments section below. We’d love to hear from you and help you out!