1. Feature Overview
Auto-distribute leads that are in close proximity to your users using Field Sales Territories. Create territories within a geography and assign sales users/teams/groups to them. All leads inside or near this territory will be evenly distributed among the assigned users. With the Territories feature, you can –
- Carve out territories within a city using a pin code or draw the territories on the map.
- Create sub-territories within the main one.
- Auto-distribute leads within the relevant territories among sales users.
- Reallocate leads within a territory to other users.
- View leads in different locations on the map.
- Assign Sales Managers to monitor different territories.
- Allow/restrict sales users from adding new leads beyond their assigned territories.
- Track the progress of the sales users within the territory.
Note:
- This article helps Admin Users and Sales Managers create territories in their LeadSquared accounts. For details about how Sales Users can use this feature, refer to Field Sales Territories for Sales Users.
- This feature is independent of the Lead Assignment Quota.
2. Prerequisites
- You must be an Administrator or a Sales Manager to manage territories.
- This is a paid feature. To enable this feature on your account, contact your account manager, or write to support@leadsquared.com.
- Before you get started, enable Lead – Switch to v2 on Mobile App Additional Settings.
3. How it Works
- Create an Activity – Create a custom activity FieldSales-Lead Distribution with the details given in this article. This activity will be posted on the Lead Details page whenever a new lead gets distributed by Territories.
- Create an Automation – Create an automation for lead distribution. Add a webhook action to this automation with the details mentioned in this article. This automation is used to distribute leads among users in a particular territory. You can configure the automation to distribute all leads or only system owned leads.
- Add Territories – Create new territories by drawing or selecting a region on the map. Then, assign users/sales groups/sales teams to these territories. You can also create parent-child territories or sub-territories. Now, configure the Territories settings.
- Distribute Leads – Once you’re done creating territories, the leads will automatically be distributed among the assigned users based on their proximity. If multiple users are assigned to a territory, the leads are distributed in a round-robin manner. You can reallocate leads to different lead owners after they’re distributed.
4. Create an Activity
Create a custom activity with the following details –
| Field | Details |
| Name | FieldSales-Lead Distribution |
| Description | Field Sales Lead Distribution activity type |
| Score | 0 |
| Direction | Inbound |
| Delete Activity | Uncheck |
| Track Location | Uncheck |
| Log Activity Changes | Checked |
| Allow pre-dated Activities | Checked |
| Show in Activity List | Checked |
| Allow Attachments | Uncheck |
| Quick Add | Uncheck |
| Lock Activity | Checked. Select Marketing User, Sales Manager, Sales User |
5. Create an Automation
- Navigate to Workflow>Automation and click Create Automation.
- On the pop-up window, click Build from Scratch. Then, under Lead Trigger, click New Lead.
- On the next window, check Trigger on Import and click Save.
- Once you can view the Automation screen, click
 .
. - Click Custom and select Webhook. On the webhook form, fill the following details –
- Name – FieldSales LeadDistribution.
- URL –
https://fieldsales-in21.leadsquared.com/api/distribution/v1/orgid/lead. Click on Verify icon beside the URL and wait for a Success message.
- Custom Header Name – Authorization.
- Custom Header Value – You can find this value on the bottom of the General Settings page.
- Notify on failure – Add the user to be notified if the automation fails.
- Retry Count – 2 (Optional).
- Click Save.
- On the automation page, click Publish.
Note:
- In the place of
orgid, enter your organization ID. - While adding a webhook, you must create a
httpsURL. Your content type must be application/json. - To know more about creating an automation, refer to
- For more information on Webhooks, see Webhooks.
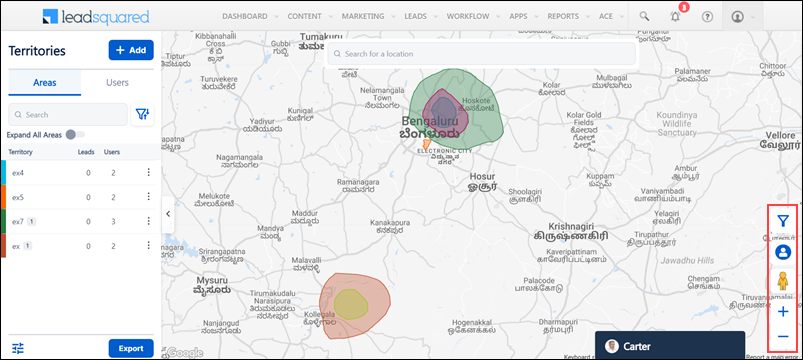
6. Add Territories
To draw or select territories –
- Navigate to Apps>Field Sales Territories and click Add.
- Enter the Territory Name.
- To draw a territory on the map yourself, click Draw. To select an entire area or pin code as your territory, click Select.
- If you click Draw, you can draw your territories using the icons at the bottom of the map.
- If you click Select, you can enter a pin code under Area to select your territory.
- Pick a colour to represent the territory.
- Under Assign Users, Sales Groups, and Sales Team, select and assign users, teams, sales managers or sales groups to the territories. Click Reset to remove the assignment.
- To assign a time limit to the territories, enable Seasonal Allocation and enter the expiry date.
- The toolbar on the map allows you to perform the following actions –

| Icon | Action |
| Lets you drag the map and view different locations. | |
| Lets you draw a circle on the map. | |
| Lets you freehand draw your territories. | |
| Lets you draw a territory with straight lines. | |
| Lets you erase all your unsaved territories. | |
| Lets you merge two overlapping territories. | |
| Lets you save the overlapping portion of two territories and erase the other parts. | |
| Lets you erase the new territory drawn on top of the old one and the overlapping portion. | |
| Undo button. | |
| Redo button. | |
| Lets you drag and move the icon bar anywhere on the map. |
Note:
- The search bar on the map only presents a location pin on the map. The Area bar under the Select section outlines the location you searched for on the map.
- If you assign multiple users to a territory, leads will be distributed among them in a round-robin manner.
- Only Administrators and Sales Managers can view the colours of the territories they created. The territories displayed to Sales Users are uniform in colour.
7. Create Sub-Territories
You can create parent-child territories (or sub-territories) by drawing them within/over another territory. There can be a total of 5 sub-territories for every territory. Users can be assigned to the sub-territory even after it is created. If no user is assigned to the leads inside a sub-territory, the leads will be distributed to the users assigned to the parent territory.
8. Map Actions
You can perform these actions using the icons displayed on the right side of the map –
| Icon | Action |
| Zoom in. | |
| Zoom out. | |
| Drag and drop the icon on the map to open street view. You can view the images of the location from various angles using this feature. | |
| Lets you hide leads. Click the same button again to view the hidden leads. | |
| You can filter leads based on the lead list, stage, and date range. |
9. Instant Lead Allocation
For leads whose location coordinates are stored in LeadSquared, Admins and Sales Managers can draw a territory and then allocate leads within that territory to a specific user.
This feature is helpful to change the lead owner when a user is deactivated (leaves an organization).
- On the Field Sales Territories page, click
 .
. - Draw a territory on the map. All the leads within the territory you’ve drawn will be displayed on the right side of the screen.
- Next to the leads you don’t want to reallocate, click
 .
. - Click Next.
- In the Lead Owner Name box, enter the name of the new lead owner.
- Click Allocate.
Note:
- Changing lead owners is also possible through bulk updates. However, the Instant Lead Allocation feature allows you to change the owenr directly on the map.
- Only 50 leads can be reallocated at once.
- You can only perform one reallocation at a time.
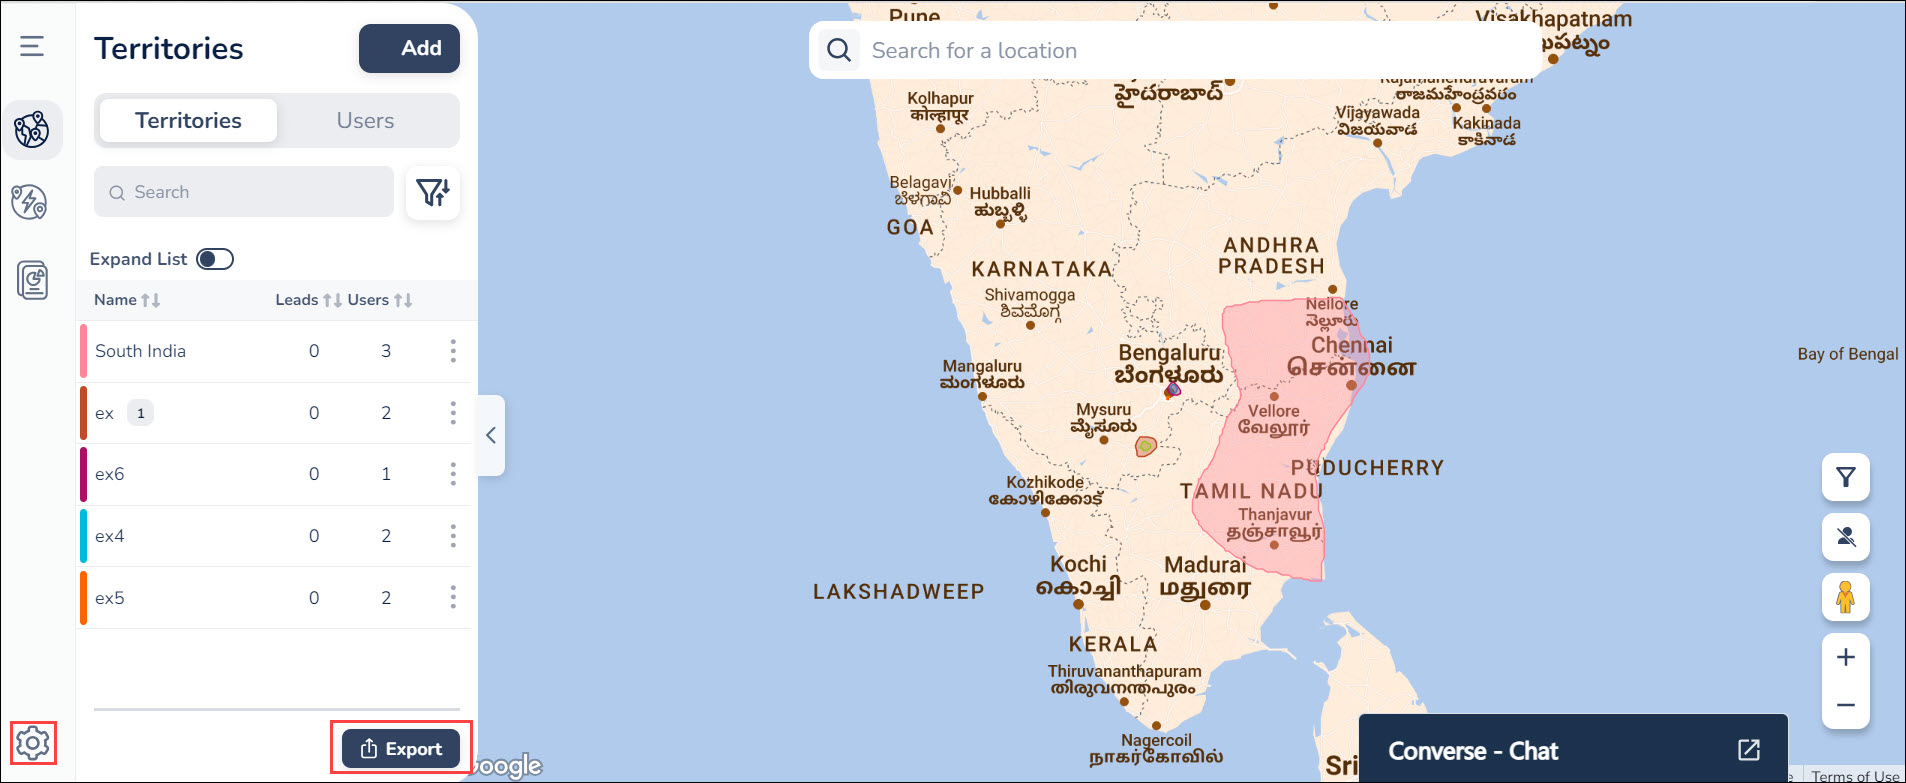
10. Manage Areas
Once you’ve added your territories, you can view them on the left side of your screen under Areas.
- To search for specific territories, use the Search bar.
- To filter/sort your territories, click
 .
. - To get a detailed view of your territories and their hierarchy (parent-child territories), enable Expand All Areas.
- Alongside the relevant territory, click
 .
.
- To edit your territory, click Edit.
- To clone your territory, click Clone. You can reuse territories by cloning and customising them according to your requirements.
- To permanently delete your territory, click Delete.
11. Manage Users
Once you’ve allocated users to your territories, you can view them on the left side of your screen under Users.
- To search for specific a user, use the Search bar.
- To filter/sort your users, click .
- To get a detailed view of the territories and leads assigned to the users, enable Expand All Users.
- To edit the allocation of territories to users, click
 .
.
12. Settings
Navigate to the bottom left corner of the screen. To export the details of all your territories, assigned users, and leads, click Export. To view the settings, click ![]() .
.
12.1 General Settings
In General settings –
- To group leads based on their geographical properties, enable Show Cluster View.
- To change your map’s theme, select any theme under Map Theme Selection.
- You can also customise the colours and pins to indicate different lead stages and lead lists.
12.2 Territories Settings
Click Territories to view the territory settings.
- To copy the lead distribution token, alongside Token for lead distribution, click Copy. This token must be used as the Custom Header Value when you create an automation for lead distribution.
- Under Territory Selection Mode, you can enable/disable grid view on the territories page. This setting lets you create territories in grids. Once you enable it, you can use the toolbar shown below to draw territories. To draw a territory in grid view, click
 .
.

- You can allow/restrict your sales users and sales managers from creating, editing or deleting leads beyond their assigned territories by enabling/disabling Restrict lead creation beyond territory.
- Under Lead Distribution, you can choose to distribute leads based on their zipcode or lat/long.
- Zipcode based lead distribution – Distribution will only work for leads having a zip code and for territories created with zip codes.
-
Latitude/Longitude based lead distribution – Distribution will only work for leads with geo-coordinates. There are no restriction on territory creation mode.
Note:
- Enabling/disabling grid view will delete all the territories and allocations already created.
- You can only create territories as grids after enabling grid view.
12.2.1 Bulk Import Territories
To import territories as a .csv file in your LeadSquared account –
- On the Field Sales Territories page, click Settings.
- Under Territories, you can view the Import Territories from File section.
- Click Download Sample and ensure that your file has the same format as the sample .csv file.
- Click Upload.
- If you get an error notification, click Download to view the territories with errors.
Note:
- Only Admins can import territories.
- 75 territories can be imported at one go.
- All territories must have unique names. You cannot add new territories with names identical to the old territories. You will have the option to either change the territory’s name or replace the older territory with the new one.

12.2.2 Define a Sales Region
You can also define a Sales Region for Sales Managers to add territories in –
- Enter the Sales Manager’s name under Defining Sales Region and click Select/Draw.
- Enter the Sales Region name.
- To draw a Sales Region on the map yourself, click Draw. To select an entire area or pin code as your Sales Region, click Select.
- If you click Draw, you can draw your regions using the icons at the bottom of the map.
- If you click Select, you can enter a pin code under Area to select your regions.
- To find previously created Sales Regions, enter the Sales Region Name under History.
- Click Assign.
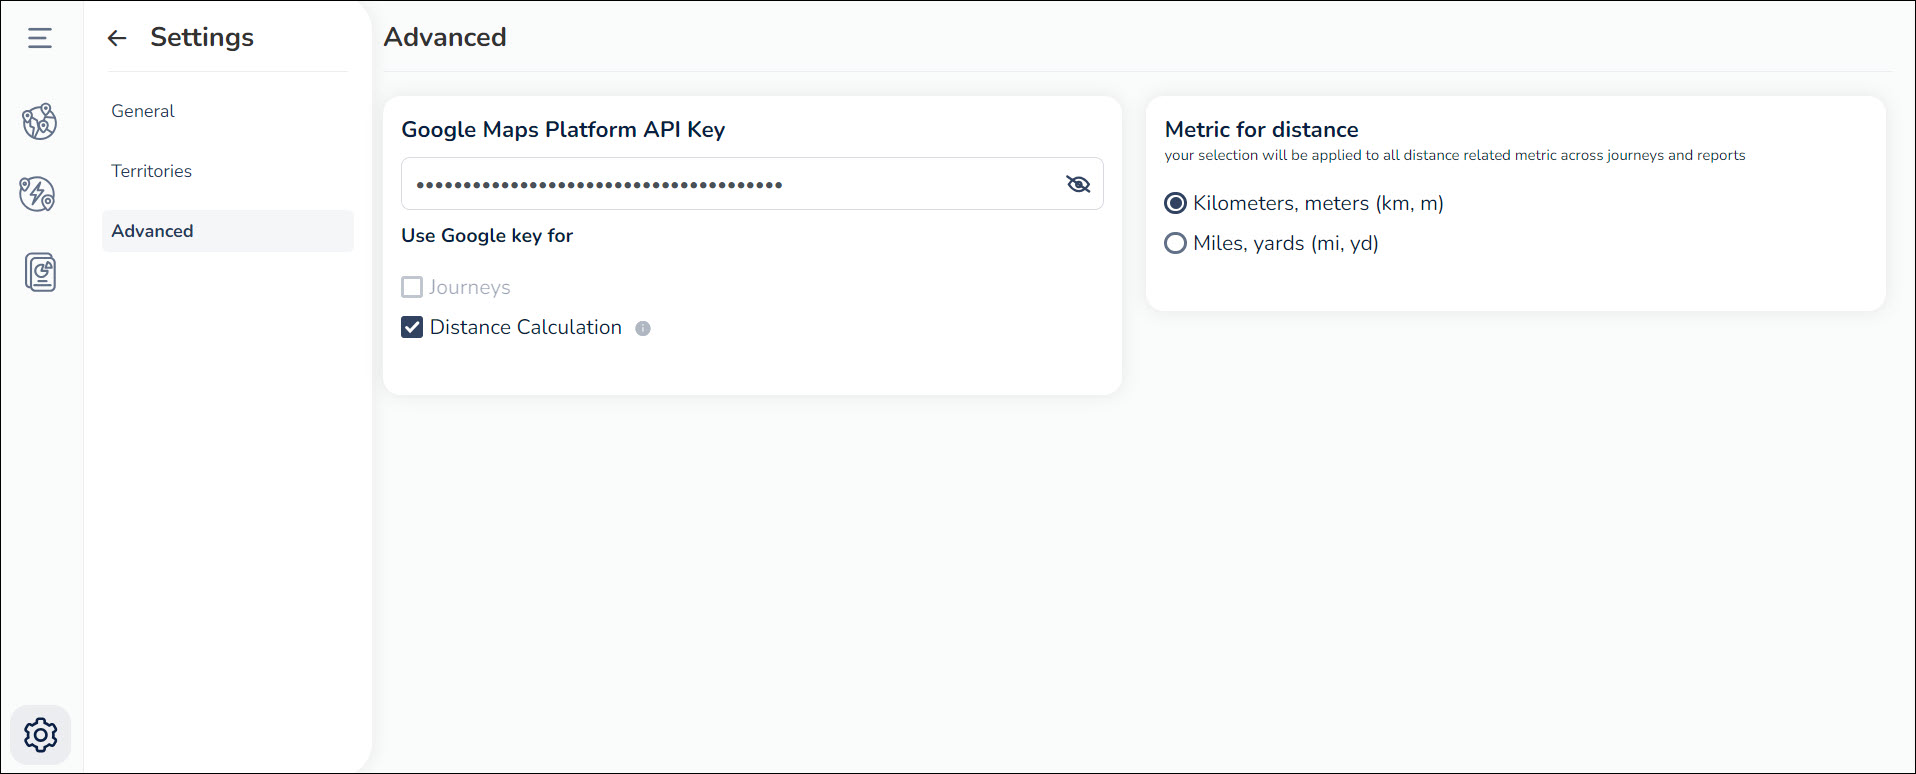
12.3 Advanced Settings
On this page, you can configure the following advanced settings –
12.3.1 Google Maps Platform API Key
Enter your Google Maps Platform API Key here. You can choose to use this key for Distance Calculation and/or Journeys
12.3.2 Metric for distance
You can see the metric for distance as Kilometers and meters (km, m) or Miles and yards (mi, yd). Your selection will be applied to all distance related metric across journeys and reports.
12.3.3 Rename Territories
- On the Territories page, click
 .
. - On the Settings page, click Advanced.
- Under Rename Modules, alongside Territories, click
 .
. - Enter the relevant display name and the plural term for it.
- Once you’re done, click
 .
. - To save changes, on the top right corner of the page, click Confirm.

Any Questions?
We’d love to answer your questions or hear your unique use cases. Feel free to share your experiences in the comments section below.


