


Get Started
Sales Suite
Field Ops
Marketing
Service CRM
Integrations & Apps
FloStack
LeadSquared SMS Connectors – India
1. Feature Overview
LeadSquared SMS Connectors facilitates customer support and other marketing efforts through simple, secure and reliable text messages. This connector lets you integrate popular SMS providers with your LeadSquared account to send automated, one-to-one and bulk SMSes to leads and opportunities in India, directly from LeadSquared.
The following SMS providers are currently supported –
- Karix (Supports Bulk SMS)
- Gupshup (Supports Bulk SMS)
- ValueFirst (Supports Bulk SMS)
- Textlocal
- TextNation (Supports Bulk SMS)
- Route Mobile
- VivaConnect
- Pragati Infocom
- Msg Advert
- OneXtel
- Twilio (Supports Bulk SMS)
- Go2Market
- Infobip (Supports Bulk SMS)
- Mtalkz (Supports Bulk SMS)
- Netcore Cloud
- Exotel (Supports Bulk SMS)
- MSG91 (Supports Bulk SMS)
- SMSHorizon
- 100Coins
- Pinnacle
- Airtel (Supports Bulk SMS)
- Soft-Tech
- Nimbus IT Solutions
- Ozonetel
- SmartPing
- Sinch
- Enablex
- R2Win
- Vialogue
- MySMSApp
- V-Connect
Important Note: In this article, we’ve used Gupshup as an example to demonstrate the installation and set-up process. The steps remain the same for all the other SMS providers, unless stated otherwise.
2. Prerequisites
- To enable an SMS provider’s connector on your account, contact your account manager or write to support@leadsquared.com.
- You must be an administrator user of your Leadsquared account.
- Your account plan must support SMS integration.
- The SMS sender Id, as well as the SMS templates you use, must be DLT approved. To know more, refer to Mandatory DLT Registration for SMS Services in India.
3. How it Works
Set up the connector by providing your SMS provider’s account details (Transactional and Promotional usernames, API Keys and Tokens, passwords, Principal Entity ID, DLT-approved Sender ID, etc.). Once it’s set up, create and configure the DLT-approved SMS templates you’ll be using to message your leads. After these templates are configured, send SMSes to your leads.
4. Install the Connector
To install the SMS connector on your account –
- From the main menu, navigate to Apps>Apps Marketplace.
- Search for the SMS connector you want to install*, and click Install.
- Alternatively, you can find the connector on the left panel, under SMS.
- Then, click Configure.
- On the Configure SMS Connector pop-up, no further action is required on this page. To configure the connector, navigate to Apps>Configure SMS Connector.
5. Configure the Connector
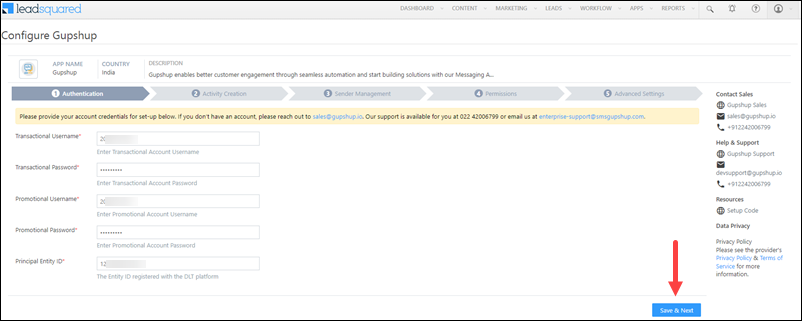
Once the connector is installed, navigate to Apps>Configure SMS Connector, and provide the following details for the SMS provider you’re looking to configure –
5.1 Authentication
Once you’re done, click Save & Next.
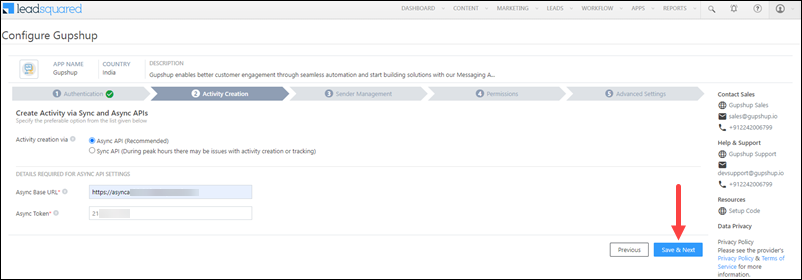
5.2 Activity Creation
When SMSes are sent to your lead, an activity is posted automatically against that lead. Here, configure the activity creation method for the SMS activity.
- Async API – This is the recommended method. If you’ve selected this method, enter your LeadSquared account’s Async API URL and API Key. To obtain both these values, navigate to My Profile>Settings>API and Webhooks>Async API.
- Sync API – This method is selected by default. To post limited SMS activities against your lead, select Sync API.
Note:
- Through the Sync API method, the activity creation process happens without any delays. But activity creation or tracking may fail during peak hours and when there’s high traffic to our servers. To work around this potential issue, we recommend you use the Async API method.
- Async APIs must be enabled on your LeadSquared account for the Async method to work.
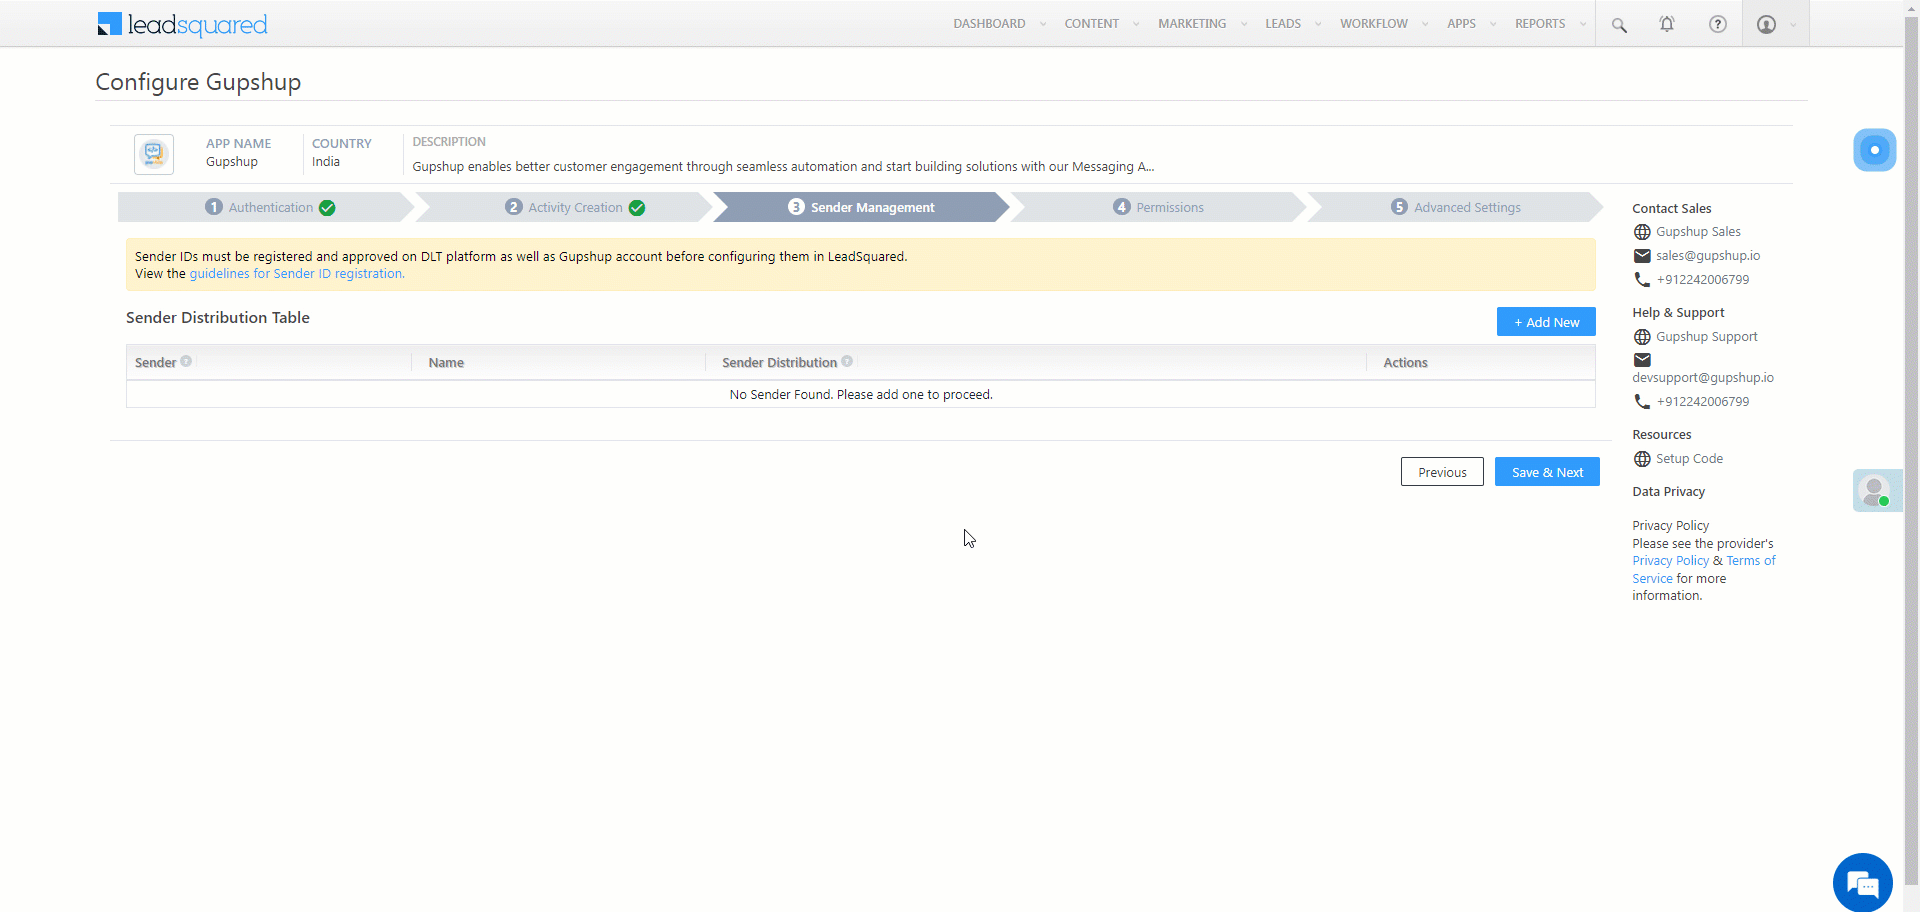
5.3 Sender Management
To add your SMS account’s Sender IDs, click Add New, and on the Add Sender ID pop-up, enter the following details –
- Sender ID – Your SMS account’s DLT approved sender Id. To obtain this Id, contact your account manager.
- Name – A name to identify the Sender ID (e.g., Promotional, Transactional, etc.). This is primarily for internal references. This is optional.
- Sender Distribution – Select the users to whom the Sender ID will be assigned –
- Based on Role – Select the LeadSquared user roles (e.g., Administrator, Marketing User, etc.) to whom you want to assign the Sender ID.
- Advanced (User Level) – Select a boolean user field that’s configured in your account. If the selected user field contains the value “True” for any user, the Sender ID will be assigned to them.
To add multiple Sender IDs, repeat the steps mentioned above. Once you’re done, click Save, and click Save & Next.
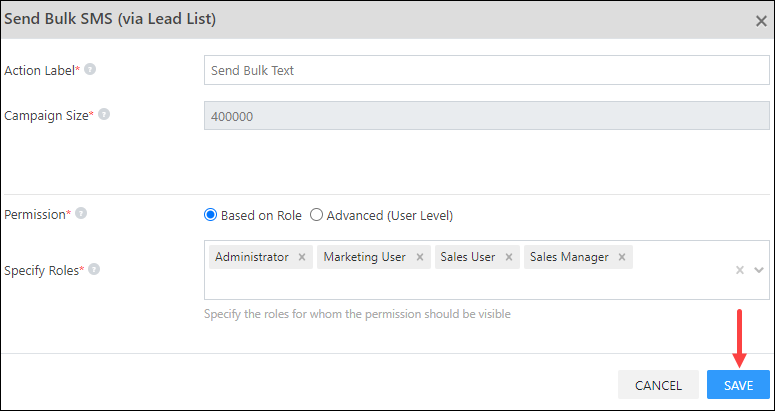
5.4 Permissions
Configure the permissions you want to grant users for the Send SMS action (Single and Bulk). This action will be configured on the following pages –
- Manage Leads page grid
- Manage Opportunities page grid
- Lead List
- Automation Page
You can also configure permission you want to grant users for managing templates and reports. This action will be configured on the following pages –
- Manage Templates (the SMS template creation screen)
- Manage Reports (the SMS Reports screen)
- Under Functionality, click on the page for which you want to configure the permissions.
- On the Send SMS pop-up, provide the following details –
- Action Label – Enter the display name of the SMS action (e.g., Send Text – Gupshup, Send Bulk Text – Karix, etc.). The limit on the number of characters you can add is 25.
- Campaign Size – This is applicable only when sending bulk SMSes. You can send SMSes to up to 200 leads through the Lead Grid, and up to to 4 lakh (400,000) bulk SMSes through the Manage Lists page in one go.
- Permission – Select if you want to enable users to Send SMS based on their user role or based on the values entered in a user boolean field.
- Based on Role – Select the LeadSquared user roles based on which you want to grant Send SMS permissions.
- Advanced (User Level) – Select a boolean user field that’s configured in your account. If the selected user field contains the value “True” for any user, they’ll be able to access the Send SMS action.
- To disable the action for your users on any page, under Enable/Disable, disable the
 slider. The action cannot be disabled for the Manage Templates and Manage Reports screens.
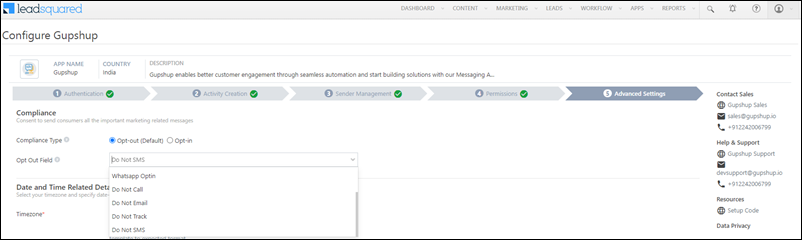
5.5 Advanced Settings
Compliance
The SMSes you send to your leads must meet regulatory compliance standards set by TRAI. You can either choose Opt-out or Opt-in as the compliance type. Once you select the type, from the list of boolean lead fields (e.g., ‘Do Not SMS’) available in your account, select an opt-out/opt-in field.
Leads for whom the value of the Opt-out field is set to ‘True’ will not receive any SMS. Alternatively, leads for whom the value of the Opt-in field is set to ‘True’ will receive SMSes.
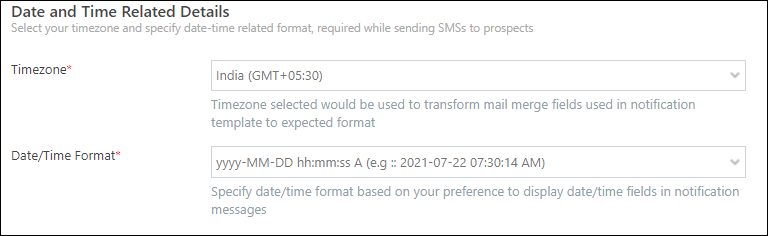
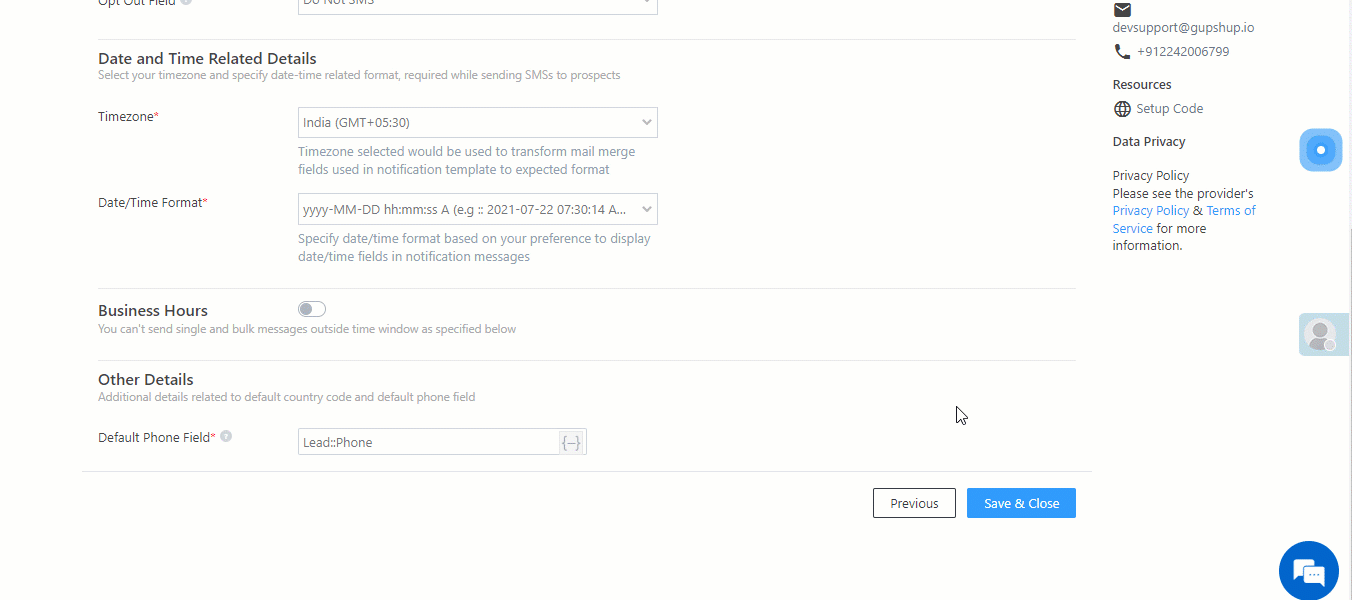
Date and Time Related Details
- Timezone – Select the timezone your LeadSquared account should follow when sending SMSes to leads.
- Date/Time Format – Select the date and time format your LeadSquared account should follow when sending SMSes to leads.
You can define business hours during which SMSes can be sent to your leads. This step is optional.
- Alongside Business Hours, enable the
 slider.
 - From the Schedule dropdowns, define the business hours.
- From the Select Sender IDs dropdown, select the senders to whom this business hour definition will be applied.
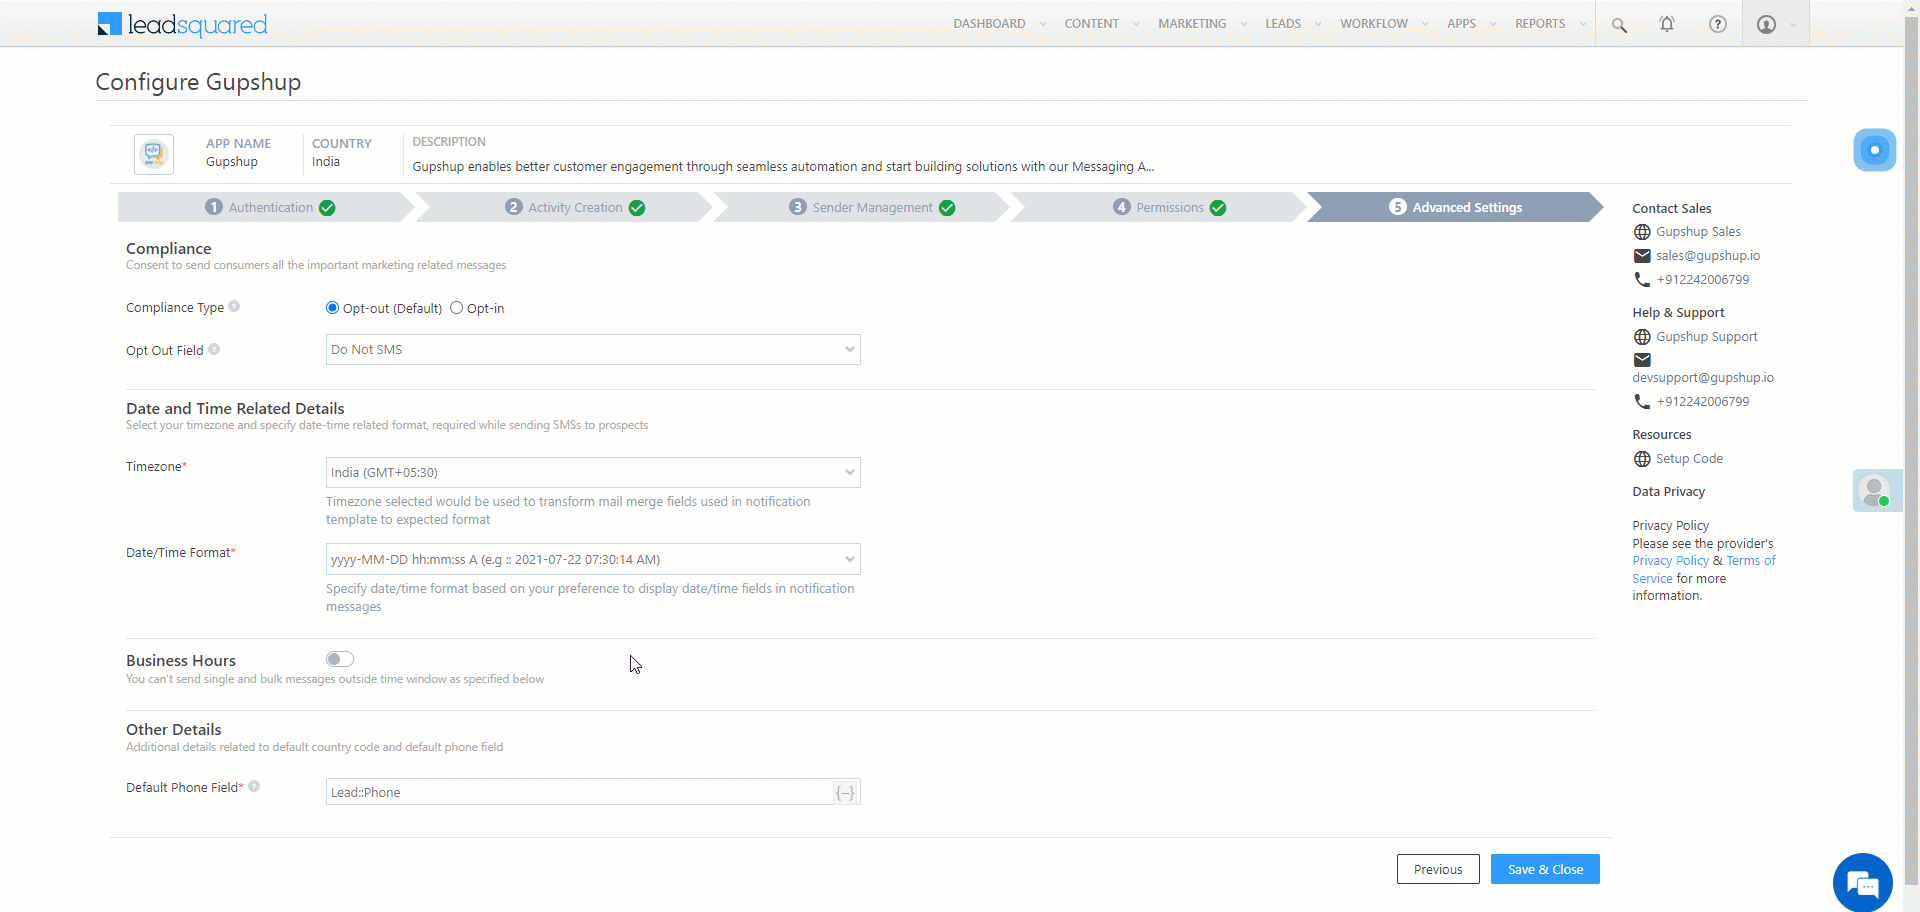
Other Details
From the Other Phone Field dropdown, select the default phone field in which the lead’s phone number is stored in your account. Once you’re done, click Save & Close.

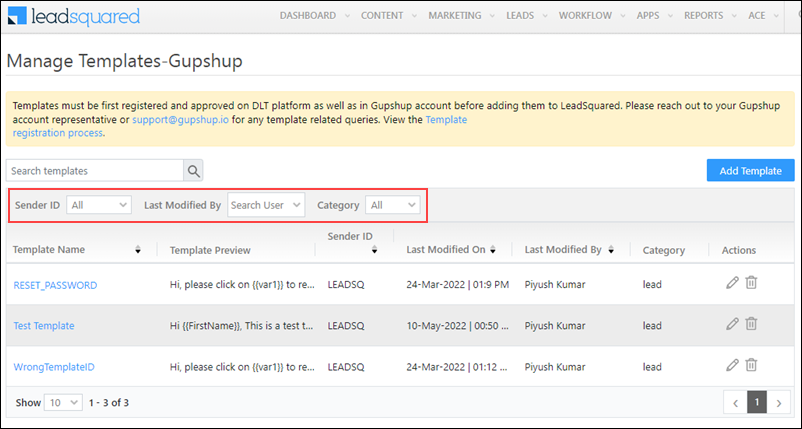
6. Manage Templates
After the SMS connector is set up, add DLT Approved SMS templates which you’ll be using to message your leads.
Note:
- The SMS templates you add here must be registered and approved on your SMS provider’s account.
- The SMS templates you add here must be DLT approved. To know more, refer to Mandatory DLT Registration for SMS Services in India.
- Navigate to Apps>Manage Templates. This is the action label name you’ve configured for the Manage Templates screen (e.g., Manage Templates – Gupshup, etc.).
- On the Manage Templates screen, click Add Template.
- On the Add/Edit Template pop-up, enter the following details –
- Category – Select the LeadSquared category type for the SMS template.
- Lead – Select this if you’re using this template to send messages to leads (e.g., offers, promotions, etc.).
- Opportunity – Select this if you’re using this template to send messages to opportunities (e.g., offers, promotions, etc.).
- Activity – Select this if you’re using this template to send notifications about an activity (e.g., Payments, Document Collections, etc.).
- Task – Select this if you’re using this template to send notifications about a task (e.g., Appointment Reminders, Follow Ups, etc.).
- User – Select this if you’re using this template to send messages to users (e.g., Reminders, Company Wide Announcements, etc.).
- Template Name – Provide a name for the template.
- Source Availability – Select if the template should be available to send Single SMS, Bulk SMSes and SMS through Automations. You can select all three sources if required. It is mandatory to select at least one source.
- SenderId – Your DLT approved Sender Id.
- Template Type – Choose if the template is –
- Transactional – Order confirmation, account creation confirmation, etc.
- Promotional – Ongoing offers, product launches, etc.
- Service Implicit – OTPs, informational messages, bookings, etc. These messages are not intended for marketing purposes.
- Service Explicit – Discounts, updates, etc. These messages are for marketing purposes.
- DLT Template Id – The DLT approved template Id. To get your template approved, and to obtain this Id, please reach out to your SMS provider’s account manager.
- Content – Enter the DLT approved Template content/message here.
- Add Variable – To add mail merge fields, click Add Variable. Variables in LeadSquared are defined as {{var}} i.e, the variable name is enclosed within two curly brackets. If the approved template contains a mail merge field “{#var#}”, then the LeadSquared mail merge value can only replace “{#var#}”, without changing anything else in the template. For e.g., “Hi {#var#}, hope you’re doing well!” can only be replaced by, “Hi @{Lead:FirstName,}, hope you’re doing well!”. We also support Custom Variables. You can use this to mail merge custom variables like the Company Name, website URLs, etc.
- Category – Select the LeadSquared category type for the SMS template.
- Once you’re done entering all the details, click Save.
On the Manage Templates screen –
- To edit an existing template, alongside the template, click
 .
. - To delete an existing template, alongside the template, click
 .
. - You can sort and filter existing templates by –
- Sender ID
- Last Modified By user
- Category
7. Send Single SMS
To send a one-to-one SMS to your leads –
- Navigate to Leads>Manage Leads.
- Alongside the lead you want to message, hover your cursor over
 . From the available options, under Messaging, click the messaging action label you’ve configured (e.g., Send Text – Gupshup, etc.).
 - On the Send Text pop-up –
- Select the Sender Id through the From dropdown.
- Under Message Body, click Select a Template, and from the list of available templates, select the one you want to use.
- If there are custom variables available, check if the relevant values are mapped to each variable.
- Once you’re done, click Send.

Alternatively, you can also send one-to-one SMSes from the Lead Details page. To do this, hover your cursor over the Lead Actions button, and under the Messaging option, click the messaging action label you’ve configured (e.g., Send Text – Gupshup, etc.).
8. Send Bulk SMS
You can send bulk SMSes to your leads from the Manage Leads page and the Manage Lists page.
Note: At present, you can send bulk SMSes only through the following SMS connectors –
- Karix
- Gupshup
- Mtalkz
- TextNation
- 100Coins
- Airtel
- ValueFirst
- Twilio
- Infobip
- Exotel
- MSG91
- Soft-Tech
8.1 Manage Leads Page
- Navigate to Leads>Manage Leads.
- Alongside the leads you want to send the SMS to, select the
 checkboxes..
 - Hover your cursor over the Actions menu. From the available options, under Messaging, click the messaging action label you’ve configured (e.g., Send Bulk Texts – Gupshup, etc.).
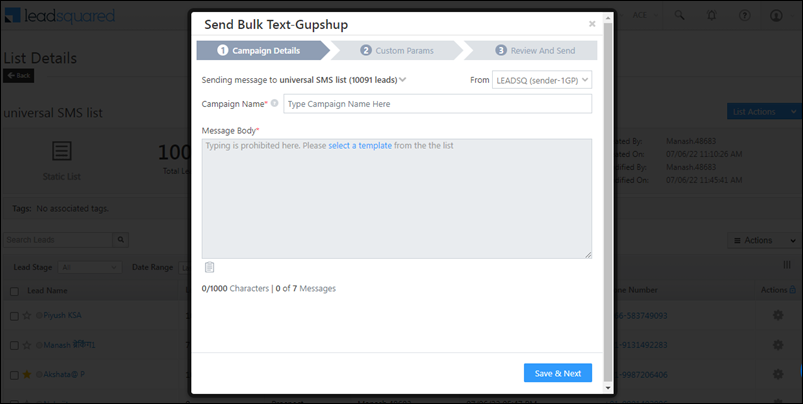
- On the Send Bulk Text pop-up, enter the following details –
- Campaign Details
- Alongside Sending messages to…, check if the correct number field has been selected. You can select multiple number lead fields.
- From the From dropdown, select the Sender Id.
- Alongside Campaign Name, provide a relevant name for the SMS campaign.
- Under Message Body, click Select a Template, and from the list of available templates, select the one you want to use.
- Alternatively, to select a template, click
 .
.
- Alternatively, to select a template, click
- Once you’re done, click Save & Next.
- Custom Params
- If there are custom variables available in the template, check if the relevant values are mapped to each variable.
- To edit the value for a variable, click .
- Once you’re done, click Save & Next.
- Review and Send – On this tab, review if all the SMS details are correct.
- Campaign Details
- Once all the details are verified, click Send.
- On the send SMS confirmation screen, click Yes. The SMS is sent to all the selected leads.
8.2 Manage Lists Page
- Navigate to Leads>Manage Lists.
- Alongside the list you want to send the SMS to, hover your cursor over
 . From the available options, under Messaging, click the messaging action label you’ve configured (e.g., Send Bulk Texts – Gupshup, etc.).
- Alternatively, open a list and from the List Actions menu, click Messaging, and click the action label you’ve configured.
- On the Send Bulk Text pop-up, enter the following details –
- Campaign Details
- Alongside Sending messages to…, check if the correct number field has been selected. You can select multiple number lead fields.
- From the From dropdown, select the Sender Id.
- Alongside Campaign Name, provide a relevant name for the SMS campaign.
- Under Message Body, click Select a Template, and from the list of available templates, select the one you want to use.
- Alternatively, to select a template, click .
- Alternatively, to select a template, click
- Once you’re done, click Save & Next.
- Custom Params
- If there are custom variables available in the template, check if the relevant values are mapped to each variable.
- To edit the value for a variable, click .
- Once you’re done, click Save & Next.
- Review and Send – On this tab, review if all the SMS details are correct.
- Campaign Details
- Once all the details are verified, click Send.
- On the send SMS confirmation screen, click Yes. The SMS is sent to all the selected leads.
9. SMS via Automation
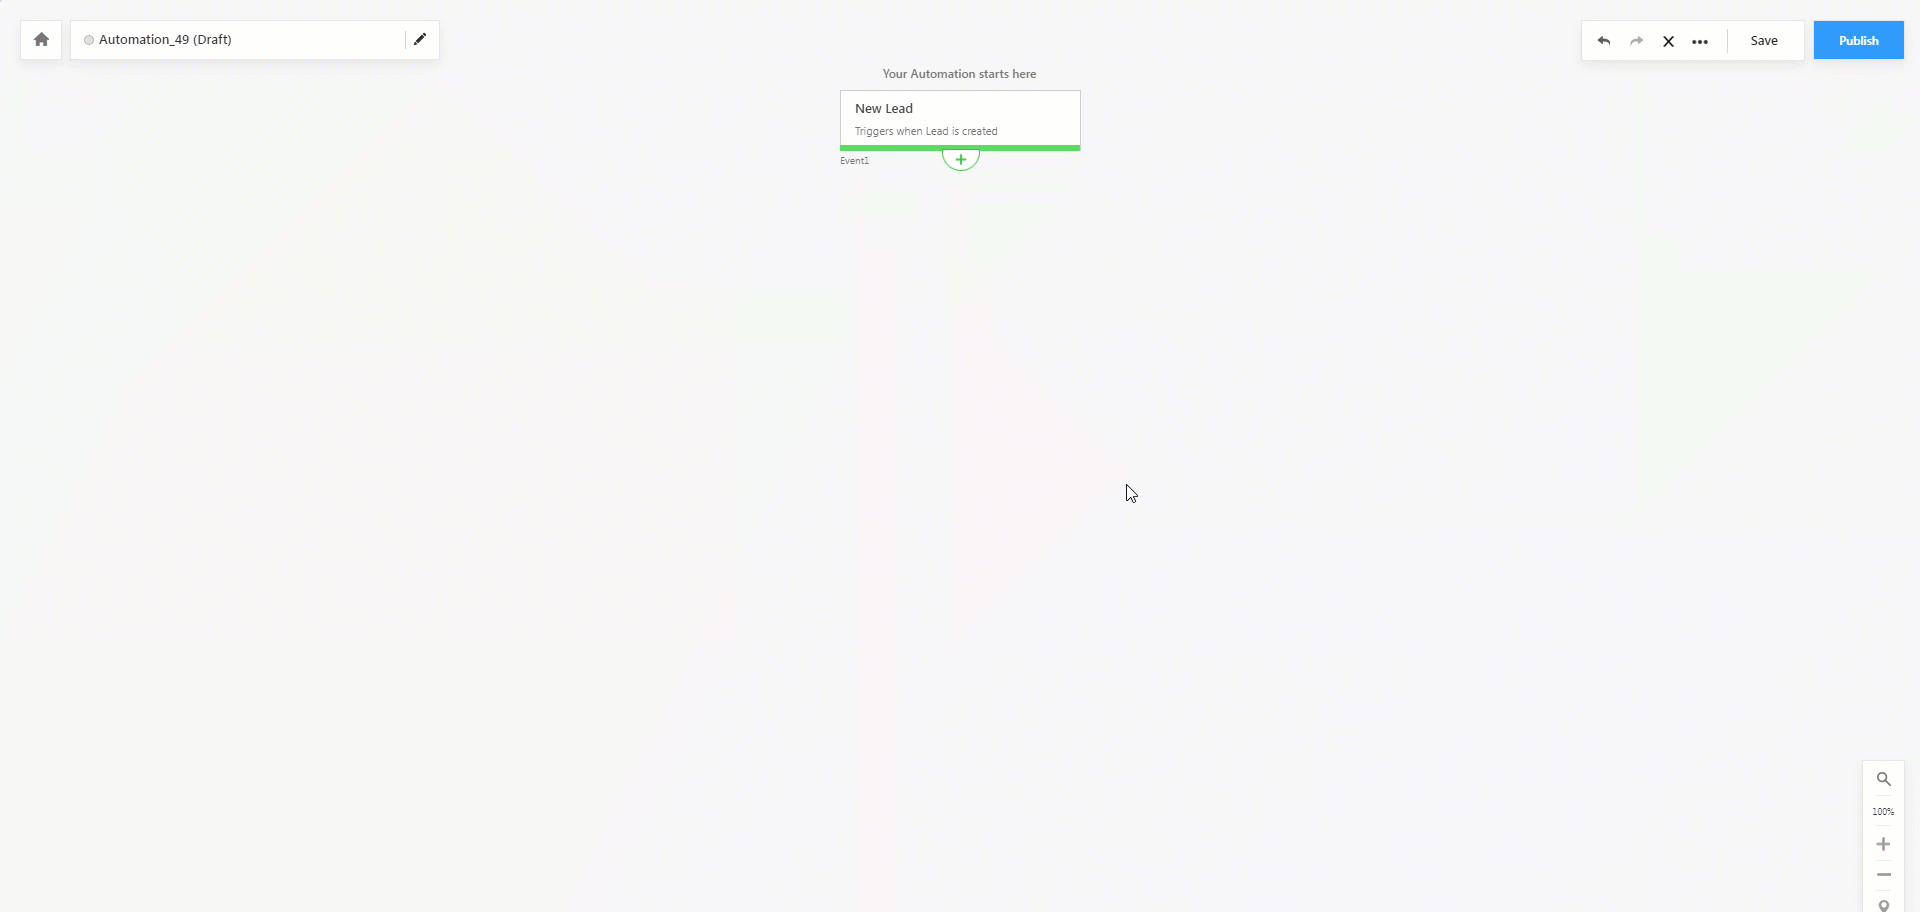
To send SMS via Automations –
- Navigate to Workflow>Automation.
- Create a new automation, or edit an existing one.
- After selecting the type of automation and the trigger, click the add
 icon, click Messaging, and click the messaging action label you’ve configured (e.g., Send Automation Texts – Gupshup, etc.).
 - After entering the required details and selecting a template, click Send SMS.
- To mail merge multiple LeadSquared phone fields, click the Add Another Number button. Filter by the entity type under which the phone field is present, and use the search box to find and add the field. In the example below, we’ve mail merged the Lead Owner phone field to the automation.
- Publish the automation.
For more information, see How to Send SMS through Automation.
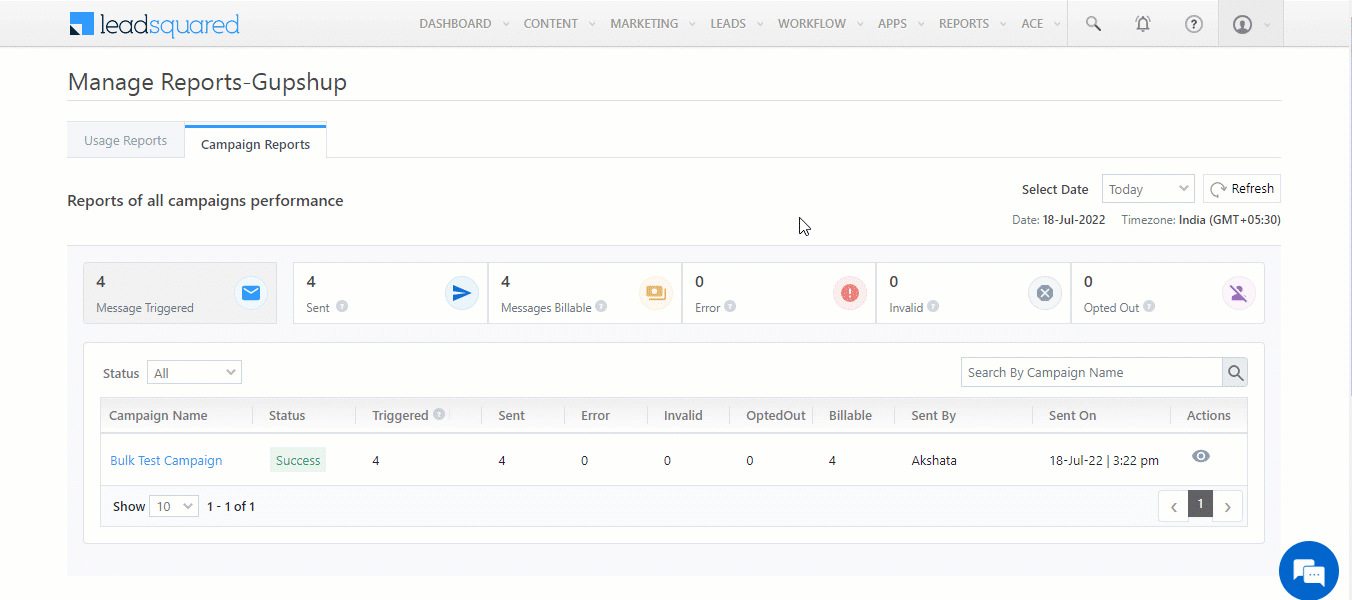
10. View Reports
To view the reports and logs of all the SMSes sent through the SMS connector –
- Navigate to Apps>Manage Reports – SMS Connector.
- You can sort the report by the following filters –
- Usage Reports – The logs of the total one-to-one as well as bulk messages sent through the connector.
- Templates – Filter the reports on the basis of the templates used when sending the messages.
- Message Source/User Wise – Filter the reports on the basis of the message source (Automation, Bulk and One-to-one messages).
- Select Date – Select the time interval for which you want to view the SMS logs data. You can select a maximum date range of up to 90-days in the past.
- Cumulative – This will render the report as a pie chart.
- Timeline – This will render the report as a bar graph.
- For pie charts, to populate the details section, click any part of the chart.
- For bar graphs, if you delete any element, the display of the graph gets updated accordingly.
- Usage Reports – The logs of the total one-to-one as well as bulk messages sent through the connector.

-
- Campaign Reports – The logs of all the bulk messages sent through the connector. This option will only show up if the connector supports bulk messaging.
- Select Date – Select the time interval for which you want to view the SMS logs data. You can select a maximum date range of up to 90-days in the past.
- Status – Filter by the campaign status (All, Success, Error, and Partial Error).
- To view detailed logs of a campaign, click on the campaign. Alternatively, click the
 icon. On the Batch Details screen, you can perform the following actions –
- To view the API details, under Batch ID (the List Id), click the entry.
- To view the status of the messages triggered, under Triggered, alongside the Batch Id you want to view the details for, click the number.
- Message Triggered – The total number of leads to whom the messages were triggered.
- Sent – The total number of successful messages sent to the SMS provider.
- Messages Billable – Every block of 160 characters in a SMS is considered as a one SMS. For e.g., if you send one SMS that contains 340 characters, it is considered as 3 messages (160+160+20) under the Messages Billable header.
- Error – Any internal LeadSquared errors (e.g., server errors, etc.) that cause the Send SMS action to fail will get logged under the Errors column.
- Invalid – The following scenarios when sending SMSes will get logged under the Invalid column –
- Formatting issues with the lead’s phone numbers
- Empty or missing lead phone numbers
- Sending SMS outside the configured Business Hours
- If the DLT variable lenght exceeds the configured limit
- Opted Out – The total number of messages sent to leads who have opted out of receiving messages.
- Campaign Reports – The logs of all the bulk messages sent through the connector. This option will only show up if the connector supports bulk messaging.
Note: To download/export a report, under Actions, click ![]() . The report contains the Lead Id, Phone Numbers, Opportunity Id, Message Content, Status Message, Message Type and Message Count of all the leads to whom the message was sent.
. The report contains the Lead Id, Phone Numbers, Opportunity Id, Message Content, Status Message, Message Type and Message Count of all the leads to whom the message was sent.
Alternatively, click on the Batch Id to download a report that contains the Lead Phone Number and Message content of the SMS sent to leads.

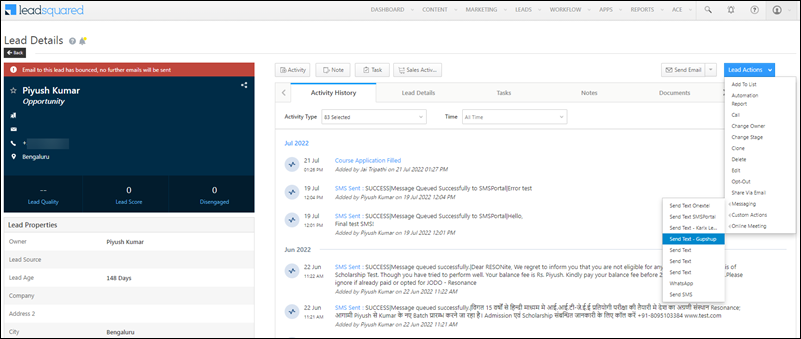
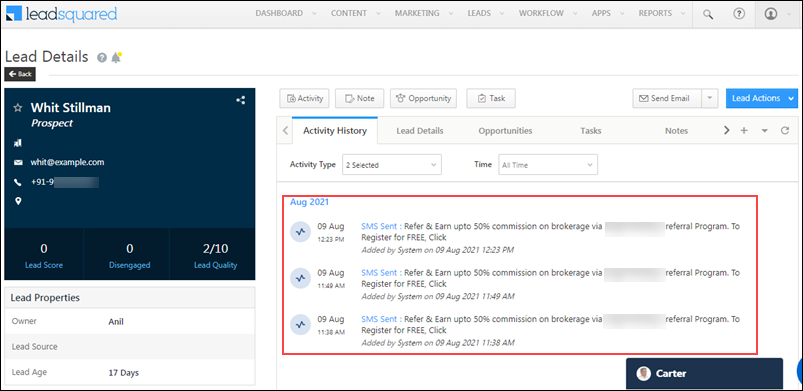
11. SMS Activities
You can track the SMS sent, from the Lead Details and Manage Activities pages. We automatically post SMS Sent activities in real-time.
11.1 Lead Details
To view more details, click the SMS Sent link for each activity.
11.2 Manage Activities
You can also view the list of leads with SMS activities. Be sure to select SMS Sent from the Activity Type drop.
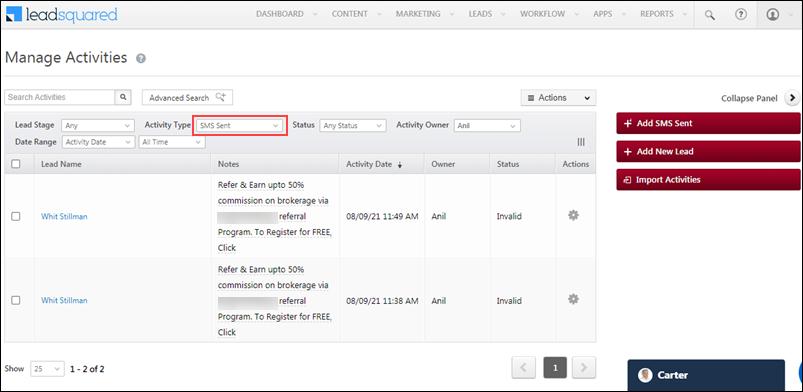
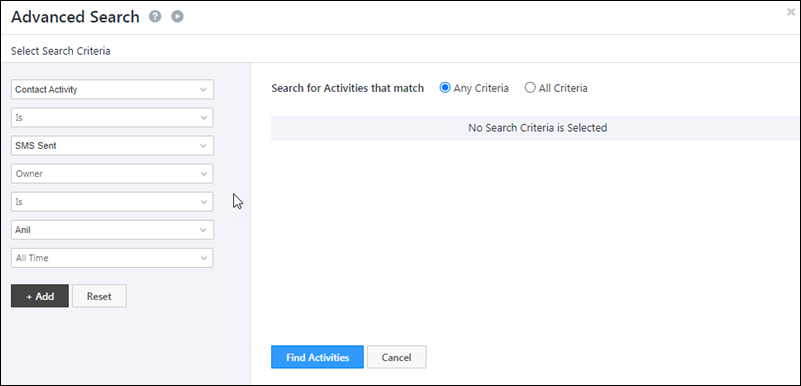
You can use the Advanced Search feature to filter SMS based on different fields, such as campaigns, date-time fields, etc.
Any Questions?
Did you find this article helpful? Please let us know any feedback you may have in the comments section below. We’d love to hear from you and help you out!
I have my custom SMS API. How Can I integrate my API here to send bulk messages
Hi, Dilip. Unfortunately, this isn’t possible.
Please confirm if this list is updated
Hi Raj,
The list is updated till the end of October. Post December 1st, the next list of supported SMS providers will be updated.