


Get Started

Sales Suite
Field Ops
Marketing
Service CRM
Integrations & Apps
FloStack
UDS – Scheduler Trigger

1. Feature Overview
The Universal Data Sync (UDS) connector now supports Scheduler as a trigger. A trigger starts a data flow. The Scheduler periodically pulls data from a third-party app into UDS, and then syncs it with LeadSquared, instead of waiting for the third-party app to push the data. It runs at the configured intervals, using API endpoints or SFTP servers maintained by your data provider.. This gives you control over how often data syncs with LeadSquared, reduces delays, and keeps your data up to date without manual intervention.
2. Prerequisites
- The Universal Data Sync Connector is a paid feature. To enable it on your account, contact your account manager, or write to support@leadsquared.com.
- You must be an Administrator user, or access must be shared with you by an admin, to set this up.
- You must first create and name your data flow before selecting a trigger. For more information, see Create a Data Flow.
3. How it Works
Previously, the UDS connector depended on the third-party application to send data according to its own schedule. With the Scheduler trigger, the UDS connector can pull data at custom intervals, including one-time and recurring syncs.
You can set up both sync types using APIs published by the data source or SFTP servers where your data provider hosts its data. This article explains how to set up the trigger using both options.
- Create a data flow, and select the Scheduler trigger.
- Configure the schedule with either a one-time sync or a recurring sync at set intervals.
- Select whether the data is pulled from an API endpoint or an SFTP server, and configure the source.
- Add the actions to perform on the data, such as creating or updating lead records in LeadSquared.
- Actions, variable mapping, and conditional actions work the same as for any other trigger.
- Enable the flow. Data syncs according to the configured schedule.
4. Create a Scheduler Trigger
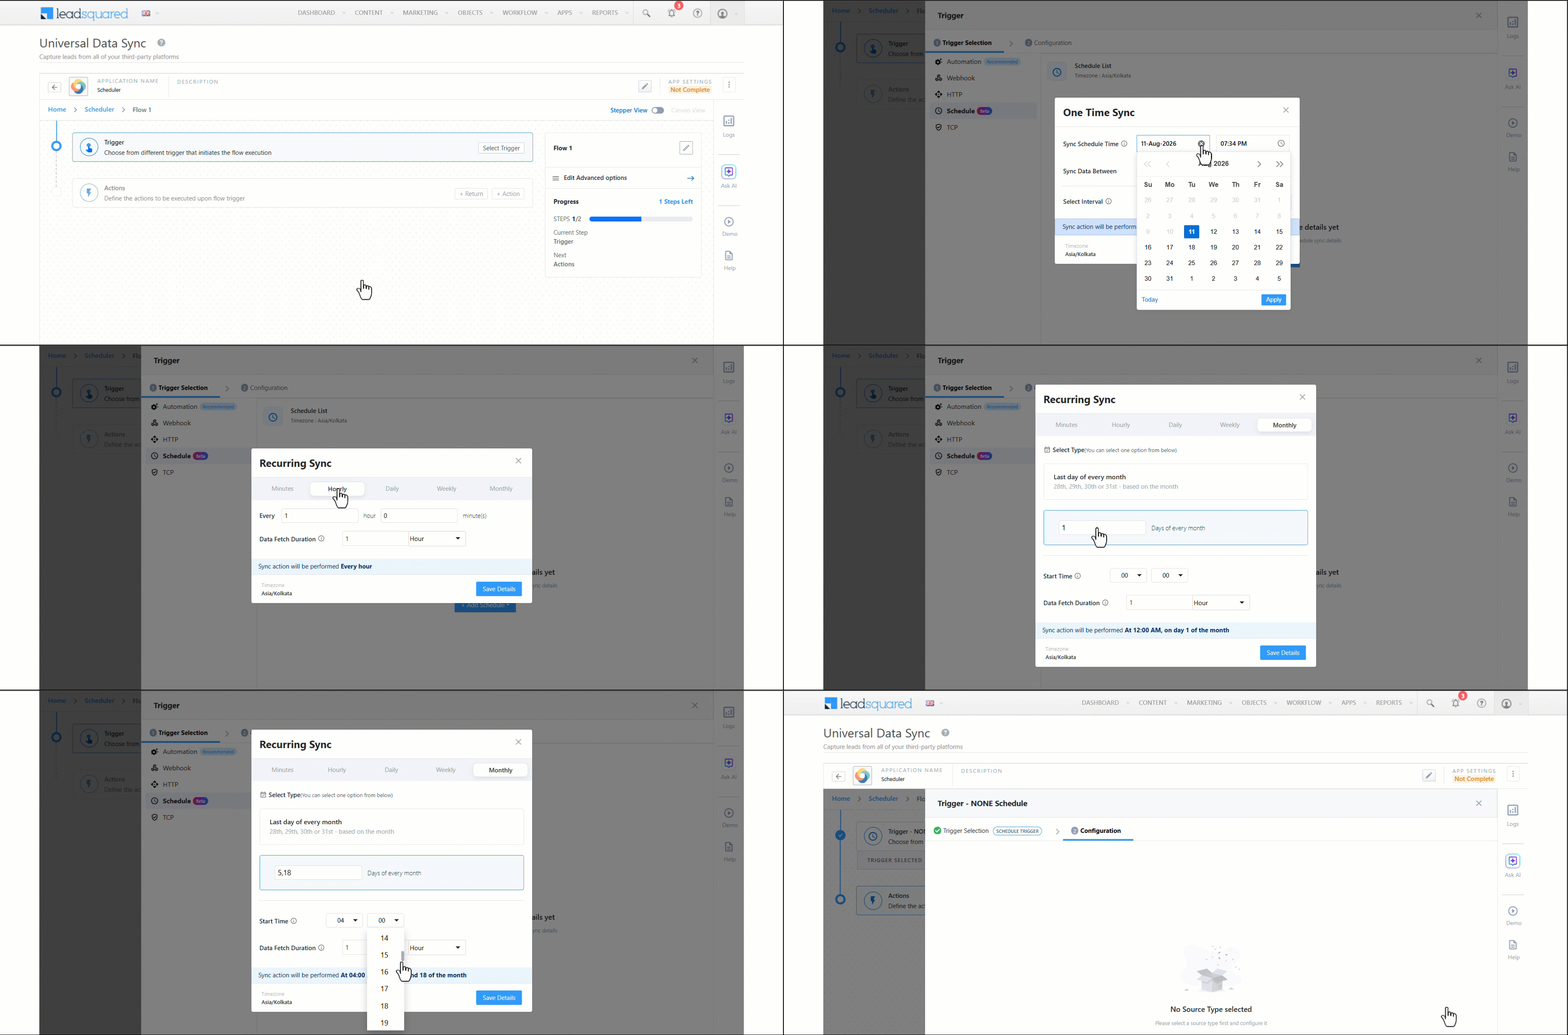
On the Universal Data Sync screen, after you create a data flow, configure the Scheduler trigger. To do this –
- Click Select Trigger, and under Trigger Selection, click Schedule.
- Under Schedule List, click Add Schedule, and select one –
- One Time – This pulls data from an external app only once. Use it for one-time data sync operations, such as pulling historical customer records into LeadSquared.
- Sync Schedule Time – Configure the start date and time when the data should be pulled.
- Sync Data Between – Select when the data should be synced between these two options –
- Defined Interval – The time range of data fetched before the configured Sync Schedule Time. For example, if the schedule time is 9:30 AM, 10th August, and the defined interval is 1 hour, the system fetches data captured between 8:30 AM and 9:30 AM. You can select the interval in minutes, hours and days.
- Defined Timestamp – The time range between which the data is fetched. For example, if the schedule time is 9:30 AM and the defined timestamp is 9:30 AM to 7:15 AM on 10th August, the system fetches only the data captured in that window, regardless of when the sync runs.
- Once you’re done, click Save Details.
- Recurring – This pulls data from an external app at the configured intervals. Use it for recurring data syncs, such as pulling all leads created in the previous month on the 1st of every month. If you select Recurring, configure the sync interval on the Recurring Sync pop-up –
- Minutes – Configure how often the sync runs, in minutes. For example, if you set the interval to 5 minutes, the sync runs at 4:05 PM, 4:10 PM, and so on.
- Hourly – Configure how often the sync runs, in hours and minutes. For example, if you set the interval to 1 hour 5 minutes, the sync runs at 4:05 PM, 5:05 PM, 6:05 PM, and so on.
- Daily – Configure how often the sync runs, in days. You can set a daily interval (for example, every 2 days) or every day of the week (Monday to Friday). You can also set the sync start time. For example, if you select every weekday with a start time of 4:30 PM, the first sync runs at 4:30 PM on the next scheduled day after you publish the sync. Subsequent syncs also run at 4:30 PM every day.
- Weekly – Select the days of the week on which the sync runs. You can select multiple days (for example, Tuesday and Thursday) or every day of the week. You can also set the sync start time. For example, if you select Tuesday and Thursday with a start time of 4:30 PM, the first sync runs at 4:30 PM on the next scheduled day after you publish the sync. Subsequent syncs also run at 4:30 PM every Tuesday and Thursday.
- Monthly – Configure how often the sync runs, in days of the month. You can run the sync on the last day of every month (for example, 30th June or 31st August) or on one or more days of the month (for example, the 5th and 18th of every month). You can also set the sync start time. For example, if you select the 5th and 18th of every month with a start time of 4:30 PM, the first sync runs at 4:30 PM on the next scheduled day after you publish the sync. Subsequent syncs also run at 4:30 PM on the 5th and 18th of every month.
- Data Fetch Duration – This setting applies to all recurring schedule types, and controls the time range of data fetched during each interval. For example, if the sync interval is 1 hour and the fetch duration is 1 hour, the Scheduler fetches only the data created in the previous hour. Data created between 4 PM and 5 PM is fetched at 5 PM, data created between 5 PM and 6 PM is fetched at 6 PM, and so on.
- One Time – This pulls data from an external app only once. Use it for one-time data sync operations, such as pulling historical customer records into LeadSquared.
- Once you’re done, click Save Details, and on the Trigger Selection screen, click Save & Next.
Note:
- For One Time syncs, you must schedule it at least three minutes in the future. For example, if the current time is 4:30 PM, you cannot schedule the sync for 4:30 PM. The earliest you can schedule it is 4:33 PM. If you don’t follow this requirement, the sync fails.
- For Data Fetch Duration, the start time and end time are only sent if you map them into your API’s headers or query parameters, and the source API must support filtering by timestamp.
- Once enabled, a sync runs at the configured interval until you disable it. Frequent intervals, such as every 5 minutes, can significantly increase processing volume and cost. Disable any sync you’re not actively using, including ones set up for testing.
- For flows that use the Scheduler trigger, clicking the Sync Job ID opens two tabs, Request Logs and Flow Logs. To know what each tab shows, refer to Logs section below.
5. API Configuration
Once you configure the schedule, you can pull data from an API endpoint or an SFTP server. This section explains how to fetch data through an external application’s API endpoint.
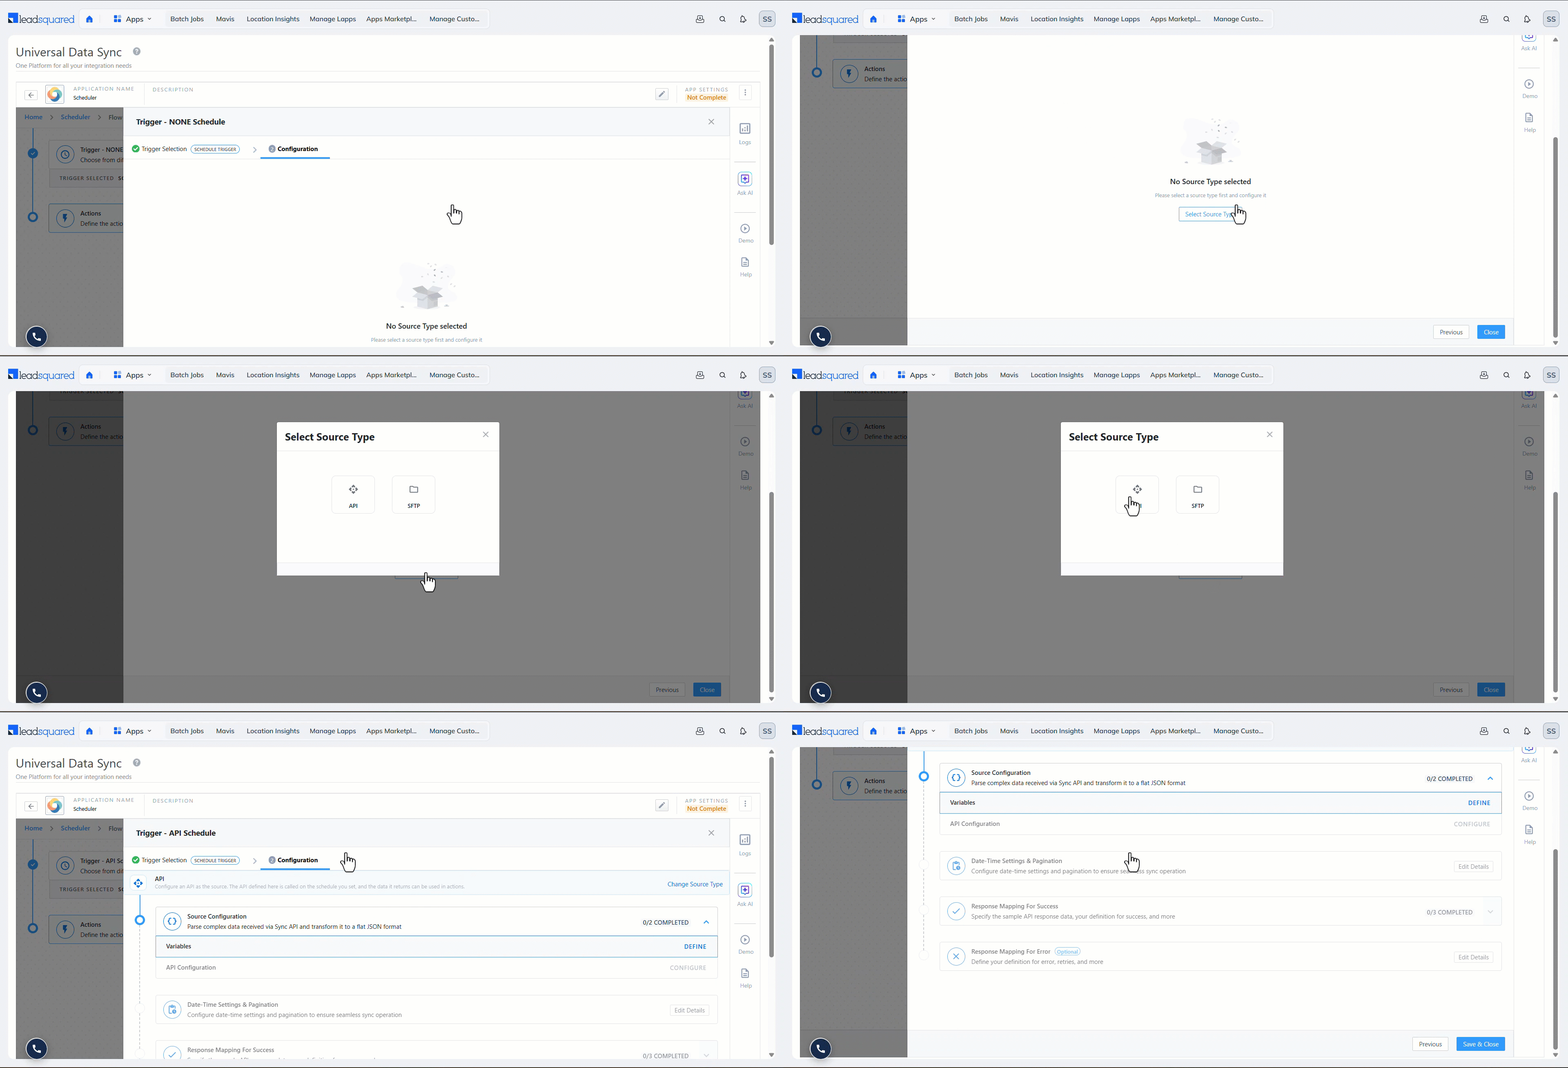
- On the Configuration tab, click Select Source Type, and select API.
- To learn how to set up Variables, API Configuration, Response Mapping for Success, and Response Mapping for Errors, read Universal Data Sync (UDS) Create Actions – API Action. This article explains how to call an external API from UDS.
- Under Variables, three variables are available for scheduled syncs, start time, end time, and page. Add them to your API’s headers or query parameters as required by your data source.
- Start time and end time define the time range of data fetched during each run, based on the Data Fetch Duration you configured.
- Page passes the page number when using pagination.
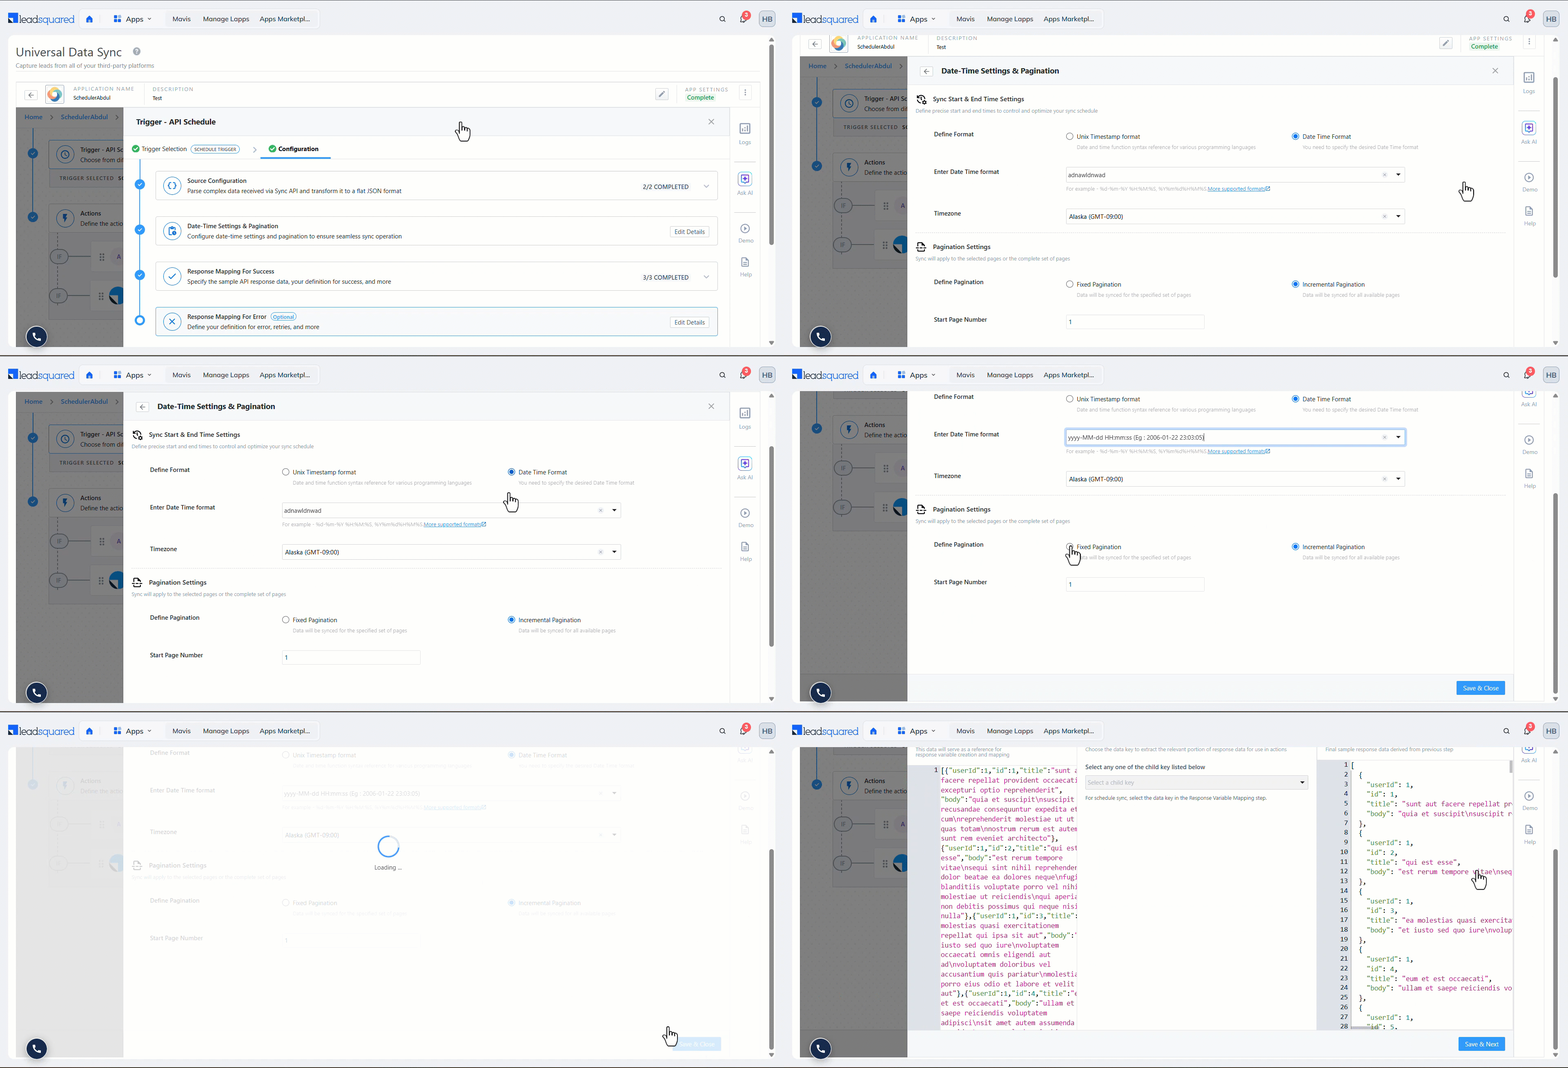
- Next to Date-Time Settings & Pagination, click Edit Details, and define the following settings to set the exact start and end times for the sync –
- Sync Start & End Time Settings – Select the date-time format used by the data source from which you’re fetching the data.
- Unix Timestamp format – Select this if your API expects timestamps in Unix format (seconds since 1 January 1970), and select the time zone the API expects. The system converts the start and end times to the selected time zone before sending them.
- Date Time Format – Select the date-time format used by your data source from the Enter Date Time Format dropdown, followed by the time zone the API expects. The system fetches data in the selected time zone.
- Pagination Settings – You can choose to sync data from specific pages or all pages that contain data in your data source provider’s API endpoint.
- Fixed Pagination – Define the start and end pages to fetch data from all pages within the selected range.
- Incremental Pagination – Define the start page, and data is fetched from that page and all subsequent pages, until the API returns an empty response.
- Sync Start & End Time Settings – Select the date-time format used by the data source from which you’re fetching the data.
- Next to Response Mapping for Success, click Edit Details, and select the data key that contains the records you want to process.
- Unlike the API Action linked above, the entire response payload maps to a single variable. Therefore, you can’t add, remove, or create custom mappings.
- This mapping is the data source for all subsequent action steps in the flow. The fields you map here appear under the Request Data tab when you configure variable mapping in your actions.
- Success criteria works the same as in an API action.
- Once you’re done, click Save & Close.
Note:
- Date-Time Settings and Pagination Settings only take effect if you map these variables into your API request.
- Each record in the response is processed as an individual request. If the payload contains 100 records, 100 requests are created.
- To know how to configure the rest of the API settings, refer to Universal Data Sync (UDS) Create Actions – API Action.
6. SFTP Configuration
Once you configure the schedule, you can pull data from an API endpoint or an SFTP server. An SFTP server acts as a secure intermediary where your third-party data source provider stores the data you want to fetch. This lets LeadSquared fetch the data securely without directly interacting with the data source provider. This section explains how to fetch data through SFTP.
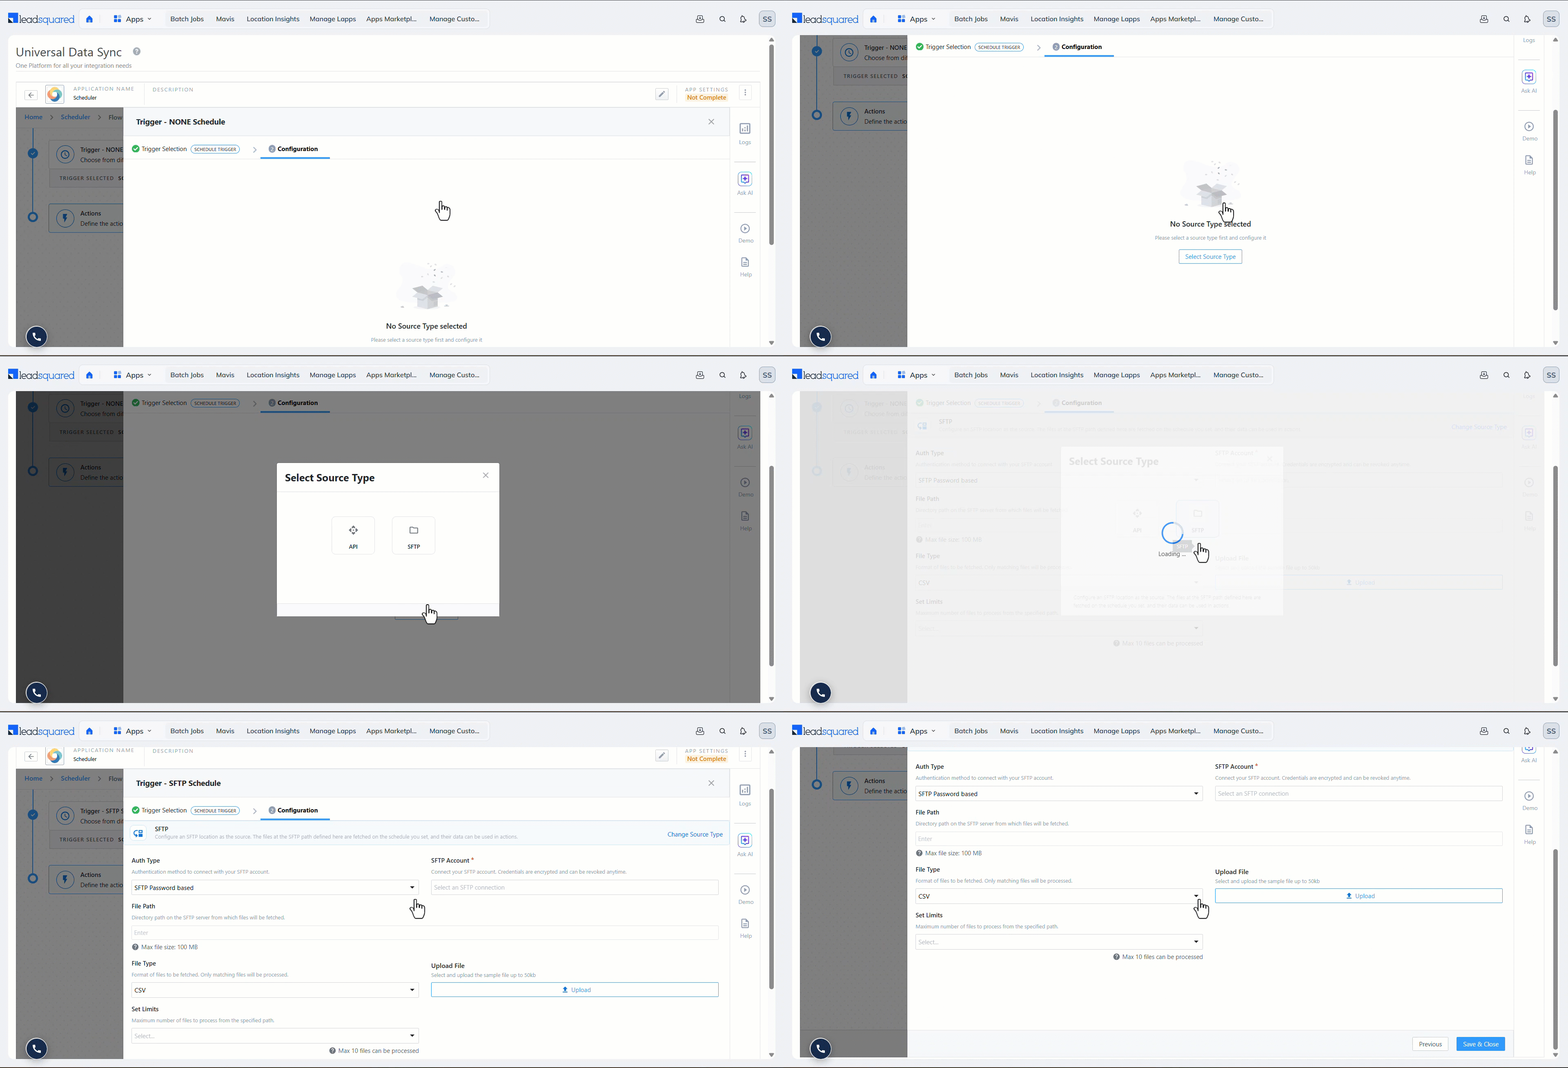
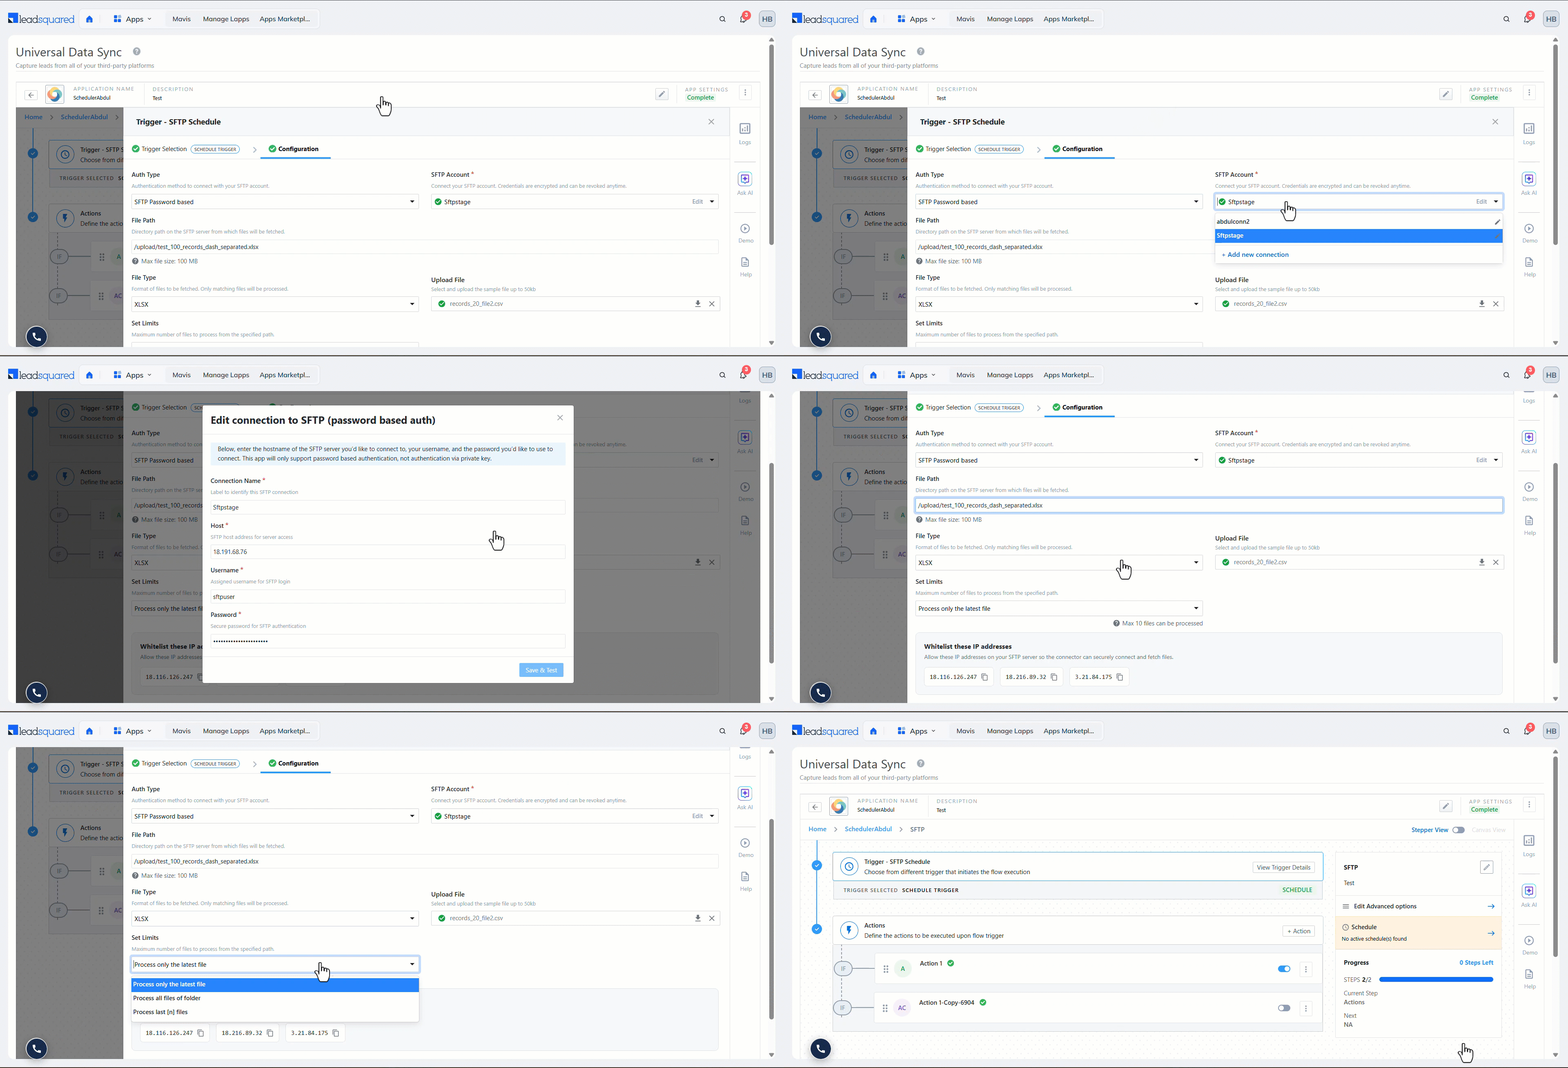
- On the Configuration tab, click Select Source Type, and select SFTP.
- Auth Type – Select the authentication method for the SFTP server. Currently, only password-based authentication is supported.
- SFTP Account – Click the dropdown, then click Add new connection to connect your SFTP account. In the Create a new connection to SFTP (password based auth) pop-up, enter the following details –
- Connection Name – Give an internal display name for this connection.
- Host – Enter your SFTP host’s IP address.
- Username – Your SFTP account username.
- Password – Your SFTP account password.
- Once you’re done, click Save & Test. After you confirm the authentication is successful, continue with the SFTP setup.
- File Path – Enter the file path on your SFTP server from which the data is fetched. You can enter a single file path or use the wildcard (*) to fetch all the files in the specified folder and all its subfolders (nested folders).
- File Type – Select the format (CSV or XLSX) of the files stored on your SFTP server. Selecting the incorrect format causes the data fetch to fail.
- Upload File – Upload a sample file with the same columns as the files on your server. The columns appear as fields you can map in your actions. The file is used only to build the mapping and isn’t processed.
- Set Limits – Select the type of file you want to fetch from the file path –
- Process only the Latest File – Fetch data only from the latest file uploaded to the SFTP server.
- Process all files in the folder – Fetch data from all files available in the SFTP server folder.
- Process last [n] files – Fetch data from the last n files uploaded to the server. For example, if the Number of files value is 8, the system fetches data from the last 8 files uploaded to the server.
- Once you enter all the details, LeadSquared’s IP addresses appear. Whitelist all the listed IP addresses on your SFTP server to allow LeadSquared servers to fetch data seamlessly.
- Once you’re done, click Save & Close.
7. Add Actions
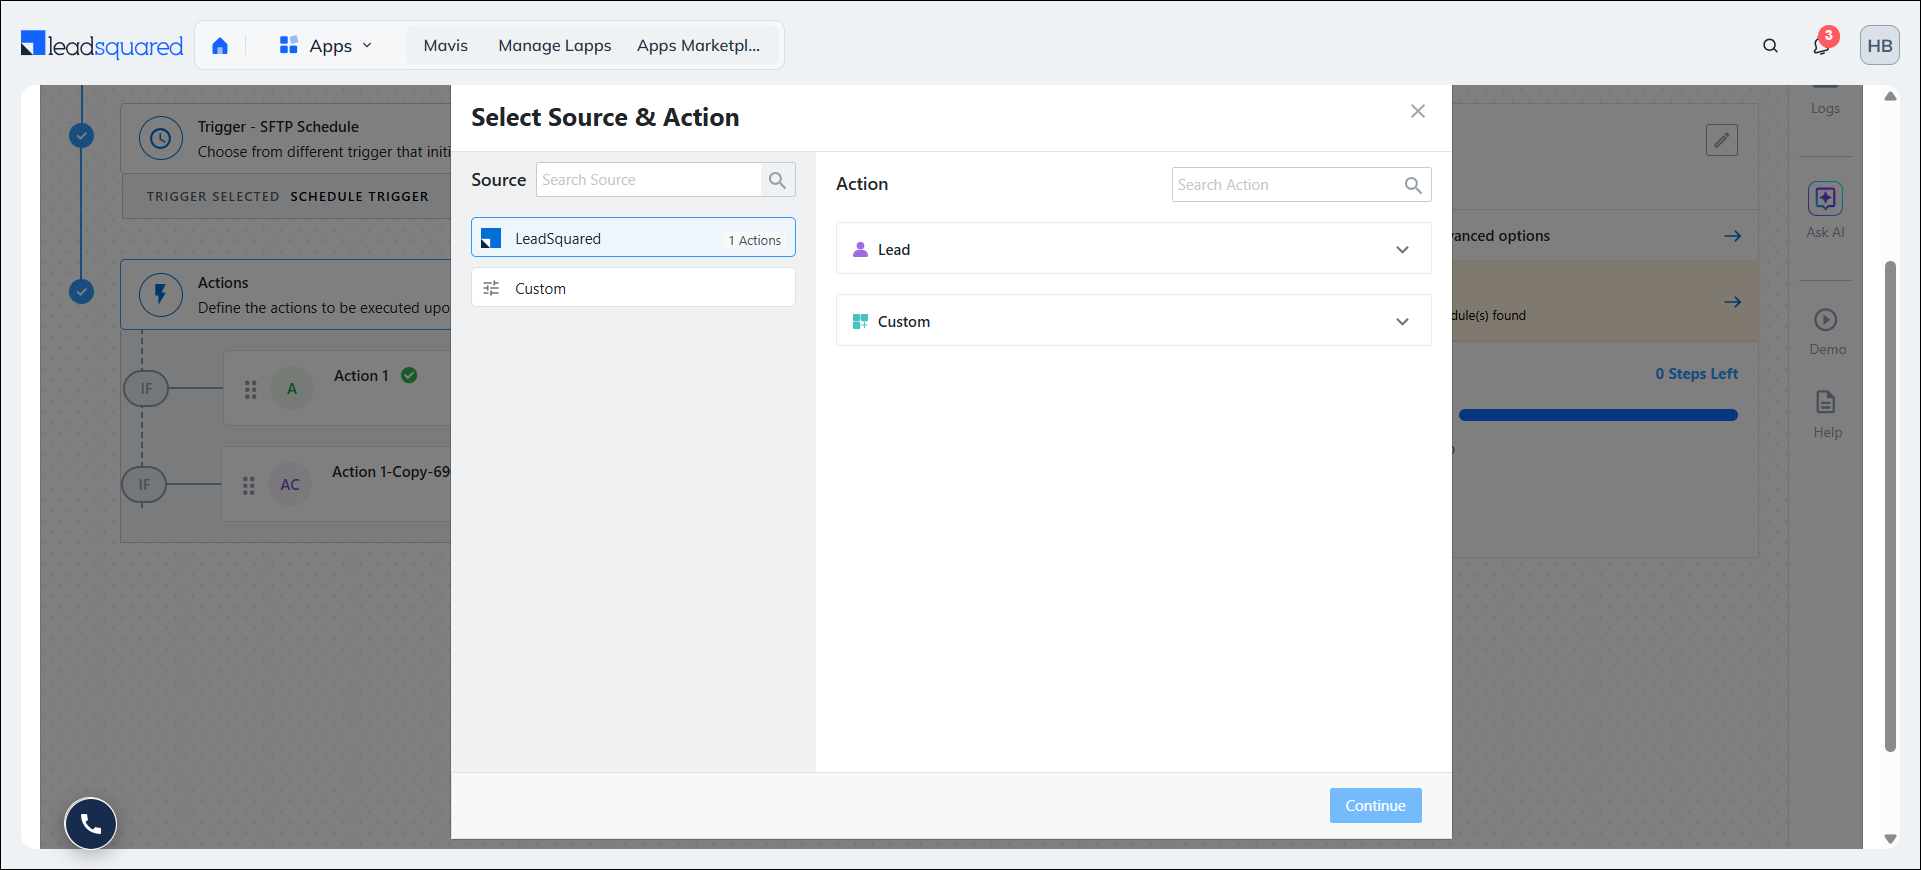
Once you set up the trigger, add the actions you want the UDS connector to perform after it pulls the data. To learn how to add actions, refer to –
- Universal Data Sync (UDS) – Create Actions Overview
- Lead Create Action
- Lead Update Action
- Lead Capture Action
- Lead Workflow Action
8. Enable the Flow
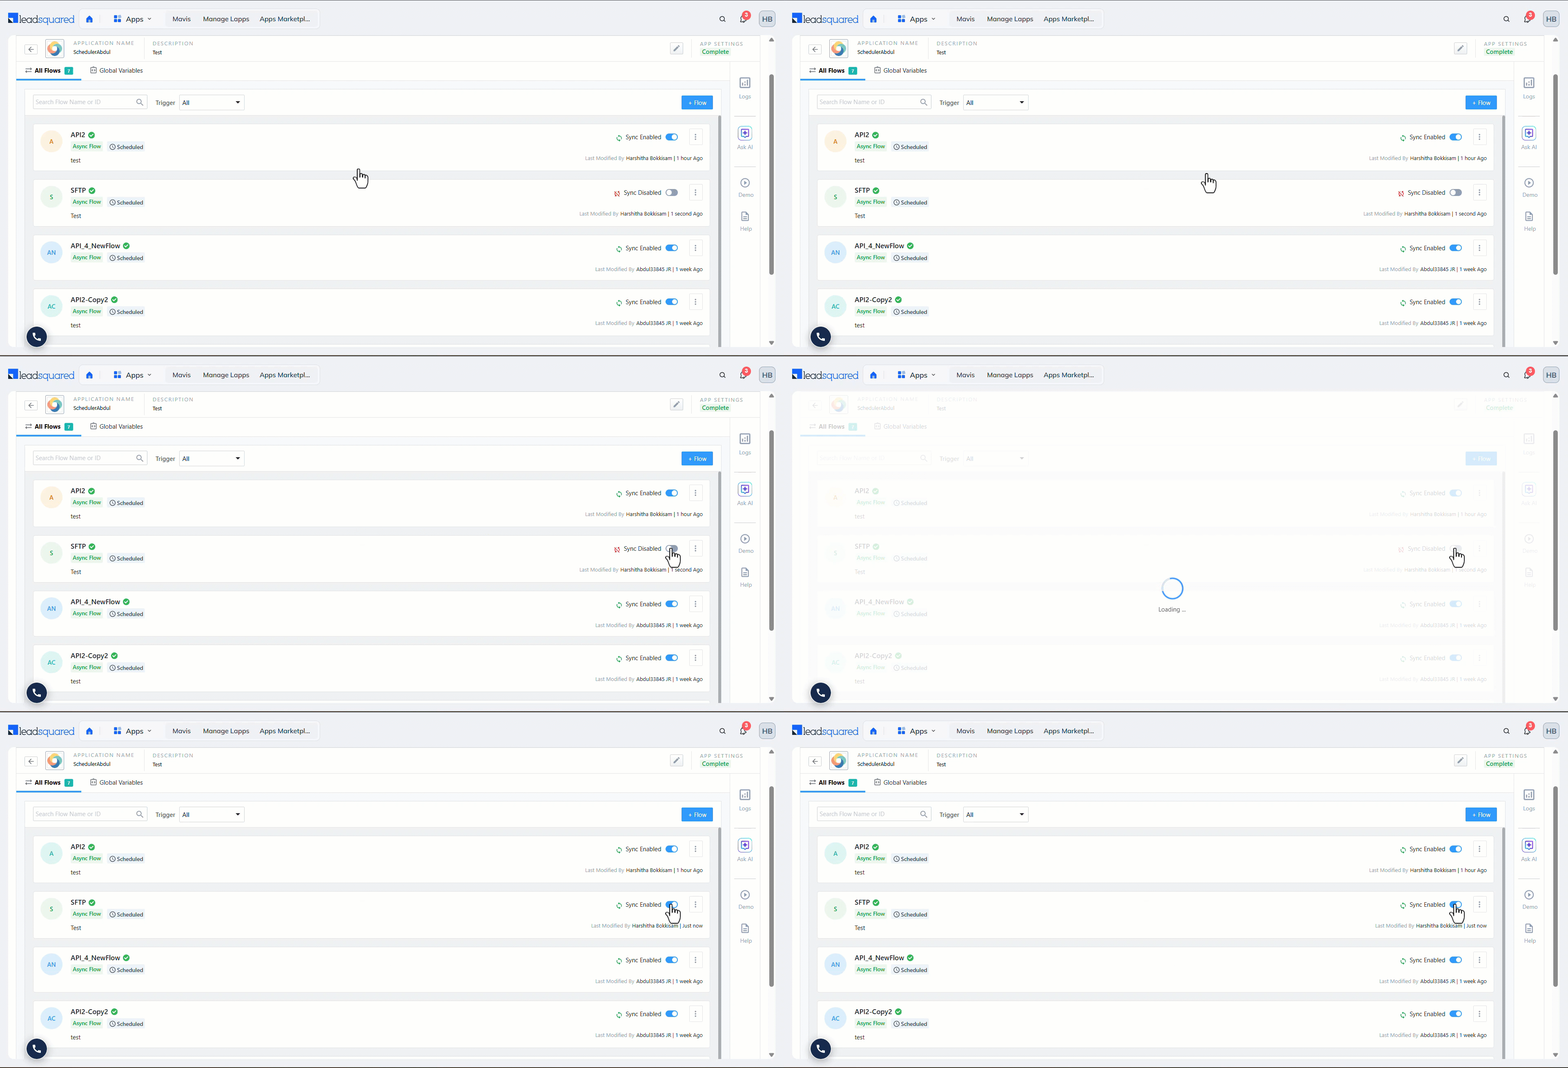
Once you configure the trigger and action, enable the data sync operation. To do this, return to the All Flows screen and enable the slider alongside Sync Disabled for the flow you configured. Once the sync is enabled, data flows into your LeadSquared account according to the configured schedule.
9. Logs
Once the data sync begins, you can view the logs for each sync. Flows that use the Scheduler trigger log data across three levels, instead of the two levels used by other triggers. This is because the Scheduler first creates a scheduled job that fetches data from your source (an API endpoint or an SFTP server), and then converts each record it fetches into an individual request.
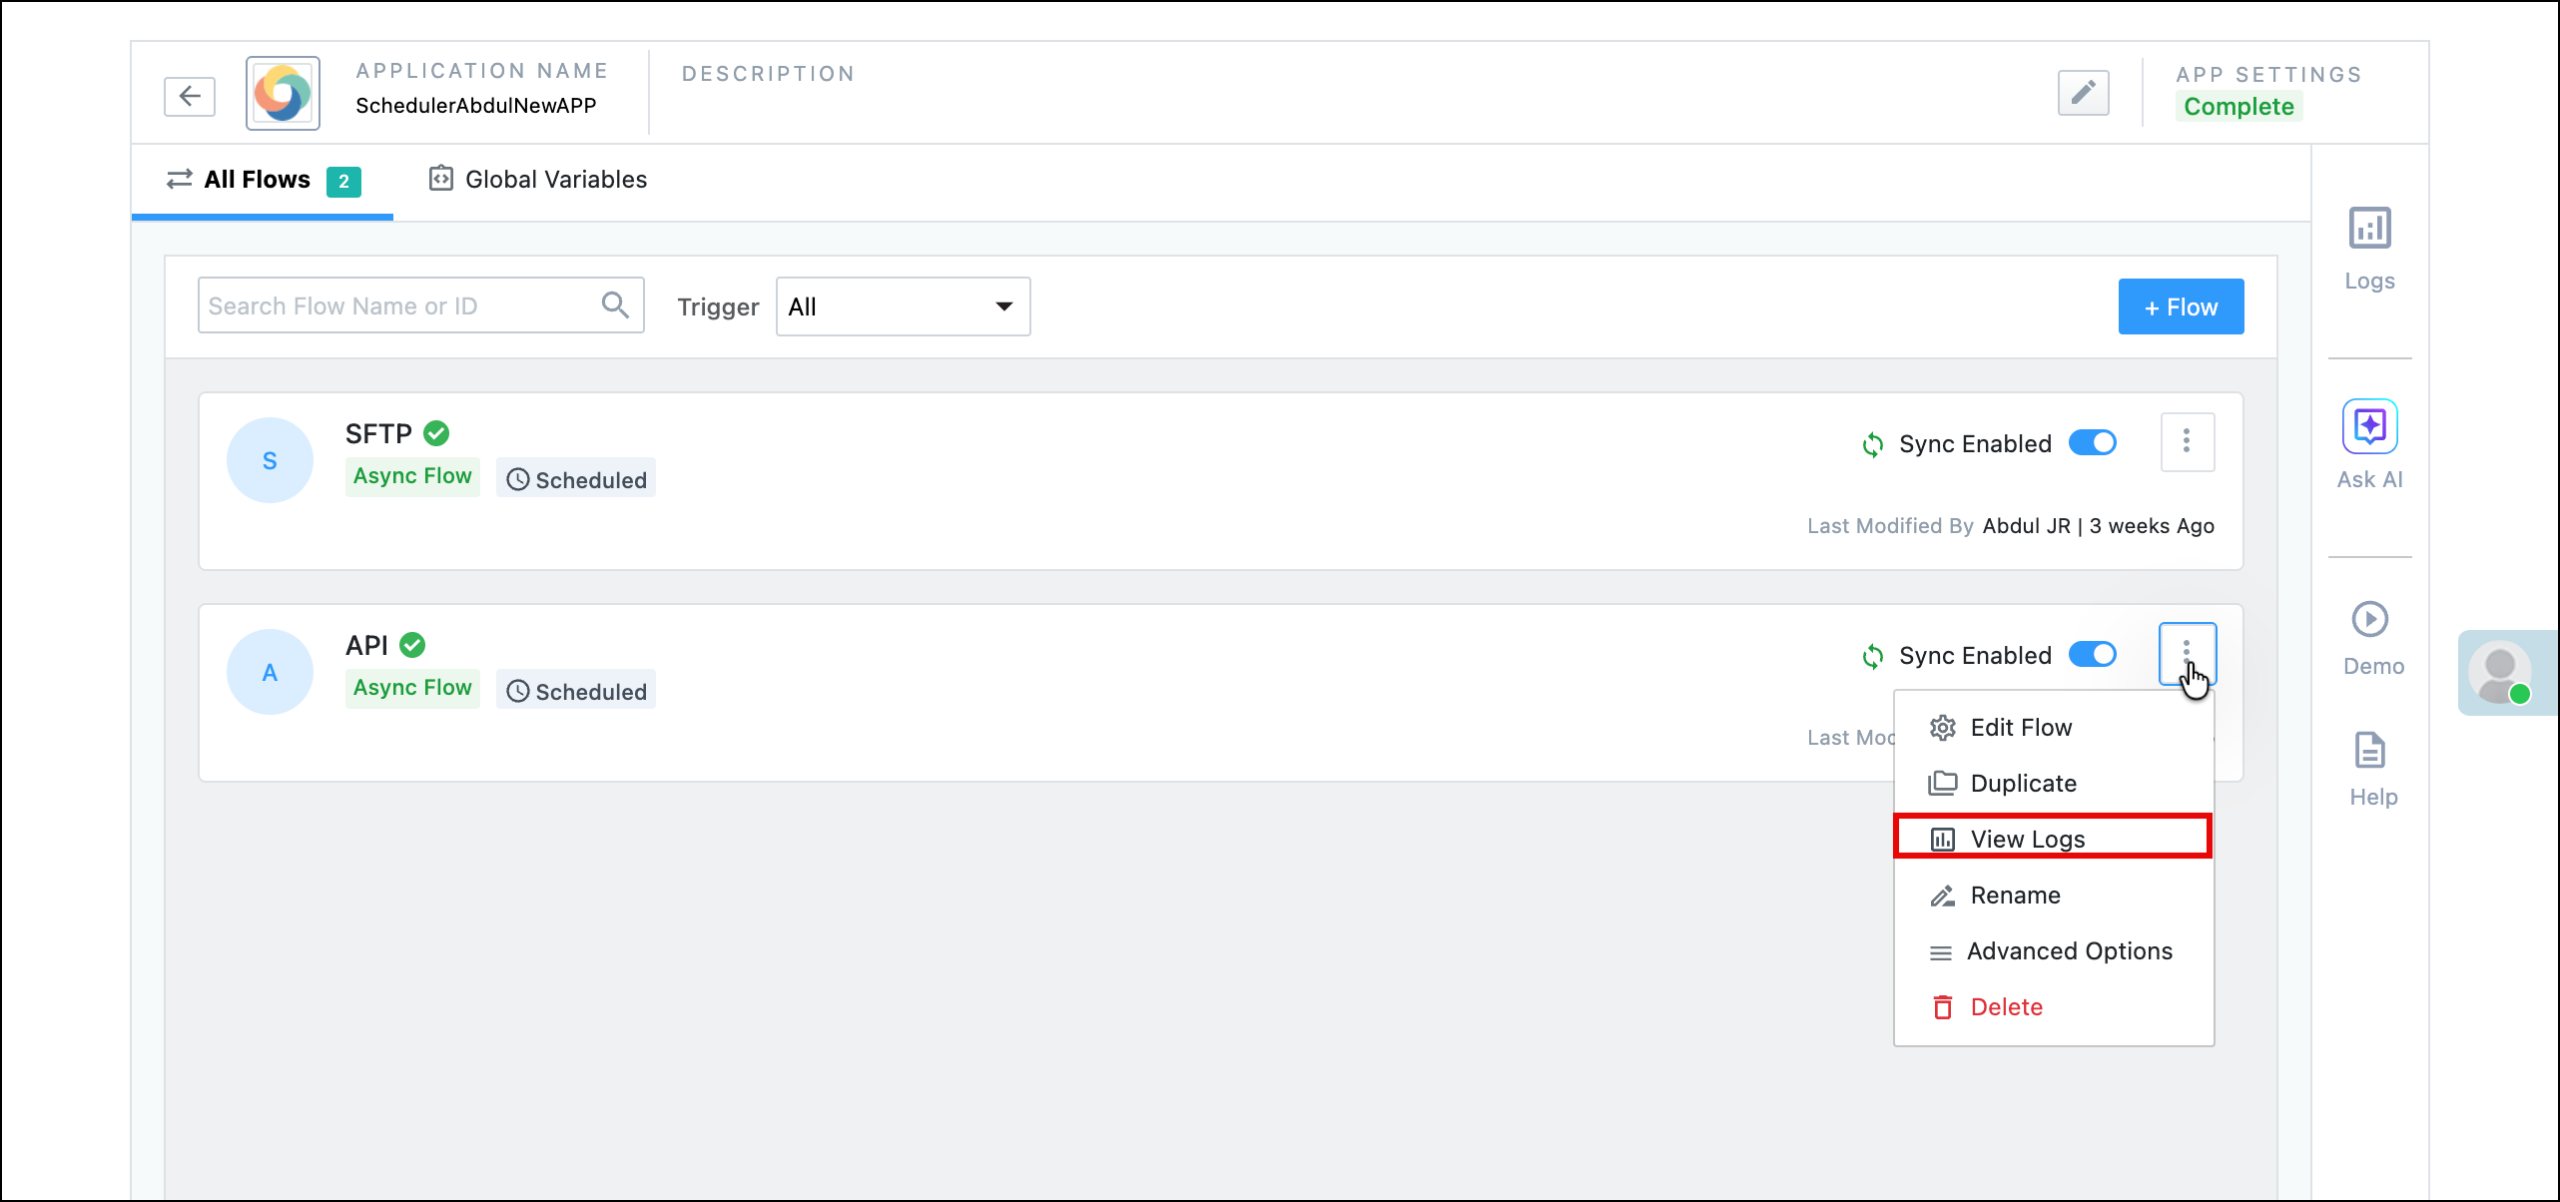
On the logs screen, each row is one scheduled run of your flow, identified by its Sync Job ID. The Status column shows the overall outcome of that run, and the Started On and Completed On/ETA columns show when the run started and finished. A run that hasn’t executed yet appears with a Queued status and an approximate ETA. For all other triggers, each row on this screen is a single inbound request.
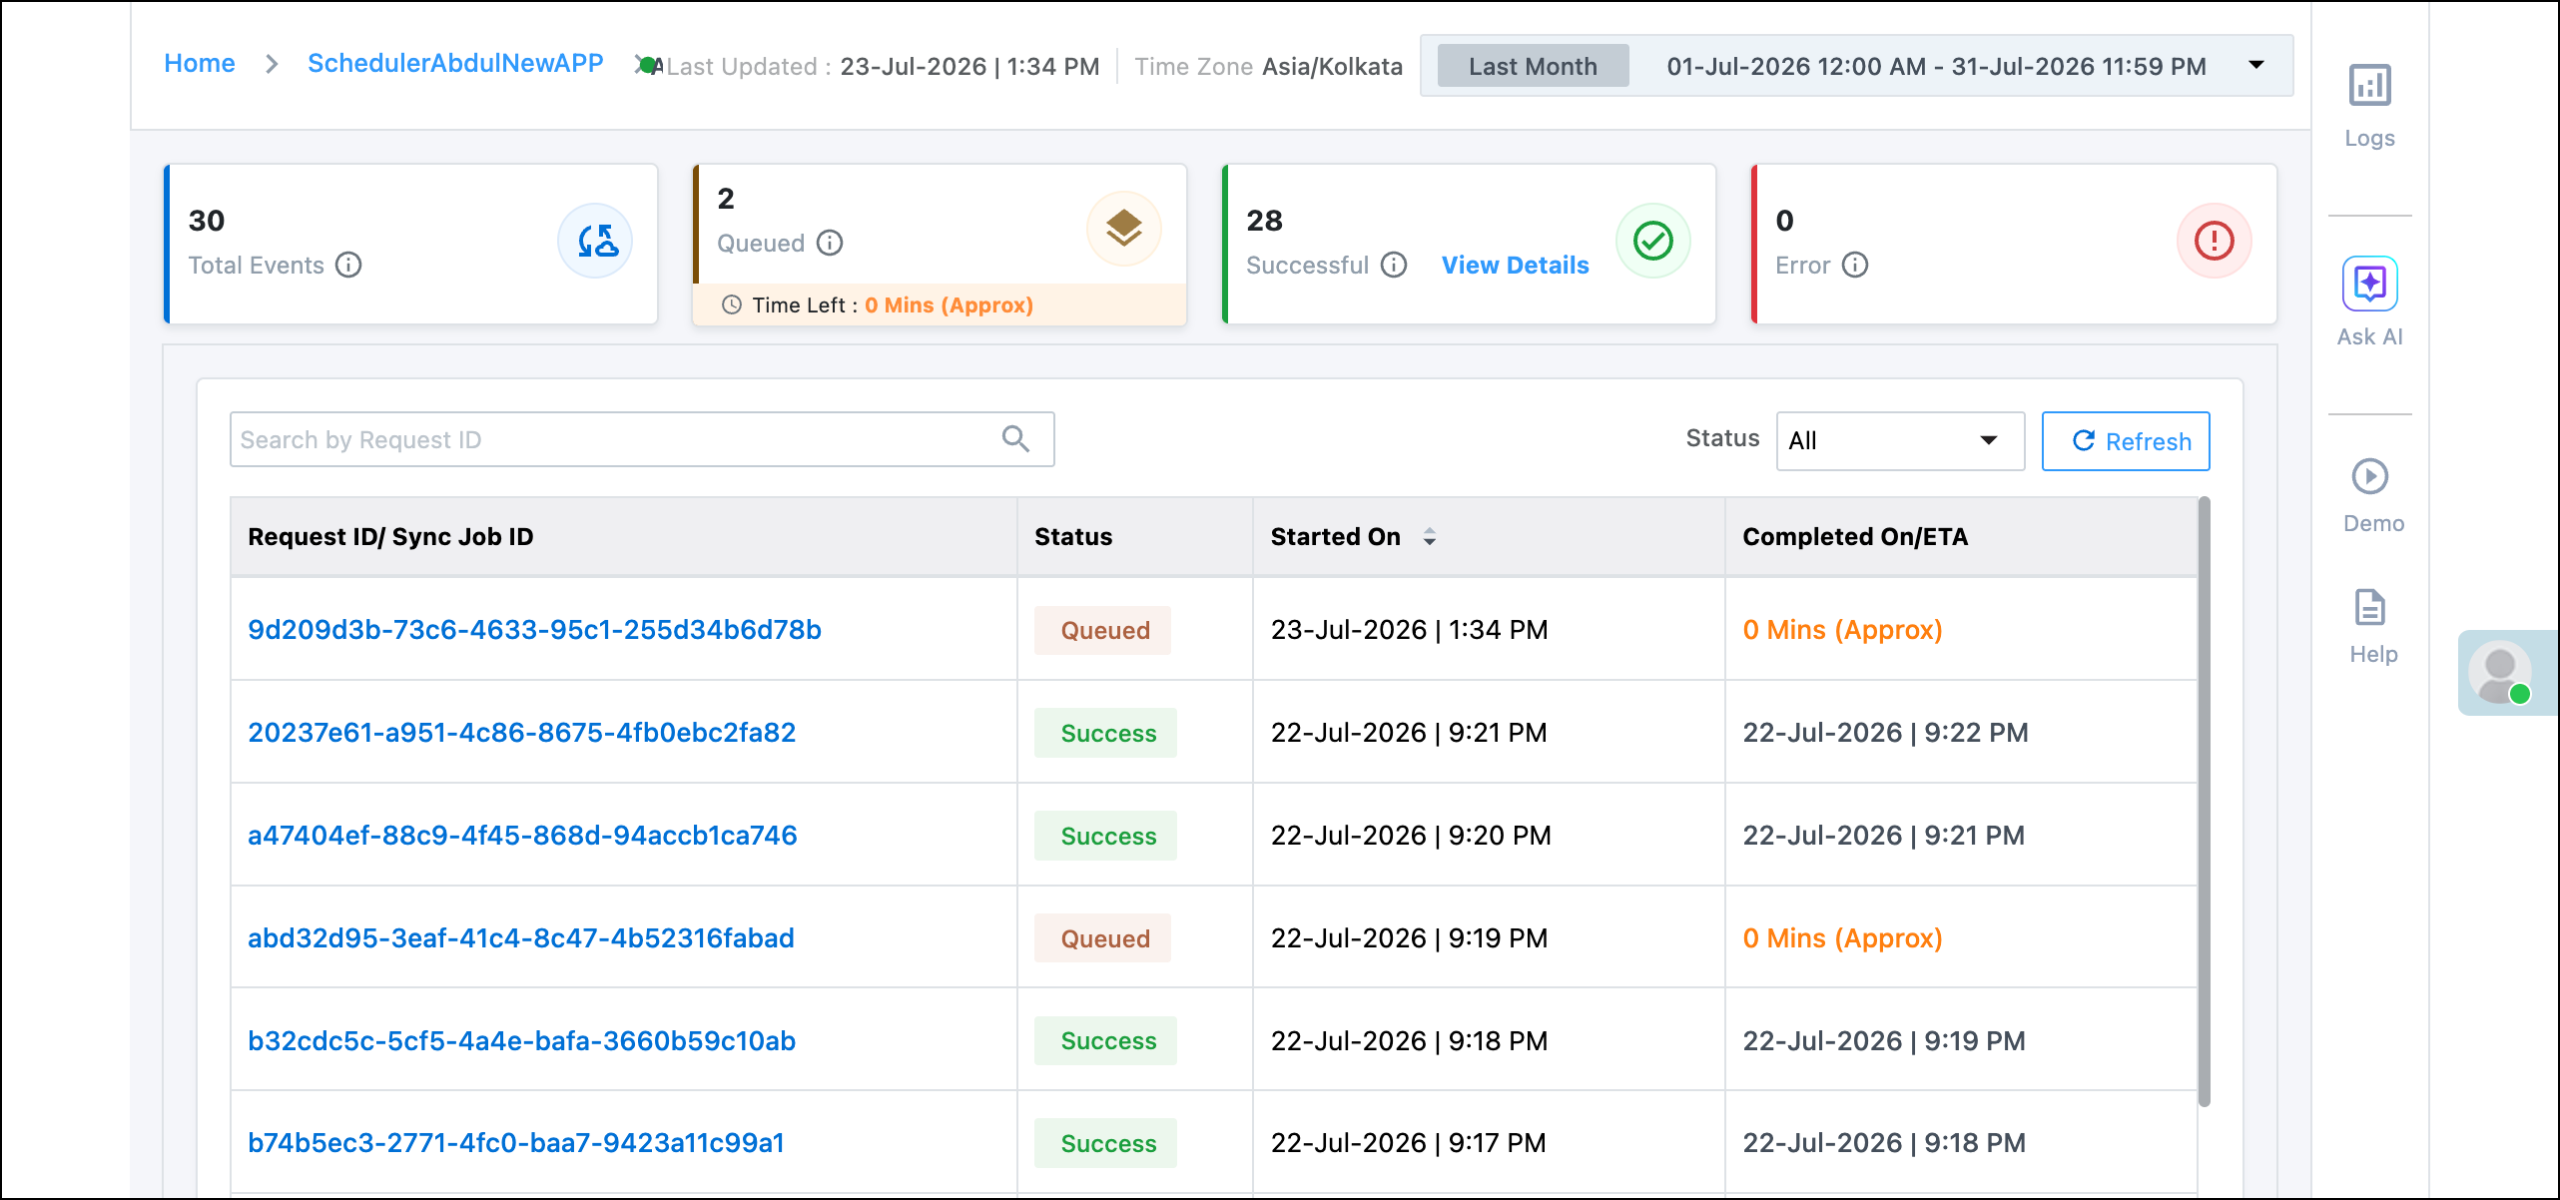
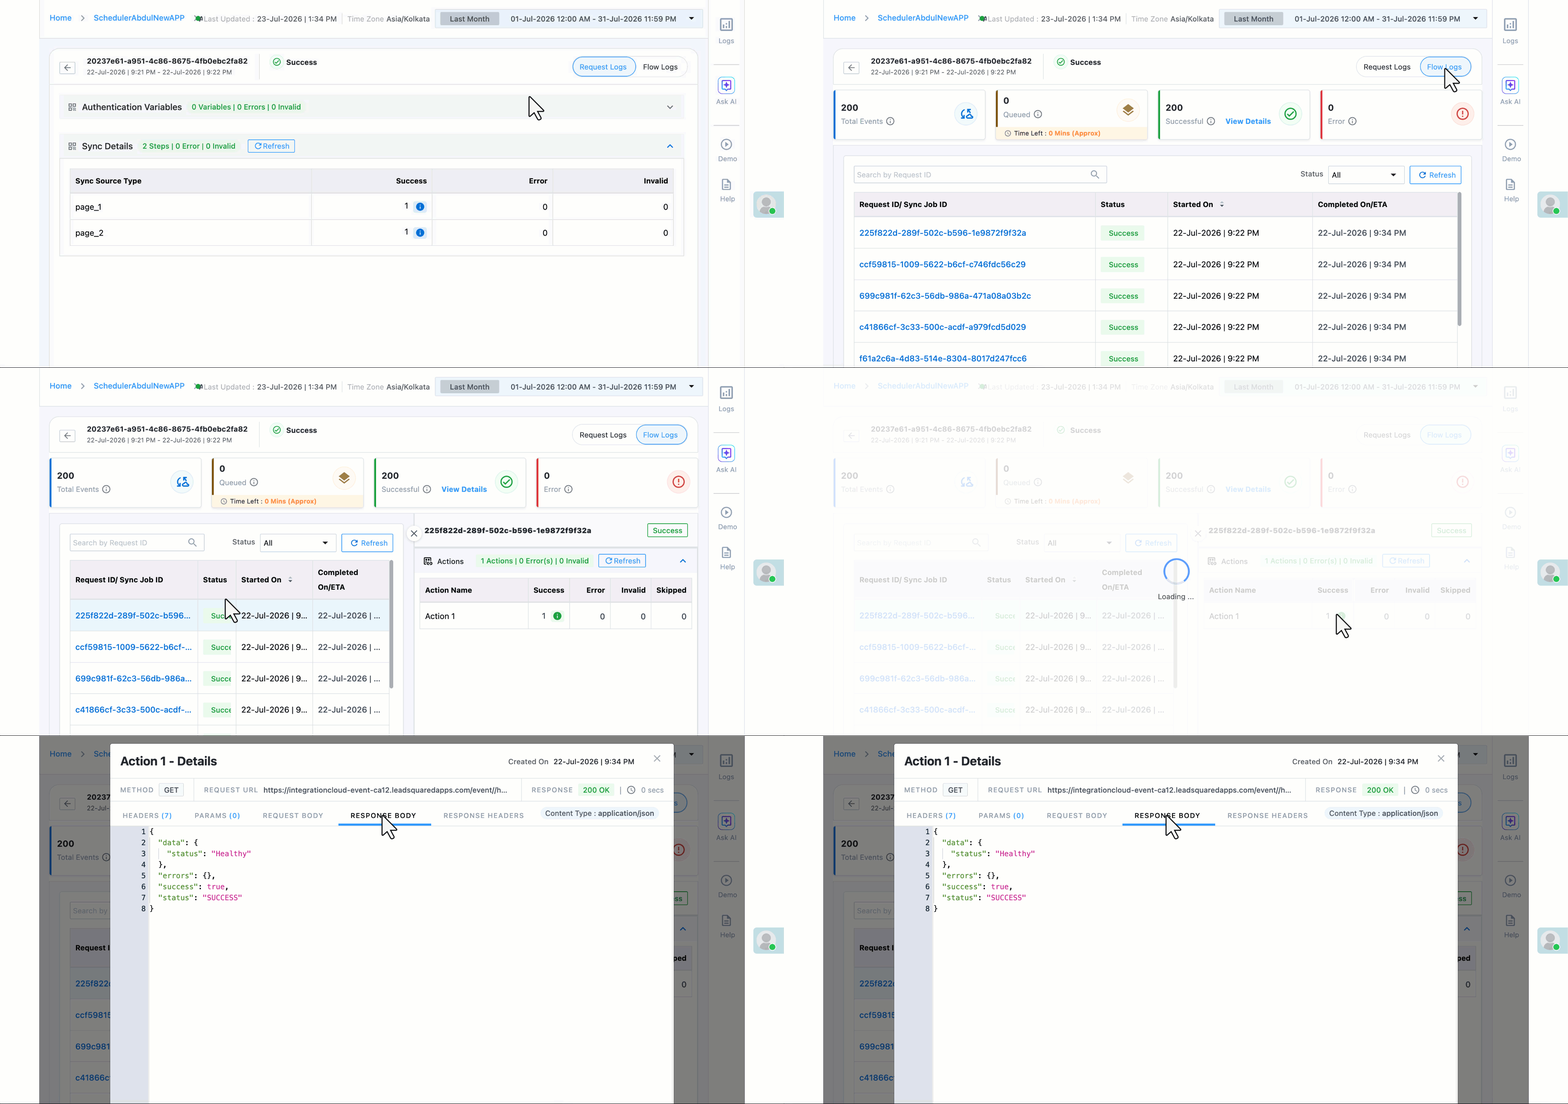
Click a Sync Job ID to open the log entry for that run. For Scheduler flows, this entry is split into two tabs –
- Request Logs – The job-level view. It shows what happened when UDS connected to your data source and fetched the data.
- Flow Logs – The request-level view. It shows each record fetched during the run, as an individual request. Click a Request ID here to view the action-level execution for that record.
For all other triggers, these tabs don’t appear. Clicking a Request ID opens the same view as a single screen, showing the webhook details and the action logs for that request.
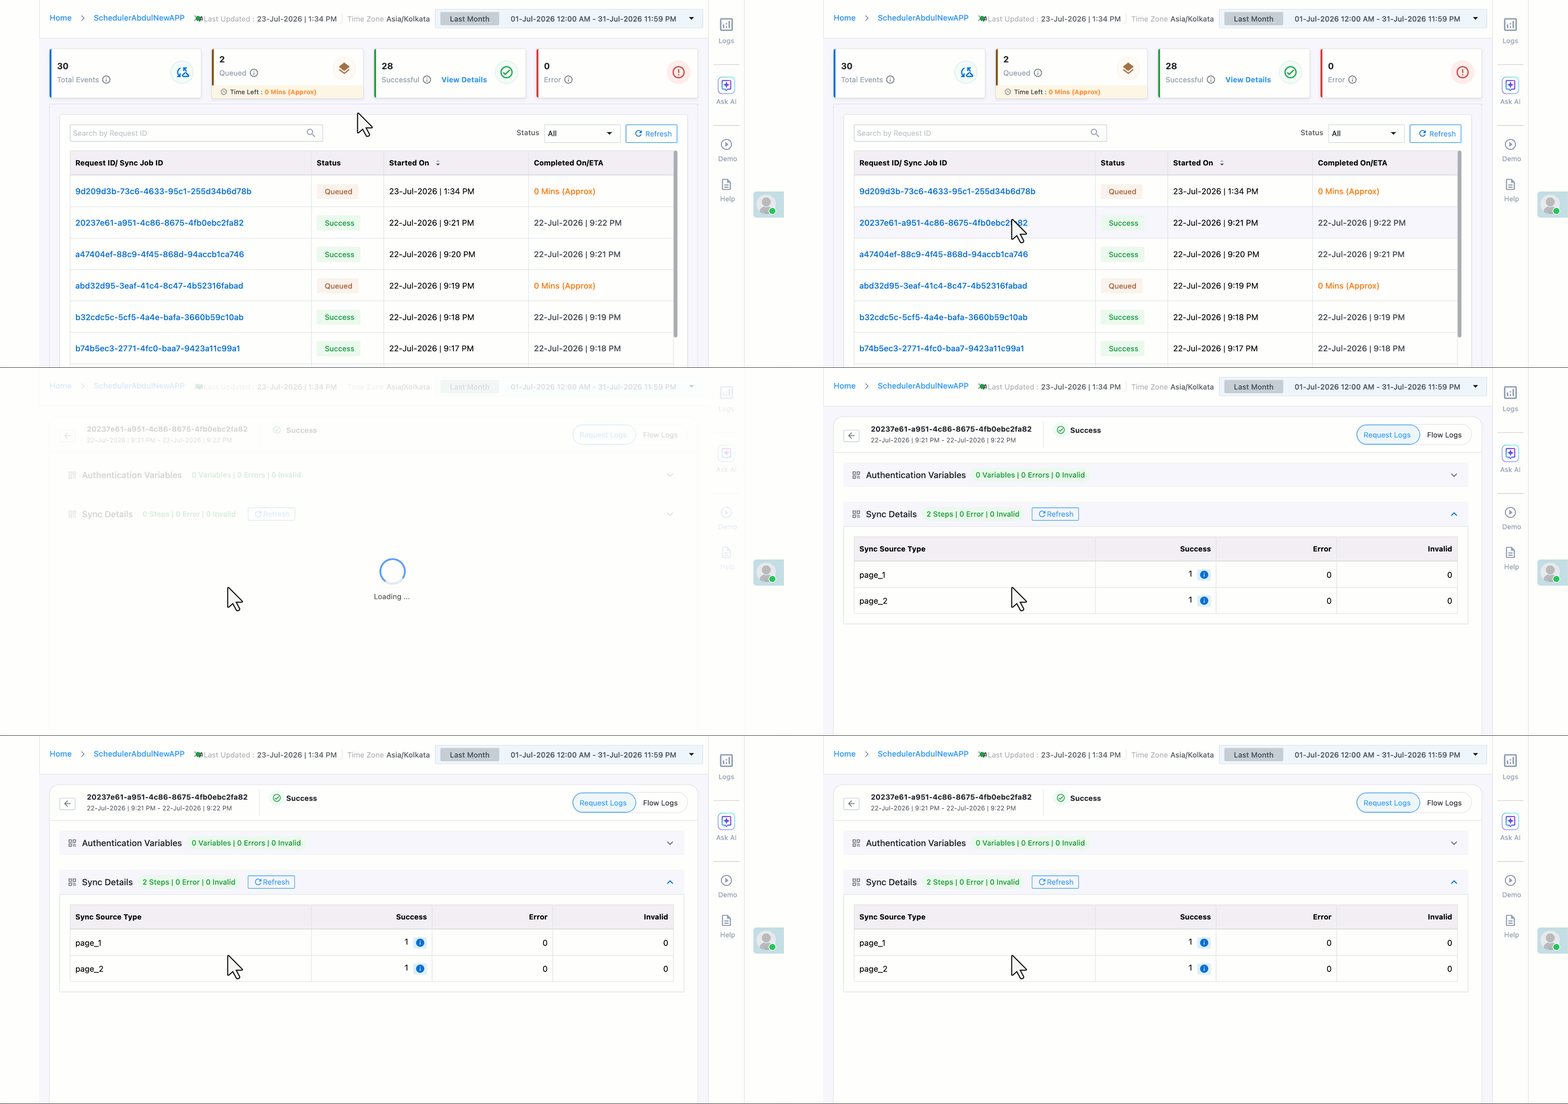
9.1 Request Logs
The Request Logs tab shows how UDS fetched the data during the scheduled run. Use it to confirm that the connection to your data source was successful, and to check how many pages or files were processed.
The tab contains the following sections –
- Authentication Variables – The variables used to authenticate with your data source, along with the number of errors and invalid entries. Click the expand icon to view the individual variables.
- Sync Details – The number of steps executed during the fetch, along with the Success, Error, and Invalid count for each step. Click Refresh to update the results while the job is still running.
What appears under the Sync Source Type column depends on the source type you configured in the trigger –
9.1.1 API source
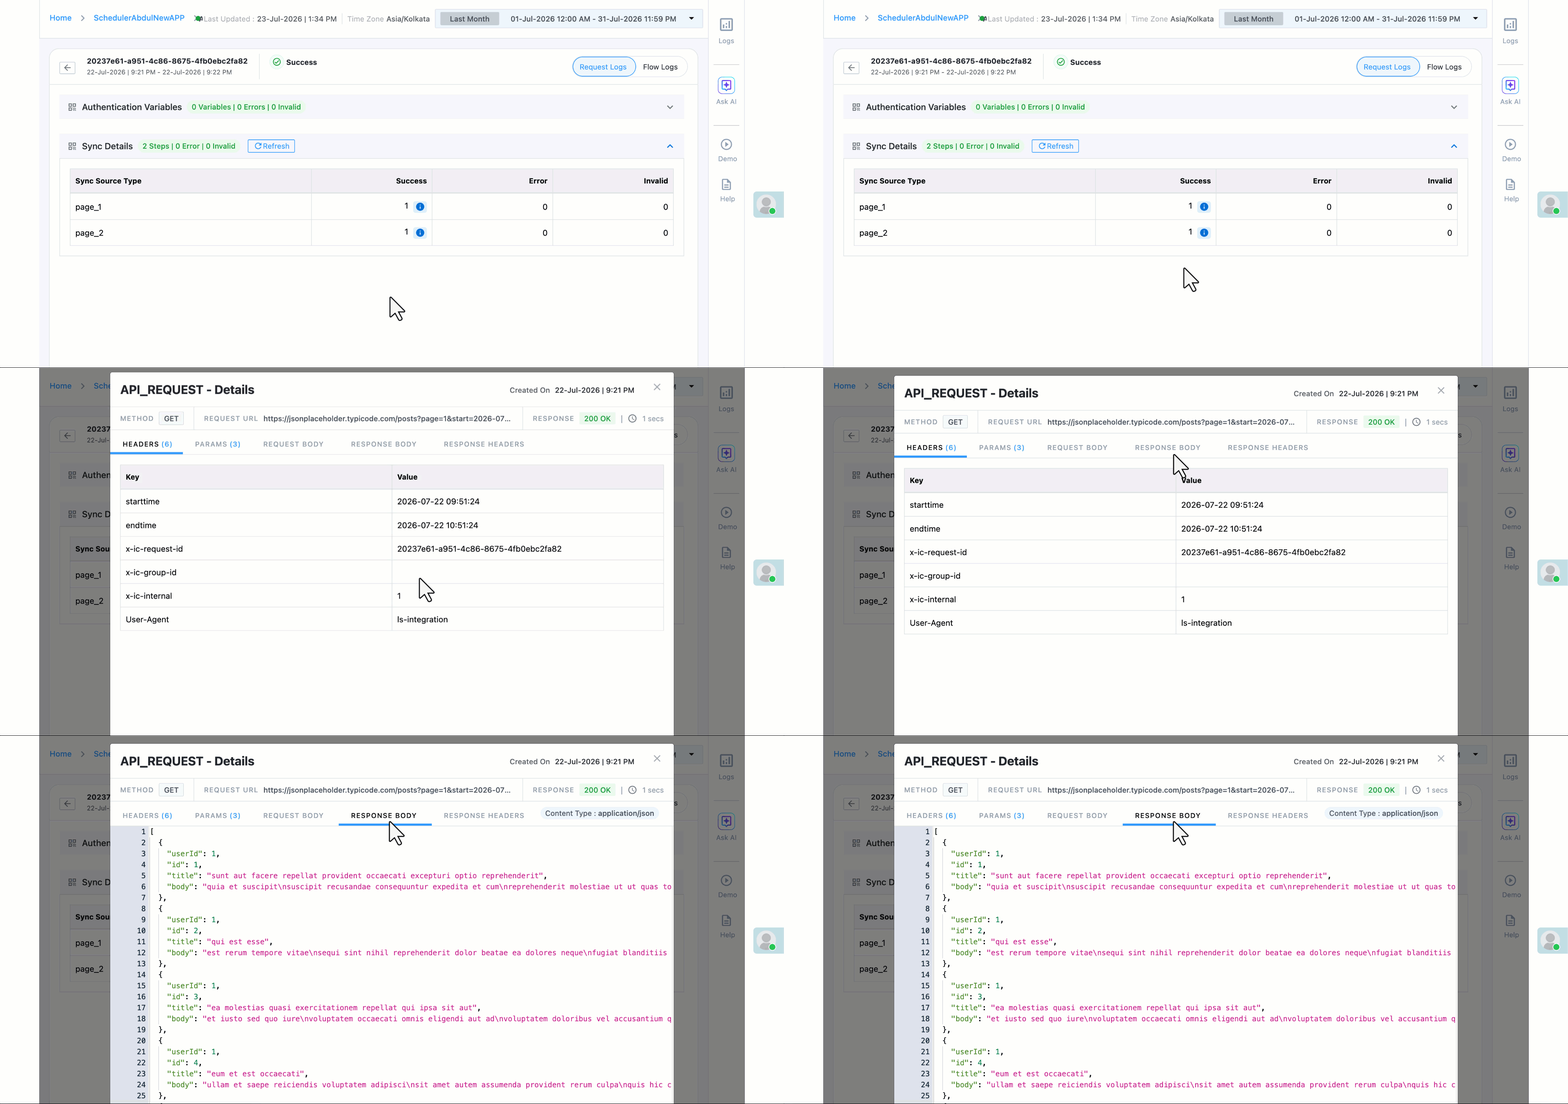
Each page fetched from your API endpoint is logged as a separate step. If you configured pagination, you’ll see one row for each page (for example, page_1 and page_2). Hover your cursor over the info icon in the row to view the details of that API call, including the request body, the response data, and the values passed for the page, start time, and end time variables.
9.1.2 SFTP source
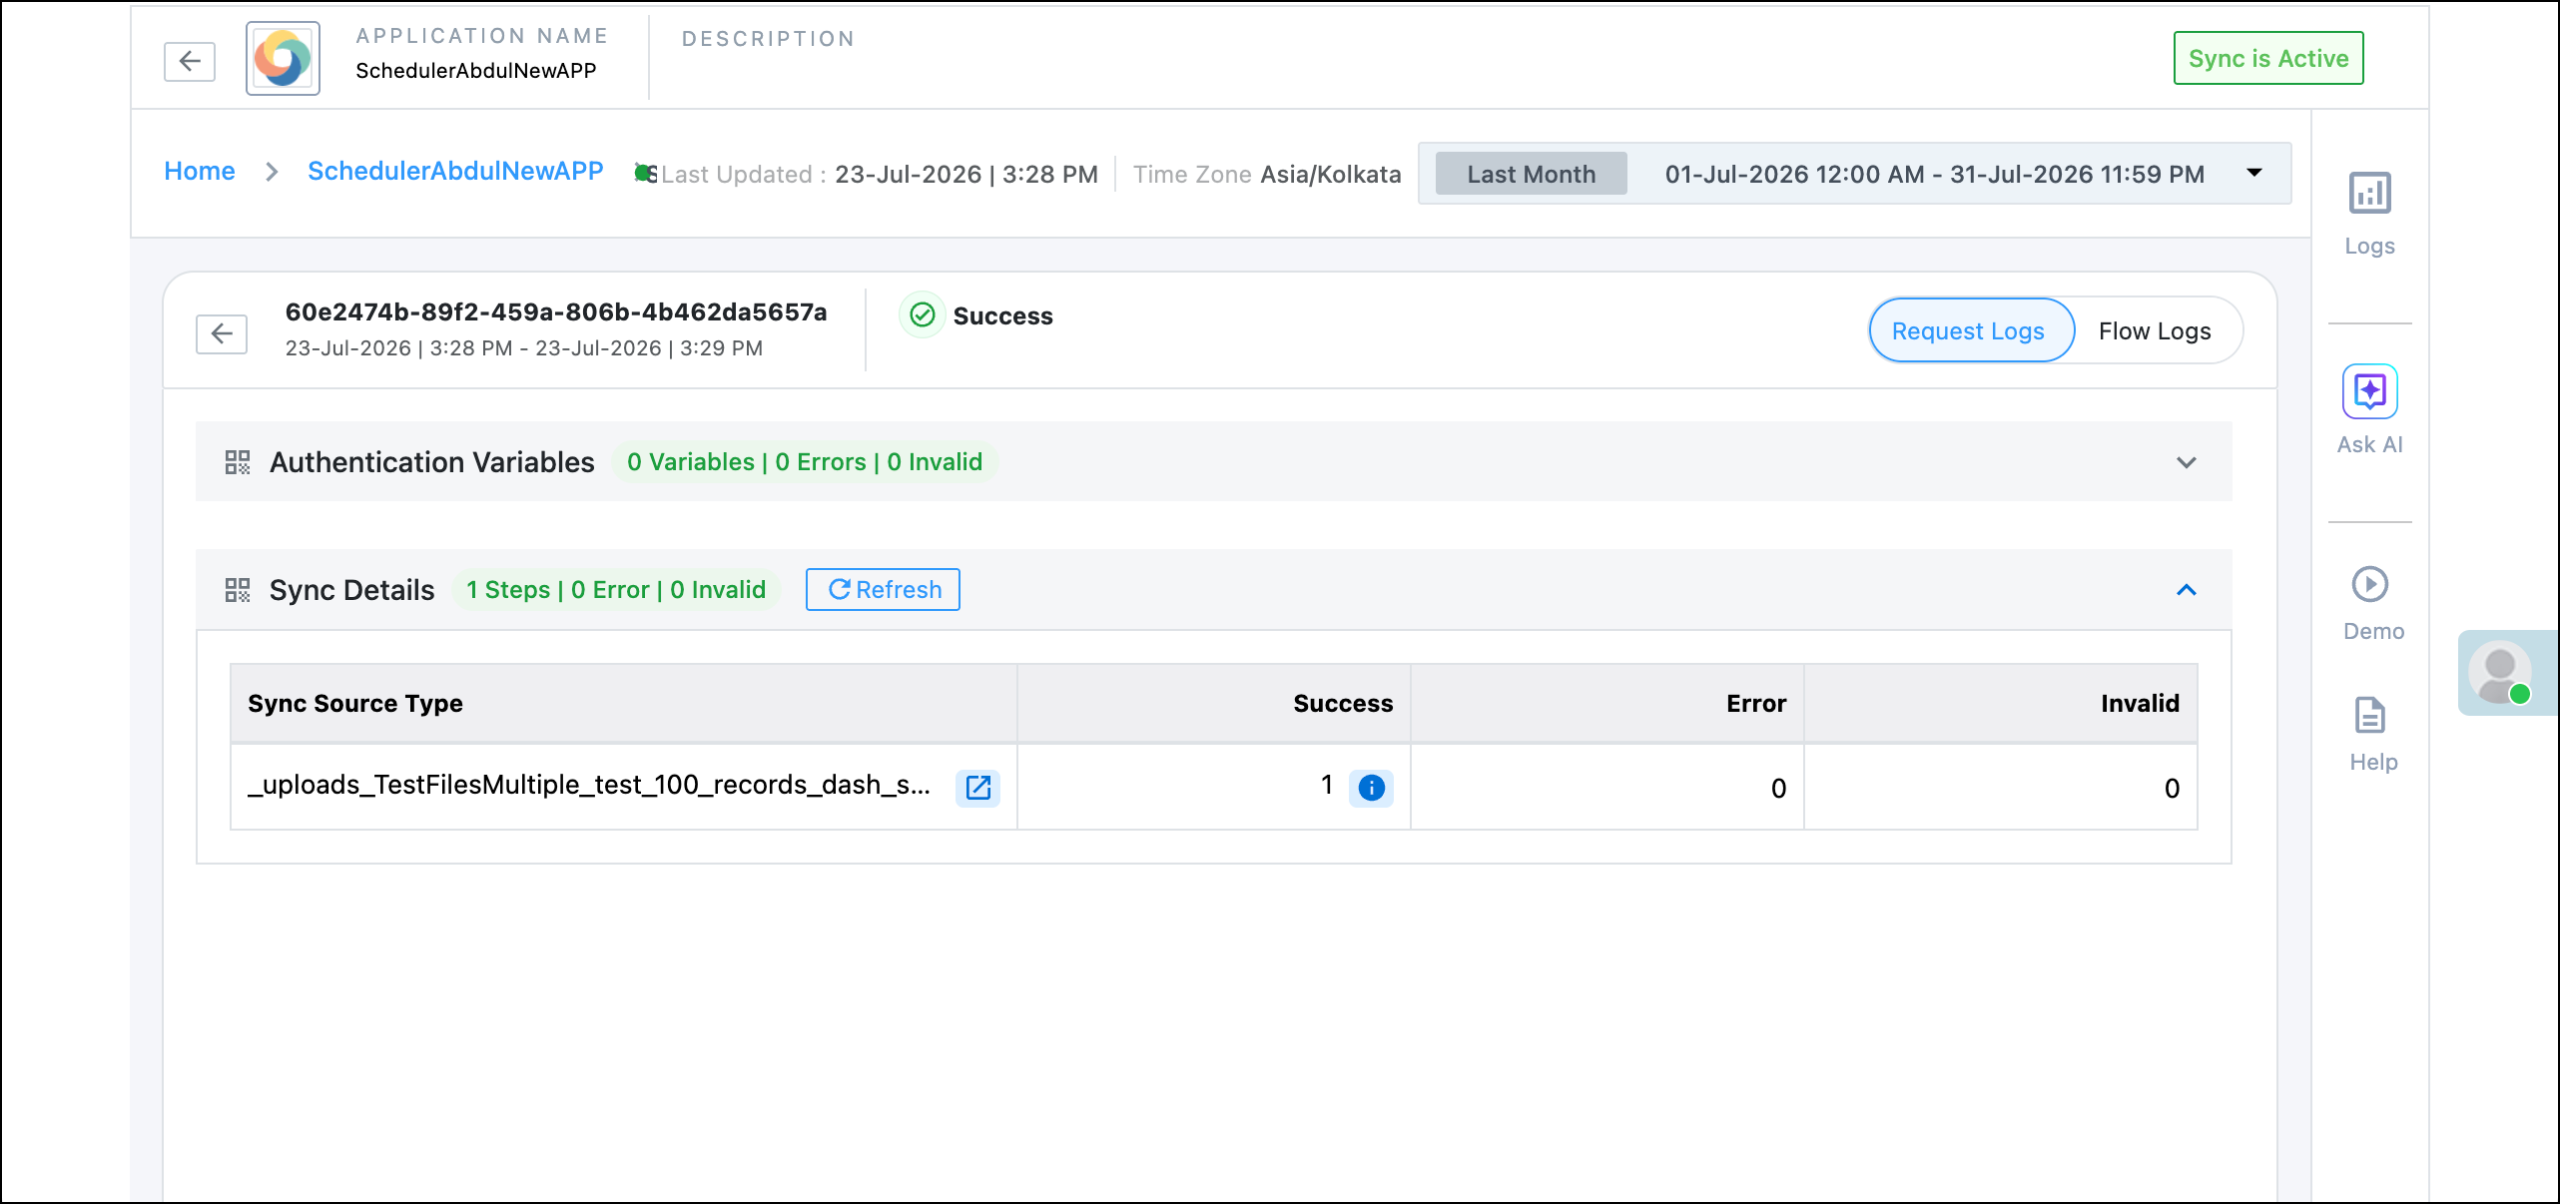
Each file downloaded from your SFTP server is logged as a separate step, and the Sync Source Type column shows the file path. Depending on the Set Limits option you configured in the trigger, you may see a single file or multiple files here. To verify the contents of a file that was picked up for processing, click the download icon alongside the file path.
9.2 Flow Logs
The Flow Logs tab is the standard UDS logs view. Each record fetched during the job is processed as an individual request and appears here. For example, if the API response contains 100 records, or an SFTP file contains 100 rows, 100 requests are created.
This tab shows the summary counts (Total Events, Queued, Successful, and Error), the search and Status filters, and the list of requests with their status, start time, and completion time. Click a Request ID to view the action-level execution for that record.
Any Questions?
Did you find this article helpful? Please let us know any feedback you may have in the comments section below. We’d love to hear from you and help you out!