


Get Started

Sales Suite
Field Ops
Marketing
Service CRM
Integrations & Apps
FloStack
Create and Manage Tools and Call Transfers on Invorto

1. Feature Overview
On the Invorto Voice Bot, without tools, a bot can only talk. It follows its system prompt, answers from its knowledge base, and records what it learned. Anything that has to happen as a result of the call, such as booking a slot or sending a link, happens afterward in your CRM.
Tools change that. A tool is a saved API call that the bot can make in the middle of a conversation. The bot reads the live response and keeps talking with that information in hand.
Invorto supports three kinds of tools.
| Tool type | What it is | Where you configure it |
| System tools | Built-in actions every bot can use, such as ending a call or transferring it. | The Tools tab of the bot. |
| Custom tools | API calls you define yourself, such as checking availability or looking up an order. | The Tools page in the left navigation, then add it to a bot. |
Typical uses include the following –
- Check open appointment slots on a calendar and confirm a booking while the caller is still on the line.
- Look up the status of an order or an application and read it back to the caller.
- Send a payment link or a document during the call, then check whether it was received.
- Hand the call to a human agent when the caller asks for one, or to a second bot that specializes in a different topic.
2. Prerequisites
- An Invorto account with an Admin role to create bots and tools.
- The API you want to call must be reachable over the public internet and must accept requests from Invorto.
- The endpoint URL, the HTTP method, and any keys, headers, or query parameters the API expects.
- A published voice bot to attach the tool to. See Creating a Voice Bot.
3. How Tools Work
When you attach a tool to a bot, Invorto appends the tool name, its description, and the conditions you wrote to the bot’s system prompt. The bot uses that text to decide when the tool applies.
The sequence on a live call is as follows.
- The caller says something that matches the conditions you described.
- The bot fills in the parameters you marked as AI input, based on the conversation.
- Invorto calls your endpoint and plays your waiting message while it waits.
- Your API returns a response.
- The bot reads the response, uses your response mapping and your success message, and continues the conversation.
4. Build a Tool
This section builds an example tool from start to finish, so you can see how every field fits together before you configure one against your own API. Follow it as written and you will end up with a tool that sends a request and receives a response. You do not need a bot or a phone call.
The example is called Get Order Status, and it looks up an order by its ID. So that you can run it without setting anything up first, it points at a public test endpoint that returns your request back to you. That lets you confirm the request left Invorto and arrived intact.
Note: Every value in this example is a fixed string. Nothing depends on a live conversation, so if something fails, the cause is the request itself rather than the wording of a prompt.
4.1 Open the Custom Tool Form
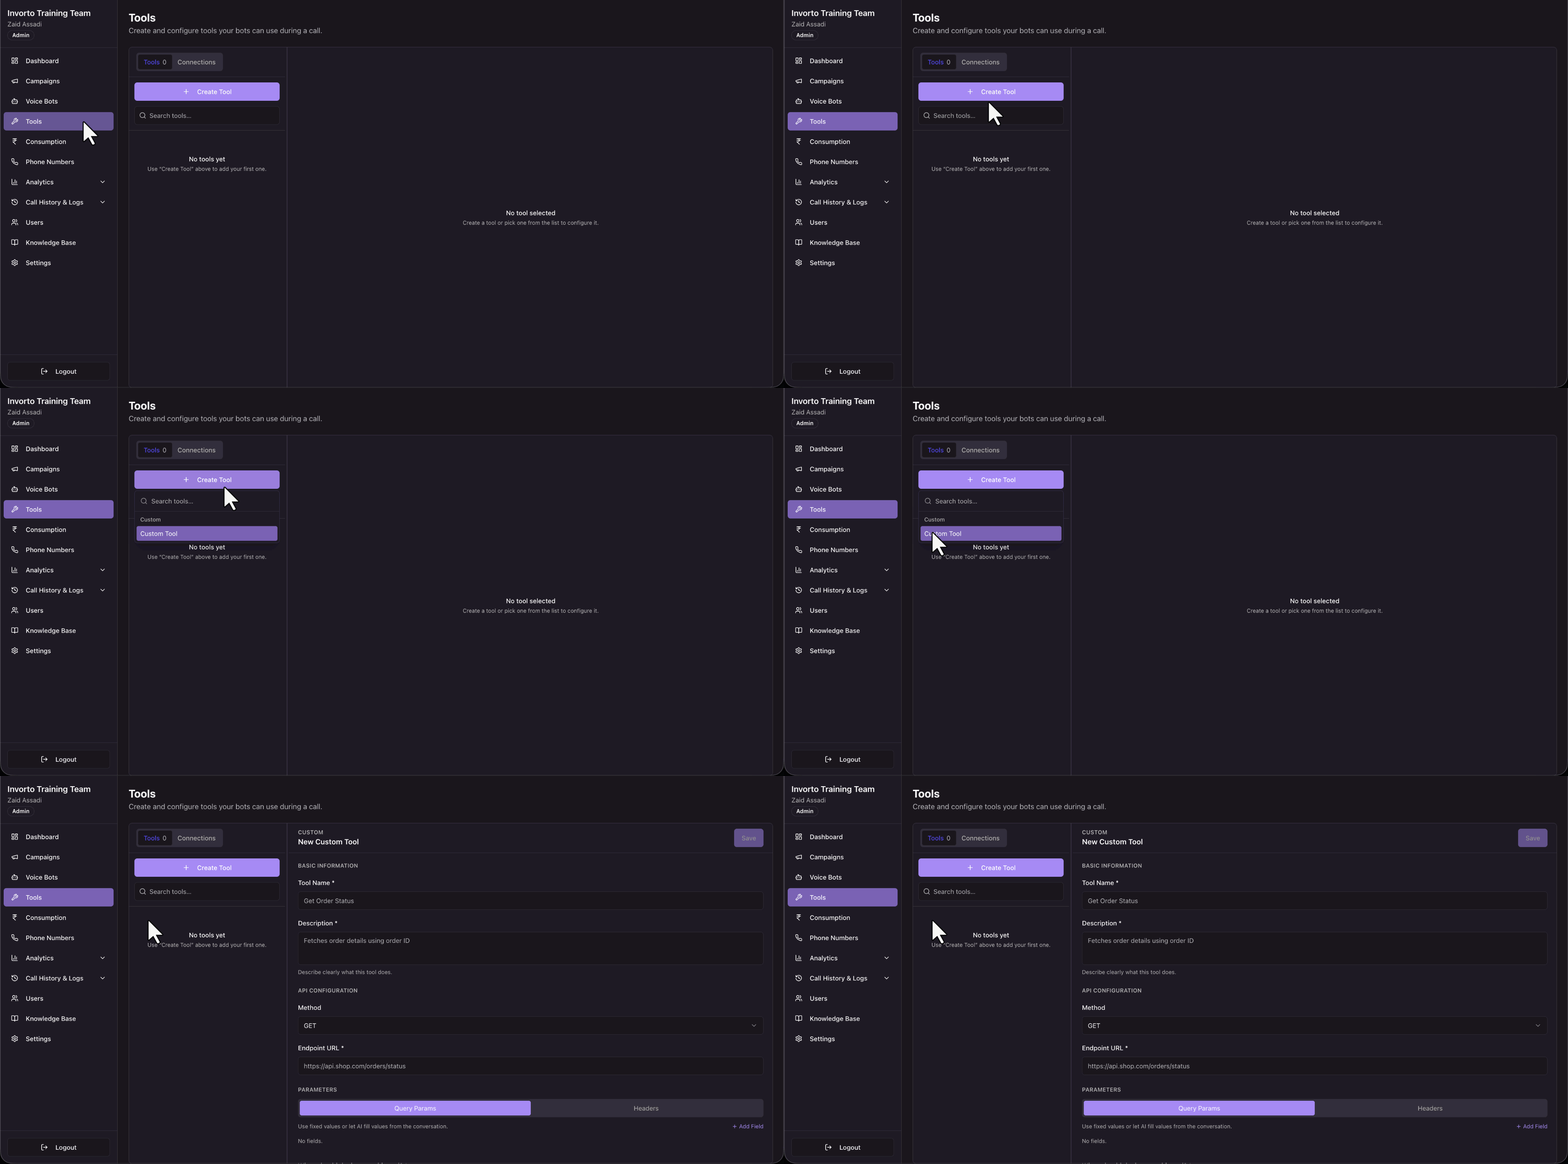
- Click Tools in the left navigation.
- Click + Create Tool.
- Select Custom Tool under the Custom
The New Custom Tool form opens in the right panel.
4.2 Add Basic Information
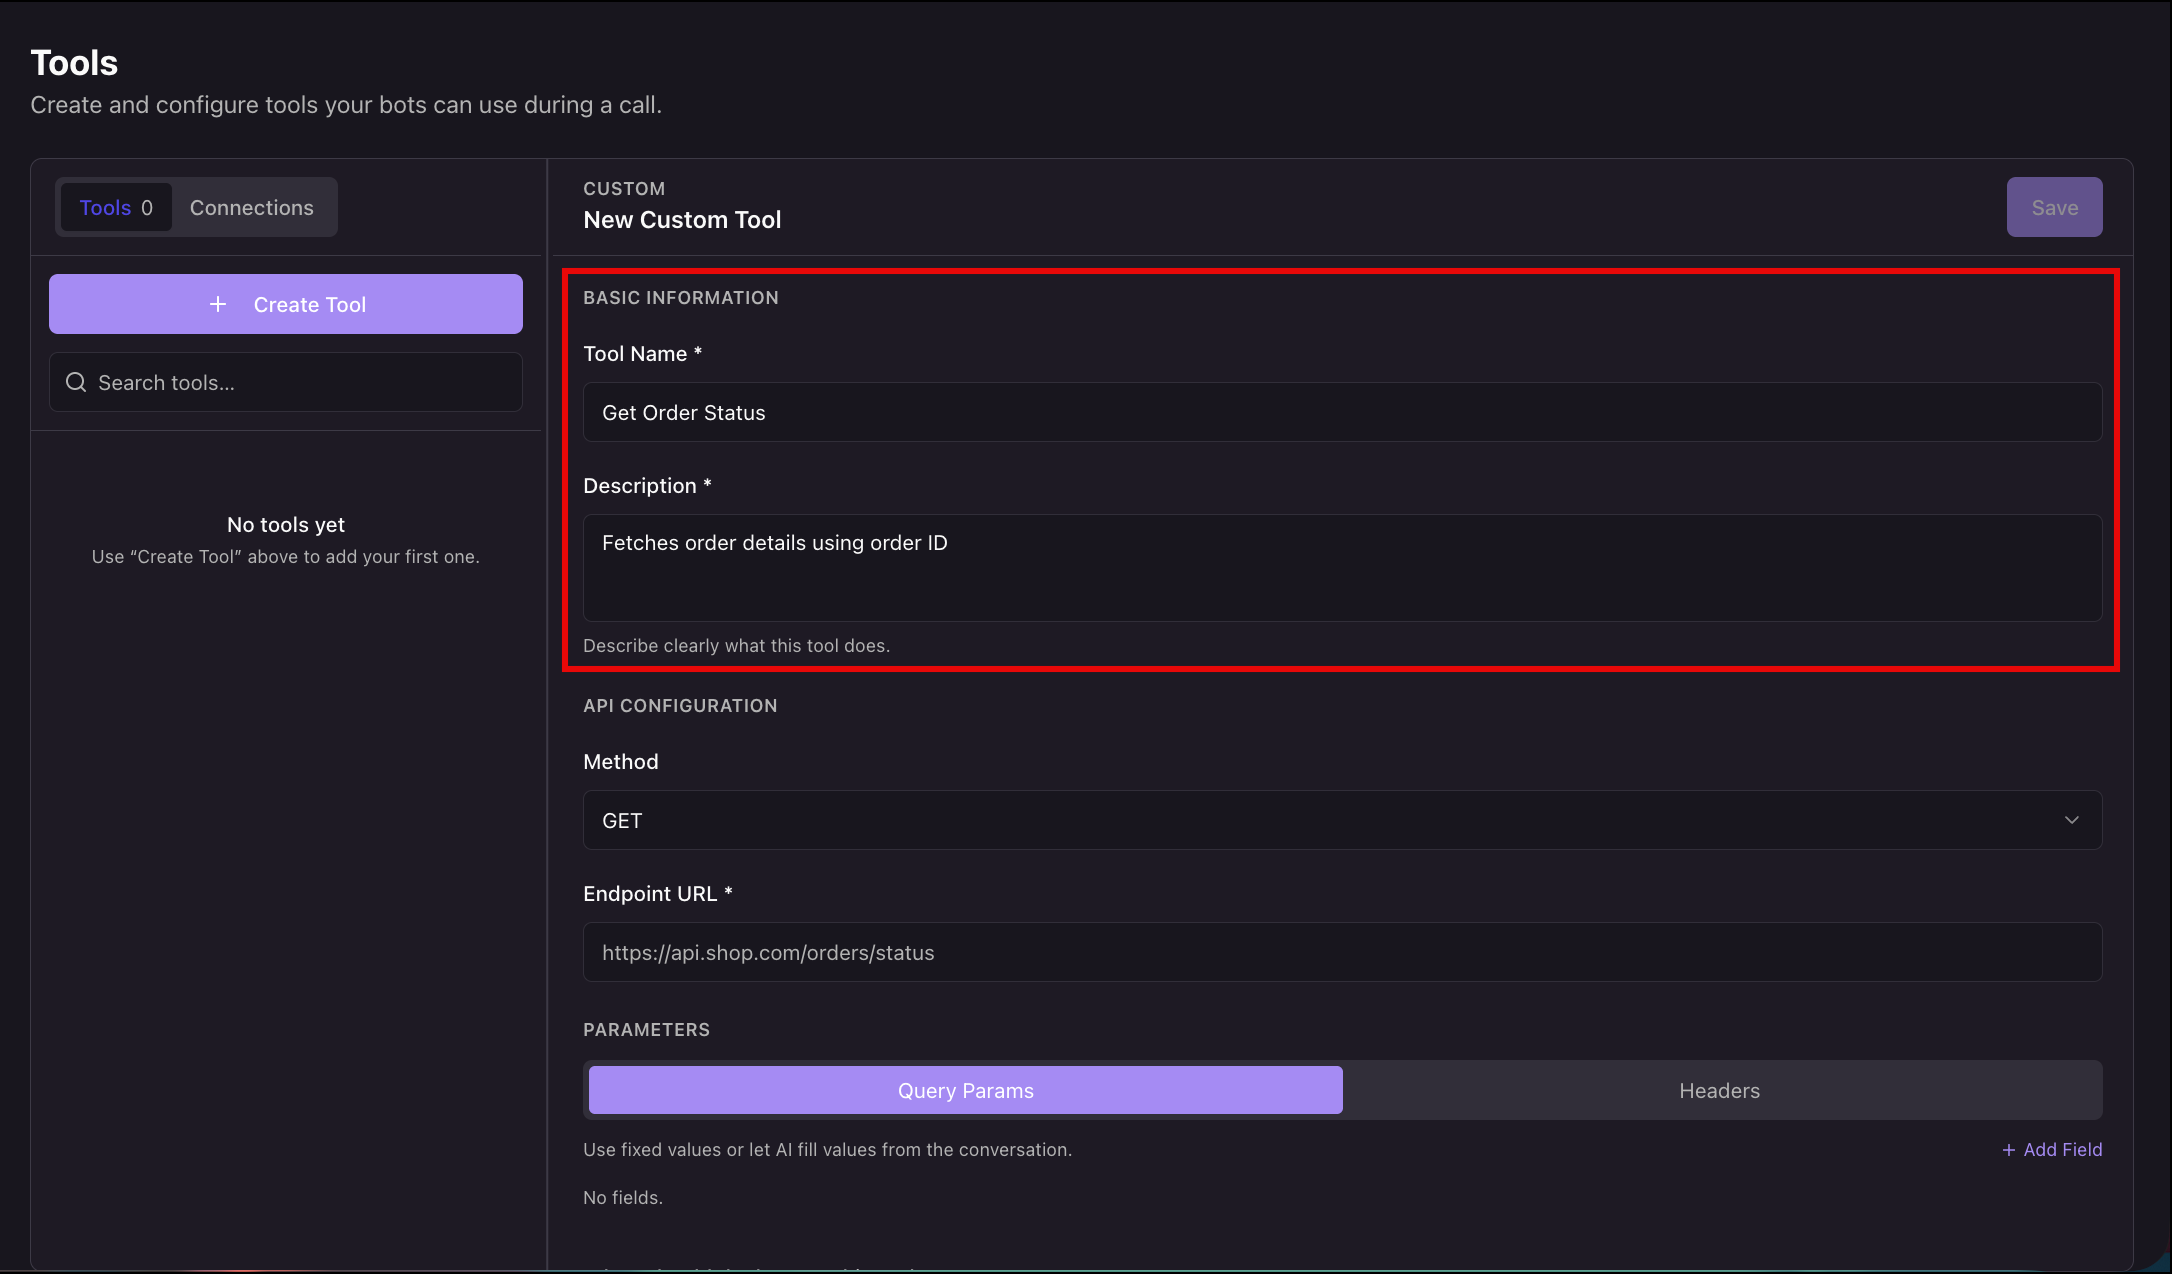
- In Tool Name, enter Get Order Status.
- In Description, enter Fetches order details using order ID.
4.3 Configure the API
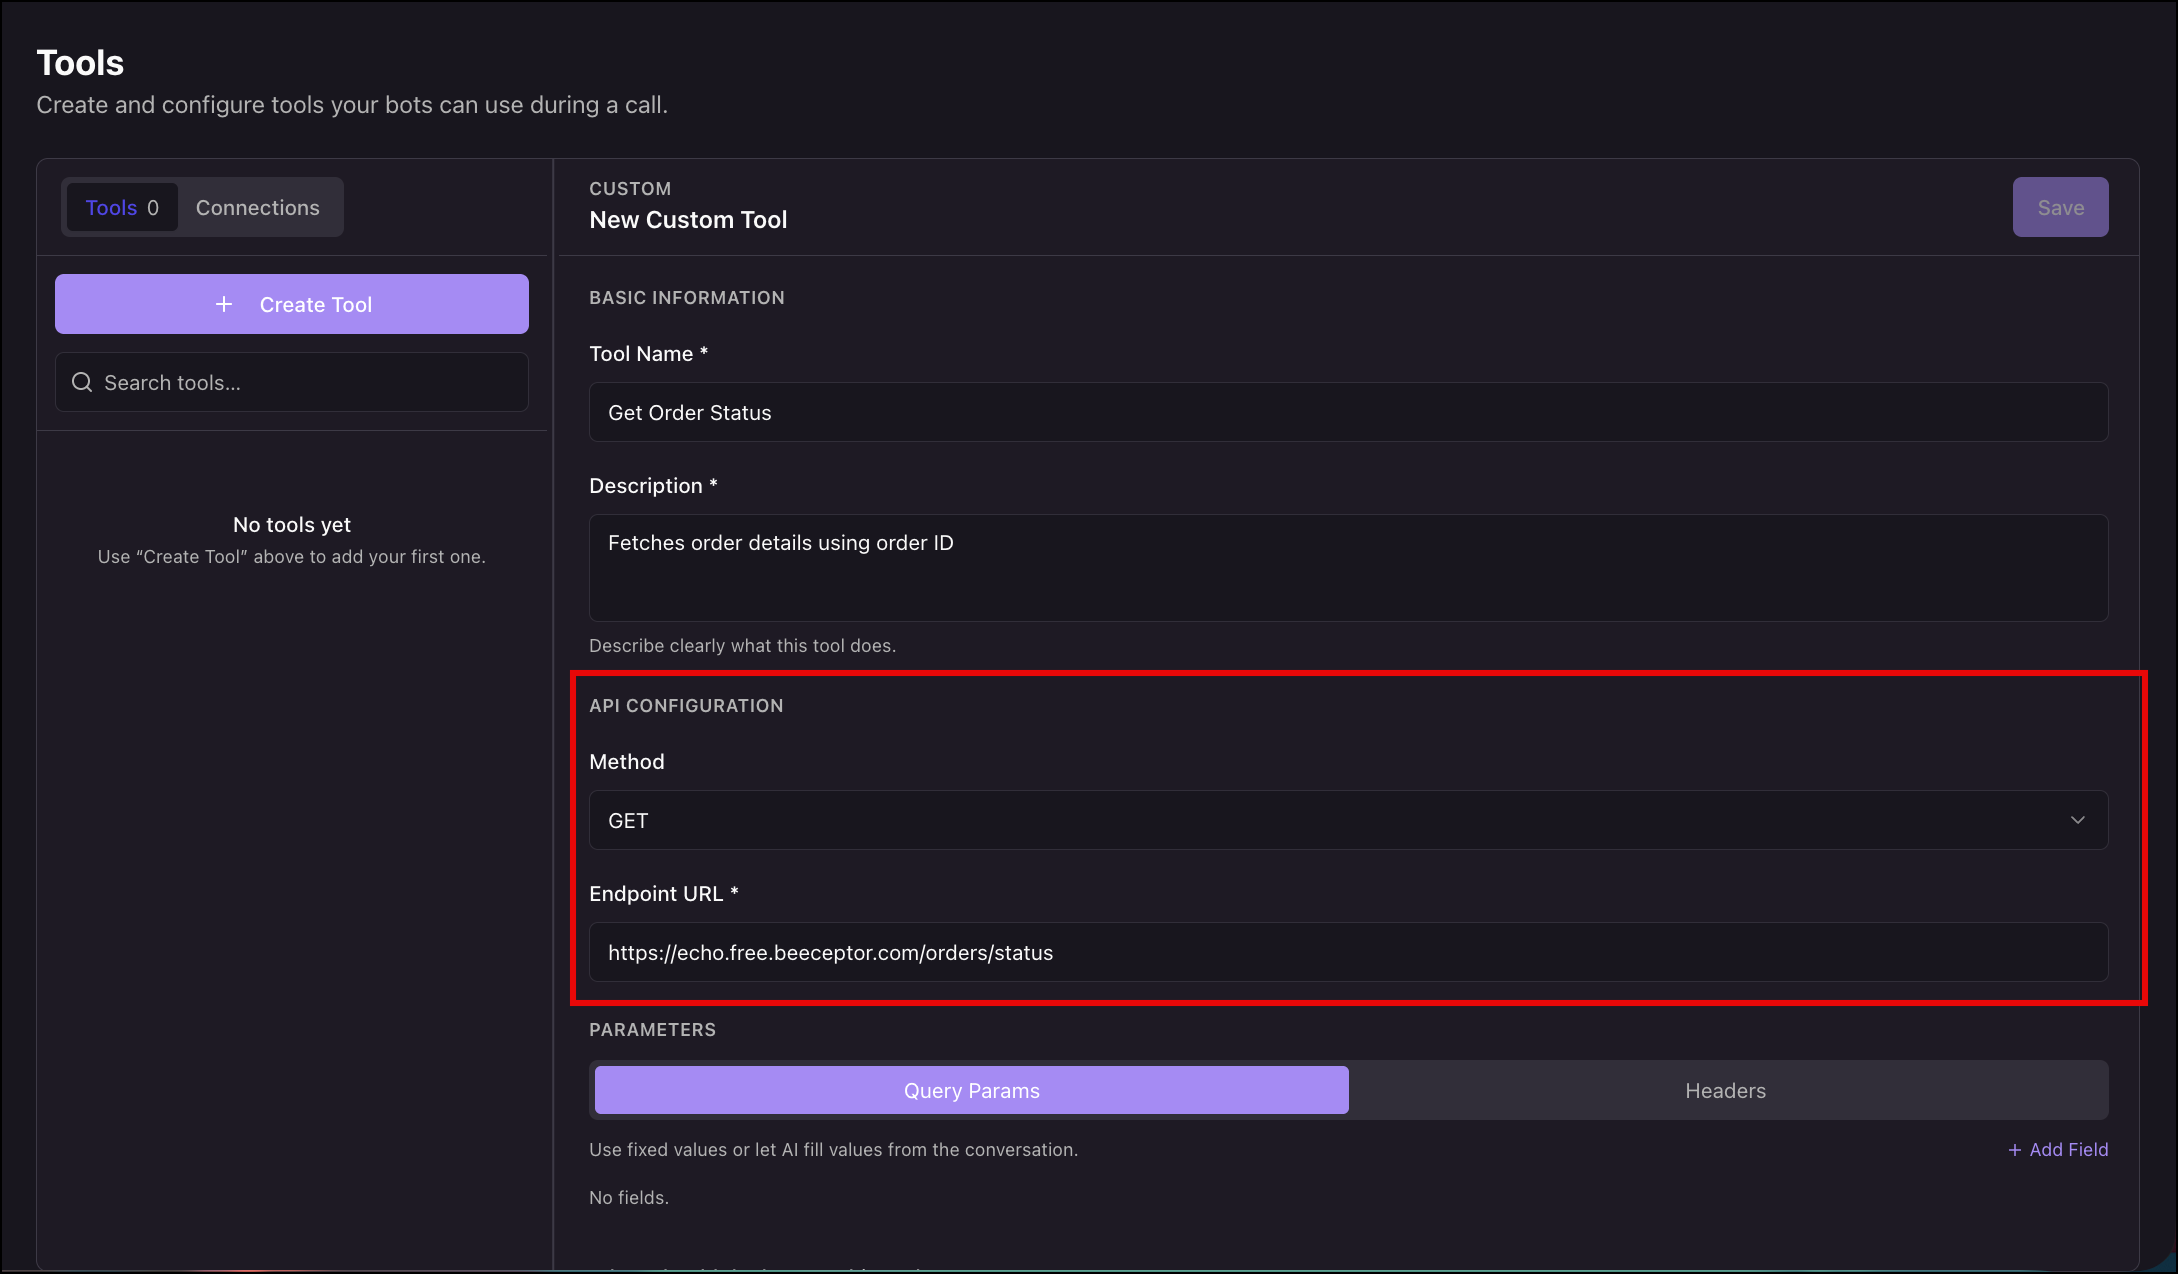
Method sets the HTTP method Invorto uses. Select the one your endpoint expects.Endpoint URL is the full address Invorto calls.
In the example, the endpoint returns your own request back to you as JSON. A real API would return order data instead.
- Leave the Method on GET.
- In Endpoint URL, enter the following:
https://echo.free.beeceptor.com/orders/status
4.4 Add a Parameter
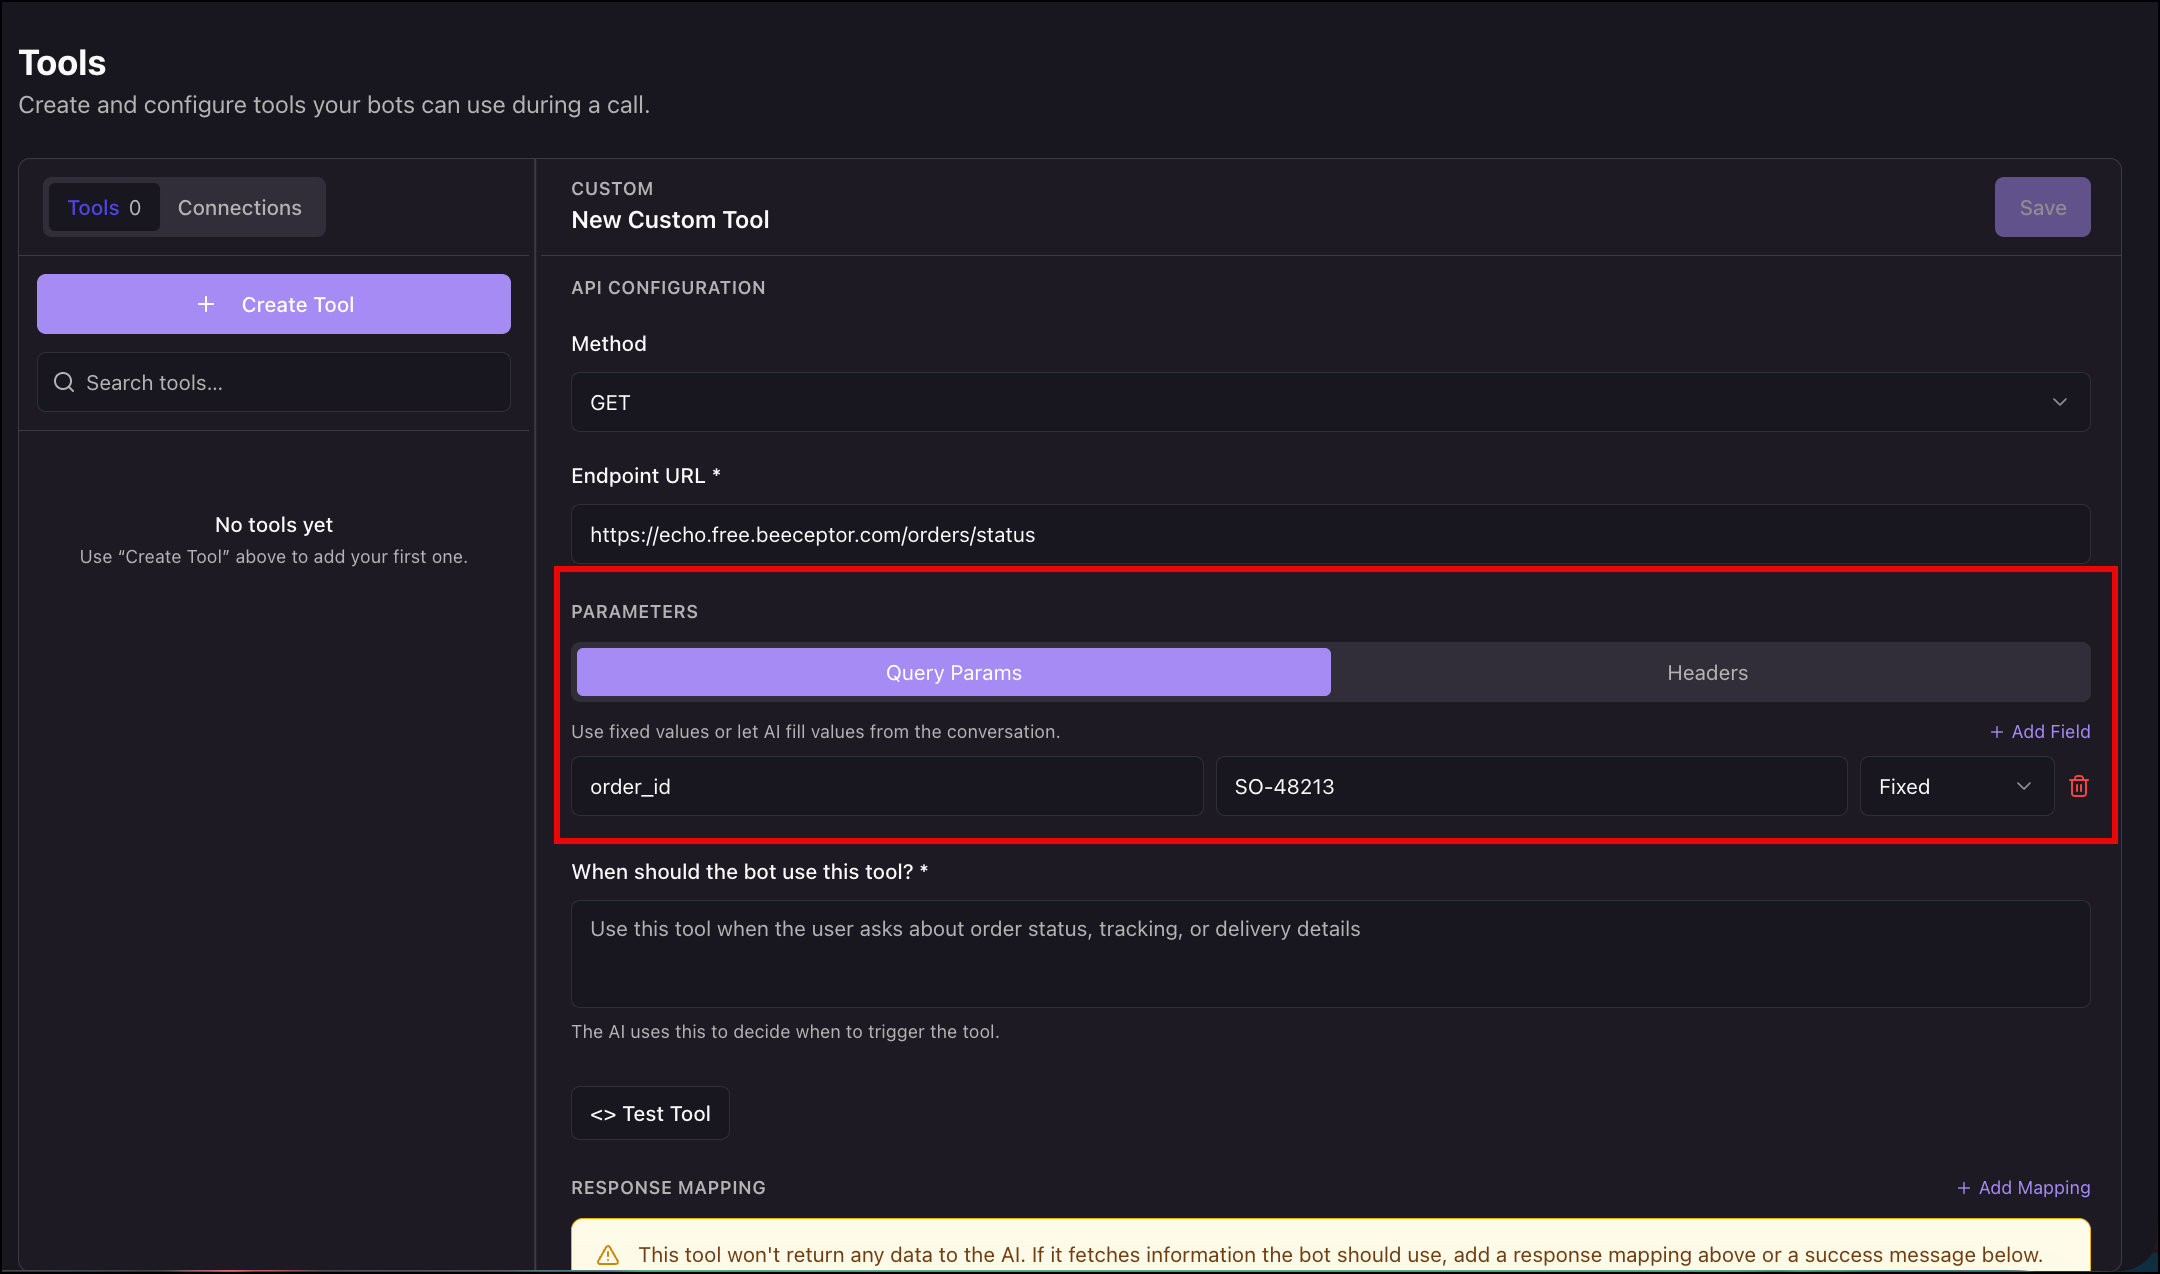
The Parameters section is where you tell Invorto what to send with the request. Use the toggle to switch between Query Params and Headers, and configure each one separately. Click + Add Field to add a row, then set the key, the value, and the value type.
The value type controls where the value comes from.
| Value type | How Invorto fills the value |
| AI Input | The bot generates the value from the conversation, following the instruction you write next to it. |
| Fixed | The value you type is sent unchanged on every call. |
| Variable | The value comes from a variable available on the call. |
| Secret | The value comes from a stored credential. Use this for API keys rather than typing them as fixed text. |
Query parameters and headers cover everything a GET request sends. When the method sends a body, the Body tab appears alongside them. The body is not a list of key and value rows. It is a JSON editor, where you write the JSON your API expects and mark the parts Invorto should fill in.
Mark those parts with placeholders. Anything you do not mark is sent exactly as you typed it.
| What you want | Write this | What happens |
| A value the AI fills | {{ai: instruction}} |
The bot fills the field from the conversation, following your instruction. |
| A named AI value | {{ai: name: instruction}} |
The same, with the middle word naming the exact parameter the bot fills. |
| A call variable | {{var: name}} |
Replaced with a live call variable at runtime. |
| A stored secret | {{secret: NAME}} |
Replaced with a stored secret. An input for the secret value appears below the editor. |
| A fixed value | The value itself | Sent as is on every call. |
A body that mixes all four might look like this.
{
  "order_id": "{{ai: the order ID the caller gives you}}",
  "caller": "{{var: caller_number}}",
  "token": "{{secret: API_KEY}}",
  "channel": "voice"
}
Each {{ai: ...}} placeholder becomes a parameter the bot fills, and by default that parameter takes its name from the JSON key above it. In the body above, the key is order_id, so the parameter is called order_id.
Some APIs do not use meaningful keys. Instead of a field per value, they take a list of attribute and value pairs, where every entry uses the same two keys.
[
  {
    "Attribute": "FirstName",
    "Value": "..."
  },
  {
    "Attribute": "LastName",
    "Value": "..."
  }
]
Here the keys cannot name anything. Both AI placeholders would be called Value, and the bot would have no way to tell them apart. Add a name in the middle of the placeholder to fix it. The syntax has three parts: ai, the name, and the instruction.
[
  {
    "Attribute": "FirstName",
    "Value": "{{ai: first_name: the caller's first name}}"
  },
  {
    "Attribute": "LastName",
    "Value": "{{ai: last_name: the caller's last name}}"
  },
  {
    "Attribute": "Phone",
    "Value": "{{var: caller_number}}"
  }
]
The JSON key stays Value, because that is what the API expects. The parameters are called first_name and last_name, because that is what the bot needs to keep them apart.
The example sends one query parameter with a fixed value, so that the same value goes out every time and you know exactly what should arrive at the other end.
- Under Parameters, stay on the Query Params
- Click + Add Field.
- In the key field, enter order_id.
- In the value type list, select Fixed.
- In the value field, enter SO-48213.
Note:
- On a live call, an order ID would be AI Input, because the caller supplies it. An instruction such as “the order ID the caller gives you, which starts with SO- followed by five digits, for example SO-48213” would tell the bot how to build it.
- Put API keys and tokens on the Headers tab with the value type set to Secret. Entering a key as Fixed leaves it readable to anyone who opens the tool.
4.5 Tell the Bot When to Use the Tool
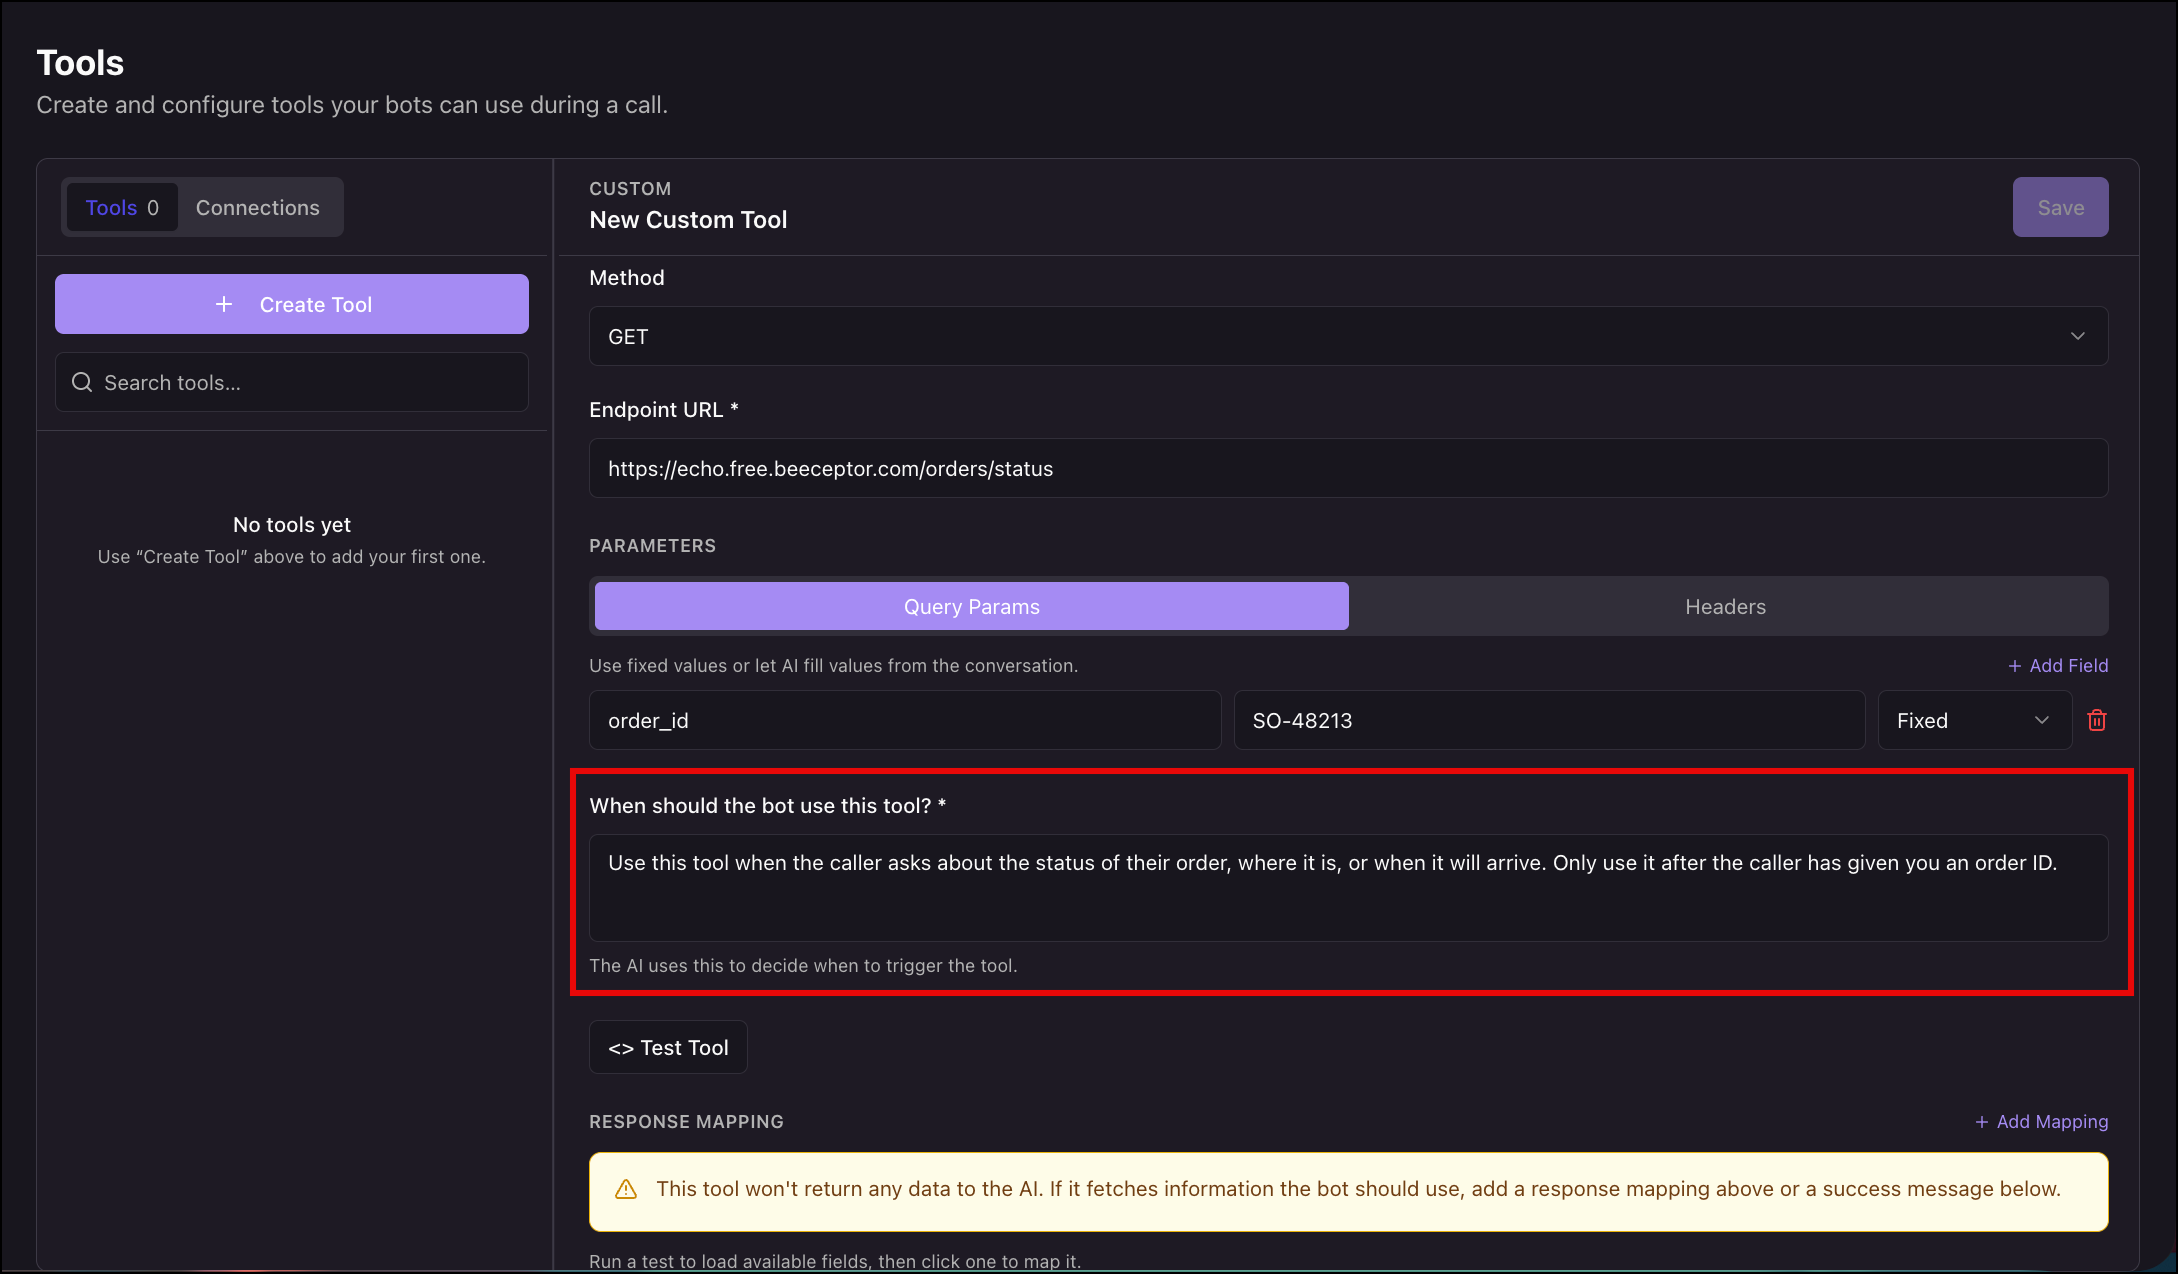
“When should the bot use this tool?” is the second field Invorto passes to the bot. The bot compares what the caller says against this text to decide whether the tool applies, so describe both when to use it and when not to. This field is required, even when no bot is attached yet.
In the example, we enter the following –
Use this tool when the caller asks about the status of their order,where it is, or when it will arrive. Only use it after the caller hasgiven you an order ID.
4.6 Test the Tool
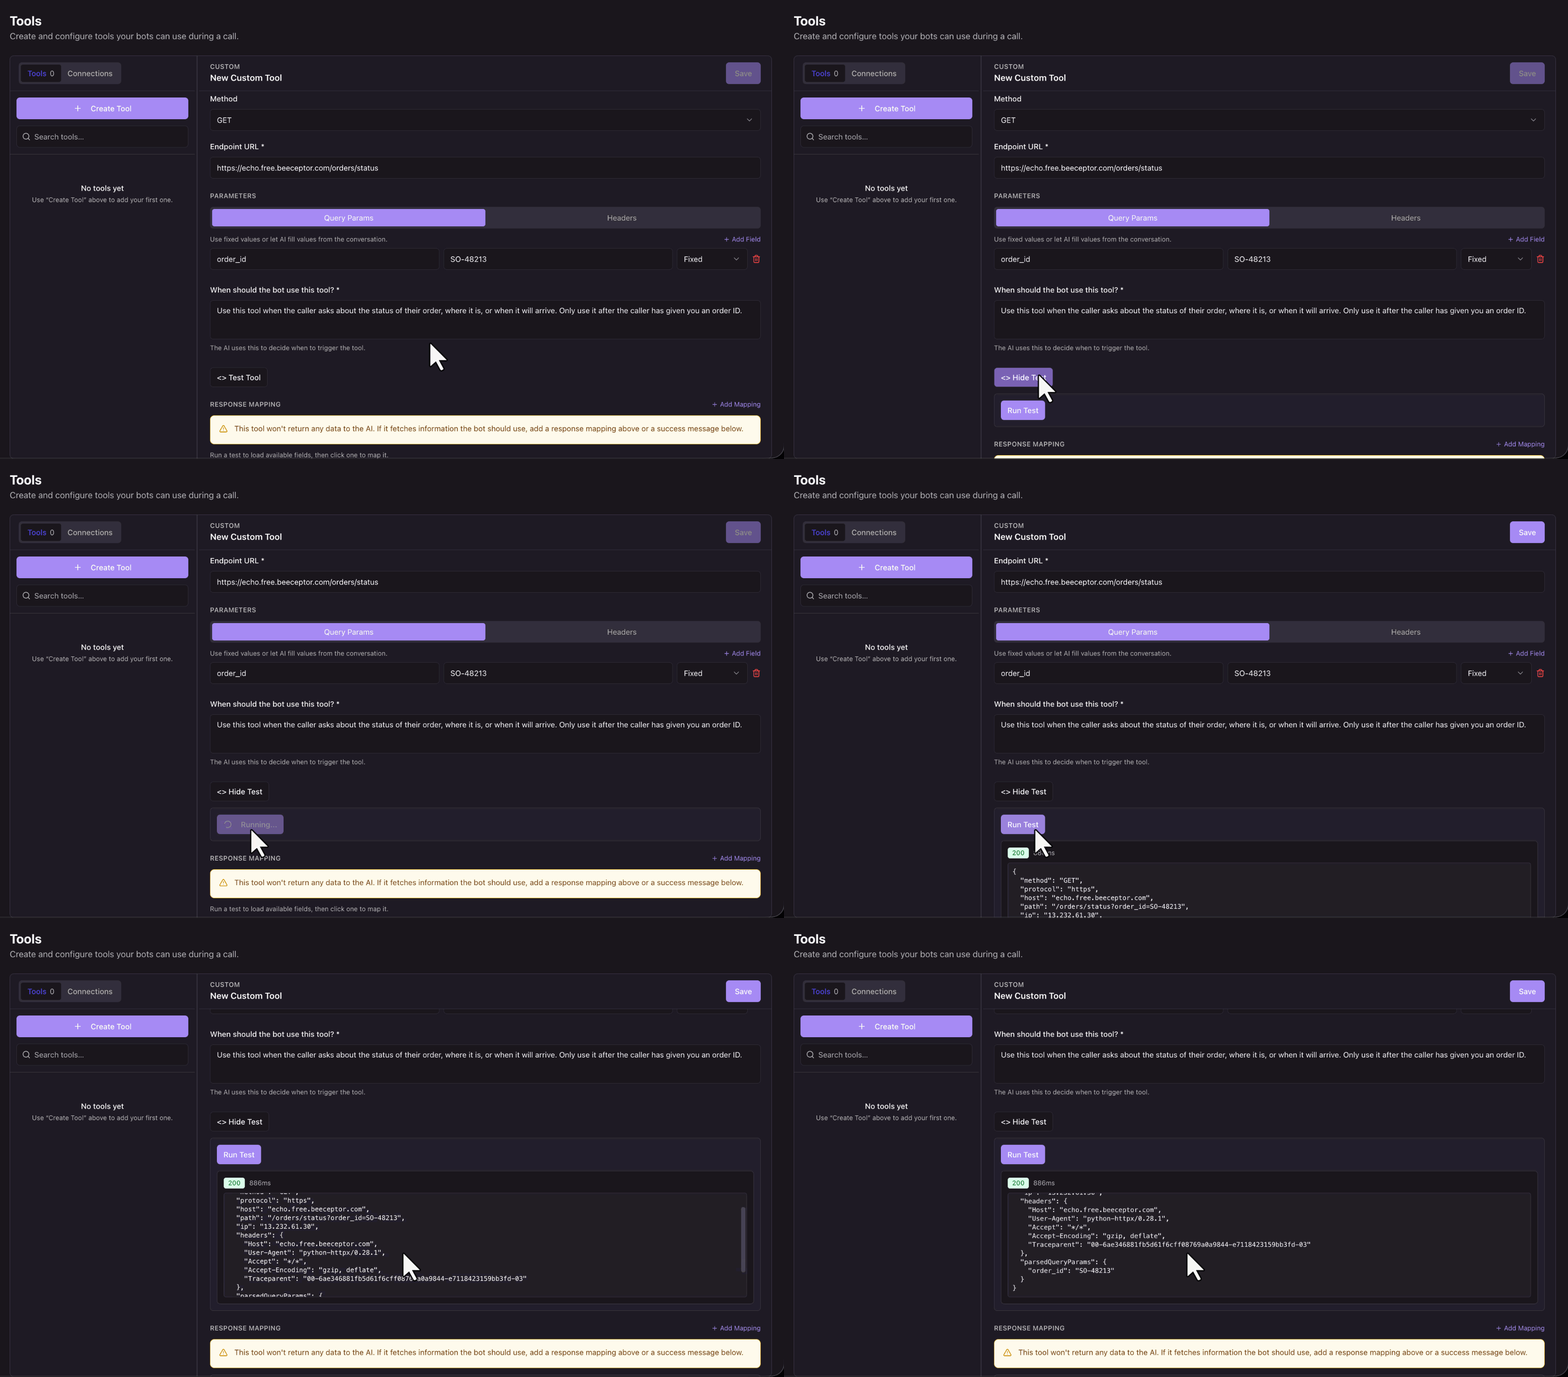
The test does two jobs. It confirms your endpoint, parameters, and credentials work, and it loads the fields from the response so you can map them in the next step.
- Click Test Tool to expand the test panel.
- Click Run Test.
- Read the response that appears.
{
  "method": "GET",
  "protocol": "https",
  "host": "echo.free.beeceptor.com",
  "path": "/orders/status?order_id=SO-48213",
  "ip": "13.232.778.30",
  "headers": {
    "Host": "echo.free.beeceptor.com",
    "User-Agent": "python-httpx/0.28.1",
    "Accept": "*/*",
    "Accept-Encoding": "gzip, deflate",
    "Traceparent": "00-b49ffba839fd74eb39a4-c8656fe7cf2bd251-03"
  },
  "parsedQueryParams": {
    "order_id": "SO-48213"
  }
}
4.7 Map the Response
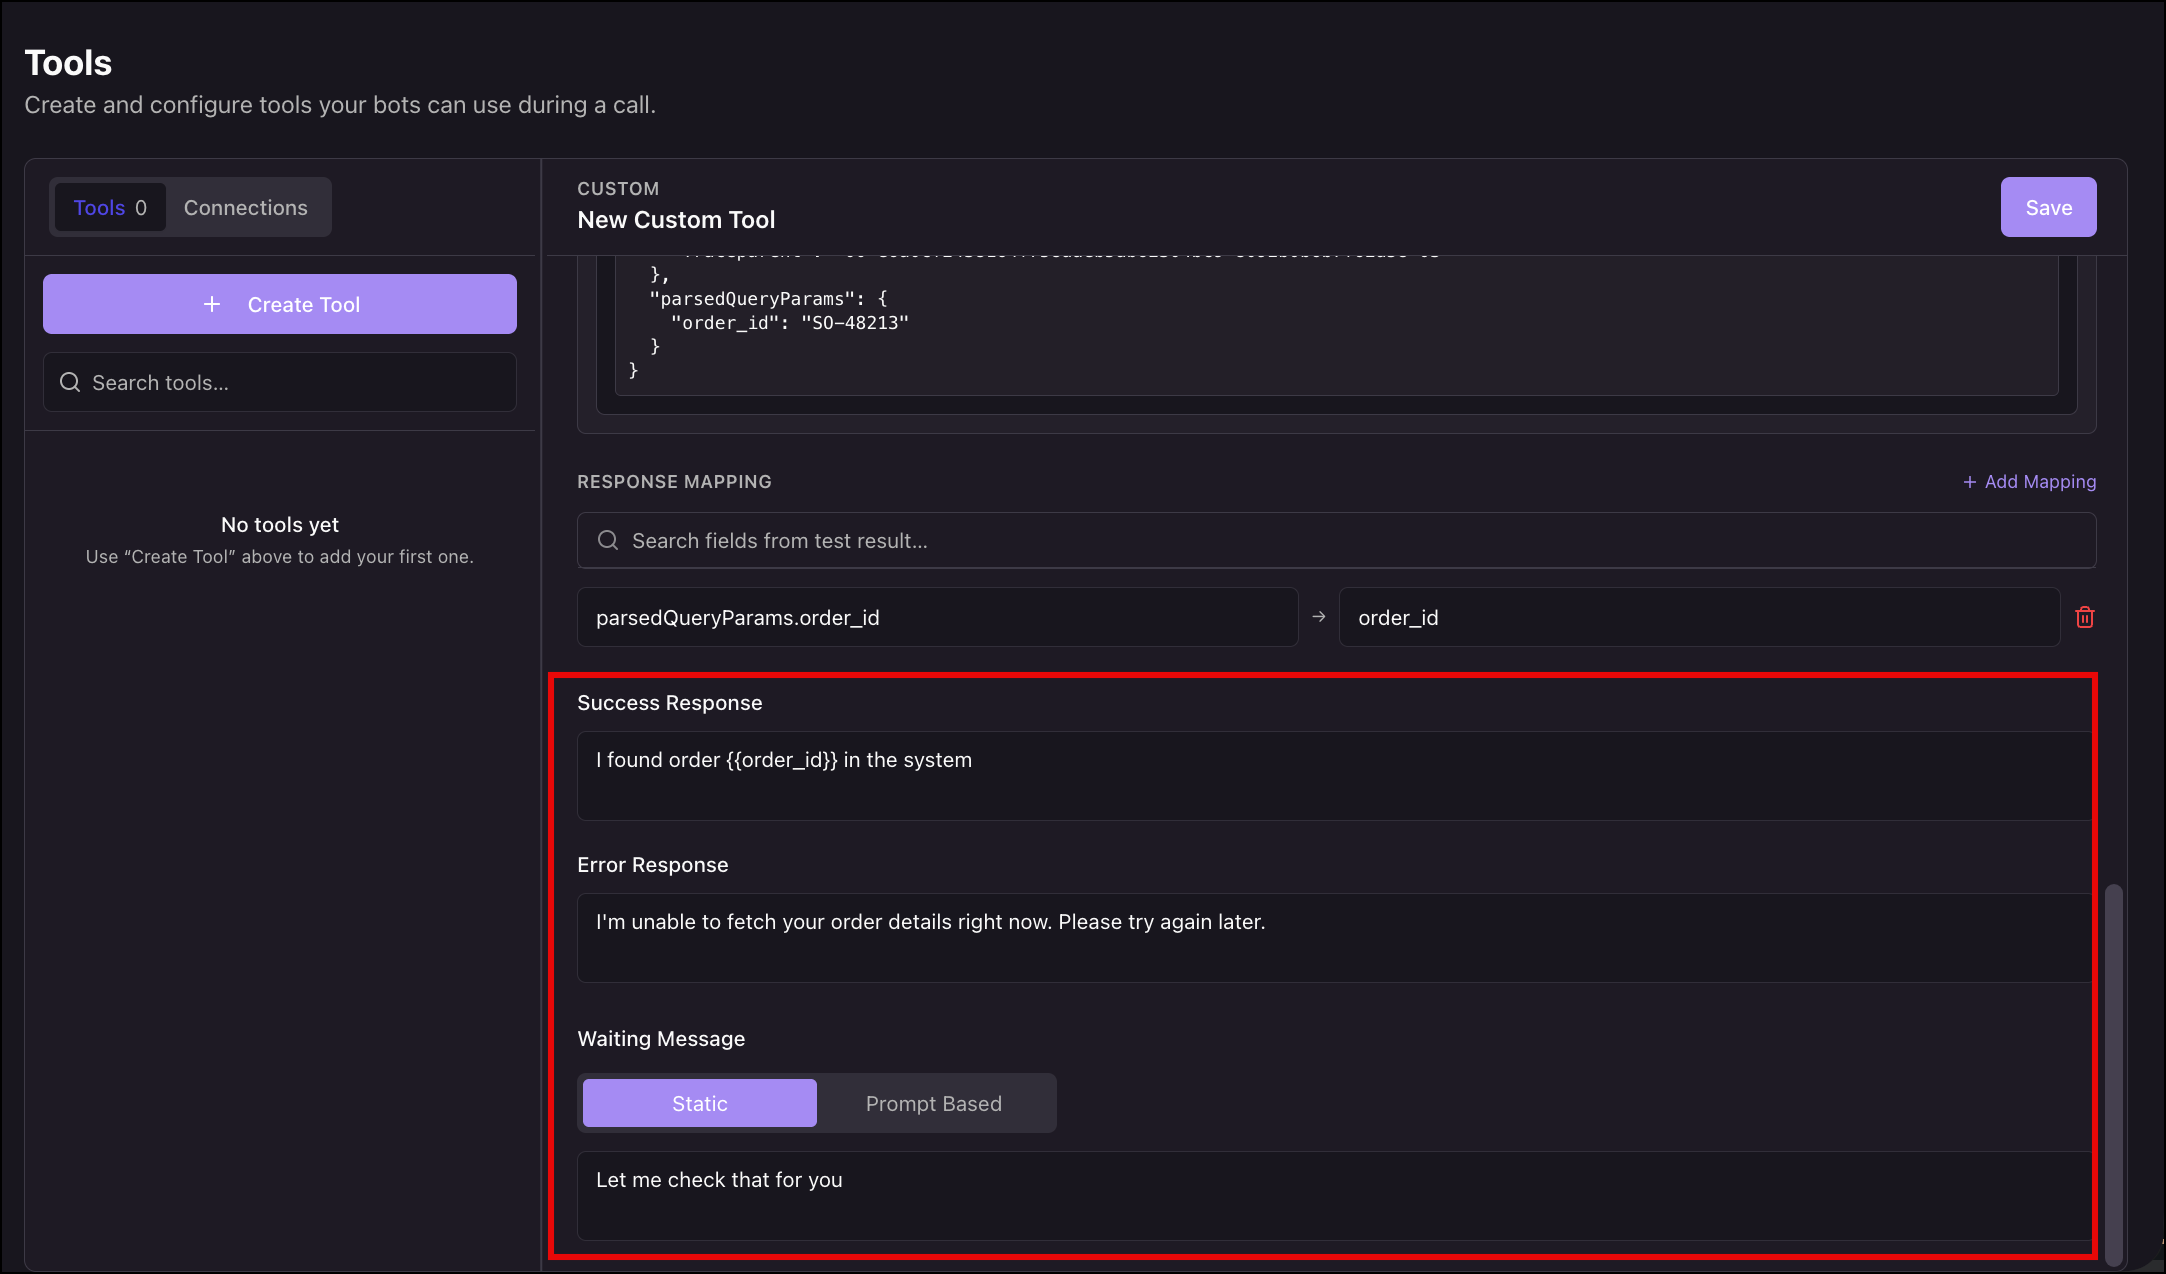
Response mapping takes values out of the API response and puts them into variables the bot can use in its replies.
- Under Response Mapping, click + Add Mapping.
- In the first field, enter the key from the API response. For this example, enter
parsedQueryParams.order_id. - In Variable Name, enter the name the bot should use. For this example, enter
order_id.
The name you enter on the right is what you reference in your messages. order_id becomes {{order_id}} in the next step.
Note:
- The key on the left must match the response exactly. In this example the order ID sits inside
parsedQueryParams, so the key includes a dot to reach it. Keys at the top level of the response, such aspath, need no dot. - If you have not run a test yet, the mapping area reads “Run a test to load available fields, then click one to map it.”
- If the tool has no response mapping and no success message, Invorto shows a warning that the tool will not return any data to the AI. The tool will still fire, but the bot will not learn anything from it. Add a mapping, a success message, or both.
4.8 Set the Success, Error, and Waiting Messages
These three fields control what the caller hears around the tool call.
| Field | What it does |
| Success Response | What the bot says when the call succeeds. Reference mapped values with the double-brace pattern, such as {{order_id}}. |
| Error Response | What the bot says when the call fails. Say plainly that the lookup did not work and offer a next step. |
| Waiting Message | What the bot says while it waits for your endpoint. Choose Static for one fixed line, or Prompt Based to describe what the bot should say and let it phrase the line in context. |
In the example:
- In Success Response, enter I found order {{order_id}} in the system.
- In Error Response, enter I‘m unable to fetch your order details right now. Please try again later.
- Under Waiting Message, select Static.
- Enter Let me check that for you.
Click Save, to save this Tool.
Note:
- Variables in the success and waiting messages come from your response mappings and your AI input fields. The form reminds you of this with the hint “Add AI Input fields above to use variables here.”
- An API call takes time. Without a waiting message, the caller hears silence while the bot waits for your endpoint, and silence on a phone call reads as a dropped connection.
Save the bot by clicking the Save button.
5. Add a Tool to a Bot
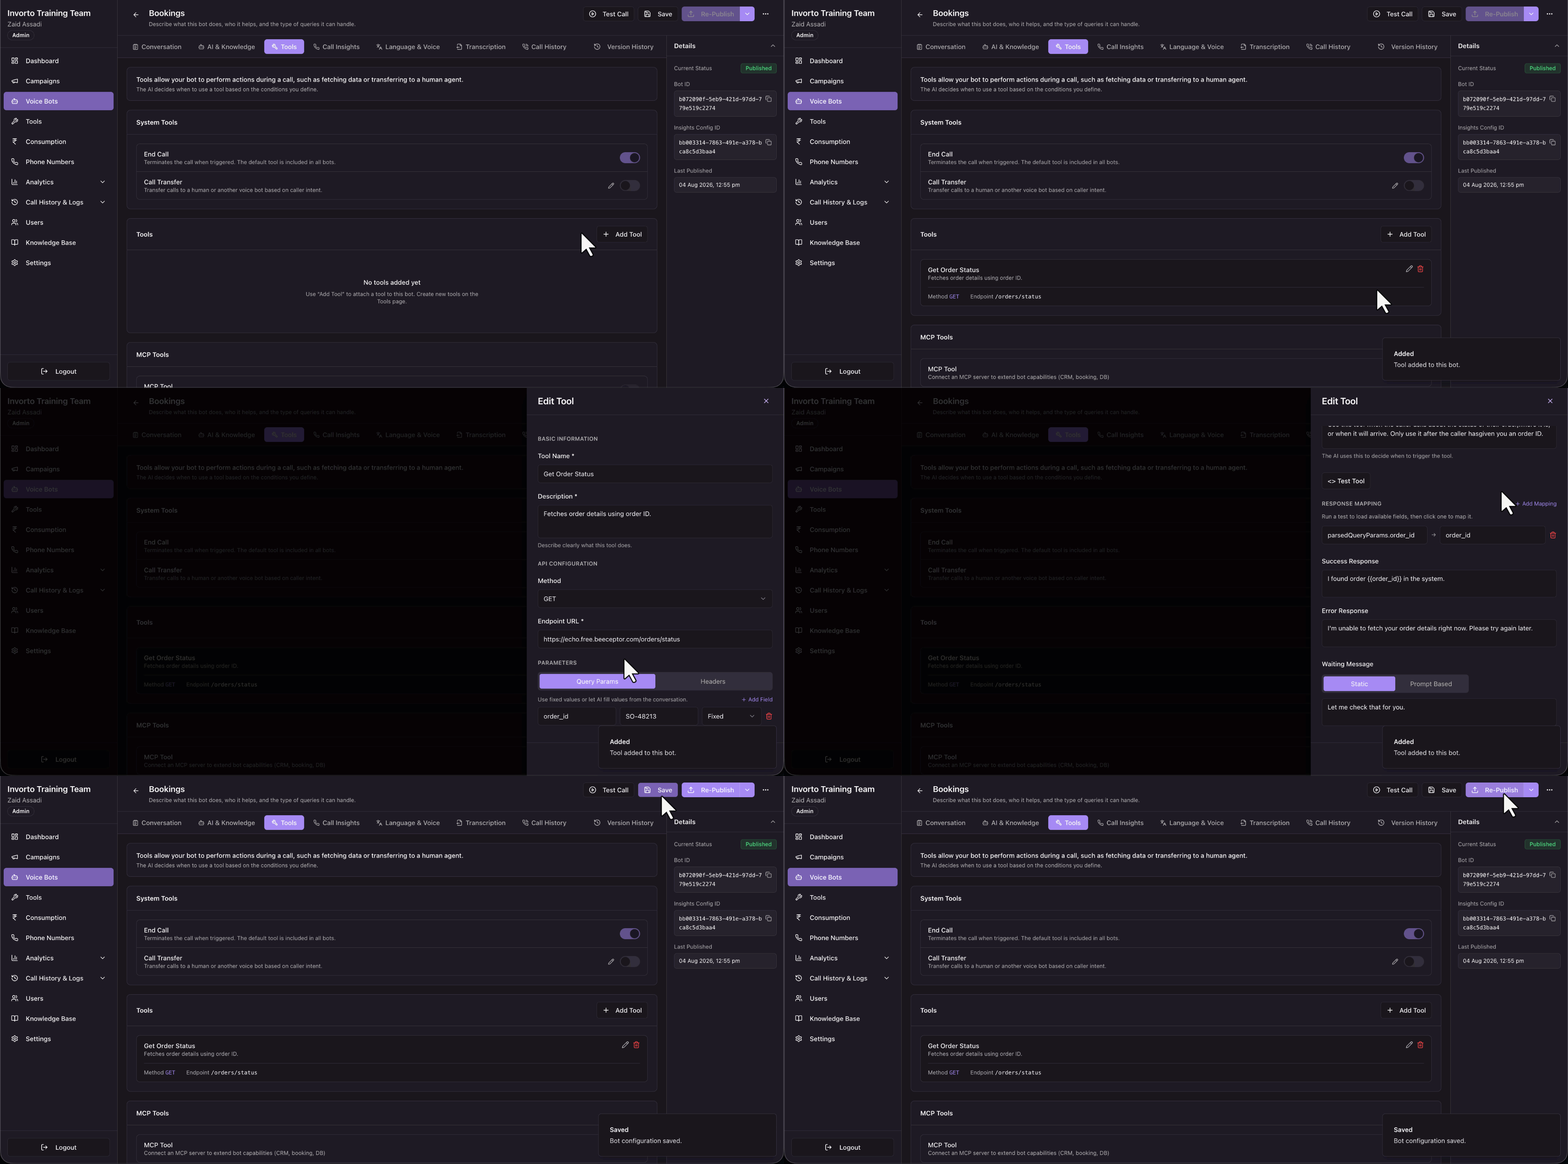
Creating a tool does not give any bot access to it. Attach it to each bot that should be able to use it.
- Click Voice Bots in the left navigation and open the bot.
- Open the Tools
- Under the Tools section, click + Add Tool.
- Select Get Order Status.
You can now click Save, then click Publish or Re-Publish.
6. Understand System Tools
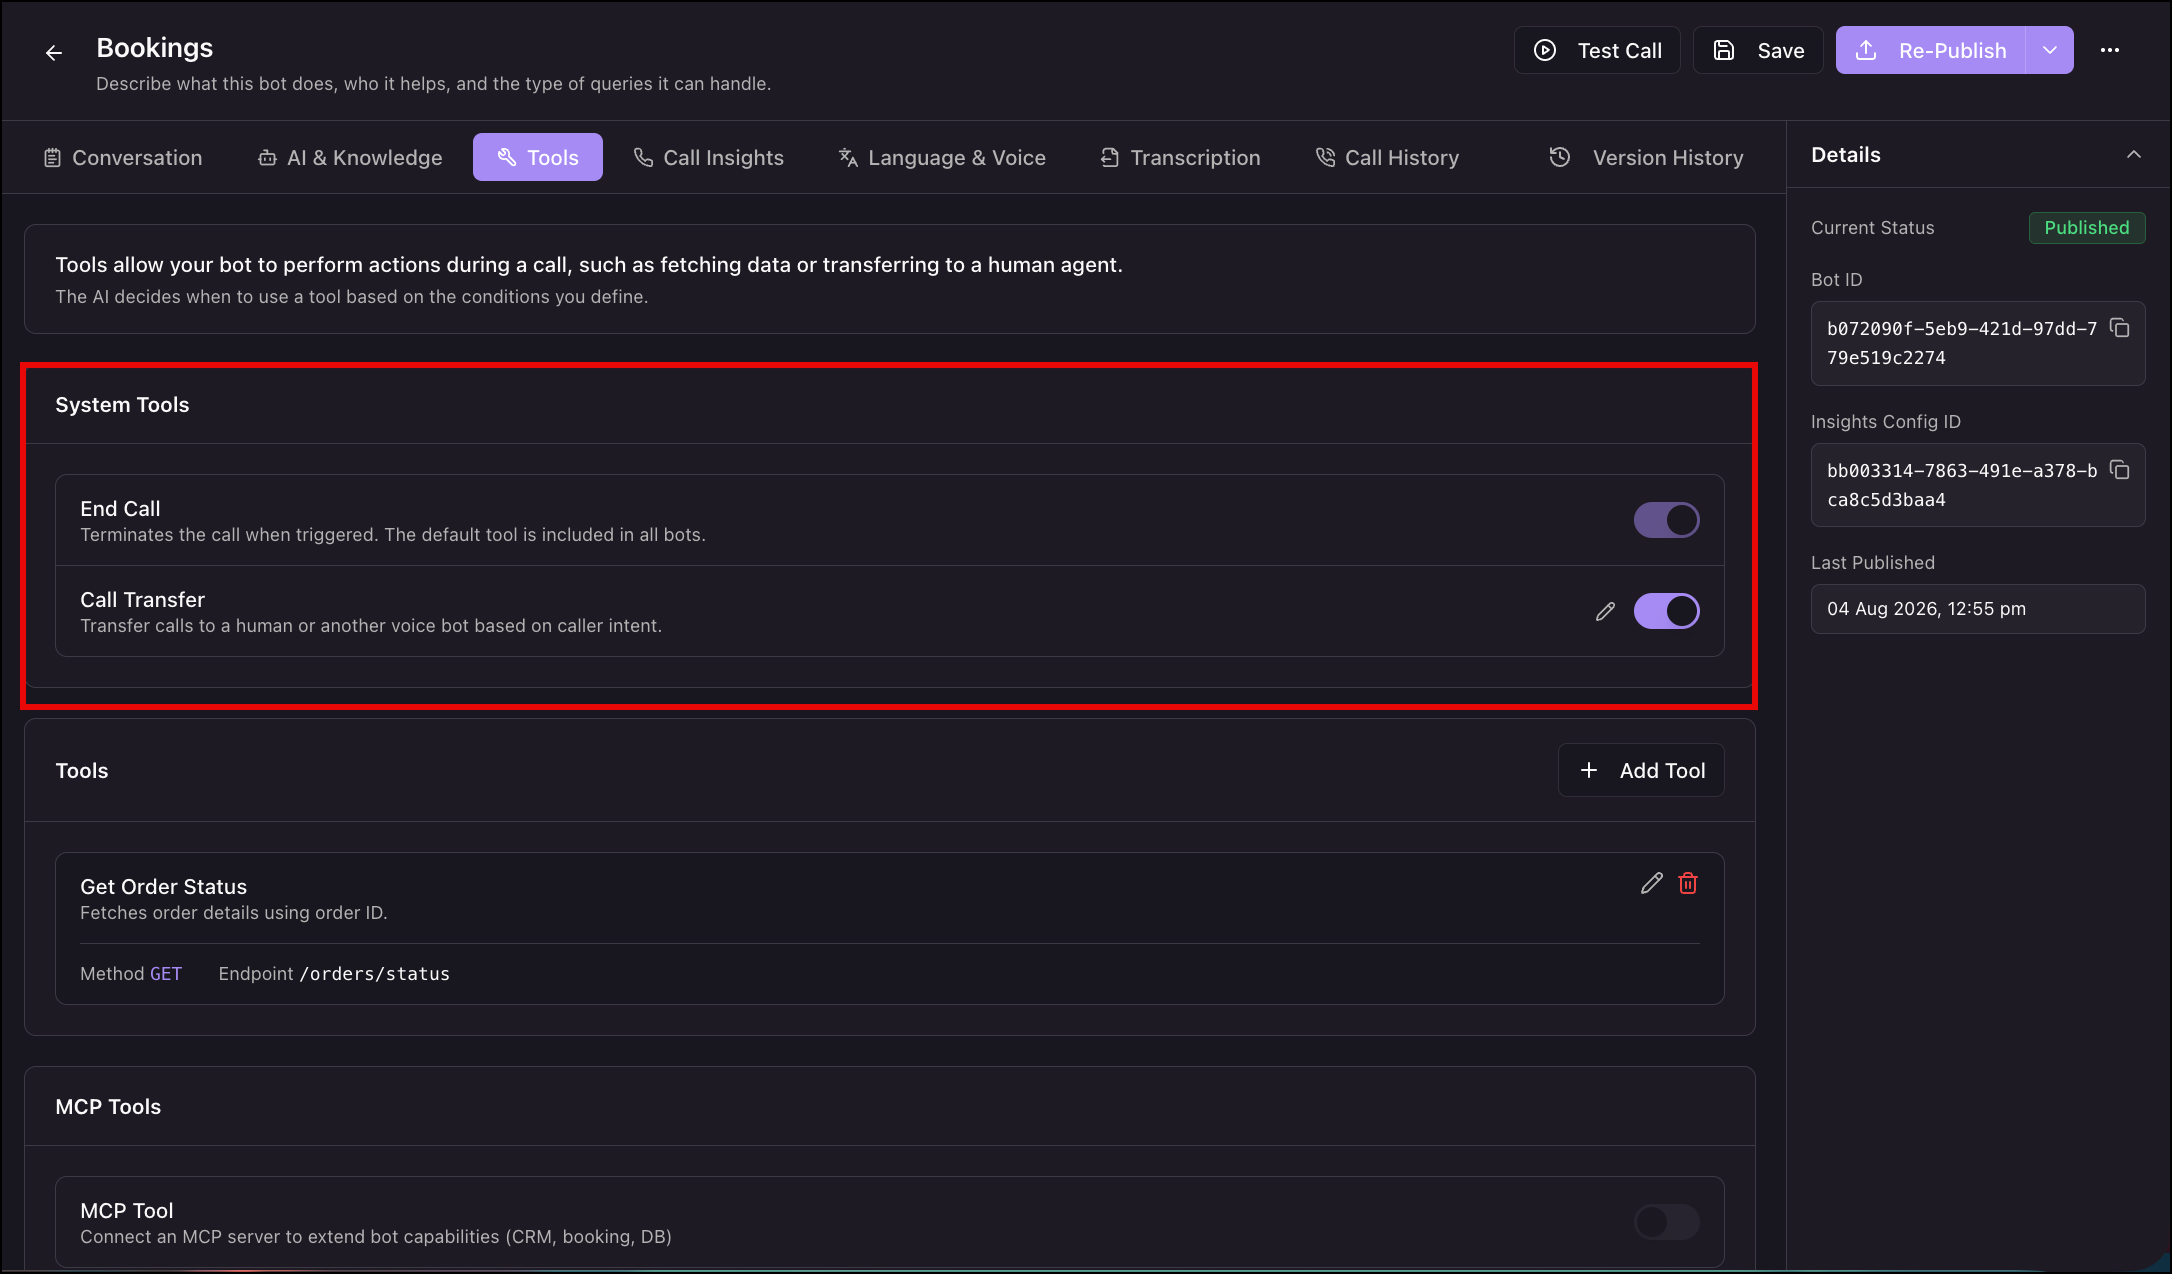
Every bot has a System Tools section on its Tools tab. These are built in, so there is nothing to create first.
| System tool | What it does | Default |
| End Call | Terminates the call when triggered. Included in all bots. | On |
| Call Transfer | Transfers the call to a human agent or another voice bot, based on caller intent. | Off |
To turn a system tool on or off, use the toggle on its row. Call Transfer also has an edit icon that opens its configuration.
7. Set Up Call Transfer
Call transfer moves a live call off the bot. Use it when the caller asks for a person, or when the conversation moves to a topic this bot was not built for.
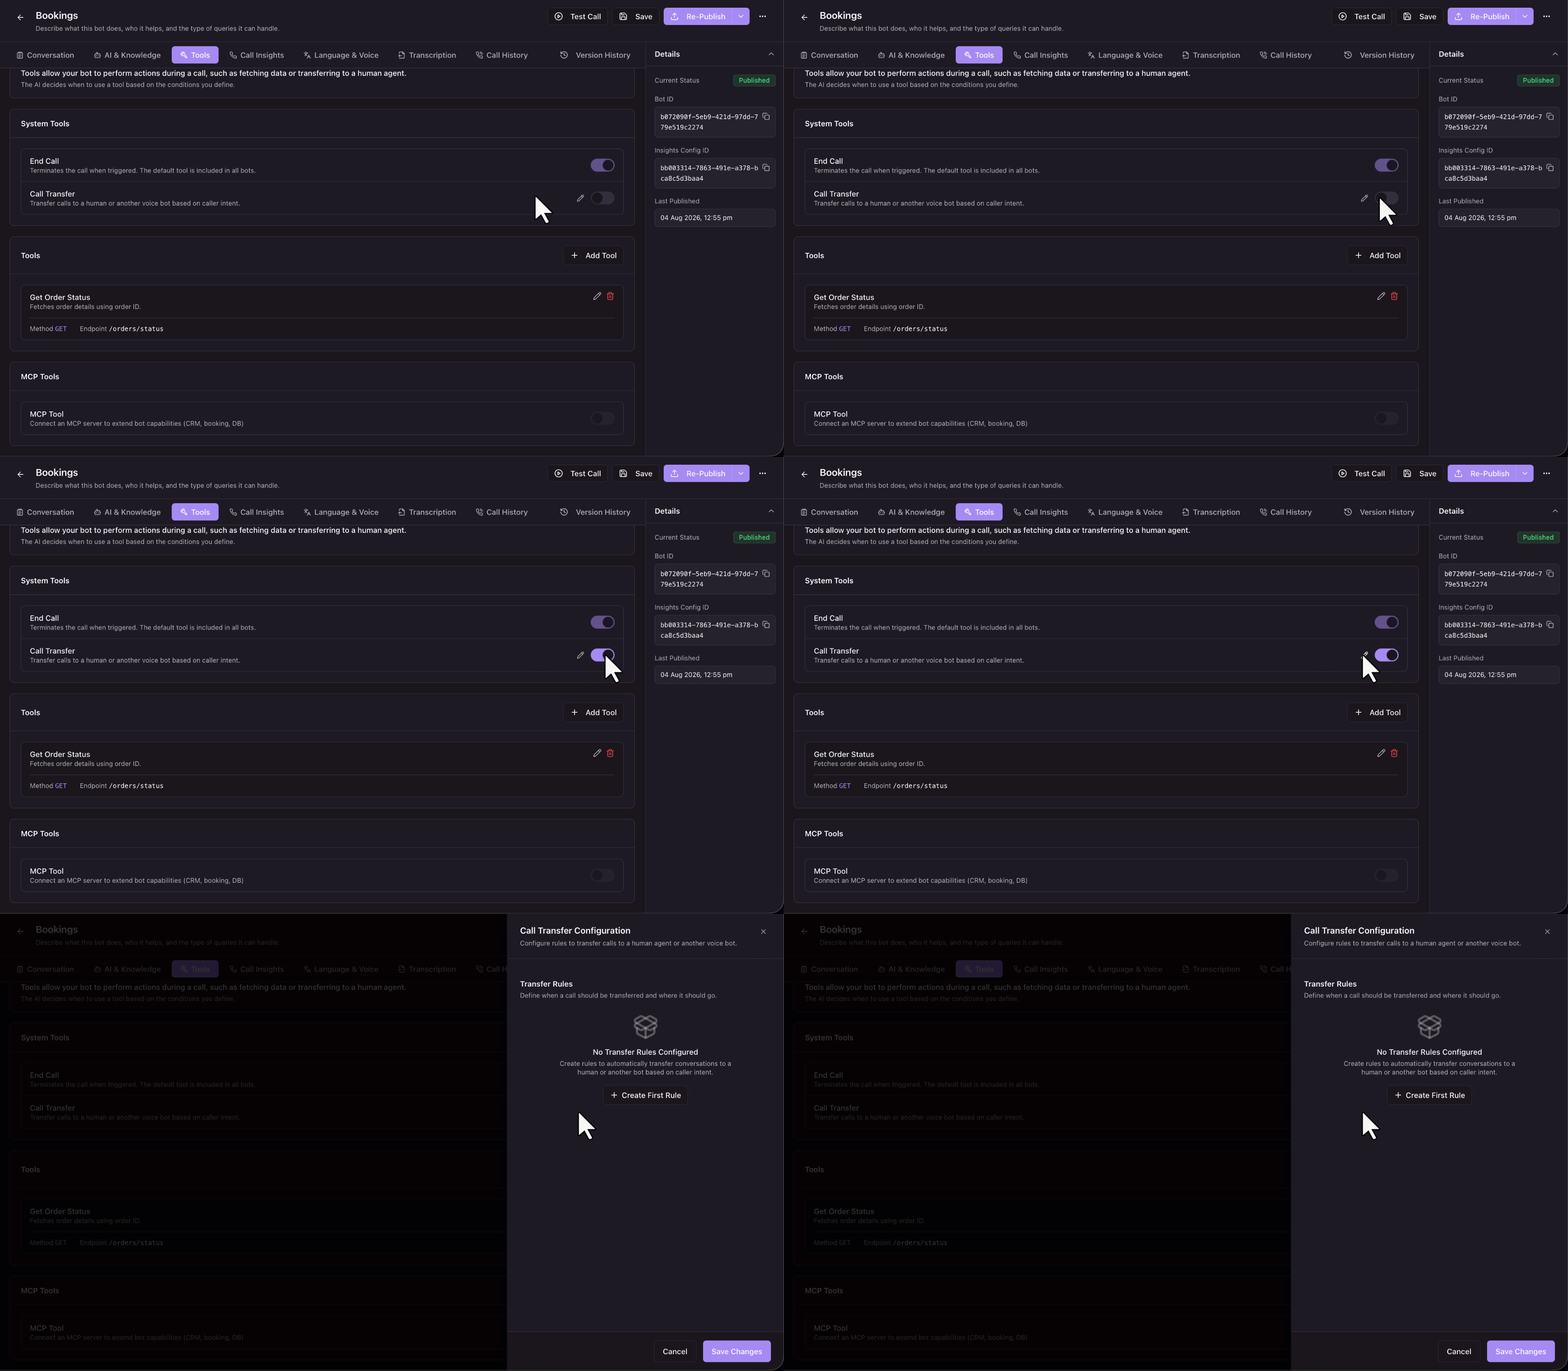
7.1 Turn On Call Transfer
- Open the bot and go to the Tools
- On the Call Transfer row, turn the toggle on.
- Click the edit icon to open the Call Transfer Configuration
The panel opens on the right and shows the Transfer Rules section.
7.2 Add a Transfer Rule
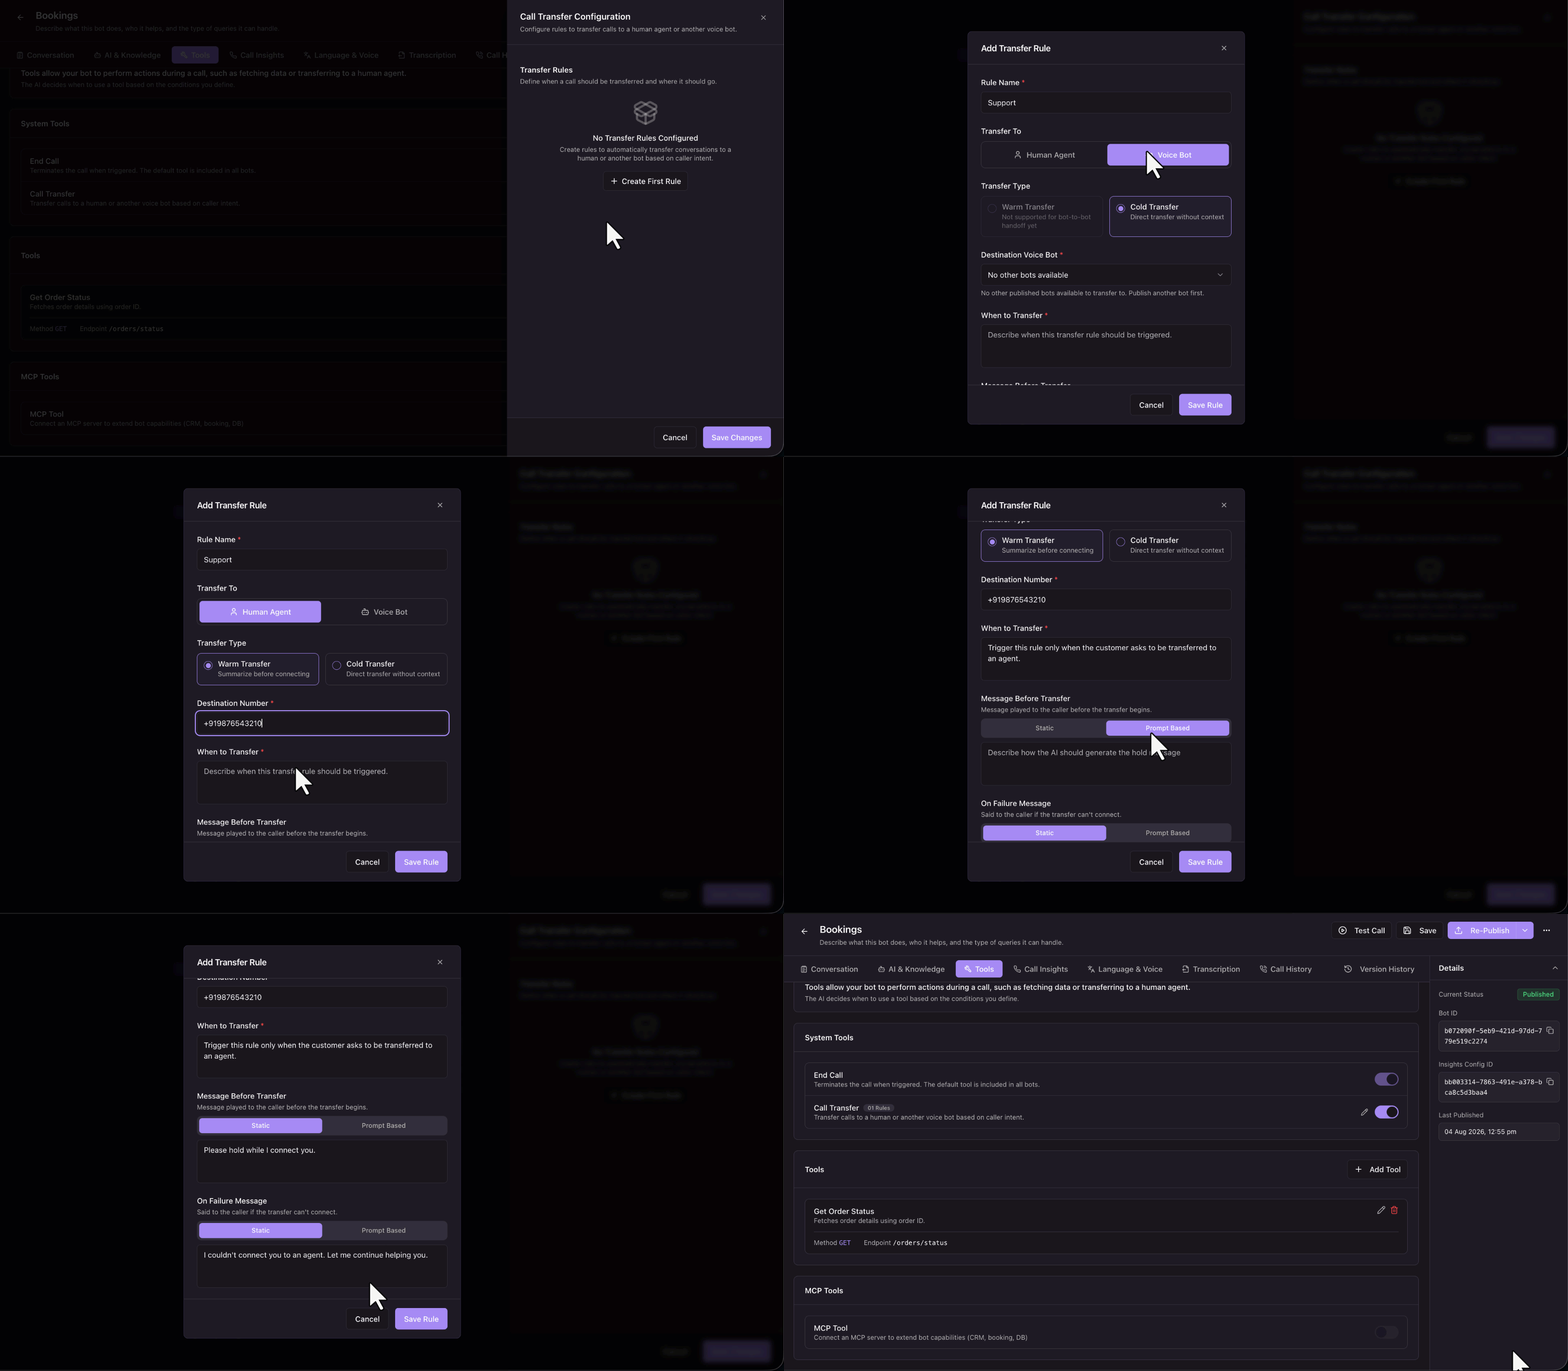
In the Call Transfer Configuration panel, click + Create First Rule. The Add Transfer Rule pop-up opens.
| Field | What to enter |
| Rule Name | A short label for the rule, such as Billing Support. |
| Transfer To | Human Agent, or Voice Bot for a handoff to another bot. |
| Transfer Type | Warm Transfer or Cold Transfer.
|
| Destination Number | The number to dial, in E.164 format with the country code, such as +14155550123. Shown only for Human Agent. |
| Destination Voice Bot | The bot that takes over the call. Shown only for Voice Bot. |
| When to Transfer | The conditions that should trigger the transfer, in your own words. |
| Message Before Transfer | What the caller hears before the transfer begins, such as “Please hold while I connect you.” |
| On Failure Message | What the caller hears if the transfer cannot connect, such as “I couldn’t connect you to an agent. Let me continue helping you.” |
Note:
- Message Before Transfer and On Failure Message each offer a Static and a Prompt Based option. Static plays the same line every time. Prompt Based lets the bot phrase it in context.
- Think about how hard the caller has to push before the bot gives way. If your rule says to transfer as soon as anyone asks for a person, the bot will transfer on the first ask. If you want the bot to try to resolve the issue first, say so in When to Transfer and describe how many attempts it should make.
- Warm Transfer is currently available for transfers to a human agent. When you set Transfer To to Voice Bot, The pp-up selects Cold Transfer and marks Warm Transfer as not yet supported for bot-to-bot handoff.
- A bot can have several transfer rules, and each one can point somewhere different. A common setup is one rule that sends billing questions to a human agent and another that sends product questions to a specialized bot. Add each rule the same way, and make sure the When to Transfer text for each one describes a distinct situation. Rules that overlap make the bot’s choice unpredictable.
Any Questions?
Did you find this article helpful? Please let us know any feedback you may have in the comments section below. We’d love to hear from you and help you out!