


Get Started
Sales Suite
Field Ops
Marketing
Service CRM
Integrations & Apps
FloStack
Add Leads to Zoom Webinars from LeadSquared
1. Feature Overview
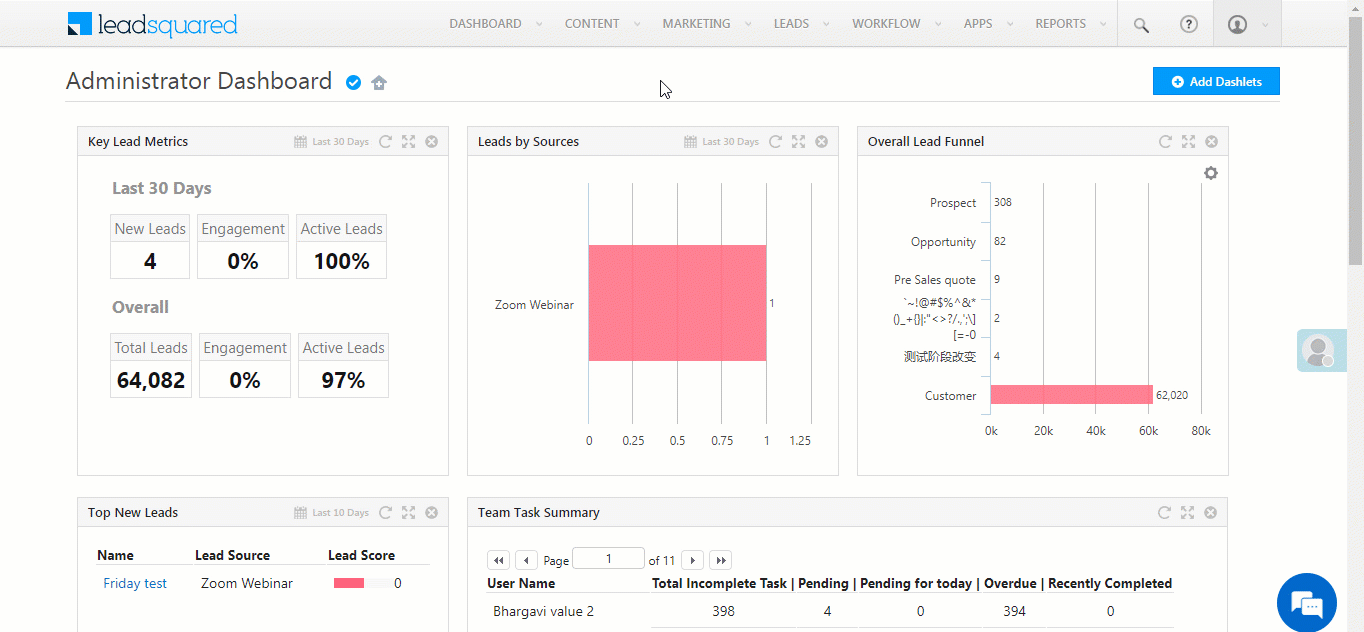
In addition to the ability to create Zoom meetings from LeadSquared, the LeadSquared Zoom Meeting Connector also has a webinars feature. This enables you to host webinars, classes and sessions, depending on your business requirements. You can add up to 50,000 participants in a single webinar (depending on your Zoom webinar license), directly from your LeadSquared account.
- Set-up the webinar and send invites to all the participants from your LeadSquared account.
- Collect details of all the participants from the webinar.
- Manage your Zoom webinars through LeadSquared tasks.
For setting up Zoom meetings between your leads and users, please refer to LeadSquared Zoom Connector.
2. Prerequisites
- You must have an active Zoom account, along with the Zoom Webinar license. To obtain it, please get in touch with your Zoom account manager.
- Call recording on Zoom is a paid feature. You can record calls through LeadSquared only if this feature is enabled on Zoom. To enable it, please get in touch with your account representative from Zoom.
3. How it Works
The steps that need to be followed while using the Webinars feature are mostly similar to the steps you follow while using the Zoom Meeting feature. Once set up, you can add leads to Zoom webinars directly from your LeadSquared account, either manually or through automation.
- Install the connector – You’ll have to begin by first installing the Zoom Meetings Connector on your account.
- Configure the connector on Zoom and LeadSquared – Post installation, you’ll have to integrate the connector with your Zoom account.
- Create webinars – From your Zoom account, create webinars for your leads to join.
- Add Leads – Once a webinar is created, you can then add leads to that webinar from your LeadSquared account. You can choose to add individual leads, multiple leads and/or leads in a list to a webinar.
- View Activities – Once a lead registers and joins a webinar, you’ll be able to view this as an activity, along with details of the webinar, on the Lead Details page.
4. Installation
Install the Zoom Meeting Connector from the LeadSquared App Marketplace.
- On the main menu, navigate to Apps>Apps Marketplace.
- Search for Zoom Meeting Connector.
- Click Install.
5. Configuration
To integrate Zoom with LeadSquared, you must obtain the Zoom API Key, API Secret Key and Event Verification Code, and use these keys to enable the Zoom Connector in LeadSquared. To activate the Zoom connector –
- Obtain your Zoom API Key and Zoom API Secret Key
- Obtain your Zoom Event Subscription Code and Secret Token
- Authenticate your Zoom Connector in LeadSquared
- Set Up the Zoom Connector in LeadSquared
- Map Fields in the Zoom Connector in LeadSquared
- Configure Default Admin Settings in LeadSquared
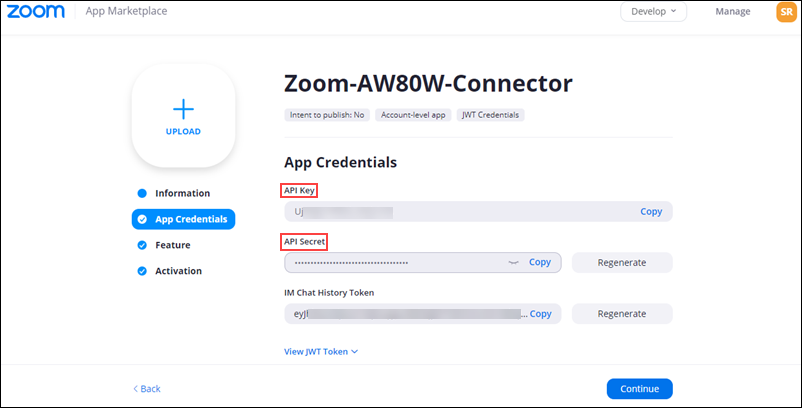
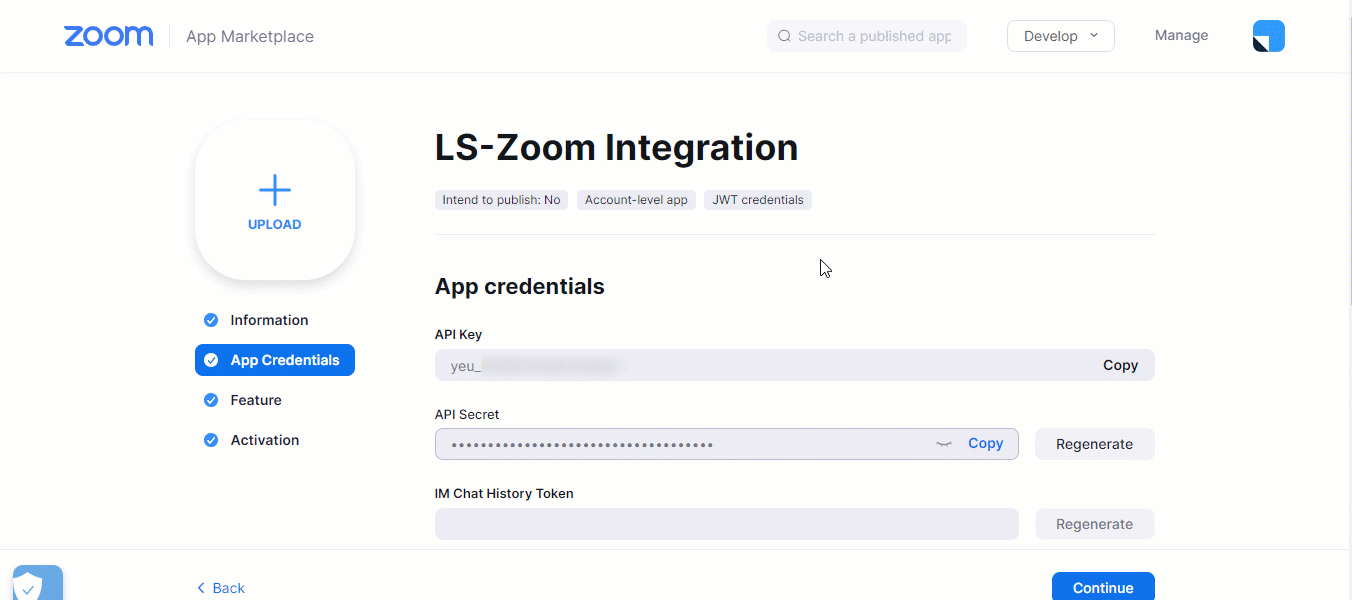
5.1 Obtain your Zoom API Key and Zoom API Secret Key
You can skip this section if you have already configured your Zoom account and generated the necessary keys. If you haven’t obtained these keys, you’ll have to build and configure a Zoom JWT app to generate them. To know more, refer to Create a JWT App.
- Navigate to the Zoom Apps Marketplace.
- Under JWT, click Create.
- In the Information tab, fill in all the required fields.
- Under the App Credentials tab, you’ll find the API Key and API Secret.
- Under the Feature tab, you’ll find the Secret Token and Verification Token.
5.2 Authenticate Zoom Connector in LeadSquared
- Once you’ve obtained the following keys, copy them and continue the configuration process on LeadSquared –
- API Key
- API Secret
- Secret Token*
- Verification Token
- Under the Authentication tab, enter the above keys alongside the corresponding values.
- Once these keys are added, click Next, and continue to Set Up your Zoom Connector.
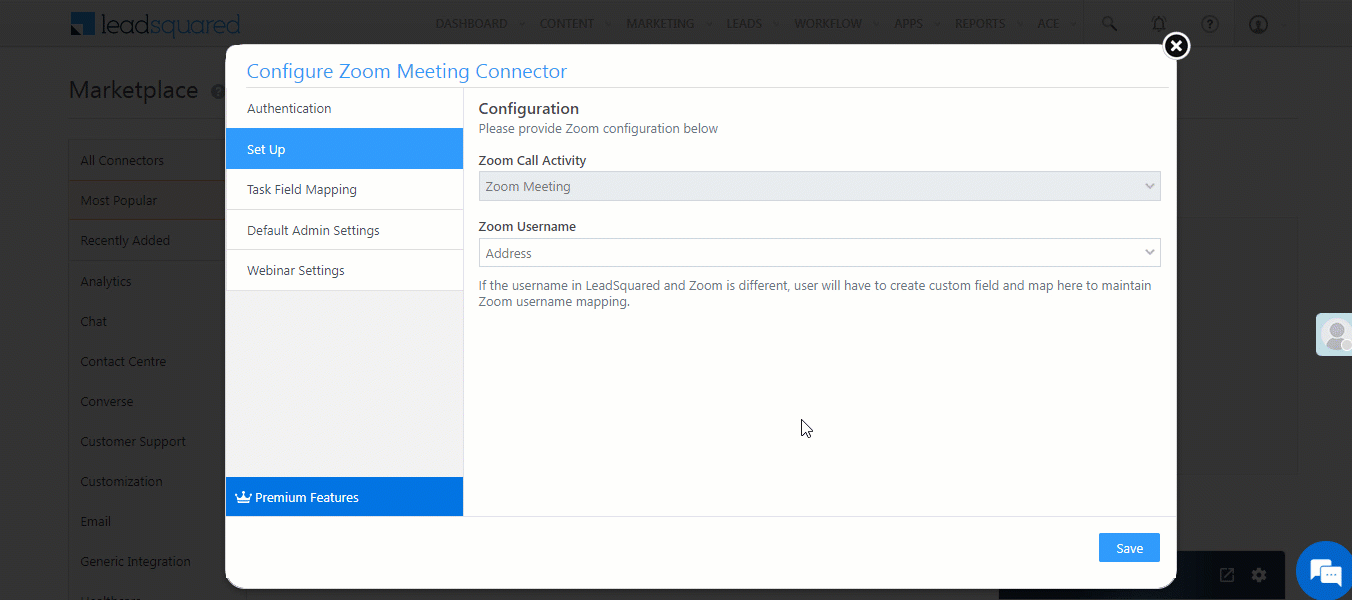
5.3 Set Up your Zoom Connector in LeadSquared
- The Zoom Call Activity is set to Zoom Meeting by default. This is a custom activity created by LeadSquared for Zoom calls, and it cannot be edited.
- For Zoom Username, if you have used the same email Id in your LeadSquared and Zoom account, you can choose Email Address as your option.
- Click Save.
- If you’re completing the Set up after 23rd October, 2022, then navigate back to the Authentication tab, and copy the Event Webhook URL.
5.4 Generate your Zoom Event Subscription Code
In this step, you must configure the LeadSquared Event Webhook URL in your Zoom JWT app. This ensures Zoom posts data to LeadSquared for the event types you subscribe to. You can find this code under the Feature tab.
Event Subscription are the actions that are automated once an event has taken place. Examples of events are user creation or call recordings that have been completed*. The URL for these events get stored as an Activity on LeadSquared. To enable Event Subscription on Zoom –
- From your LeadSquared account, on the LeadSquared Zoom Configuration page, under the Authentication tab, copy the LeadSquared Event Webhook URL.
- Navigate to your Zoom account. Under the Feature tab, alongside Event Subscription, toggle the
 slider.
 - Click the Add New Event Subscription button, and give a relevant name for the entry.
- On the Zoom Event Subscription page, under Event notification endpoint URL, paste the Event Webhook URL.
- If you’re adding a new event after the 23rd October, 2022, it is mandatory for you to Validate* the webhook URL. Once the validation is successful, complete the remaining steps.
- Under Event Types, click on Add Events. The following events are supported in LeadSquared-
- Participant/Host joined webinar
- Participant/Host left webinar
- Webinar registration has been created
- Webinar registration has been cancelled
- Webinar registration has been approved
- Webinar registration has been denied
- Once you’ve selected the Event types, click Done.
- Click Save, and then click Continue. Your Event Verification Code is generated. Once you’ve completed the above steps, your Zoom JWT app is active.
Note:
- *Before you Validate the webhook URL, ensure the connector Set Up is Saved in LeadSquared. The validation will fail if the set up is not saved.
- If an event was created before 23rd October, 2022, and if you’re looking to edit the event after the said date, it’s recommended you create a new event, and delete the existing event (instead of editing it). Editing this event may result in you not receiving Zoom meeting updates.

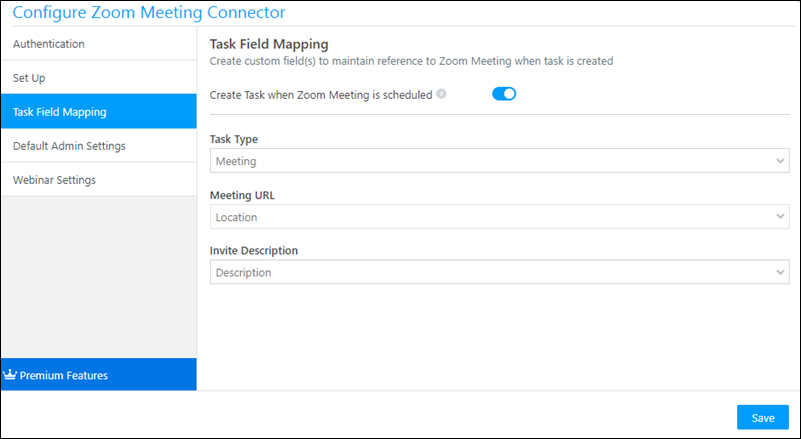
5.5 Map Fields in your Zoom Connector in LeadSquared
You can automate task creations in LeadSquared for every Zoom meeting you schedule. In this section, you can map the meeting details to the corresponding task fields in LeadSquared. Once this is done, you can view these tasks and details on the Lead Details and Manage Tasks page, and track them to completion.
- Ensure the
 slider at the top of the page is active.
 - Under Task Type, select the desired task type (we recommend Meeting). This ensures that when you schedule a Zoom meeting, a Meeting task type is created in LeadSquared.
- Under Meeting URL, select Location. Every time you schedule a meeting, your meeting URL gets published directly to LeadSquared.
- Under Invite Description, select Description. This ensures your meeting description gets published to LeadSquared.
- Click Next.
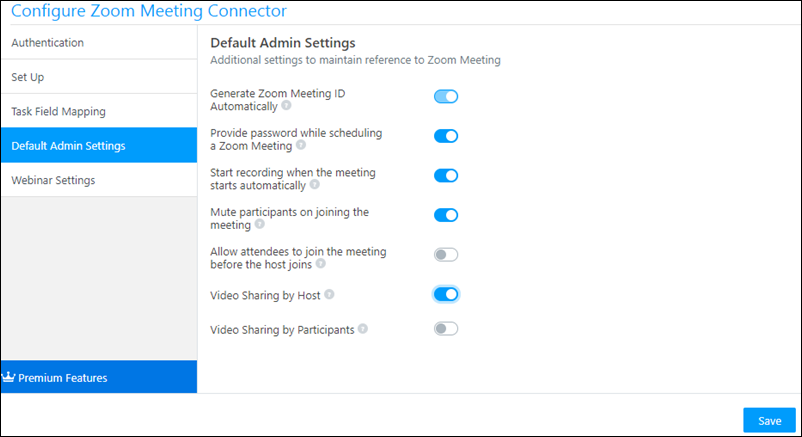
5.6 Configure Default Admin Settings in LeadSquared
These are additional settings that are available to you.
- “Generate Zoom Meeting ID Automatically” is enabled by default, and you can’t disable it.
- Enable “Start recording…” to ensure that all your calls get recorded. The other options can be turned on or off, depending on your requirement.
- Once you’re done, click Save.
- You’ll get a “Configurations Saved” notification on top of your screen.
5.7 Webinar Settings
You must have a webinar licence from Zoom to enable these settings on your account. To enable it, toggle the ![]() slider.
slider.
- Webinar Webhook URL – The LeadSquared webinar webhook URL that you must enter on the Zoom Event Subscription page.
- Maximum Audience Size – The maximum number of participants in a webinar. The limit is determined by your Zoom webinar license subscription plan.
- Select Custom Users for List – You can restrict the number of LeadSquared users who can access the webinar feature. To do this, toggle the
 slider, and from the Select Users dropdown list, select the users for whom you want to restrict access to.
 - Create new lead when registration is complete – To create a new lead in LeadSquared when a participant registers for the webinar, toggle the slider. When leads are captured from your Zoom Webinar registrations, we’ll capture leads with the following webinar registration fields
| LeadSquared Lead Field Schema Name | Zoom Webinar Registration Field Name |
| FirstName | first_name |
| LastName | last_name |
| EmailAddress | |
| mx_City | city |
| mx_Street1 | address |
| mx_Country | country |
| mx_Zip | zip |
| mx_State | state |
| Phone | phone |
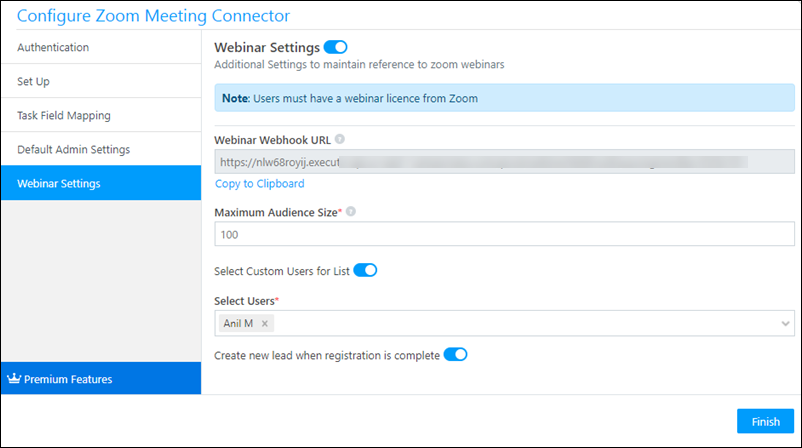
Once you’re done, click Finish. You’ll get a “Configurations Saved” notification on top of your screen.
6. Create Webinars
You can only create a Zoom Webinar from your Zoom account. To know how to create a webinar, please refer to Getting started with Zoom webinar. Once a webinar is created in your Zoom account (that’s linked to your LeadSquared account) you can add leads to that webinar directly from LeadSquared.
7. Add Leads to a Webinar
7.1 Individual Leads
To add an individual lead to your Zoom webinar –
- From the LeadSquared main menu, navigate to Leads>Manage Leads.
- On the Manage Leads page, against a lead, hover your cursor over the
 icon. From the dropdown list, click Online Meeting, and then click Add to Zoom Webinar.
 - On the Zoom Webinar pop-up, from the Select Webinar dropdown, select the webinar you want to add the lead to.
- From the Webinar Occurrences dropdown, select the date and time on which you want to schedule the webinar. This field is available only for recurring webinars.
- You’ll find other details of the webinar, such as webinar URL, ID, timezone, etc.
- Once you’re done, click Add to Zoom Webinar. Your lead will get an invite for the webinar.

7.2 Multiple Leads
To add multiple leads to your Zoom webinar –
- From the LeadSquared main menu, navigate to Leads>Manage Leads.
- On the Manage Leads page, select the leads you want to add to the webinar by checking the
 box against their names.
 - After selecting the leads, hover your cursor over the
 button.
 - From the dropdown list, click Online Meeting, and then click Add to Zoom Webinar.
- On the Zoom Webinar pop-up, from the Select Webinar dropdown, select the webinar you want to add the leads to.
- From the Webinar Occurrences dropdown, select the date and time on which you want to schedule the webinar. This field is available only for recurring webinars.
- You’ll find other details of the webinar, such as webinar URL, ID, timezone, etc.
- Once you’re done, click Add to Zoom Webinar. Your leads will get an invite for the webinar.

7.3 Leads in a List
To add leads in a list to your Zoom webinar –
- From the LeadSquared main menu, navigate to Leads>Manage Lists.
- On the Manage Lists page, against an existing list, hover your cursor over the icon. From the dropdown list, click Online Meeting, and then click Add to Zoom Webinar.
- On the Zoom Webinar pop-up, from the Select Webinar dropdown, select the webinar to which you want to add the leads in the list.
- From the Webinar Occurrences dropdown, select the date and time on which you want to schedule the webinar. This field is available only for recurring webinars.
- You’ll find other details of the webinar, such as webinar URL, ID, timezone, etc.
- Once you’re done, click Add to Zoom Webinar. The leads in your list will get an invite for the webinar.
8. Webinar Activities
Activities are posted –
- When a lead registers for a webinar.
- When a lead joins/leaves a webinar.
You can filter leads based on these activities (for example, leads that attended a webinar, leads that left a webinar, etc.) and set up tasks, follow-ups and automations based on your business flow.
To view these activities, on the Lead Details page –
- From the main menu, navigate to Leads>Manage Leads, and click on the lead who’s been added to the Zoom webinar.
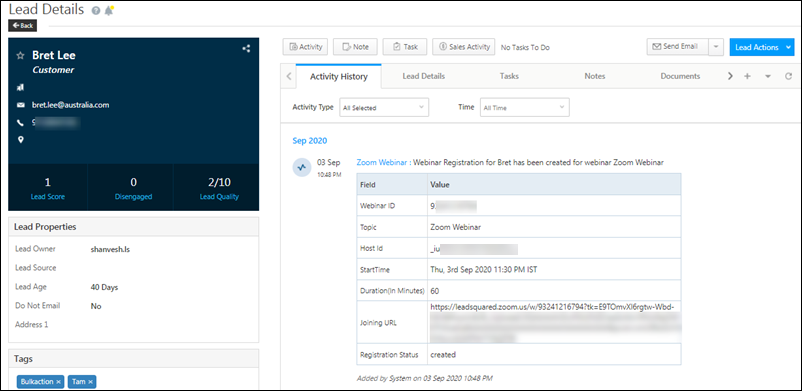
- On the Lead Details page, under Activity History, you’ll see Zoom Webinar activities.
- Once you click on Zoom Webinar, you’ll be able to view the webinar details such as Webinar ID, Joining URL, etc.
9. Zoom Webinar Automations
- Automatically register leads to recurring webinars (such as daily online classes, training sessions, offline interest, etc.), based on certain triggers or activities on leads (such as form submission, stage change, etc.).
- Register leads to webinars (both recurring and non-recurring ones) on form submissions from LeadSquared landing pages and portals.
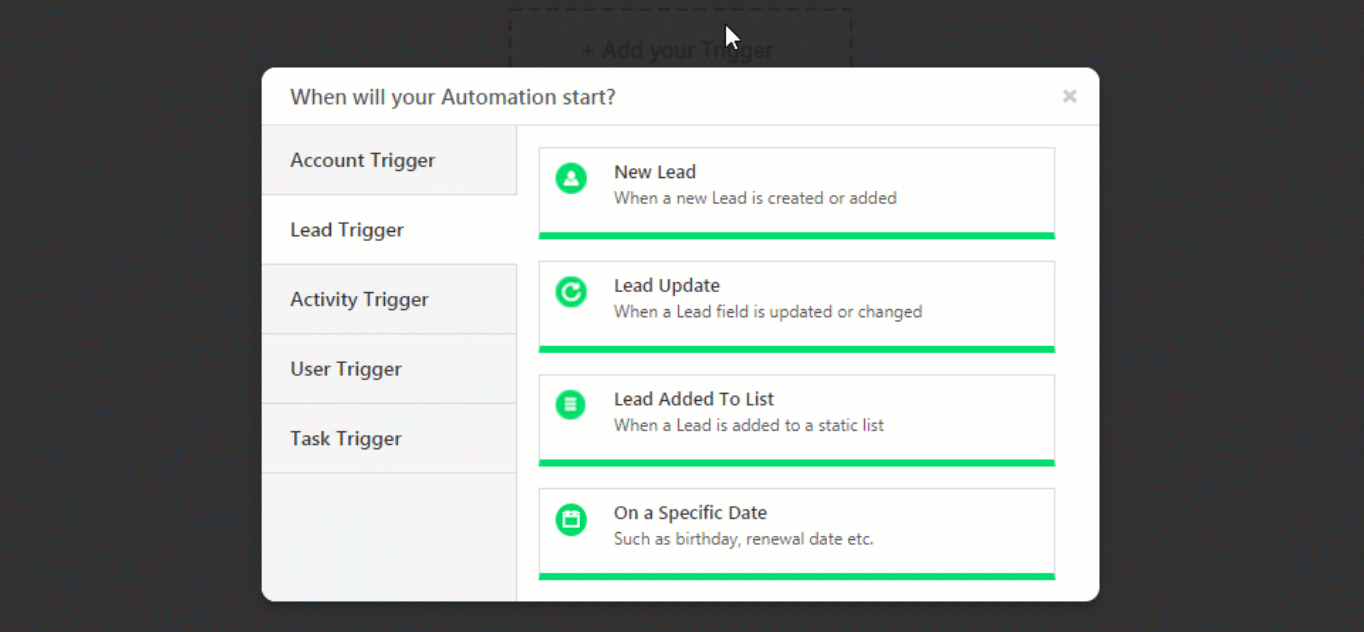
- From the main menu, navigate to Worklow>Automation.
- On the automation page, you can either edit an existing automation, or to create a new automation, click on Create Automation.
- After creating a trigger, click the
 icon, then click Online Meeting, and then click Zoom Webinar.
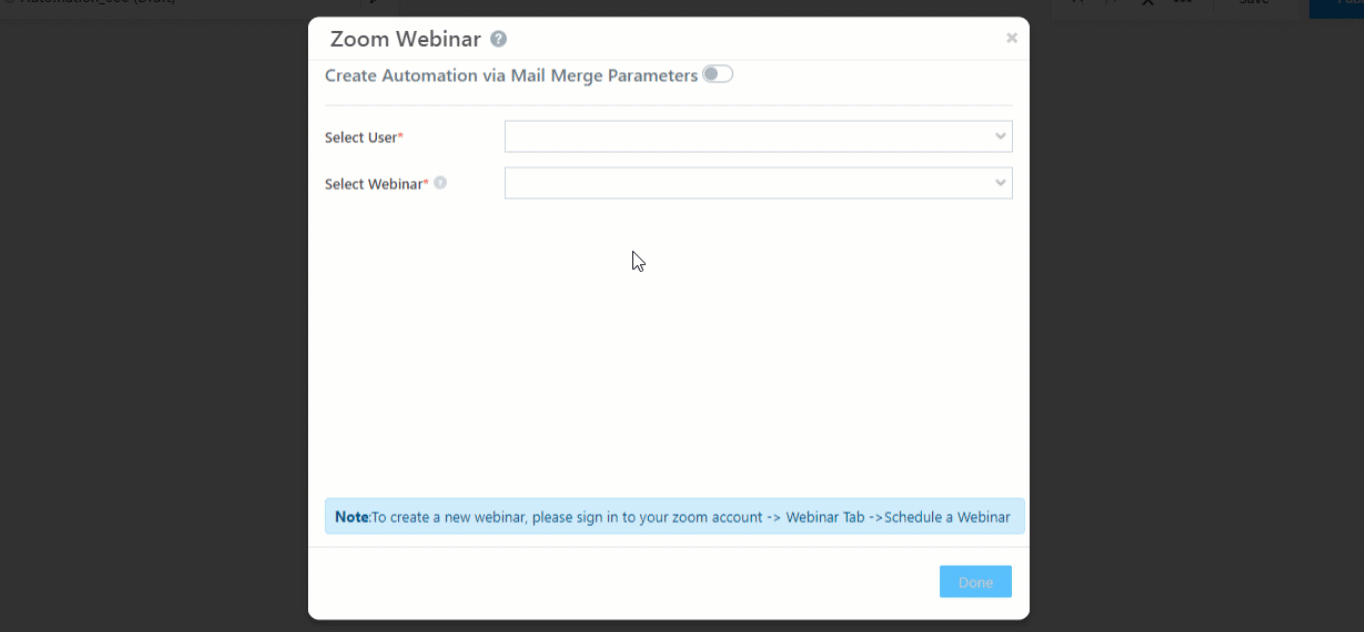
 - On the Zoom Webinar pop-up, from the Select User dropdown, select the user. This will show the list of webinars that user has created.
- From the Select Webinar dropdown, select the webinar you want to add the leads to. These are the webinars created by the user you selected in the previous step.
- If it is a recurring webinar, then select the Webinar Occurrences from the dropdown.
- Click Done, and add other actions and/or conditions if required.
- Click Publish once you’re done.
Alternatively, you can choose to use the mail merge parameters in your automation, to directly add leads to a webinar. This is helpful if your leads are signing up for webinars from your online forms (via portals, forms, webinar landing pages, etc.). The mail merge feature will allow you to automatically capture the webinar details (such as Webinar ID, etc.) to the lead or to an activity in your LeadSquared account.
You’ll have to begin by creating a custom field (see How to Create a Custom Lead Field), listed either under an activity or a lead, to map the webinar Id to the lead. You can call this custom field “Webinar ID”, and your webinar Id will be mapped to this field. Once the lead or activity trigger on which you’re creating the automation is satisfied, the lead will get added to the webinar automatically. This will also ensure that the Zoom Webinar activity is posted on the lead.
To create the webinar automation using mail merge parameters –
- On the Zoom Webinar pop-up, toggle the slider.
- For an existing lead who signs up for a webinar from an online form, then the form submission activity will get created inside LeadSquared, along with webinar details selected by the lead. Select the Activity trigger, and then select the “Webinar ID” parameter.
As an example, let us look at a recurring online class that’s being conducted. A custom activity field called Webinar ID must be created in LeadSquared. Once a student signs up for the webinar, the webinar ID will be mapped to the custom field (in this case, “Webinar ID”) that’s created as an activity field. This will in turn add the student to the online class (and all subsequent classes under the same Webinar ID). The “Zoom Webinar” activity will then get posted on the student’s Lead Details page. - If a new lead is created (from a landing page, portal, etc.), and signs-up for a webinar, the webinar details will be part of the lead’s data. In this instance, select the Lead trigger.
As an example, let us look at a product demo that’s being scheduled online. A custom lead field called Webinar ID must be created in LeadSquared. Once a lead signs up for a demo, the Webinar ID will be mapped to the custom field (in this case, “Webinar ID”) that’s created as a lead field. This will in turn add the lead to the webinar that’s scheduled. The “Zoom Webinar” activity will then get posted on the Lead Details page.
- For an existing lead who signs up for a webinar from an online form, then the form submission activity will get created inside LeadSquared, along with webinar details selected by the lead. Select the Activity trigger, and then select the “Webinar ID” parameter.
- Once you’re done, click Done.
- Click Publish.
Troubleshooting
My Zoom Webinar Automation Card is Failing.
- Issue: Error in the Zoom Webinar Card of the Automation – “Error in Action Trigger”.
- Root Cause: This error usually occurs when the Zoom account or Zoom Webinar account is disconnected at the connector level.
- Resolution: Navigate to the connector settings and reconnect to your Zoom Webinar account.

Any Questions?
Did you find this article helpful? Please let us know any feedback you may have in the comments section below. We’d love to hear from you and help you out!