


Get Started
Sales Suite
Field Ops
Marketing
Service CRM
Integrations & Apps
FloStack
LeadSquared WhatsApp Integration with WhatsApp Cloud API
1. Feature Overview
The WhatsApp Cloud API (hosted by Meta) enables you to send and receive WhatsApp messages without the cost of hosting your own servers. If you’re using WhatsApp Cloud API, this article will help you integrate with LeadSquared to avail WhatsApp messaging functionality right within the platform.
We also support WhatsApp integrations through other service providers like Infobip, Zoko, Kaleyra, Wati, and Gupshup.
2. Prerequisites
If you’re not familiar with LeadSquared’s WhatsApp integration, see WhatsApp Business Messaging Connector. For frequently asked questions, see WhatsApp Business FAQs.
- Get an approved WhatsApp Business Number and Account.
- To enable the WhatsApp Cloud API integration on your account, contact your account manager, or write to support@leadsquared.com.
- Submit Message Templates for Approval. To know how to do this, refer to Add WhatsApp Templates to LeadSquared.
3. Installation
For installation, refer to WhatsApp Business Messaging Connector.
4. Configuration
Once the connector is installed, add and configure your WhatsApp phone numbers to the connector.
4.1 Basic Details
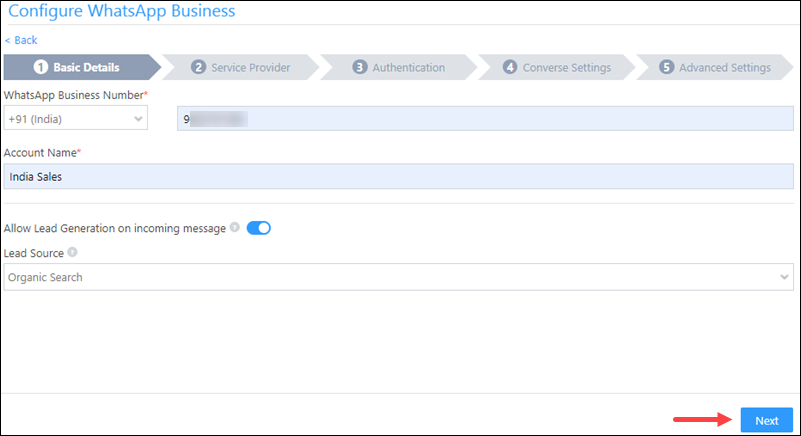
| Field | Description |
| WhatsApp Business Number | Select the country code, and provide your WhatsApp business number. This field is mandatory. To get your WhatsApp business number, contact your Meta account representative or support team. |
| Account Name | Provide a relevant name for your connector. This field is mandatory. |
| Allow Lead Generation on incoming message | Enable |
| Lead Source | From the dropdown, select a lead source for your leads. |
Once you’re done, click Next.
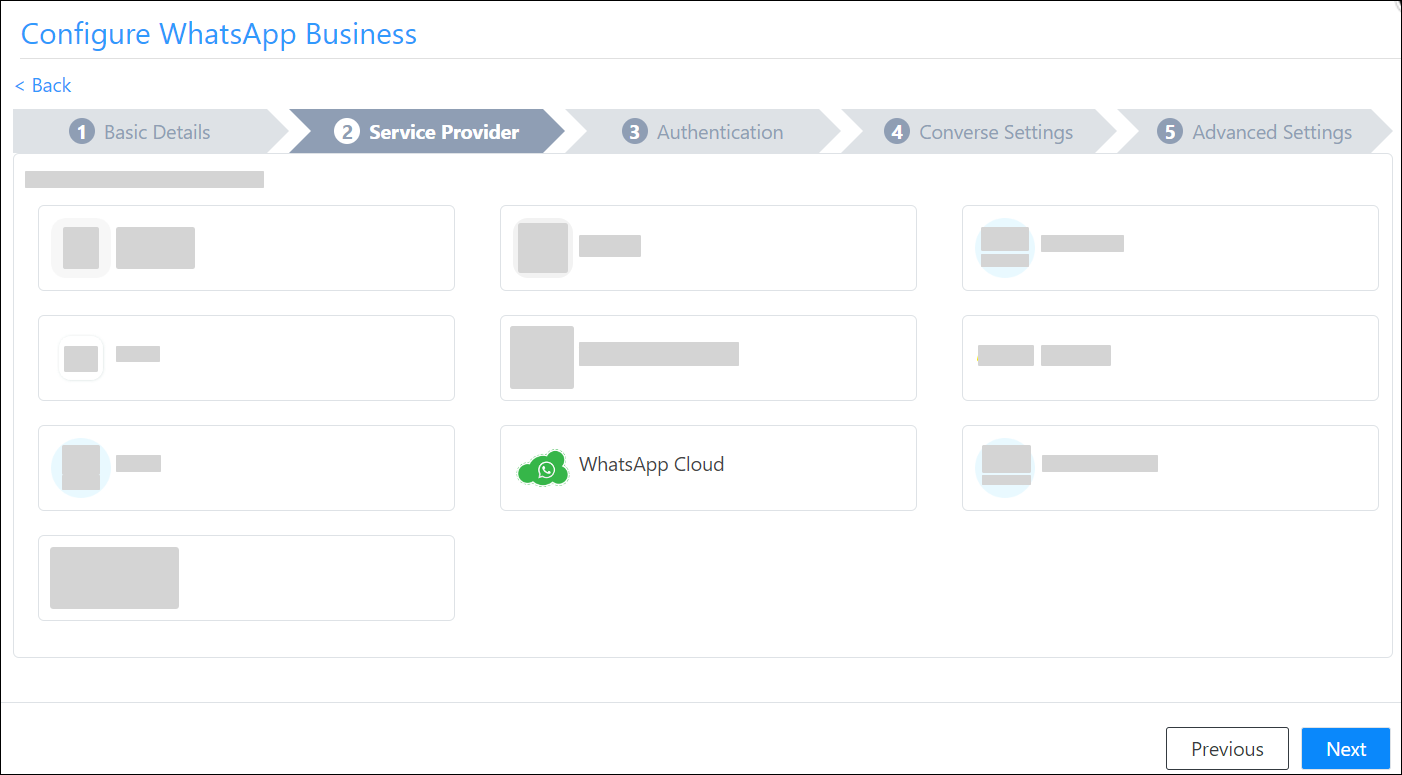
4.2 Service Provider
From the available options, select WhatsApp Cloud and click Next.
4.3 Authentication Set-up
On this screen, enter –
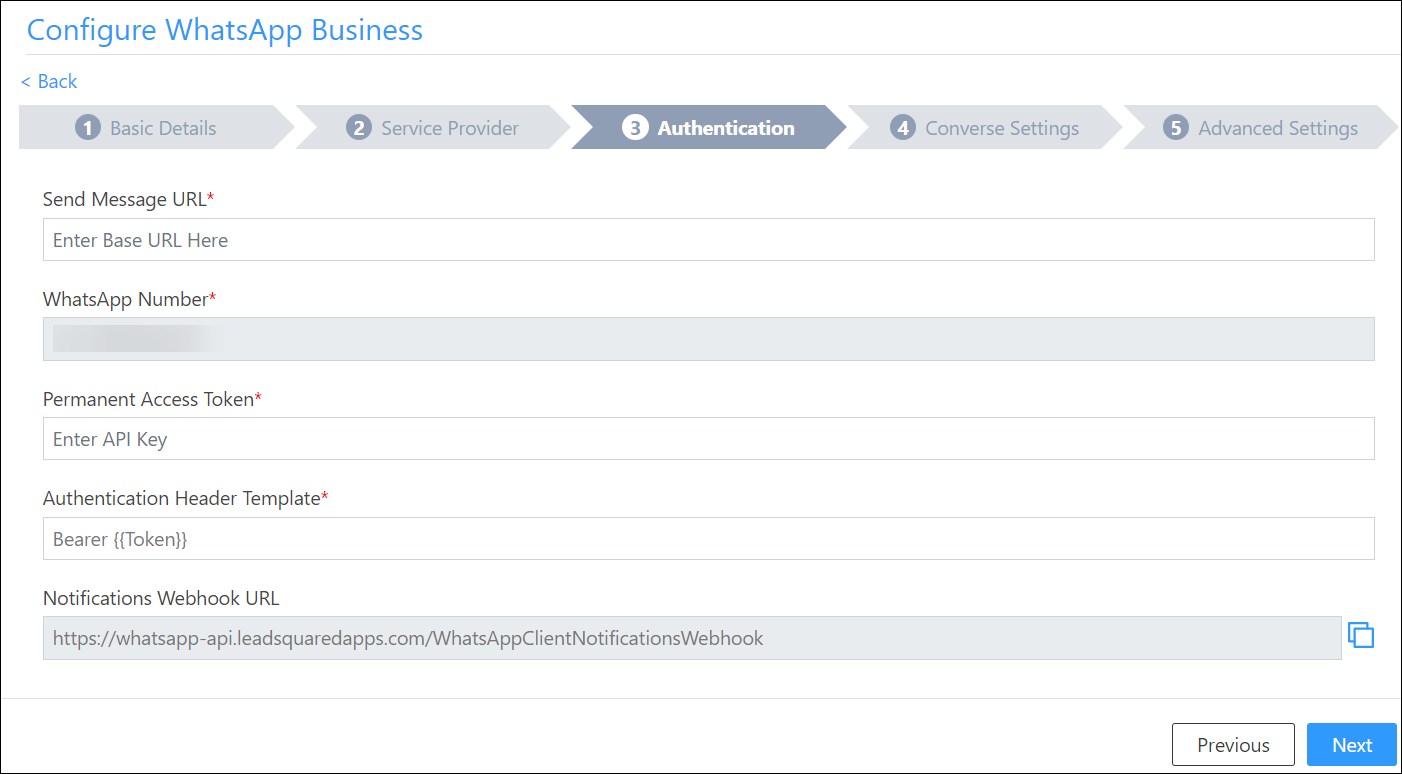
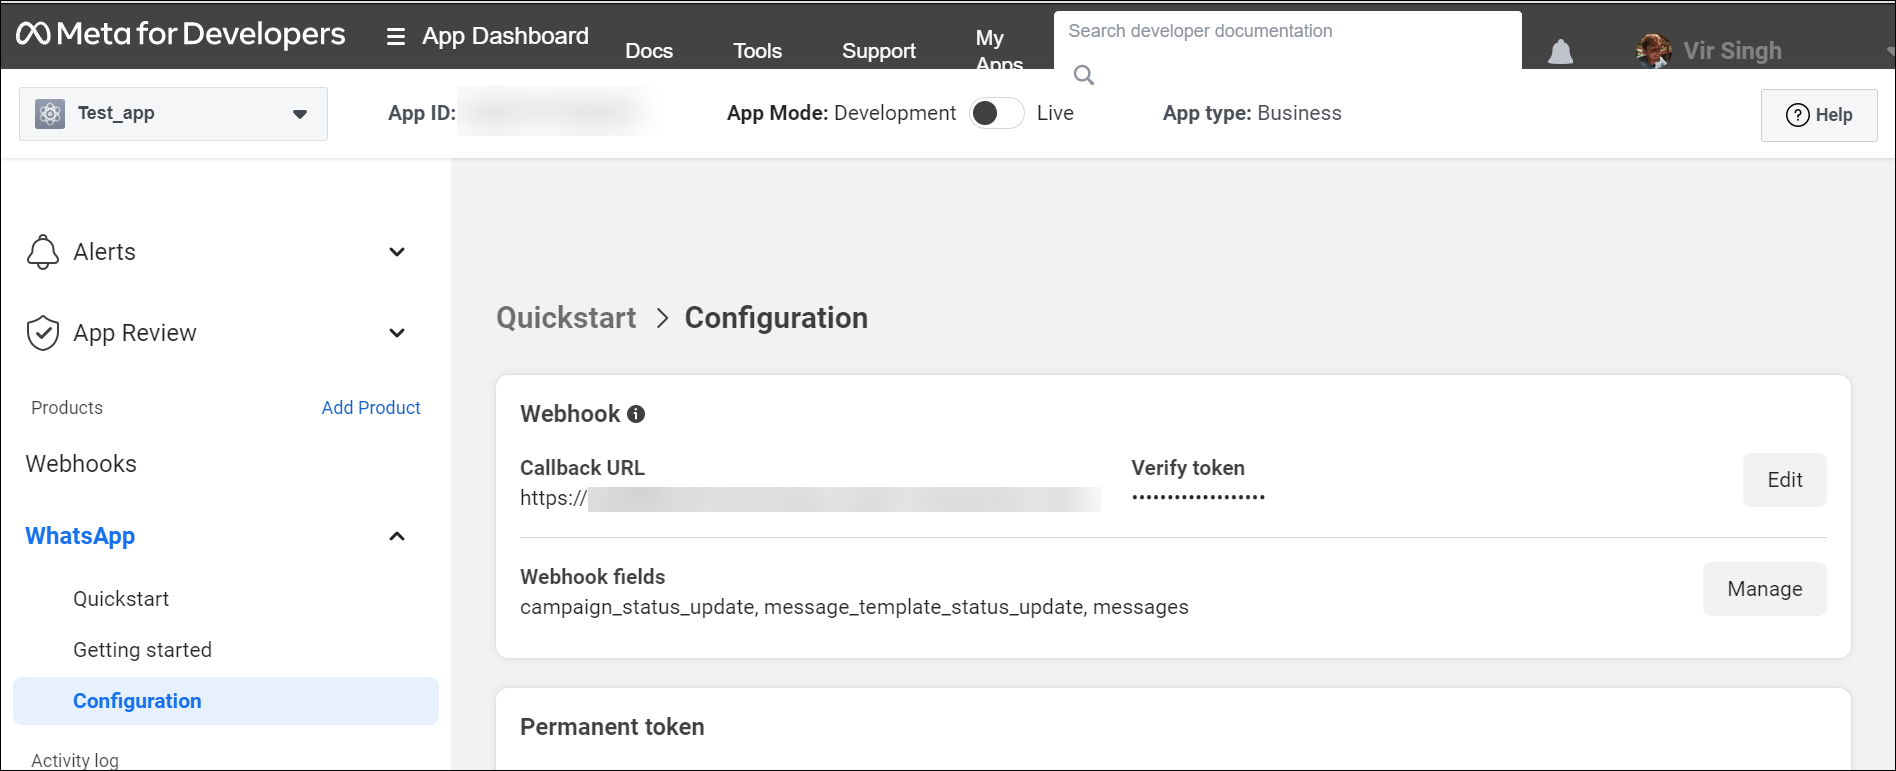
Send Message URL – This URL is available in your Meta Developer Dashboard, under the App where you’ve configured WhatsApp Cloud API, in the sample Curl request to send and receive messages –
- Navigate to your Meta Dashboard (https://developers.facebook.com/apps/), and select the concerned App.
- Under Products>WhatsApp, click Getting Started.
- Under Send and receive messages, scroll down to Step 2: Send messages with the API.
- From the sample Curl request, copy the URL. For example –https://graph.facebook.com/v16.0/120345067891011/messages
- Paste this URL under Send Message URL in the configuration pop-up in your LeadSquared account.

WhatsApp Number – WhatsApp number provided by your Meta business account.
This is the WhatsApp business number you provided in the Basic Details screen. It’s a non-editable field. To change the number, navigate back to the Basic Details screen, and change it there.
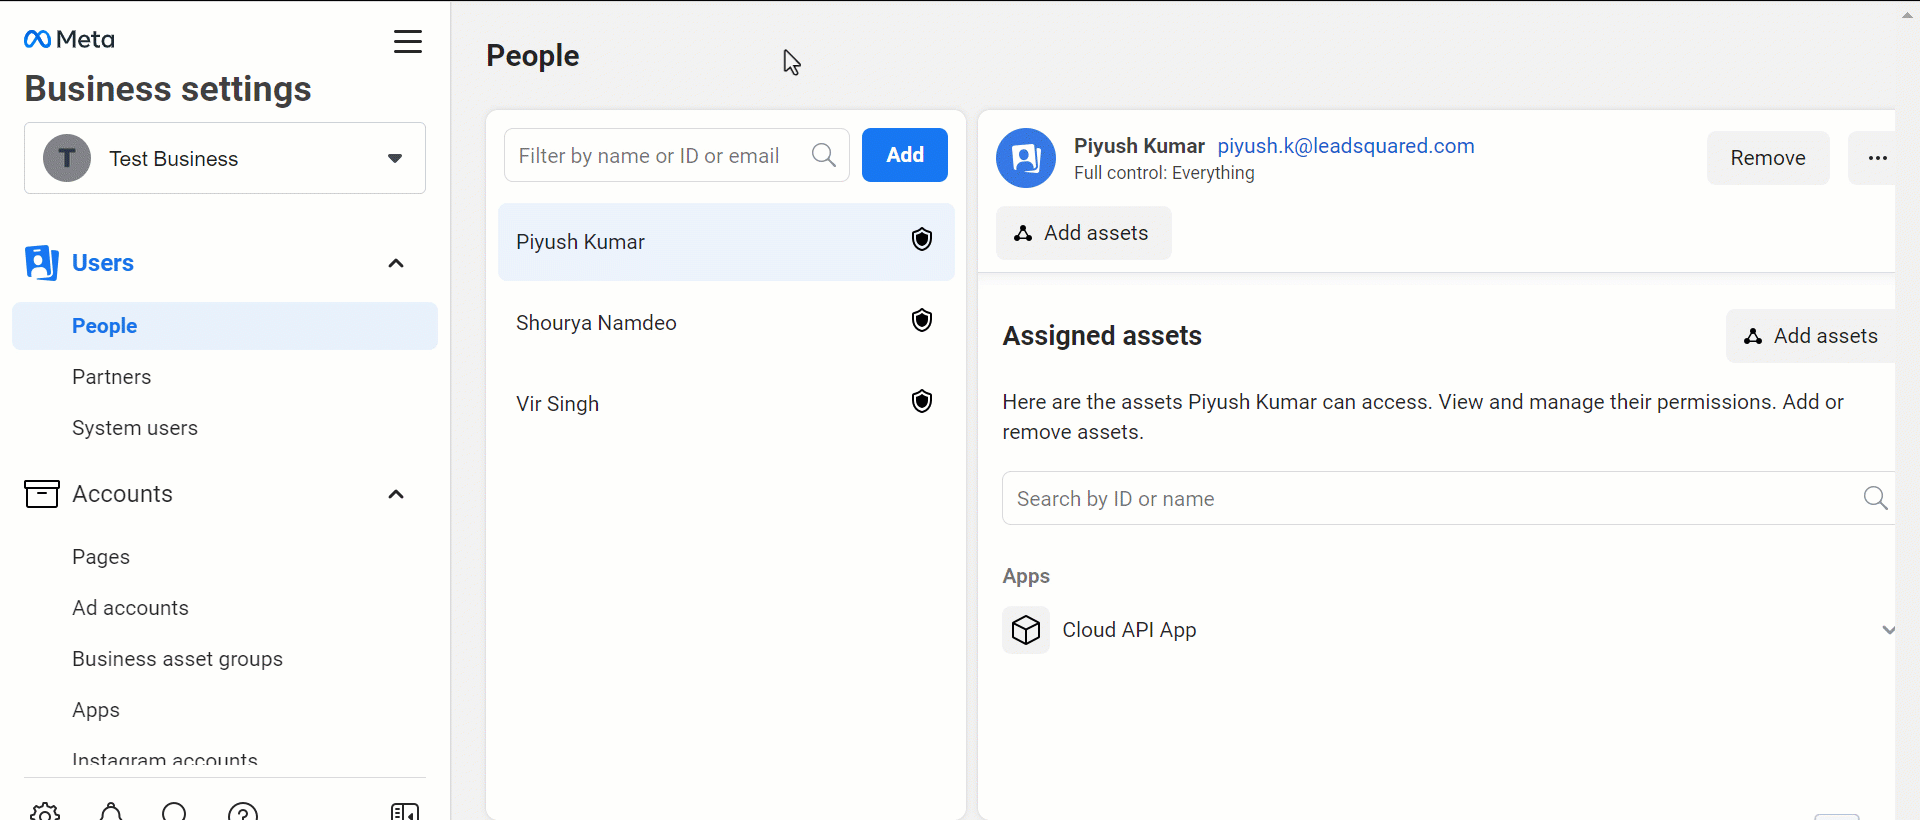
Permanent Access Token – Generate a system user access token from your Meta Business Account.
- Navigate to your Meta Business Account (https://business.facebook.com/settings/people).
- Under Users, click System users, then click Add to create a new system user.
- Under System user role, select Admin.
- Select the system user you just created, and click Add assets.
- Select the concerned App (where you configured WhatsApp Cloud API functionality), and under Full control, enable the Manage App permission.
- Click Generate token, select the concerned App from the dropdown, and set Token expiration to Permanent.
- Under Available permissions, enable whatsapp_business_messaging and whatsapp_business_management, then click Generate token.
- Copy and save this token in a separate file on your system. This token won’t be visible in the dashboard later.
- Paste the token under Permanent Access Token in the configuration pop-up in your LeadSquared account
For more information, see Create a Permanent Access Token (Meta documentation).
Authentication Header Template – API header used to authenticate WhatsApp API calls.
Leave this field as is. This value is used in the header of the WhatsApp API calls for sending messages from your LeadSquared account.
Get Media URL – If you’re a WhatsApp Cloud user, please leave this field empty. However, if you’re using a third-party service provider that utilizes WhatsApp Cloud, then provide the URL where your service provider store media files sent by leads. This URL allows LeadSquared to access media files sent by your leads, enabling you to access these files directly from your LeadSquared account. To obtain this URL, reach out to your service provider’s account representative.
Notifications Webhook URL – Configure this webhook in your Meta app to get alerted when you receive a message or when a message’s status has changed.
Follow the instructions listed in the Configure a Webhook (Meta documentation).
- Navigate to your Meta Dashboard (https://developers.facebook.com/apps/), and select the concerned App.
- Under Products>WhatsApp, click Configuration.
- Then, find the webhooks section and click Configure a webhook.
- Callback URL – Copy the webhook URL from the LeadSquared WhatsApp configuration pop-up, under Notifications Webhook URL, and paste it here.
- Verify Token – Enter the following string – LSQCloudApi
- Click Verify and save.
Once you’re done entering all the details on the LeadSquared WhatsApp configuration pop-up, click Next.
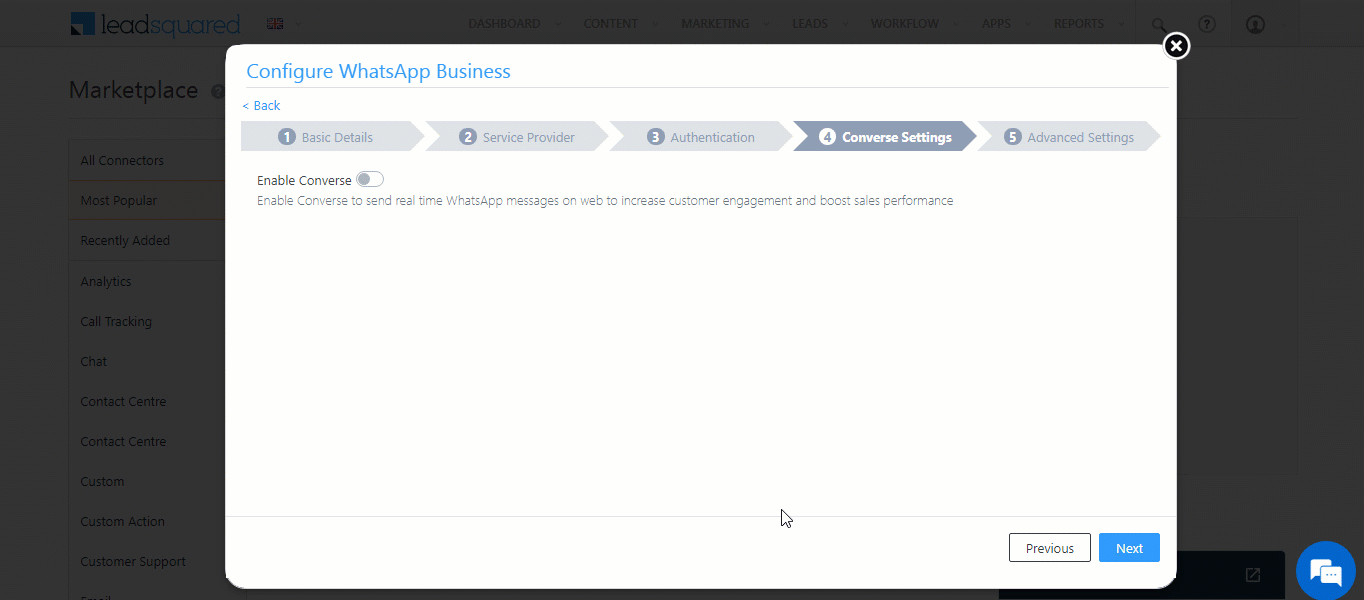
4.4 Converse Settings
LeadSquared Converse is an instant messaging feature that allows you to have real-time conversations with your leads via WhatsApp.
To integrate LeadSquared Converse with WhatsApp, complete the following steps –
- On the Converse Settings tab, toggle the Enable Converse
 slider.
 - Under User Access, grant permissions to users who can communicate with leads through the LeadSquared Converse.
- Based on Role – From the Search and Select Users dropdown, select the LeadSquared user roles that can send messages through LeadSquared Converse.
- Advanced (User Level) – Based on the value entered in the selected user boolean field (e.g., for the user Sam, the “Is Employee” user field contains the value “Yes”), the user will be able to send messages through LeadSquared Converse. From the Select User Field dropdown, select a relevant boolean field.
- Functionality – The following additional settings must be configured –
- Approved Templates – Enable this functionality to allow your users to send approved WhatsApp templates to your leads.
- Unapproved Templates – Enable this functionality to allow your users to send unapproved WhatsApp templates to your leads. These can only be sent if the 24-hours service window is active.
- Notify Lead Owner* – When enabled, only lead owners will get notifications of the WhatsApp messages a lead sends. When disabled, all logged-in users will receive notifications of these WhatsApp messages.
- Sending Rich Media – Enable this functionality to allow your users to send media files in the WhatsApp messages.
Note:
- *Message notifications are only sent to one user, i.e., either the Lead Owner or to the user (other than the Lead Owner) that sent the WhatsApp message to the lead. When the Notify Lead Owner setting is enabled, only the Lead Owner will get notified, while the user who sent the message will not get a notification.
- If you enable the Send Rich Media option, you must also enable the Approved Templates option. This ensures that you can add your media files to a template when messaging your leads.
4.5 Advanced Settings
On this screen, provide the following details –
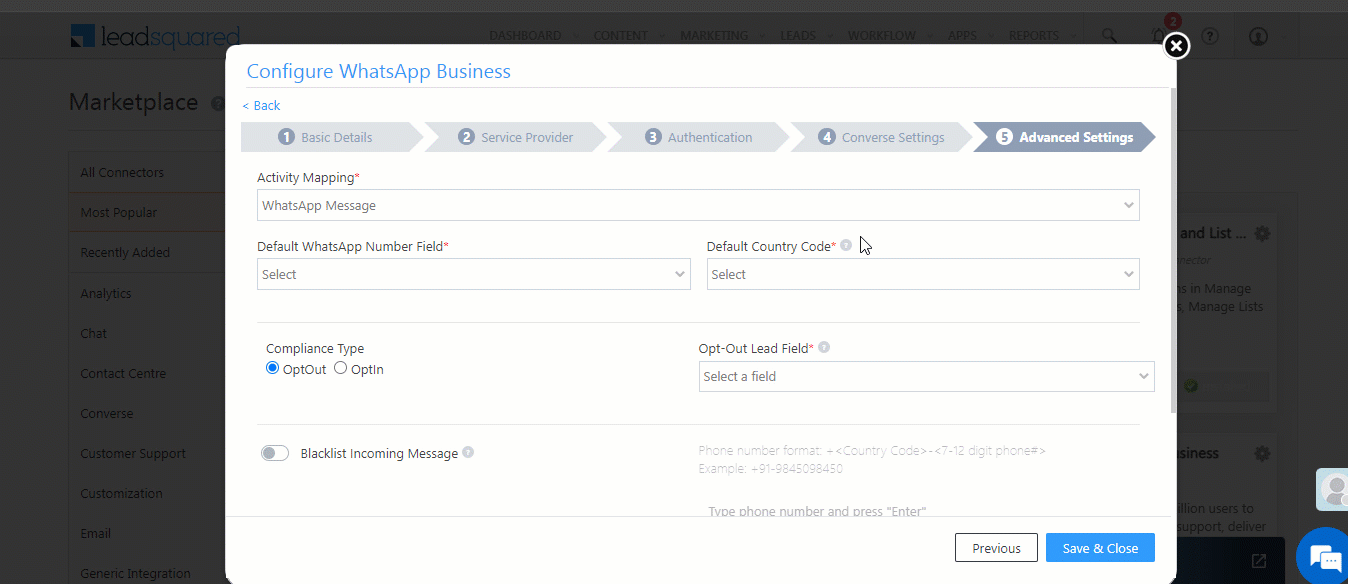
- Activity Mapping – A LeadSquared activity field to capture your WhatsApp messages. This is the activity that will be posted every time a WhatsApp message is sent or received.
- Default WhatsApp Number Fields – The number you set as the default phone number will be automatically selected when you’re sending a WhatsApp message to a lead. You can also select other numbers that are available from the Add Another Number dropdown.
- Default Country Code – The default country code will be used to send messages to a phone number that’s stored in a custom field, if no country code is listed.
- Enable Rich Media Template Support – If you want to include media files in your WhatsApp message, you must enable the slider.
- Show URL Preview in Custom Messages – Enable the slider to allow for URL previews in non-templatized WhatsApp messages.
- Compliance Type – Here, you can select the compliance type for the WhatsApp template, by choosing either WhatsApp Opt-out or Opt-in.
- WhatsApp Opt-out – Your leads can opt-in or out of receiving WhatsApp messages on the basis of this field. From the dropdown, select a LeadSquared lead field for the WhatsApp opt-in/opt-out functionality.
- Blacklist Incoming Messages – If required, you can enable this option to blacklist incoming messages from specific numbers. This is useful when you want to block numbers that send inappropriate messages to your users. Once enabled, enter the phone numbers in the text box available on the right side of your screen. You can add phone numbers with 7-12 digits (excluding the country code). This option is available only when the Allow Lead Generation on incoming messages setting is enabled.
Click Save & Close when you’re done.
- If your credentials are correct, you’ll see the success message highlighted below.
- If they were incorrect, the integration will fail.
5. Sync Templates
You can sync your existing WhatsApp templates directly with LeadSquared from your WhatsApp Business accounts. This reduces the time and effort needed for copying and pasting template data. To sync existing templates –
- In your LeadSquared account, navigate to Apps>Apps Marketplace, and search for the WhatsApp Business Connector.
- On the connector, hover your cursor over
 , and click Configure, and select the WhatsApp Cloud account for which you want to sync templates.
 - On the Authentication tab, enter your WhatsApp Business Account’s ID. This is the account from which you want to sync templates with LeadSquared. Once you’re done, click Save.
- Then, navigate to Apps>WhatsApp Templates, and from the Account dropdown, select the WhatsApp Cloud account for which you want to sync templates.
- On the top-right side, click the Sync Account button that’s available. This will sync the existing templates in your WhatsApp Cloud account with your LeadSquared account.
Note:
- We use the template name as a unique key. If a template already exists in LeadSquared’s WhatsApp templates, it won’t be synchronized from the business account. If you wish to sync such templates, kindly delete them first from your LeadSquared account, and then proceed with the synchronization. Please note that you will need to define the mail merge fields, media files, and URLs again after deletion.
- Newly synced templates will have the
 icon under Action. This means the templates need to be reviewed by you before you Save them. This is to ensure the template fields are mapped to the correct LeadSquared fields. Once this is done, you can begin using this template to send WhatsApp messages to your leads.
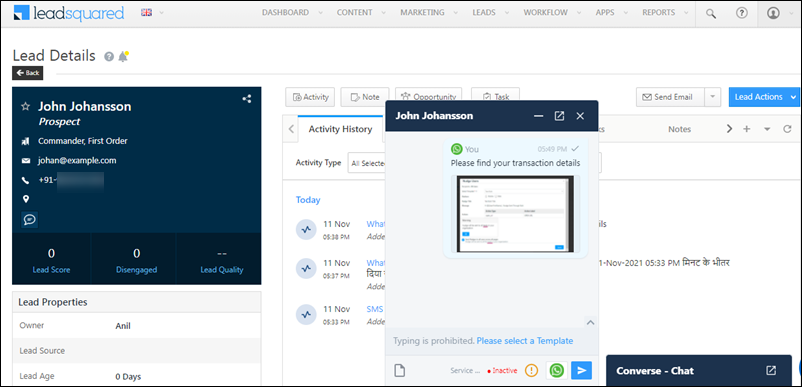
6. Conversing with Leads via WhatsApp
Integrating Converse with LeadSquared’s WhatsApp connector will enable your users to have real-time conversations with your leads through WhatsApp. Using templatized messages, you’ll be able to attach and send media files (such as images, documents, etc.) in your conversations. To know more, refer to LeadSquared Converse.
7. Next Steps
Once the connector is successfully installed, you can proceed to add WhatsApp templates and finally message your leads. For details, see Adding WhatsApp Templates to LeadSquared.
Any Questions?
Did you find this article helpful? Please let us know any feedback you may have in the comments section below. We’d love to hear from you and help you out!
What is the “WhatsApp Business Account ID” in WhatsApp Cloud API, Authentification step and how to get it.
Hi Ujwal, you can find your WhatsApp Business Account (WABA) ID in Meta Business Manager (business.facebook.com). Select your business, go to Accounts > WhatsApp Accounts, and click the relevant WhatsApp account. The WABA ID will appear in the panel that opens.