


Get Started

Sales Suite
Field Ops
Marketing
Service CRM
Integrations & Apps
FloStack
Bureau Insights

1. Feature Overview
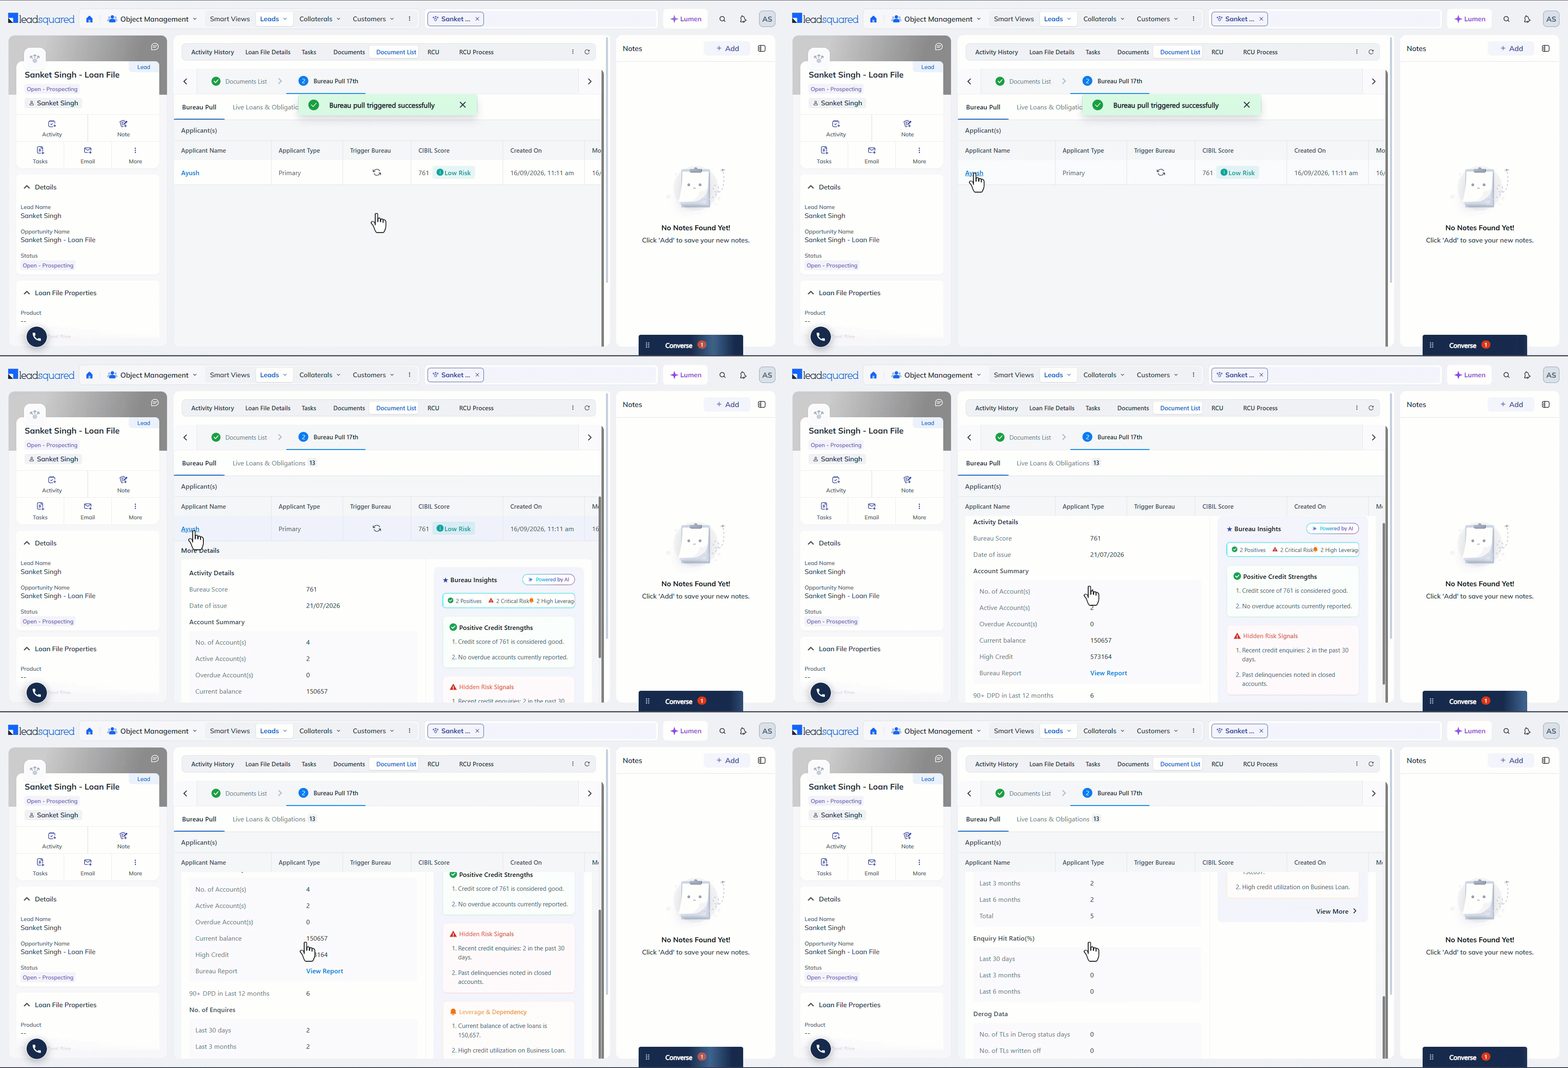
During LOS loan disbursal, credit managers review applicants’ credit reports to assess their creditworthiness. These reports can be lengthy and contain a large amount of information. Bureau Insights uses AI to analyse the report and generate a one-page summary with only the key information.
A default AI prompt is available, which you can update to define what appears in the summary. This lets the summary report reflect your assessment criteria instead of a fixed template. Based on the configured prompt, the summary can include insights such as positive credit strengths, hidden risk signals, the applicant’s leverage and dependency details, and more. This helps credit managers quickly access the information they need to make informed decisions without manually reviewing the entire report.
2. Prerequisites
- Only Admin users can configure this feature.
- The Loan Origination Workflow (LOS) Workflow app must be enabled on your account. To do this, contact your account manager or write to support@leadsquared.com.
- Create an Opportunity Type to associate with an LOS workflow.
- The associated opportunity type must contain a custom field with the display name “Workflow Version”, the schema name “mx_Custom_100”, and the type “Number – Decimal”. This is mandatory.
- Create a custom activity that is posted on the opportunity when the workflow executes.
- TransUnion CIBIL is currently available as the default credit bureau. If you use a different vendor to fetch and analyse these reports, contact your account manager or email support@leadsquared.com.
- The LeadSquared team creates a LAPP based on the credit bureau you want to fetch details from. No setup is required from your end, but you must provide the report fields you want to fetch from the bureau.
3. How it Works
After fetching the loan applicant’s credit report, we use AI to summarise it and post it as a custom activity on the Opportunity Details page.
- First, create a LOS Workflow with a custom stage that will be displayed on the Opportunity Details page.
- Configure this stage by adding Bureau Pull as the workflow process, and associate it with the custom activity you’ve created.
- Associate the credit report fields with the custom activity fields.
- Then, review the custom AI prompt that’s used to summarise the report. This prompt can be updated to your liking.
- Publish the workflow.
- Your users can now navigate to the Opportunity Details page, and summarise the credit report.
4. Create a Workflow
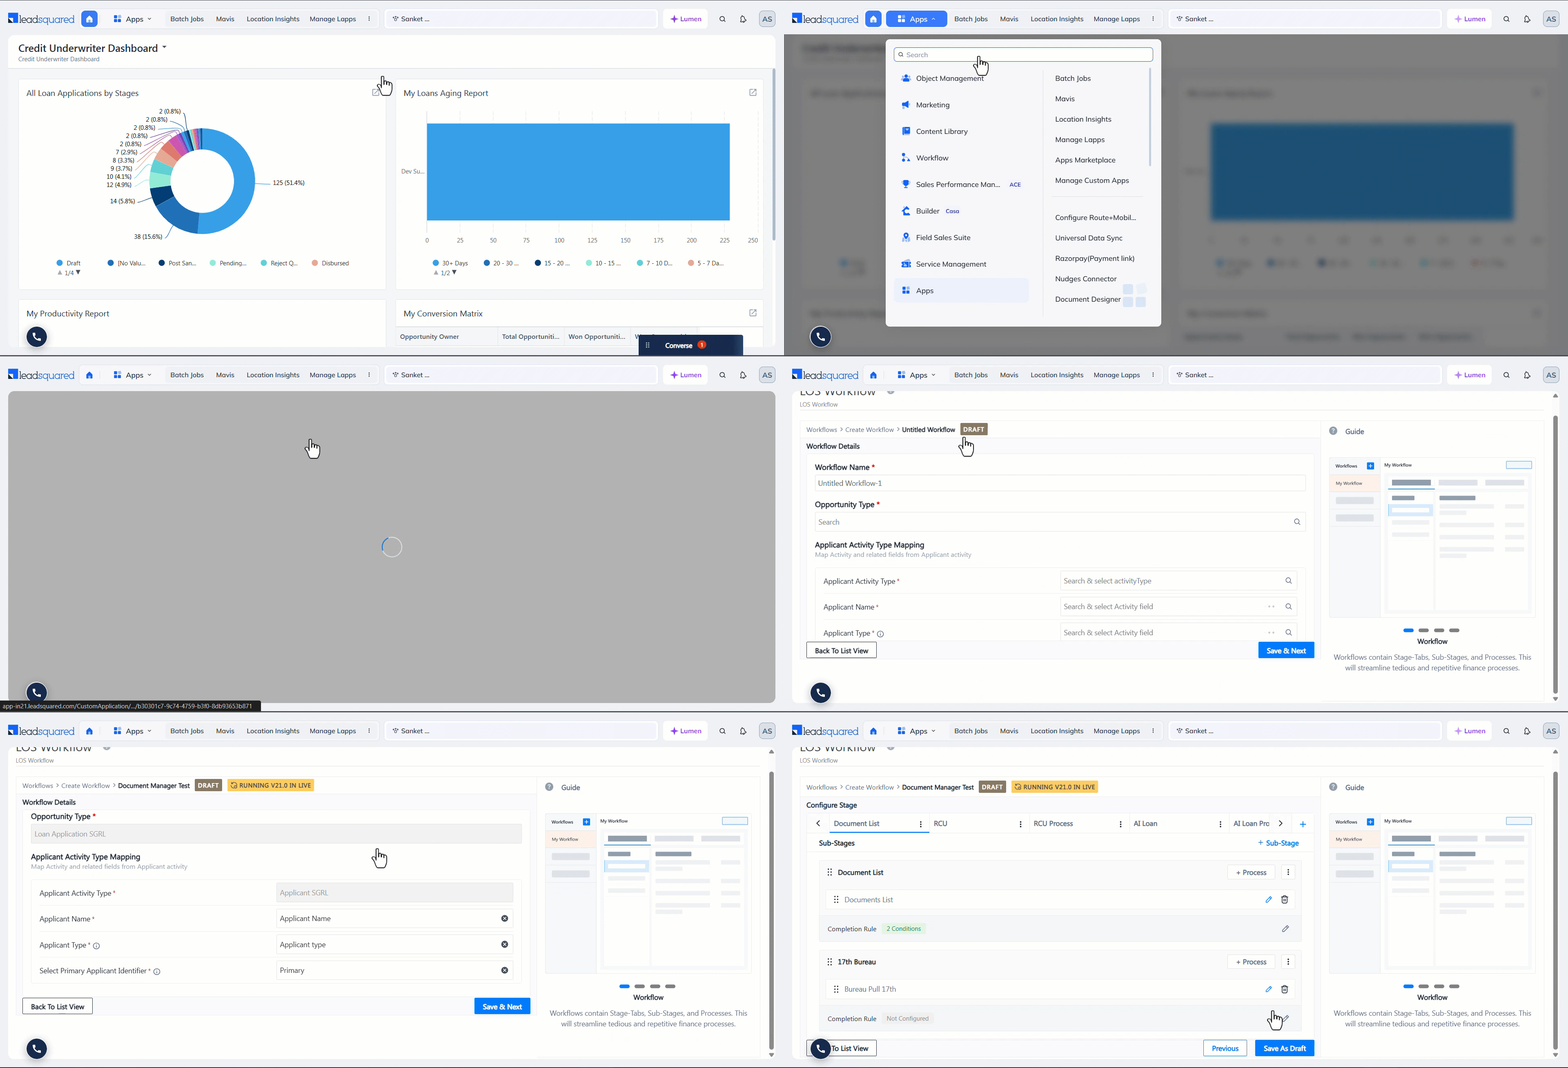
- On your LeadSquared account, navigate to Apps>LOS Workflow.
- On the LOS Workflow screen, alongside Workflows, click the Add icon.
- On the Workflow Details screen, enter the following details –
- Workflow Name – An internal name that identifies the workflow.
- Opportunity Type – The LeadSquared opportunity type* you want to associate with the workflow.
- Applicant Activity Type – Select the custom activity you created.
- Applicant Name – Select the custom activity field that stores the lead’s name.
- Applicant Type – Select the applicant type dropdown field associated with the custom activity.
- Select Primary Applicant Identifier – From the dropdown options, select the primary applicant type. For example, if the options are Primary, Co-applicant, and Dependent, select Primary.
- Click Save & Next.
- On the Configure Stage screen, add a new stage using the Add Stage Tab button.
- This tab appears on the Opportunity Details page for the selected Opportunity Type.
- Enter the display name for the tab, and click Save.
Note:
- You can associate an Opportunity Type with only one LOS workflow.
- The associated opportunity type must contain a custom field with the display name “Workflow Version”, the schema name “mx_Custom_100”, and the type “Number – Decimal”. This is mandatory.
5. Configure a Sub-stage
On the Configure Stage screen, create a sub-stage and configure the AI prompt that generates the report summaries.
5.1 Basic Details
First, enter and configure the basic details required to create the new activity type.
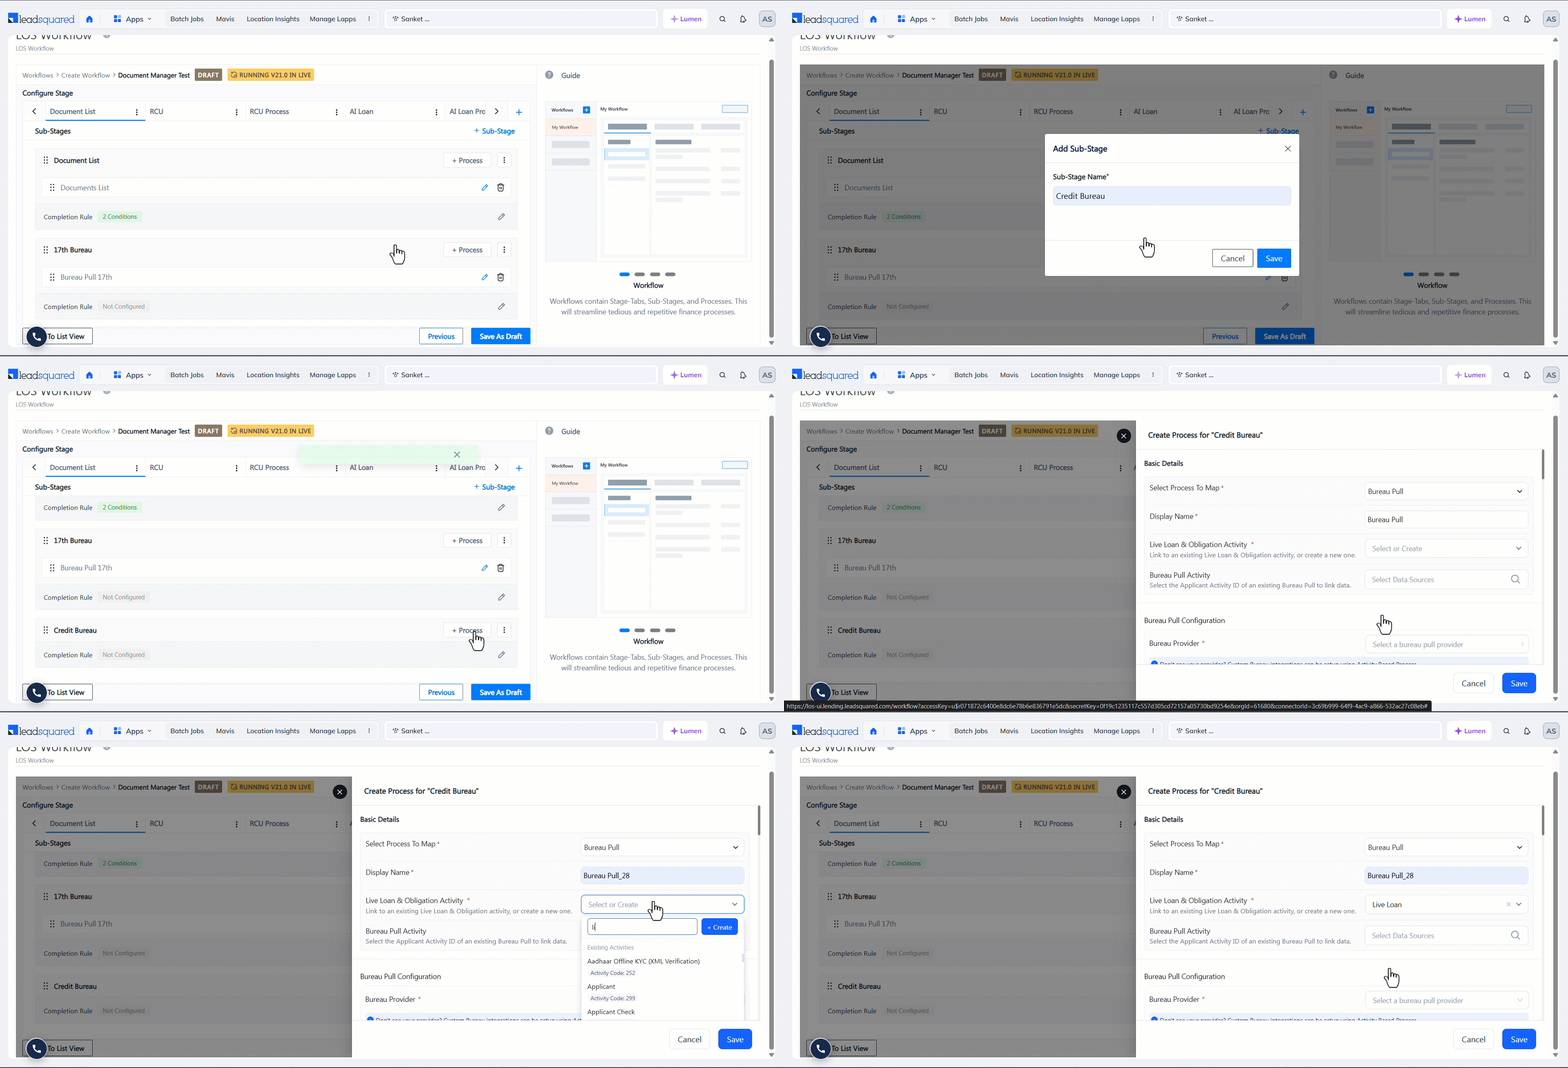
- Click the Sub-stage button, add a display name, and click Save.
- Click the Process button, and on the Create Process screen, configure the following Basic Details –
- Select Process to Map – Select Bureau Pull. This is the process your workflows follow to summarise the credit report.
- Display Name – Enter a display name for the process.
- Live Loan & Obligation Activity – Link the process to the custom activity you’ve created.
- Bureau Pull Activity – Select the activity ID of an existing Bureau Pull process you previously created. The selected process’s summary data is linked here. This is optional.
5.2 Bureau Pull Configuration
Here, select the credit bureau you want to fetch the data from and map it to the corresponding activity fields in the custom activity you selected above.
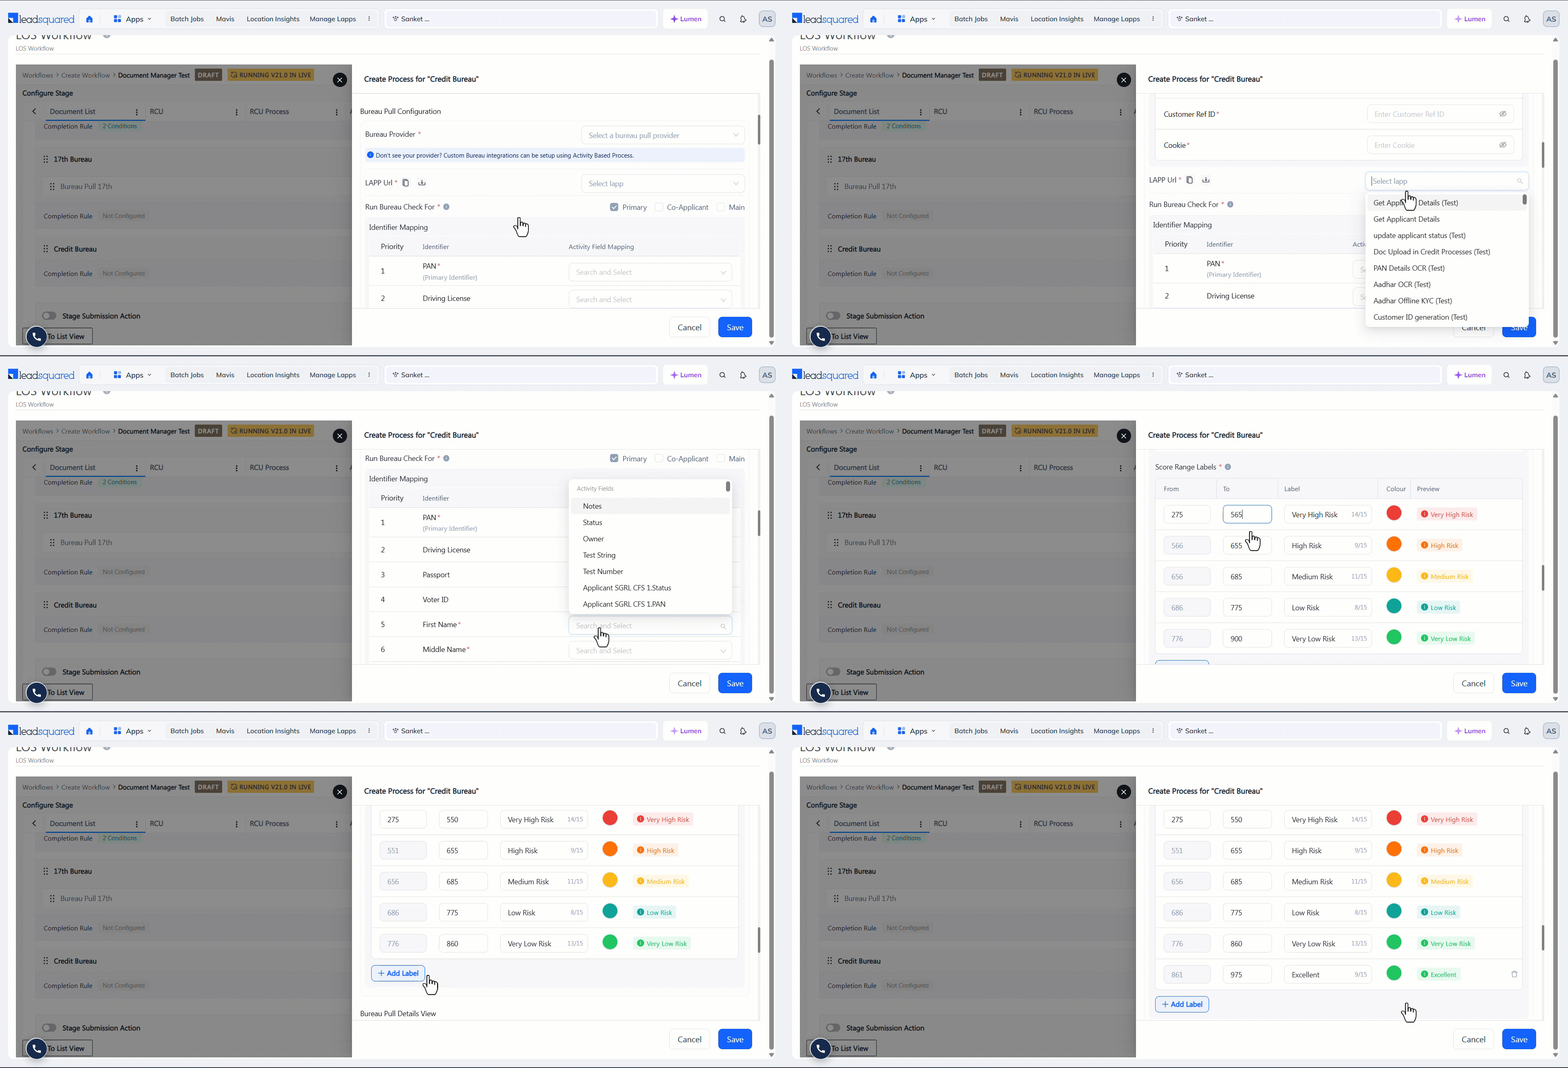
- Bureau Provider – Select TransUnion CIBIL. This is the default provider we support.
- Type of Credit Report – Select the type of credit report to be fetched –
- Consumer Credit Report contains an individual’s borrowing history.
- Commercial Credit Report contains a business entity’s borrowing history.
- Under request configuration, enter the following details from your CIBIL account –
- Member Ref ID
- API Key
- Client Secret
- Customer Ref ID
- Cookie
- LAPP URL – Select the LAPP the LeadSquared team configured in your account.
- Run Bureau Check For – Select whether the report is being fetched for the primary applicant, co-applicant or main applicant.
- Identifier Mapping – Map the credit report fields to the corresponding custom activity fields. All the fields marked with a red asterisk are mandatory.
- Score Range Labels – Define the credit score range, select a colour, and enter a description for the credit score fetched from the bureau. The score ranges indicate the risk rating of the credit score fetched.
- Click Add Label to add multiple custom credit score ranges.
5.3 Bureau Pull Details View
Here, the credit report fields are displayed as columns. You can also choose up to three fields from the custom activity you created to display.
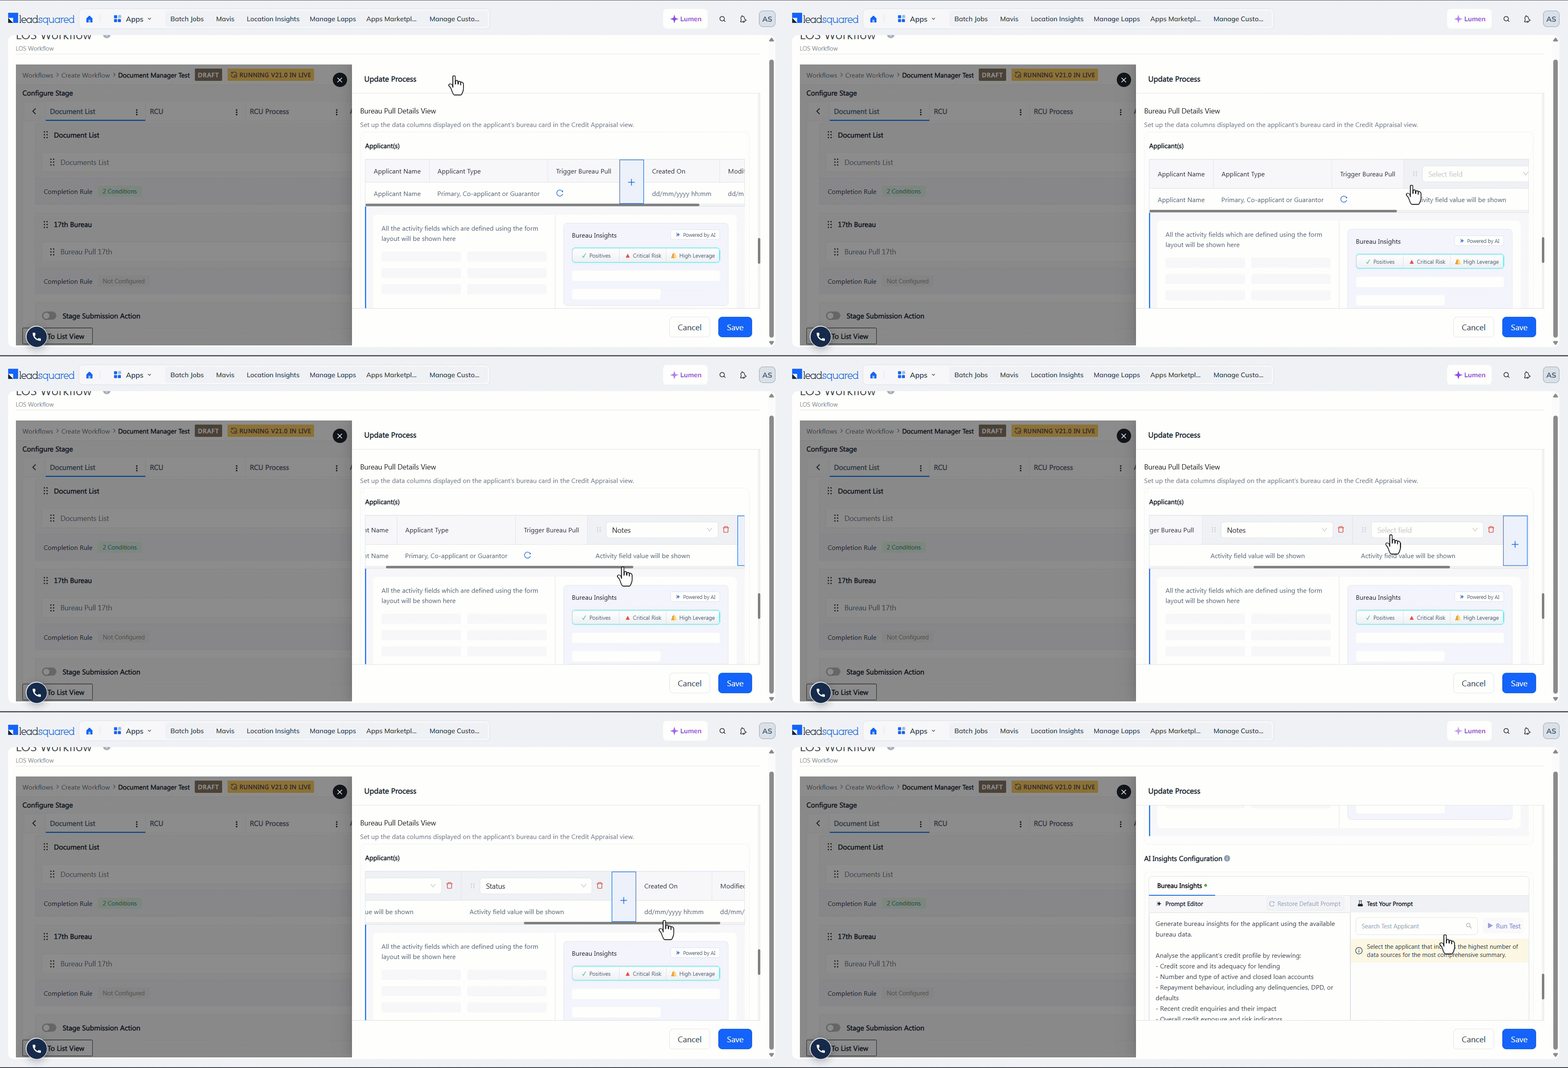
5.4 AI Insights Configuration
- An AI prompt is provided by default. You can update it to fetch, analyse, and summarise the credit report based on your business use case. Make the prompt specific to the insights and fields you want to include in the summary. You can also define the format, structure, and business-specific criteria the AI should follow.
- Under Test Your Prompt, select an internal applicant and click Run Test to test the prompt.
- Once you’re satisfied with the generated summary and the prompt works as expected, click Save.
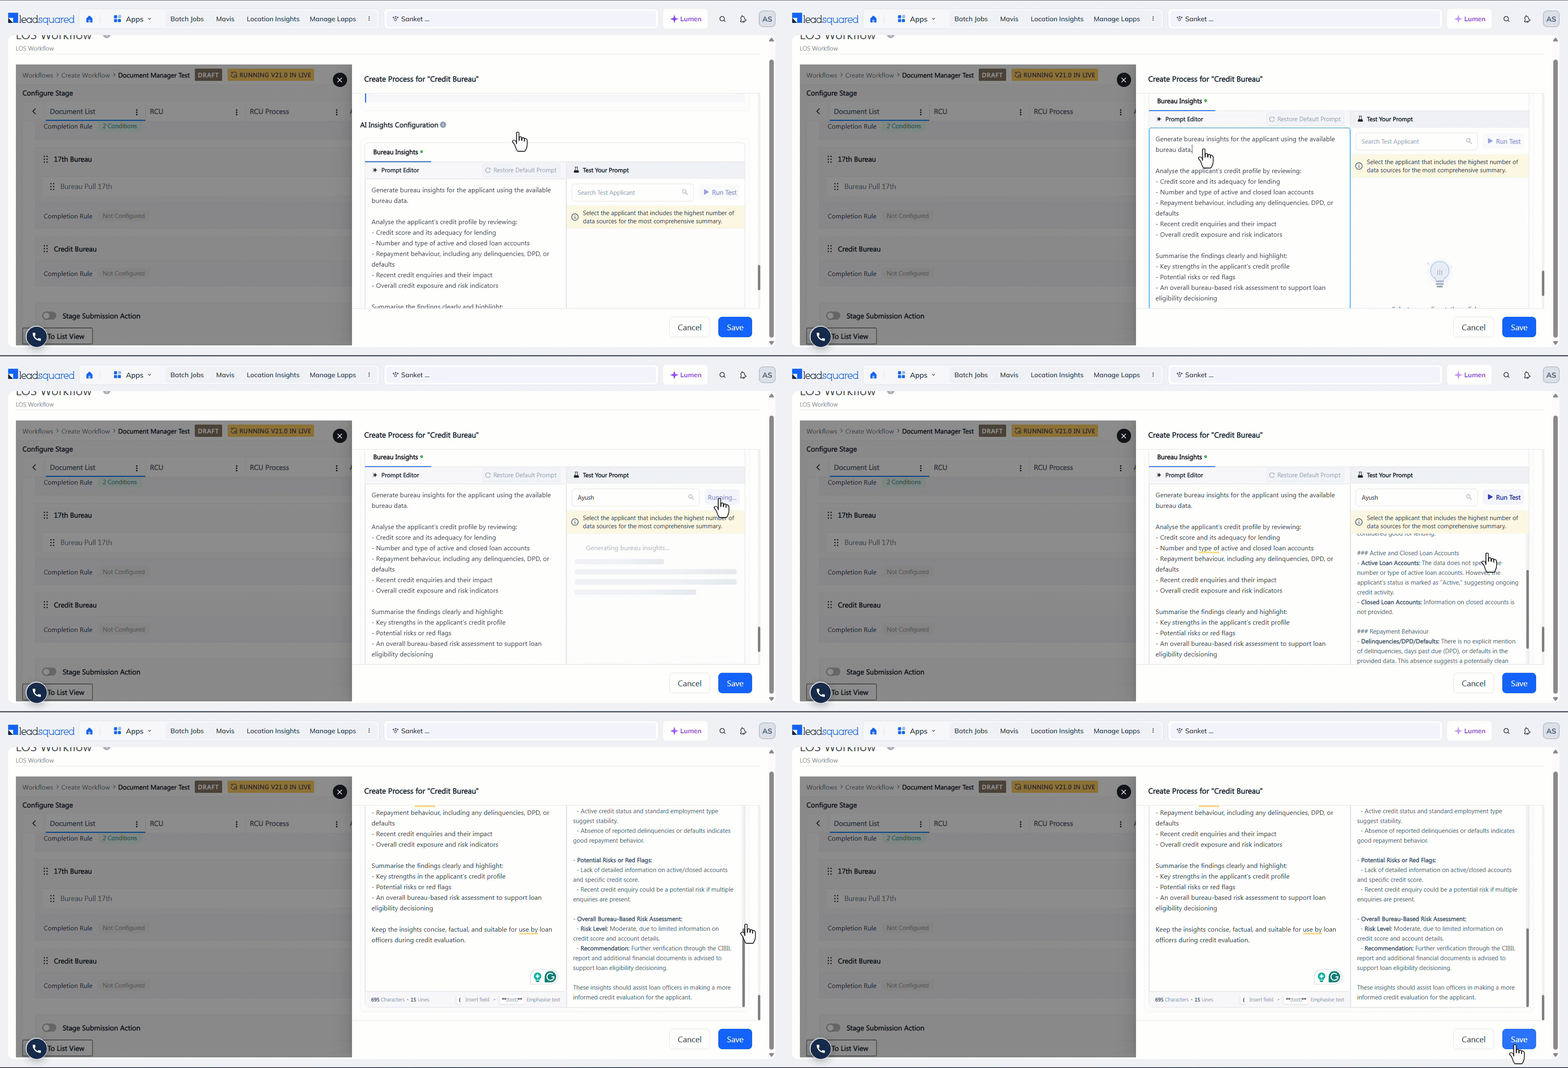
6. Publish the Workflow
Once the process is fully configured, click Save as Draft, and Publish the stage.
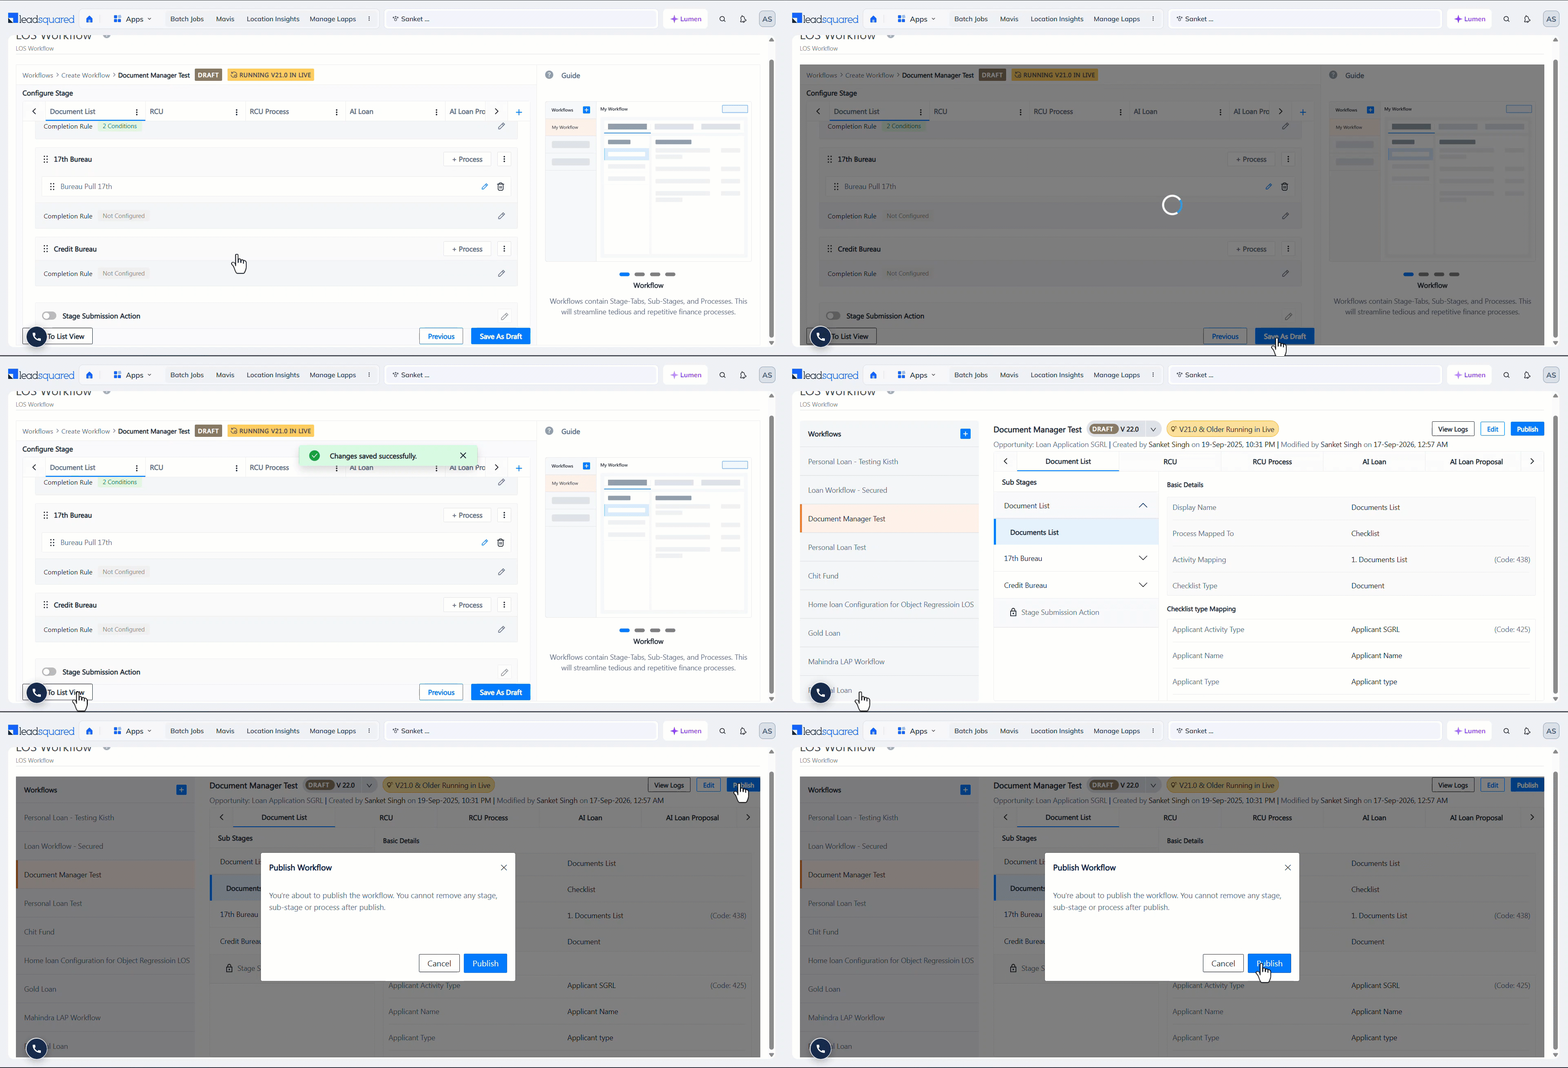
7. View the Report Summary
- For the applicant for whom you want to view the report summary, navigate to Lead Management>Opportunities>Opportunity Details.
- Open the Bureau Pull Stage tab you created and click the refresh icon alongside the lead. This fetches the latest report data.
- To view the report summary, click the lead’s name. The summary contains the configured fields and AI insights based on the configured prompts. You can also download the summary for offline use.
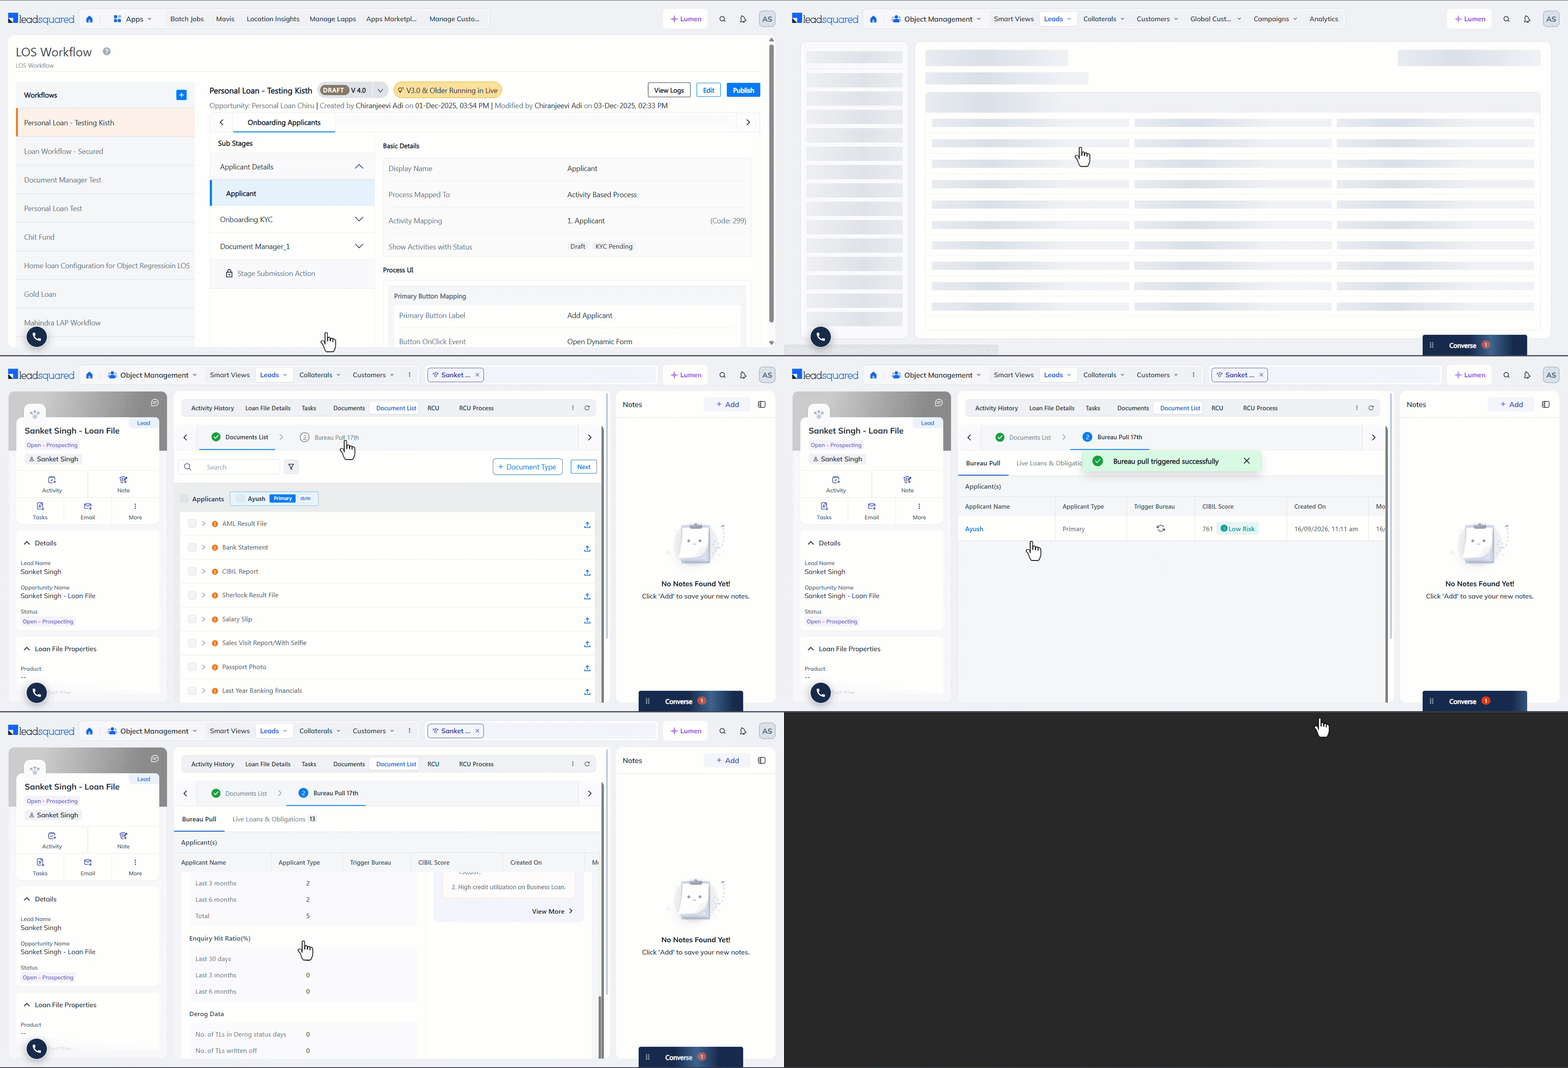
Any Questions?
Did you find this article helpful? Please let us know any feedback you may have in the comments section below. We’d love to hear from you and help you out!