


Get Started
Sales Suite
Field Ops
Marketing
Service CRM
Integrations & Apps
FloStack
CallTrackingMetrics Telephony Connector (v2)
1. Feature Overview
The LeadSquared CallTrackingMetrics Telephony connector integrates your CallTrackingMetrics (CTM) application with LeadSquared.
Through this connector, you can avail the following benefits –
- Ability to make outbound calls (click to call) and automatically track the calls in Lead Activity History.
- You can manage users in your CTM account directly from LeadSquared.
- Prevents lead leakage by tracking outbound and inbound phone call logs as activities.
- Access call recordings of inbound and outbound calls.
- Display lead information pop-up to LeadSquared users when an incoming call is received or an outgoing call is placed.
2. Prerequisites
- You must be an Administrator User of your LeadSquared account to access the app settings.
- You need an active CallTracking Metrics account with at least one tracking number.
- The ‘Agents’ in CTM should have the same email addresses as the LeadSquared users you’re looking to sync –
- If john@example.com is a user in LeadSquared, with associated phone number ‘XXX-XXXXX’, a user with the same email address (john@example.com) associated with that ‘Inbound Phone Number’ should be available in CTM.
- Before you install the CTM Telephony connector, we recommend you download and set up the CTM dialer desktop application.
Note:
- The agent phone number for this connector is not fetched from the Agent Phone Number field in LeadSquared. Instead, you must configure a phone number when setting up the connector.
- If you’re migrating from the CTM Telephony v1 connector, then you must delete existing phone numbers in the Agent Phone Number field before you set up the CTM Telephony v2 connector.
- You can also embed your entire call tracking metrics dashboard in LeadSquared and access it directly from your LeadSquared account. For more information, see Embed Your Call Tracking Metrics Dashboard in LeadSquared.
3. How it Works
Using the CTM connector, you can create users in your CTM account directly from LeadSquared. You can also update their phone numbers from LeadSquared, and ensure that data between LeadSquared and CTM users and agents are synced.
After the connector is configured, you’ll be able to –
- Make and receive phone calls from the following pages –
- Lead Details
- Manage Leads
- Leverage the agent pop-up to capture lead details.
- View and manage phone call activities, complete with call details like duration, status, recordings, etc.
- Use other LeadSquared features like automation to automate workflows based on call disposition.
4. Install the Connector
- From the main menu, navigate to Apps>Apps Marketplace.
- Search for CTM Telephony, and click Install.
- Alternatively, you can find the connector on the left panel, under Telephony – United States.
- Once the connector is installed, hover your cursor over the
 icon, and click Configure.
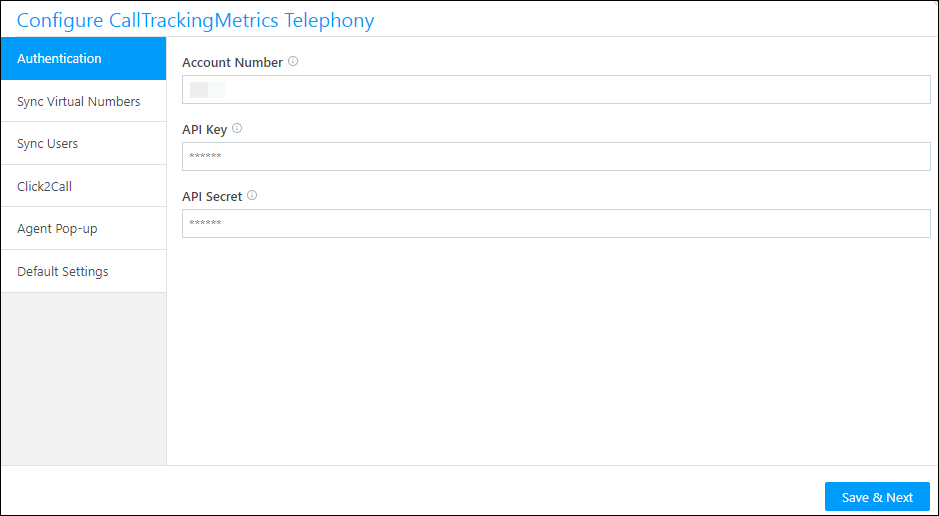
5. Authentication
Once installed, configure the connector to sync your CTM account with LeadSquared.
- Enter the following details to authenticate your CTM account –
- Account Number – Enter your CTM account number here.
- API Key – Enter your API Key here.
- API Secret – Enter your API Secret Key here.
- Once you’re done, click Save & Next
6. Sync Virtual Numbers
6.2.1 Example Use Case
Give your agents the option to choose from a list of virtual numbers while calling a lead from LeadSquared.
For example, if an educational institution wants to call a lead for admissions to a New York campus, agents can select a local New York virtual number, for Texas, they can select a local Texas virtual number, and so on.
6.2.2 Procedure
Click Sync Virtual Numbers to auto-sync numbers from your CTM account to LeadSquared. The sync may take a few minutes to complete (click ![]() to refresh the grid). You can allow/disallow calling from specific virtual numbers by clicking
to refresh the grid). You can allow/disallow calling from specific virtual numbers by clicking![]() under the Allow Calling column. This controls whether that virtual number will be shown as an option to the agent while placing the call to the lead from the agent pop-up.
under the Allow Calling column. This controls whether that virtual number will be shown as an option to the agent while placing the call to the lead from the agent pop-up.
At the time of dial-out, agents can choose the appropriate virtual number from the drop-down –
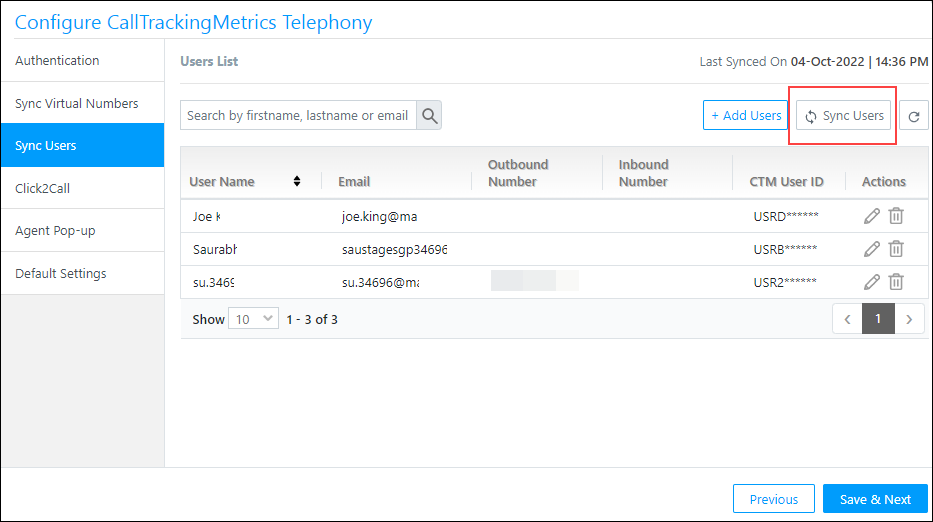
7. User Sync
Sync users between your CTM and LeadSquared accounts.
7.1 For New Accounts
If you are setting up a new CTM account (with no existing users) with LeadSquared, you can directly migrate existing users from your LeadSquared account. These users will get created inside your CTM account.
- On the User Sync tab, click Add Users.
- Alongside the users you want to migrate to CTM, click the
 checkbox.
 - Once you’re done, click Add Users. These users will now get created in your CTM account.
7.2 For Existing Accounts
If you are syncing a CTM account that contains existing users with LeadSquared, ensure the users have been created with the same email Id in both CTM and LeadSquared. To sync these users, on the User Sync tab, click Sync Users.
The other actions you can perform are –
- To delete an existing user from the CTM Connector, click
 .
. - To change the Outbound or Inbound numbers of an existing user, click
 , and select the new number from the dropdown.
- By default, all the Outbound numbers present in your CTM account will be displayed here. To add more Outbound numbers, refer to Buy CTM Tracking Numbers.
- For Inbound numbers, enter the 10-digit number along with the country code (e.g., +1-6557828771, etc.).
Once you’re done, click Save & Next.
8. Click2Call
Configure the following settings –
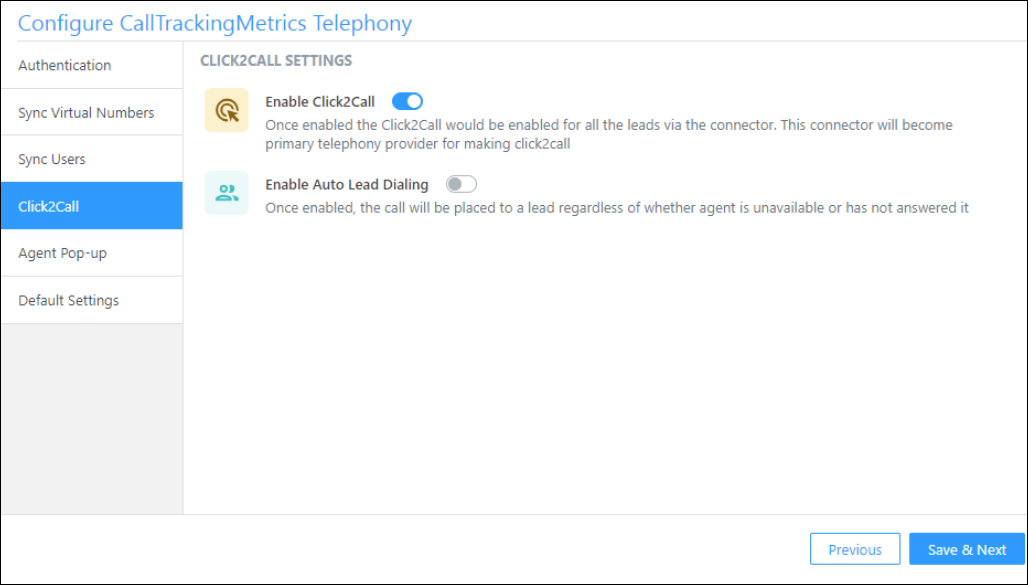
- Enable Click2Call – When enabled, users can call the lead by clicking the lead’s phone number. The CTM Connector will become the primary telephony provider when placing a call.
- Enable Auto Lead Dialing – When enabled, the call is placed to the lead regardless of whether the agent answers the call or is unavailable. This guarantees faster throughput for calls because –
- The agent doesn’t have to answer the call before it’s placed to the lead.
- The call is still made to the lead even if the agent’s status accidentally changes to unavailable.
Click Save & Next to proceed.
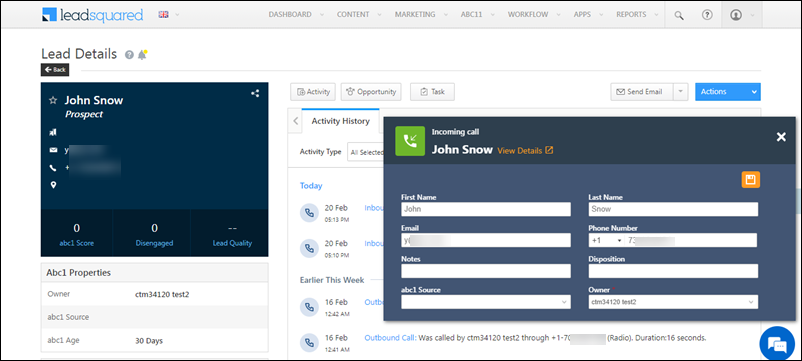
9. Agent Pop-up

- Enable Agent Pop-up – When enabled, the agent pop-up form is displayed to your users during the call.*
- Agent Pop-up Configuration – From the list of options, select which types of calls you want to display the agent pop-up for –
- Outbound
- Inbound
- Inbound and Outbound
- Agent Pop-up Configuration – From the list of options, select which types of calls you want to display the agent pop-up for –
- Enabled Call End Status (only for Marvin) – When enabled, it notifies the Marvin app when a call has ended, and the calling panel (the panel on the bottom of your screen) will close automatically.
- Enable Softphone – When enabled, you’ll be able to access the softphone pop-up inside LeadSquared.**
- Enable New CTM Softphone – This is the recommended softphone to set up when using the CTM connector. The CTM softphone has improved performance and lets you stay connected to the call when switching between browser tabs.***
Note:
- *To configure the field you’d like displayed in the agent pop-up form, navigate to My Profile>Settings>Leads>Lead Forms, and select the Agent Pop-up Form. Alternatively, you can also configure a more advanced, dynamic form using the Forms feature and then use the Process Designer to embed the form in the agent pop-up work area.
- **If both this softphone and the CTM softphone are enabled, the system will prioritize the new CTM softphone for use. However, it will fall back to the old softphone if there are any issues with the CTM softphone. That said, it is strongly recommended to use only the new CTM softphone for the best experience.
- ***To use the new softphone, the user must be a CTM user and should be synced in the CTM connector. But unlike the old softphone, the new softphone does not require the user to log in to the CTM portal.
9.1 Launching the New CTM Softphone
To launch the new CTM softphone: Click on the Soft Phone panel and click Launch Phone.

10. Default Settings
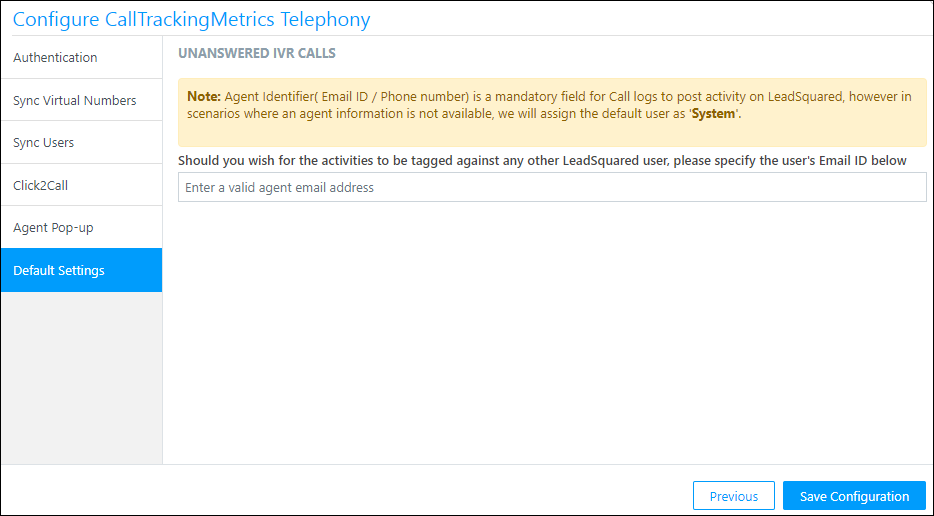
Sometimes leads call an IVR number and then disconnect the call while waiting in queue to talk to an agent. In these instances, LeadSquared creates a new lead and posts the incoming call activity to the default ‘system user’ in your account. You can enter an email id here to assign all such leads to a particular agent in your account. This way, the agent can track unanswered IVR calls and call the leads back.
11. Actions
Once your CTM account is successfully integrated with LeadSquared, you can start making calls to leads directly from your LeadSquared account. You can also receive calls and access the call logs for your leads.
11.1 Place Outbound Calls
- Navigate to the Manage Leads page, and click on the lead you want to call.
- On the Lead Details page, from the Lead vCard, click the lead’s number to place the call.
- On the Confirm pop-up, click Ok. Your call is placed to the lead.
11.2 Receive Inbound Calls
You can receive the inbound calls from your leads on any page in the LeadSquared platform.
For New Leads – If you receive a call from a new number that does not correspond to any lead in your LeadSquared account, a new lead will automatically get created and the call details will get logged.
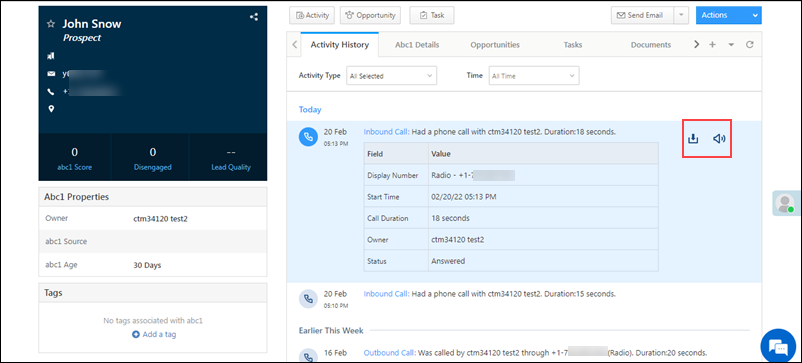
For Existing Leads – Calls received from numbers that already exist in your LeadSquared account will reflect on the Lead Details page, under the Activity History tab for the given lead.
Note: When you receive calls from a number that doesn’t correspond to existing leads, by default a new lead is created in LeadSquared. To disable this –
- For outbound calls, enable the Configure telephony ignore rules Advanced Setting.
- For inbound calls, enable the Ignore Inbound Calls Advanced Setting.
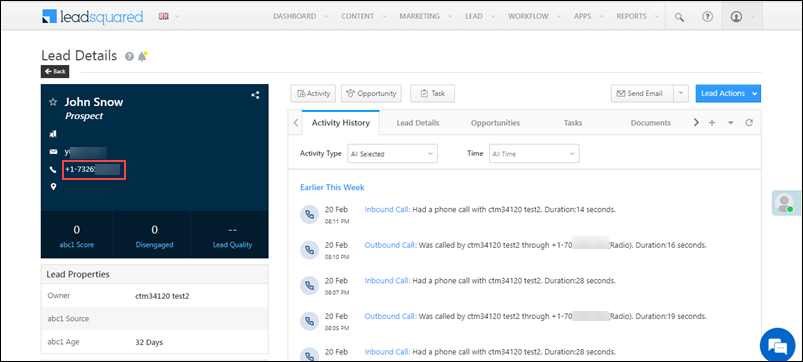
11.3 Access Call Logs
Once the call (Inbound and Outbound) is completed, a call recording is posted against the lead on the Lead Details page, under the Activity History tab.
- To listen to the recording, click
 .
. - To download the recording, click
 .
.
12. Reports
You can track key phone call metrics using the default reports available in your account, by navigating to Reports>Reports Home>Telephony and SMS.
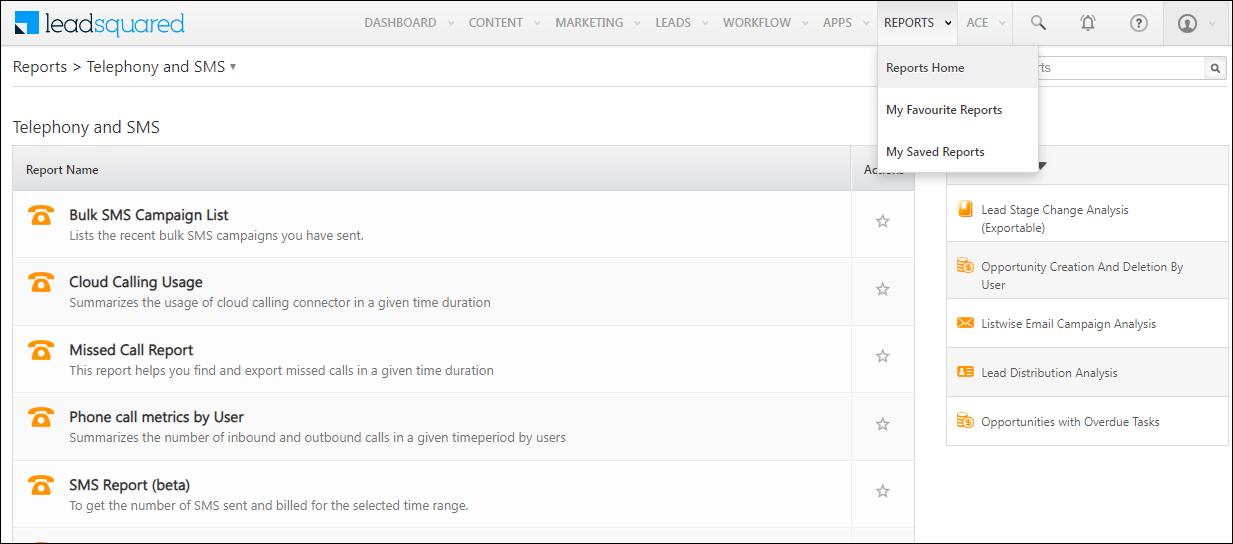
However, we recommend upgrading to our new reporting infrastructure SIERA, and using the more advanced, highly customizable Call Analysis Report.
Troubleshooting
Call Recording Not Playing in Activity History (CTM Telephony) – 401 Unauthorized Error
- Issue: Call recordings in the Activity History tab for CTM Telephony are not playing, showing a 401 Unauthorized error.
- Cause: This happens when 2FA (Two-Factor Authentication) is enabled for the Agency account in CTM Telephony and password protection for recordings is turned on.
- Solution” To resolve this, update the security settings in your CTM account:
- Go to Account > Settings > Security.
- Enable and then disable the Override the Agency Security Settings option.
- Under Password Protected Recordings, ensure “Require a user login to access call recordings” is turned OFF.
After making these changes, you should be able to play call recordings without any issues.
Any Questions?
Did you find this article helpful? Please let us know any feedback you may have in the comments section below. We’d love to hear from you and help you out!
The link to download the CTM softphone app is broken. Can you please repost?
Hi, Chad. It seems to be working fine, please try this link – CTM dialer desktop application
is CTM can receive calls simultaneously? cause as we experience, once agent is on call, it shows the running time, and we can’t hear the ring and the customer.
Hi, Catherine. If you’ve enabled the Auto Lead Dialing feature, try disabling it. If this doesn’t solve your issue, please raise a ticket to support@leadsquared.com.