1. Feature Overview
The Customer 360 (C360) page gives you a comprehensive view of a customer by integrating the LeadSquared Sales and Service CRM platforms to display important Leads, Opportunities, Activities and Ticket information on a single page.
You can fully customize the C360 page to show relevant customer data in a clean and organized view, which will helps users understand each customer’s journey. This shared view allows for better collaboration between your sales and service teams, and enables your users to serve your customers better.

2. Prerequisites
- Service CRM is a paid feature. To enable it, contact your account manager, or write to scsupport@leadsquared.com.
- LeadSquared Opportunities is a paid feature. To enable it, contact your account manager, or write to support@leadsquared.com.
- You must be a Service CRM Admin to configure the C360 feature.
3. How it Works
Widgets are the building blocks of the Customer 360 Page. Each widget can be customized to display data from Leads, Opportunities, and Tickets from LeadSquared. You can also embed an external URL inside the widget. A Customer Activity widget is also available by default, but this cannot be edited.
Once the widgets are configured, use them to design a C360 page. You can fully customize the page layout.
Link each page to a ticket issue type. The C360 button on the Ticket Details page (for a ticket created with this issue type) will redirect to the C360 page. You can create multiple pages, and link these pages to different ticket issue types.
4. Configure Widgets
The following widgets are available by default on your account –
- Product Purchased – Displays information about the different products purchased by your customer. Displays the Opportunity Details tagged to this customer.
- Lead Details – Displays Lead Details of the customer.
- Ticket History – Displays Ticket Details from the tickets tagged to the customer.
- Customer Activity – Display details of all activities associated with the customer.
- iFrame Widget – This lets you display data from an external source, by rendering a URL inside the widget. Use this option to embed an external URL inside the widget.
- Action Centre Widget – Redirects you to an external URL.
You can use these widgets as is, or edit and customize them. Additionally, you can create custom widgets from scratch.
- Once you log in to LeadSquared (https://login.leadsquared.com/), navigate to My Profile>Settings, and click Customer 360.
- On the Customer 360 page, you can create a widget from scratch or edit an existing widget.
- To create a new widget, click Create.
- To edit an existing widget, under Actions, click
 , and then click Edit.
5. Lead Details Widget
This widget displays lead attributes on the C360 page. Display data from both the system and Custom Lead Fields. On the Lead Details widget builder, configure the following elements –
- There are four components on the Lead Details widget –
- Name – When creating a new widget, give it a name. This is mandatory.
- You can also edit the name of an existing widget.
- Customer Card – This card displays the lead’s name by default. There are two configurable rows, where you can integrate and display data from any lead field (e.g., Email, Phone, City, etc.). You can only configure Date type fields in Row 1, and any lead field in Row 2.
- Label – Add a relevant display name for the field.
- Select Field – Select the lead fields you want to display from the dropdown.
- KPIs – These three cards (titles) can be customized to display relevant lead metrics (such as Lead Score, Engagement Score, etc.). You can only configure Number type fields in Title 1 and Title 2, and any lead field in Title 3.
- Label – Add a relevant display name for the field.
- Select Field – Select the lead fields you want to display from the dropdown.
- Customer Details – On this card, you can add and display additional lead fields.
- Only show fields with data – When this setting is enabled, only the fields containing data are displayed on the card.
- Name – When creating a new widget, give it a name. This is mandatory.
Once you’re done –
- Save as Draft – This saves all your configurations, but the widget will not get published.
- Publish – This publishes the widget and makes it live. You must now link it to a Page.

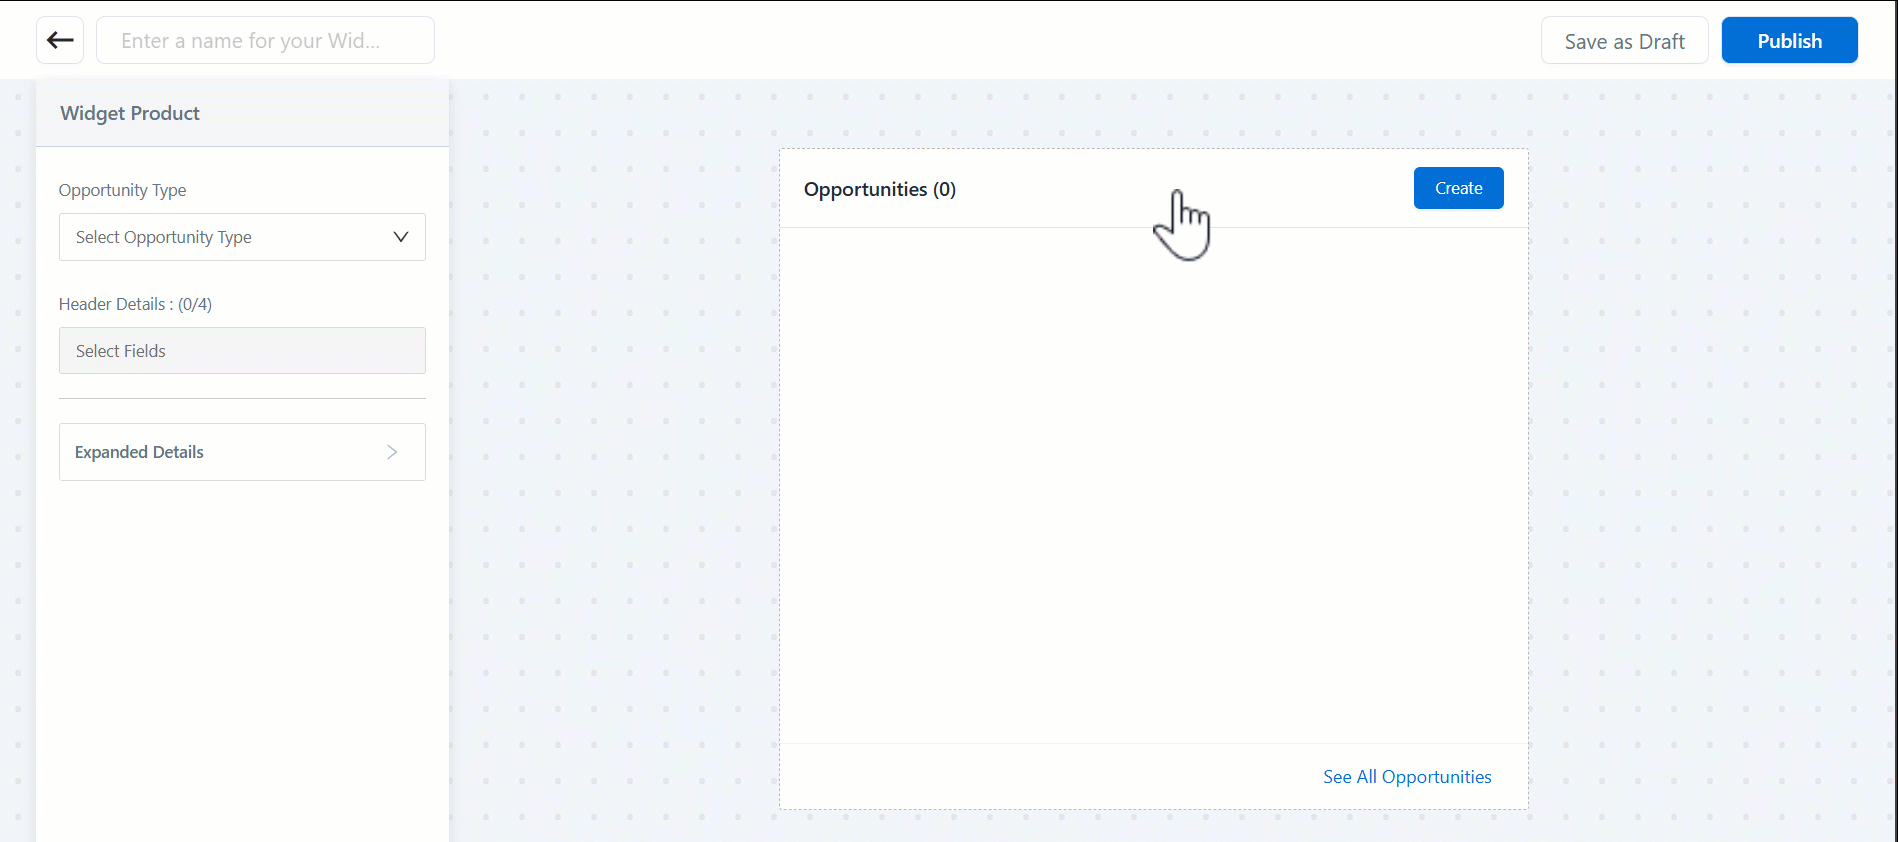
6. Products Purchased
This widget displays details of the opportunities tagged to the customer. Configure which opportunity fields you want to display on the C360 page.
- Name – When creating a new widget, give it a name. This is mandatory.
- You can also edit the name of an existing widget.
- Opportunity Type – Select the opportunity type you want to integrate with the widget.
- Header Details – Display opportunity fields (both system and custom opportunity fields) from the selected opportunity type in the widget header. Opportunity Name is selected by default, and this cannot be removed. Additionally, you can add up to three more opportunity fields in the header.
- Expanded Details – Here, select and display additional opportunity fields (both system and custom opportunity fields) from the selected opportunity type. This is rendered within the widget’s body.
Once you’re done, click Save. The widget is ready to use. You must now link it on a Page.
Note:
- Use the Opportunity Type dropdown to add multiple opportunities to the widget.
- You can also add opportunity fields associated with each opportunity type within the widget.
- Your agents can add new opportunities from the C360 page.
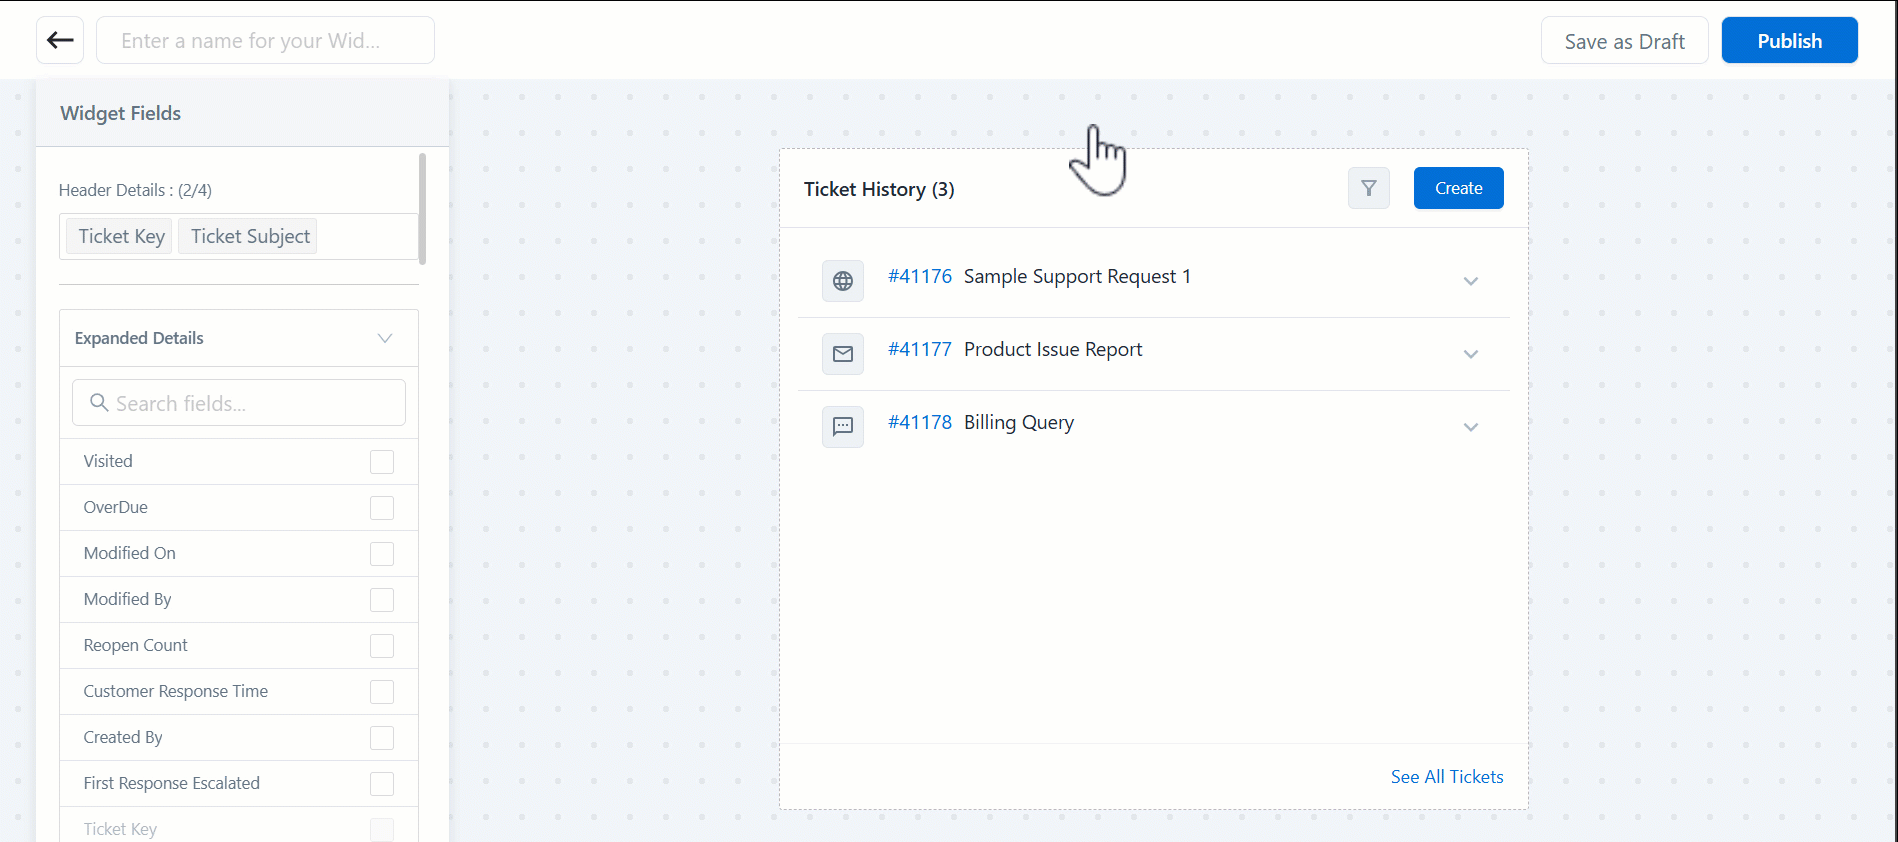
7. Ticket History
This widget displays details of the tickets tagged to the customer. Configure which ticket fields you want to display on the C360 page.
- Name – When creating a new widget, give it a name. This is mandatory.
- You can also edit the name of an existing widget.
- Header Details – Display ticket fields (both system and custom fields) in the widget header. Ticket Key (the ticket number) and Ticket Subject are selected by default, and this cannot be removed. Additionally, you can add up to two more ticket fields in the header.
- Expanded Details – Here, select and display additional ticket fields (both system and custom ticket fields). This is rendered within the widget’s body.
Once you’re done –
- Save as Draft – This saves all your configurations, but the widget will not get published.
- Publish – This publishes the widget and makes it live. You must now link it to a Page.
8. iFrame Widget
Embed external URLs to seamlessly display data from third-party apps and websites on the C360 page.
- Name – When creating a new widget, give it a name. This is mandatory.
- You can also edit the name of an existing widget.
-
Enter the URL to load on the iFrame – Paste the URL you want to display within the widget, and click Load.
Once you’re done –
- Save as Draft – This saves all your configurations, but the widget will not get published.
- Publish – This publishes the widget and makes it live. You must now link it to a Page.

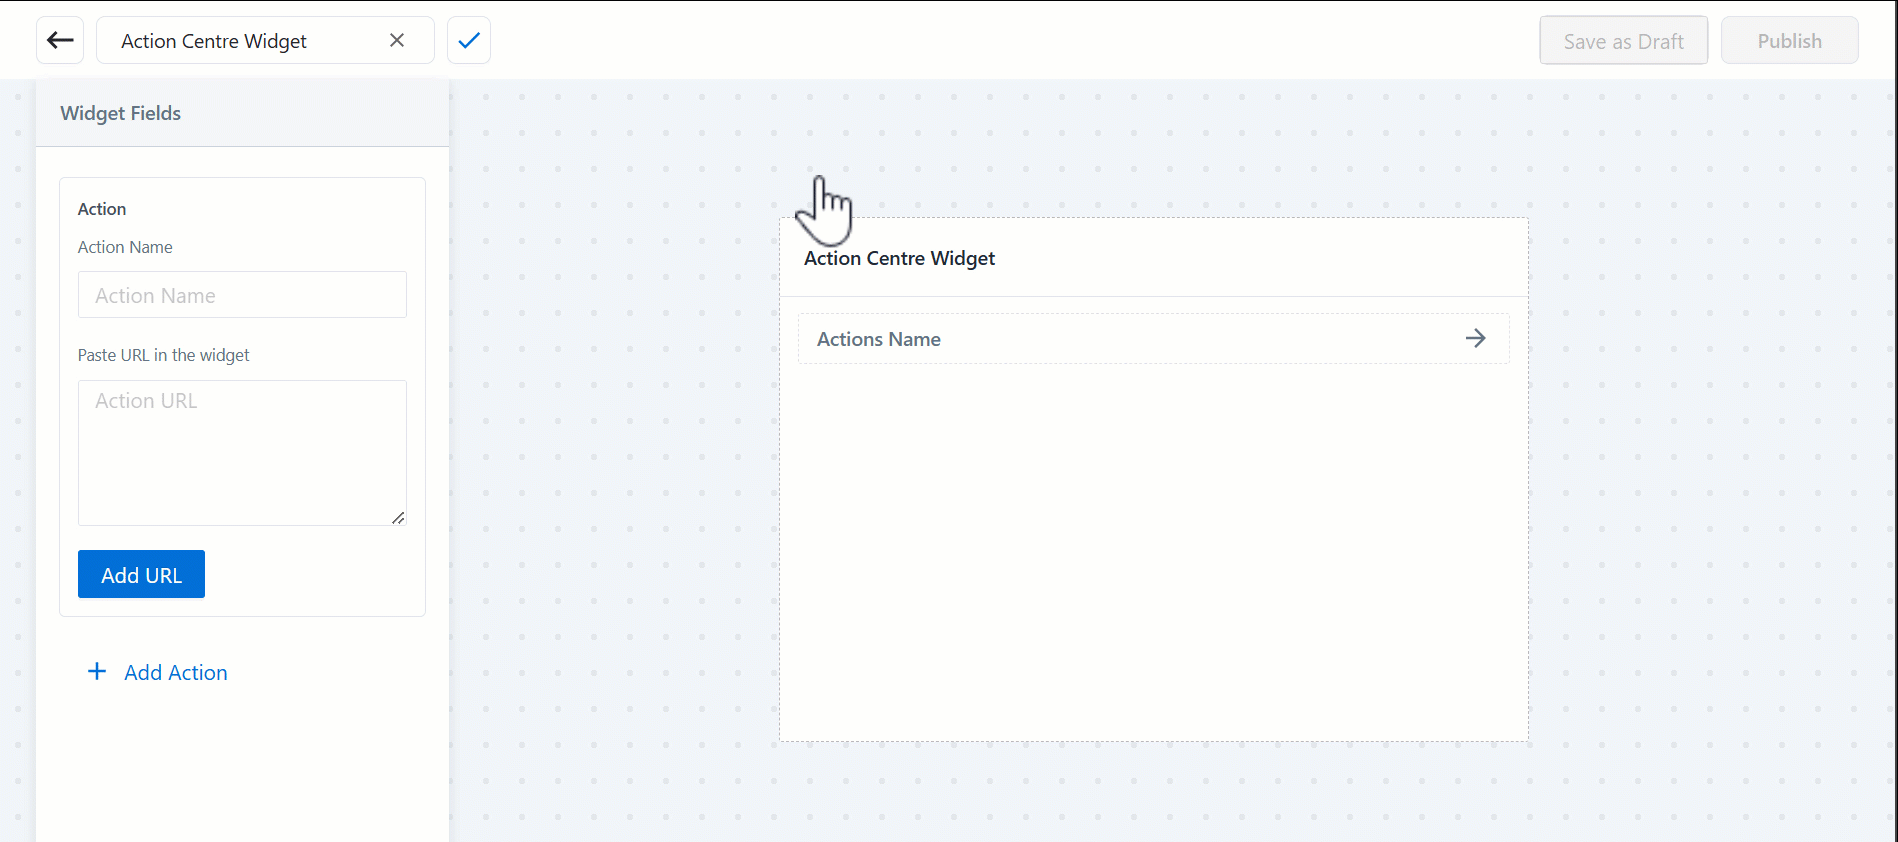
9. Action Centre Widget
Add an external URL to your C360 page. When an agent clicks on it, they are redirected to this webpage outside LeadSquared.
- Widget Name – When creating a new widget, give it a name.
- Action Name – Enter the name of the action you want the agent to perform (e.g., Visit Google, etc.).
- Paste URL in the widget – Enter the external URL to which you want the agent to be redirected.
All three elements listed above are mandatory. Once you’re done, click Add URL. Once you’ve added the URL, click on it to test it out.
To add multiple URLs within the same widget, click Add Action and provide the details mentioned above.
Once you’re done –
- Save as Draft – This saves all your configurations, but the widget will not get published.
- Publish – This publishes the widget and makes it live. You must now link it to a Page.
10. Pages
Once you’ve configured the widgets, add them to the C360 page, and associate this page with a ticket issue type. When you open the Ticket Details page (for this issue type), you’ll see the C360 button, which redirects to the page configured here. The page layout is fully customizable. Drag and drop widgets in any order.
- From C360, click Page.
- You can create a new page, or edit the existing default page.
- On the Page builder, enter a relevant name for the page.
- Drag and drop the widgets you want to display on the page.
- Use the search bar to find the widgets you want to add to the page.
- Click Map with Issue Type and select the ticket issues with which you want to integrate the page.
- If required, click Add New Section to add additional sections to the page.
- Once you’re done, click
 and preview the page.
 - Then, you must –
- Save as Draft – This saves all your configurations, but the page will not get published.
- Publish – This publishes the page, and makes it live on your account.

11. Other Actions
Perform the following additional actions from the –
10.1 Widgets Configuration Dashboard
- Filter the widgets by –
- All
- Drafts
- Published
- Unpublished
- Sort the widgets by –
- Newest First
- Oldest First
- To display the widgets on the dashboard page using a –
- Tile view, click
 .
. - Details view, click
 .
.
- Tile view, click
- Click to Edit a widget.
- Edit lets you update the details configured on a widget.
- Clone lets you create a duplicate of the widget.

10.2 360 Page Configuration Dashboard
- Filter the pages by –
- All
- Drafts
- Published
- Unpublished
- Sort the widgets by –
- Newest First
- Oldest First
- Click to Edit a widget.
- Edit lets you update the details configured on a widget.
- Clone lets you create a duplicate of the widget.

Any Questions?
Did you find this article helpful? Please let us know any feedback you may have in the comments section below. We’d love to hear from you and help you out!


