


LeadSquared Sandbox v2

1. Feature Overview
The Sandbox v2 feature lets you create a test environment to test, evaluate, and understand LeadSquared features. The Sandbox is a copy of your live LeadSquared account’s configuration, without its existing data. You can configure and test a feature in the Sandbox and, once it works as expected, deploy it to your Live environment without configuring it again.
Changes made in the Sandbox do not affect the customisations, configurations, or existing data in your live LeadSquared account during testing, ensuring new feature setup does not disrupt your users’ day-to-day work. You can use the Sandbox for –
- Product Testing – Test and configure features in the Sandbox without scheduling downtime for your live account.
- Employee Training – Give users a safe space to test and understand features without affecting live customers if they make mistakes.
- Conflict Detection – Flags changes that would affect or break your existing live configuration before you deploy them.
- Safe Mode – Lets you test automations without sending emails to customers or triggering external API calls.
- Change Tracking – Logs every change made in the Sandbox, along with who made it and when, so you know exactly what you’re deploying.
Note: The Sandbox v2 feature works alongside the existing Sandbox v1 feature.
- In v1, you could test and configure a feature in the Sandbox, but you had to repeat the setup in your Live environment once you were satisfied with the results.
- In v2, you only need to configure the feature once in the Sandbox. After you’re satisfied with the results, you can deploy the feature to your Live environment with a single click, without repeating the setup process.
2. Prerequisites
- You must be an Administrator to create and access the Sandbox.
- No existing live data (for leads, opportunities, activities and tasks) is exported into your Sandbox. Add dummy data to test the features you configure.
- To enable this feature on your account, reach out to your account manager, or write to support@leadsquared.com.
3. How it Works
- Once the Sandbox feature is enabled, create a new Sandbox environment.
- In the Sandbox, configure and update features as you normally would in the live LeadSquared environment. These changes do not affect your live data.
- Once you’re satisfied with the changes and their performance, switch back to the Live environment.
- In the Live environment, deploy the changes made in the Sandbox. Once the deployment succeeds, the changes appear in your Live environment without requiring you to repeat the setup.
4. Create a Sandbox
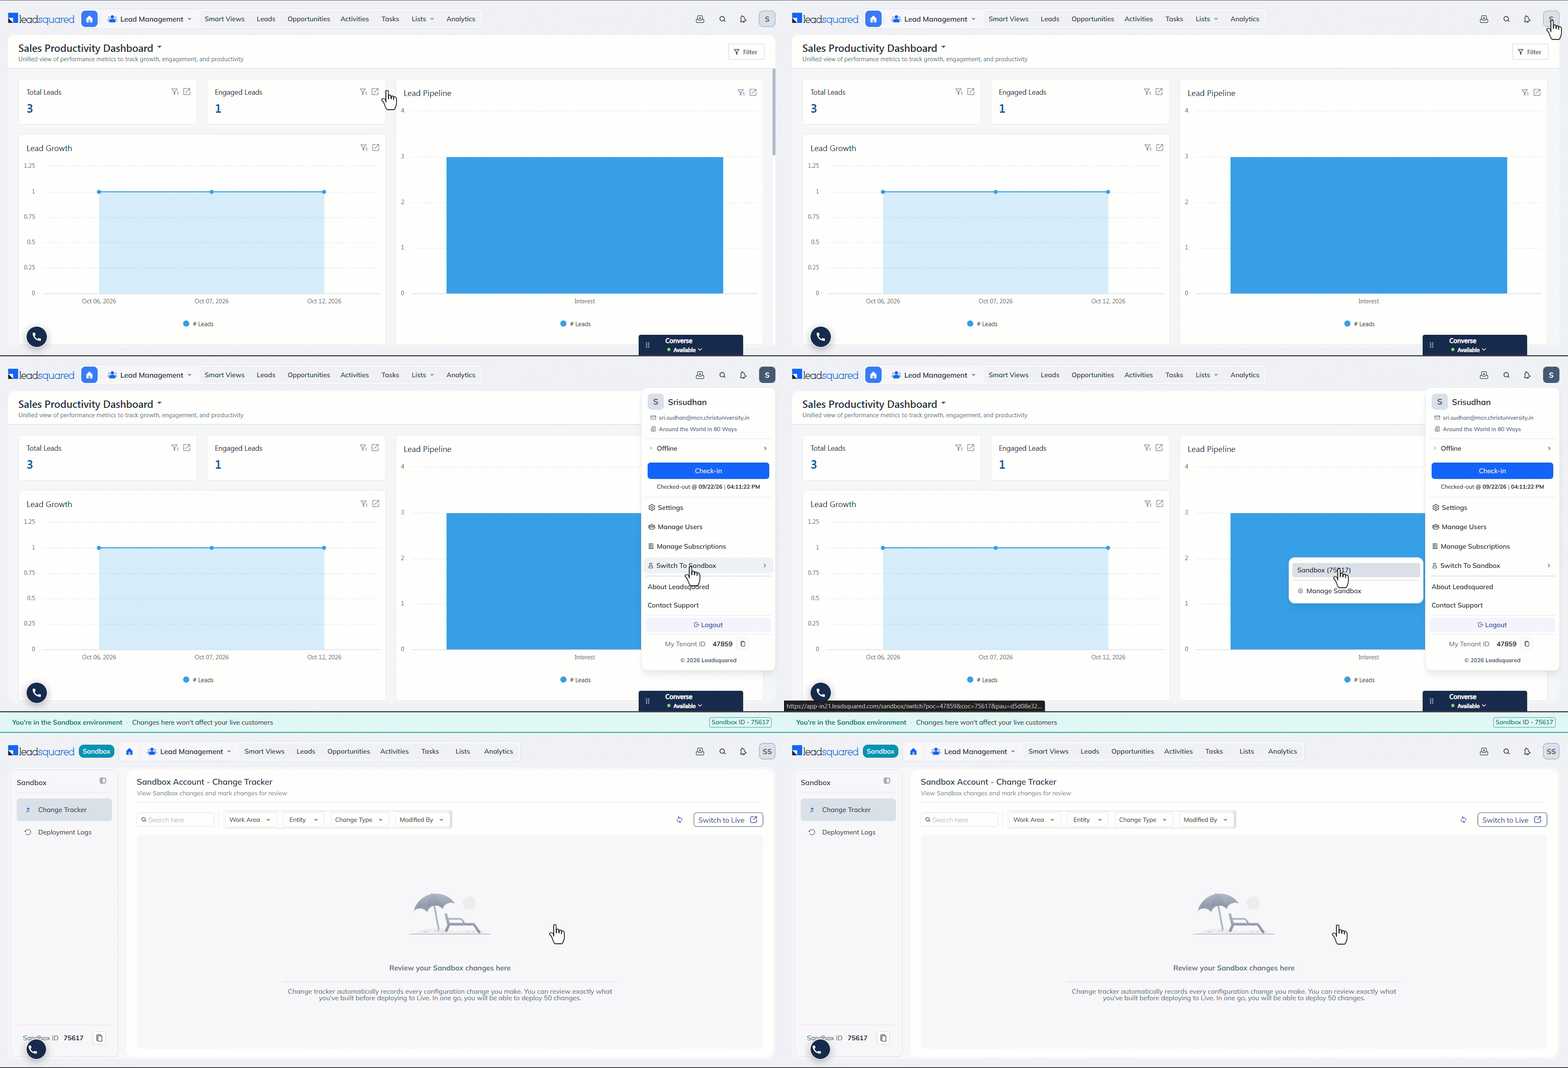
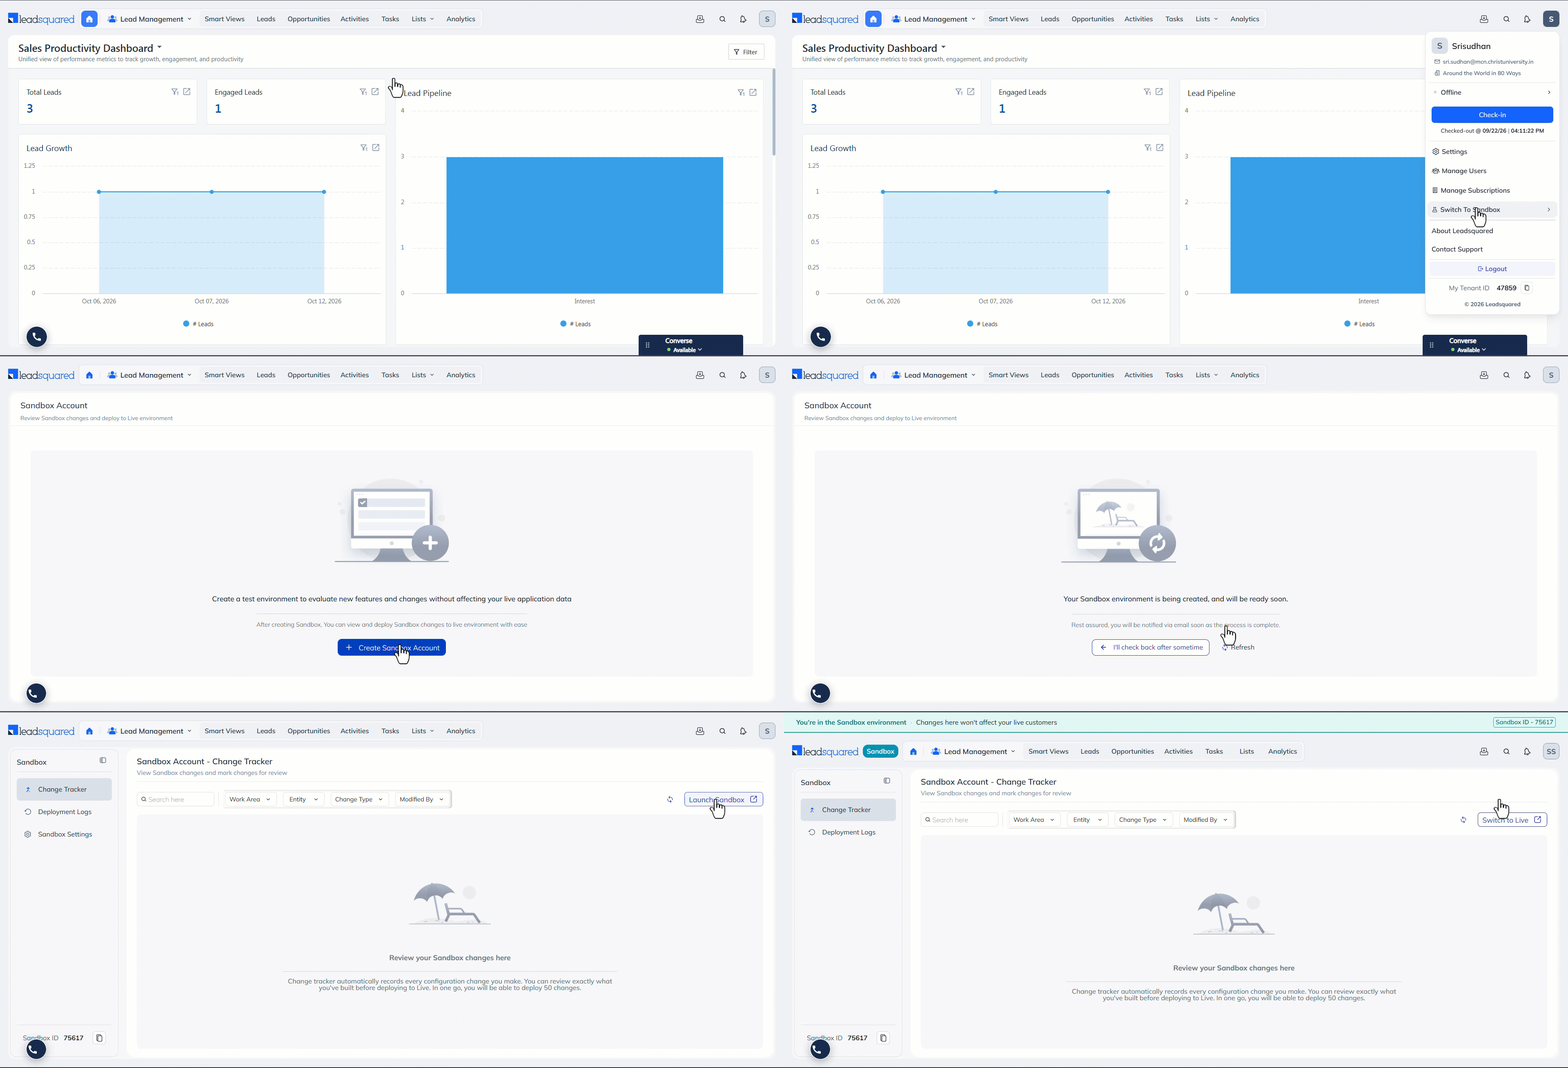
- Using your existing LeadSquared credentials, log in to your account and click the Profile icon.
- From the available options, click Switch To Sandbox, and then click Manage Sandbox.
- On the Sandbox Account screen, click Create Sandbox Account.
- On the confirmation pop-up, click Create Sandbox.
- After a few minutes, the new Sandbox environment is ready.
- To access the Sandbox, click Launch Sandbox.
Note: The Sandbox environment has a different tenant ID from your live LeadSquared account.
5. Test Features in the Sandbox
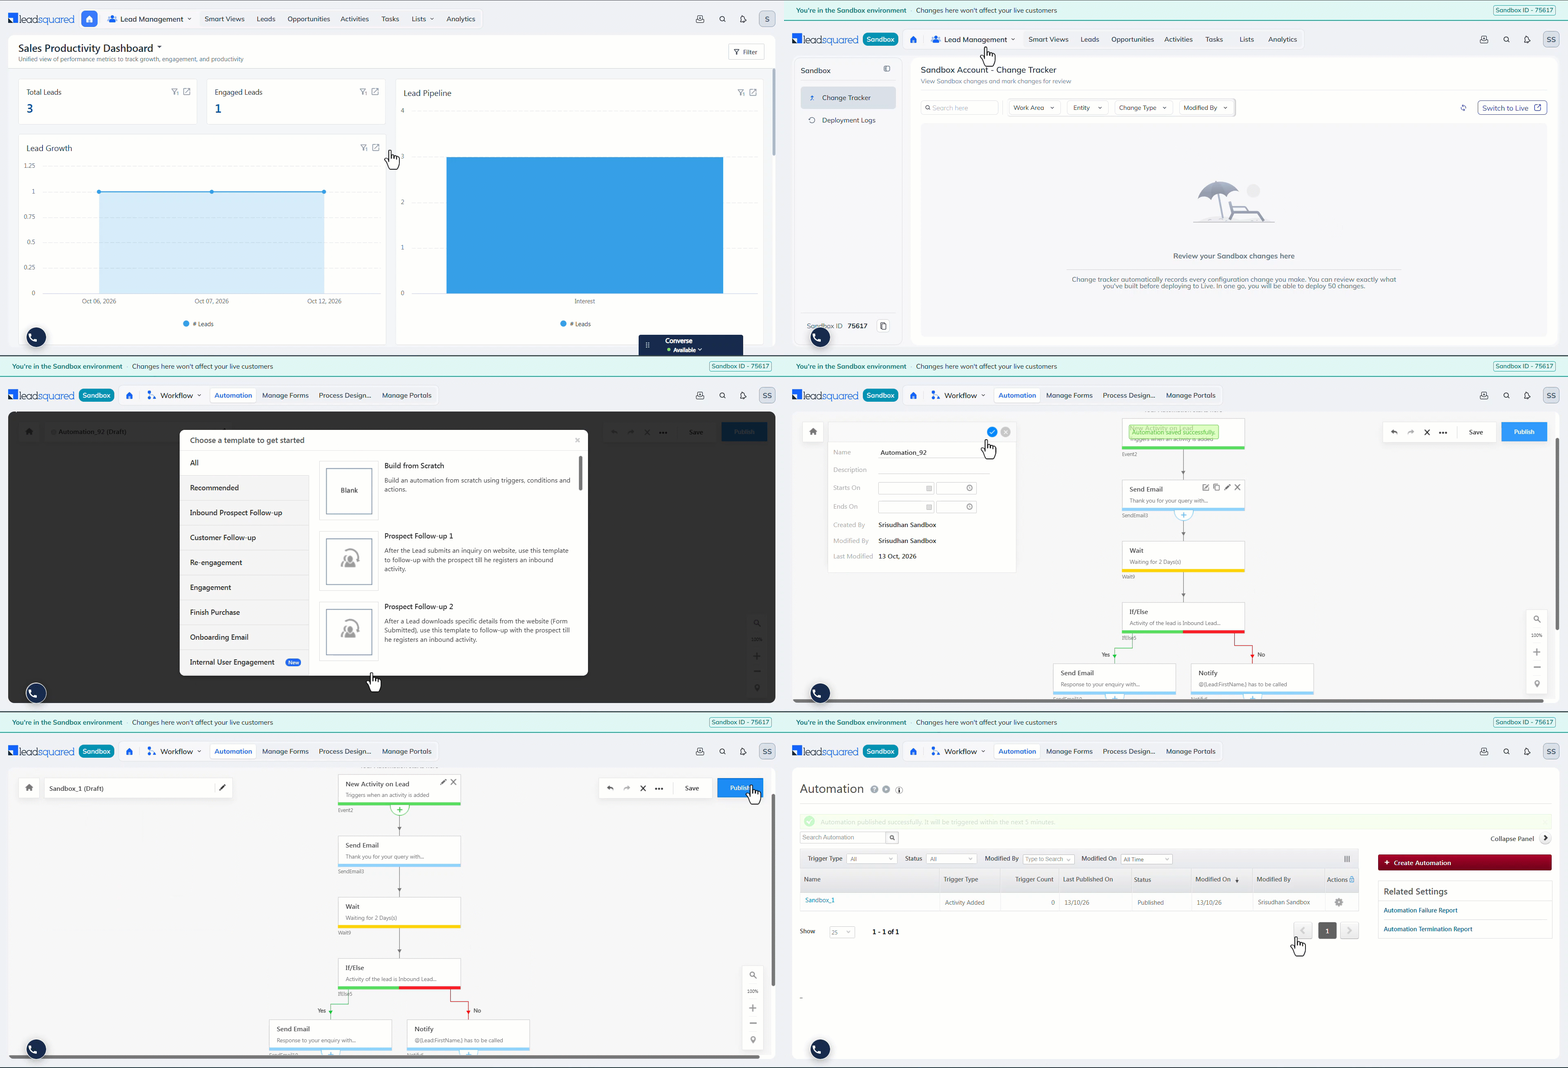
A green banner at the top of the screen always identifies the Sandbox environment. You can set up and test LeadSquared features in the Sandbox just as you would in the Live environment. In the GIF below, a simple automation is set up in the Sandbox.
6. Deploy Changes to the Live Environment
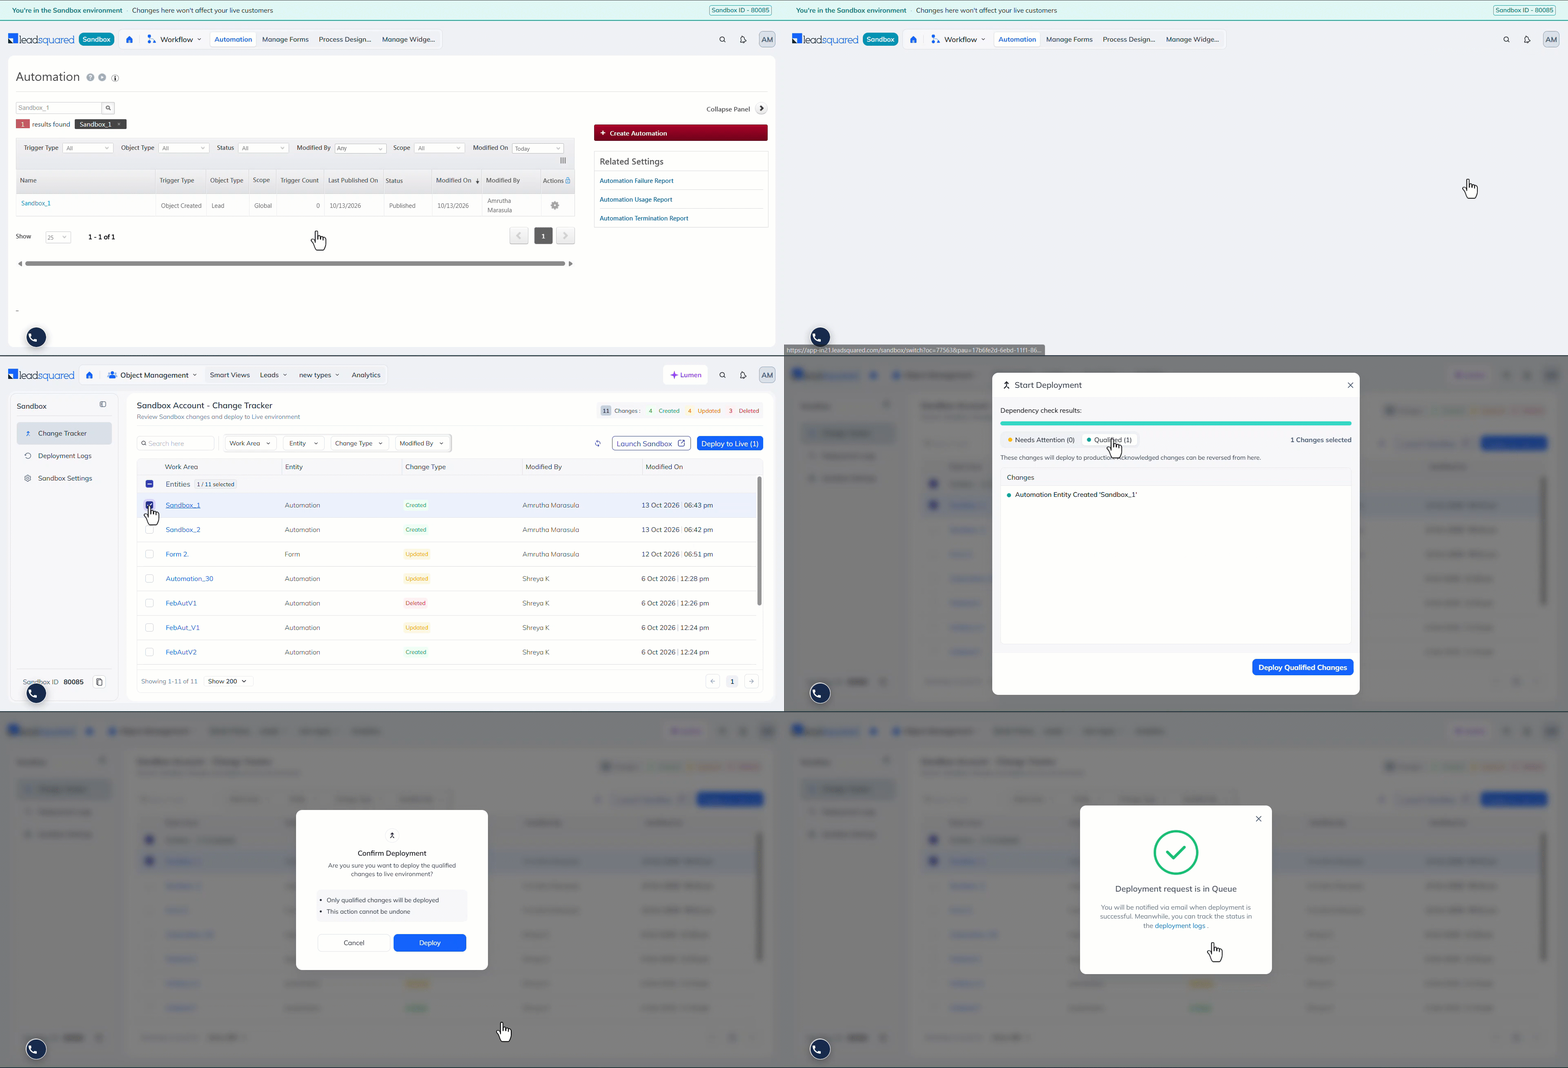
- Once you’ve made the changes in the Sandbox, click Switch to the Live Environment.
- On the Sandbox Account – Change Tracker page, select the changes you want to deploy, and click Deploy to Live.
- For changes that are flagged under the Needs Attention tab, the following options are available –
- Skip – Skip deploying the change to the Live environment.
- Acknowledge – Acknowledge that this change might not work as expected in the Live environment, and proceed to deploy it.
- For changes that are flagged under the Needs Attention tab, the following options are available –
- Once you confirm that the selected changes have qualified successfully, click Deploy Qualified Changes.
- On the Confirm Deployment pop-up, click Deploy.
- You can view the deployment status on the Deployment Logs screen.
Note:
- You can deploy the changes only from the Live Environment.
- You can deploy up to 50 changes at a time. To deploy more, deploy the remaining changes in a separate deployment.
- If any changes need your attention before deployment, they appear under the Needs Attention tab, along with the reasons why it’s being flagged. Examples of this include –
- Updating a process that affects a published form in the Live environment
- Deleting a form linked to a process or automation in the Live environment
- Some changes are classed as extended changes and take more than 24 hours to deploy. Extended changes must be deployed separately, and can’t be combined with other changes in the same deployment.
7. Change Tracker
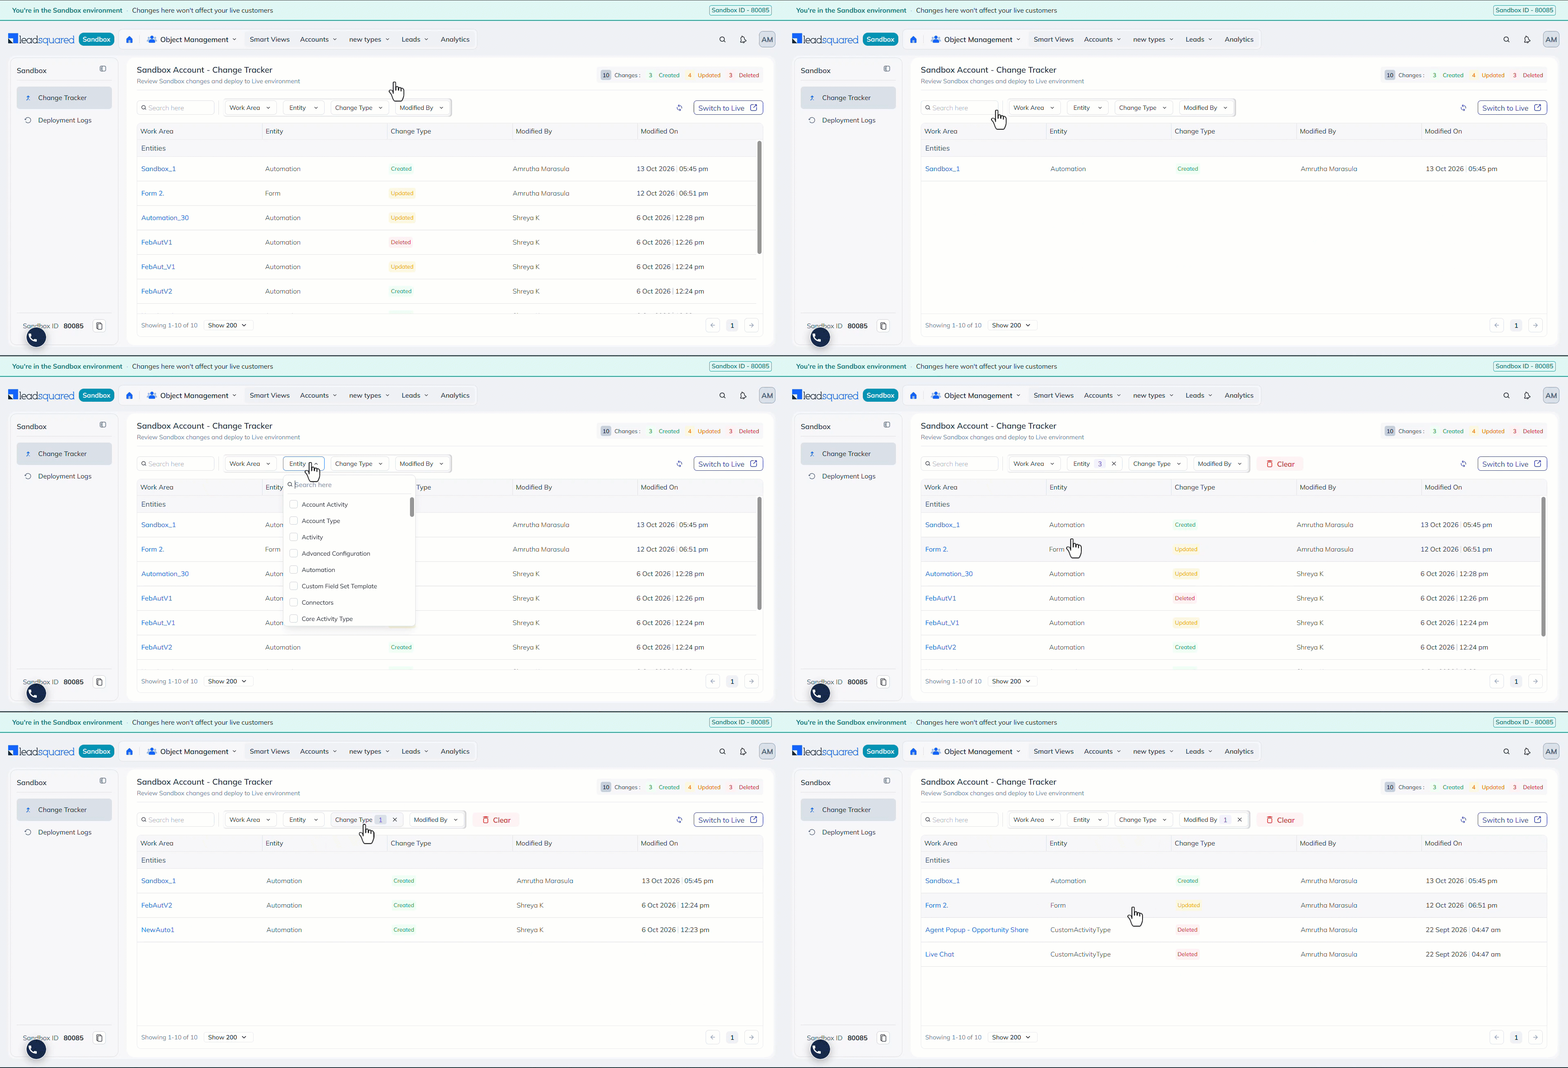
This page displays changes made in the Sandbox environment. On this screen, you can use the following filters –
- Search Box – Search for changes using the entity name (for example, an automation name or form name).
- Work Area – Filter by entities (automations, forms, processes, etc.) or by fields (lead fields, activity fields, etc.).
- Entity Type – Filter by specific entities (leads, connectors, telephony, etc.).
- Change Type – Filter changes by action type –
- Create – Set up new features from scratch
- Update – Modify an existing feature’s settings
- Delete – Remove an existing feature
- Modified By – Filter by the LeadSquared users who made the changes in the Sandbox.
8. Deployment Logs
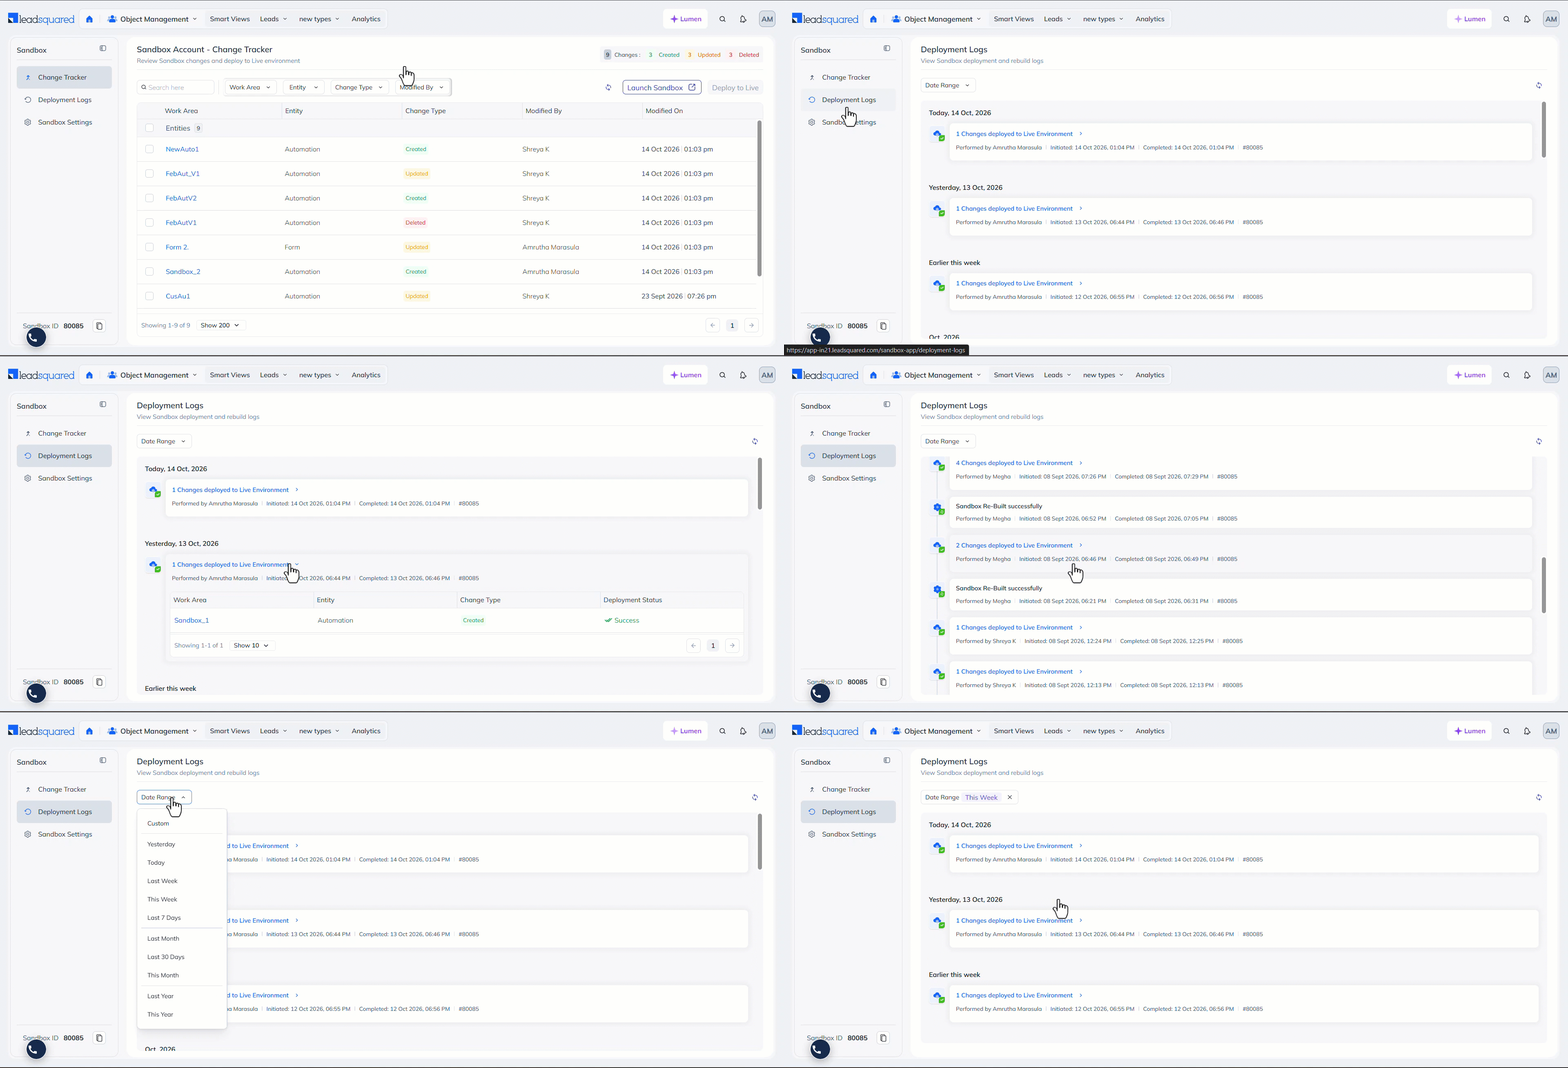
This screen displays the current status of a deployment to the Live environment.
- Once a change is deployed, the status updates to Pending, Success, or Failed.
- The logs also show the name of the user who performed the deployment and when the changes were deployed.
9. Sandbox Settings
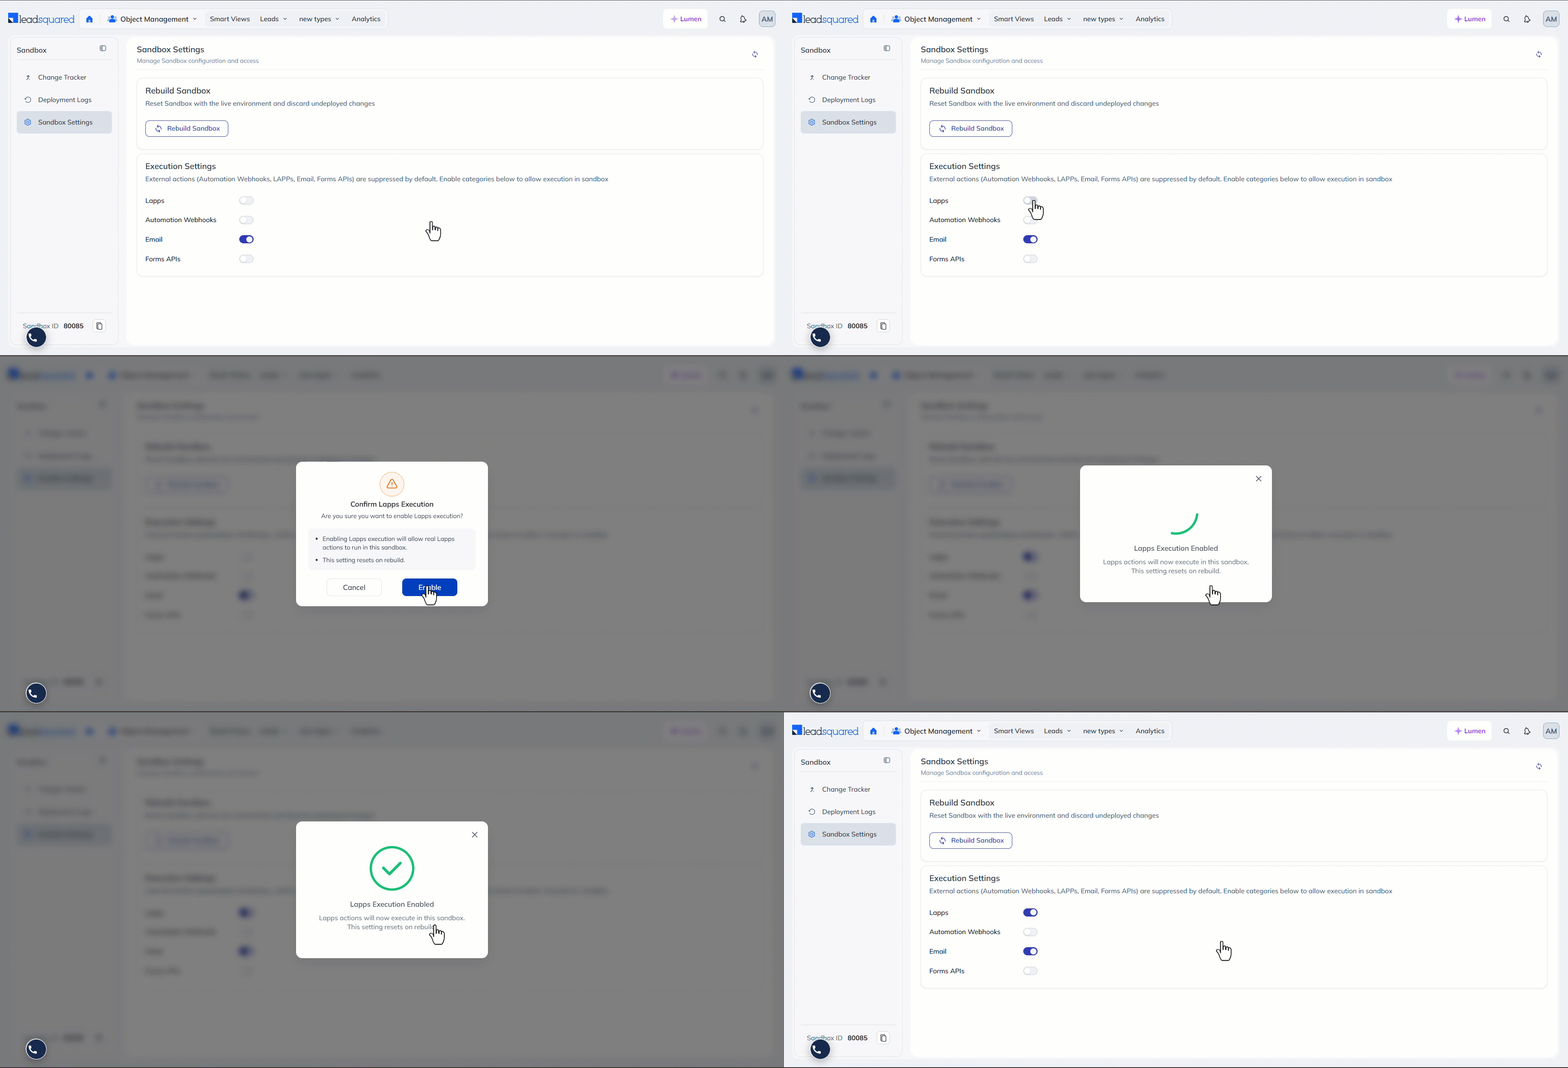
You can perform the following additional settings on the Sandbox Settings page –
- Rebuild Sandbox – Resets the Sandbox with your Live environment’s configuration and discards undeployed changes.
- Previously deployed changes continue to function as expected.
- Execution Settings – The following actions are disabled by default in the Sandbox. To enable an action and to test these features, turn on the setting alongside its name –
- Lapps
- Automation Webhooks
- Form APIs
Note:
- This page can be accessed only from the Live environment.
- You can rebuild the Sandbox only once every 24 hours.
Any Questions?
We’d love to answer your questions or hear your own unique use cases. Feel free to share your experiences in the comments section below.