


Get Started
Sales Suite
Field Ops
Marketing
Service CRM
Integrations & Apps
FloStack
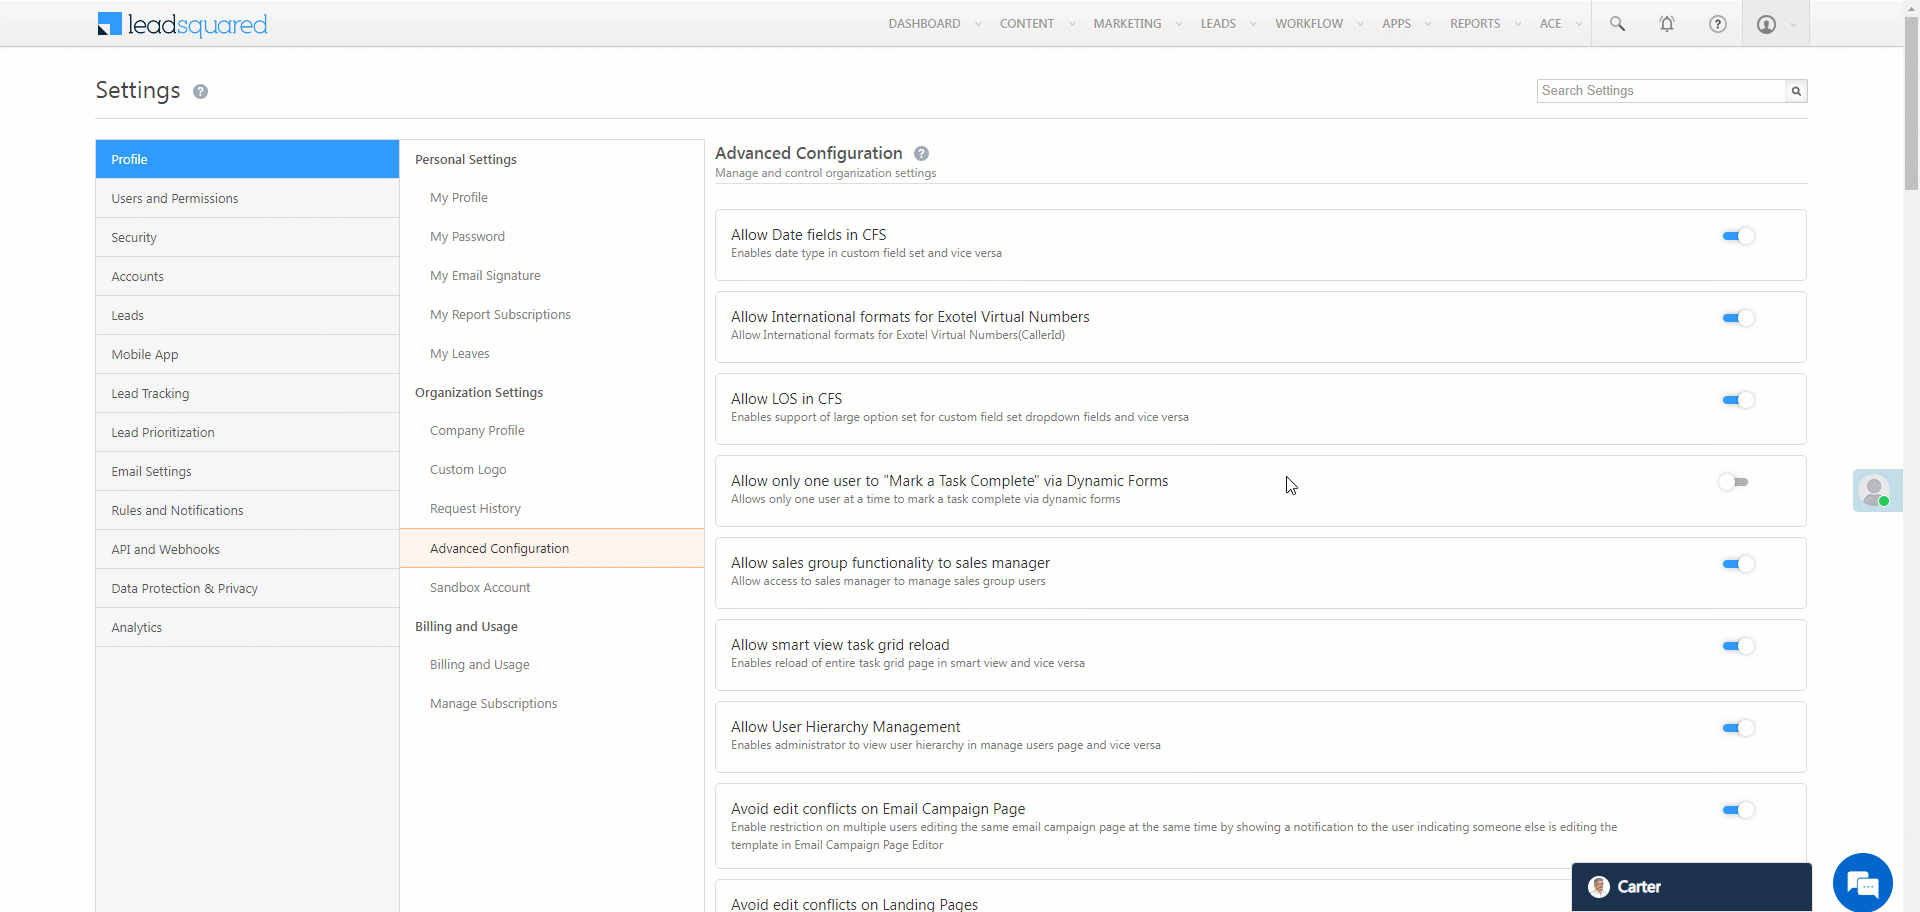
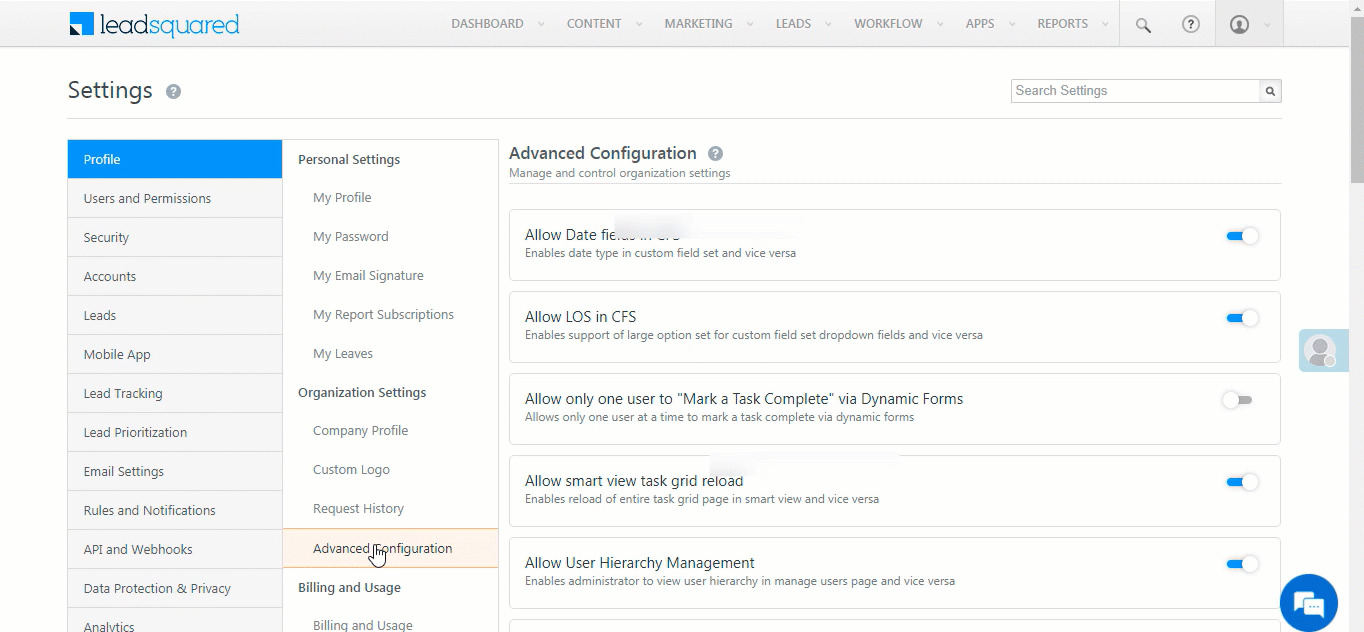
Organization Settings – Advanced Configuration
1. Feature Overview
The advanced configuration page enables you to manage settings related to key features for your organization. Once enabled, settings are applied globally (for all users) across your LeadSquared account. This article explains each of these settings in detail.
2. Prerequisites
- Settings on this page are only accessible by LeadSquared Admin users.
- Certain settings are available only if the associated feature is enabled on your account. Contact us at support@leadsquared.com if you want to enable new features on your account.
3. Navigation
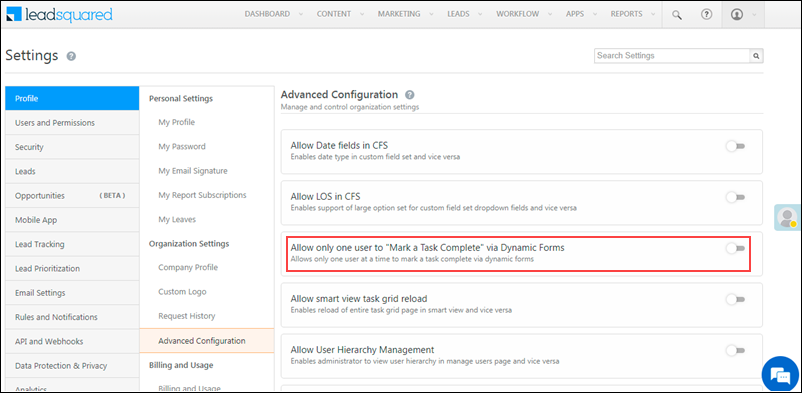
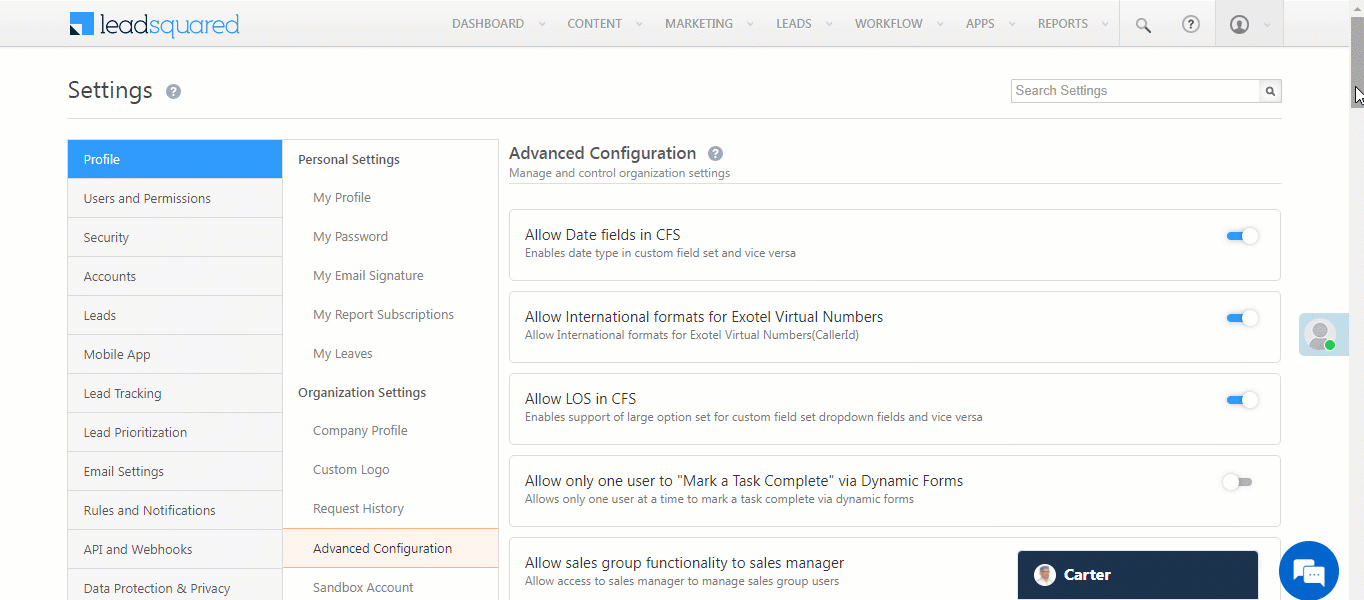
The Advanced Configuration page is available under Settings>Profile>Organization Settings>Advanced Configuration.
4. Settings
- Allow Date Field in CFS
When enabled, admin users can create date type fields within Custom Field Sets. One of the primary use cases for Custom Field Sets is to upload files and documents (for KYC, loan approvals, education assessments, etc.). This setting will help users capture dates associated with these document collection activities.

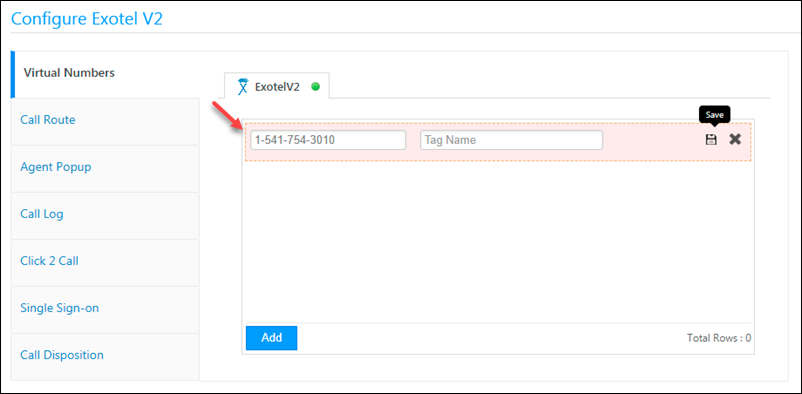
- Allow International formats for Exotel Virtual Numbers
Enables you to configure international phone numbers in the Virtual Numbers (Caller Id) field of the Exotel V2 connector.
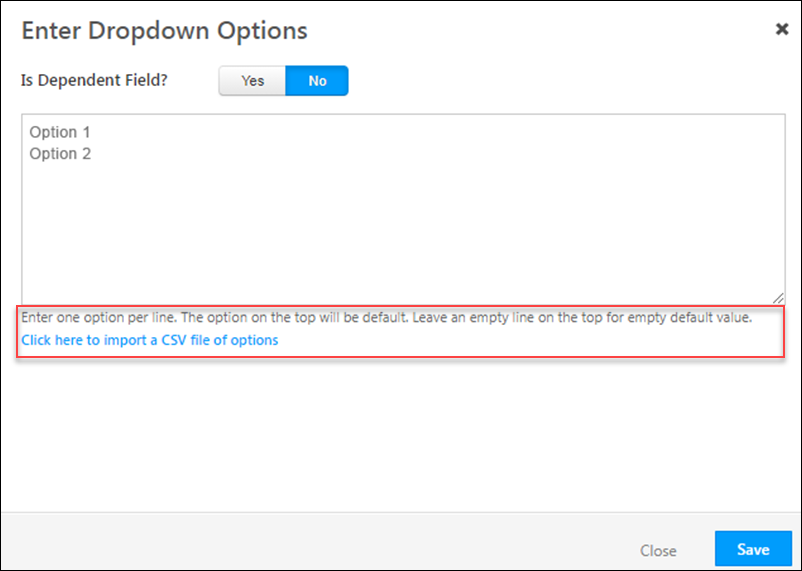
- Allow LOS in CFS
When enabled, admin users can add a large number of values (see Large Options Set) to drop-down type fields within Custom Field Sets. This is helpful if you want to create drop-downs with a large number of values like a list of schools/colleges, a list of doctors/hospitals, multiple locations/cities, etc. Once enabled, while associating the CFS with a lead or activity, you can upload a CSV file with the list of options instead of creating them manually.
- Allow only one user to “Mark a Task Complete” via Dynamic Forms
When enabled, two users will not be able to mark a task as complete from a dynamic form at the same time. Only a single user can mark a task as complete.
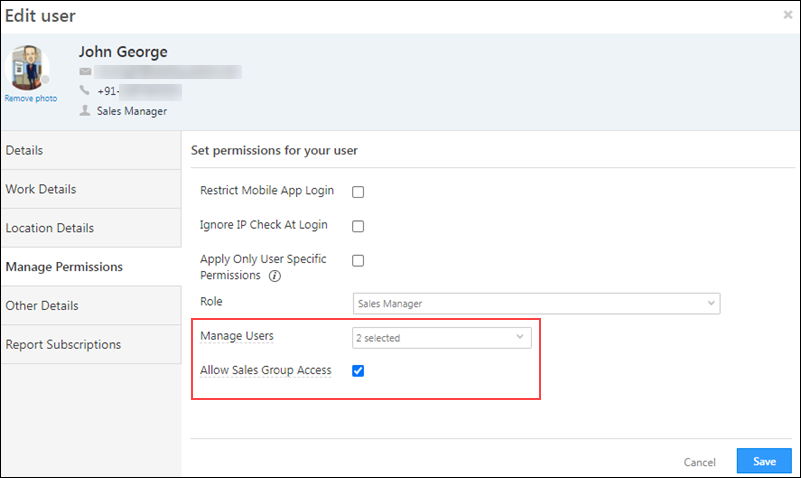
- Allow sales group functionality to sales manager
When enabled, Sales Manager user roles will be able to access the Sales Groups Settings page to create, manage and delete sales groups.

Once you enable this setting, ensure the following permissions are given to your Sales Managers –
- Navigate to the My Profile>Settings>Users and Permissions>Users, and create or edit a user.
- Click Manage Permissions, click Edit, and from the Manage Users dropdown, select Sales Manager.
- Alongside Allow Sales Group Access, enable the
 checkbox.
 - Once you’re done, click Save.
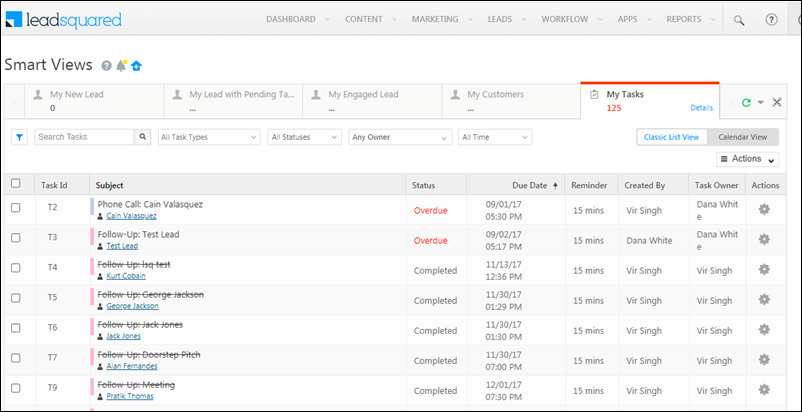
- Allow smart view task grid reload
When enabled, the Smart Views task grid automatically reloads once a task is marked as complete.
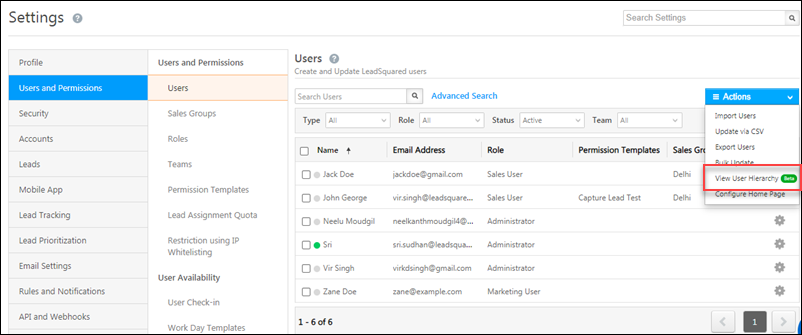
- Allow User Hierarchy Management
Once enabled, admin users can create and update user hierarchies from the Manage Users page. The user hierarchy UI gives users a simple drag and drop interface to organize users according to their reporting managers (based on the ‘Reporting To’ user field). For more details see Manage Users.
-
Allow users to save dynamic forms as Drafts
Enable this setting to access the Save as Drafts feature which enables users to save their progress while filling out Dynamic Forms, allowing them to pause and return later to complete and submit the form. To know more, see Save a Dynamic Form as a Draft.
-
Allow Users without lead access to create opportunities
When the ‘Allow Sales User to Create Opportunity on Inaccessible Leads’ setting is enabled, users will be able to view all leads in the associated field search results, ensuring no relevant lead is missed during opportunity creation. Additionally, even when both ‘Allow Sales User to Create Opportunity on Inaccessible Leads’ and ‘Allow Sales User to Update or Overwrite Lead Fields of Inaccessible Leads’ settings are enabled, the system will allow users to search for leads but will restrict them from modifying lead fields.
- Avoid edit conflicts on Email Campaign Page
When enabled, multiple users will not be able to edit an Email Campaign at the same time. An error notification will be displayed to subsequent users who try to edit the campaign. - Avoid edit conflicts on Landing Pages
When enabled, multiple users will not be able to edit a Landing Page at the same time. An error notification will be displayed to subsequent users who try to edit the page. - Change Owner of Opportunity Tasks on Opportunity Owner change
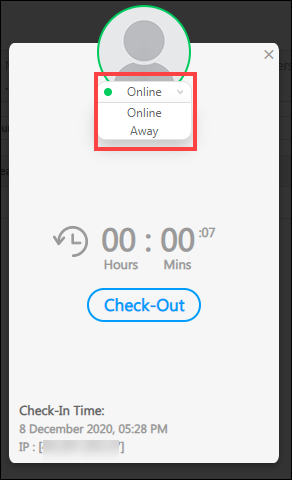
Once enabled, every time there’s a change in the opportunity owner, pending and overdue tasks on that opportunity will be automatically assigned to the new owner. - Check-in/Check-out status configuration
Allows you to configure status names and status colours for user check-in and check-out. To know more, please refer to User Management Features: Check-In and Check-Out.
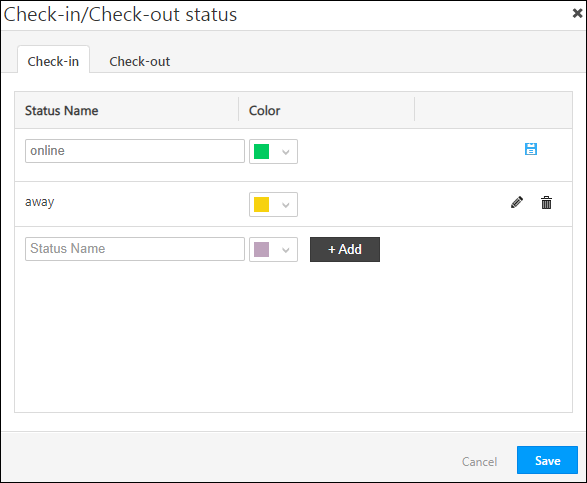
The statues configured here will reflect on the Check-In/Check-Out widget.
-
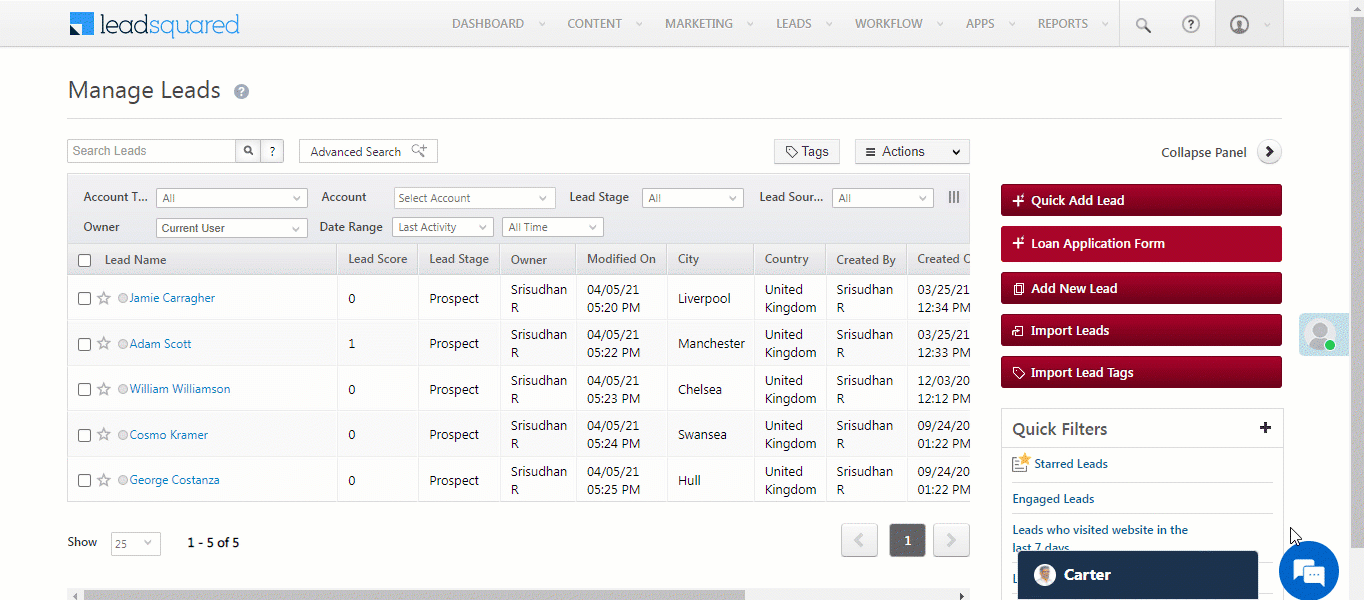
- Configure Actions Panel in Manage Leads/Activities/Opportunities/Smart Views Page
Configure the Action Panel to hide the following Quick Add action buttons –
-
- On the Manage Leads page – Quick Add Lead, Add New Lead and Add New Lead (in a new tab)
- On the Manage Activities page – Add Activity and Add New Lead
- On the Manage Opportunities page – Add Opportunity and Add New Lead
- On the Smart Views page – Across all the Add Activity, Add Lead and Add Opportunity buttons.
To hide these buttons –
- Click Configure.
- On the Configure Actions Panel pop-up, from the respective entity tabs, uncheck the
 checkboxes for the buttons you want to hide.
 - Once you’re done, click Save.
In the below example, we’ve configured the Action Panel to hide the Quick Add Lead button on the Manage Leads page.
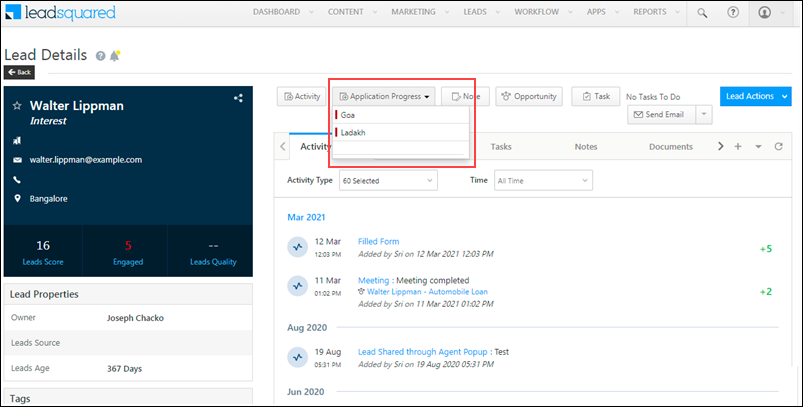
- Configure Activity Process Button in Lead Details
Configure the display name of the Processes button, present on the Add Activity process on the Lead Details page. If you’ve configured a process to show different forms on the Lead Details page, this setting will allow you to change the display name of the button that triggers the process. To know how to add a process, please refer to How to Create a Process.
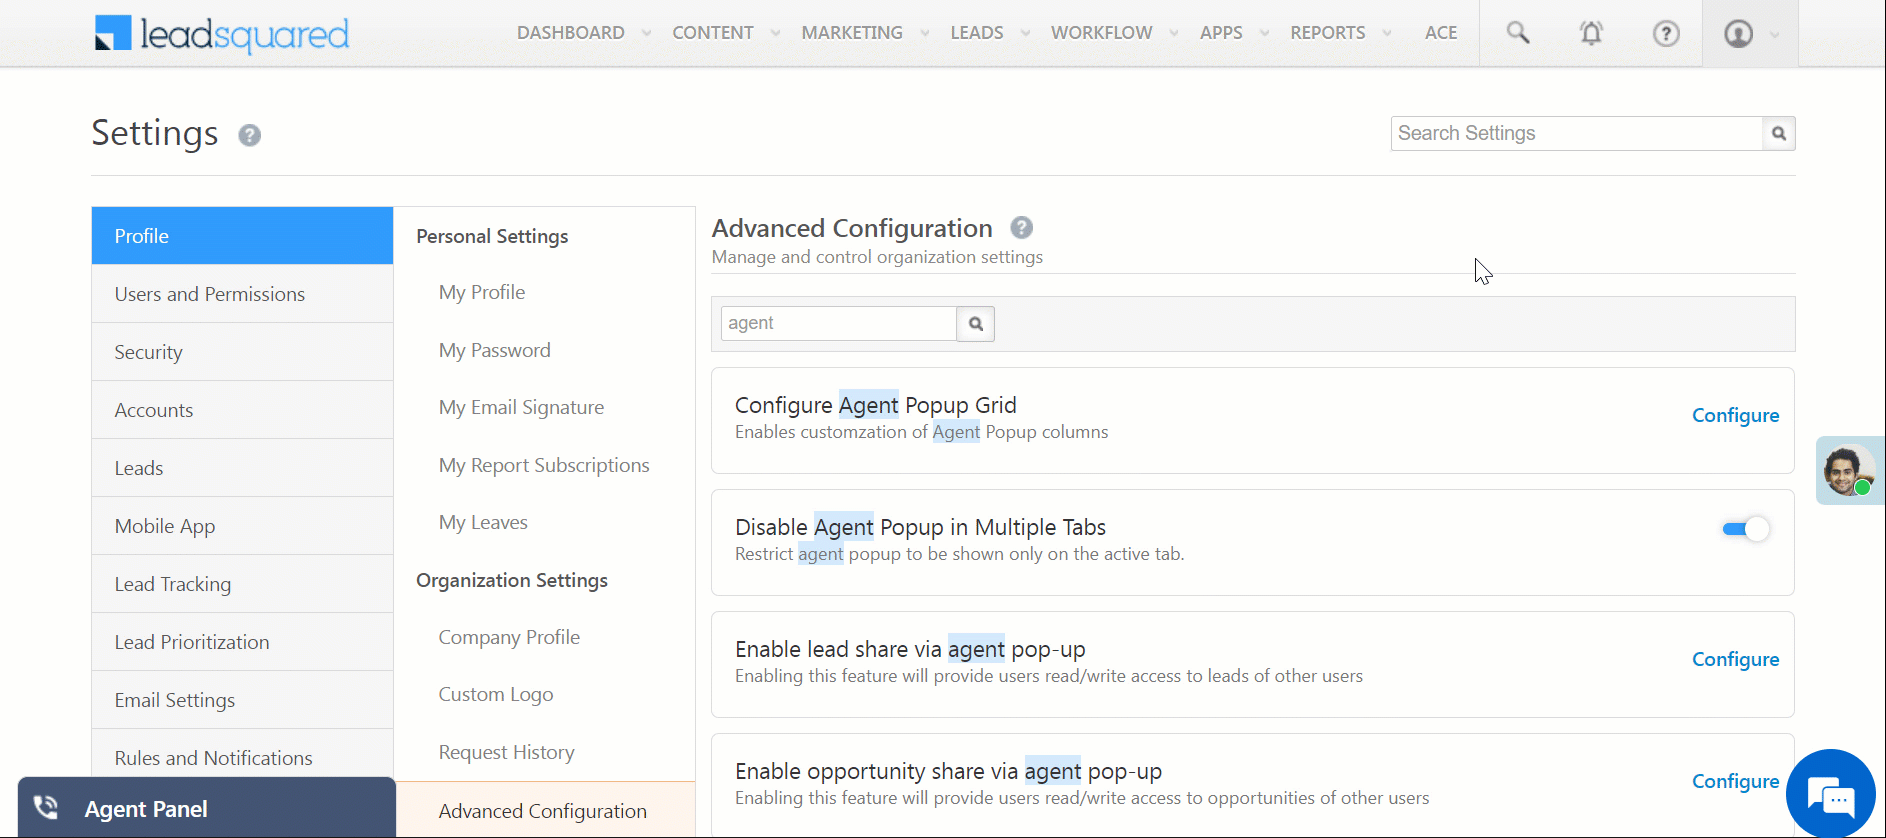
- Configure Agent Popup Grid
Admins can customize the columns in both Lead and Opportunity grids within the Agent Popup to align with their business requirements. Additionally, they can choose to disable the grids if needed.
- Click Configure.
- Select Enable Lead/Opportunity Grid in the Lead or Opportunity Tab.
- Select the Columns under their respective Schema Name.
- Configure Custom Fields for User On-Boarding in Mobile App
When enabled, users who don’t have access to email inboxes can still sign-up for their LeadSquared account. This setting can help you onboard external vendors, delivery partners, or third-party service providers. To know more, please refer to Sign-up Users Without Access to Email Inboxes.
- Configure Smart Views
Allows you to configure the number of custom filters you can set on a Smart Views tab, along with the auto refresh rate (intervals) for these Smart Views tabs.
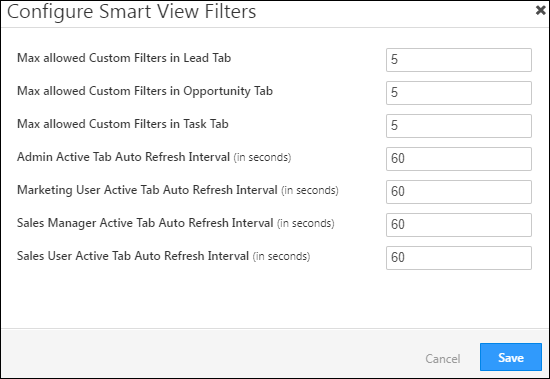
Note that you can set a maximum of 15 filters per tab.
- Configure telephony ignore rules
When enabled, this setting will ignore calls from unknown numbers. This works across all telephony providers. Logs of ignored calls will still be posted in your account. To view telephony logs, navigate to My Profile>Settings>API and Webhooks>Telephony Logs.
- Configure User Deactivation rules
Let’s you restrict your Admins from deactivating users with associated leads/opportunities. To do this –
- Search for Configure User Deactivation rules, and click Configure.
- On the User Deactivation Rules pop-up, enable the checkbox to restrict deactivation –
- If user has associated Leads
- If user has associated open Opportunities
- Once you’re done, click Save.
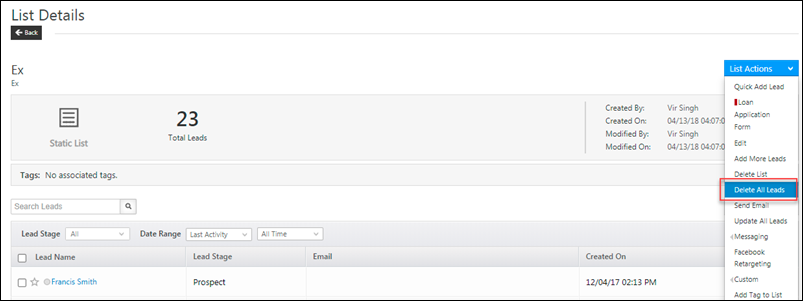
- Disable ‘Delete all Leads’ static List Action
This setting hides the Delete all Leads action on the List Details page. It helps prevent accidental lead deletion.
- Disable Access of LSQ app in Iframe
This is a security setting that disables clickjacking in your LeadSquared account. When enabled, LeadSquared won’t work in an Iframe.
- Disable Agent Popup in Multiple Tabs
When enabled, the Agent pop-up will only be displayed on the active browser tab (when LeadSquared is open on multiple tabs).
- Disable Lead Notes Feature
When enabled, users won’t be able to add notes to a lead -the Add Note button and Notes tab on the Lead Details page won’t be visible. This setting is helpful to prevent users from adding notes to leads and encouraging them to adhere to a defined business process (adding details in activities, forms, etc.). However, notes created via API will still be posted against leads.

- Disable Opening of Entity Details in Marvin
By default, the Lead or Opportunity details page opens automatically for incoming calls in Marvin. Turn this on if you prefer not to open the details page automatically.
- Enable Async APIs for Telephony (Capras)
For customers using the Exotel Telephony connector, once you enable this setting, you can use LeadSquared’s Async API framework to ensure more reliable call logs posting for outbound calls. To know more, refer to Exotel Connector.
- Enable Auto Check-In on Login
When enabled, users logging in to their LeadSquared accounts will be automatically checked in. This setting can be enabled only if user check-in is configured on your account. To know how to configure it, refer to User Management Features: Check-In and Check-Out.
- Enable Auto Check-out on Sign-out
Users can now automatically check-out of LeadSquared while logging out. When this setting is enabled, users will only get the option to ‘Check-out and Log-out’ while signing out of LeadSquared. This allows Admins and Managers to view an accurate report of the users’ Check-in and Check-out history.
- Enable Automation Mail Merge as per ‘From’ User’s Time Zone in Email Cards
When a user is in a different timezone, and the LeadSquared account is configured in a different timezone, and a mail merge date/time field is included in the Send Email automation card, the account’s timezone is automatically applied to the date/time value of the field.
For example, a user’s timezone is configured to Pacific Time (PT) and the LeadSquared account is configured to Eastern Time (ET). When a date/time mail merge field is added in the Send Email automation card like an application interview date field, the value of the field is automatically set to the account timezone (ET) instead of the user’s timezone (PT). This may result in the lead receiving an unintended application interview date/time in the email.
Once enabled this setting applies the user’s timezone to the mail sent through the automation card. - Enable change of Opportunity owner on Lead owner change
When enabled, the new lead owner will automatically become the opportunity owner for all child opportunities under the lead. - Enable Call Log Optimization
The Call Log API for telephony integrations can now be optimized for better performance. - Disable Report Subscriptions
Disables the Daily Reports subscription for all users in your account.
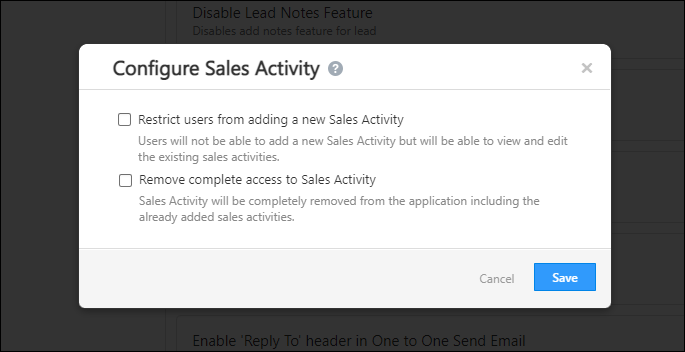
- Disable Sales Activity
Click Configure to –- Restrict users from adding a new Sales Activity – When selected, users in your account will not be able to add any new Sales Activities. They can continue to view and edit existing Sales Activities.
- Remove complete access to Sales Activity – When selected, users in your account will not be able to add new Sales Activities. Additionally, they will also not be able to view and edit existing Sales Activities.
To know more, refer to Disable Sales Activity Access.
- Disable Task Type configuration for non-admin roles
Restricts Marketing Users and Sales Manager roles from viewing, creating and configuring task types.
- Enable anchor tag for lead name
When enabled, the lead name link that redirects to the Lead Details page in the Manage Opportunities grid will be available. You can disable this to reduce clutter, if users are working specifically on opportunities.
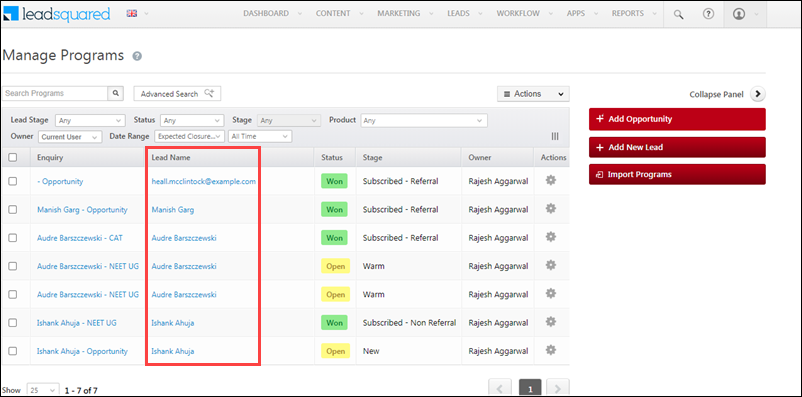
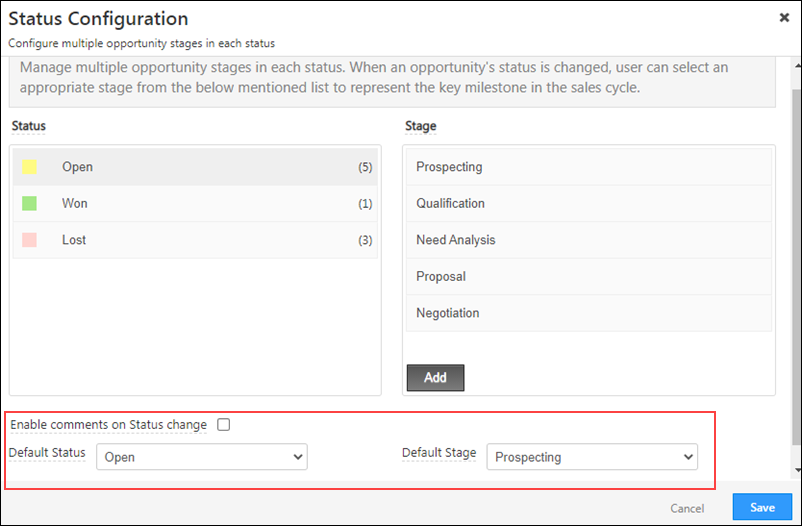
- Enable Default Status And Stage
This setting allows you to set a default status and stage for new opportunities. To configure statuses and stages, please refer to Opportunity Configurations.
- Enable default tab for all users
This setting allows you to set a default tab (such as Activity History, Tasks, etc.) for all users on the Lead Details page. To do this, against the setting, click Configure, and select the default tab you want to display.
- Enable Email Notification on Automation Failure
Select the list of users who’ll receive an automation failure email notification. To do this, click Configure, and on the Notify Users on Automation Failure pop-up –
- Under Notify, on automation failure, if you want to notify the
- User who created the automation, enable the checkbox.
- User who modified the automation, enable the checkbox.
- To view the list of users in your account by user role type, from the Filter by Role dropdown, select the role type.
- From the list of Available Users, select the users you want to notify, and click
 .
. - Once you’re done, click Save. The selected users will receive a notification of automation failure.
- Enable Enhanced Data Type For Opportunity
Enable this setting to Configure Opportunity Fields using the following data types –
-
- Phone
- Date
- Geolocation
- Auto ID
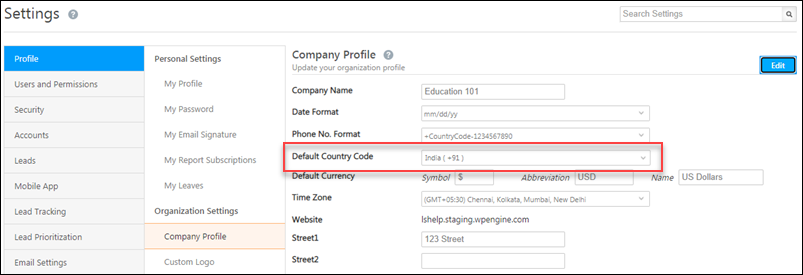
- Enable formatting of non-unique phone type lead fields
When enabled, phone type lead fields that are not marked unique, will be processed and formatted as follows –
+cc-<phone number>
For this to work, the default country code must be defined from the Company Profile settings (Settings>Profile>Organization Settings>Company Profile and define ‘Default Country Code’ field).
- Enable full screen mode of lead details
When enabled, if a user clicks on a lead from a Smart Views tab, the Lead Details page will open in full-screen mode.
- Enable Hiding Opportunity Activities of other users
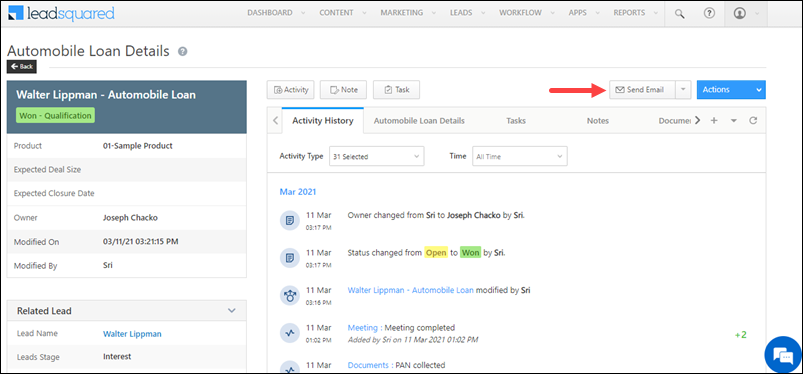
When enabled, the opportunity owner will not be able to view the activities posted on the opportunity by other users, under the Activity History tab on the Opportunity Details and Lead Details pages. For e.g., when there is a change in opportunity owners, this setting can be used to hide past activities from the new owner. - Enable Lead Capture
When enabled, lead capture activities (captured by the Lead Capture API) posted for duplicate leads, are visible on the Lead Details page, under Activity History.

- Enable leading zeros in phone type lead fields
When enabled, users can create phone numbers with zero as the first digits. This is helpful for phone numbers in certain countries that support zeros as the first digit of the phone number.
- Enable new phone number format setting
Once enabled, international phone numbers will be formatted in the cc+phonenumber format.
- Enable Opportunity – Telephony
When enabled, opportunities are integrated with telephony connectors. This allows users to perform telephony events on opportunities. To know more, please refer to Opportunity Integrations in Telephony.
- Enable opportunity audit for import and V2 API operations
Once enabled, changes made through Opportunity Import and Opportunity Management APIs will get captured and logged on the Opportunity Details page, under the Activity History tab.
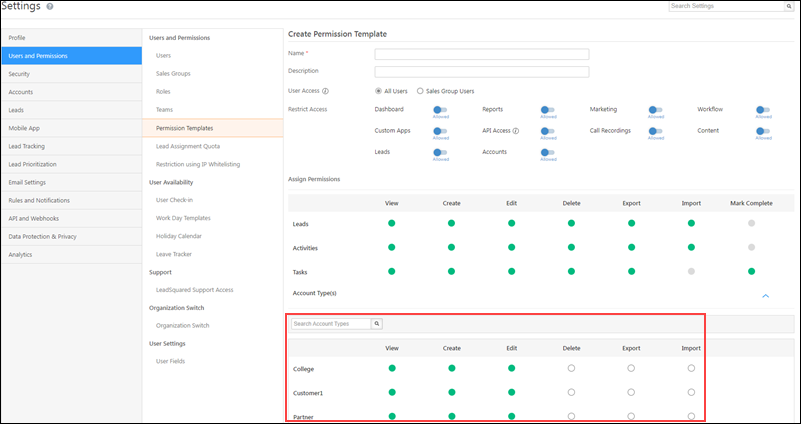
- Enable Permission Templates for Account Management
Once enabled, Admin users can set Permission Templates to restrict your users from Viewing, Creating, Editing, Deleting, Exporting and Importing individual Accounts.
- Enable Opportunity Sharing
When enabled, you can share opportunities with your users for a defined duration, using the Opportunity Share feature and Share an Opportunity API. - Enable quick filters on manage opportunities page
When enabled, on the Manage Opportunities page, you can create and save quick filters using the Advanced Search feature.
- Enable Sending Emails Via Opportunity
When enabled, you can send emails to your leads from the Opportunity Details page.
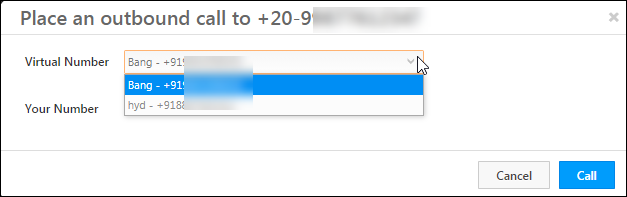
- Enable Virtual Number Randomization
In telephony connectors, where multiple virtual numbers are configured, the setting randomizes the virtual number with every call placed by an agent.
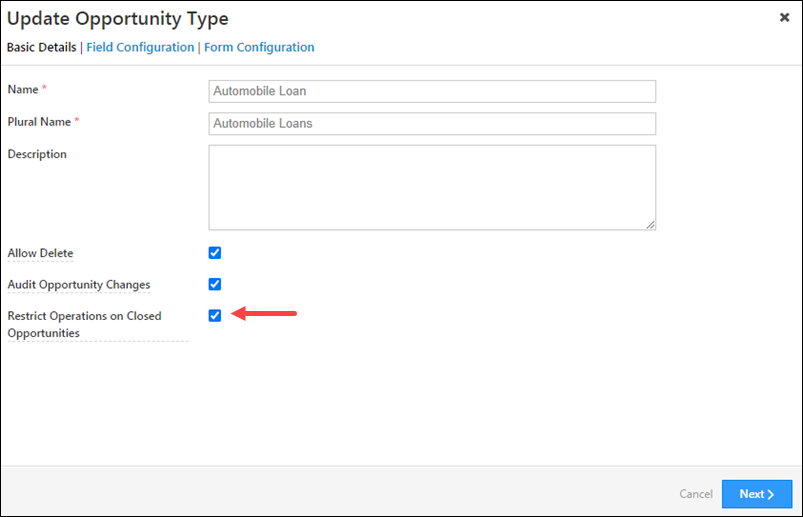
- Restrict Operations on Closed Opportunities (Won/Lost)
This setting restricts users from performing any updates, or posting any activities/tasks on a closed opportunity. Once enabled, you can configure individual opportunities to restrict user operations. To know more, please refer to Opportunity Configurations.
- Entity Access through Opportunity ownership
When enabled, users can view 2,000 or more opportunities that have been assigned to them.
- Ignore Inbound Calls
When enabled, all incoming calls from unknown numbers received through any configured telephony connector (through the call log or agent pop-up) will be ignored. This ensures that users can focus only on calls with existing leads.
- Infinite scroll in Activity History
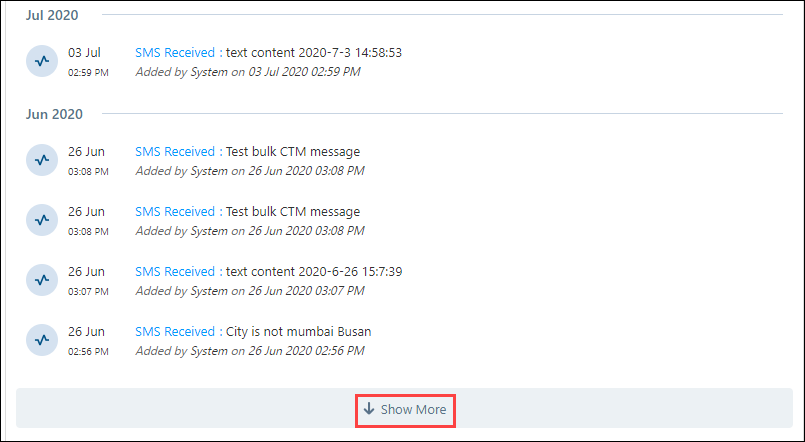
When enabled, the Show More button gets disabled and infinite scrolling is enabled under Activity History tab on the Lead Details page.
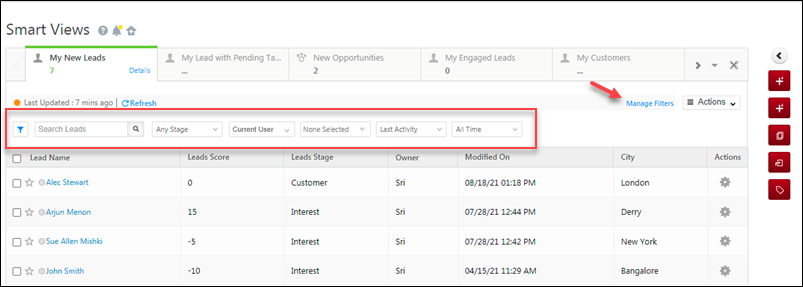
- Load inactive tabs in Smart Views
When you navigate between Smart Views tabs, they sometimes take a moment to load. This setting saves you time, by pre-loading data for inactive Smart Views tabs in the background.
Enables you to redirect to the Lead Details page, instead of seeing the agent popup, while making or receiving calls from a lead.
- Remove Quick Add Activity Button
When enabled, the Quick Add Activity Button (on the Lead Details page) won’t appear if processes are configured to show dynamic forms in Lead Details>Add Activity. This helps eliminate clutter and ensures that users adhere to processes where dynamic forms have been configured.
- Restrict all mobile users as email senders
When enabled, LeadSquared Mobile App users will not appear as the sender in the “From” email dropdowns, across email campaigns, one-to-one emails, automation emails, and landing page auto-response emails. However, mobile users can continue to send emails even after this setting is enabled. - Restrict request history to owners
Users will only be able to view their own requests (lead delete, lead export, etc.), and not requests made by other users, under Request History.
Notes:
- For customers with Super Admin enabled –
- Only Super Admins will be able to toggle the setting
- Only Super Admins will be able to see everyone’s records
- In non-Super Admin accounts –
- Only admins will be able to toggle the setting
- Only admins will be able to see everyone’s records
- Restrict sales user to view email template
When enabled, sales users sending emails will only be able to see their own email templates, and not email templates of other users.

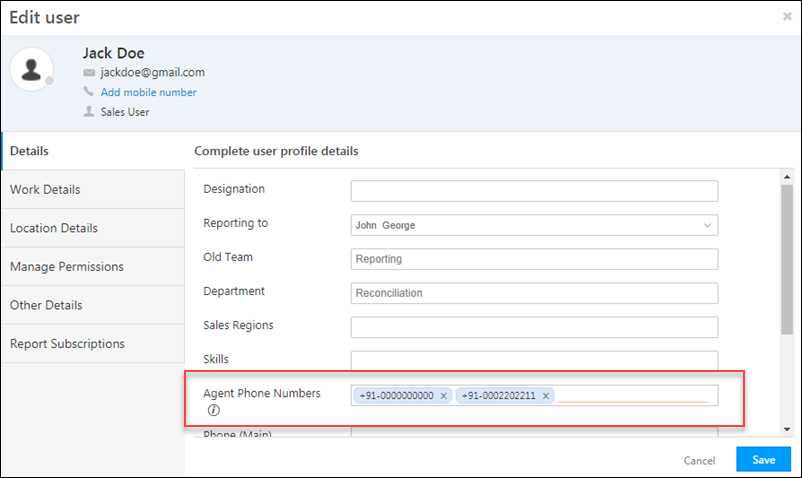
- Restrict update of associated phone number
When enabled, only admin users will be able to update to the ‘Agent Phone Numbers’ associated with a user. If disabled, all other user roles will be able to update the ‘Agent Phone Numbers’ associated with their own user profiles.
- Restrict users from creating email templates
This allows you to restrict specific users from creating email templates. - Restrict users to download activity attachments
Restricts your users from downloading audio files that are added as activity attachments. When enabled, your users will still be able to access and listen to the audio files. To enable this setting, click Configure, and select the audio file types for which you want to restrict user downloads.
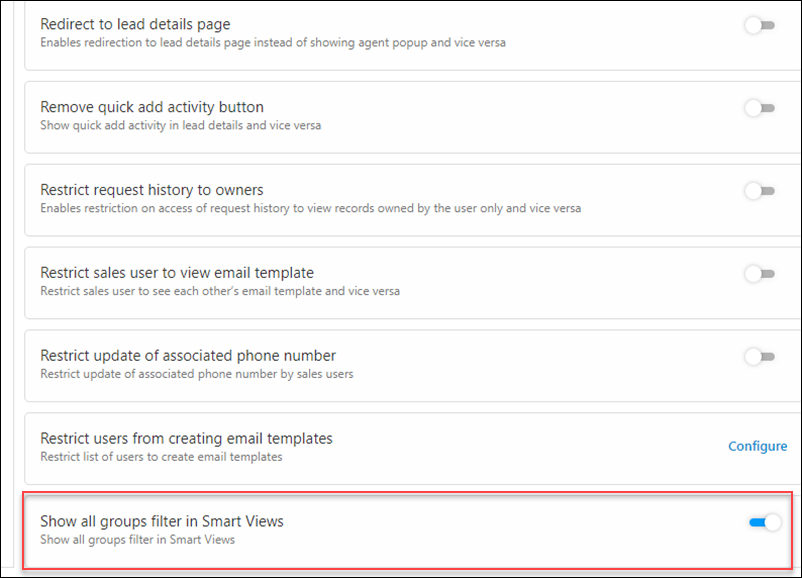
- Show all groups filter in Smart Views
For lead tabs in Smart Views, Admin, Marketing and Sales Manager roles can see leads belonging to all sales groups, using the sales group filter. By default, sales users can only see leads belonging to his/her own group.
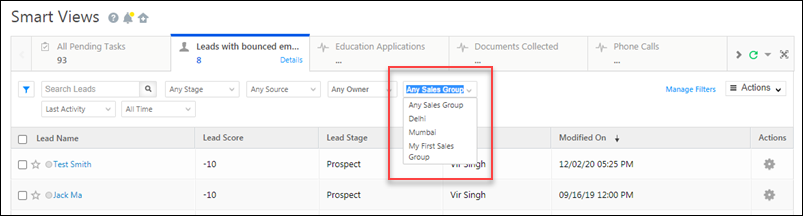
This setting allows sales users to view all sales groups (even the ones that they’re not a part of) in the sales group filter.
- Show Only Opportunity Related Forms In Agent Popup
When your users (agents) receive inbound calls, if only a single LeadSquared Form is configured to capture opportunity details and linked to an opportunity to agent pop-up (using the Process Designer), this form is automatically displayed to them. Enabling this setting ensures your users don’t have to manually select this form through the Agent Popup.
Note that if more than one form is linked to the agent pop-up, even after this setting is enabled, your users will have to manually select a form through the Agent Popup. - Show Only Relevant Opportunities Under a Lead to Sales User
When enabled, sales users will only be able to view opportunities for which they are the opportunity owner, on the Lead Details page.
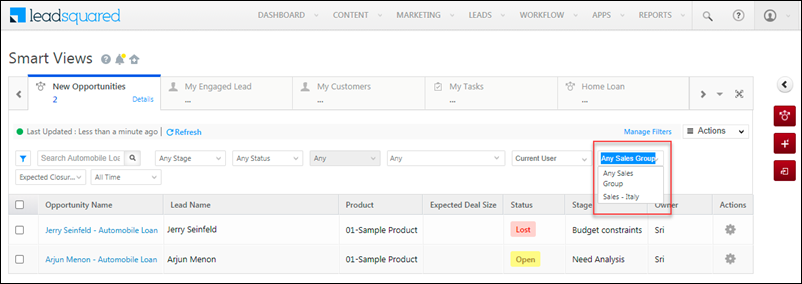
- Show Sales Group Filter for Opportunity Grid in Smart Views
When enabled, on the Opportunities Smart Views tab, sales users can filter opportunities by the sales groups they are a part of. To allow sales users to view the opportunities of sales groups they are not a part of, enable the Show all groups filter in Smart Views setting.
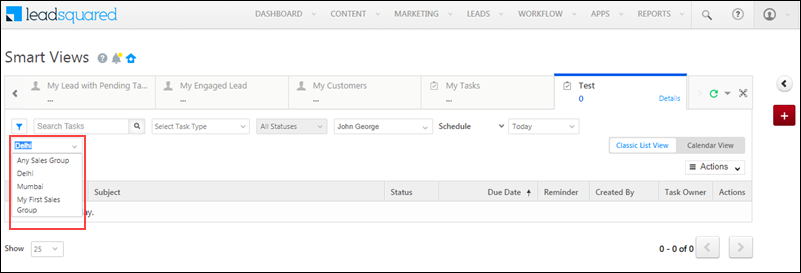
- Show Sales Group Filter for Task Grid in Smart Views
Once enabled, you can filter tasks by sales groups, on task tabs of Smart Views. If you want your sales users to view the tasks of other groups, first enable the Show all groups filter in Smart Views settings.
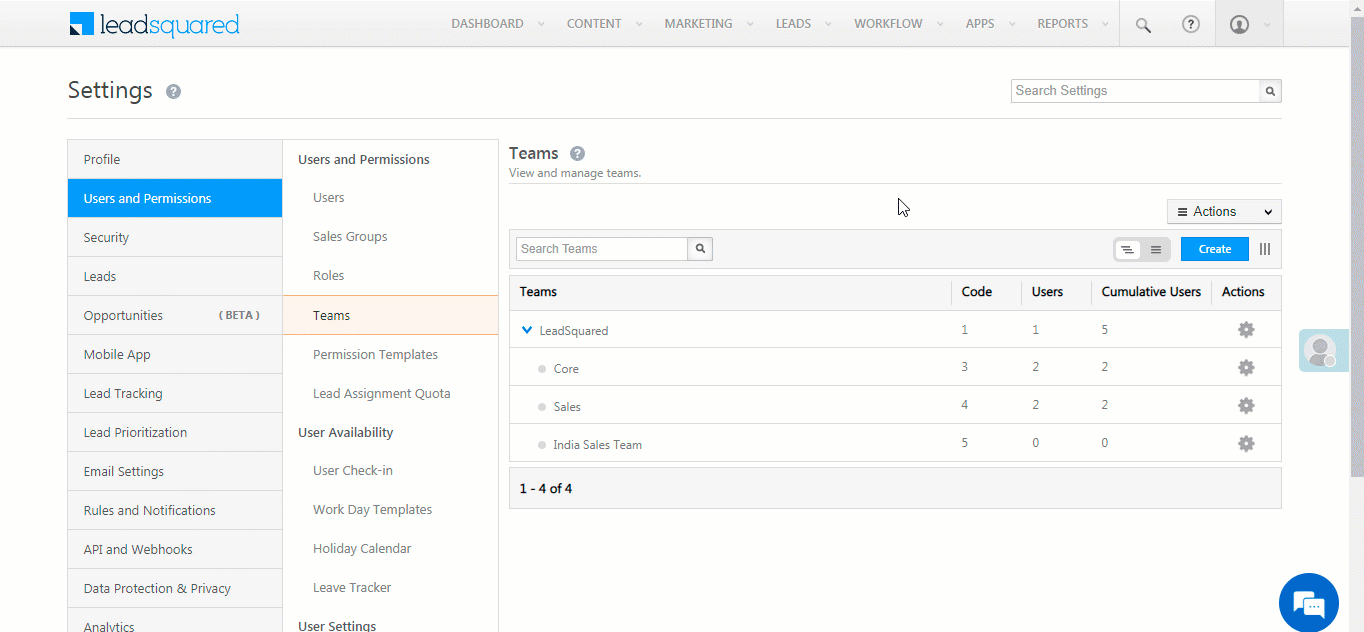
- Switch to teams UI V2
We’ve enhanced the user interface for the Teams settings page. The new interface will remove the Bulk Actions button present on the top-right corner of your screen, and will instead allow you to perform actions on an individual level for each team. This makes it easier and quicker to perform actions like Apply Holiday Calender, Workday Templates, Smart Views, etc.
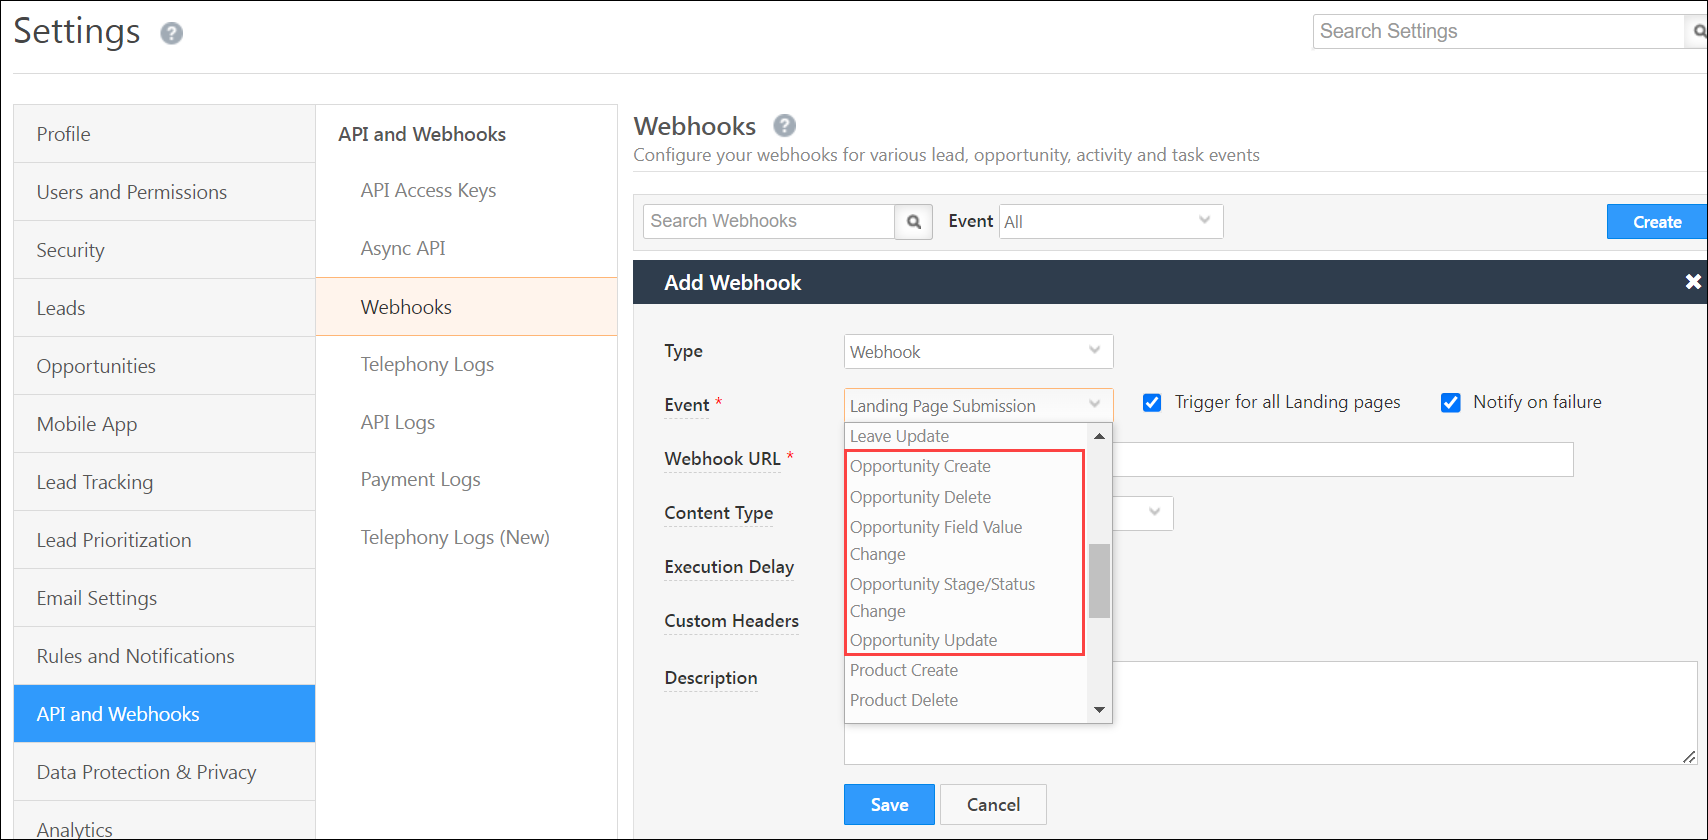
- Enable Webhooks for Opportunity
Once enabled, Admin users can now configure webhooks for opportunity events and keep track of the triggered webhooks.
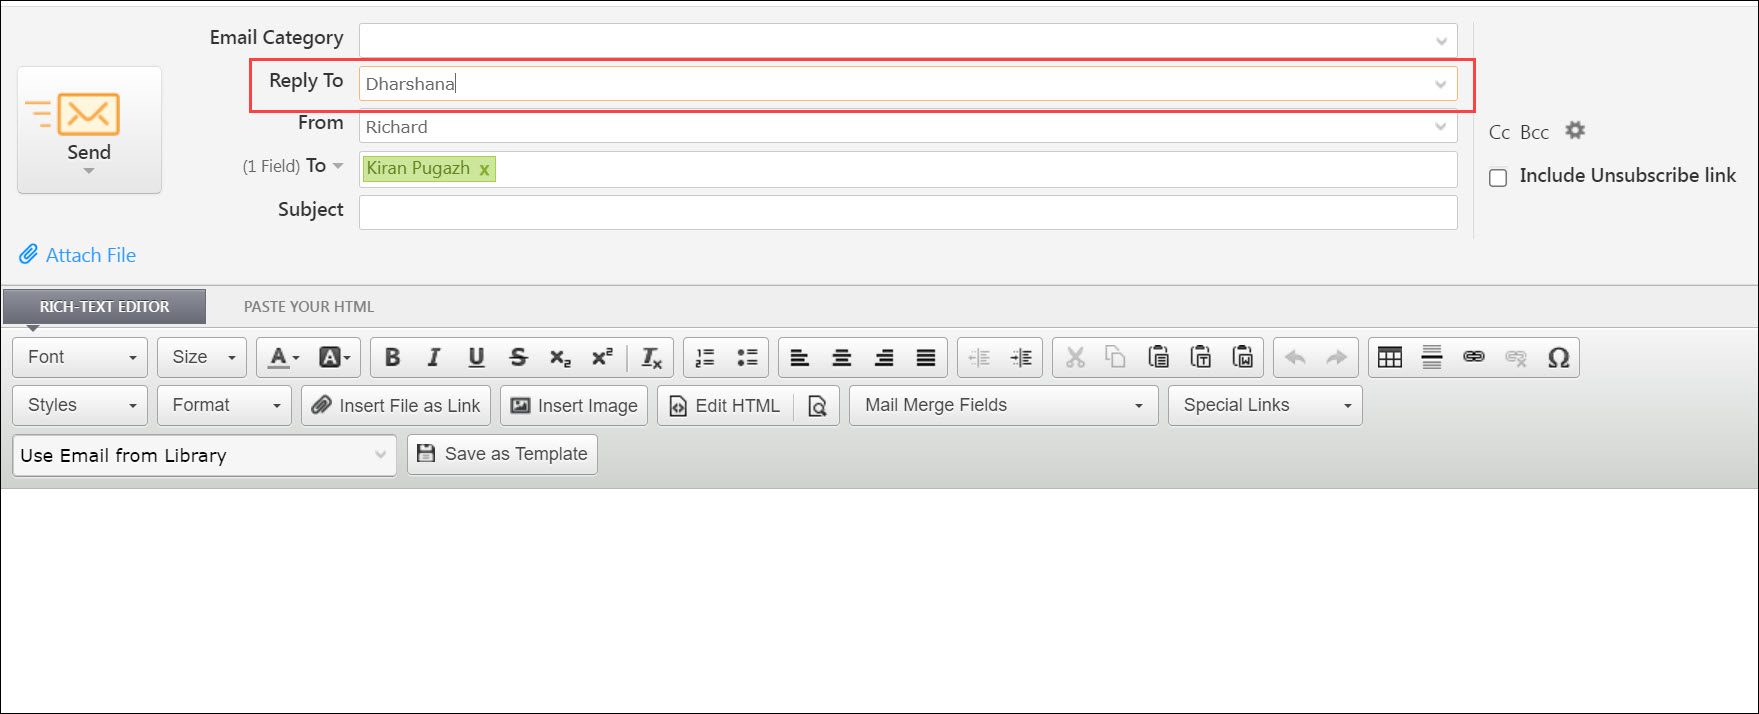
- Enable ‘Reply To’ header in One to One Send Email
When enabled, users can direct replies to one-on-one and bulk emails to a specific user by adding them to the Reply To header during email composition.
Any Questions?
Did you find this article helpful? Please let us know any feedback you may have in the comments section below. We’d love to hear from you and help you out!
I have a query about the CFS Field, In the advance configuration where do I configure the CFS Field?
Hi Deepa.
If you’re talking about creating a Custom Field Set with a collection of fields to store different types of data (e.g., date, time, text, file type, etc.), navigate to Settings>Leads>Manage Custom Field Sets, click Create and follow the process. However, if you’re looking to store your documents (file type fields) using different storage providers (e.g., Amazon S3, Alibaba Cloud OSS, etc.), then navigate to Settings>Lead>Configure Custom Field Sets.