Tag Archive for: email campaign

Email Library – Adding Templates to Email Library

1. Feature Overview

Create reusable email templates for one-to-one emails and email campaigns on the Email Library page. You can view and edit these templates on the same page. You can also import any sample email templates you already have. The flow of the email template editor is the same as the email campaign editor.

Note:


2. Prerequisite

You must be the Administrator or the Marketing User of your account.


3. Add Email Templates

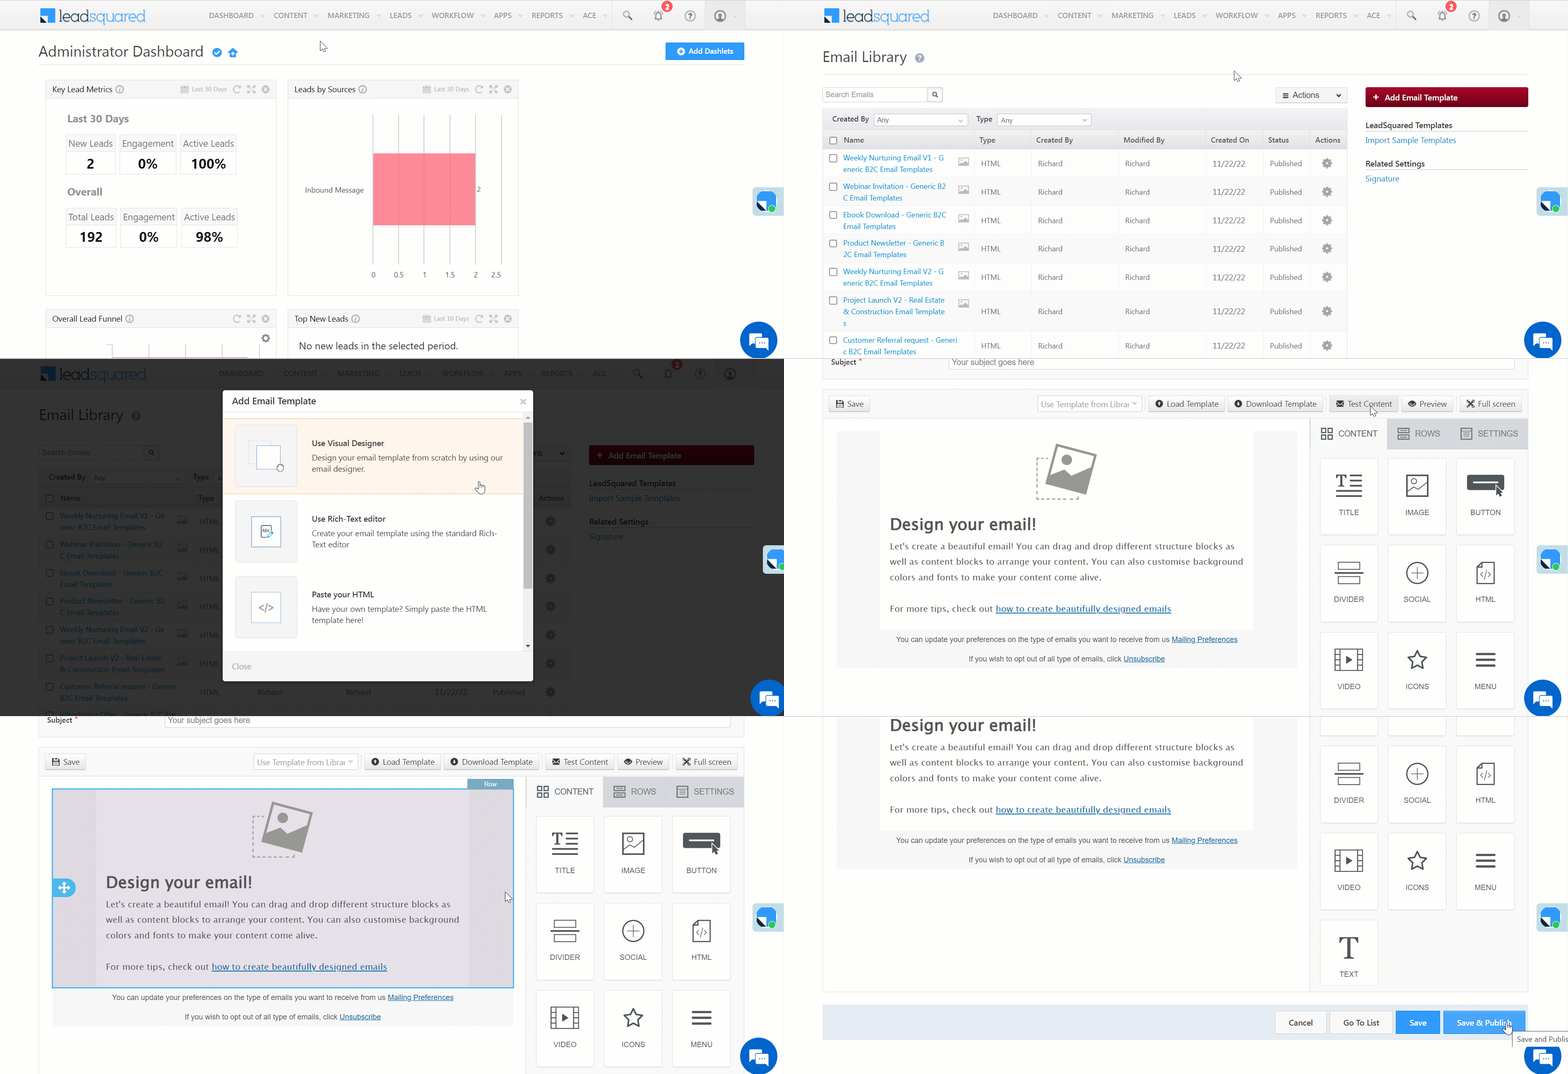
Navigate to Content>Email Library and click Add Email Template.  You can select the type of Email Template you want to add on the Add Email Template pop-up window.

  • Use Visual Designer – You can design your email template from scratch through this option. To know more about designing templates, see How to Design Emails in LeadSquared and Email Campaign Editor (BEE Editor).
  • Use Rich-Text Editor – You can create a template using LeadSquared’s standard rich-text editor. You can select this option to send simple messages with attached images and files.
  • Paste your HTML – You can use your own HTML template by pasting it in this section. To know more, see HTML Editor and Use your own Custom HTML to design Email Template.
  • Use Plain-Text Editor – You can draft simple messages with high deliverability through this option. However, you cannot add images or text formatting in this template.

Once you’re done designing your email template, you can save it as a draft by clicking on Save or publish it immediately by clicking on Save and Publish.

Note: 

  • Only published templates can be used in one-to-one emails and email campaigns.
  • The templates available in the editor you choose will depend on the editor you used to design your template. For example, HTML editor will only display the templates you created using the same editor.
  • You must upload the required images in Images and Documents to add them to your Email Templates.
  • You can personalize emails by including certain fields in the text like Lead First Name, Job Title, etc. To know more, see How to Personalize your Emails by Using Mail Merge Tags.
  • You can send test emails to different email addresses for review. To do so –
    • If you’ve chosen Use Visual Designer, click Test Content.
    • If you’ve chosen any of the other three options, enter the email addresses in the text box under Send Test Emails.
  • You can add unsubscribe, mailing preference, and view in browser link by adding the following code snippet before the end of the body tag –
    Action Code Snippet
    Unsubscribe <a href=”MXVAR[{unsubscribeurl}]”>Unsubscribe</a>
    Mailing Preference <a href=”MXVAR[{managesubscriptionurl}]”>Mailing Preferences</a>
    View in Browser <a href=”MXVAR[{viewinbrowserurl}]”>View in browser</a>
LeadSquared - Add email templates

4. Other Actions

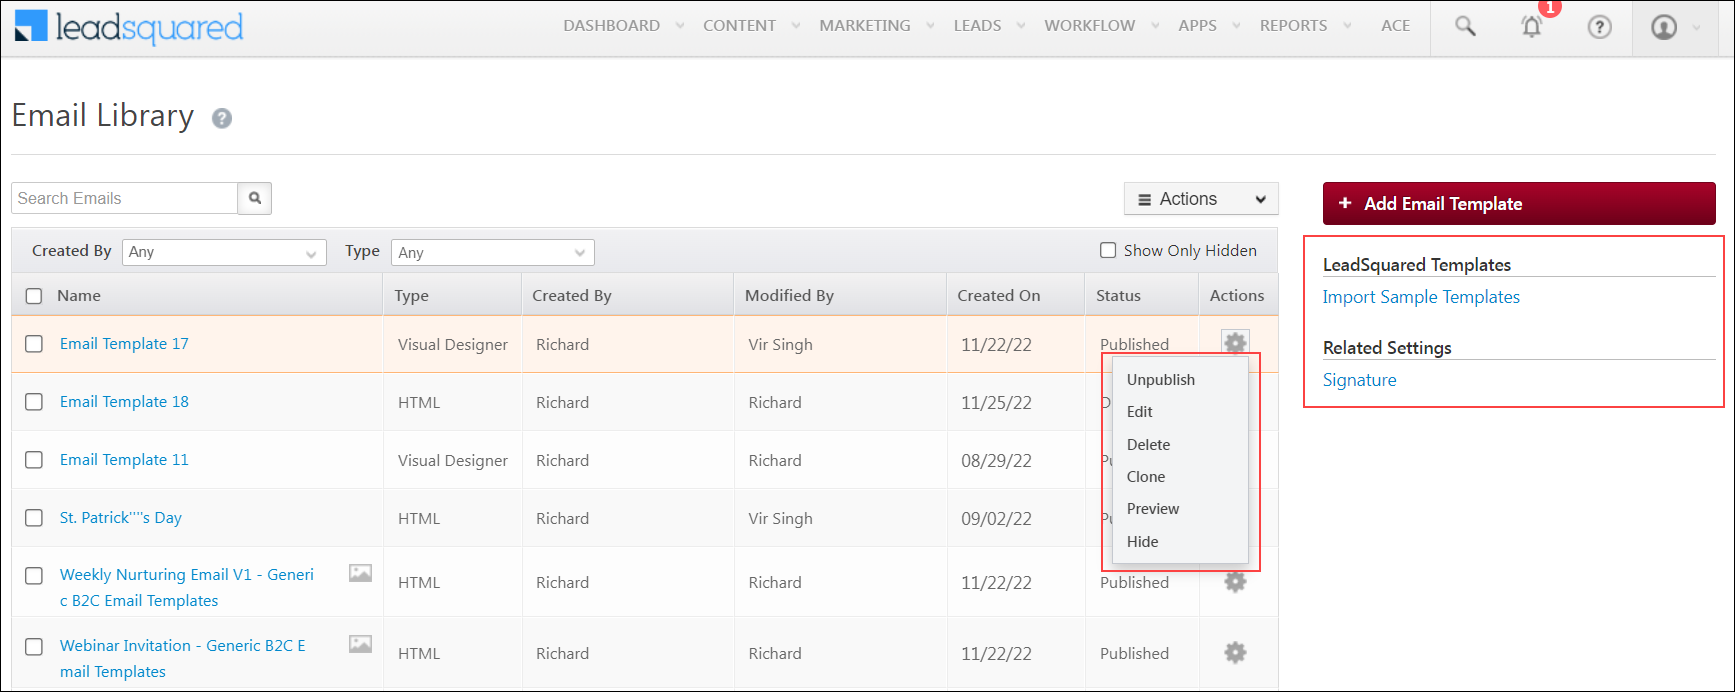
  • To import sample templates to the Email Library page, under LeadSquared Templates, click Import Sample Templates.
  • To edit your HTML or text signature, under Related Settings, click Signature.
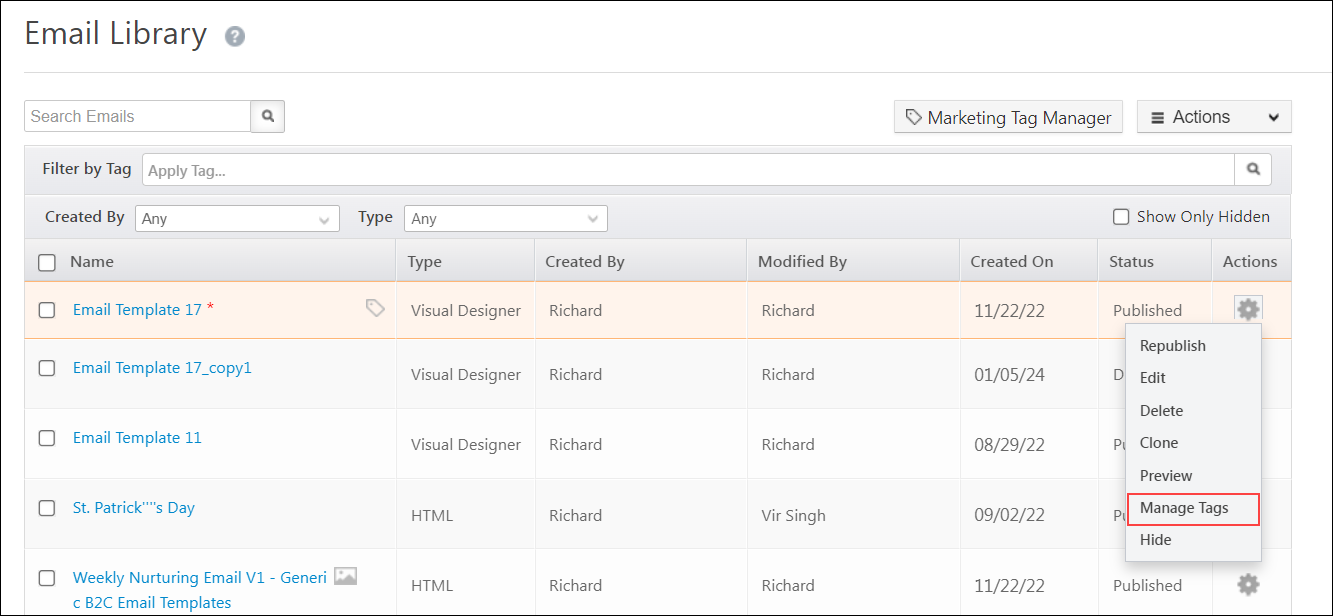
  • Alongside the email template name, if you hover your cursor over tags icon, you can view all the tags associated with the template. You can also add new tags or delete tags here. The Manage Tags action can also be used to perform the same.
  • To view these row actions, alongside the template, click LeadSquared
    • Publish – Publish the email templates in draft status.
    • Unpublish – Unpublish email templates.
    • Edit – Edit email templates.
    • Delete – Delete email templates.
    • Clone – Clone the selected email template.
    • Hide – Hide email templates with private information instead of deleting them.
    • Preview – Preview email templates

LeadSquared - email library

4.1 View Hidden Email Templates

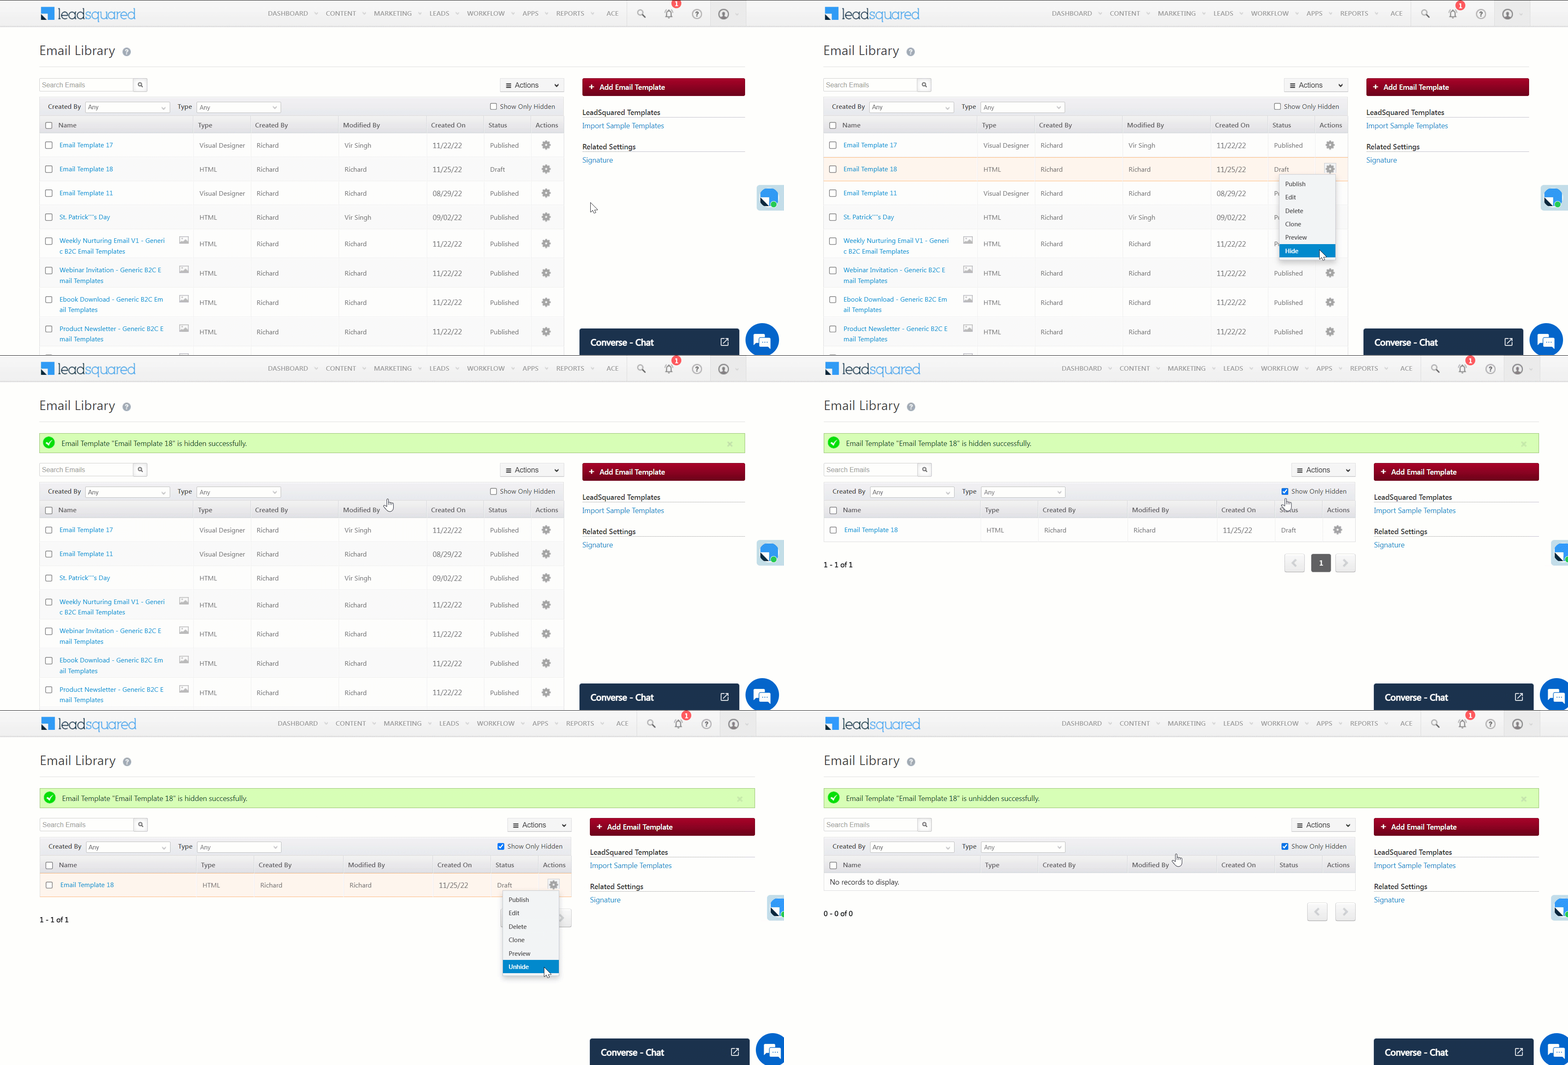
Hide email templates that contain business records or private information instead of deleting them. By doing so, you can navigate, search and sort templates much faster without irrelevant templates cluttering the page. Once hidden, you can also choose to unhide these templates and show them on the Email Library.

  • To hide an email template, alongside the template, clickLeadSquared. Then, click Hide.
  • To view the hidden templates in your account, alongside Show Only Hidden, click SIERA Checkbox. You can now view all your hidden templates.
  • To unhide any template, alongside the template, clickLeadSquared. Then, click Unhide.
Note: Hidden email templates will only be displayed when you select Show Only Hidden.

LeadSquared - Hide email template

4.2 Add Tags to Email Templates

You can add tags to email templates while creating or editing them. This feature is now available by default to all users.

  • You can create new tags or select an existing one while drafting your email.
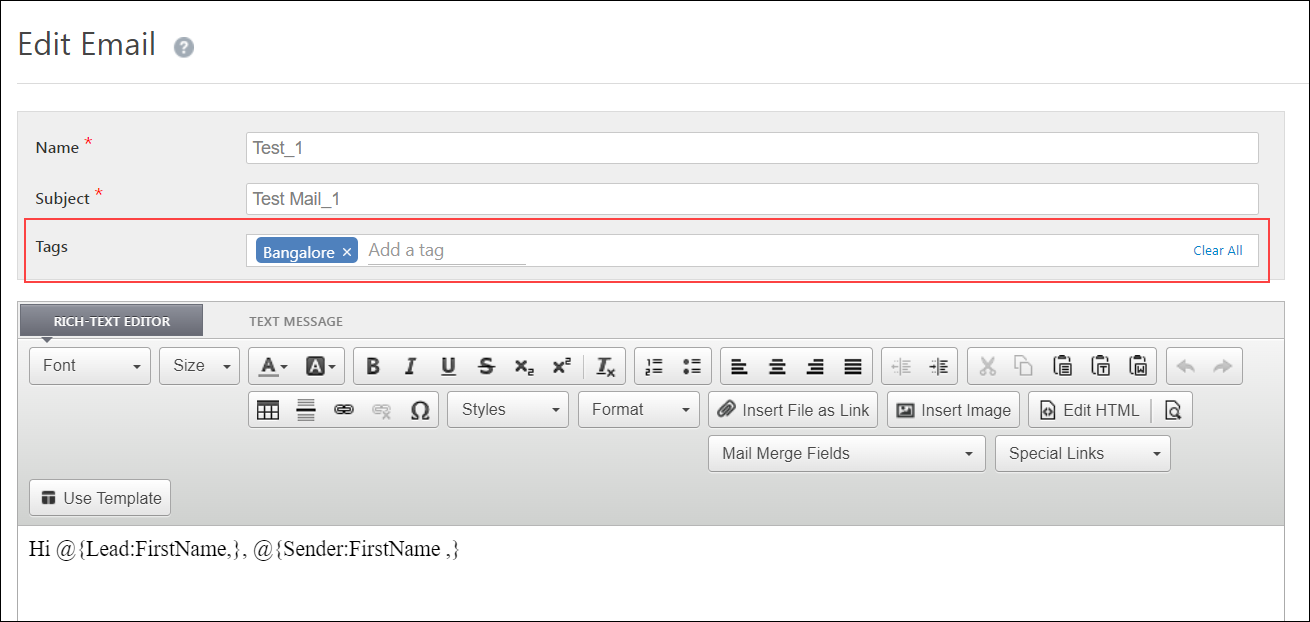
LeadSquared - email tags

  • You can retrieve email templates from the Email Library by filtering these templates based on their tags.
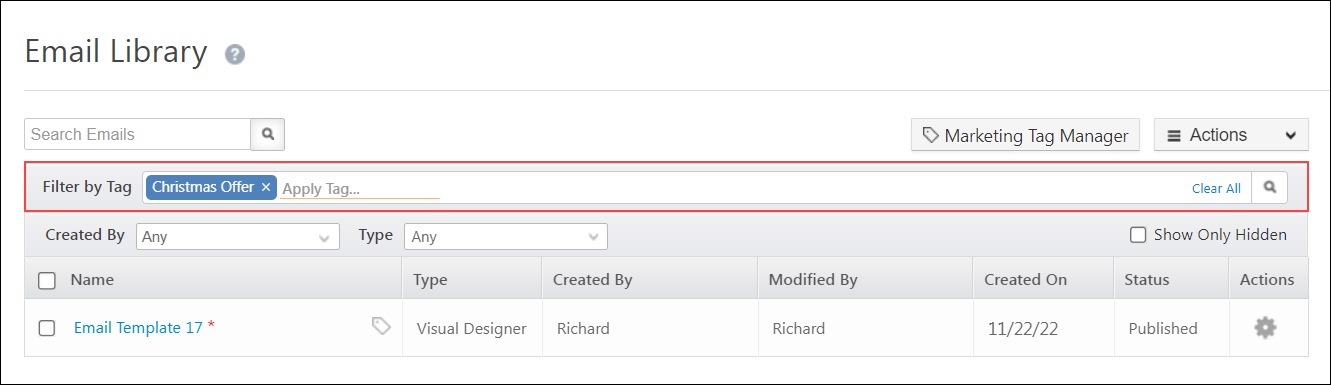
LeadSquared - email tags

  • In the email templates grid, alongside the email template name, if you hover your cursor over tags icon, you can view all the tags associated with the template. You can also add new tags or delete tags here.
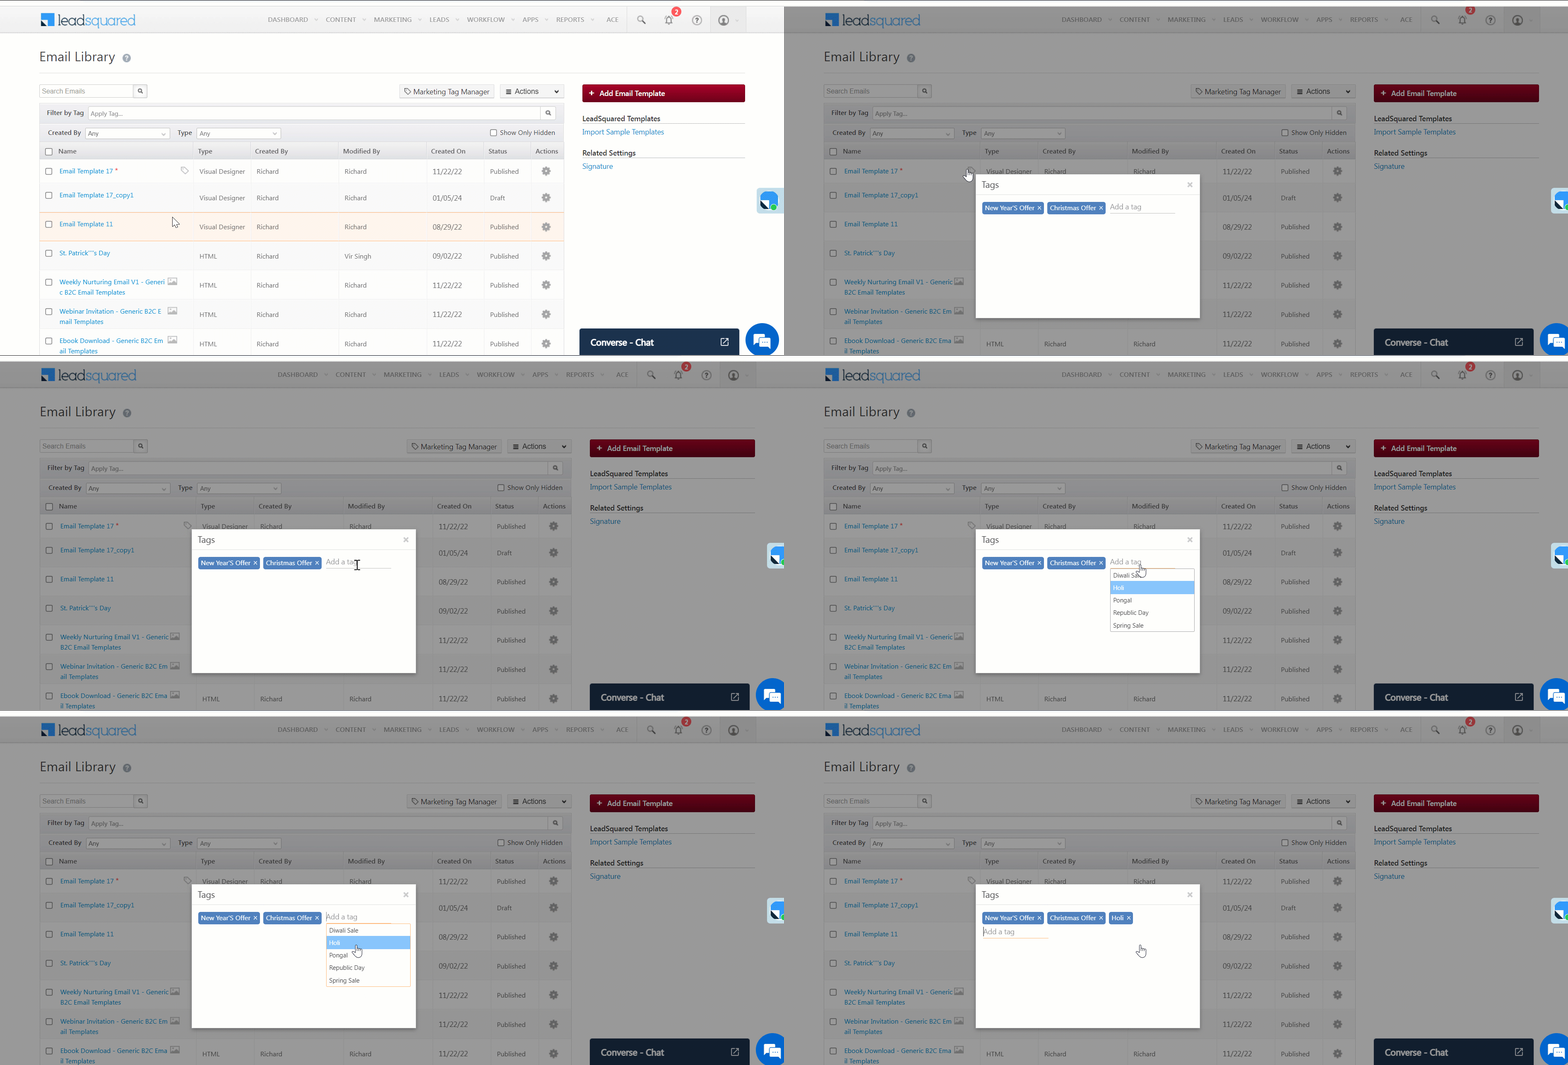
LeadSquared - Email tags

  • On the Email Library, to manage (view, add, or delete) your tags, hover your cursor over LeadSquared - Settings icon and select Manage Tags.

LeadSquared - tags 3

  • Use email templates while drafting an email by clicking on Use Template. On the Use Template pop-up, you can filter the templates by their tags. You can also add or remove tags while saving the template.
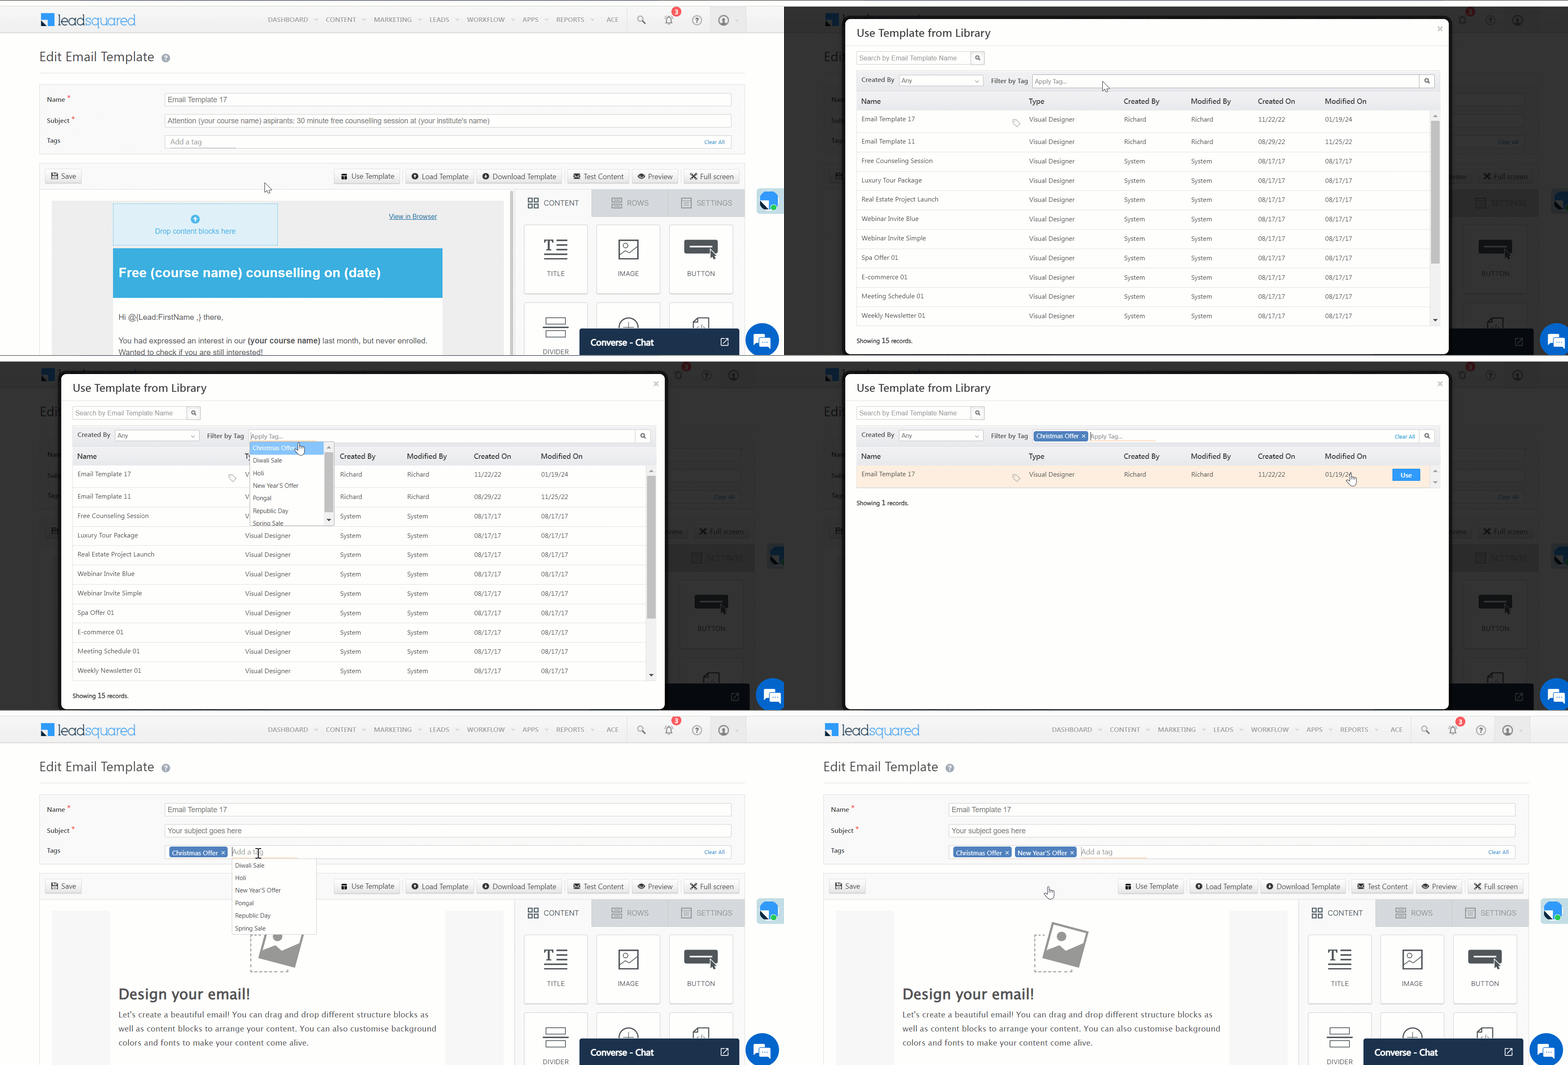
LeadSquared - Manage tags

4.3 Clone & Edit Email Templates

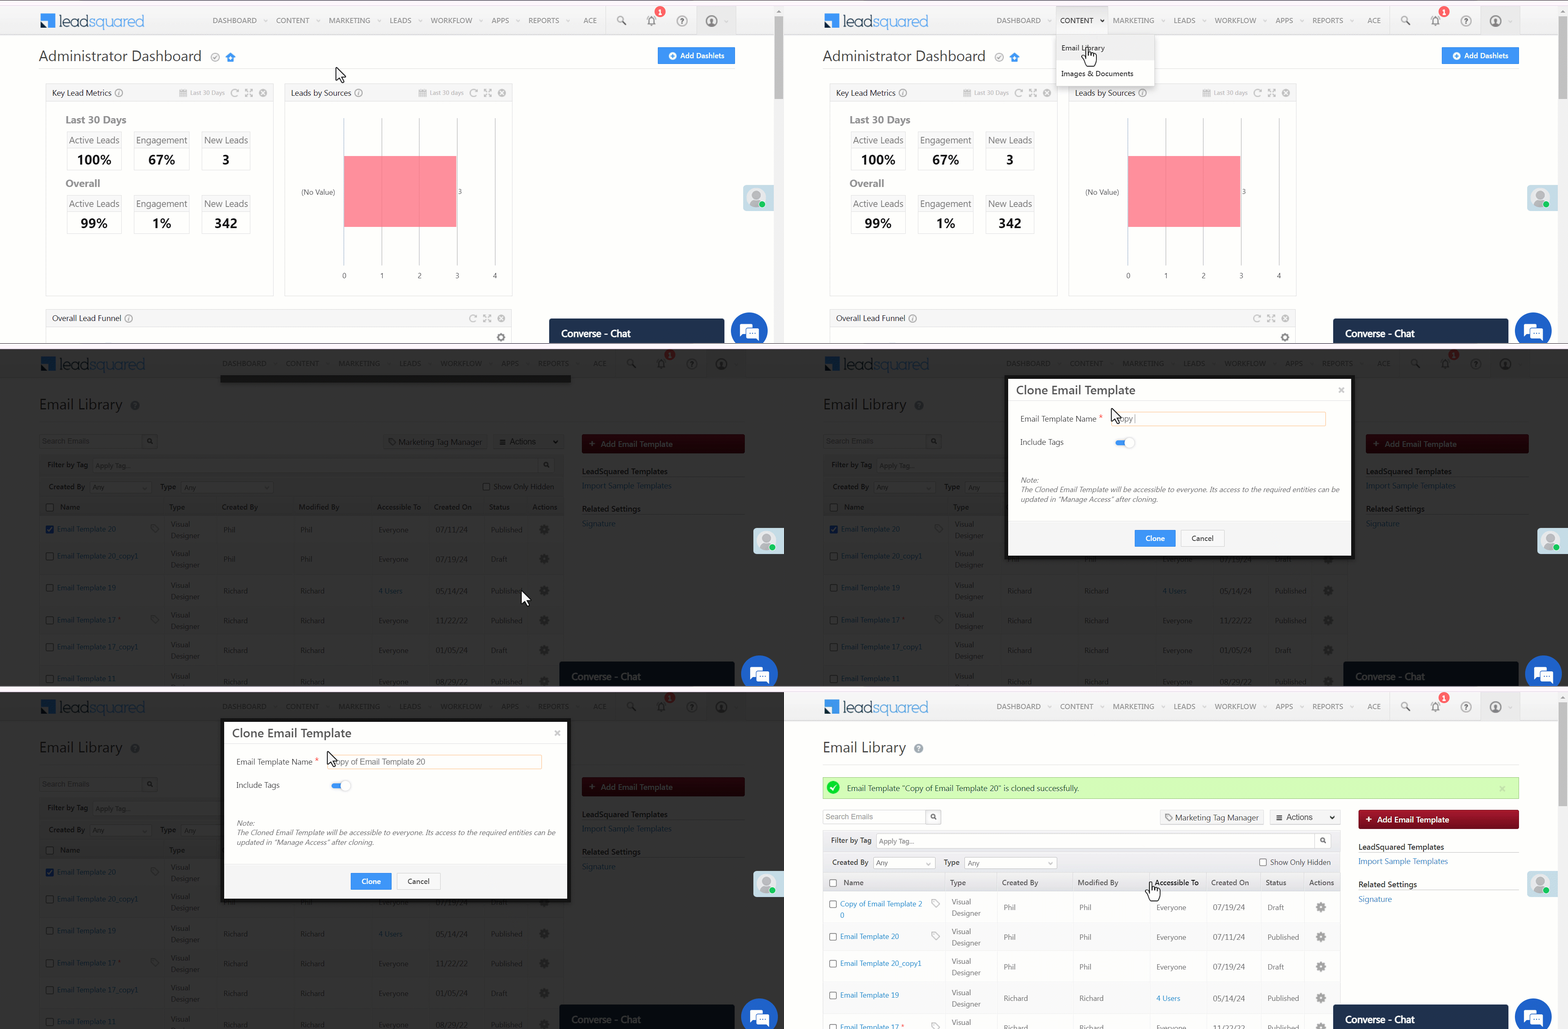
  1. On your LeadSquared Dashboard, navigate to Content>Email Library.
  2. Alongside the relevant email template, click seria sales user dashboard actions.
  3. From the dropdown, select Clone.
  4. On the Clone Email Template popup, you can rename the cloned template. The name cannot be blank, must be unique among existing templates, and must not exceed 100 characters.
  5. The Include Tags toggle –
  • Will be enabled by default for email templates with tags. If cloned with these tags, a (tag icon) will be visible alongside the Email Template in the Email library.
  • Can be disabled if you do not want the tags to be cloned.
  • Will not be visible for email templates that do not have tags.
  1. To edit a cloned template, click seria sales user dashboard actions alongside the relevant cloned email template and select Edit from the dropdown.
Note: Sales users can only clone the templates created by them.

Leadsquared - Email Library


5. Send One to One Emails Using Templates

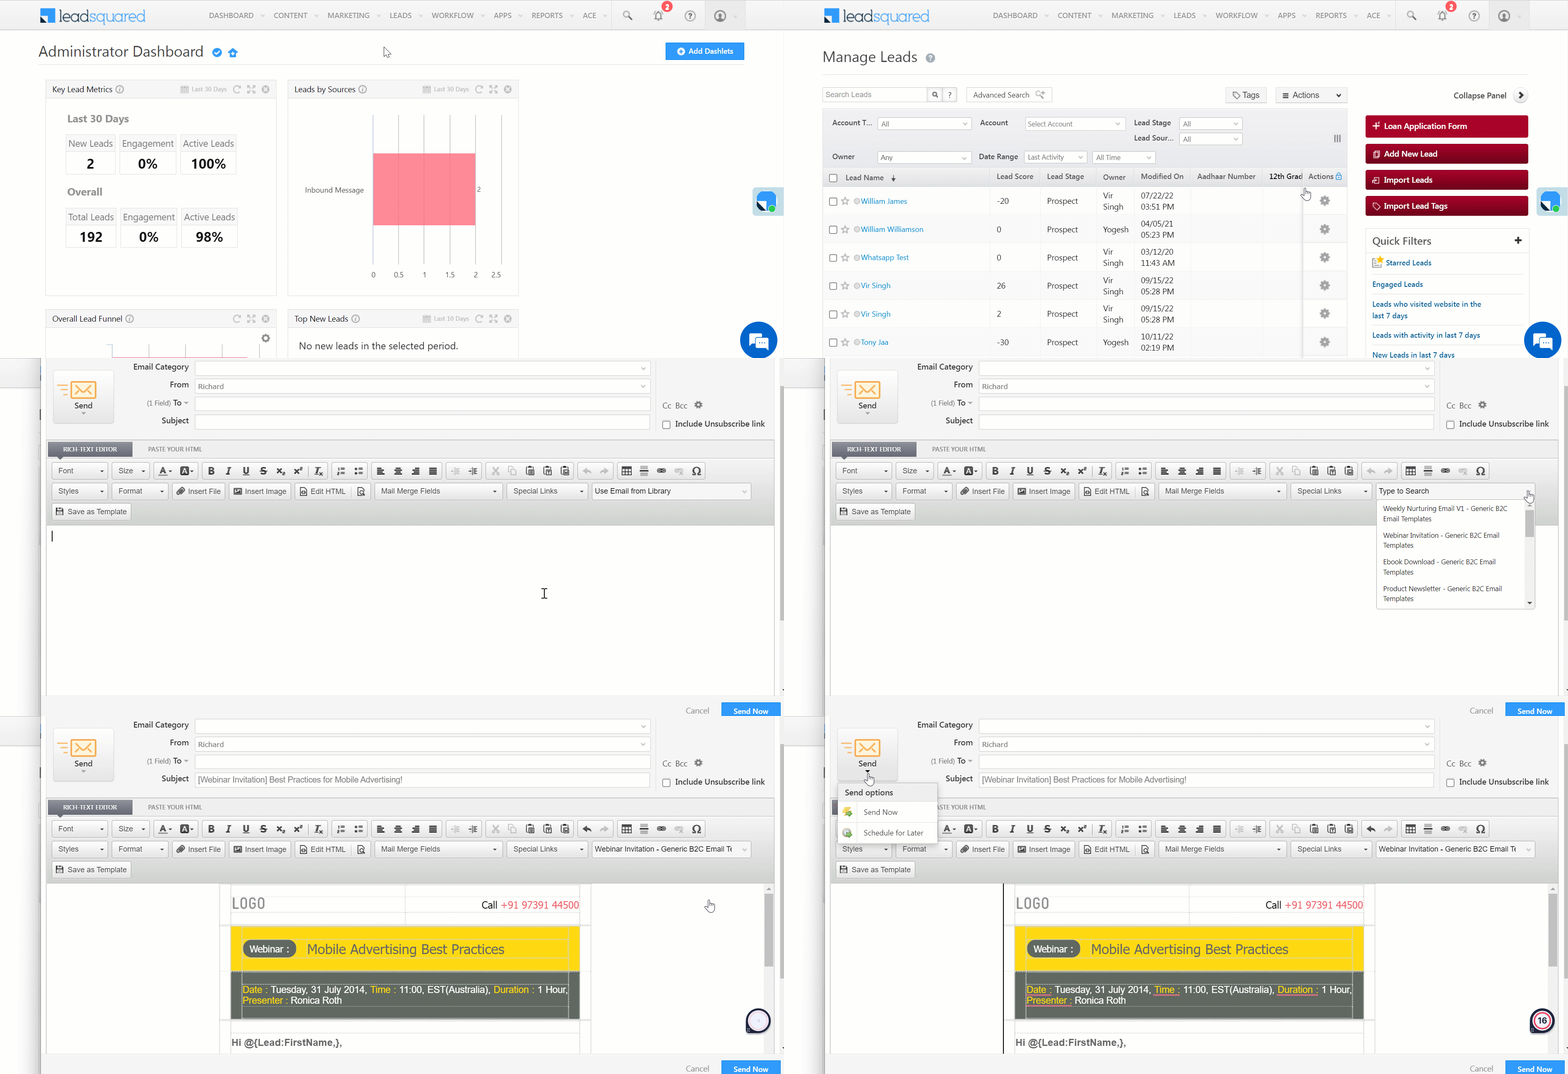
Send one-to-one emails using the templates available in the Email Library –

  1. Navigate to Leads>Manage Leads.
  2. Click LeadSquared and select Send Email.
  3. Click the Use Email from Library dropdown and select a template. Alternatively, you can enter the name of the template in the dropdown box.
  4. Make relevant changes and click Send.
LeadSquared - Send one to one emails using template


6. Send Email Campaigns Using Templates

  1. Navigate to Marketing>Email Campaigns and click Create Email Campaign.
  2. Enter the Email Campaign name and select how you would like to create the email – using email templates (visual designer) or using the Html Editor.

6.1 Using Visual Designer

  1. On step 1 of creating an email campaign, select Use Email Template.
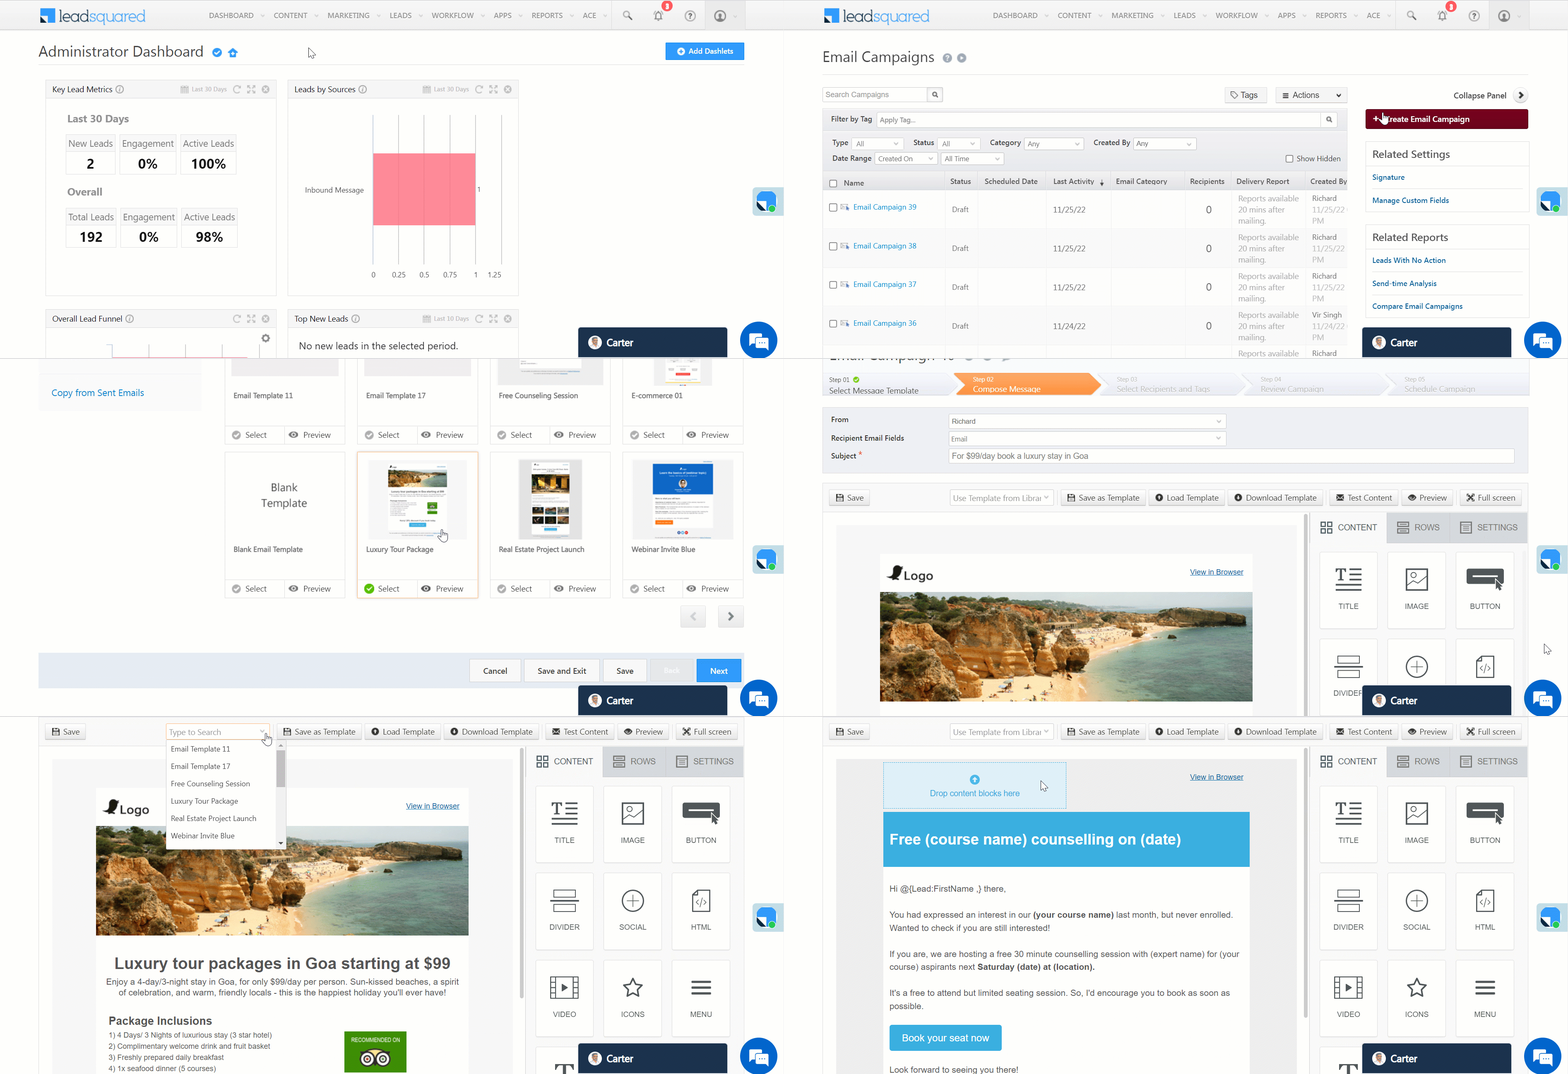
  2. You can now view all the published visual designer templates. Select one and click Next.
  3. On the visual designer, you can customize your template and send it to your leads.
  4. To use another template, click the Use Template from Library dropdown and select a template.
  5. To save the customized email as a template, click Save as Template.
  6. To download the template, click Download Template.
  7. To upload a template from your device, click upload template.
LeadSquared - Visual designer email campaign using template

6.2 Using HTML Editor

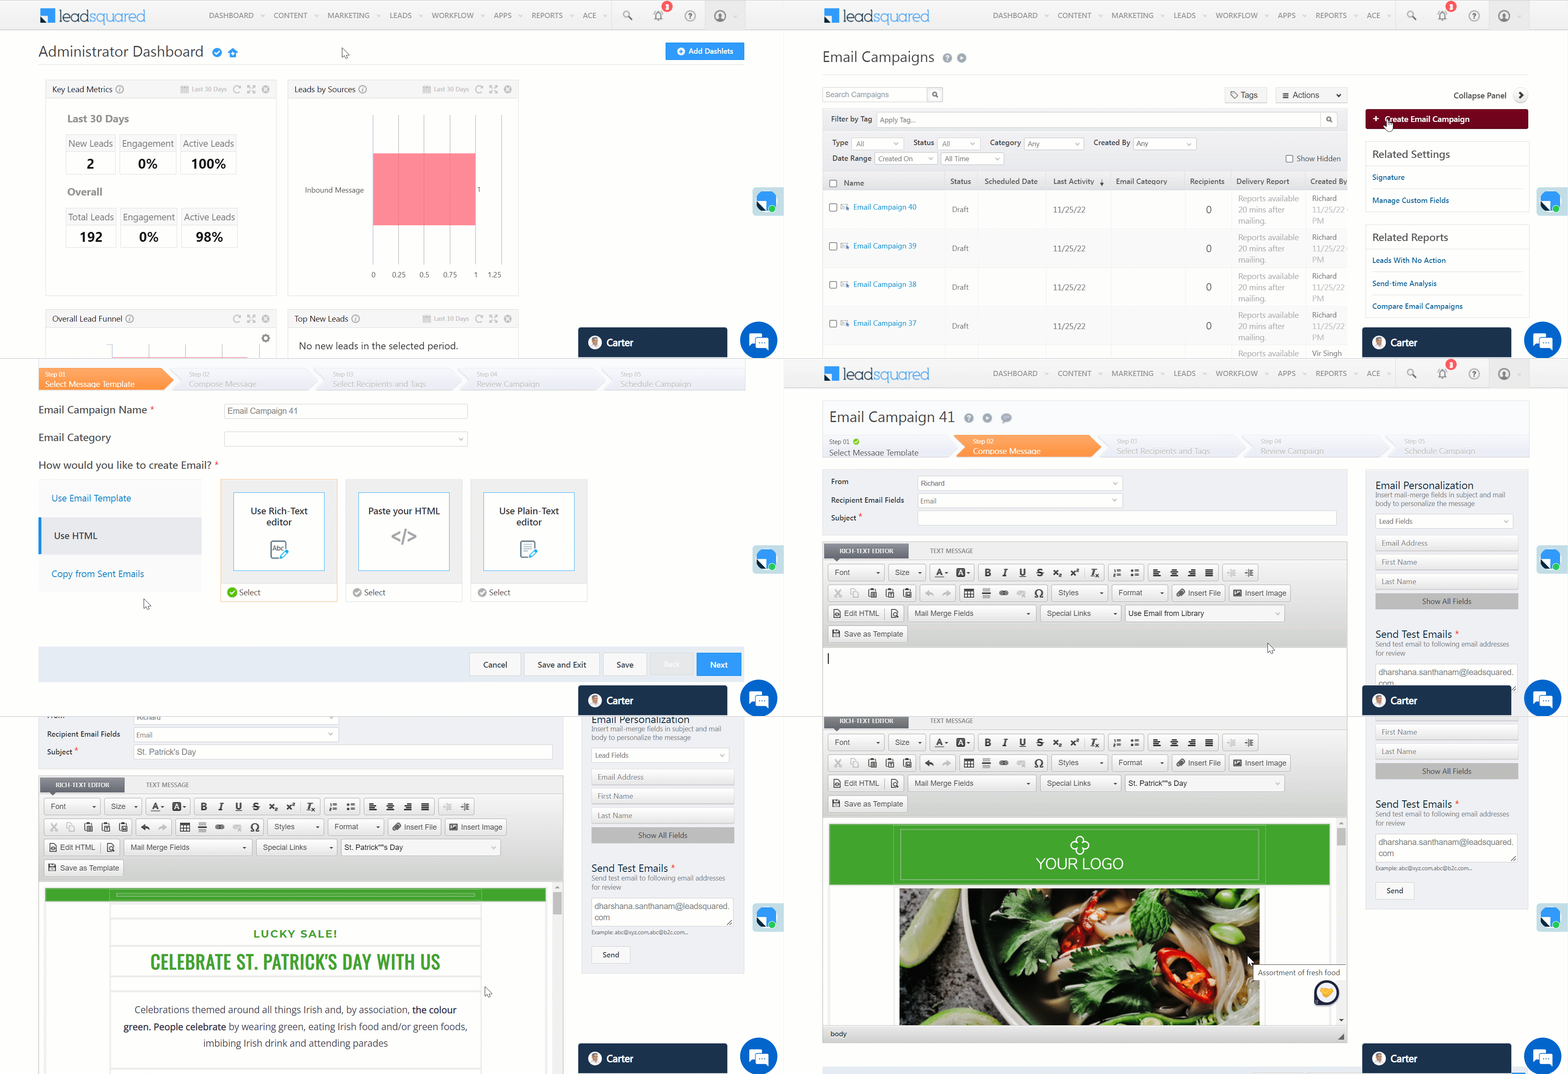
  1. On step 1 of creating an email campaign, select Use HTML.
  2. Select an HTML Editor and click Next.
    • If you want to write your own HTML code and add rich text content (like coloured text, bold text, headings, etc.), select Use Rich-Text editor.
    • If you have a pre-written or third-party HTML code for the email, you can directly paste it into the editor by selecting the Paste your HTML option. This option is chosen in the gif shown below.
    • If you want to create a simple text email campaign without images and attachments, select Use Plain-Text editor.
  3. Once you can view the editor, click the Use Email from Library dropdown.
  4. Customise the template and send it to your leads.
LeadSquared - Html editor email campaign using template


FAQs

How do I move an email template from one LeadSquared account to another?
If you have multiple LeadSquared accounts and need to transfer an email template, follow these steps based on the template type:

  • For Visual Editor Templates:
    1. Log in to the account where the template is created.
    2. Go to the Email Library and locate the template.
    3. Edit the template and click Download Template to export it.
    4. Log in to the target account.
    5. Navigate to Email Library > Add Template > Visual Designer > Load Template > Save and Publish.
  • For Rich Text Editor Templates:
    1. Log in to the source account.
    2. Go to the Email Library and locate the template.
    3. Edit the template and click Edit HTML, then copy the HTML code.
    4. Log in to the target account.
    5. Navigate to Email Library > Add Template > Rich Text Editor > Edit HTML > Paste the copied HTML > Save and Publish.

The same process applies to Plain Text email templates.


Any Questions?

Did you find this article helpful? Please let us know any feedback you may have in the comments section below. We’d love to hear from you and help you out!
How to Structure and Align Your Emails Better in LeadSquared

There are some great email templates in LeadSquared to work with. But, I am sure you would want to customize them more.

This video tutorial tells you how to modify the default templates, add structures and change the alignment of the content.

How to Easily Resend Emails to New Leads

If you hate redoing the same work again and again, this nifty little hack is for you. What happens if you have sent out a great campaign to your lead list and a few days later new lead gets added to that list? Well, you don’t have to set up the whole campaign again – just one click would do.

This tutorial would show you how to easily resend your emails to new leads.

How to Change Fonts to Make Your Emails More Readable

Want to improve your click-rates? Making your emails more readable would help. You will be surprised to know that small things like changing your email fonts can also have a major impact on the readability of your emails.

This video tutorial shows you how you can change fonts easily in LeadSquared:

How to Create Recipient and Suppression Lists for Your Emails

The Recipient and Suppression lists make sure that your emails reach a very specific group of people. Check out how you can do it easily in LeadSquared. (You need to be on Step 3: Select Recipients and Tags of creating your email campaigns to use this tutorial.)

P.S: We increased our email click rates by 48% by using this feature very effectively. You can read about it here.

How to Add Hyperlinks to Your Emails in LeadSquared

Nothing builds trust with your leads like sending them useful content. Hyperlinks in emails allow you to quickly direct the email recipients to this content – be it on a landing page or a web page.

This quick tutorial helps you to understand how to add Hyperlinks to your Emails in LeadSquared. (You need to be on Step 2: Compose Message of creating your email campaigns to use this tutorial.)

How to Edit Images in your Email

Images allows you to improve the look and feel of your email, and capture the recipients’ attention very easily. In LeadSquared, inserting and editing images are simple.

Here’s how you can do it. (You need to be on Step 2: Compose Message of creating your email campaigns to use this tutorial.)

How to Attach Documents to Your Emails with LeadSquared

Looking to share important documents with your leads through email? It’s very easy to do in LeadSquared.

This video tutorial shows you how. (You need to be on Step 2: Compose Message of creating your email campaigns to use this tutorial.)

How to Improve Look and Feel of Your Emails with LeadSquared

If your emails are getting opened, but not getting enough clicks, (even with great offers), maybe the look & feel and readability of your email is the problem.

This quick video (2 minutes) helps you understand how to fix the look and feel of your emails and enhance their readability in LeadSquared. (You need to be on Step 2: Compose Message of creating your email campaigns to use this tutorial.)

How to Add Social Sharing Buttons to Your Email

Great content gets reads. Content that is easy to share, gets shared. So encourage your readers to share the great stuff you send them, on social media. The social sharing buttons in each email makes it easier for your reader to share!

Social Sharing buttons allows you to increase the engagement capability of your Email with Social Media.

This tutorial video helps to understand how to improve the the sharing capability of your Emails using Social Sharing buttons.

Manage Marketing Tags

1. Feature Overview

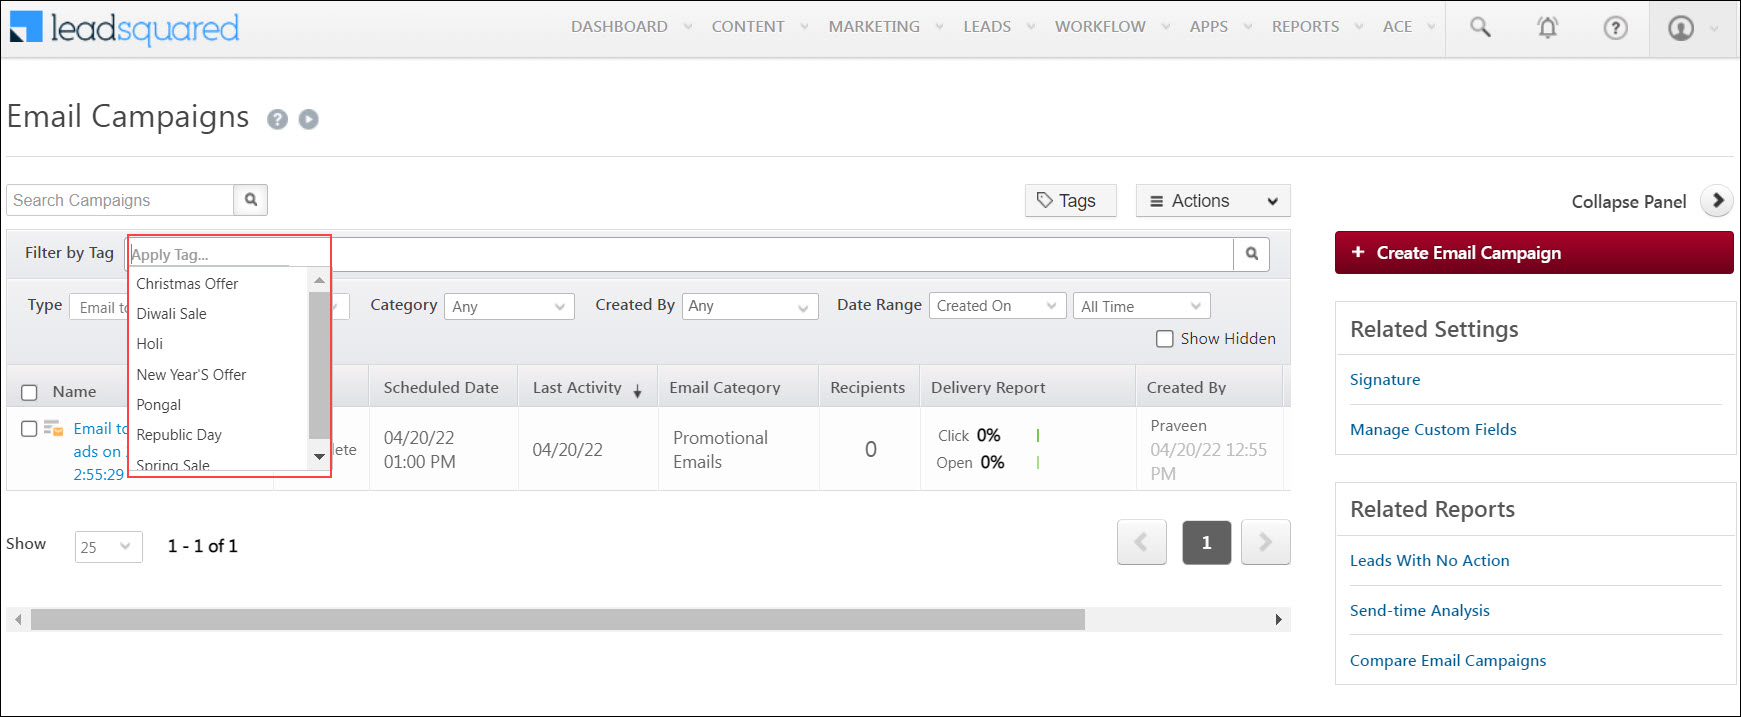
Use marketing tags to identify and filter out specific landing pages, email campaigns, and automations. For example, let’s say you’ve applied a marketing tag named ‘Christmas offer’ on a set of email campaigns. If you want to find the email campaigns created with this tag, on the Email Campaigns page, enter the tag name in the Filter by Tag bar.

Note:


2. Prerequisite

You must be an Administrator or a Marketing User of your account.


3. Create Marketing Tags

3.1 On Settings Page

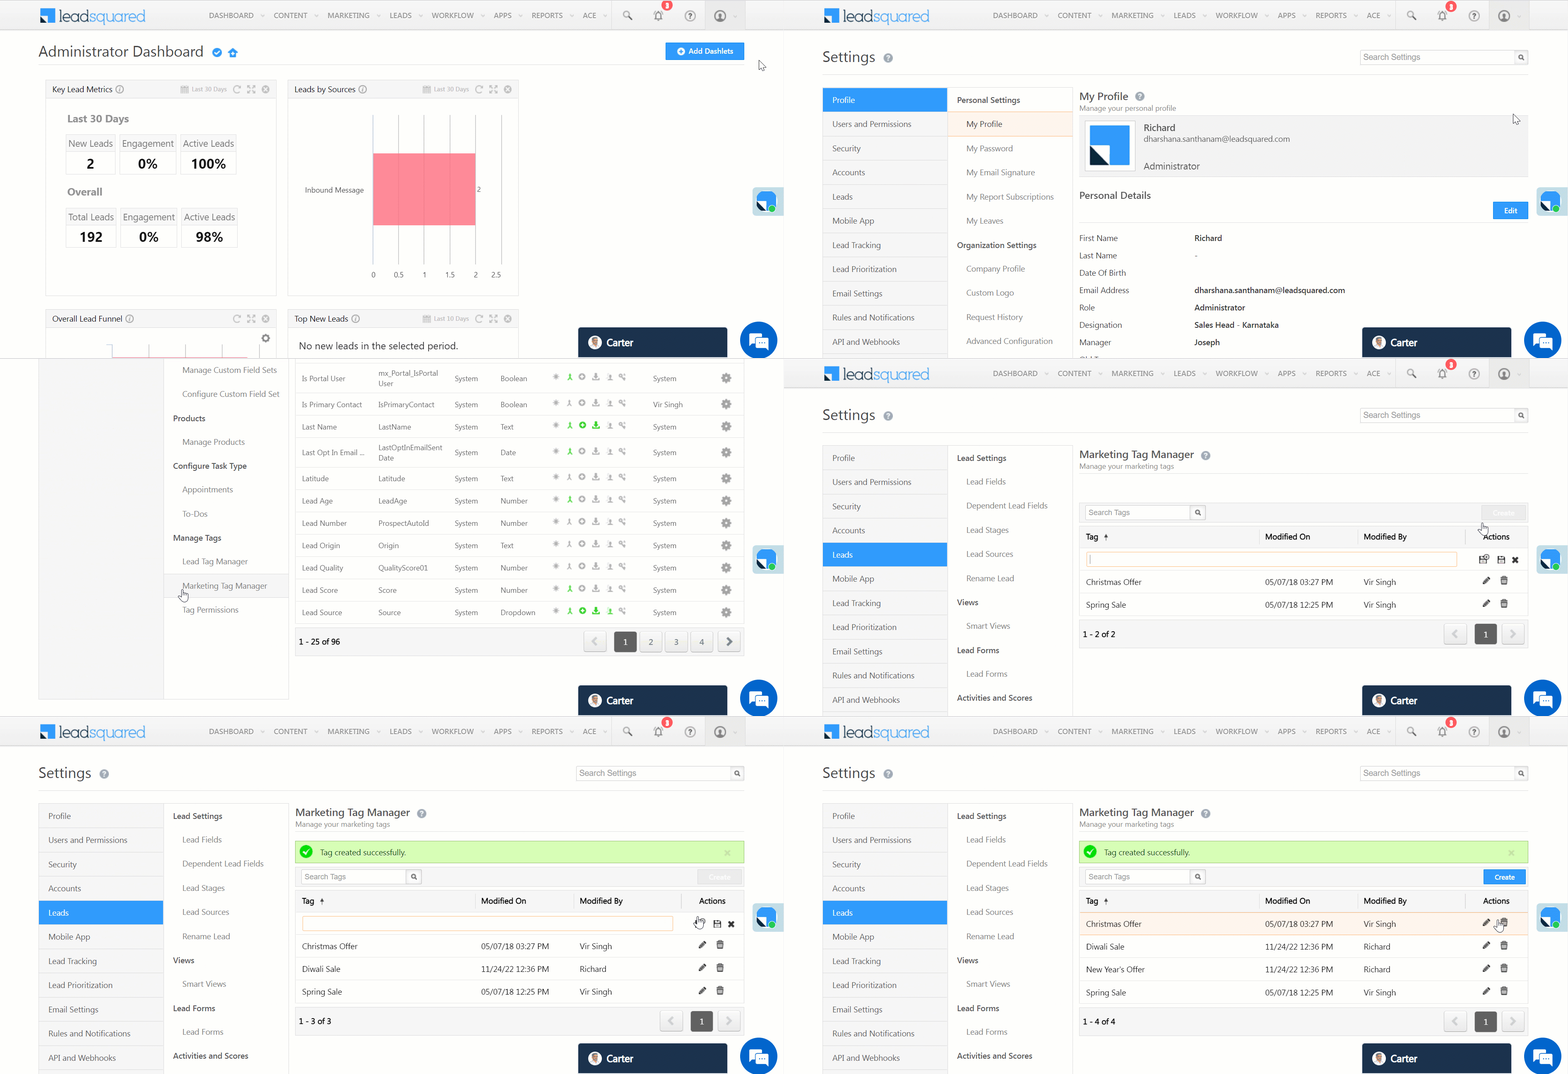
  1. Navigate to My Account>Settings>Leads>Marketing Tag Manager.
  2. Click Create.
  3. Enter the marketing tag name.
  4. To save your tag, click .
  5. To save and add a new tag, click Save & New.

LeadSquared - Create marketing tags

3.2 On Email Campaigns Page

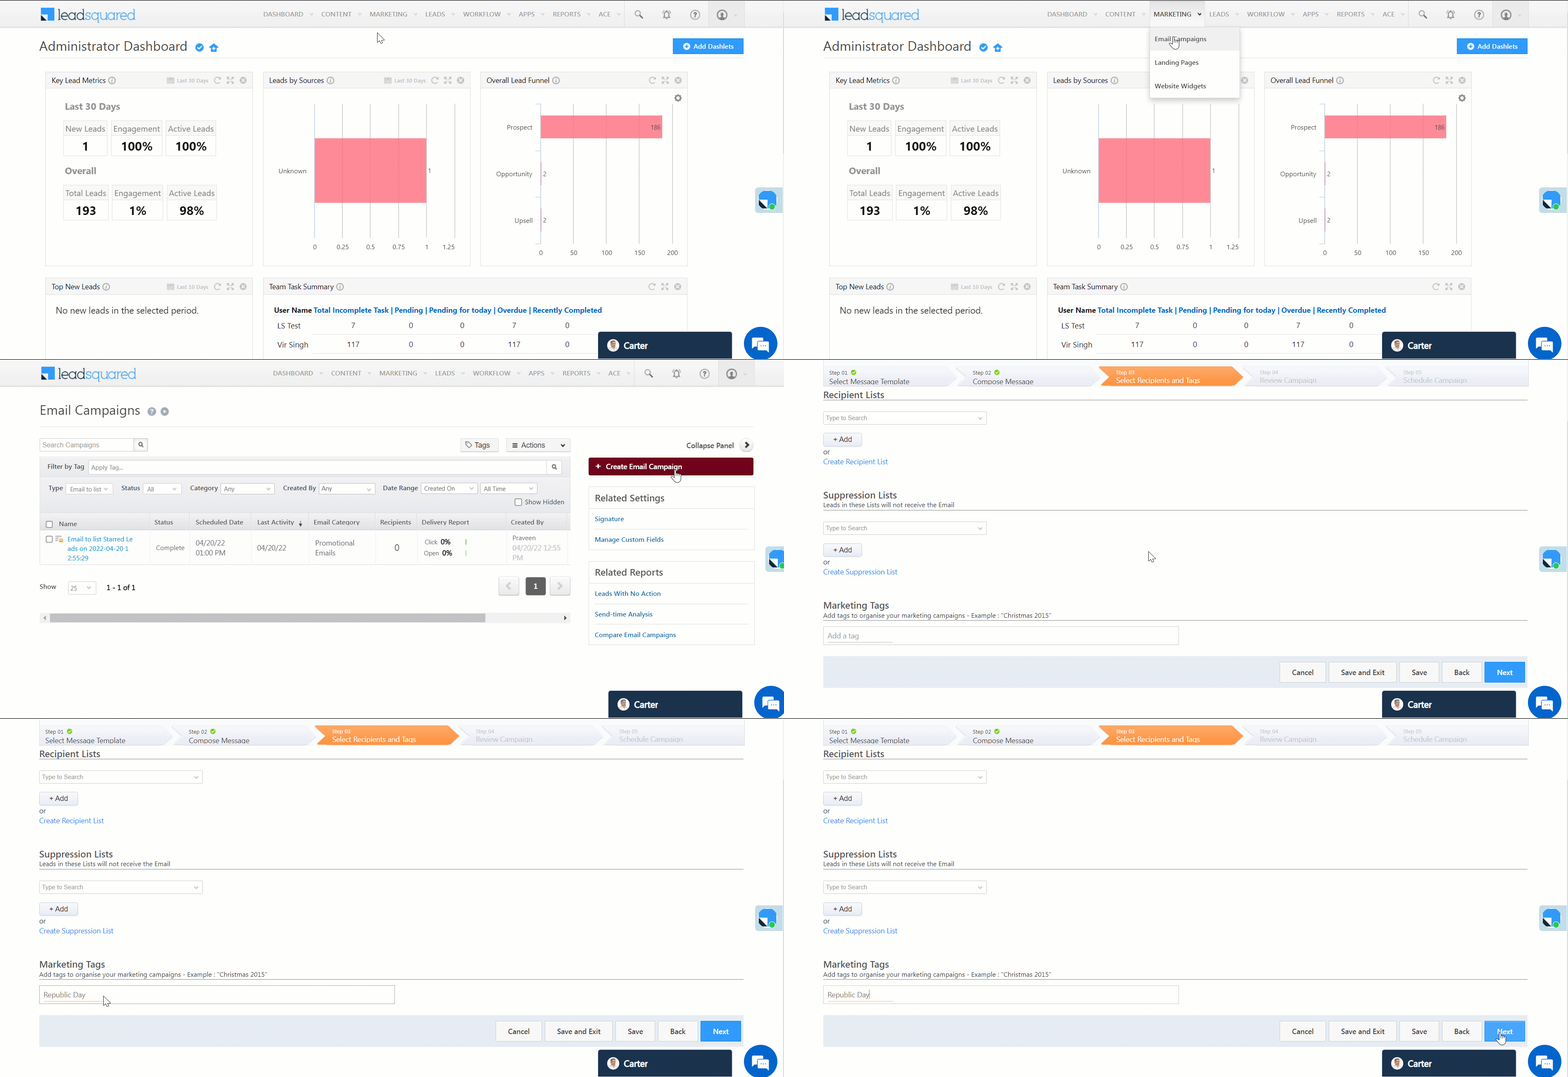
  1. Navigate to Marketing>Email Campaigns and click Create Email Campaign.
  2. On step 3, under Marketing Tags, write the name of your tag. You can also choose an existing tag here.
  3. Click Next and finish creating your email campaign.
Note: Create a Marketing Tag in Landing Pages designer using the same method. On step 3, under Apply Tags, write the name of your tag.

LeadSquared - Create marketing tags on email campaign


4. Other Actions

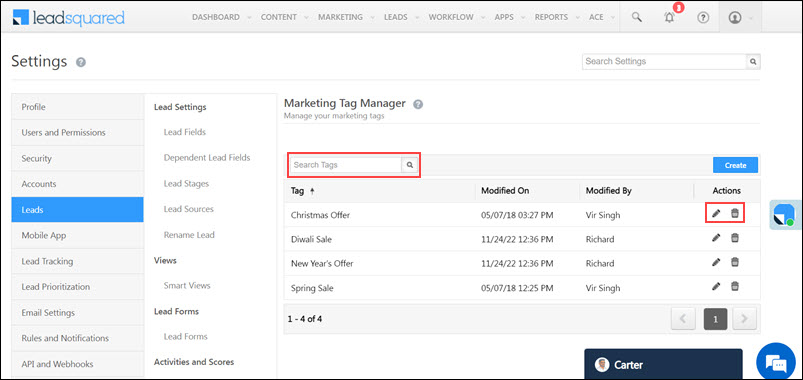
  • To edit a marketing tag, alongside the tag, click Edit.
  • To delete a marketing tag, alongside the tag, click delete.
  • To search for a specific marketing tag, enter the tag name in the Search Tags bar.

LeadSquared - Marketing tags other actions


5. Apply Filters based on Marketing Tags

You can filter out email campaigns using Marketing Tags –

  1. Navigate to Marketing>Email Campaigns.
  2. Alongside Filter by Tag, click the dropdown and select the Marketing Tag. You can select multiple tags.
Note: You can apply these filters for Landing Pages and in Email Library using the same method.

LeadSquared - Apply marketing tag


Any Questions?

Did you find this article helpful? Please let us know any feedback you may have in the comments section below. We’d love to hear from you and help you out!
Can I stop an Email Campaign after it is sent?

No. You will not be able to stop an email campaign once it is sent. But, if you have scheduled it for a later time, then you can cancel it, and the email campaign will not be sent.

How can I use the Email Campaign report?

1. Feature Overview

The Email Campaign Report provides various metrics (like the percentage of leads who have clicked, opened, or unsubscribed from the email) that help you study the impact of the campaign on your leads. You can also export these leads and create a list with those who have clicked on a link, unsubscribed, marked the email as spam etc. Modified and targeted email campaigns can be sent to the leads in these lists accordingly.

Note: To know how to create an email campaign, see Create and Schedule Email Campaigns.


2. Prerequisites

  • You must be an Admin or Marketing user to view the report.
  • You must first create and send an email campaign.


3. Email Campaign Report

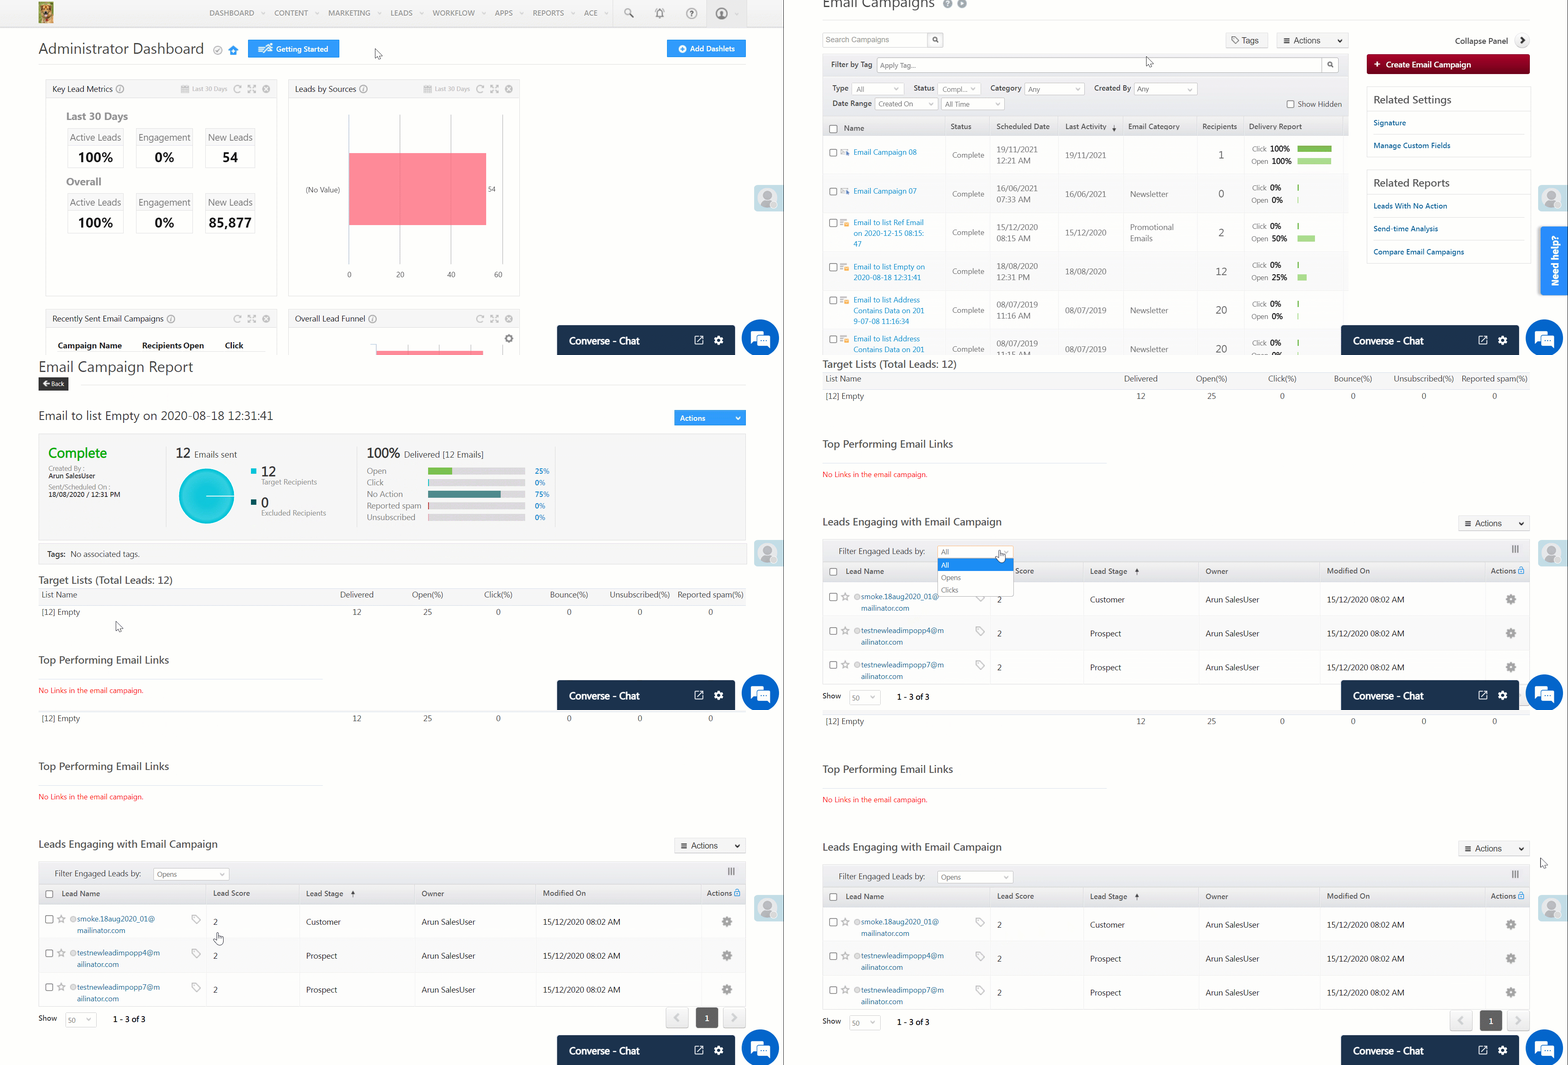
Navigate to Marketing>Email Campaign and click on the relevant email campaign.

  • On the top of the page, you can view the status of the email campaign, number of recipients (target and excluded), and the email delivery rate.
  • You can also view the percentage of leads that have
    • Opened the email.
    • Clicked a link in the email.
    • Not responded to the email.
    • Marked the email as spam.
    • Unsubscribed from receiving further emails.
  • Under Target Lists, you can view the lists of leads you’ve sent emails to and their response (i.e., the click rate, bounce rate, spam rate, etc.). If a particular list has a low click rate, you can make changes to the email campaign based on the interests/requirements of the leads in that list.
  • Under Top Performing Email Links, you can view the different links in the email and their click numbers. If you observe that any of your links has low clicks, you can change the position of the link or replace the link with a new one.
  • Under Leads Engaging with Email Campaign, you can filter the leads based on whether they opened the email or clicked on the attached link. To do so, click the dropdown next to Filter Engaged Leads by.
  •  You can view the leads who unsubscribed from the email,  the leads from whom the email bounced and leads who have marked your email campaign as spam. These leads will automatically be added to the Do Not Email list in your account. If you want to send a follow-up email to these leads, you have to manually edit the lead details and un-check their Do Not Email field.
  • To export the leads in a list, click and select Export Leads.
Note: To view the reports of emails sent through automation, see Automation Reports.

LeadSquared - Email Campaign Report


4. Other Actions

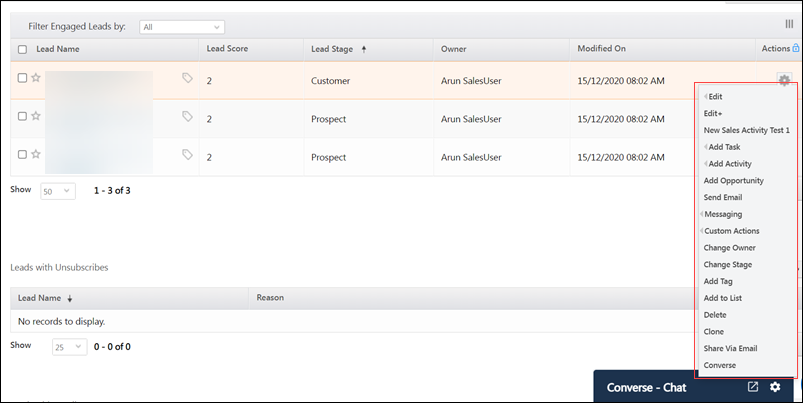
To perform the actions shown in the gif, alongside the leads present in the list, click LeadSquared.

LeadSquared - Other Actions in Email Campaign Report


5. FAQs

How is the Click and Open Count Calculated in the Email Campaign Report?

  • Issue: There are discrepancies in the data count representation. Specifically, the No. of Opens appear differently in the summary section (chart) and the lead-wise grid (the count is lower here).
  • Resolution: 
    • Summary Section (Chart): The summary section shows the count of all activities for the lead but only takes the first activity instance for the activity type (Open/Click/Unsubscribe/Bounce/Spam).
    • Lead-Wise Section (Grid): In the grids (‘Lead Engaging with Email Campaign’, ‘Lead with Unsubscribes’), the record for a lead is removed when the activity moves from one stage to another (for instance, from Open → Click).
    • Advanced Search: To get the count of leads for each activity, you can use Advanced Search and search for the lead for each activity type (Open, Click, Unsubscribe). Here, the same lead will appear under all activity types.
  • Example:
    • Step 01 – Lead A opens the campaign:
      • Open count in summary = 1
      • Click count in summary = 0
      • Open count in grid = 1
      • Click count in grid = 0
    • Step 02 – Lead A clicks on the “View in Browser” link:
      • Open count in summary = 1
      • Click count in summary = 1
      • Open count in grid = 0
      • Click count in grid = 1
    • Step 03 – Lead A unsubscribes from the campaign:
      • Open count in summary = 1
      • Click count in summary = 1
      • Unsubscribe count in summary = 1
      • Open count in grid = 0
      • Click count in grid = 0
      • Unsubscribe count in grid = 1

Why do email unsubscriptions or unusual link clicks appear frequently in reports?
This may be caused by aggressive spam filters in email servers. When an email is received, the server may “click” links to scan for suspicious content before delivering it to the inbox, spam folder, or quarantine.


Any Questions?

We’d love to answer your questions or hear your own unique use cases. Feel free to share your experiences in the comments section below.

How to Prevent Emails from Ending up in the Spam Folder

There are steps you can take to prevent your emails from ending up in your recipient’s Spam folders. We’ve listed some of the best practices you should follow –

Maintaining the Reputation

IP Address Warming

  • Spammers often create new IP addresses and send large volumes of unwanted emails. To safeguard against this, Inbox service providers (ISP) treat mail received from new or ‘cold’ IP addresses with suspicion and are also sensitive to initial email volume.
  • When you start to use LeadSquared’s email campaigns feature, the IP addresses assigned to you have never been used to send emails before. To build up a positive sender reputation, ensure better email deliverability, and prevent your emails from ending up as spam, it’s essential to warm up your IP.
  • To warm up your IP, start by slowly and methodically sending small volumes of email, and then gradually ramping up to moderate and higher volumes. The objective is to build up approximately 30 days of sending history and data to familiarize ISPs with emails coming from your new IP address.


Follow a Consistent Schedule and Email Volume

  • Email service providers (ESPs) and spam filters monitor sending behavior. Sudden spikes in email volume can trigger spam filters, especially if you haven’t been sending regularly. These spikes can be suspicious and lead to your emails being sent to spam folders or even blocked.
  • Consistent sending patterns help them identify you as a legitimate and reliable sender, ultimately improving your sender reputation. This means your emails are less likely to be flagged as spam and more likely to reach inboxes. Monitor the health of the domain and IP reputation regularly.


Purge Your Lists

  • Keep your email lists clean. Remove old and unverified email addresses.
  • Regularly purging your list helps maintain a clean and up-to-date database of active subscribers. This ensures your emails reach real people who are interested in your content.
  • While purging your list might seem counterintuitive, it’s essential for long-term success. Remember, a smaller list of engaged subscribers is far more valuable than a large one with many inactive or uninterested recipients. By regularly purging your list, you can ensure your emails reach the right people, improve deliverability, and maximize the impact of your email marketing efforts.

LeadSquared - Purge Your List


Segmentation of Lists

By segmenting your list, you can tailor your emails to specific subscriber interests and demographics. This leads to more relevant content that resonates better with recipients.

LeadSquared - Segmentation of Lists


Send Emails Only to Interested Users

  • While buying mailing lists is an obvious no-no, you should also be careful about emailing people who didn’t give you explicit permission to do so.
  • When users receive emails, they didn’t sign up for or no longer want, they are more likely to mark them as spam. This negatively impacts your sender reputation, making future emails more likely to be filtered as spam for everyone on your list, even those who want your messages.


Avoid Spam Traps and Blacklists

  • Negative Impact on Sender Reputation
    • Spam Traps – These are email addresses specifically designed to catch spammers. Sending emails to them signifies poor list hygiene and potentially unethical practices, leading to a damaged sender reputation. This can significantly lower the deliverability of your future emails, even for legitimate recipients.
    • Blacklists – These are lists of IP addresses or domains identified as sources of spam. Getting blacklisted can severely hamper your email deliverability, potentially causing emails to be blocked entirely. This can significantly disrupt your communication and marketing efforts.
  • Increased Risk of Filtering and Blocking – Both spam traps and blacklisted addresses are used by email service providers (ESPs) and spam filters to identify suspicious senders. If your emails hit even a few spam traps, it can trigger filters to flag your future emails as spam, sending them to spam folders or even blocking them altogether.


Clear Information about Unsubscribing

If someone is frustrated and can’t find an Unsubscribe button, they’re more likely to just mark your email as spam. This hurts your sender reputation with email providers like Gmail and Outlook, which can then start filtering your emails to spam folders for other recipients as well. An easy unsubscribe option gives them a clear path to opt-out, reducing the chance of a spam complaint.

LeadSquared - Unsubscribe from Email Campaign link

Always add the Mailing preference link. This lets recipients choose exactly what kind of communication they want from you and how often they receive it. Everyone appreciates control, and offering this option can keep subscribers engaged for much longer.

LeadSquared - Mailing Preference Link


Focusing on Infrastructure

Authenticating with DKIM | SPF

  • The DKIM record allows LeadSquared to digitally sign your emails for your domain. Without this record, LeadSquared’s email provider still adds this to your emails, but it’s signed for the sending party’s sending server instead of your domain. For more information on this, see Email Link Domain and DKIM/SPF Settings for LeadSquared.
  • When you add the SPF record to your domain, that allows receiving email servers like Hotmail, Gmail, Yahoo, and others, to verify the identity of your emails for the SenderID authentication. If somebody else such as LeadSquared is sending Emails on your behalf, then that SPF record explicitly gives permission to LeadSquared to send email on your behalf.


Use Double Opt-in

  • Spammers often use fake email addresses. With double opt-in, only confirmed addresses make it to your list, minimizing bounces.
  • Double opt-in confirms a subscriber’s genuine interest. People who take the extra step to verify are more likely to be engaged with your content, leading to higher open rates and click-through rates.

LeadSquared - Welcome Email


Shared versus Dedicated IP Address

  • Shared IP for Low Volume – Shared IPs are a good starting point for low-volume senders or those with a good reputation established elsewhere. They’re cost-effective and don’t require initial reputation building.
  • Dedicated IP for High Volume and Control – If you send high volumes of email or prioritize maximum control over reputation, a dedicated IP is the way to go. It allows you to build your sender reputation from scratch and avoid the risks associated with other users’ actions.

Please reach out to support@leadsquared.com for assistance in upgrading to a dedicated IP.

Content Optimization

Use Branding and Personalization

  • Branded and personalized emails are more likely to resonate with subscribers, leading to higher open rates and click-through rates. Email providers track these metrics, and consistent engagement signals that your content is relevant and wanted.
  • Please ensure that mails can be sent with Sender name like “Shibani from LeadSquared” or “Team Leadquared” instead of lead owner names for the user to identify the mail and act on it. Avoid using no-reply in the email or sender name.

LeadSquared - Change Sender Name in Email Campaign


Send Welcome Email

If someone signs up for your list but never receives a welcome email, they might forget why they subscribed and end up marking your future emails as spam. A welcome email clarifies who you are and what they can expect, reducing confusion and the likelihood of spam complaints.


Keep the subject of the email relevant

The subject line is the easiest way to get your email filtered as spam. Keep it short and simple. Avoid heavy usage of emojis. Don’t use spammy words.


Send Relevant Content

  • If your content is consistently relevant and subscriber-focused, it helps build a positive sender reputation. This good reputation translates to your emails being less likely to be filtered out by spam filters.
  • If subscribers consistently receive emails that don’t align with their interests, they’re more likely to mark them as spam. A rise in spam complaints can significantly hurt your sender reputation and deliverability.


Making Optimized Content

  • Include a text version of your email – Including a text version of your email in HTML emails is the easiest way to avoid emails ending up in the spam folder. You are greatly reducing the chances of your email being filtered as SPAM.
  • Avoid spam trigger words and phishing phrases – Some phrases like “Once in a lifetime opportunity“, “Click here“, “Make billions“ and so on would easily catch the attention of spam filters. Also avoid too many exclamation marks and using all caps.
  • Avoid large attachments and certain attachment types – Avoid executable attachments such as .exe, .zip, .swf, etc. As a general rule, you shouldn’t send attachments to people on your list that aren’t expecting them. You can instead include a link in the email to download the file/attachment.
  • Code your HTML email properly – If your HTML Email code is bad, you appear as a spammer. Broken images, missing tags, and non web-safe colors are some of the things spam filters look for.
  • Maintain a good text to image ratio – Usually spam filters cannot identify images, and so if you include more images, it is likely to end up in the Spam folder. Optimal Text to Image ratio is 60:40.

LeadSquared - Text to image ratio in Email Campaign

  • No use of shortened URL and no broken URLs.
  • Be compliant with the CAN-SPAM Act: The CAN-SPAM Act, a law that sets the rules for commercial email, establishes requirements for commercial messages, gives recipients the right to have you stop emailing them, and spells out tough penalties for violations. Here are a few points to help you stay compliant –
    • Don’t use false or misleading header information.
    • Don’t use deceptive subject lines.
    • Identify the message as an ad.
    • Tell recipients where you’re located.
    • Tell recipients how to opt-out of receiving future emails from you.
    • Honor opt-out requests promptly.
    • Monitor what others are doing on your behalf.
Note: Please reach out to Leadsquared Support team for assistance in improving your email deliverability.


Any Questions?

We’d love to answer your questions or hear your own unique use cases. Feel free to share your experiences in the comments section below.

Can I embed a form in an Email?

No. You will not be able to embed a form in an email. Microsoft Outlook does not allow rendering of forms in emails and hence will not support opening of forms.

Why Is Email Tracking Not Working for My Email Campaign?

General Email Tracking

For email tracking to work correctly, you must ensure all CNAME records provided by us are added correctly in your DNS provider settings. These include the Domain Settings for Email Links and DKIM/SPF Settings.

On our end, the sender domain must be whitelisted in the email provider sub account. If you’ve checked the DNS settings on your end and you’re still facing issues, reach out to us at support@leadsquared.com

Tracking Email Opens

We track Email Open by putting a tiny invisible image at the bottom of your HTML message. When Email is opened this imaged gets downloaded and we track this download as Email Open event.

Email Tracking will work only in HTML messages because we obviously can’t embed an image in plain text message.  Also a lot of Email clients prevent downloading of images in HTML. You will see some text placeholder in place of images in such messages. This is a privacy measure that is used very widely by email applications.  If this privacy measure is in place at your email recipient’s email app, then we will not be able to track Email Open unless the recipient explicitly download the images. You obviously can’t ask your recipients to change their privacy settings.

So the Email Open measurement may not be accurate. You should instead measure Click action on links within Email.  Click is a better measurement from reliability as well as lead engagement perspective.

In HTML message you can hyperlink any text. Any click to the link will be tracked. In plain text message you should provide full URL in plaintext including the “http://”. For example if you want to hyperlink to www.yourwebsite.com then you should write the URL as http://www.yourwebsite.com .