


Get Started
Sales Suite
Field Ops
Marketing
Service CRM
Integrations & Apps
FloStack
Object Types – Feature Guide
1. Feature Overview
What are Object Types?
Object Types let you manage and track your business entities like students, parents, agents, partners, dealers, etc. as separate modules in your CRM – outside the core Leads module.
Each Object Type is fully configurable, with its own fields, forms, opportunity pipelines, and workflows. This ensures that every entity is tracked through a CRM process tailored to its real-world role – collecting only the information that’s relevant to its unique persona and business context – without cluttering your main leads module.
Why use Object Types?
With Object Types, you can:
- Separate your data – Maintain different records for different entities instead of overloading your leads module.
- Customize deeply – Each object can have its own:
- Forms and fields
- Opportunity stages and pipelines
- Activities, tasks, and Smart Views
- Email campaigns and reports
- Tailor entity workflows and user experiences – Give sales teams views and actions that match the type of object they’re working with.
Example: A training institute can manage students and agents as separate object types – each with their own forms, workflows, and stages – while keeping leads focused on inquiries.
Note:
- Object Types cannot be enabled alongside LeadSquared’s Accounts module. If you are migrating from Accounts module to Object Types, please take the necessary backup.
- To know how Object Types is supported on the LeadSquared Mobile App, see Object Types in LeadSquared Mobile App.
2. Example Use Cases
Object Types can be tailored to reflect the unique business entities relevant to your industry. Below are examples of how different sectors might use Object Types:
| Industry | Example Object Types |
| BFSI | Bank Account, Branch Contact, Specified Persons Contact, Customer Leads Contact |
| Education | Student, Teacher, Parent, School Point of Contact (POC) |
| Healthcare | Patient, Doctor, Nurse, Clinic |
Example: Education Industry
A Student object type might include:
- Fields – Grade, Stream, Course
- Stages – Inquiry, Application Submitted, Enrolled
- Opportunities – Test Prep Package, Summer Camp Enrollment
- Activities – Admission Form Filled, Interview Scheduled
This structure ensures that each entity follows a CRM process that reflects their real-world journey, with only the relevant data, stages, and actions.
3. Prerequisites
- You must be an admin user to create and configure object types.
- You must have NextGen enabled on your account.
- To enable Object Types in your account, reach out to support@leadsquared.com.
4. How it Works
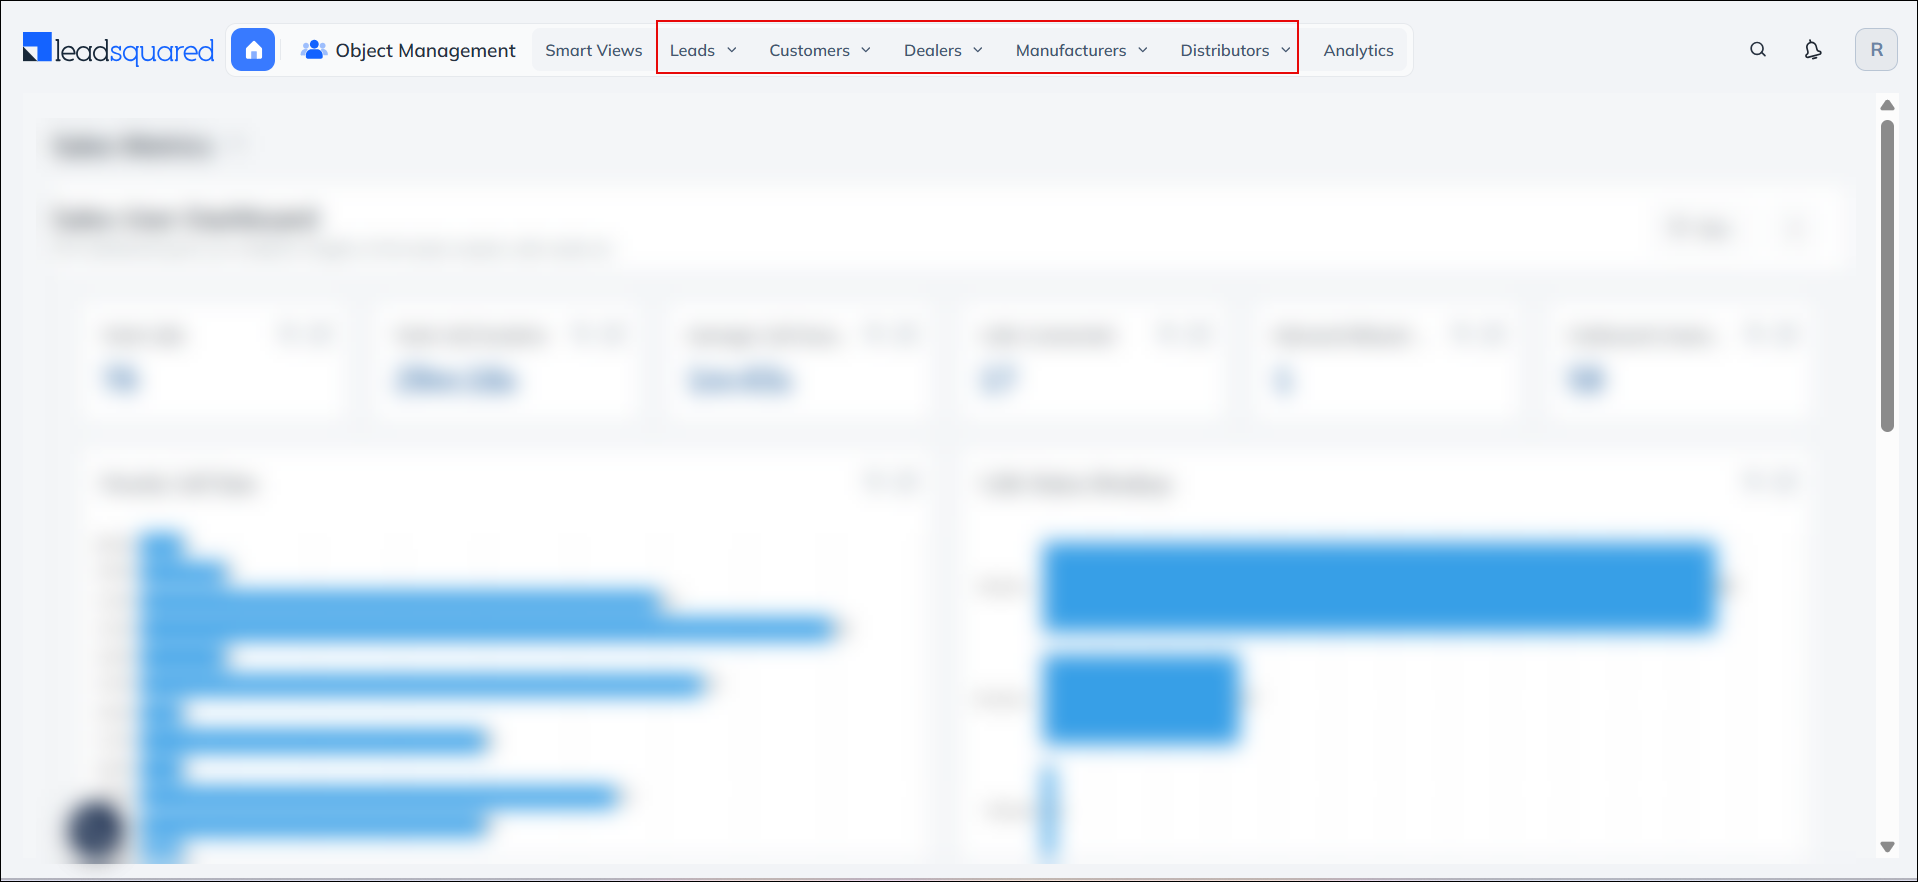
Once Object Types are enabled, you’ll see separate tabs for each object in your navigation menu – making it easy to view, track, and act on different entities like Students, Agents, or Partners.
For each object type, you can:
- Customize the Details Page (Object Details View)
Show key information like contact details, activities, tasks, and opportunities in a layout tailored to each object type. - Set Up Custom Forms and Processes
Design unique forms and lead journeys – like enrolment steps for students or on-boarding for partners. - Define Activities and Opportunities
Create specific interaction points (e.g., “Interview Scheduled”) and sales pipelines that match the object’s real-world life-cycle. - Assign and Track Tasks
Set tasks for follow-ups, meetings, or documentation – based on the needs of each object type. - Run Targeted Email Campaigns
Send personalized emails to contacts linked to a specific object type, using their unique data.
5. Create Object Types
To create an Object type in your account –
- Navigate to Settings>Objects>Object Types.
- Click Create.
- On the Create Object Type pop-up, enter the singular and plural name, then click Next.
- Select and associate relevant object fields from Available Object Fields, select the relevant lead fields –
- Click
 to add fields.
 - Click
 to remove fields.
- Click
- Choose the object fields you want to display on this object type’s Manage Objects page – this is the list view where users can track and filter records.
- Click Publish. You can also save the object type as a draft and publish it later.
To create new lead fields, see How to Create Custom Lead Fields.
Note:
- A default object type will be automatically added in your LeadSquared account once you enable this feature. This object type can only be edited and cannot be deleted.
- If objects are added through a third party connector, they’ll automatically be categorized as the default object type.
- Only the fields associated with a specific object type will be visible on that object’s details page, forms, and other related areas.
- Each object type must be associated with –
- One Search Key field (for global search)
- One Unique Key field (for unique identification)
- Display names must be unique. You cannot reuse the same display name across multiple object types
- The following keywords are restricted and cannot be used in object type names:
Account/Accounts, Lead/Leads, Activity/Activities, Task/Tasks, List/Lists and Opportunity/Opportunities.
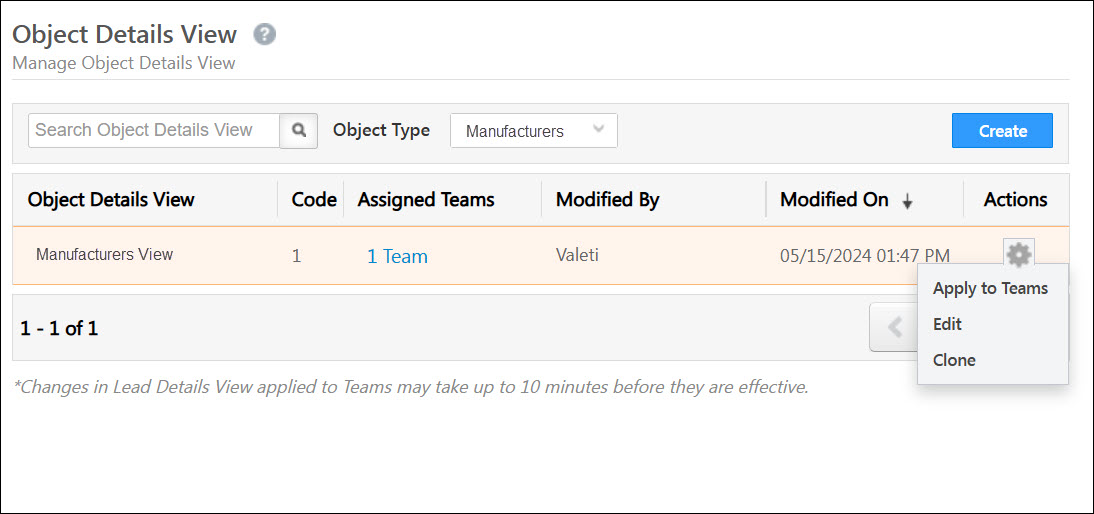
6. Customize Object Details View
You can tailor the layout of the Object Details Page to suit your team’s workflow. This includes configuring the Tabs, Actions, Buttons, and the Object VCard – giving your users a focused view of only the most relevant information for each object type.
To customize Object Details View –
- Navigate to My Profile>Settings>Objects>Object Details View.
- Select the relevant option from the Object Type dropdown.
- Click Create.
On the Create Object Details View pop-up, under the Details tab, enter the following details –
- Name – A name for the view you’re creating. This is mandatory.
- Description – A description of the view you’re creating.
Then, select the relevant data to be displayed in the VCard, Tabs and as Actions and click Save.

Once the Object Details View is created hover your cursor over the actions ![]() button and click Apply to Teams.
button and click Apply to Teams.
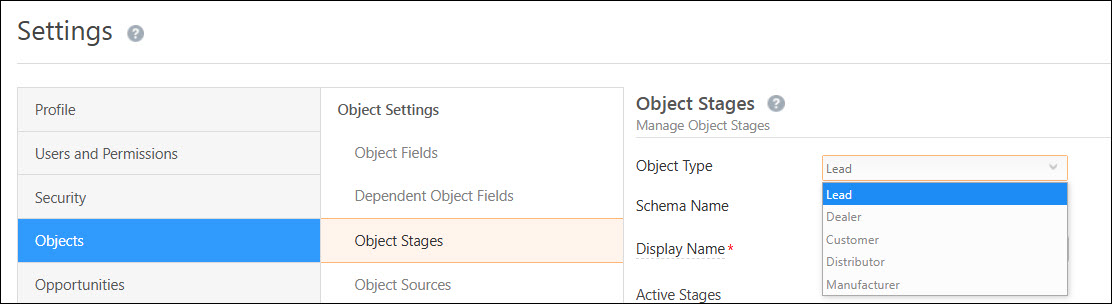
7. Configure Object Stages
Object Stages help you track the progress of each object through its own business lifecycle, whether that’s a sales funnel, approval workflow, or onboarding process. When Object Types are enabled, you can define unique stages for each object type to reflect the journey specific to that entity.
For example:
- Customer object type can have stages like New, Engaged, and Converted
- Manufacturer object type can have stages like Shortlisted, Approved, and Partnered
By default, all object types have the existing default stages (Prospect, Opportunity, Customer) configured.
To configure stages for different object types –
- Navigate to Settings>Objects>Object Stages.
- Select the relevant object type from the first dropdown.
- Under Active Lead Stages or Inactive Lead Stages, click Add and enter the name of the stage.
- Click
 to save the newly created Lead Stage.
You can select Enable Comments on Stage Change to let your Sales Users make and read comments about the Stage change. Under Other Properties, click any of checkboxes to add the available characteristics to the Lead Stage.
8. Import Objects
You can bulk import records into a specific object type using a CSV (Comma-Separated Values) file. This is useful for onboarding large volumes of data like students, agents, or dealers into your CRM quickly and accurately.
- Navigate to the relevant object type and select the Objects page (e.g., Dealers>Manage Dealers).
- Click the
 actions button and select Import Object Type (e.g. Import Dealer) and proceed further.
Note: The fields available for mapping will depend on the Object Fields configured for that object type.

9. Object Type Support in Forms and Processes
How to Create Forms for each Object Type
LeadSquared supports two types of forms – Default and Dynamic – both of which can be customized per Object Type. This ensures that each entity (like Students, Dealers, or Partners) is captured and updated using forms relevant to their unique attributes and workflows.
Create Default Forms
Default Object Forms allow you to create and manage forms directly from your web app settings to capture or updating object records. When Object Types are enabled in your account, these forms can be customized based on the specific attributes of each object type to capture relevant data.
For example, in an EdTech setup:
- Forms for the Student object type may include Class, Exam Grades, Courses Enrolled.
- Forms for the Teacher object type may include Subject Specialization, Years of Experience, Assigned Classes.
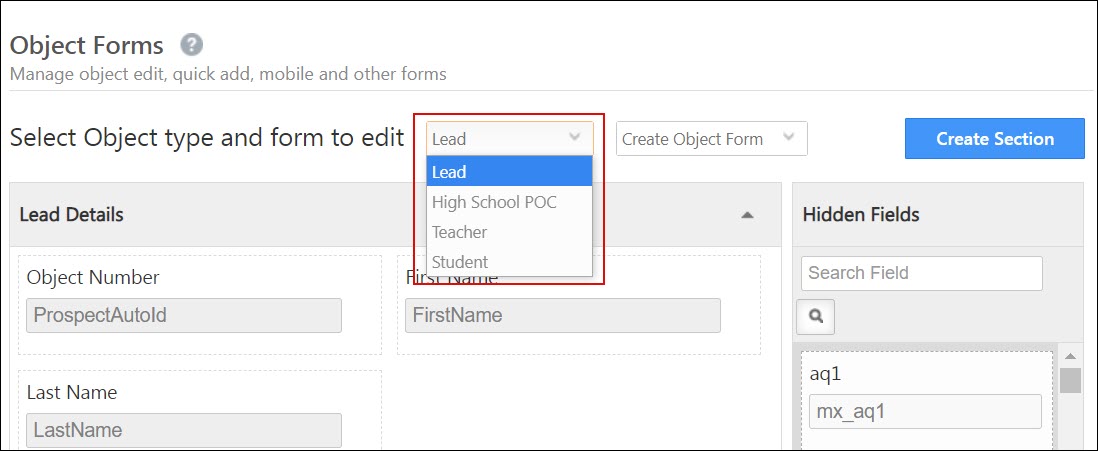
To create a new Object Form –
- Navigate to My Profile>Settings>Objects>Object Forms.
- Click the Select Object Type dropdown and choose the relevant object type.
- Alongside Select Form to edit, click the dropdown and select Create Object Form.
- You can remove/hide Lead Fields by dragging it to the Hidden Fields section on the right. You can also retrieve a particular field from the Hidden Fields by dragging it to the relevant section.
- Reorder fields and sections by dragging them and click Save when done.
Create Dynamic Forms
Dynamic forms let you build advanced lead capture forms with rules and logic tailored to specific object types. These forms can be embedded in workflows and made available across web and mobile apps.
- Navigate to Object Management>Workflow>Manage Forms and click the Create Form button and select the relevant purpose.
- On the Create Form popup, you can select the object type from the Lead dropdown alongside Object Fields.
- The lead fields relevant to the particular object type will be displayed on the Design page.
- You can drag and drop the required fields onto your form.

Create Processes for each Object Type
After you publish your form, you can create processes for specific object types to control when and where the dynamic form appears.
- From your LeadSquared Dashboard, navigate to Object Management>Workflow>Process Designer.
- On the Manage Processes page, click Create Process.
- Select At Specific Work Area. This option lets you create a button on a specific page (Manage Leads, Lead Details, etc.) to trigger the process.
- In the popup, from the Object dropdown, select the relevant object type and proceed further.
- In the Choose starting point popup, select work areas in the web and mobile app where your process should begin and click Save.
Note:
- To know more, refer to How To Create a Process.
- While selecting the work areas, ensure you check the box for mobile. This ensures that the process you set up is also available in the mobile app.

10. Object Types Support in Opportunities
Configure Opportunities and Create Dedicated Views for each Object Type
In LeadSquared, Opportunities represent your potential deals. When Object Types are enabled, you can associate specific opportunity types with specific object types, ensuring every deal tracks the right kind of entity and context.
For example, if a manufacturer purchases Cement Basic and expresses interest in Cement Plus or Cement Star, these would be added as cross-sell or up-sell opportunities, visible directly under the manufacturer object in your CRM.
This setup allows your teams to:
- Create targeted opportunity types per object (e.g., Customers, Dealers, Manufacturers)
- Avoid clutter by showing only the relevant opportunities for each object
- Customize how each opportunity type is viewed and managed across web and mobile
Configuring Opportunity Types
While configuring an opportunity type in the web app settings, you can associate it with one or more object types. For instance, if your object types include distributors and manufacturers, you can associate specific opportunity types like Cement Super and Cement Plus to distributors as well as manufacturers. This ensures the opportunity is only available for relevant entities, and helps teams create, manage, and report on deals specific to their business context.
- Navigate to Settings>Opportunities>Opportunity Types.
- Click Create and enter the relevant details.
- From the Associated Object Types dropdown, select the relevant object types you want the opportunity type to be associated with.
- Click Next. Once you complete the Field and Form configuration, click Save.
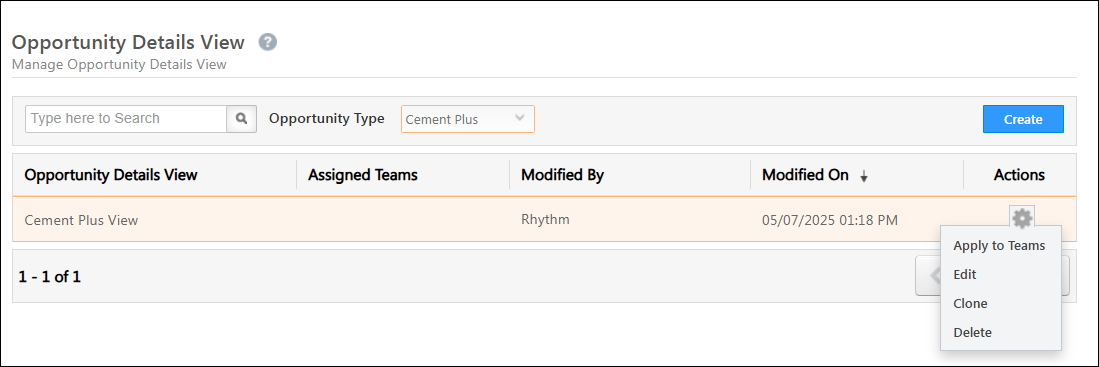
How To Create Opportunity Details View
Admins can customize the layout of the Opportunity Details page for each opportunity type. This includes configuring tabs, action buttons, and VCards to present information that matters most for each type of opportunity.
- Navigate to My Profile>Settings>Opportunities>Opportunity Details View.
- Click Create.
- On the Create Opportunity Details View pop-up, under the Details tab, enter the following details –
- Name – A name for the view you’re creating. This is mandatory.
- Opportunity Type – The opportunity type for which you want to create this view.
- Description – A description of the view you’re creating.
Then, select the relevant data to be displayed in the VCard, Tabs and as Actions and click Save.

Once the Opportunity Details View is created hover your cursor over ![]() and click Apply to Teams.
and click Apply to Teams.
How To Customize Opportunity Card (Mobile App)
You can configure different opportunity cards to be displayed on the mobile app for each opportunity type. In the hidden fields, only the fields associated with that particular object type will be displayed.
- Navigate to Settings>Mobile App>Customize Opportunity Card.
- Click Yes alongside Customize Opportunity Card.
- Select Object Type and the associated Opportunity Type from the relevant dropdowns.
- Then, configure the Opportunity card as required.

11. Object Types Support in Activities and Tasks
Configure and Add Activities for each Object Type
With Object Types enabled, you can assign custom activities to specific object types, ensuring that each entity (e.g., Student, Dealer, Partner) is tracked through interactions that match its role in your business process.
For example:
- A Student object might have activities like Orientation Attended or Mock Test Completed
- A Dealer might have activities like First Purchase or Contract Renewed
These activities appear only for the object types they are associated with, keeping the UI clean and relevant for your teams.
How to Configure Activities
- Navigate to Settings>Objects>Custom Activities & Scores.
- Click Add and enter the relevant details.
- From the Associated Object Types dropdown, select the relevant object types you want the activity type to be associated with.
- Enter the required details in the pop-ups and click Save.
Note: The system object type will have all activity types associated with it and it cannot be modified.

How to Post Activities
Once you’ve created the required activity types, users can start posting them against individual objects.
- Navigate to the relevant object type and click Activities.
- Select the custom activity from the Activity Types list.
- Click the Add Custom Activity button, and enter the activity, lead and opportunity details (if applicable).
- Once you’re done, click Save & Close.

Alternatively, navigate to the relevant Object Type page (e.g., Dealers>Manage Dealers page), select the dealer and post an activity from the dealer details page.

Add Tasks for each Object Type
Tasks let you assign actionable items like follow-ups, meetings, or documentation for objects under different object types. Each task is contextually linked to the object, helping users stay focused on what needs attention.
For example:
- Schedule a Follow-up Call for a Dealer
- Assign a Document Collection Task for a Student
To create and manage tasks for specific object types –
- Navigate to the relevant object type and click Tasks.
- Click the Add Task button and select a task type you want to create.
- Enter the task details on the pop-up.
- Click Save & Close.

Alternatively, navigate to the Object Type page (e.g., Dealers>Manage Dealers), select the dealer and post a task from the dealer details page.

12. Create Targeted Email Campaigns for each Object Type
LeadSquared’s Email Campaign module allows you to run personalized outreach tailored to the sales journey of each object type.
For example:
- For Dealers, share new product launches or performance-based incentive programs.
- For Partners, schedule periodic engagement emails tied to their pipeline stage or activity history.
This ensures that every email campaign speaks directly to the recipient’s role and status in your sales process.
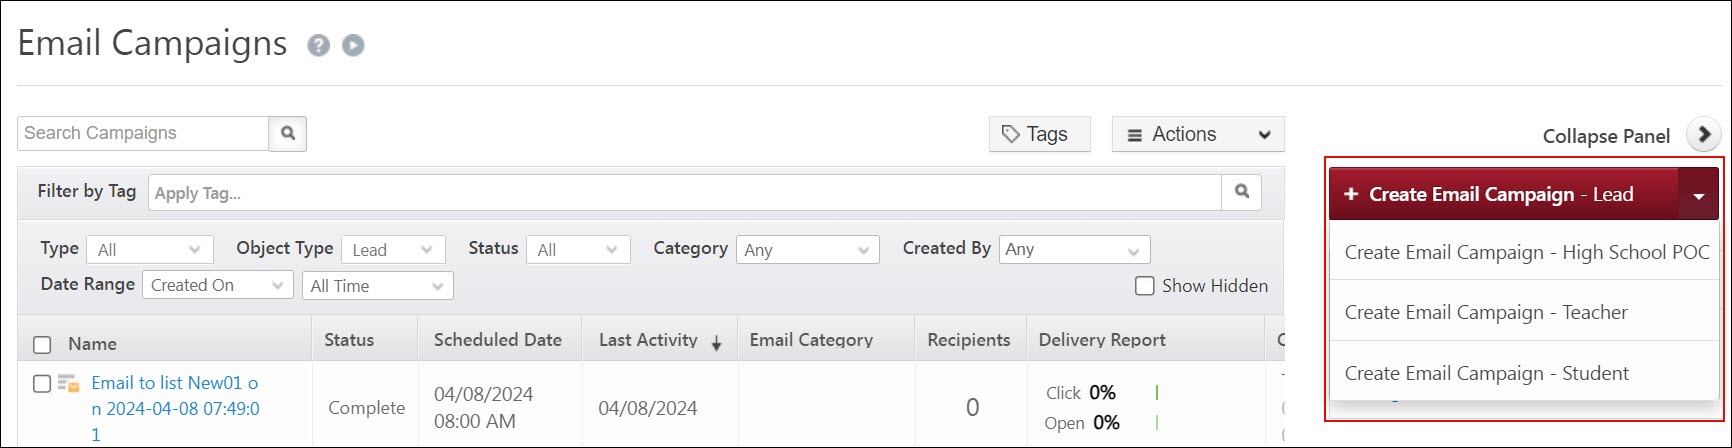
To create email campaigns for specific object types –
- Navigate to Object Management>Marketing>Email Campaigns.
- Click the dropdown alongside Create Email Campaign and select the relevant Object Type to create email campaigns for specific object types.
13. Object Types in Smart Views
Smart Views help sales teams filter and prioritize their work. When Object Types are enabled, you can create focused views for each object type to reflect their sales lifecycle. To learn more about creating a Smart Views tab, see Smart Views for Administrators or Smart Views – Feature Guide as per your role.
For example:
- A Dealer Manager might create a Smart View to track dealers at the Negotiation or Contract Sent stages.
- A Partnership Manager might view only partners with open opportunities above a certain value.
As an Admin (Creating Smart Views for Object Types)
- Navigate to Settings>Objects>Smart Views.
- On the Add New Tab popup, select the relevant object type from the Object Type dropdown and add other relevant details.
- In the Select Criteria popup, build your condition with the relevant fields. You will only be shown the fields associated with the Object Type you’ve selected in the previous popup.
Note:
- While configuring columns and filters, you will only see the object fields relevant to the selected object type.
- While configuring Task Smart View Tabs, you can select multiple Object Types so that you can view tasks across all relevant object types.

As a User (Creating Smart Views in the UI)
- Navigate to Smart Views from your LeadSquared Dashboard.
- Click the
 icon next to the rightmost Smart Views tab on top of the page.

14. Object Types in Casa
LeadSquared’s Casa feature lets you design tailored homepages for both your web and mobile apps. When used with Object Types, Casa allows you to build role-specific dashboards that reflect each team’s focus area – helping sales reps, managers, and field agents see the most relevant data and actions as soon as they log in.
For example:
- A Dealer Sales Team homepage can highlight pending dealer follow-ups, open opportunities, and a shortcut to the Manage Dealers page.
- An Agent Onboarding Team homepage can show tasks like document collection or interview scheduling specific to the Agent object type.
Object Types is supported in the following Casa Widgets on the Web App –
| Widgets | Description |
| Progress Bar | View all your completed tasks in a bar format for a specific object type during a specific time period |
| Single Counter | View tasks or the data count present in the smart views based on a specific object type |
| Speedometer | View all your completed tasks in a speedometer format for a specific object type during a specific time period |
| Calendar View | View your object type-specific tasks – either complete, pending, overdue or pending and overdue in the Calendar view |
| Icon Launcher | Open an icon to navigate to a specific object list or object form |
| Banner | Open a banner to navigate to a specific object list or object form |
| Launch Bar | Open an icon on the launch bar to navigate to a specific object list or object form |
Object Types is supported in the following Casa Widgets on the Mobile App –
| Widget | Description |
| Launcher | Open an icon to navigate to a specific object list or object form |
15. Object Types in Journeys on the Web App
Journeys is a field sales planning feature available on the LeadSquared Mobile App. It enables sales users to create structured visit plans by selecting specific leads and scheduling interactions over a defined time period.
To create a plan on the web app –
Navigate to Apps> Journeys.
Create a Template with Object Types Enabled
When Object Types is enabled, you can select objects categorized based on object types. Select the relevant object type tab to view the list of objects. To learn how to create Templates, see Create Lead Templates.
Create Template-Based Plan with Object Types Enabled
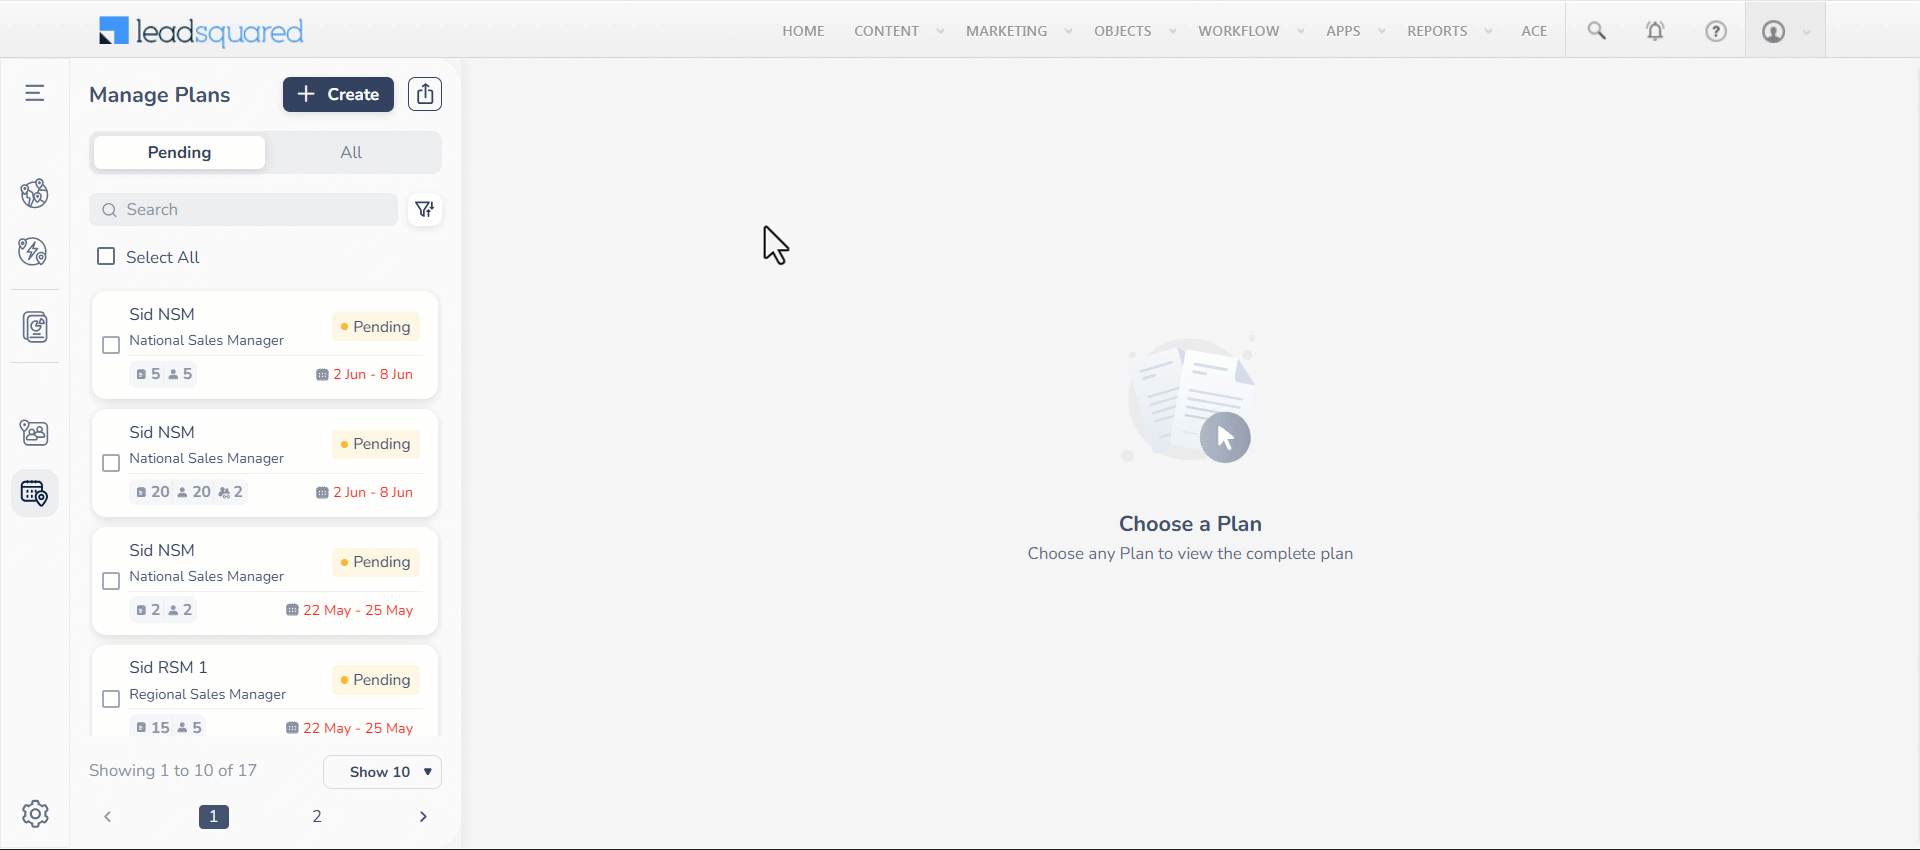
- In Journeys, alongside Manage Plans, click Create.
- Select the User, Date Range and Working Days.
- Select Templates under Create Plan with and click Next.
- Select the relevant template from the left side menu and add it to the dates.
- Click on the template-added date to view the objects in the template categorized based on the object types.
- Once the required objects are added across all days in the plan, click Publish.
Create a Lead-Based (Object-Based) Plan with Object Types Enabled
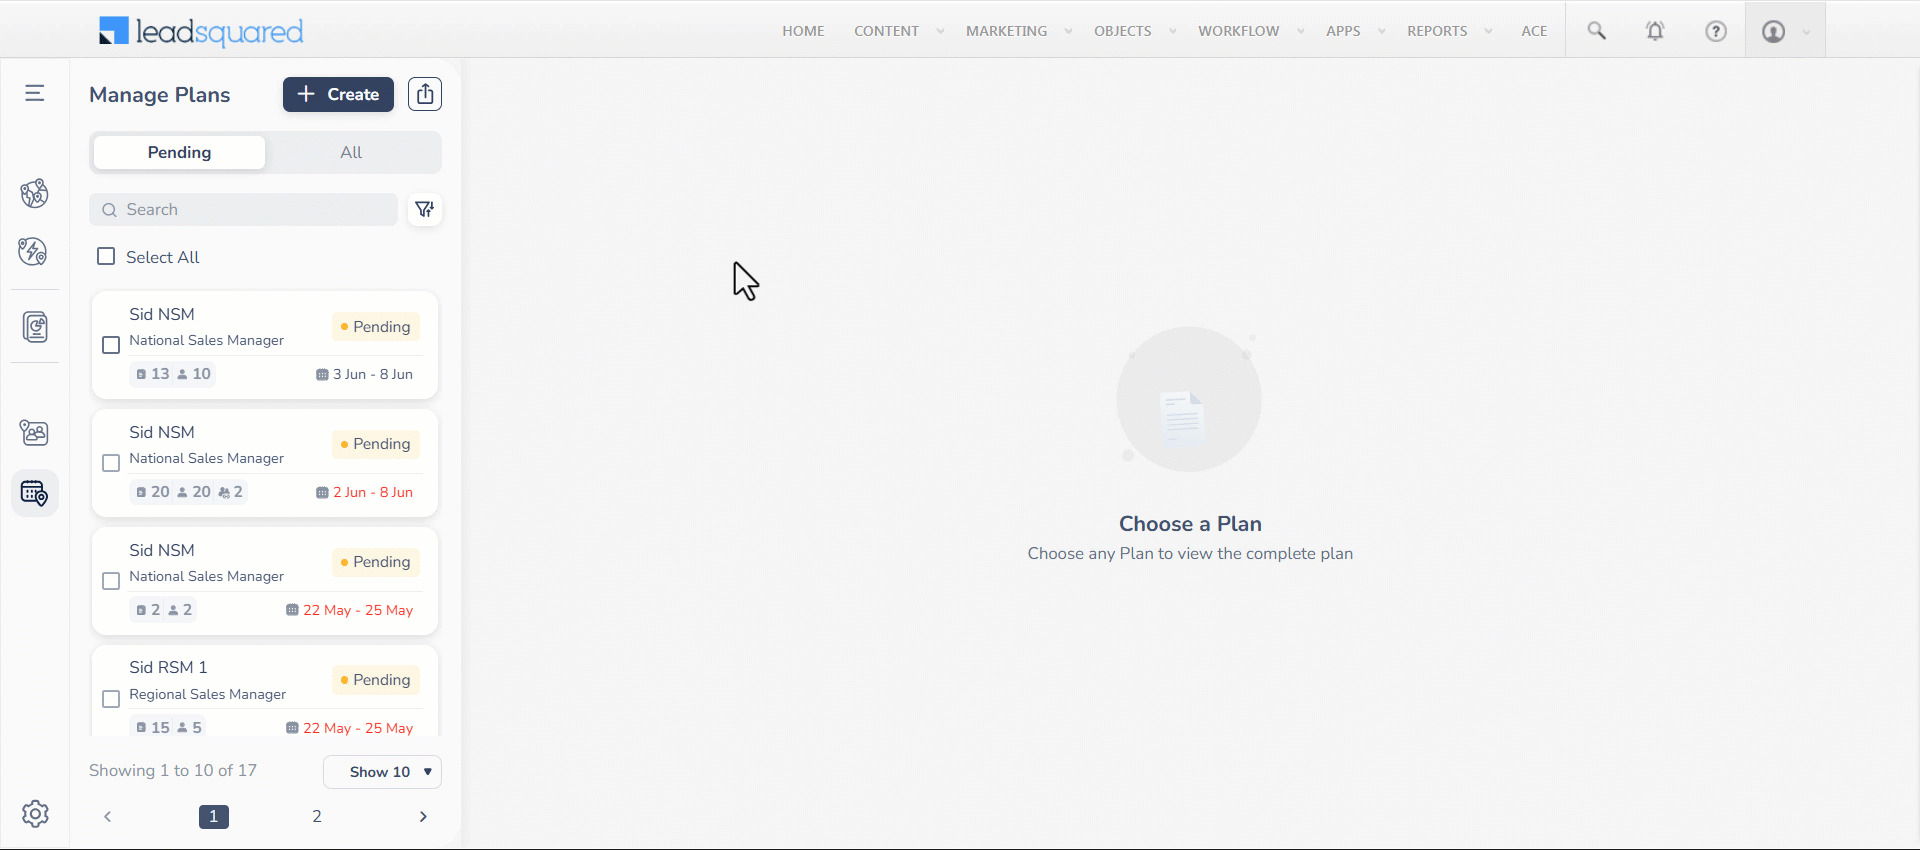
- In Journeys, alongside Manage Plans, click Create.
- Select the User, Date Range and Working Days.
- Select Objects under Create Plan with and click Next.
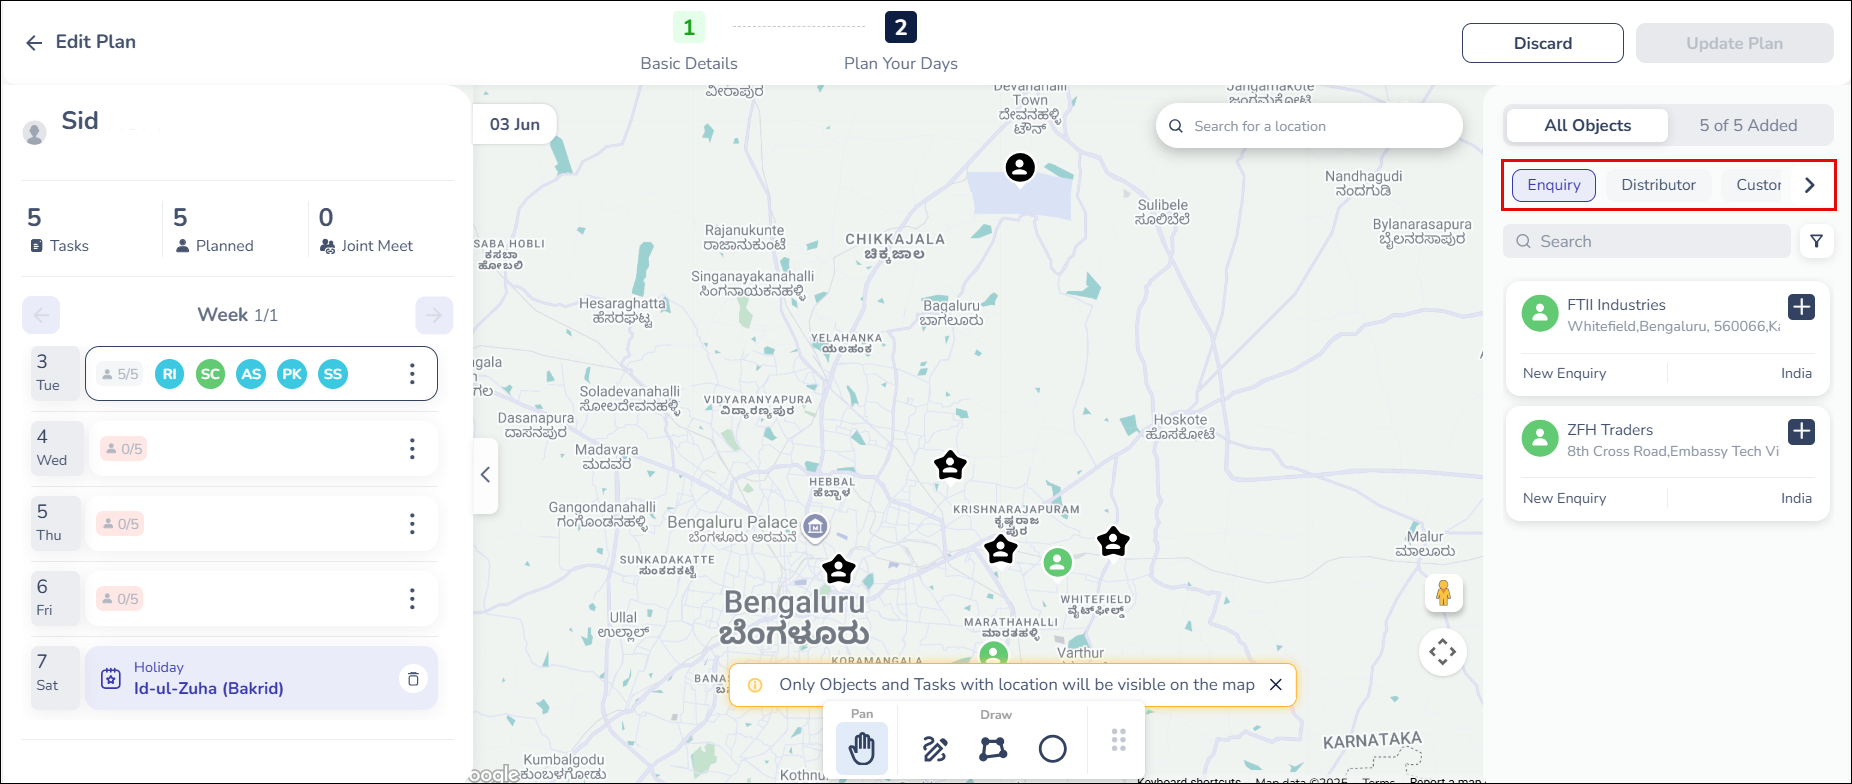
- From the right side menu, select the relevant object type tab and objects under it.
- Once the required objects are added across all days in the plan, click Publish.

Edit a Plan with Object Types Enabled
To learn how to edit Lead-Based (Object-Based) plans, see Edit Pending or Approved Plans. While editing a plan submitted for approval, you can click the relevant object type chip on the right side menu and add or remove objects.
Approve/Reject a Plan with Object Types Enabled
To learn how to approve or reject a plan, see Approve or Reject Plans. While attempting to approve or reject plans, you can view the objects for each date categorized based on the object types.
16. Dissociating Object Field & Unpublishing an Object Type
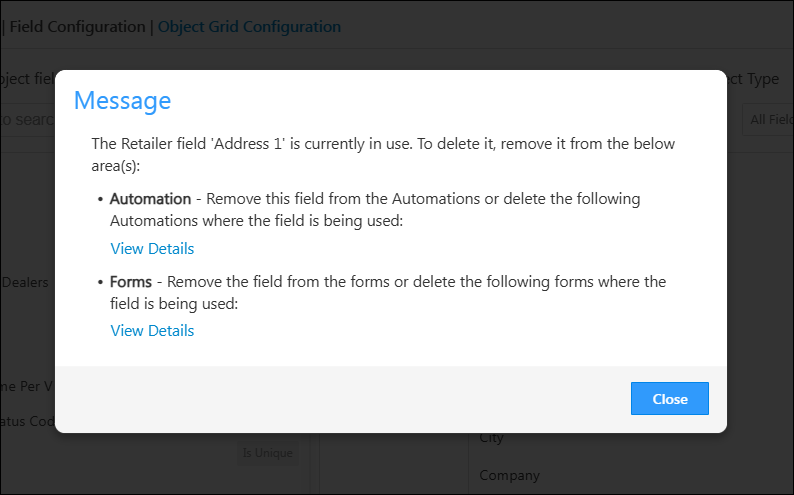
Dissociating Object Fields
When you attempt to dissociate an object field from an object type configuration, a popup message displays all the areas where the field is currently in use. To proceed, you must first remove the field from each associated work area before dissociating it from the object type.
For example, if the Date of Birth field is used in Dynamic Form 10, you must remove it from the form before you can dissociate it from the object type.
Associated work areas could be:
- Object Details View
- Selected Automation Cards
- System and Dynamic Forms
- Lists (as the field will be available in advanced search)
- Quick Filter (as the field will be available in advanced search)
- Mobile App Object Card
- Email Campaigns
- Landing Pages
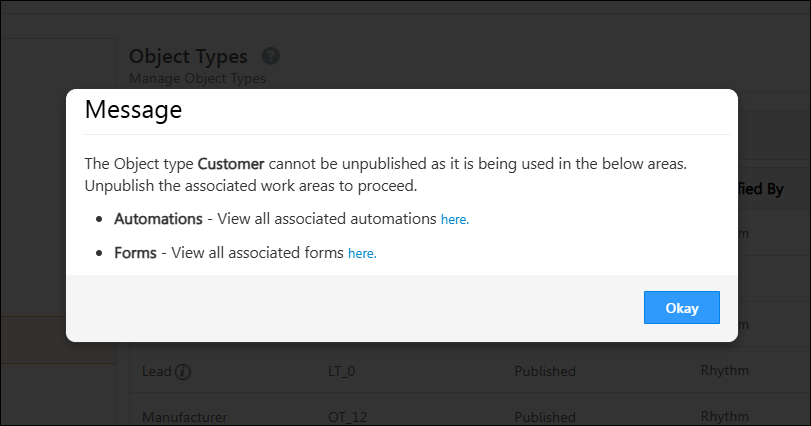
Unpublishing Object Type
When you attempt to unpublish an object type, a popup message displays the details of its associations. To proceed, you must first unpublish the associated work area before unpublishing the object type itself.
For example, if the Student object type is used in an Email Campaign, you must first delete the associated Email Campaign before you can unpublish the Student object type.
Areas where the Object Type may be associated:
- Automation
- Dynamic Forms
- Email Campaigns
- Landing Pages
17. FAQs
1. Why am I unable to import objects into the default Object Types?
Import functionality is not supported for default Object Types. You can only import custom object types from LeadSquared.
2. How can I move objects from one Object Type to another?
Currently, objects can only be moved from a default Object Type to a custom Object Type. Moving objects between two default Object Types or between custom Object Types is not supported.
3. Why can’t I see Manage Activities or Manage Opportunities for an object type?
These options will only appear if at least one Activity Type or Opportunity is associated with the object type. If none are linked, the Manage Activities or Manage Opportunities tab will not be displayed in the object type menu. To resolve this, make sure you’ve associated the relevant activity types or opportunities with that specific object type.
Any Questions?
Did you find this article helpful? Please let us know any feedback you may have in the comments section below. We’d love to hear from you and help you out!