


Get Started

Sales Suite
Field Ops
Marketing
Service CRM
Integrations & Apps
FloStack
Creating a Voice Bot on Invorto

1. Feature Overview
An Invorto Voice Bot is what your campaigns use to make calls. It stores everything a call needs: who the bot is, what it says, the AI model it uses, the language and voice it speaks in, how it understands the contact, and the data it collects after each call.
You build a bot once and use it in any number of campaigns. For example, one appointment reminder bot can run a new campaign every morning with a new contact list. Each contact’s name and appointment time are passed to the bot at call time. Because the bot and the campaign are separate, you can improve the bot anytime without changing your campaigns.
A new bot starts as a Draft. You can test a draft bot, but campaigns can’t use it until you publish it. Published bots appear in the campaign creation wizard.
This article covers the full process: create and configure the bot, test it, publish it, and manage it.
2. How It Works
A voice bot works in four layers. Each setup tab controls one of these layers –
| Tab | What it Does |
| Transcription | Converts the contact’s speech into text. |
| Conversation, AI & Knowledge | Decides what the bot says next. |
| Tools | Lets the bot act during the call, such as looking up a record in your system or transferring the call to a person. |
| Language & Voice | Converts the bot’s reply into speech. |
| Call Insights | Collects data from the call after it ends. |
Here’s what happens on a call –
- Invorto dials the contact. The bot speaks the greeting message, with the contact’s values filled into the variables.
- The contact replies. The bot converts their speech into text.
- The AI model decides what to say next, based on your system prompt and knowledge base.
- The bot speaks the reply.
- Steps 2 to 4 repeat until the call ends. Invorto then analyzes the call, generates the insights, and sends them to your webhook (if you added one).
To build a bot: create and configure it, save it, test it with a call to your own number, and publish it. If you edit the bot later, publish it again for the changes to go live.
3. Prerequisites
- You must have access to the Invorto portal, with an Admin role that allows bot creation.
- If you want the bot to answer questions from reference content, keep your documents (PDF, DOC, or TXT files) or a public URL ready.
- If you want to send call insights to an external system (for example, your CRM), you must have a webhook URL.
4. Create a New Bot
- On the Invorto portal, navigate to Voice Bots.
- Click + New Bot.
- On the Create Voice Bot pop-up, select Start from Scratch or a pre-built template.
- Click Create.
- At the top of the bot page, enter a name and a short description for the bot.
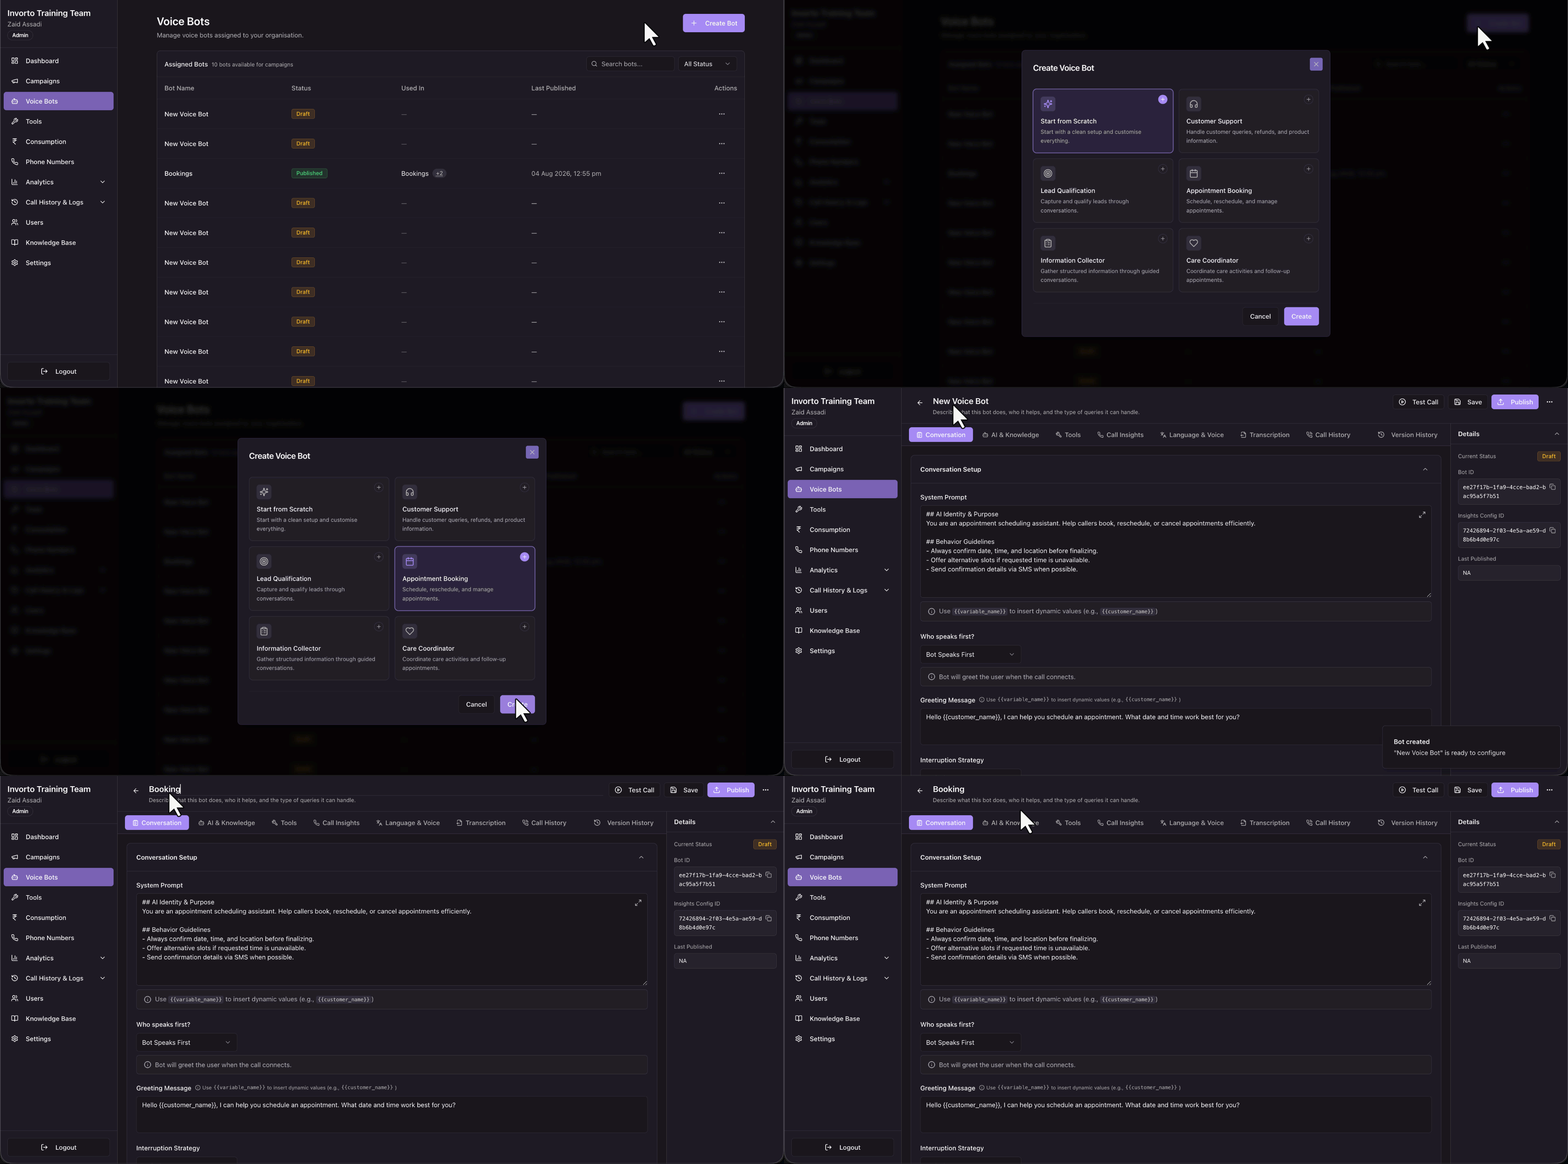
Templates pre-fill the system prompt and greeting message for a common use case. You can customize everything after the bot is created –
| Template | Best For |
| Start from Scratch | A clean setup where you write the entire configuration yourself. |
| Customer Support | Handling customer queries, refunds, and product information. |
| Lead Qualification | Capturing and qualifying leads through conversations. |
| Appointment Booking | Scheduling, rescheduling, and managing appointments. |
| Information Collector | Gathering structured information through guided conversations. |
| Care Coordinator | Coordinating care activities and follow-up appointments. |
The bot opens with six setup tabs: Conversation, AI & Knowledge, Tools, Call Insights, Language & Voice, and Transcription. The Call History and Version History tabs sit alongside them. Work through the setup tabs in order.
5. Conversation
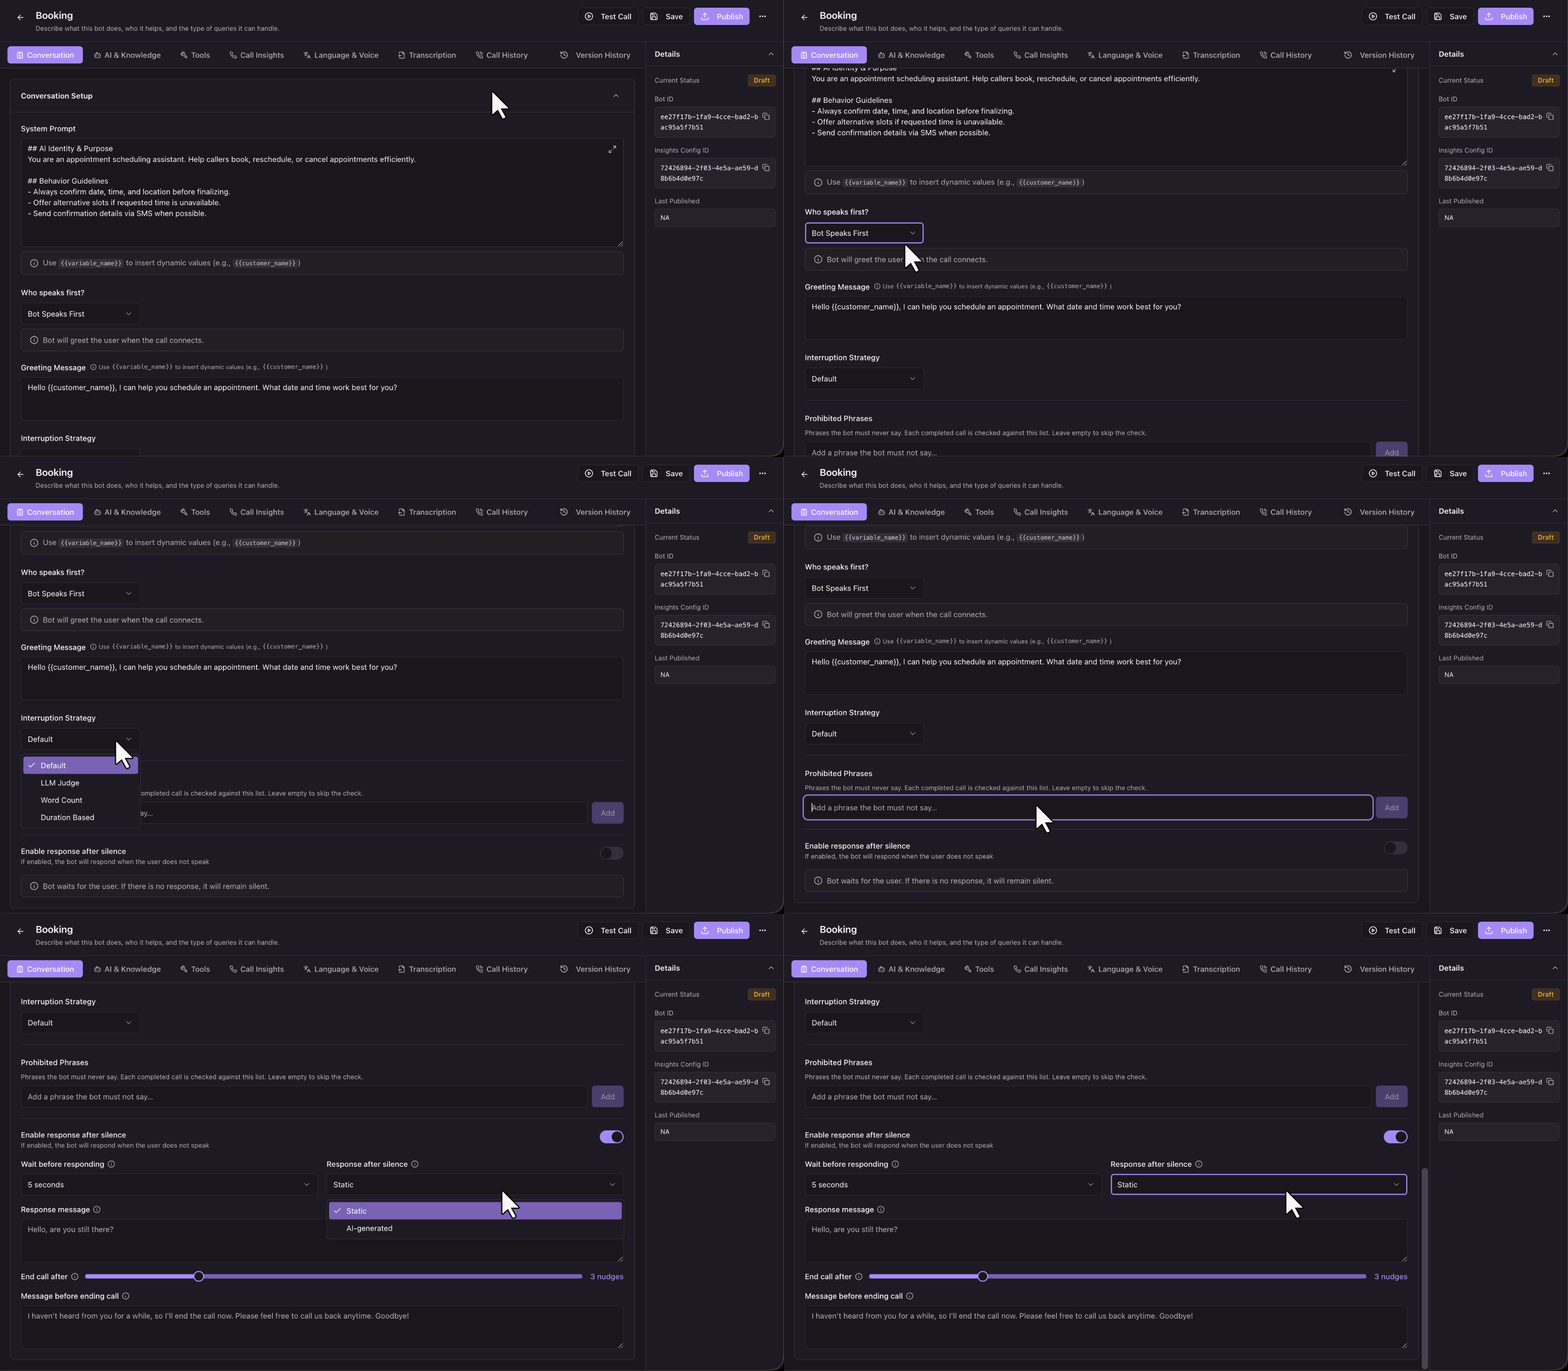
On the Conversation tab, define what the bot says and how it behaves on a call –
- System Prompt – The bot’s core instructions. Describe who the bot is, the context of the call, what it must accomplish, and the rules it must follow. This is the single most important setting on the bot. To write dynamic prompts, insert variables in the
{{variable_name}}format (for example, “Hi{{customer_name}}, your appointment is on{{appointment_date}}“). You pass the values for these variables when you upload contacts to a campaign or initiate a call through the API. - Who Speaks First – For outbound calls, select Bot Speaks First. The bot greets the contact as soon as the call connects.
- Greeting Message – The first line the bot speaks. It also supports variables.
- Interruption Strategy – Controls how the bot reacts when the contact speaks while the bot is talking.
- Default – Balanced behavior suited to most bots.
- LLM Judge – The AI model judges whether the contact intends to interrupt, so short backchannel words (for example, “okay” or “uh-huh”) don’t cut the bot off. Click Configure to set the Instant Interrupt Word Count. Once the contact speaks this many words or more, the bot interrupts immediately without waiting for the AI model’s judgment. Lower values make the bot more sensitive to interruptions.
- Word Count – The bot interrupts once the contact’s speech reaches a minimum number of words. Click Configure to set the Threshold Words. Speech below this word count is treated as a backchannel (for example, “uh-huh”) and doesn’t interrupt the bot.
- Duration Based – The bot interrupts once the contact has been speaking continuously for a minimum length of time. Click Configure to set the Threshold (ms). Speech shorter than this duration is treated as a backchannel and doesn’t interrupt the bot.
- Prohibited Phrases – Phrases the bot must never say. Type a phrase, then click Add. Invorto checks every completed call against this list. Leave the list empty to skip the check.
- Enable Response After Silence – Turn this on so the bot speaks up if the contact goes quiet, instead of waiting silently. Once enabled, configure –
- Wait Before Responding – How long the bot waits in silence before it responds (for example, 5 seconds).
- Response After Silence – The style of the bot’s response after silence: Static (the bot always says the same message) or AI-generated.
- Response Message – If you’ve selected Static response then enter message the bot speaks when the contact has been silent for too long (for example, “Hello, are you still there?”).
- End Call After – The number of silent nudges the bot sends before it ends the call (for example, 3 nudges).
- Message Before Ending Call – The message the bot speaks just before it ends the call due to prolonged silence (for example, “I haven’t heard from you for a while, so I’ll end the call now…”).
6. AI & Knowledge
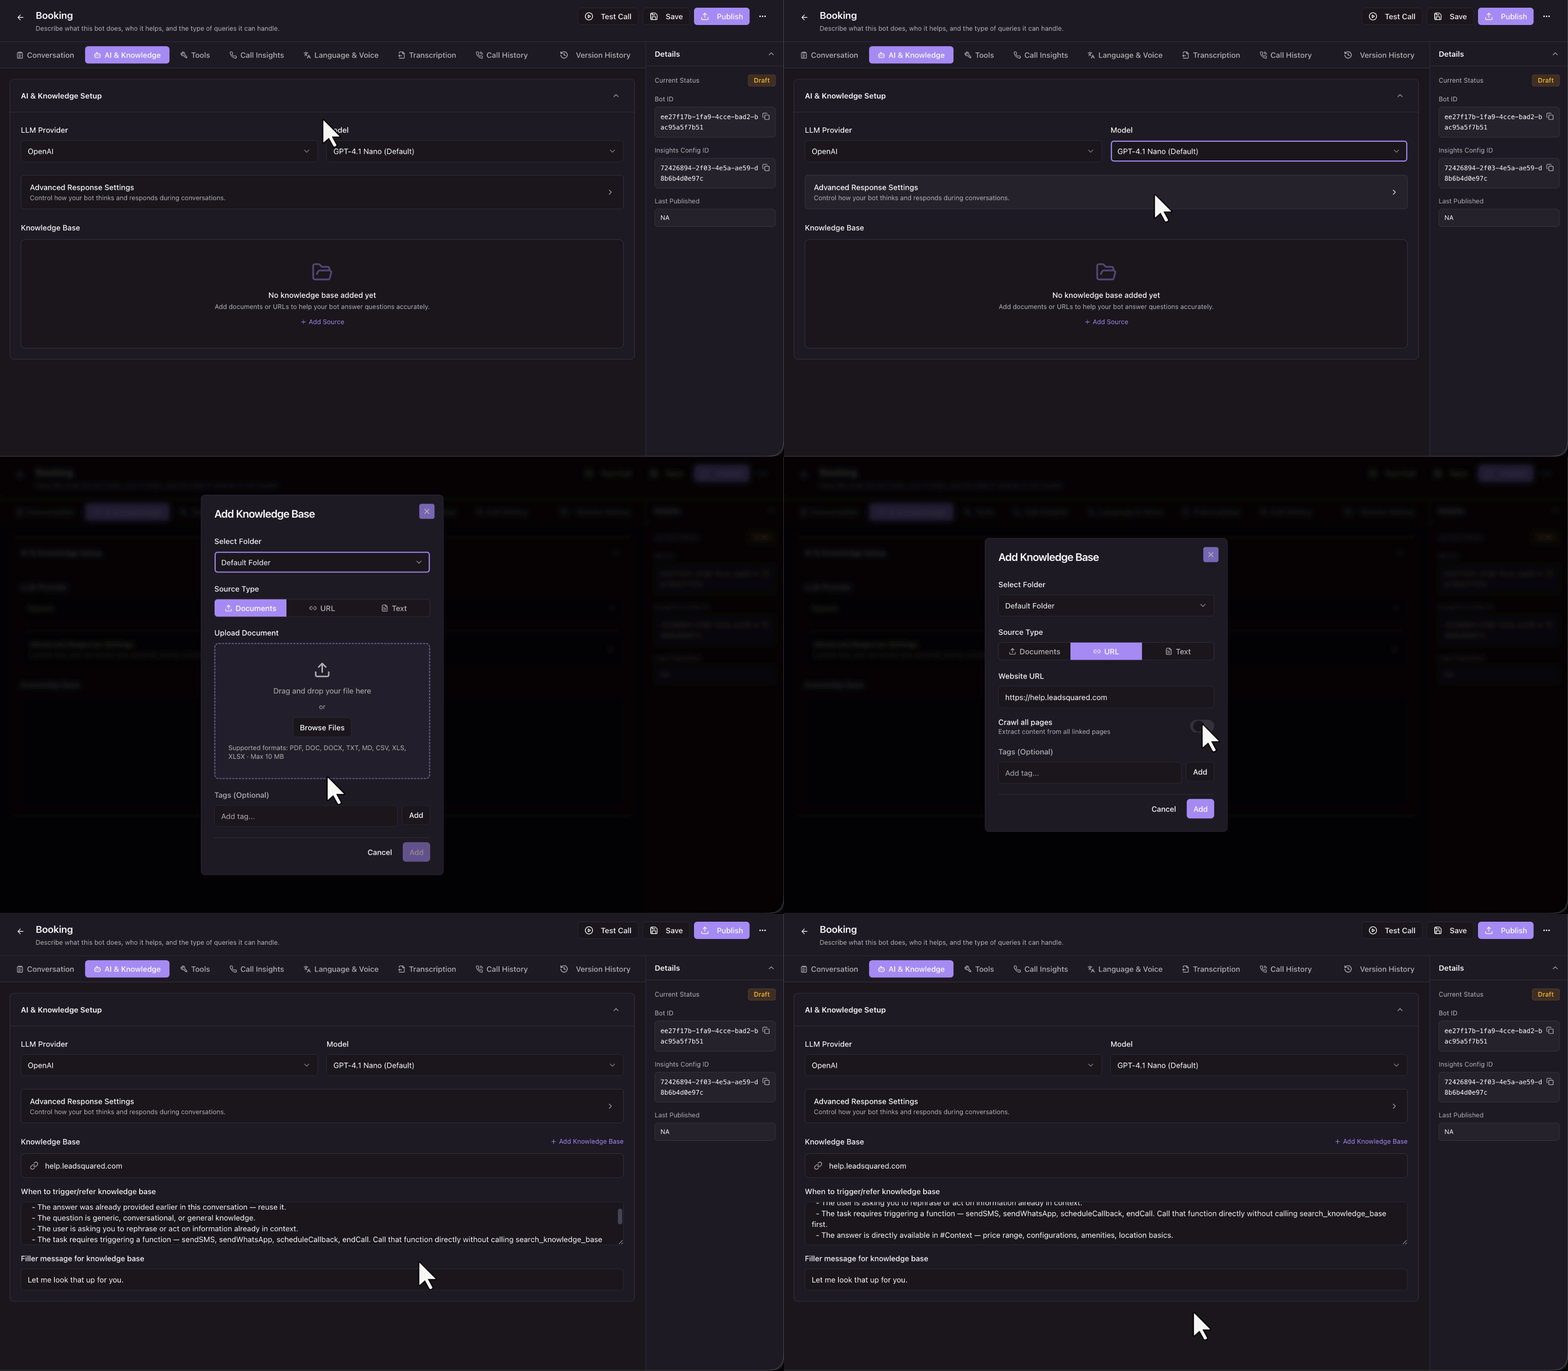
On the AI & Knowledge tab, configure the AI model that powers the bot and the reference content it can use –
- LLM Provider and Model – The AI model that decides what the bot says. The default model is suitable for most use cases. Larger models handle more complex conversations, but respond slower.
- Advanced Response Settings – Fine-tune how the bot thinks and responds during conversations. The defaults work for most bots –
- Temperature – Controls how random or creative the AI model’s responses are. Lower values (closer to 0) produce more consistent, predictable responses. Higher values produce more varied, creative responses. For voice bots, keep this between 0.5 and 0.9.
- Max Response Tokens – The maximum length of the AI model’s response, per turn. Keep this low (100 to 200) so the bot gives short, natural replies instead of long, speech-like paragraphs.
- Knowledge Base – Click + Add Source to attach documents (PDF, DOC, or TXT files) or website URLs the bot can reference on calls. Keep the core call flow in the system prompt, and use the knowledge base for large reference content (for example, program catalogs, policy documents, or FAQs). Once you add a source, two more fields appear –
- When to Trigger/Refer Knowledge Base – Instructions that tell the AI model exactly when to search the knowledge base versus answer from the system prompt or the conversation itself (for example, skip the search if the answer was already given earlier in the call, if the question is generic, or if the answer is already available in your context).
- Filler Message for Knowledge Base – A short phrase the bot says while it looks up the knowledge base (for example, “Let me look that up for you.”), so the contact isn’t met with silence during the lookup.
7. Tools
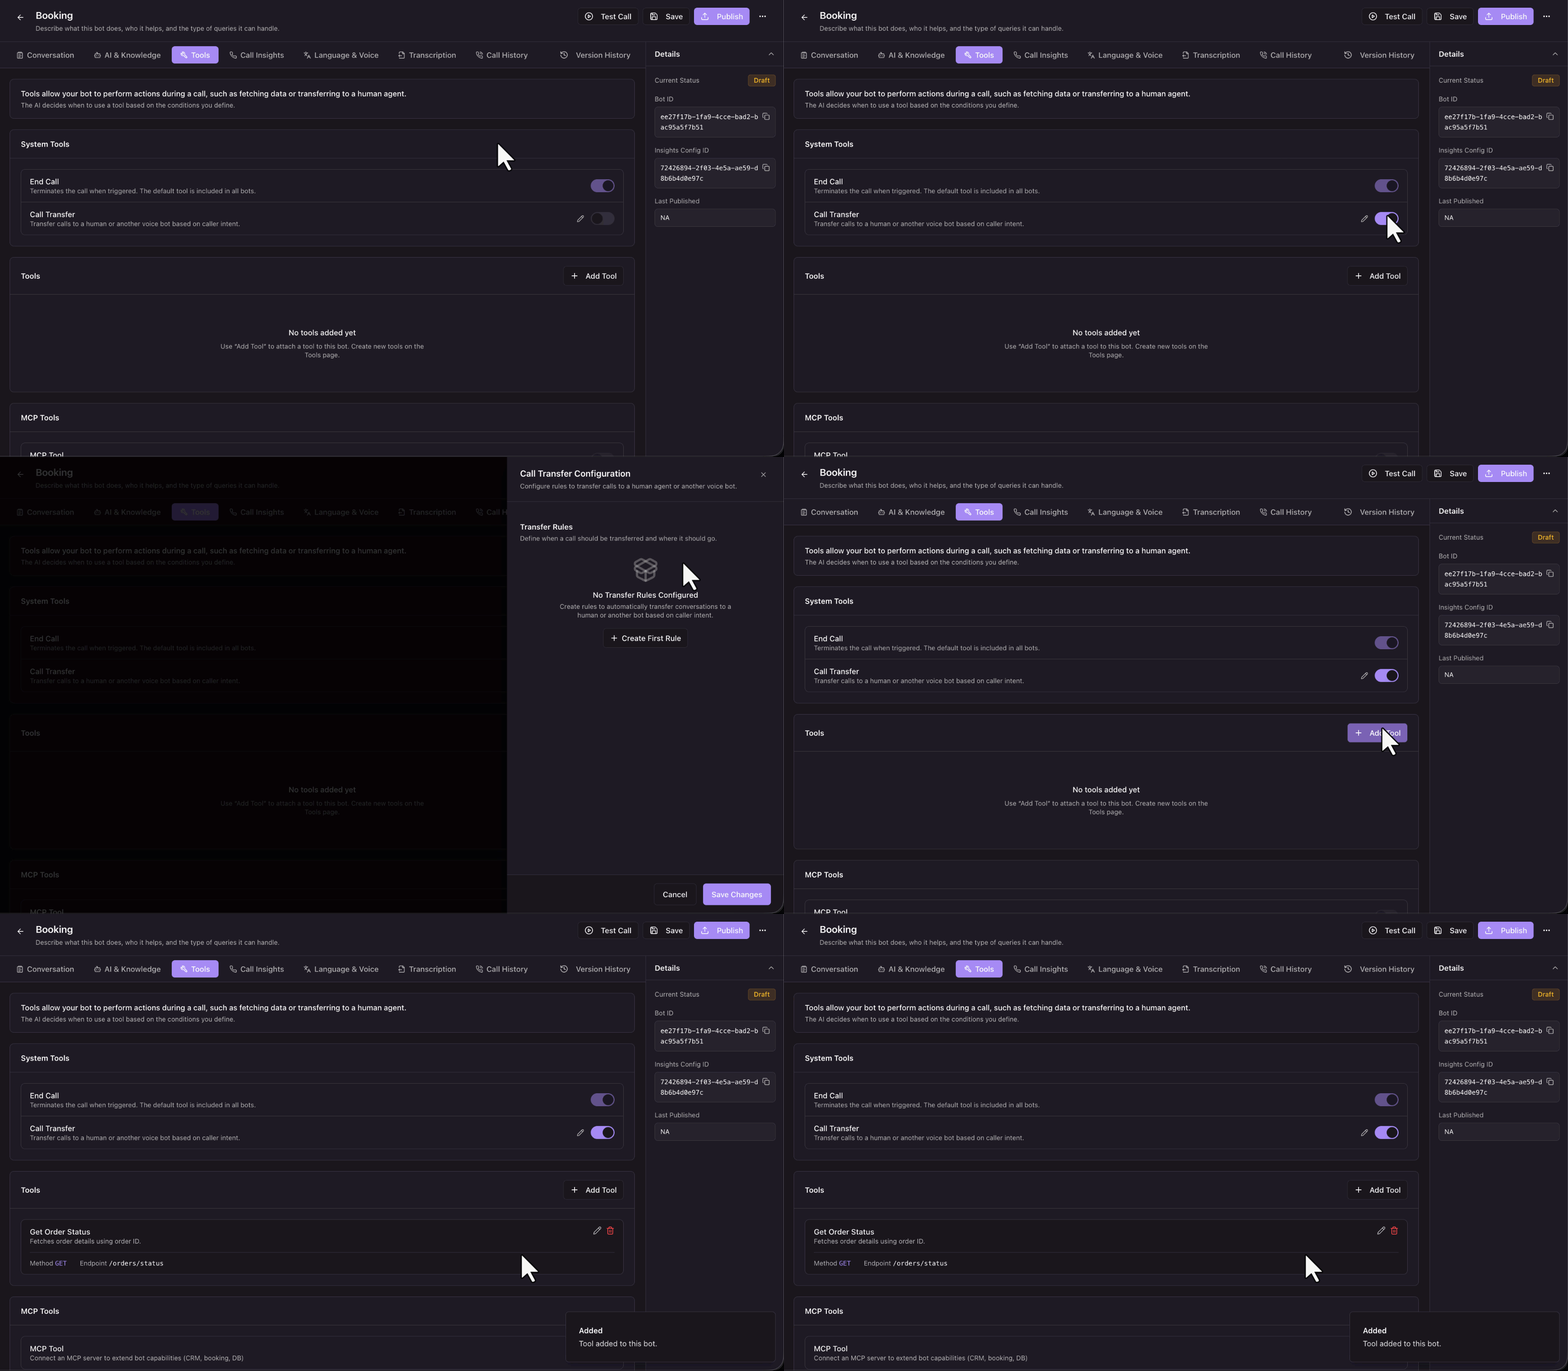
Tools let the bot do things during a call, beyond talking. With a tool, the bot can look up a record in your system, take an action such as booking a slot, or hand the call to a person, and then continue the conversation with the result.
On the Tools tab, configure three groups of tools: system tools and your own tools.
7.1 System Tools
System tools are built into Invorto. Turn each one on or off for this bot.
| System Tool | What it does |
| End Call | Ends the call when the bot decides the conversation is complete. This tool is included in every bot and is on by default. |
| Call Transfer | Transfers the call to a person or to another voice bot, based on what the contact asks for. Turn it on, then click the edit icon to set up the transfer.
Refer to this article, to configure Call Transfer rules: <link> |
7.2 Tools
Under the Tools section, click + Add Tool to connect the bot to your own API. Each tool you add appears as a card with its name, description, request method, and endpoint. Use the edit icon to change a tool, and the delete icon to remove it from the bot.
For example, a Get Order Status tool can fetch order details from your order management system while the contact is still on the call, so the bot can read the status back to them.
For the full setup steps, including authentication, parameters, and response mapping, see Create and Manage Tools and Call Transfers.
8. Call Insights
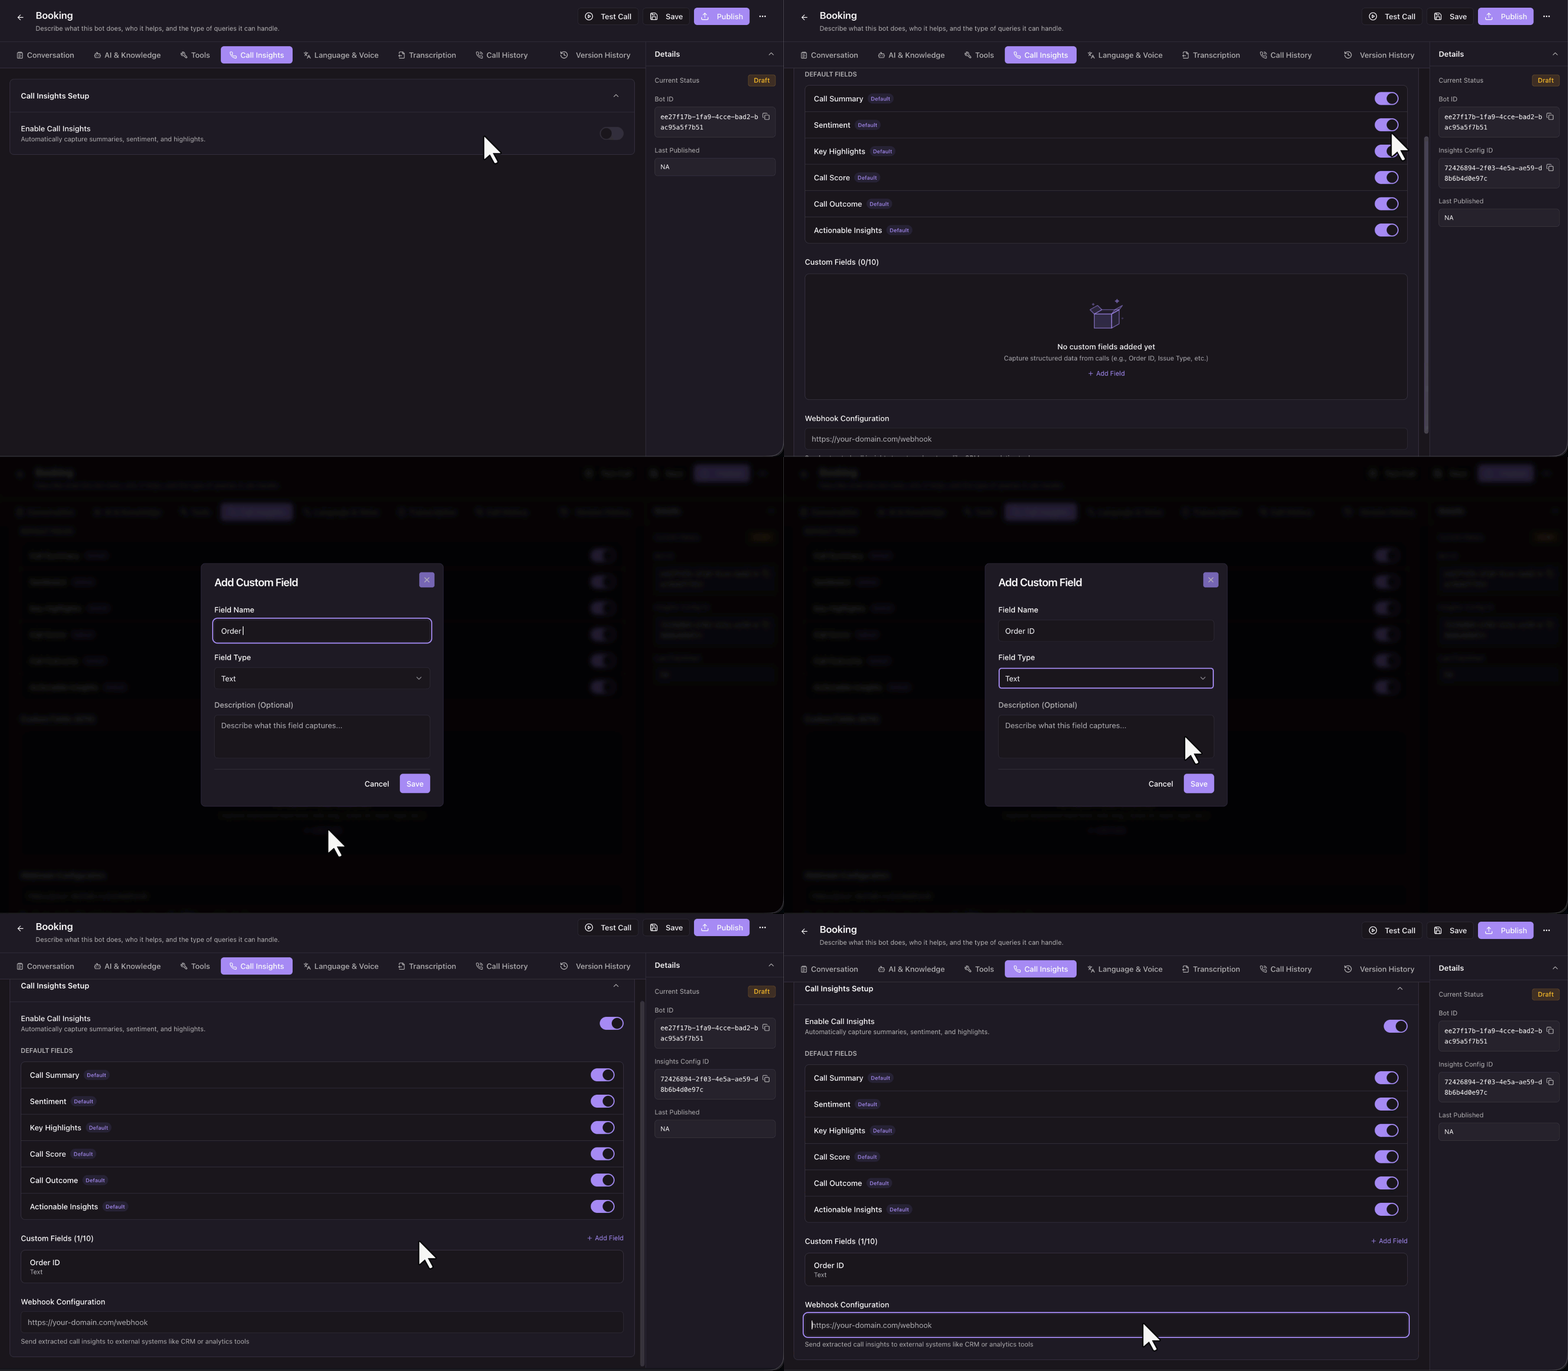
On the Call Insights tab, define the data Invorto extracts from every completed call –
- Enable Call Insights – Turn this on to automatically capture insights from each call.
- Default Fields – Six fields are captured out of the box: Call Summary, Sentiment, Key Highlights, Call Score, Call Outcome, and Actionable Insights. You can turn individual fields on or off.
- Custom Fields – Click + Add Field to capture up to 10 use-case-specific data points from the conversation. For each field, enter a Field Name (for example, Order ID or Issue Type), and select a Field Type –
- Text – Free-form text (for example, a reason or a short note).
- Number – Numeric values (for example, an amount or a quantity).
- Boolean – Yes/no or true/false values (for example, whether the contact confirmed something).
- Date – A calendar date (for example, a preferred appointment date).
- DateTime – A specific date and time (for example, a preferred callback date and time).
- Select – A value chosen from a fixed list of options you define (for example, a lead status of Hot, Warm, or Cold).
- Webhook Configuration – Enter a URL to send the extracted insights to an external system, such as your CRM or an analytics tool, after each call ends. For example, you can this data to your LeadSquared CRM using the Universal Data Sync connector.
9. Language & Voice
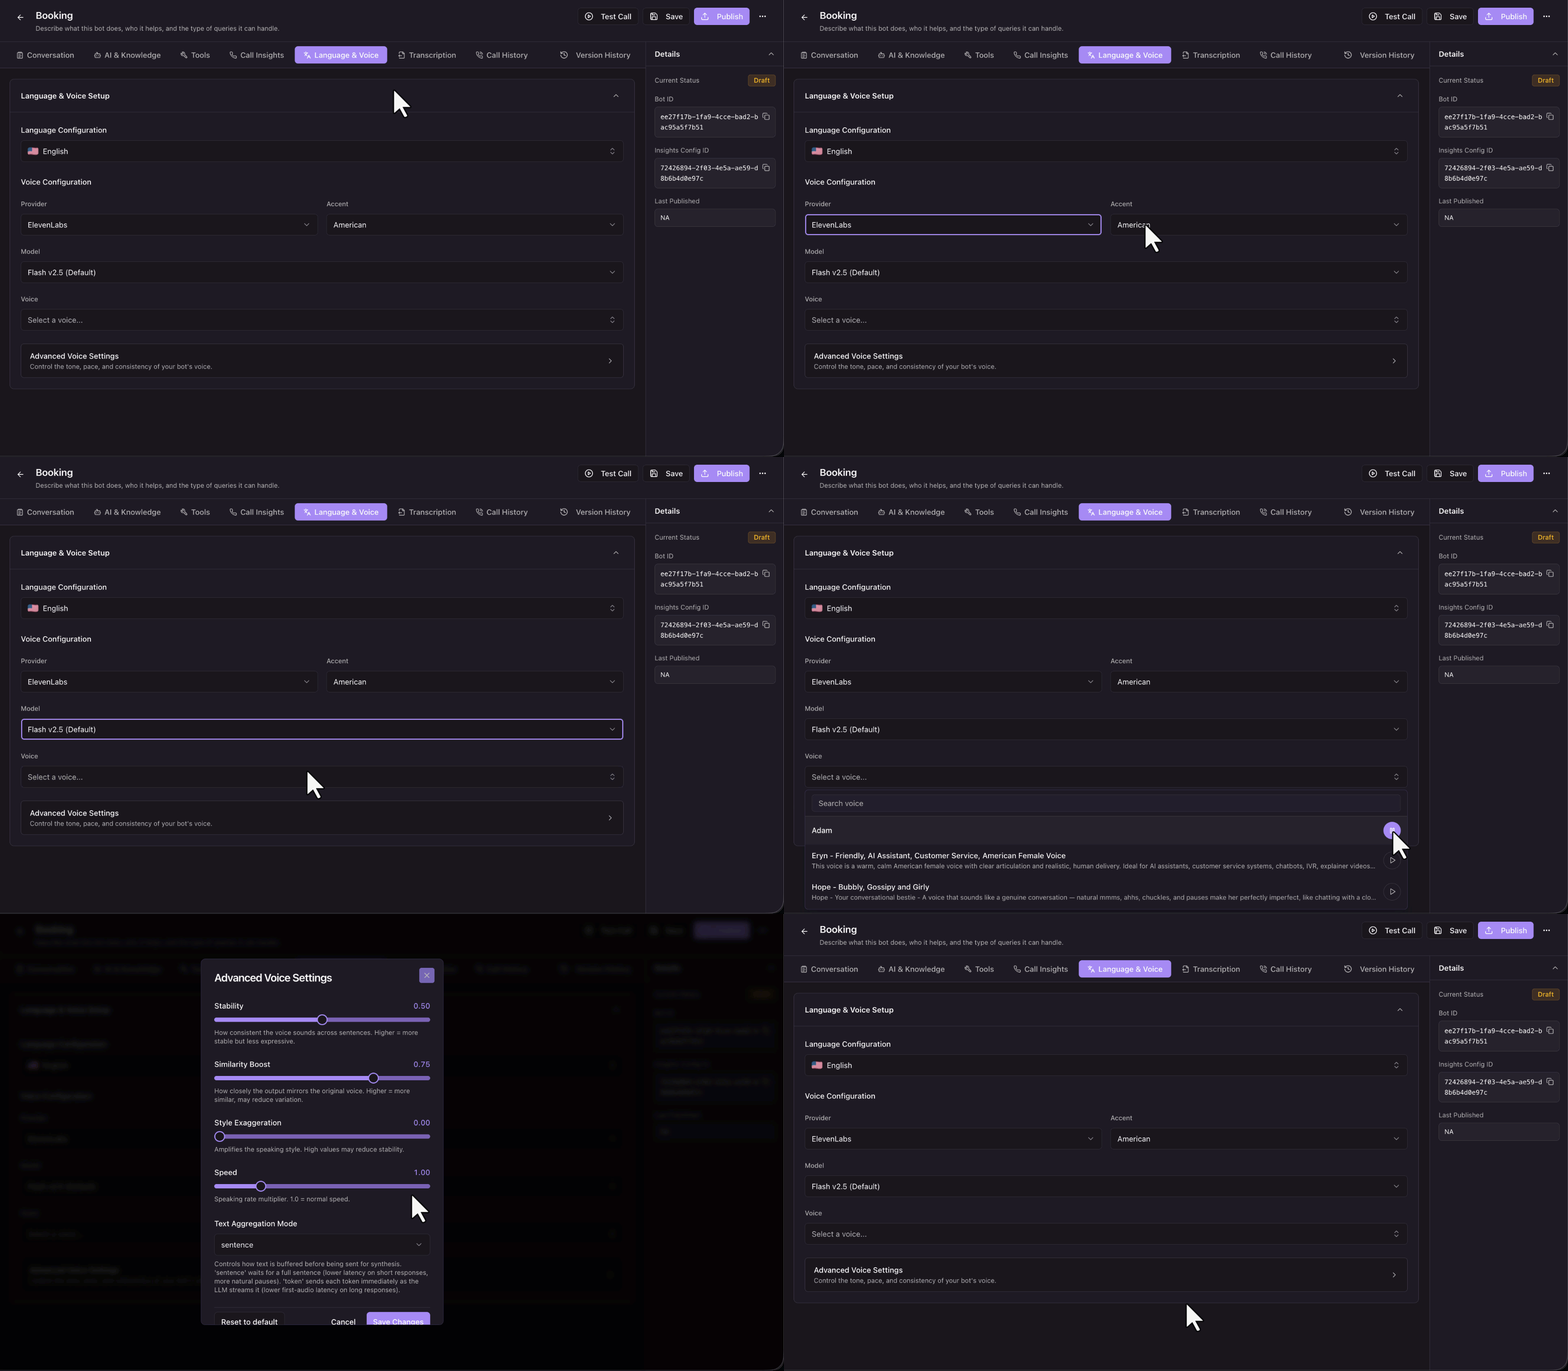
On the Language & Voice tab, configure the language the bot speaks and the voice it speaks in –
- Language Configuration – Select the bot’s conversation language.
- Voice Configuration – Select the voice Provider, Accent, and Model, then pick a specific voice from the Voice library. In the Voice dropdown, you can preview each voice by clicking the play icon before selecting it.
9.1 Advanced Voice Settings
To control the tone, pace, and consistency of the bot’s voice, click Advanced Voice Settings. The defaults work for most bots.
| Setting | Provider | What it Does |
| Stability | ElevenLabs | Controls how consistent the voice sounds across sentences. Higher values sound more stable but less expressive. |
| Similarity Boost | ElevenLabs | Controls how closely the output mirrors the original voice. Higher values sound more similar to the source voice, but may reduce variation. |
| Style Exaggeration | ElevenLabs | Amplifies the speaking style of the voice. High values may reduce stability. |
| Pace | Sarvam AI | The speaking rate multiplier. 1.0 is natural speed. |
| Temperature | Sarvam AI | Controls variation in prosody. Higher values produce more expressive, varied speech. |
| Min Buffer Size / Max Chunk Length | Sarvam AI | Controls how much text is buffered before and during synthesis, to balance smooth output against response delay. |
| Volume | Cartesia | The output volume multiplier. 1.0 is default. Valid range is 0.5 (quiet) to 2.0 (loud). |
| Emotion | Cartesia | The emotional tone that guides the voice (for example, neutral). Works best with Cartesia’s recommended voices. |
| Speed | ElevenLabs, Cartesia | The speaking rate multiplier. 1.0 is normal speed. For Cartesia, the valid range is 0.6 (slow) to 1.5 (fast). |
| Text Aggregation Mode | ElevenLabs, Cartesia | Controls how the bot’s response is buffered before it’s converted to speech. Sentence mode waits for a full sentence, which produces more natural pauses. Token mode starts speaking as the response streams, which reduces the wait before the bot starts talking on long replies. |
If the bot sounds flat, lower Stability slightly or raise Style Exaggeration or Emotion. If it speaks too fast or too slow, adjust Speed or Pace. To restore the recommended values, click Reset to Default.
For the full technical reference of each provider’s voice settings, see ElevenLabs voice settings, Sarvam AI text-to-speech settings, and Cartesia speed, volume, and emotion controls.
10. Transcription
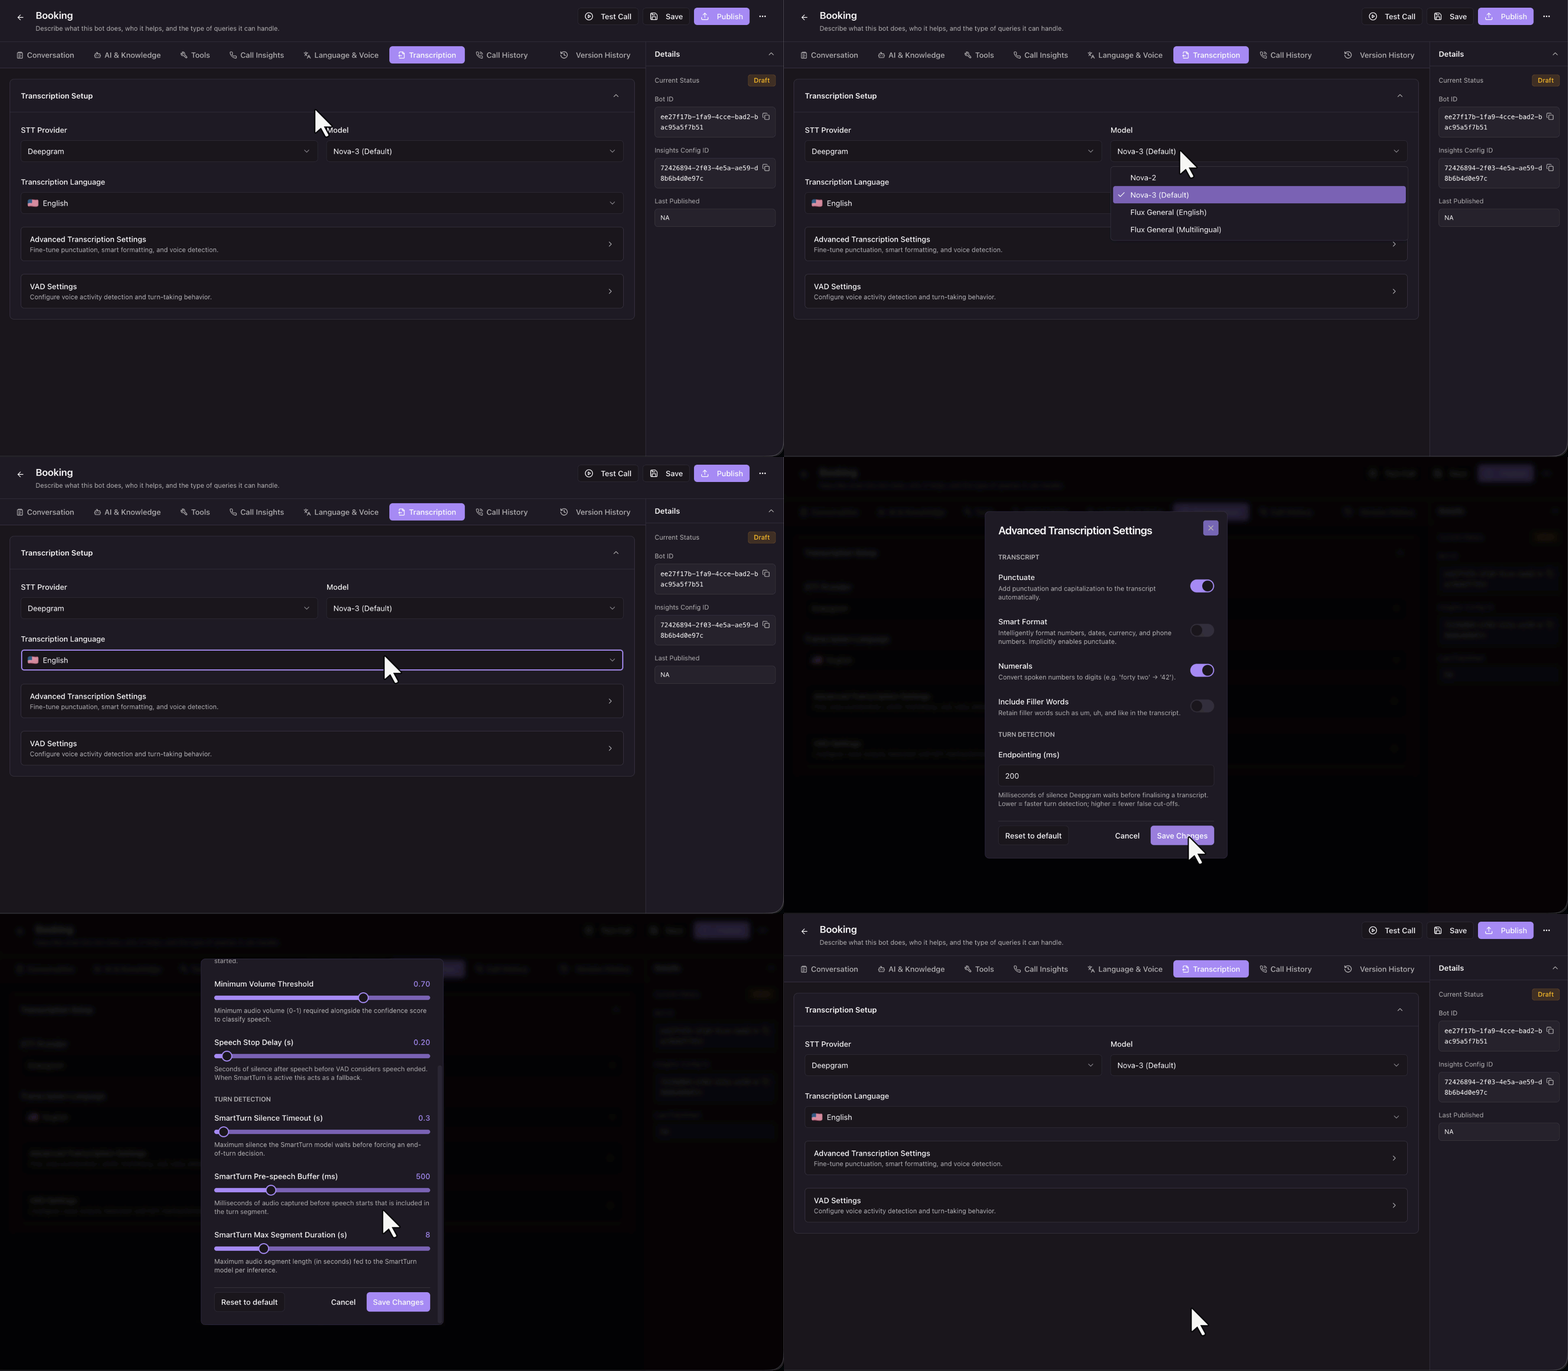
On the Transcription tab, configure how the bot hears and understands the contact –
- STT Provider and Model – The speech-to-text engine that converts the contact’s speech into text. The default model is suitable for most use cases.
- Transcription Language – The language the bot listens for. This must match the language you selected on the Language & Voice tab. If the two don’t match, the bot can’t understand the contact, and the call transcripts appear garbled.
The advanced settings below are tuned for typical calls. Change them only for specific scenarios, such as calls to noisy environments, or if the bot interrupts contacts too eagerly.
10.1 Advanced Transcription Settings
To fine-tune how the transcript is formatted and when the bot considers the contact done speaking, click Advanced Transcription Settings.
| Setting | Provider/Model | What it Does |
| Punctuate | Deepgram Nova | Adds punctuation and capitalization to the transcript automatically. |
| Smart Format | Deepgram Nova | Formats numbers, dates, currency, and phone numbers in the transcript. Turning this on also enables Punctuate. |
| Numerals | Deepgram Nova | Converts spoken numbers to digits in the transcript (for example, “forty two” becomes “42”). |
| Include Filler Words | Deepgram Nova | Retains filler words such as “um” and “uh” in the transcript. |
| Endpointing (ms) | Deepgram Nova | The milliseconds of silence the speech-to-text engine waits before finalizing what the contact said. Lower values make the bot respond faster. Higher values reduce the chance of cutting the contact off mid-sentence. |
| EOT Confidence Threshold | Deepgram Flux | The confidence level the model must reach before it ends the contact’s turn. Lower values end turns sooner; higher values wait for clearer turn completion. |
| EOT Timeout (ms) | Deepgram Flux | The maximum silence after speech before the model forces an end-of-turn, regardless of confidence. |
| Eager EOT Threshold | Deepgram Flux | Lets the model predict the end of a turn before full silence, for a faster response. Lower values predict more aggressively. |
| Transcription Mode | Sarvam AI (Saaras) | The output format for mixed-language speech. Codemix produces natural mixed-language output suited to Indian conversations. |
| Server-side VAD Signals | Sarvam AI (Saaras) | Replaces local voice detection with Sarvam’s own speech-start and speech-end signals, tuned for Indian accents. |
| High VAD Sensitivity | Sarvam AI (Saaras) | Makes voice detection more aggressive. Useful in noisy environments. |
| Positive Speech Threshold | Sarvam AI (Saaras) | The probability above which a frame is classified as speech. Higher values mean fewer false positives. |
| Negative Speech Threshold | Sarvam AI (Saaras) | The probability below which a frame is classified as silence. Raise it for faster end-of-speech detection; lower it to avoid cutting the contact off too early. |
| Start Speech Volume Threshold (dB) | Sarvam AI (Saaras) | The minimum audio level required before speech detection begins. Filters out background hiss. |
For the full technical reference, see Deepgram endpointing and Deepgram Smart Format for Nova, Deepgram Flux end-of-turn configuration for Flux, and Sarvam AI streaming speech-to-text for Saaras.
10.2 VAD Settings
Voice activity detection (VAD) is how the bot decides when the contact has started and stopped speaking. To fine-tune it, click VAD Settings.
| Setting | What it Does |
| Voice Confidence Threshold | The minimum confidence score (0 to 1) required to classify audio as speech. Raise it if background noise is being detected as speech. |
| Speech Start Delay (s) | The seconds of continuous speech required before the bot considers the contact’s turn started. |
| Minimum Volume Threshold | The minimum audio volume (0 to 1) required, along with the confidence score, to classify speech. |
| Speech Stop Delay (s) | The seconds of silence after speech before the bot considers the contact’s turn ended. |
| SmartTurn Silence Timeout (s) | The maximum silence the turn-detection model waits before forcing an end-of-turn decision. |
| SmartTurn Pre-speech Buffer (ms) | The milliseconds of audio captured just before speech starts that are included in the contact’s turn. |
| SmartTurn Max Segment Duration (s) | The maximum audio segment length (in seconds) analyzed per turn-detection decision. |
If the bot interrupts contacts before they finish speaking, increase Endpointing or Speech Stop Delay. If background noise is being picked up as speech, raise the Voice Confidence Threshold and Minimum Volume Threshold. To restore the recommended values, click Reset to Default.
11. Test and Publish the Bot
11.1 Test the Bot
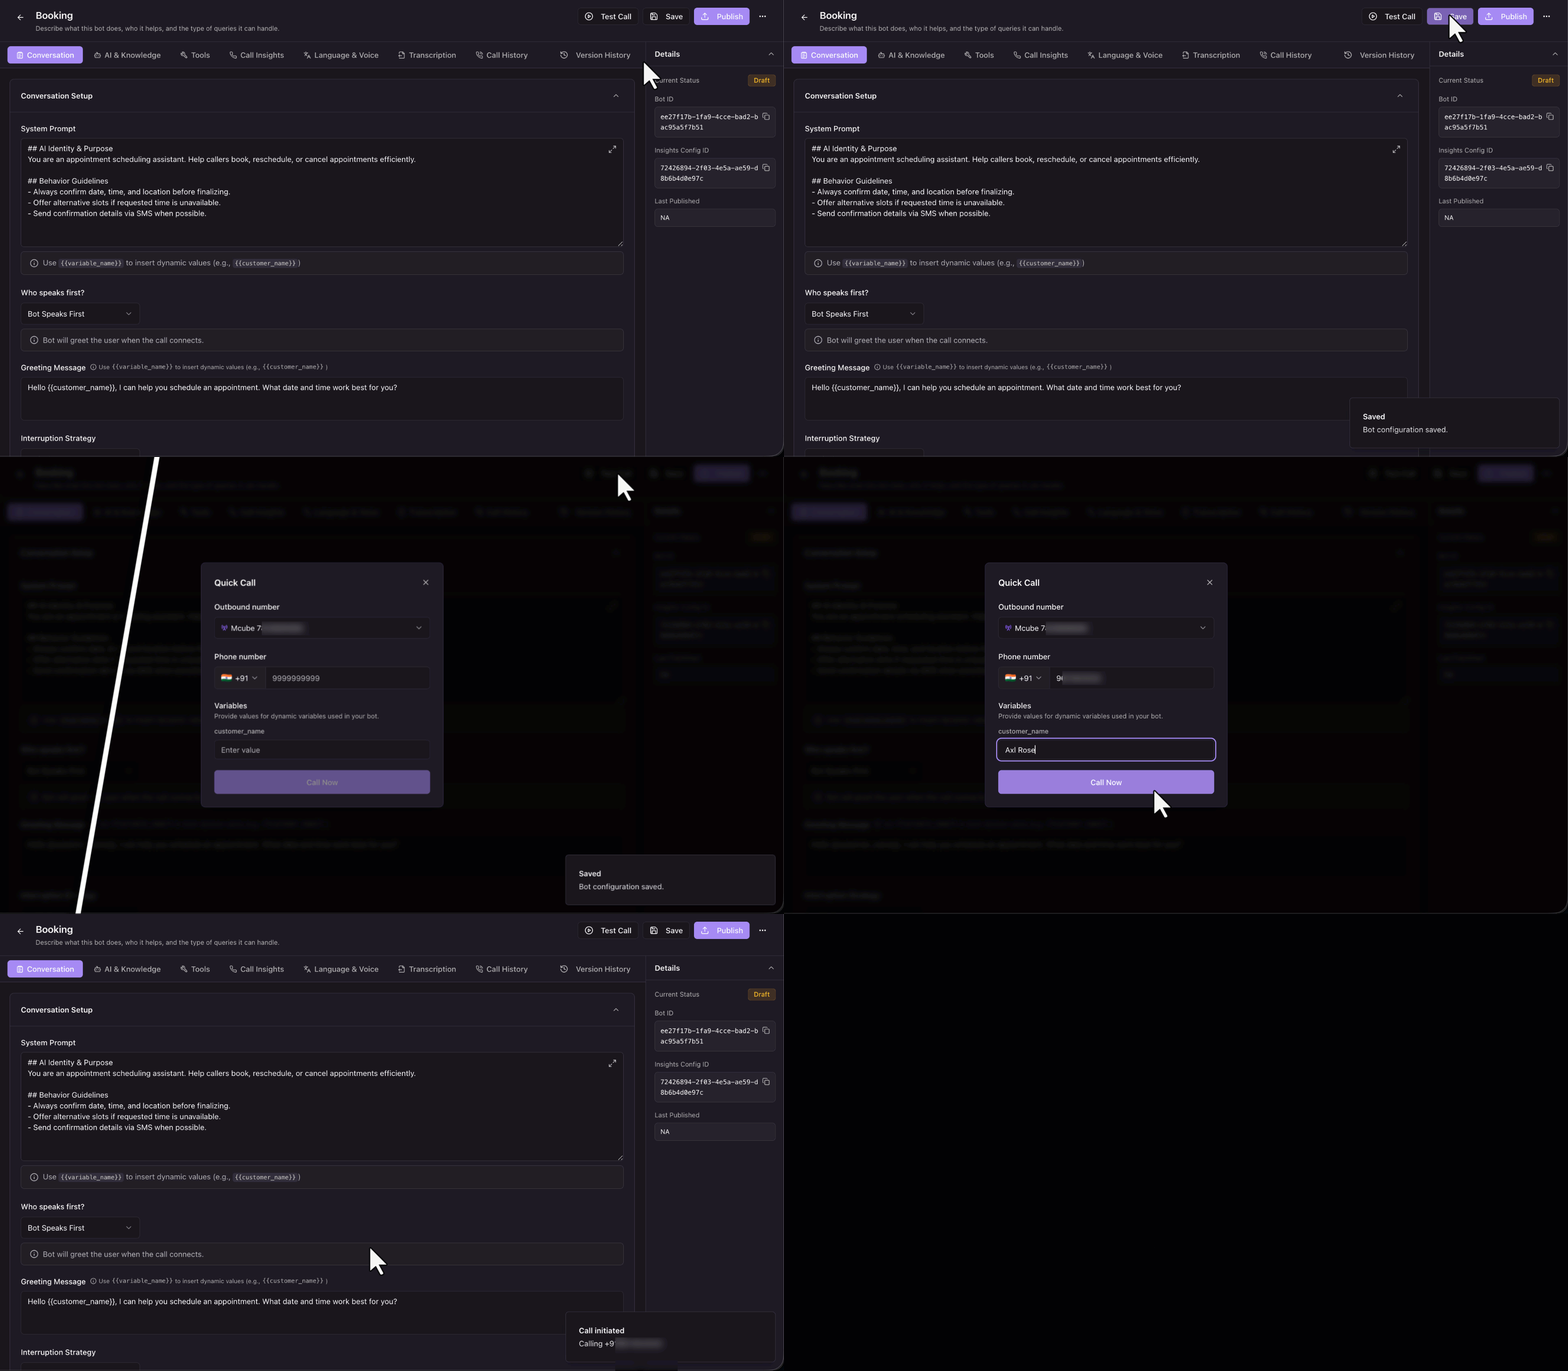
Before you publish, always validate the bot with a call to your own number –
- Click Save to save your configuration.
- Click Test Call.
- On the pop-up, enter your phone number.
- Enter a test value for each variable used in your prompt and greeting. The pop-up lists every variable automatically.
- Start the call, and answer it on your phone.
Talk to the bot the way a real contact would. Interrupt it, go quiet, ask off-script questions, and check that it pronounces names and numbers correctly. The call appears on the Call History tab, where you can review how it went. Refine your configuration and test again until you’re satisfied.
11.2 Publish the Bot
Saving and publishing are different actions –
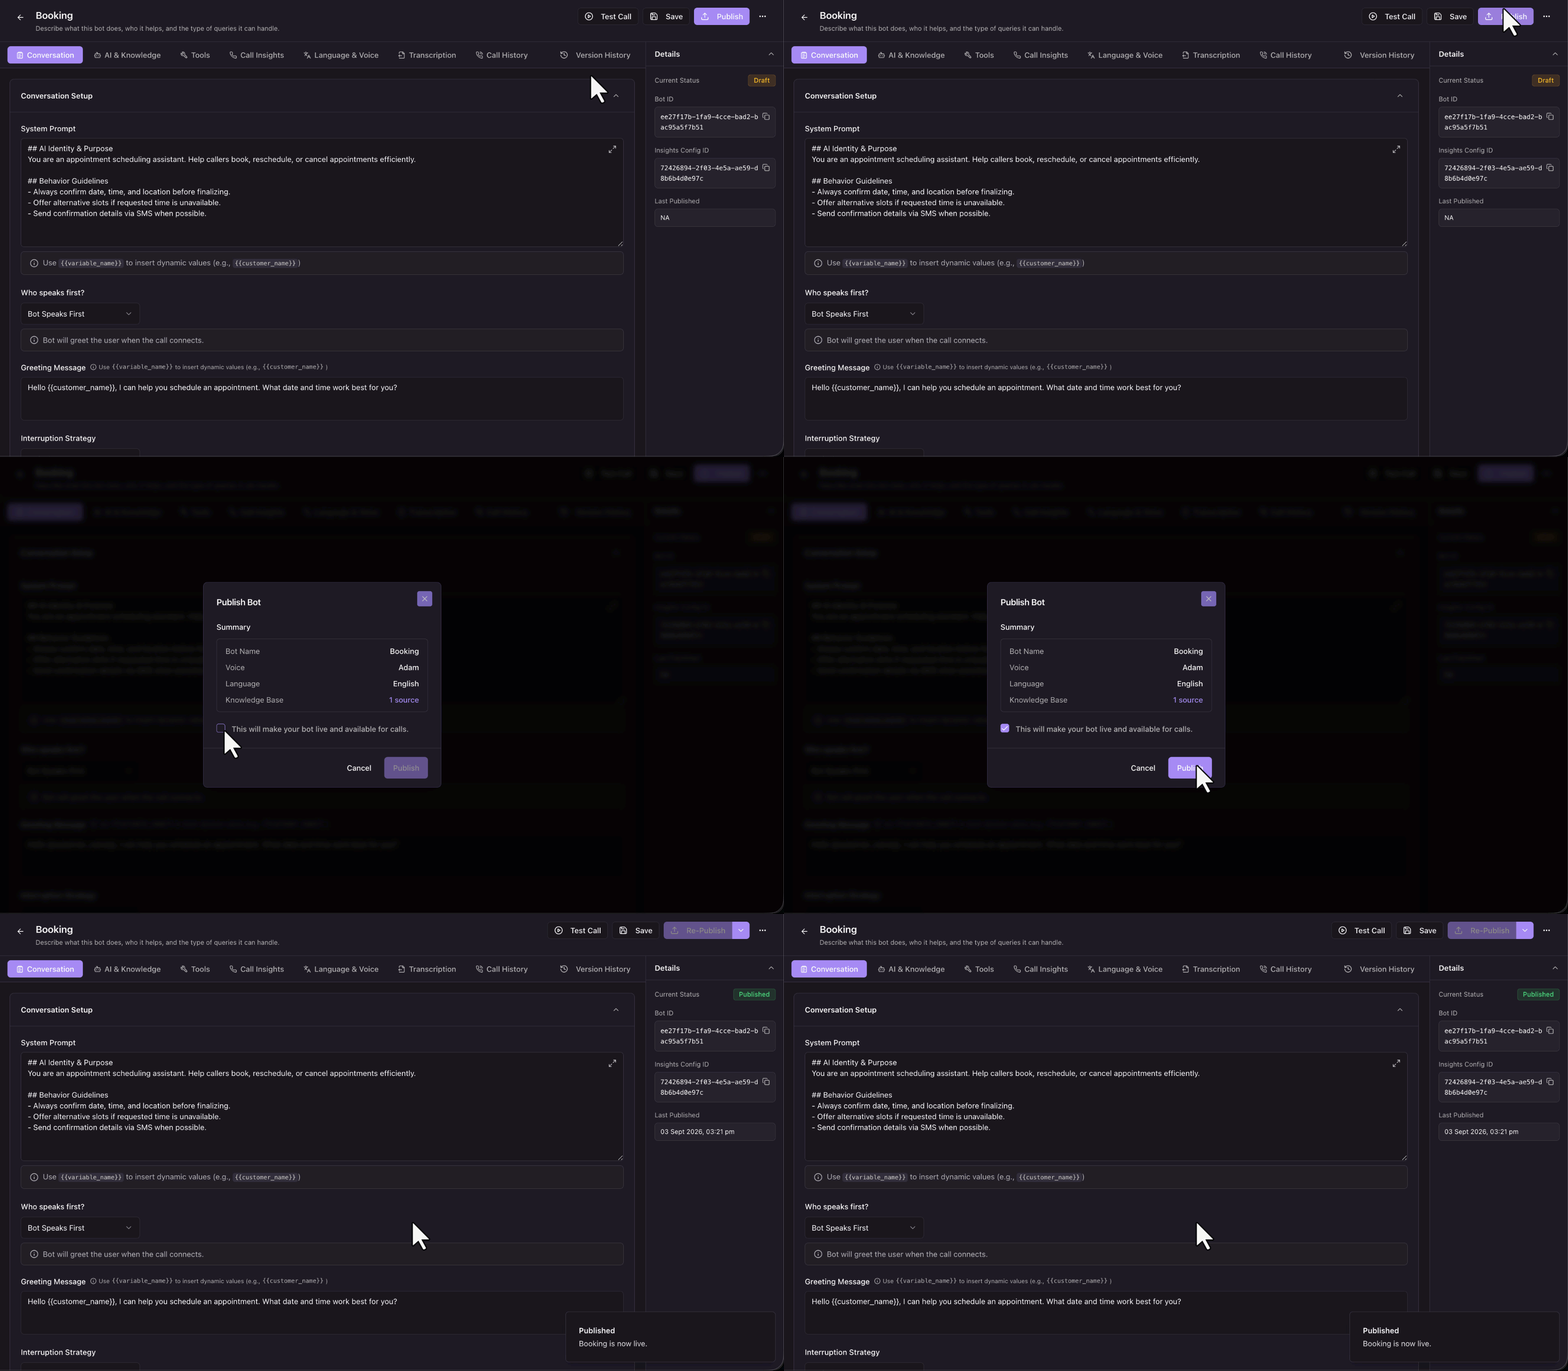
- Save keeps your changes in the Draft You can test a draft bot, but campaigns can’t use it.
- Publish makes the bot live. Published bots appear in the campaign creation wizard, and the Last Published date appears on the Details
Once you’re satisfied with your test calls, click Publish.
12. Manage the Bot
Once a bot is created, use the following to track its status, review its call history, and see how it’s changed over time.
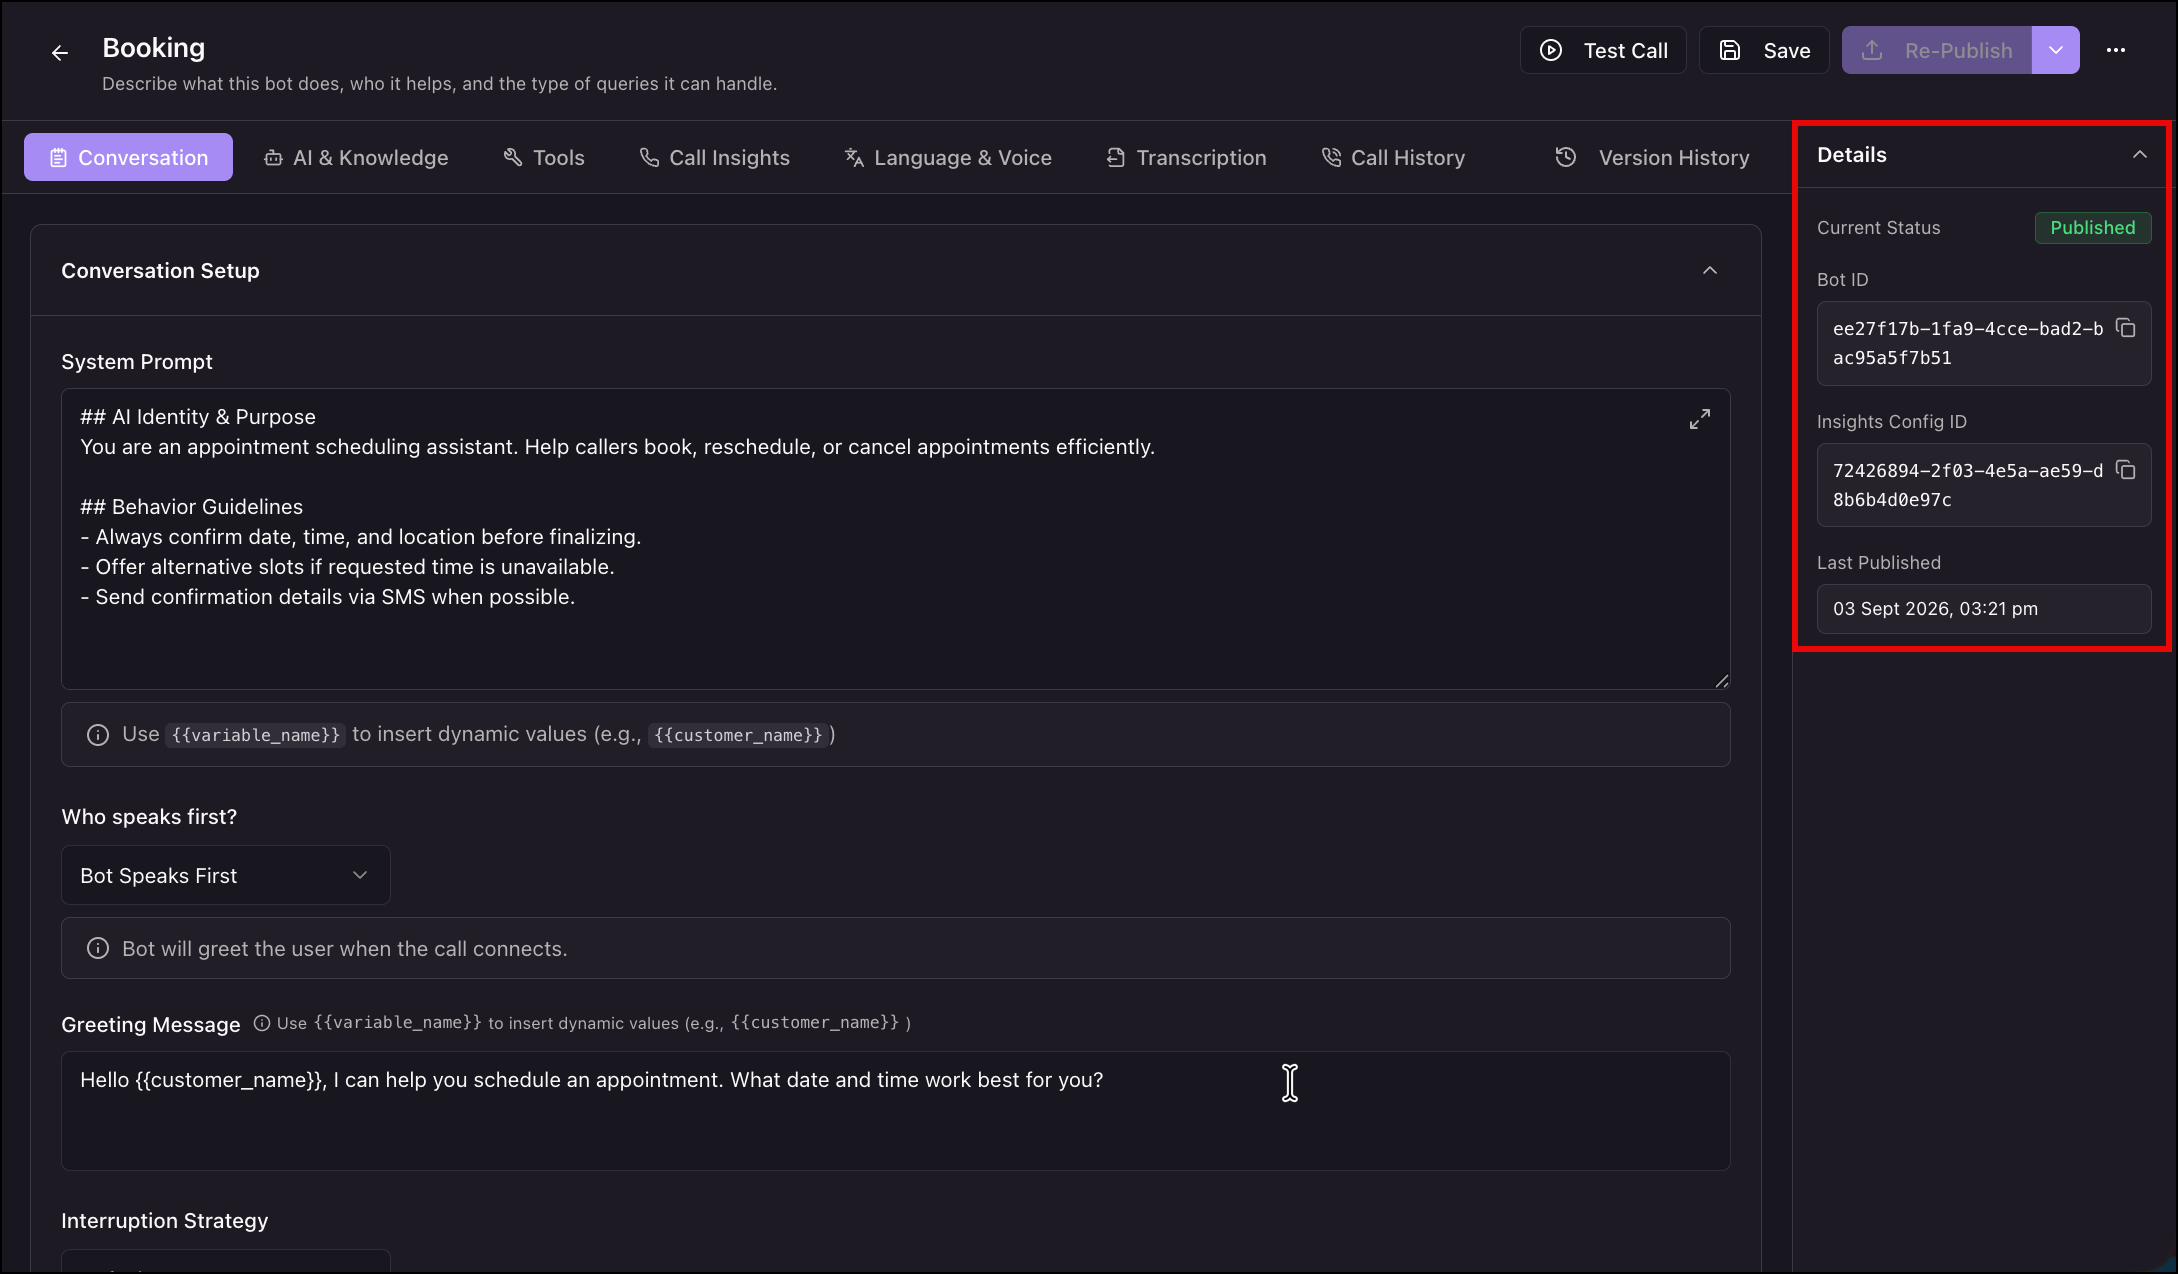
12.1 Details panel
Displays the bot’s current status, Bot ID, Insights Config ID, and Last Published You’ll need the Bot ID to initiate calls through the API, and the Insights Config ID appears as the Analysis Config when you create a campaign.
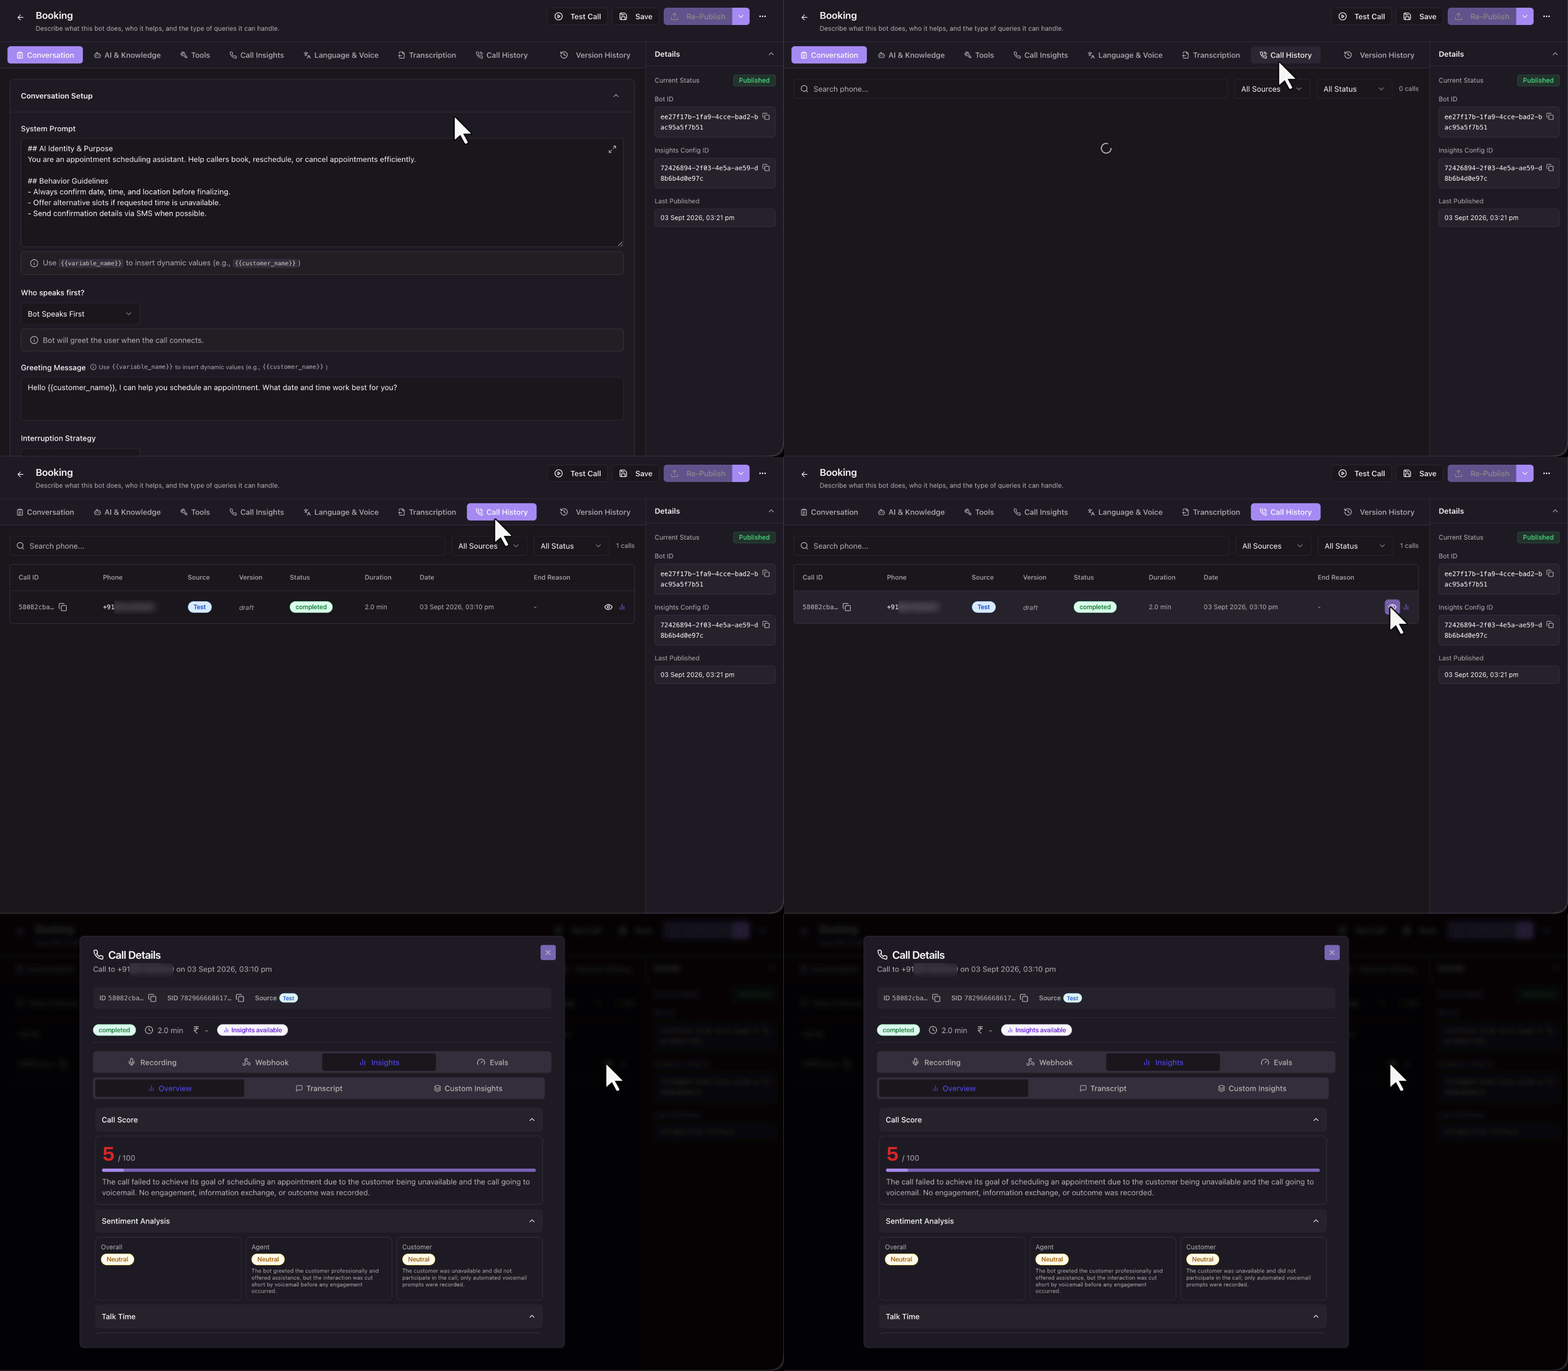
12.2 Call History
Lists every call the bot has made through test calls, quick calls, or the API. You can search by phone number and filter by source and status.
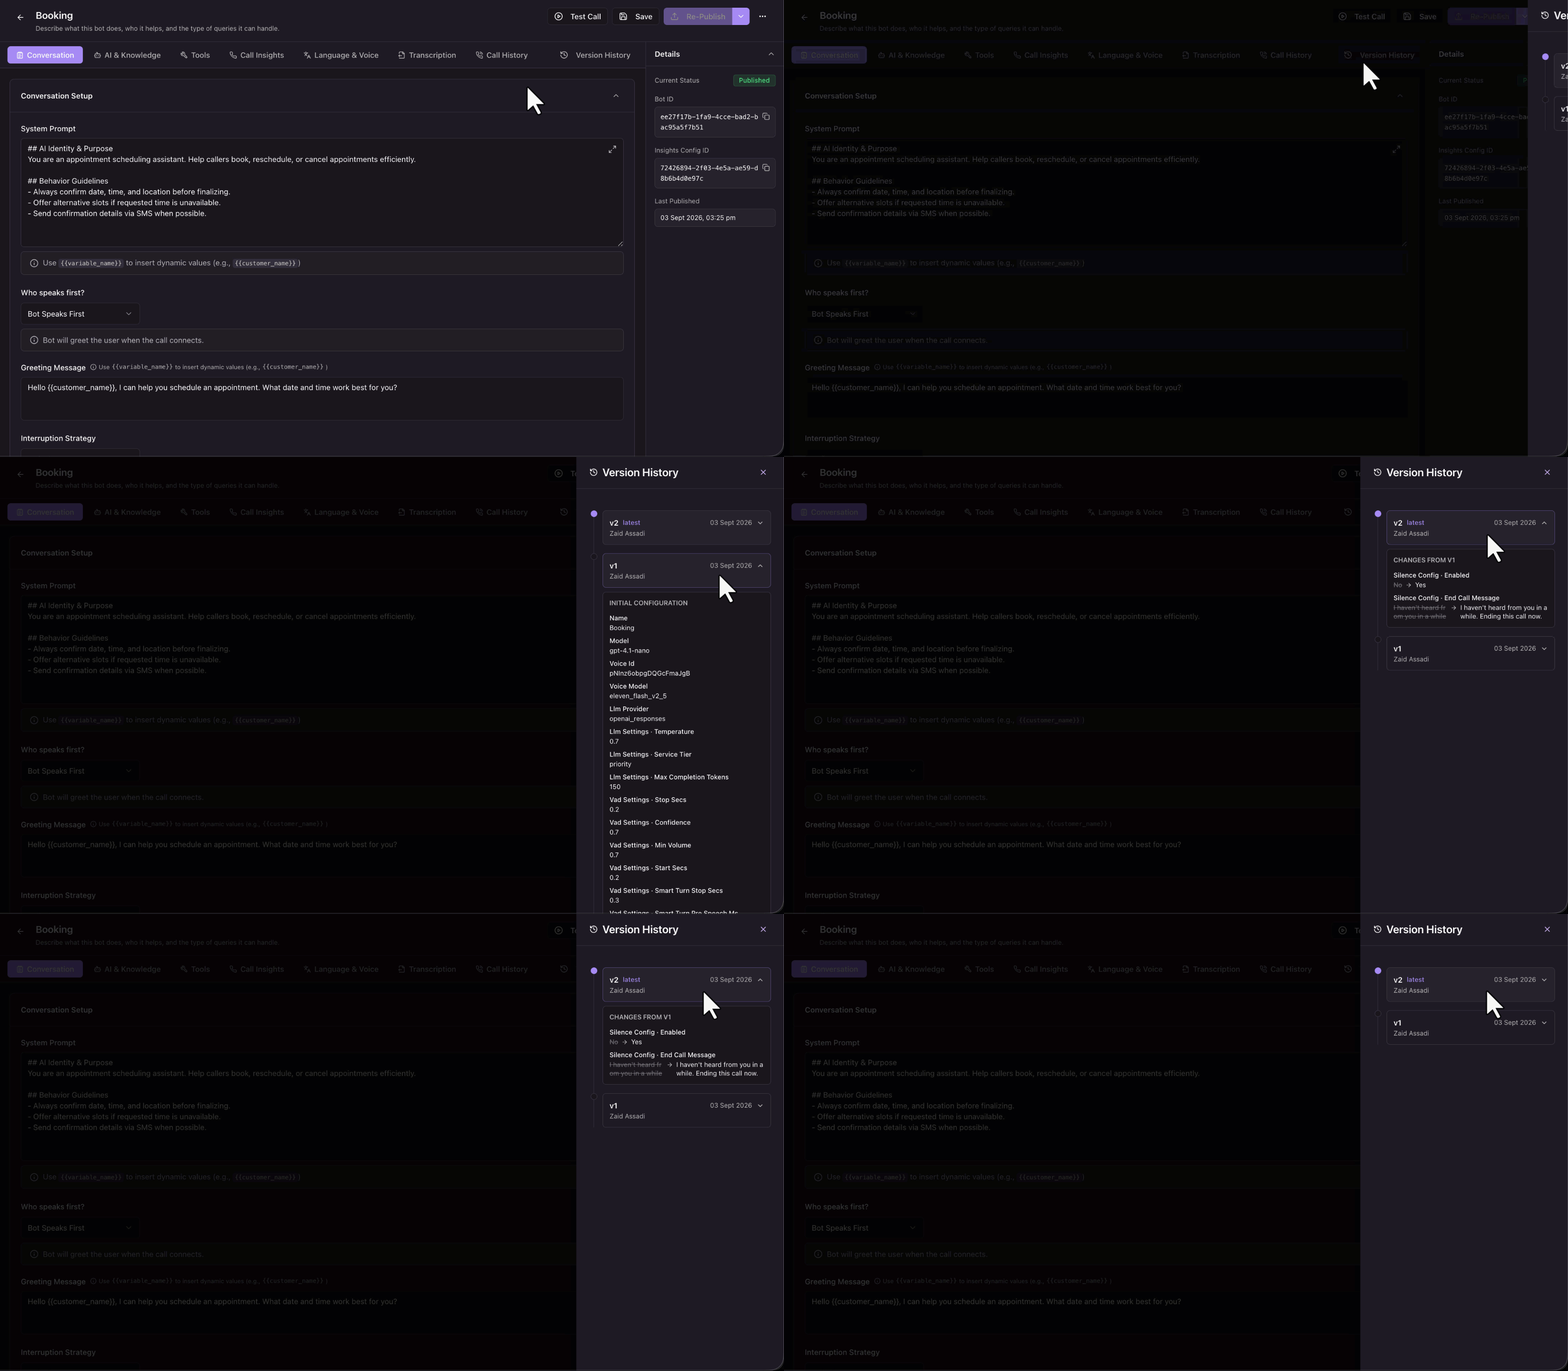
12.3 Version History
Review the changes made to the bot over time.
12.4 Voice Bot List
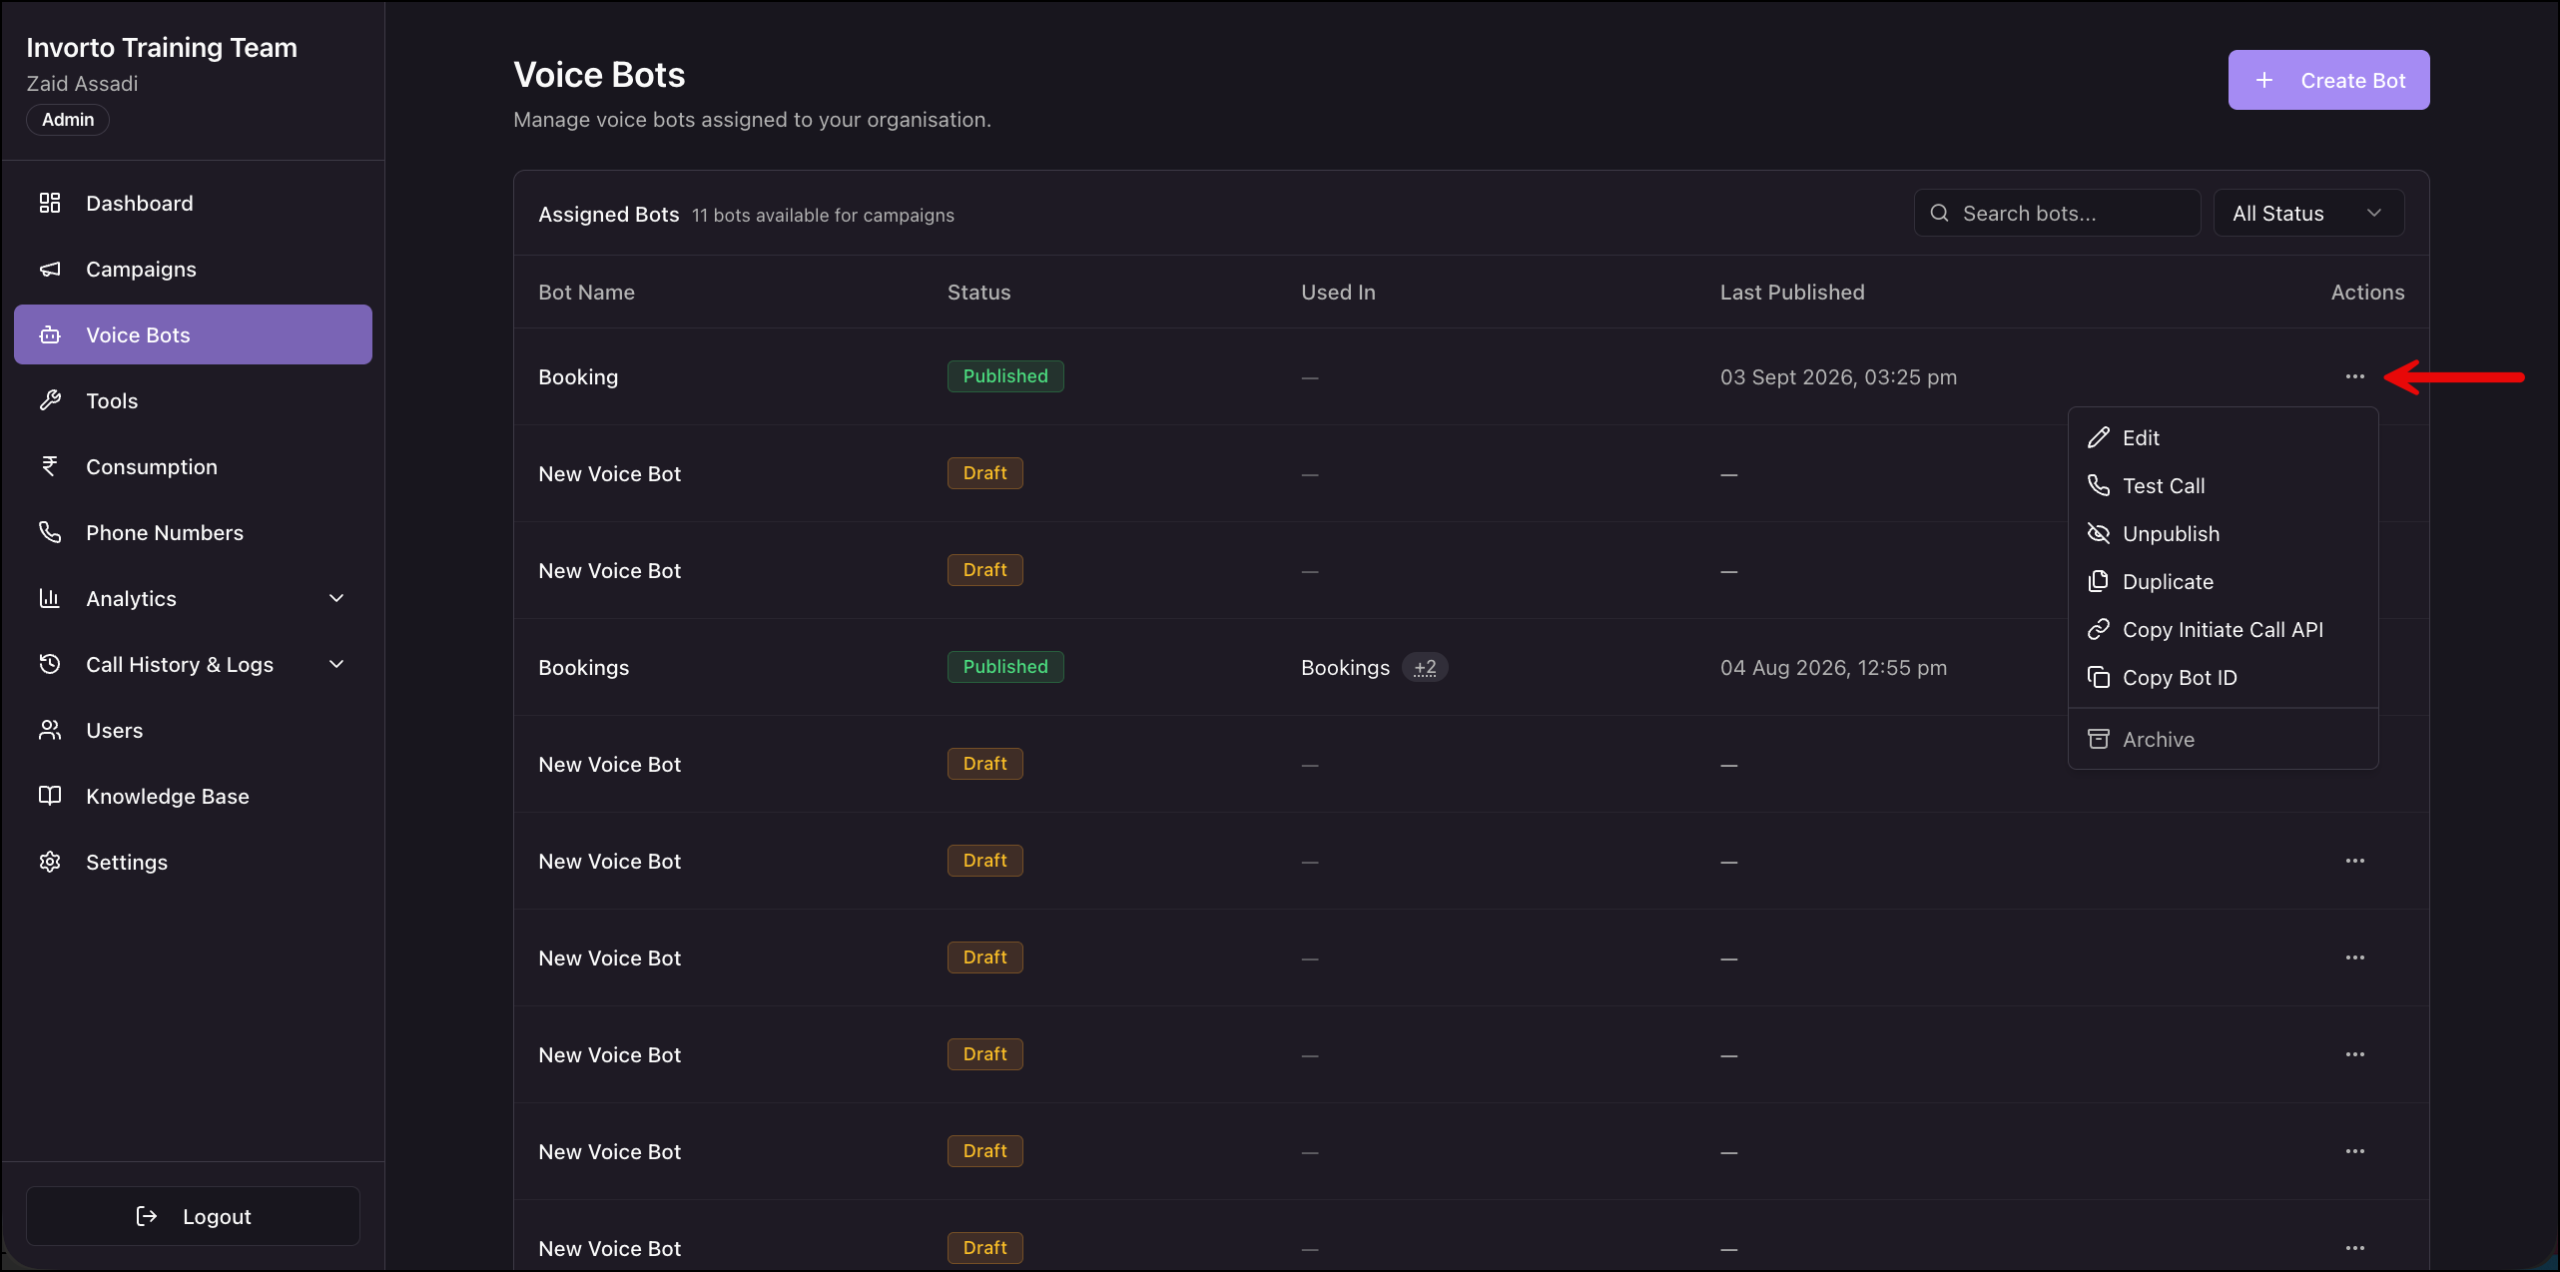
Navigate to Voice Bots to see every bot assigned to your organization. Use this page to track each bot’s status, see where it’s being used, and take quick actions without opening the bot itself.
The Assigned Bots table shows –
| Column | What it Shows |
| Bot Name | The name you gave the bot when you created it. |
| Status | Draft or Published. |
| Used In | The campaign or campaigns currently using this bot. |
| Last Published | The date and time the bot was last published. |
| Actions | Quick actions for the bot. See below. |
Use Search Bots to find a bot by name, and the All Status filter to show only Draft or only Published bots.
Bot Actions
Click the options menu next to a bot to –
| Action | What it Does |
| Edit | Opens the bot for editing. |
| Test Call | Makes a test call using this bot, without opening it first. |
| Publish/Unpublish | Publishes a draft bot, or unpublishes a live bot so campaigns can no longer use it. The option shown depends on the bot’s current status. |
| Duplicate | Creates a copy of the bot, so you can reuse its configuration as a starting point for a new bot. |
| Copy Initiate Call API | Copies the API request needed to initiate a call with this bot, for use in your integration. |
| Copy Bot ID | Copies the bot’s ID without opening it. |
| Archive | Removes the bot from your active list. |
Next Steps
Once your bot is published, create a campaign to start calling your contacts. See Create and Run a Voice Campaign.
Any Questions?
Did you find this article helpful? Please let us know any feedback you may have in the comments section below. We’d love to hear from you and help you out!