


Get Started

Sales Suite
Field Ops
Marketing
Service CRM
Integrations & Apps
FloStack
Create and Run an Insight Campaign on Invorto

1. Feature Overview
Invorto Voice Bot supports two campaign types: Voice and Insight. Use an Invorto Insight campaign when the conversation already happened and you want structured data out of it. For example:
- A health system uploads recordings of appointment reminder calls its agents made, and checks how many patients confirmed.
- A collections team uploads agent call recordings, and captures the outcome and the promised follow up on each account.
- A support team uploads recordings, and extracts the Order ID, Issue Type, and Preferred Callback Time discussed on each call.
Invorto runs the same analysis on these recordings that it runs after a bot call in an Invorto Voice campaign. The analysis comes from the Call Insights configuration saved on a voice bot. That configuration holds the default fields, such as Call Summary, Sentiment, Call Score, and Call Outcome, plus any custom fields you added.
2. Prerequisites
Before you create an Insight campaign, make sure you have the following.
- A voice bot with Call Insights enabled. The Insights Config you select in the campaign comes from that bot. For details, see Creating a Voice Bot.
- Every custom field you want extracted, already added on the bot’s Call Insights Invorto only extracts the fields that exist in the Insights Config you select.
- Your recordings saved in a supported audio format. See section 5 for the formats and the size limit.
- The destination URL, if you want Invorto to post the results to another system.
Note: Add your custom fields to the bot before you create the campaign. If you add a field to the bot afterward, the campaign keeps using the earlier configuration. To pick up the new field, re-select the Insights Config in the campaign.
3. How It Works
- You create an Insight campaign and select an Insights Config. The Insights Config is the Call Insights configuration saved on a voice bot. It defines what Invorto extracts from each recording.
- You add audio to the campaign. You upload audio files from your computer, or you submit an audio URL.
- Invorto queues each file. The file waits in the Queued tab until processing starts.
- Invorto transcribes the recording, then runs the analysis defined by the Insights Config.
- Invorto moves the file to the Completed tab, and adds the results to the Insight Analytics
- If you entered a Callback URL, Invorto posts the analysis results to that URL after each job completes.
4. Create an Insight Campaign
You create an Insight campaign through a three step wizard. The steps are Basics, Configure, and Review.
4.1 Basics
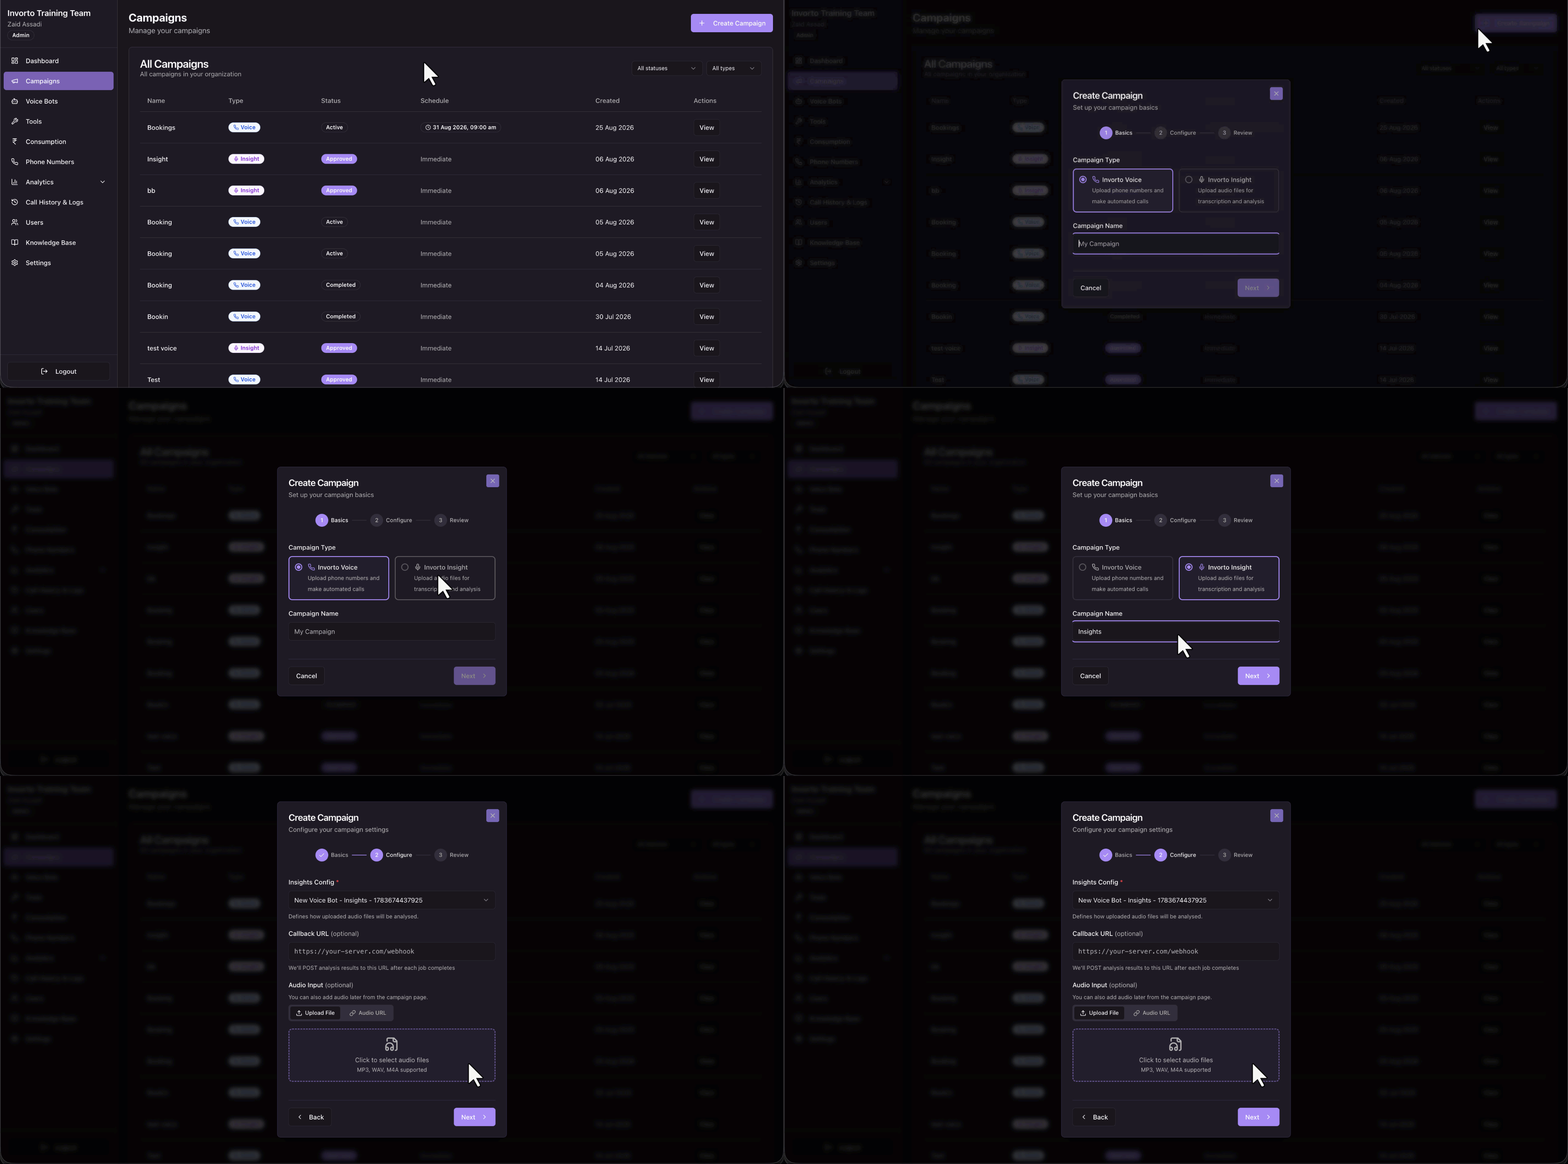
- On the left navigation pane, click Campaigns.
- Click Create Campaign.
- On the Create Campaign pop-up, under the Campaign Type section, select Invorto Insight.
- In the Campaign Name box, enter a name.
- Click Next.
4.2 Configure
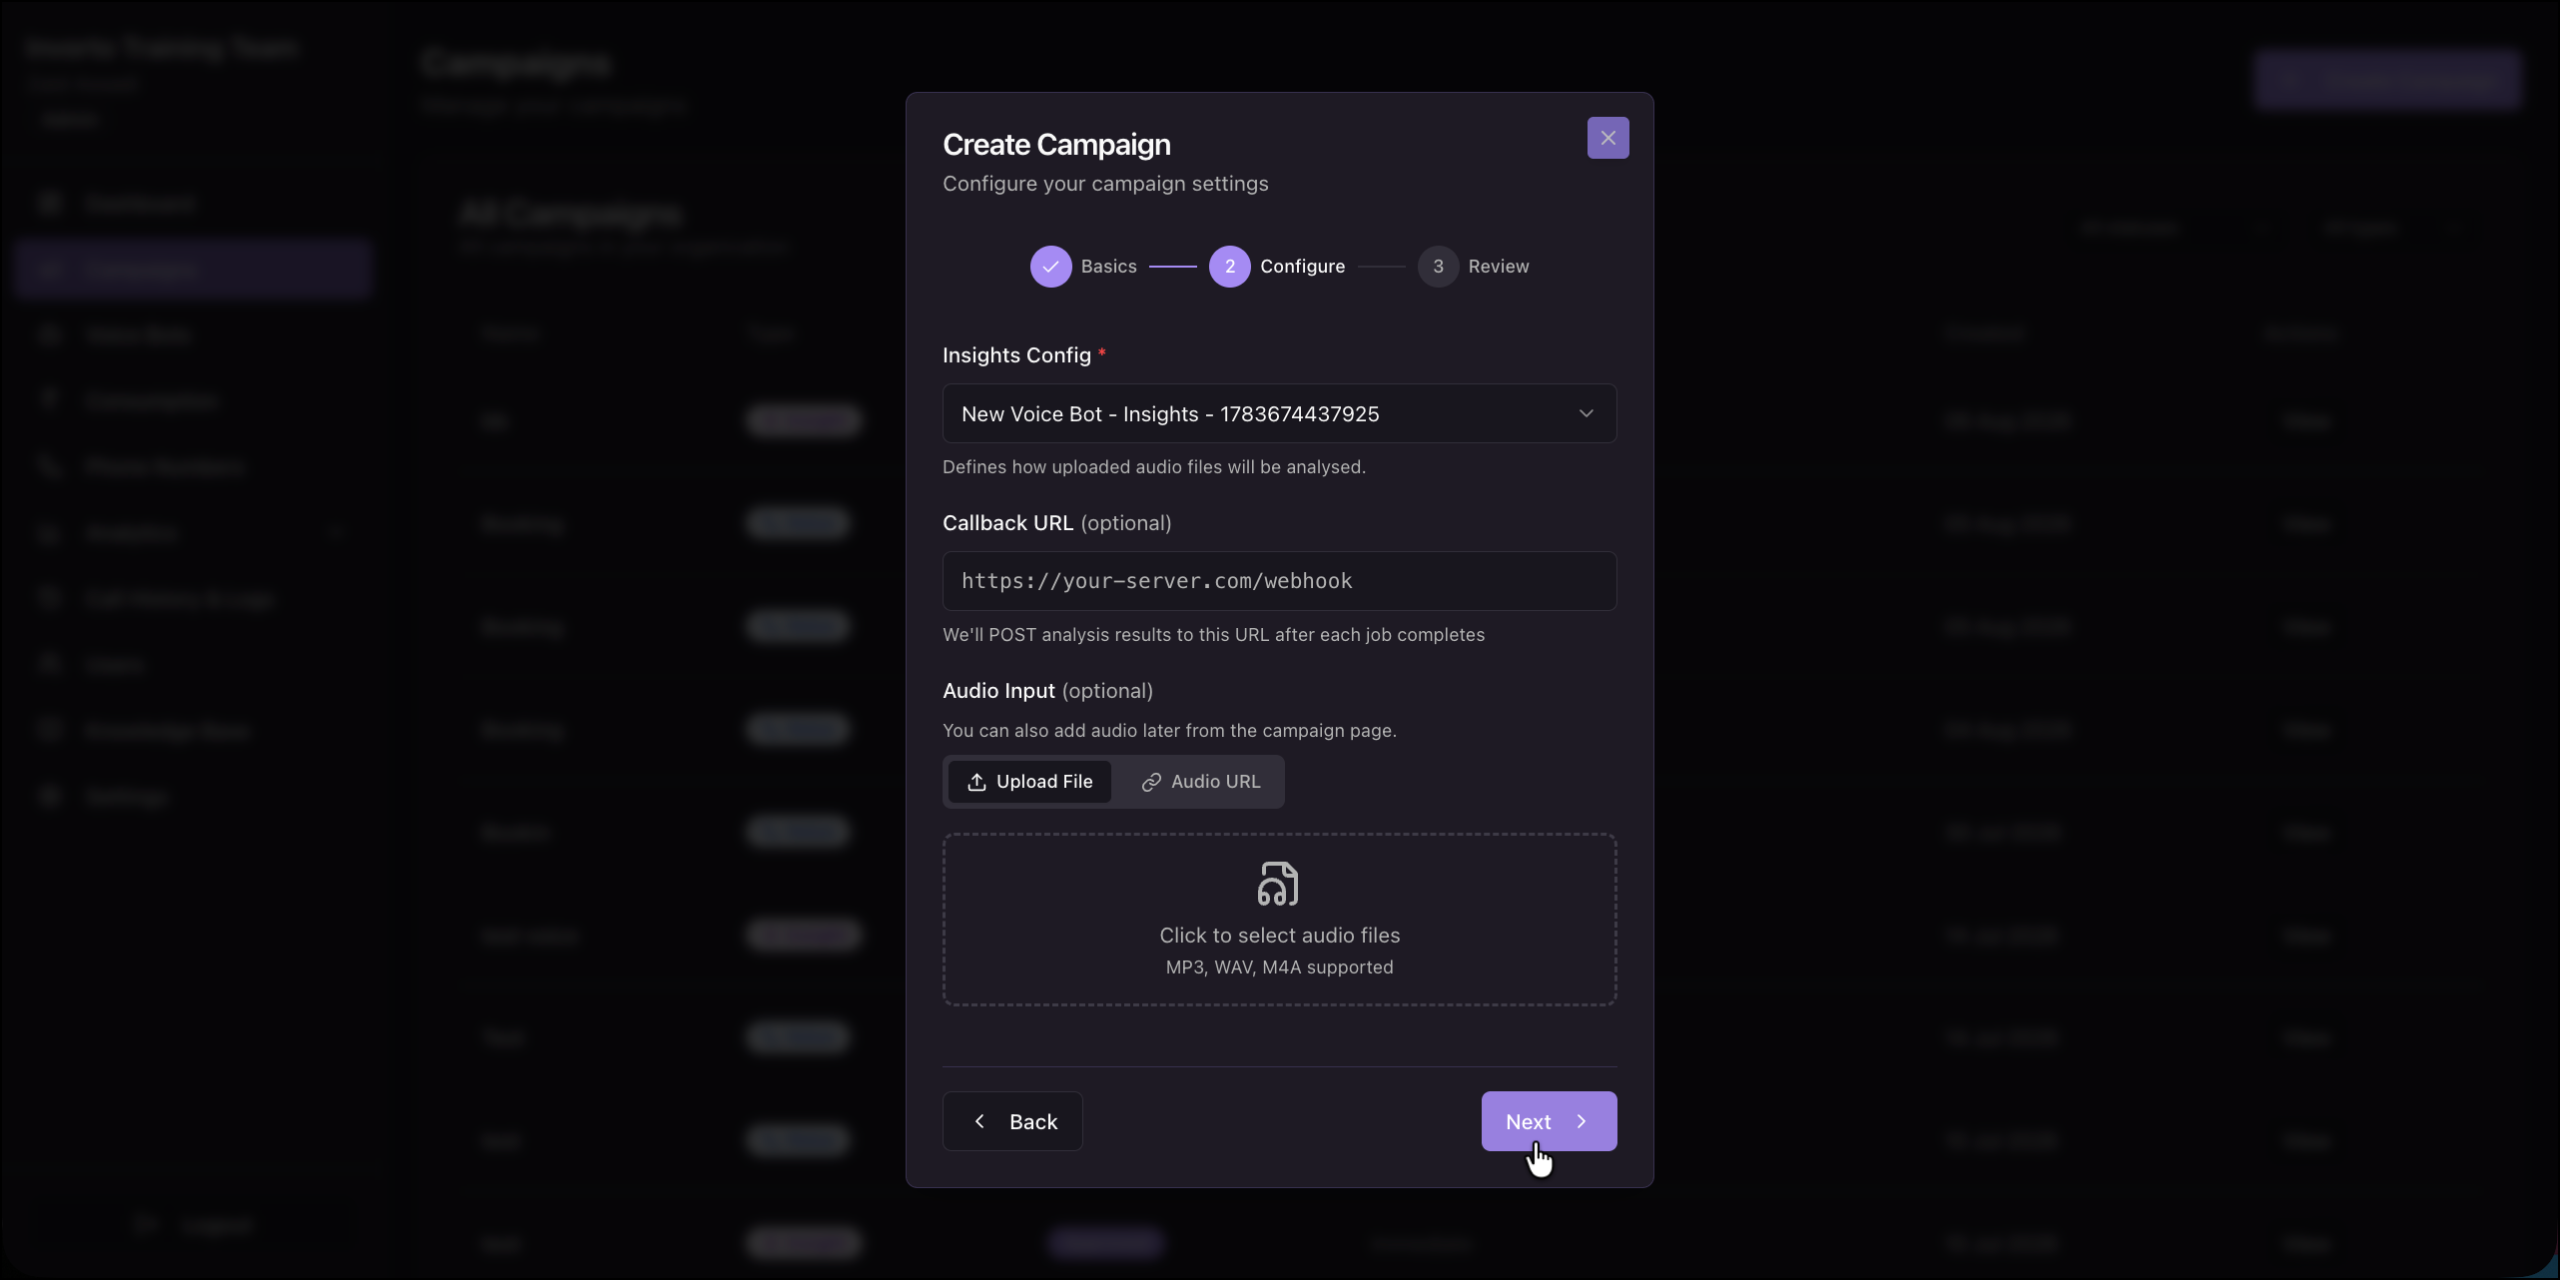
The Configure step for an Insight campaign shows three settings. It does not show a voice bot, an outbound phone number, a schedule, or a concurrency limit. Those settings belong to Invorto Voice campaigns.
- From the Insights Config list, select the configuration you want Invorto to apply. Each entry shows the bot name, the word Insights, and the configuration ID.
- (Optional) In the Callback URL box, enter the URL where you want Invorto to post the analysis results.
- (Optional) Under the Audio Input section, add your recordings now, or add it later from the campaign page. Click Upload File to select files from your computer, or click Audio URL to submit a link.
- Click Next.
4.3 Step 3 – Review and Create
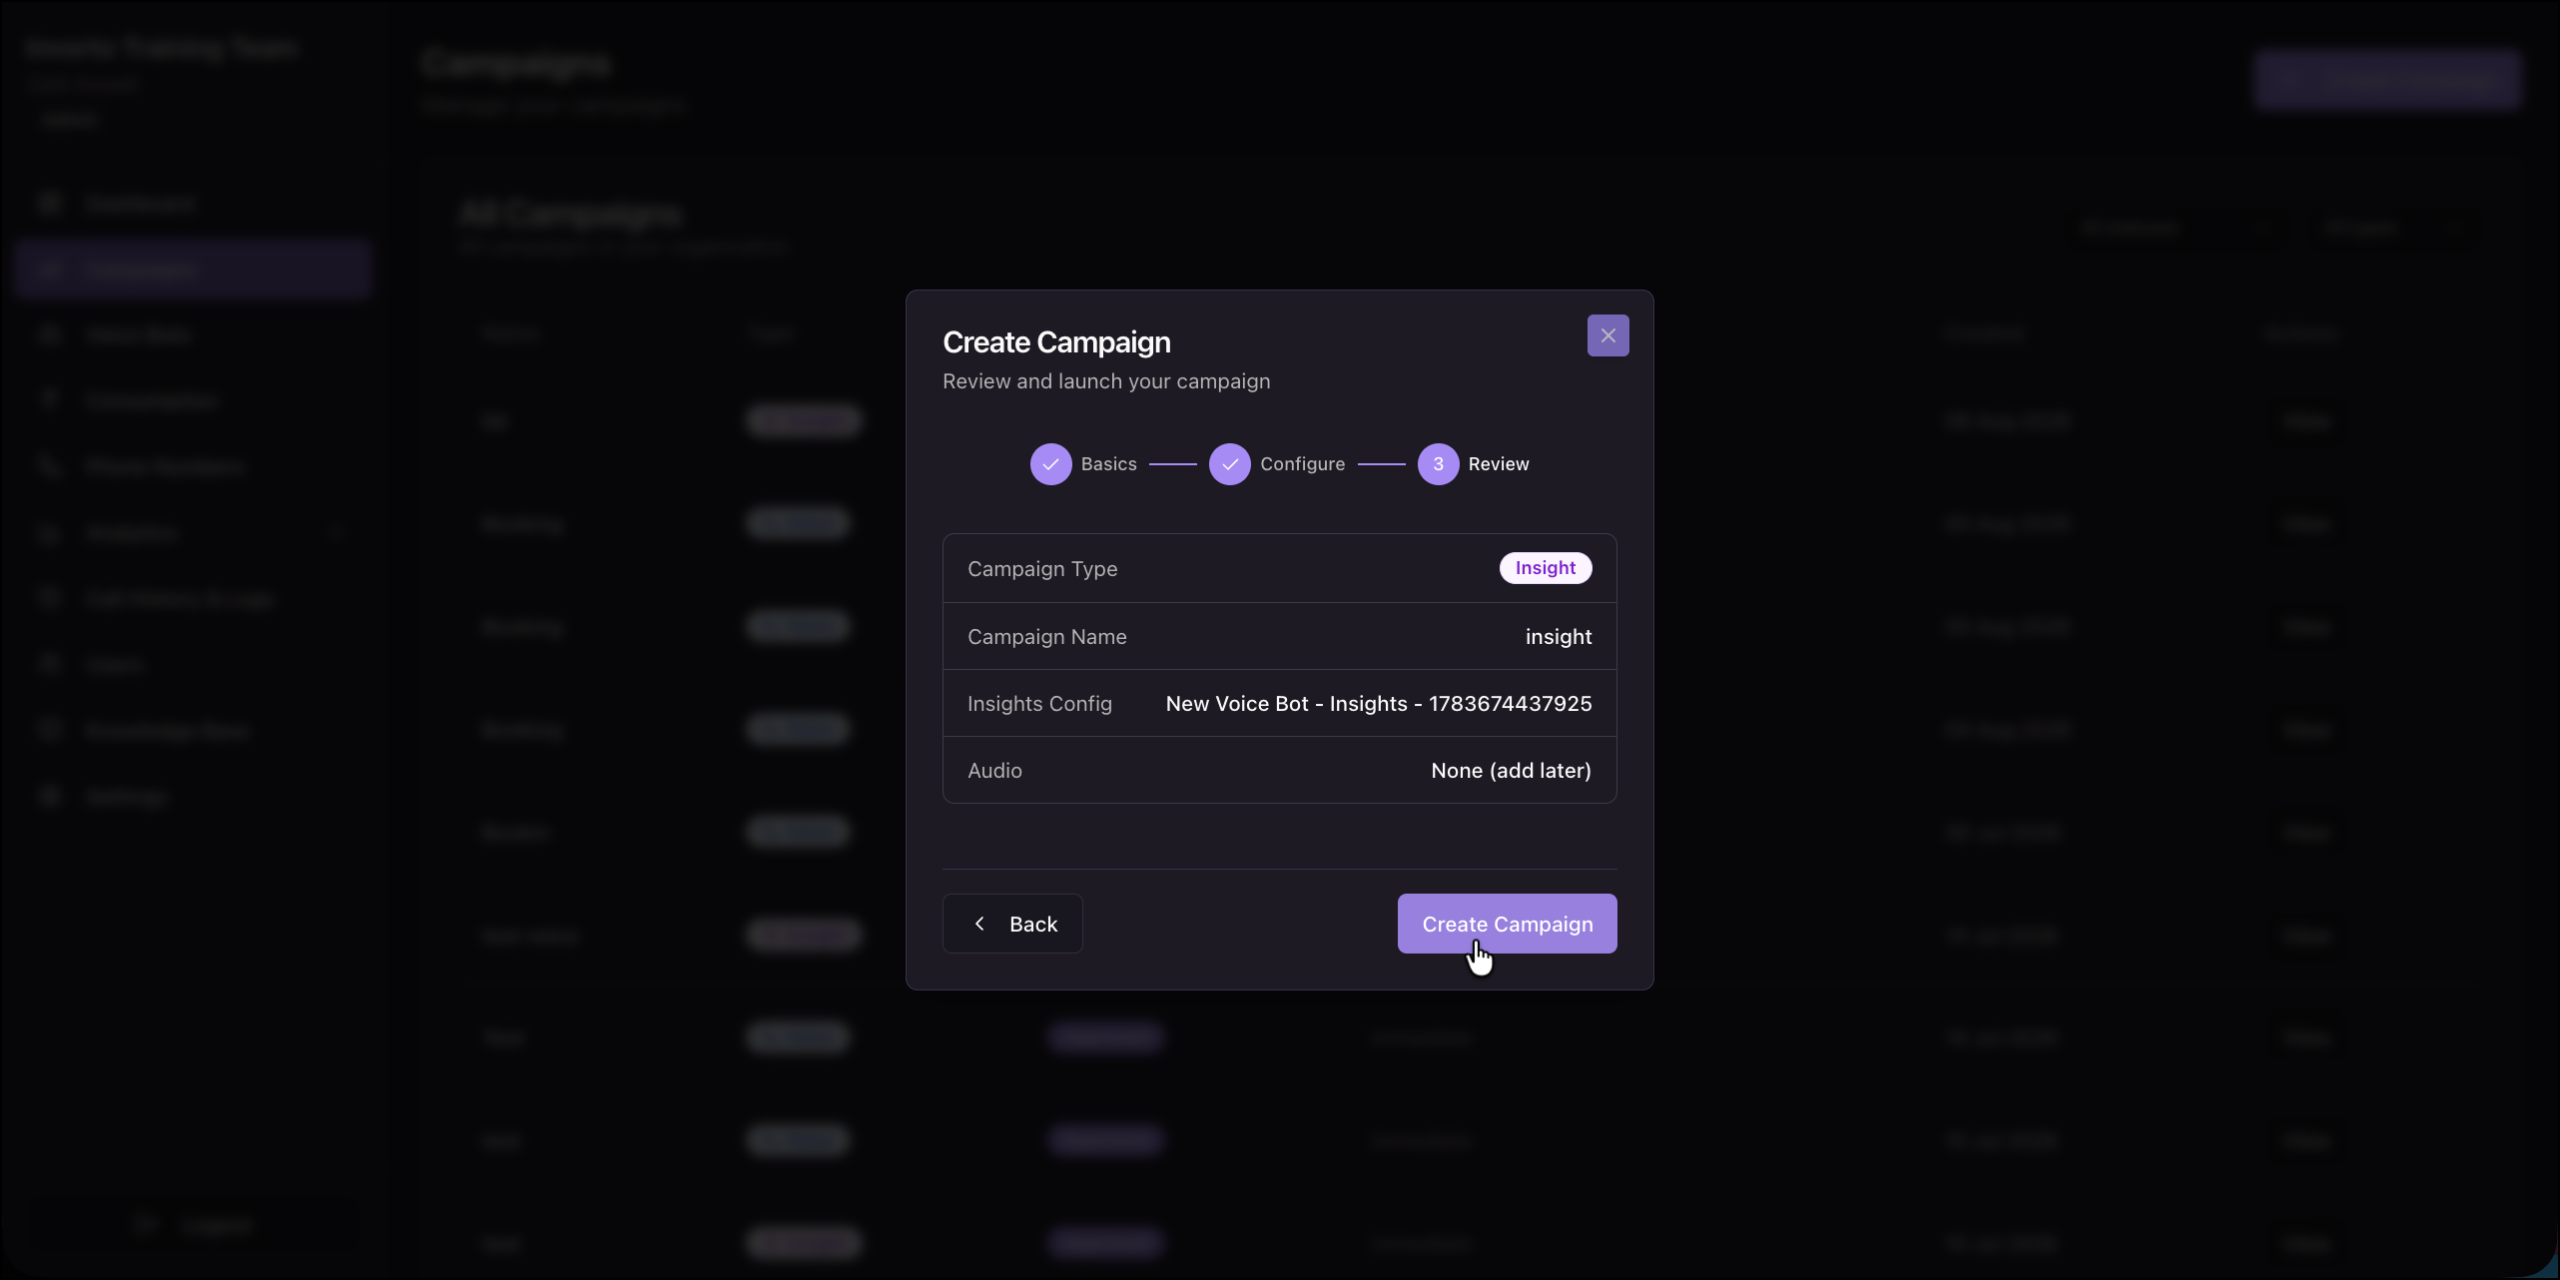
- Check every row on the Review step: Campaign Type, Campaign Name, Insights Config, and Audio.
- Confirm that the Insights Config row shows the bot whose fields you want extracted.
- If you did not add recordings in the previous step, the Audio row reads None (add later).
- Click Create Campaign.
Invorto creates the campaign and opens the campaign page.
5. Add Audio to the Campaign
You add recordings from the Add Audio section on the campaign page. You can add audio at any time after you create the campaign, and you can add more audio to a campaign that already processed files.
Invorto supports the following audio formats: MP3, WAV, M4A, OGG, FLAC, MP4, and WEBM. Each file must be 25 MB or smaller.
5.1 Upload Audio Files
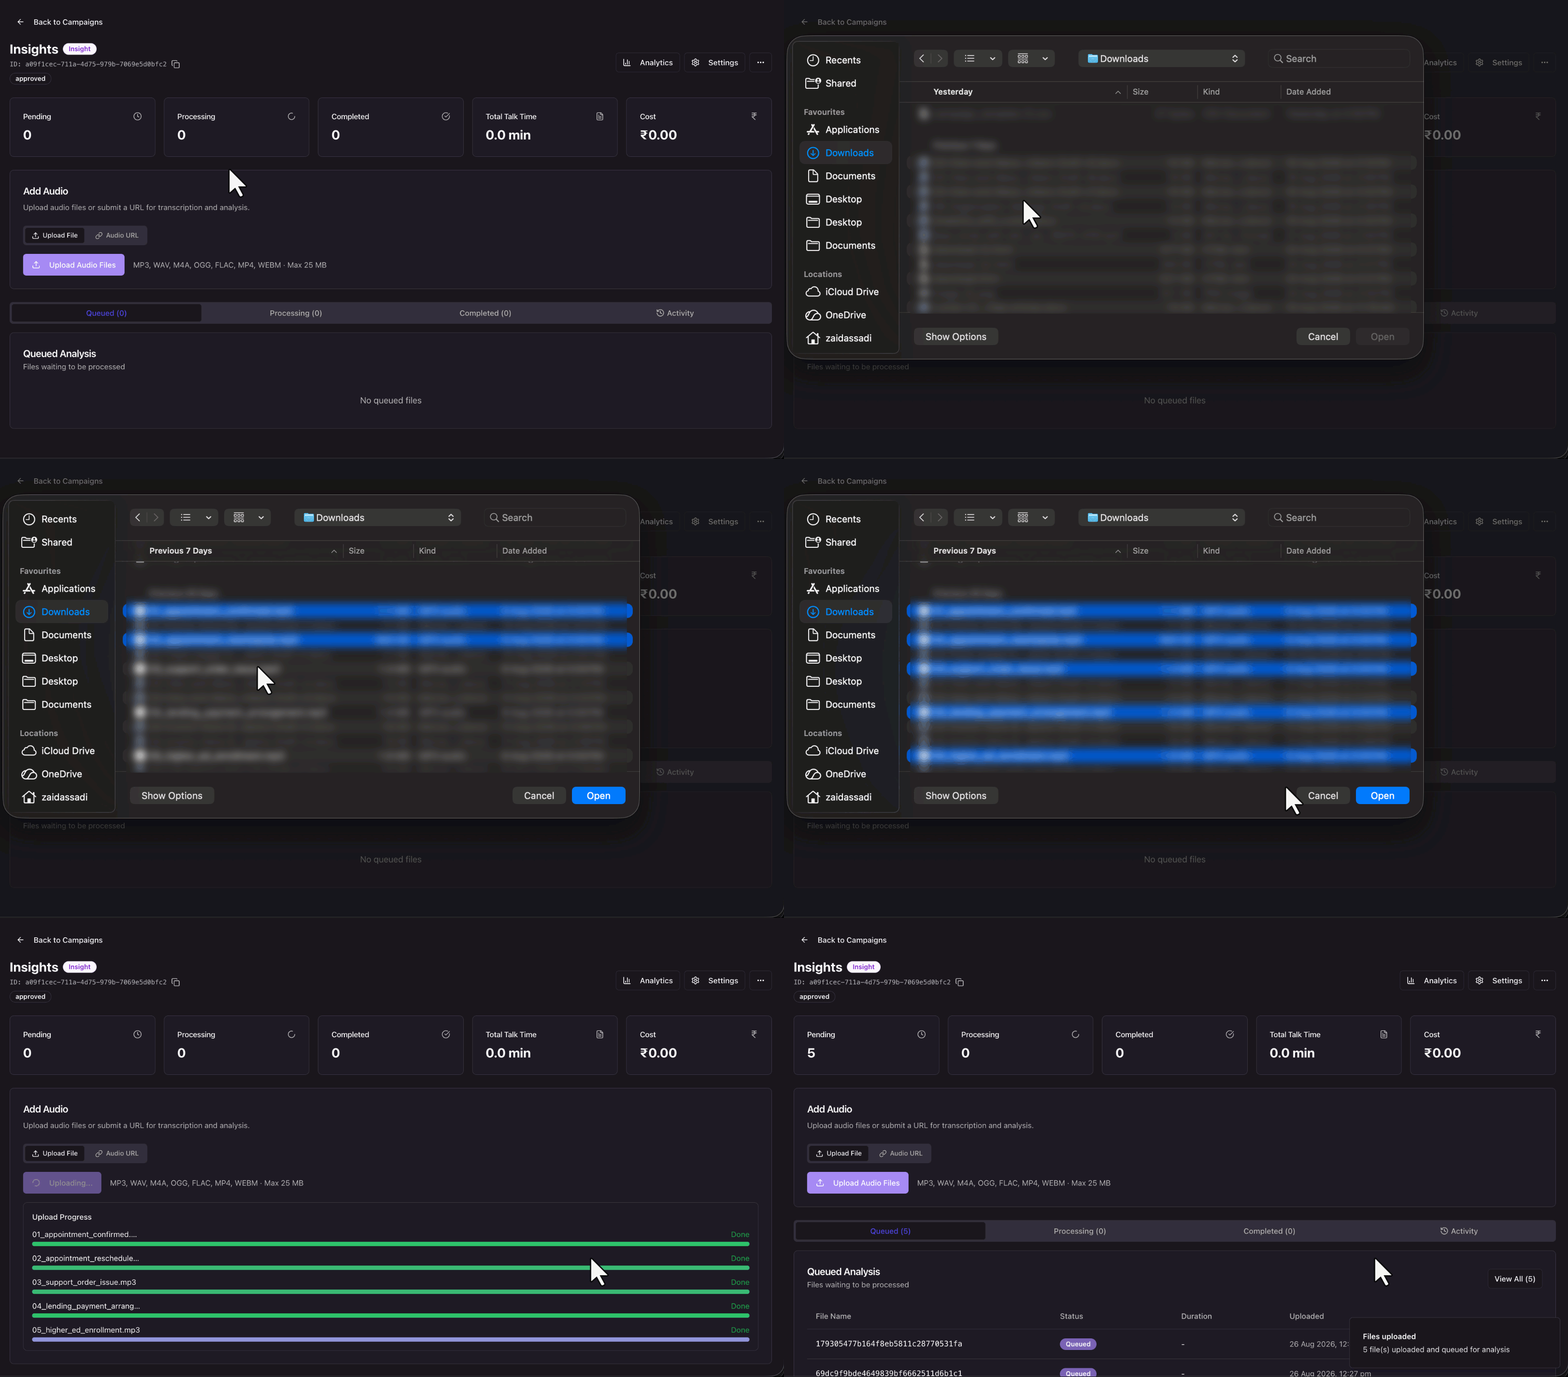
- Under the Add Audio section, click Upload File.
- Click Upload Audio Files.
- Select one or more recordings, then confirm the selection.
Invorto adds each file to the Queued tab and updates the Pending tile.
5.2 Add an Audio URL
Use this option when your recordings already live in a storage location that Invorto can reach.
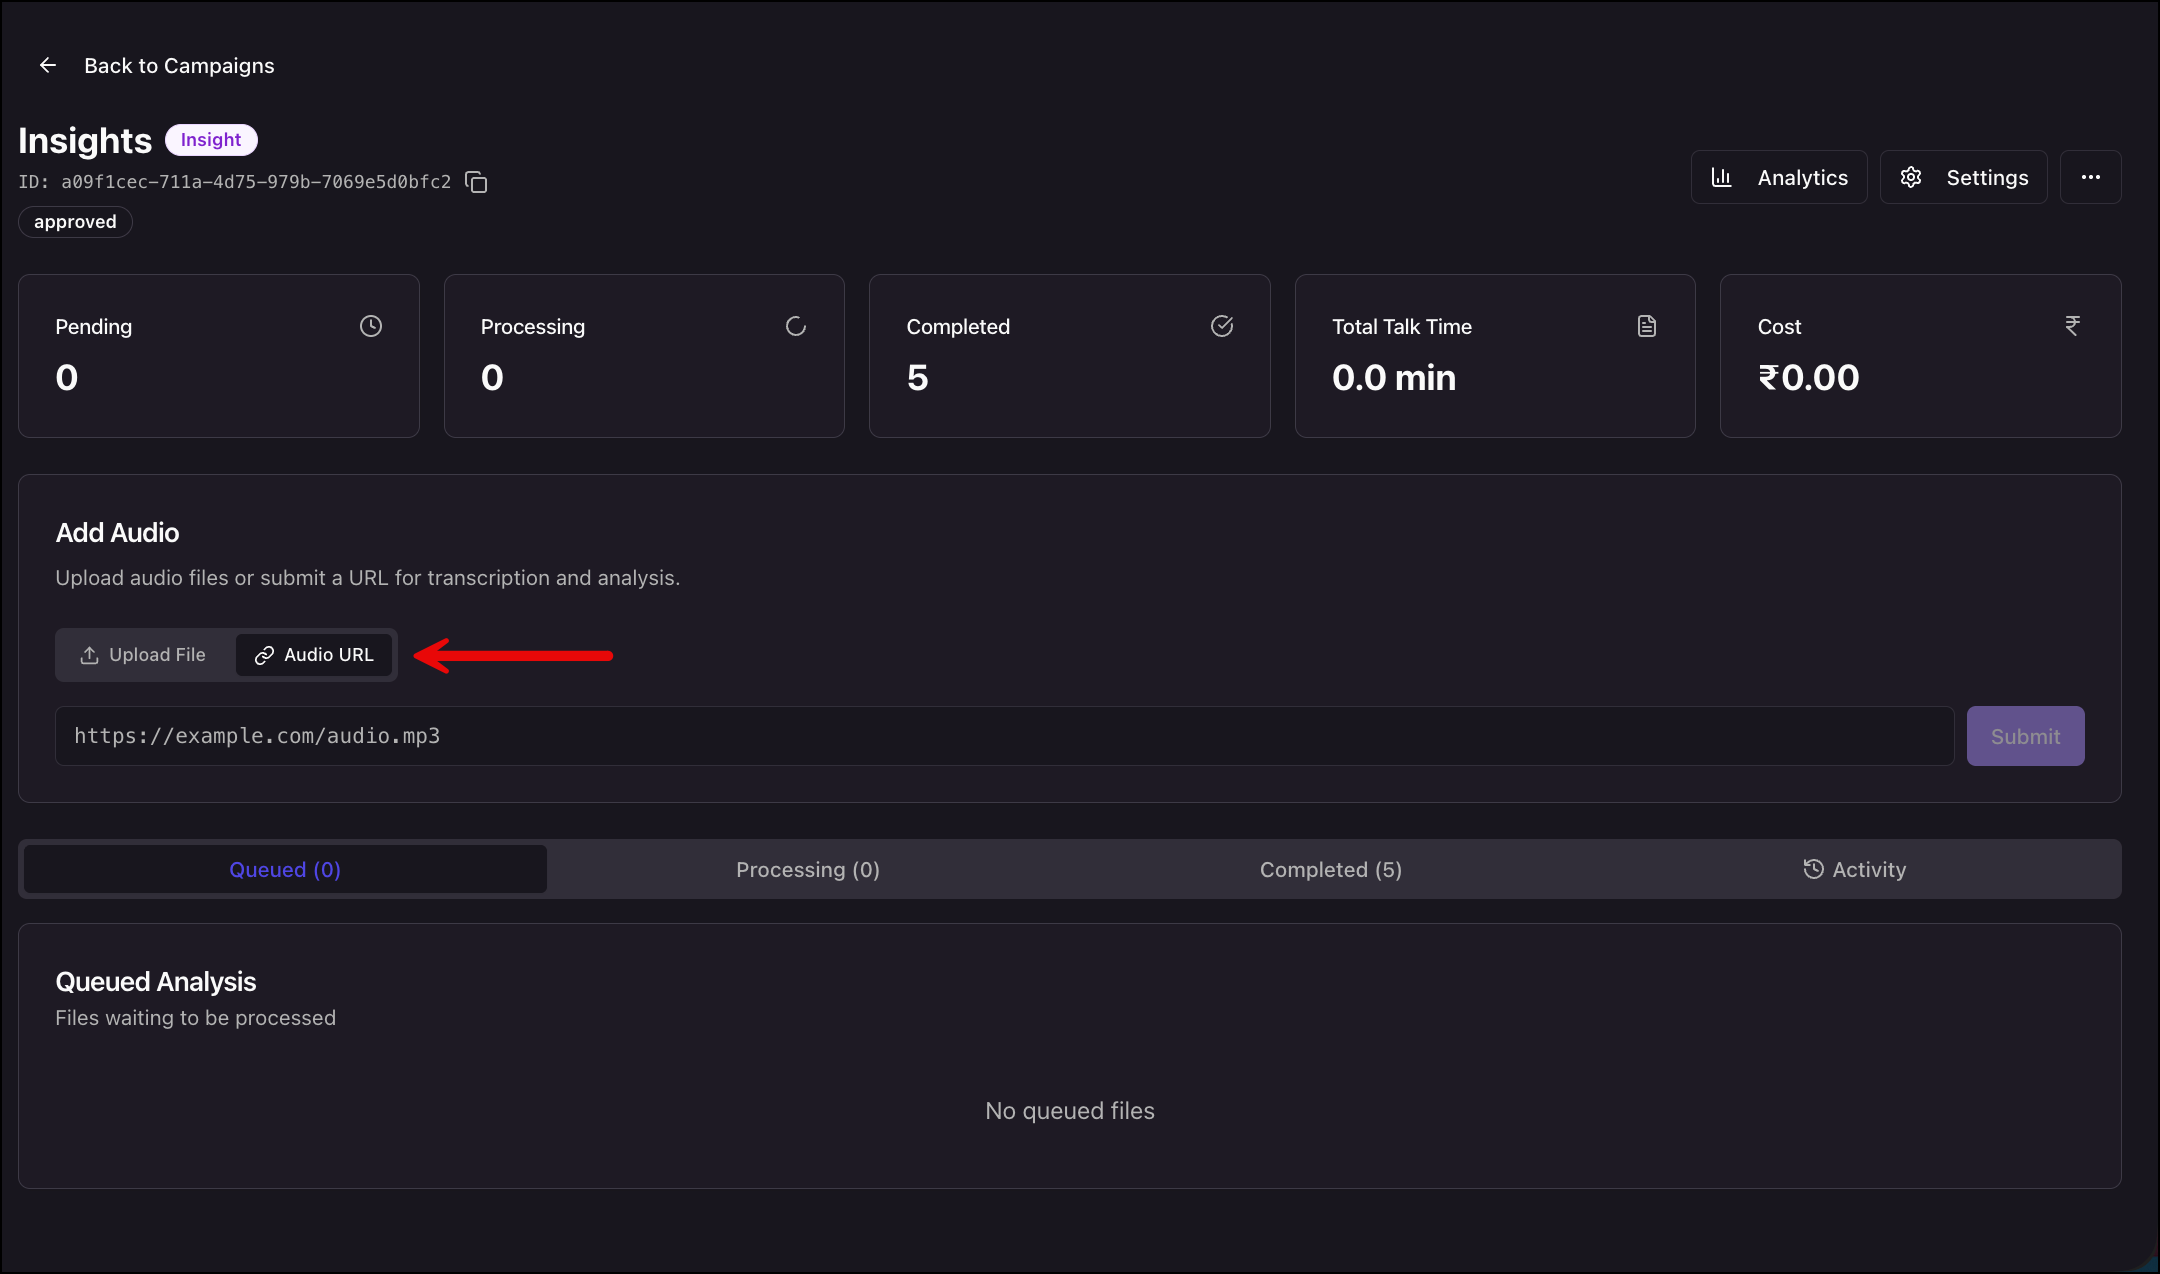
- Under the Add Audio section, click Audio URL.
- Enter the link to the recording.
- Submit the link.
Invorto fetches the file and adds it to the Queued tab.
6. Monitor the Campaign
The campaign page shows five tiles across the top. The tiles update as Invorto works through the queue.
- Pending – Recordings waiting to be processed.
- Processing – Recordings that Invorto is transcribing and analyzing right now.
- Completed – Recordings that finished processing.
- Total Talk Time – The total duration of the audio analyzed so far.
- Cost – The usage recorded against this campaign.
Below the Add Audio section, a tab strip mirrors the tiles.
- Queued – lists the files waiting to be processed.
- Processing – lists the files currently being transcribed and analyzed.
- Completed – lists the files that finished, with their results.
- Activity – lists the events on this campaign, such as uploads and status changes.
Larger files take longer to transcribe. A file stays in Processing until both the transcription and the analysis finish.
7. Review the Insights
You review the output of an Insight campaign in two places.
7.1 Call Insights
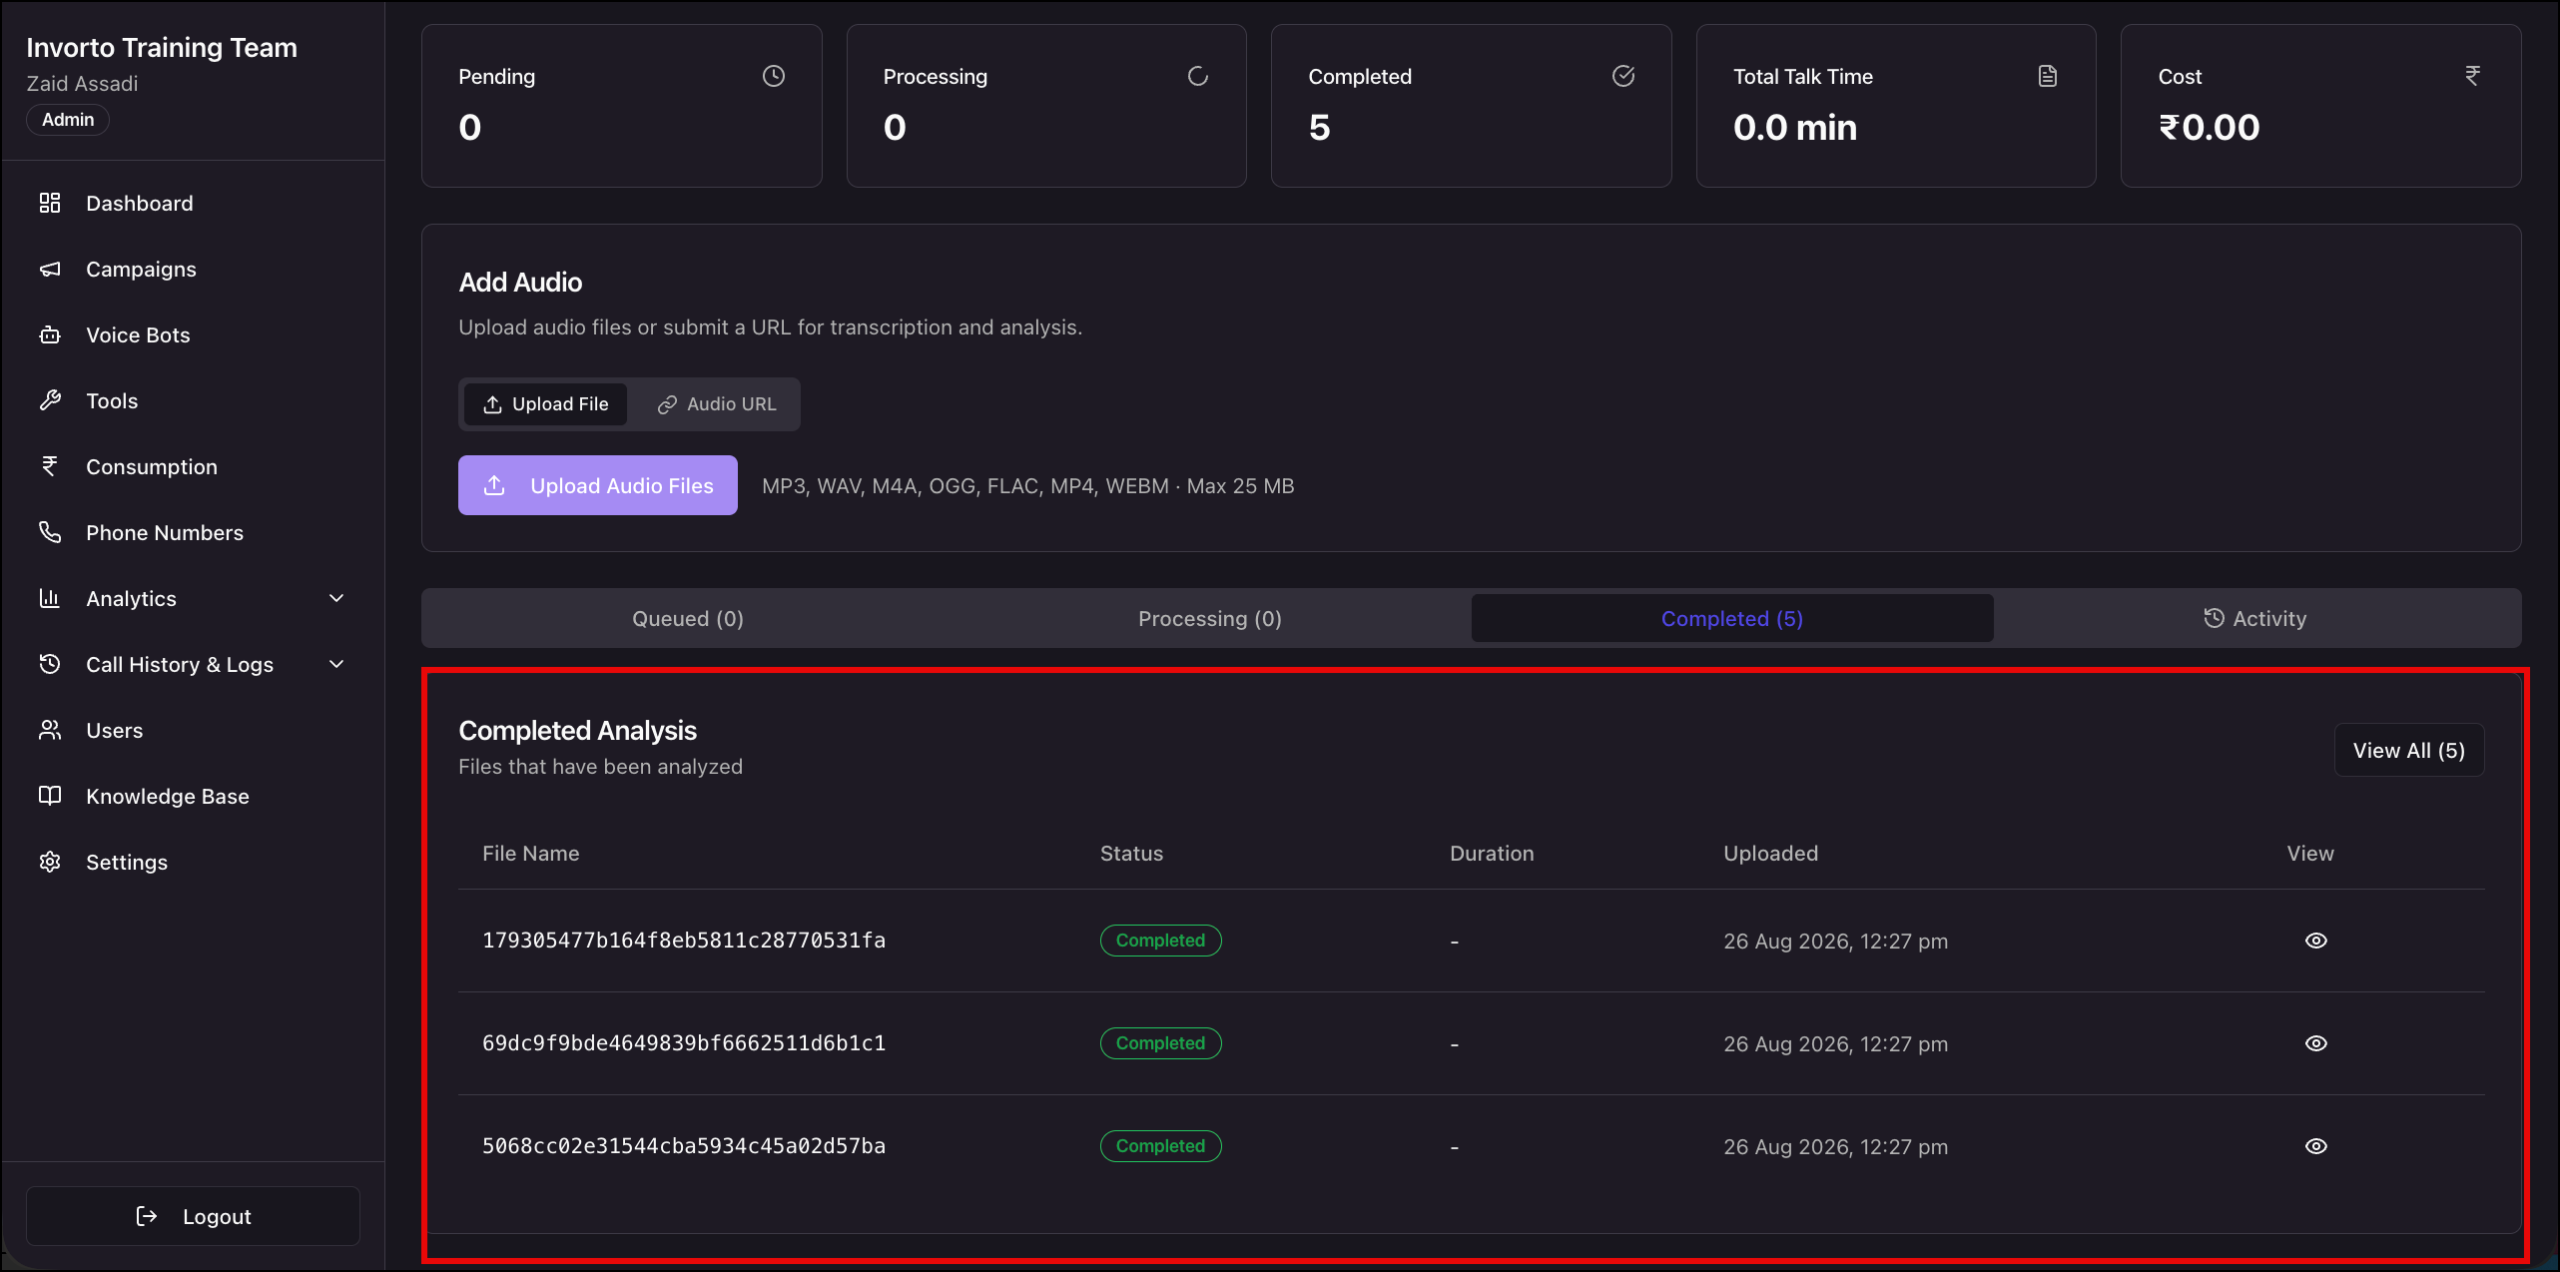
On the campaign page, open the Completed tab to see each processed recording, along with its transcript and the fields Invorto extracted.
7.2 Campaign Analytics
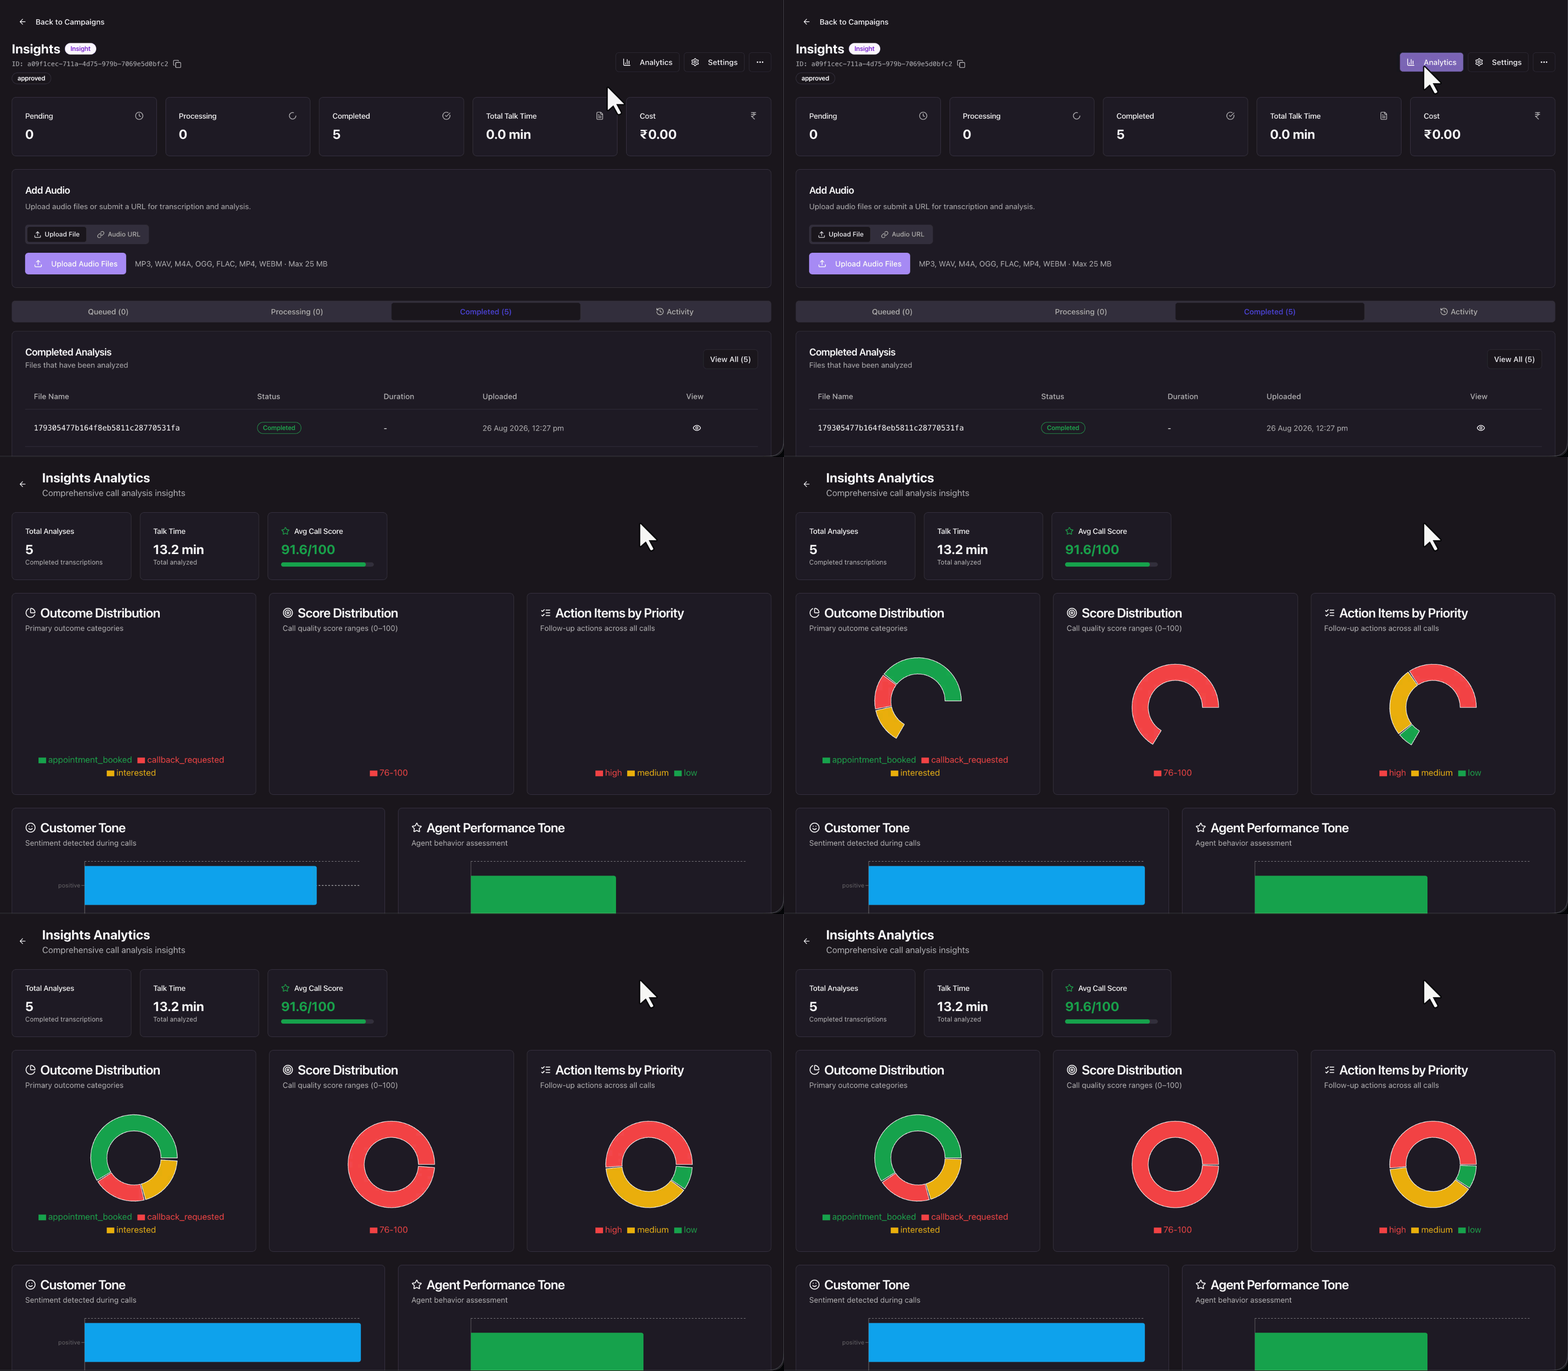
Click Analytics in the top right corner of the campaign page to open the analysis for this campaign.
7.3 Insight Analytics
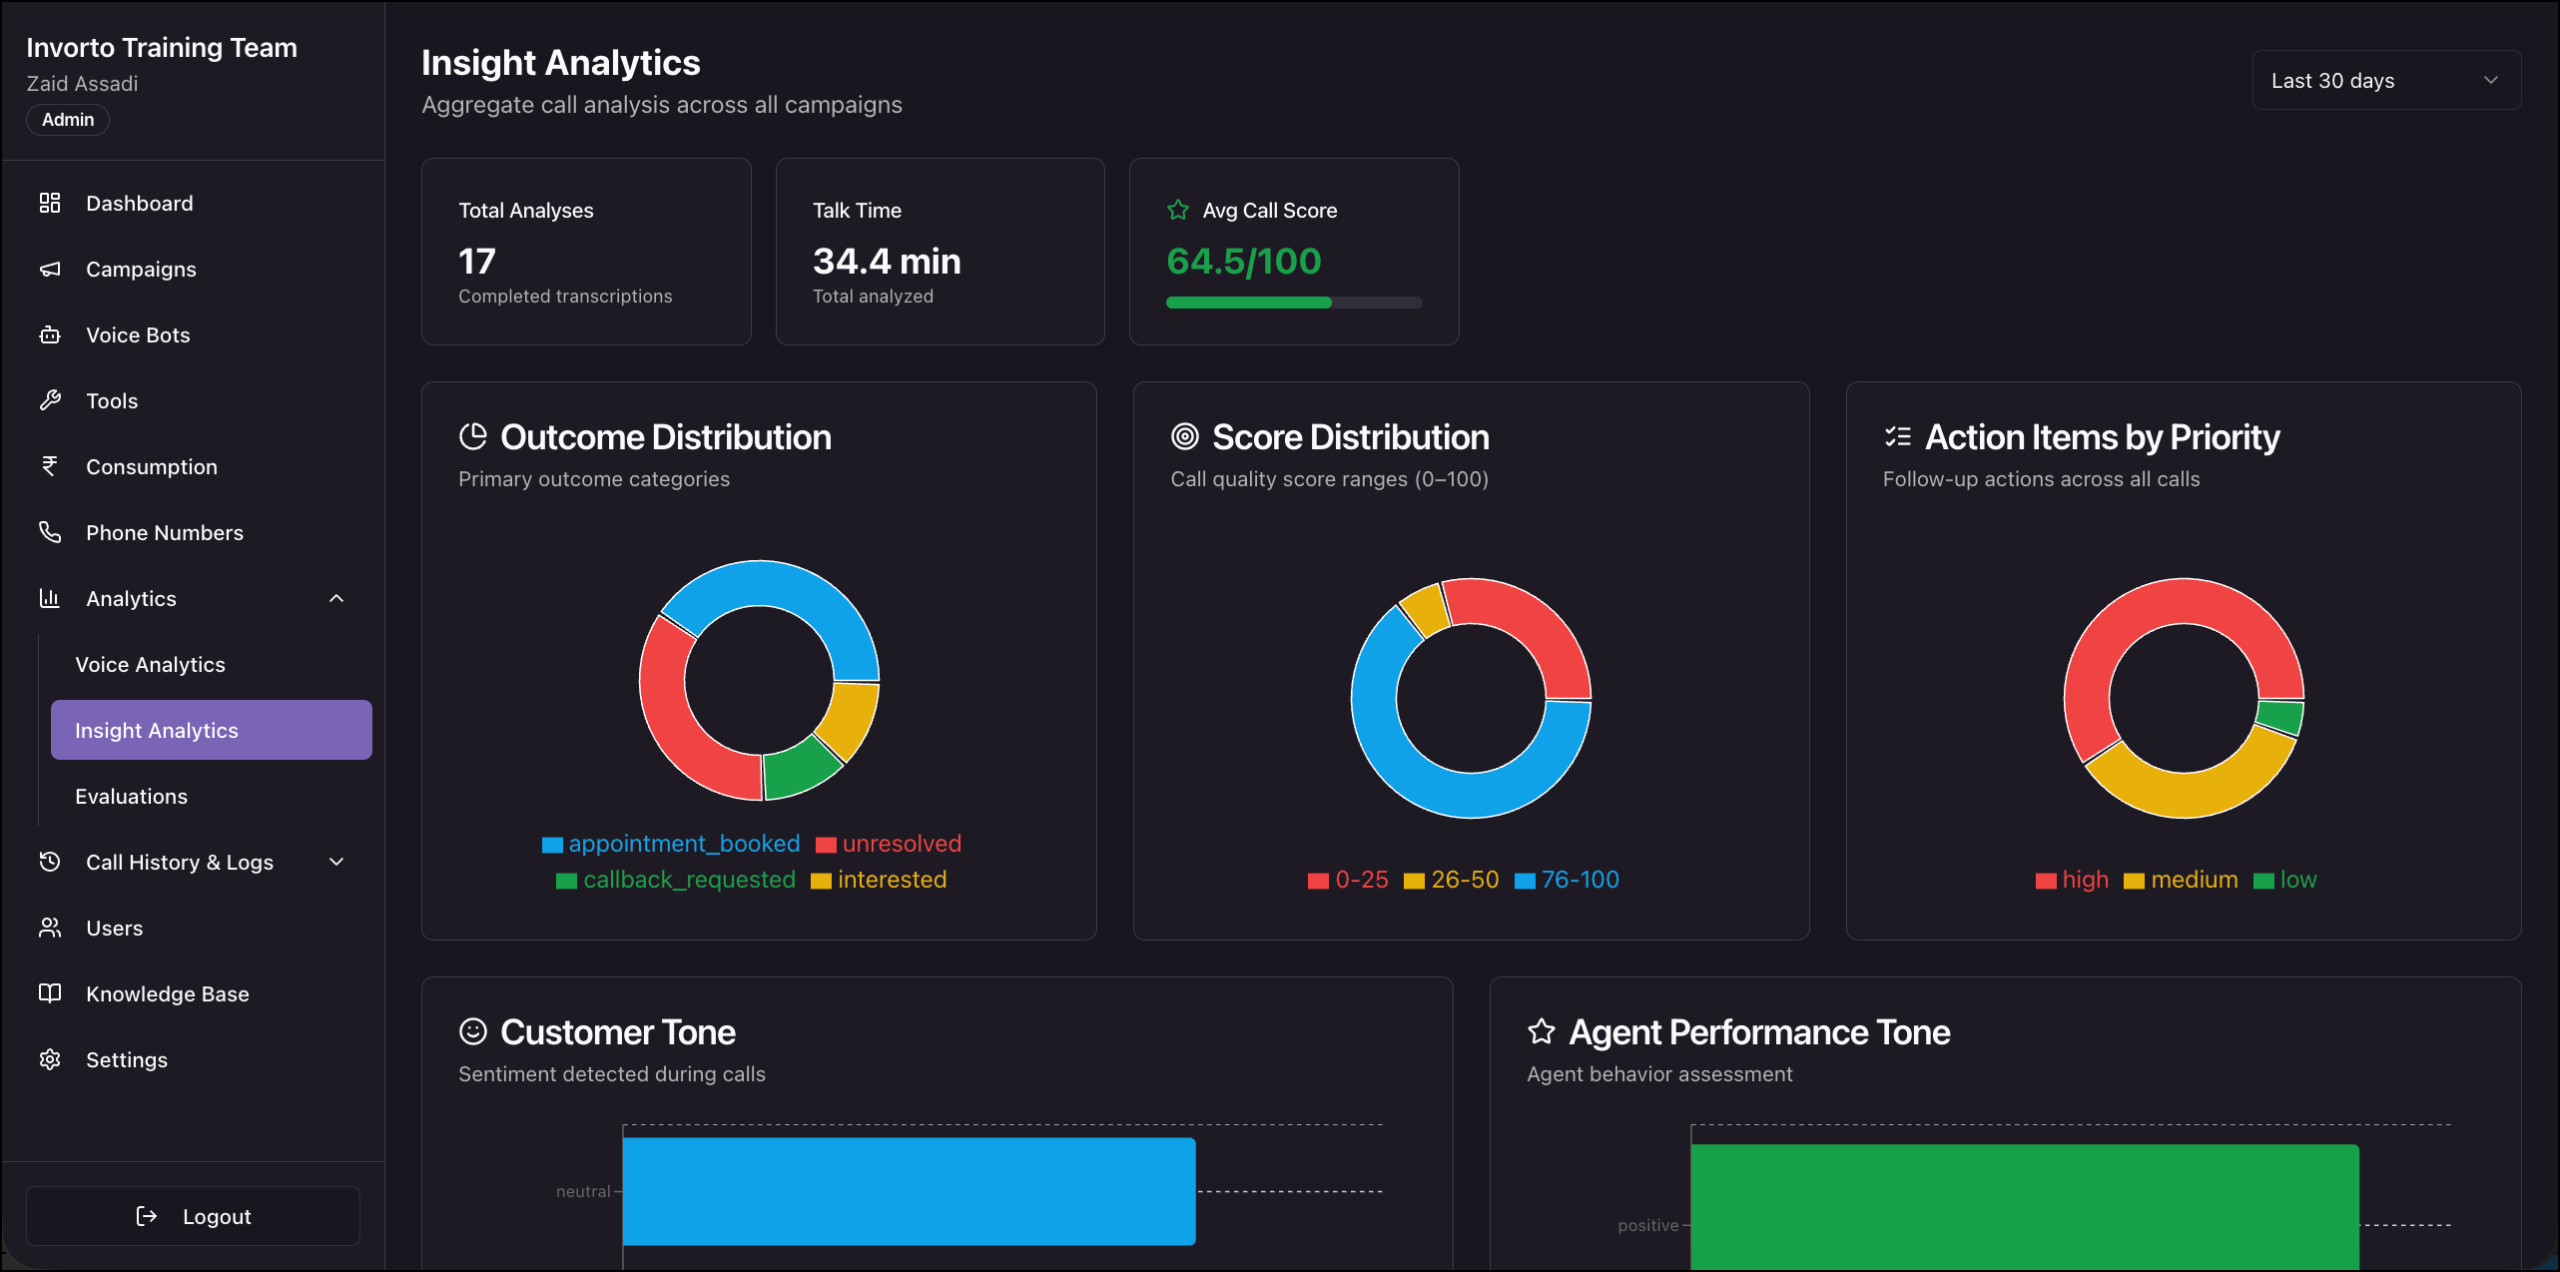
On the Insight Analytics page. Click Insight Analytics on the left navigation pane. This page aggregates the analysis across every campaign in your organization.
To see how many recordings each campaign processed, click Consumption on the left navigation pane, then click the Invorto Insight tab.
8. Manage Your Campaigns
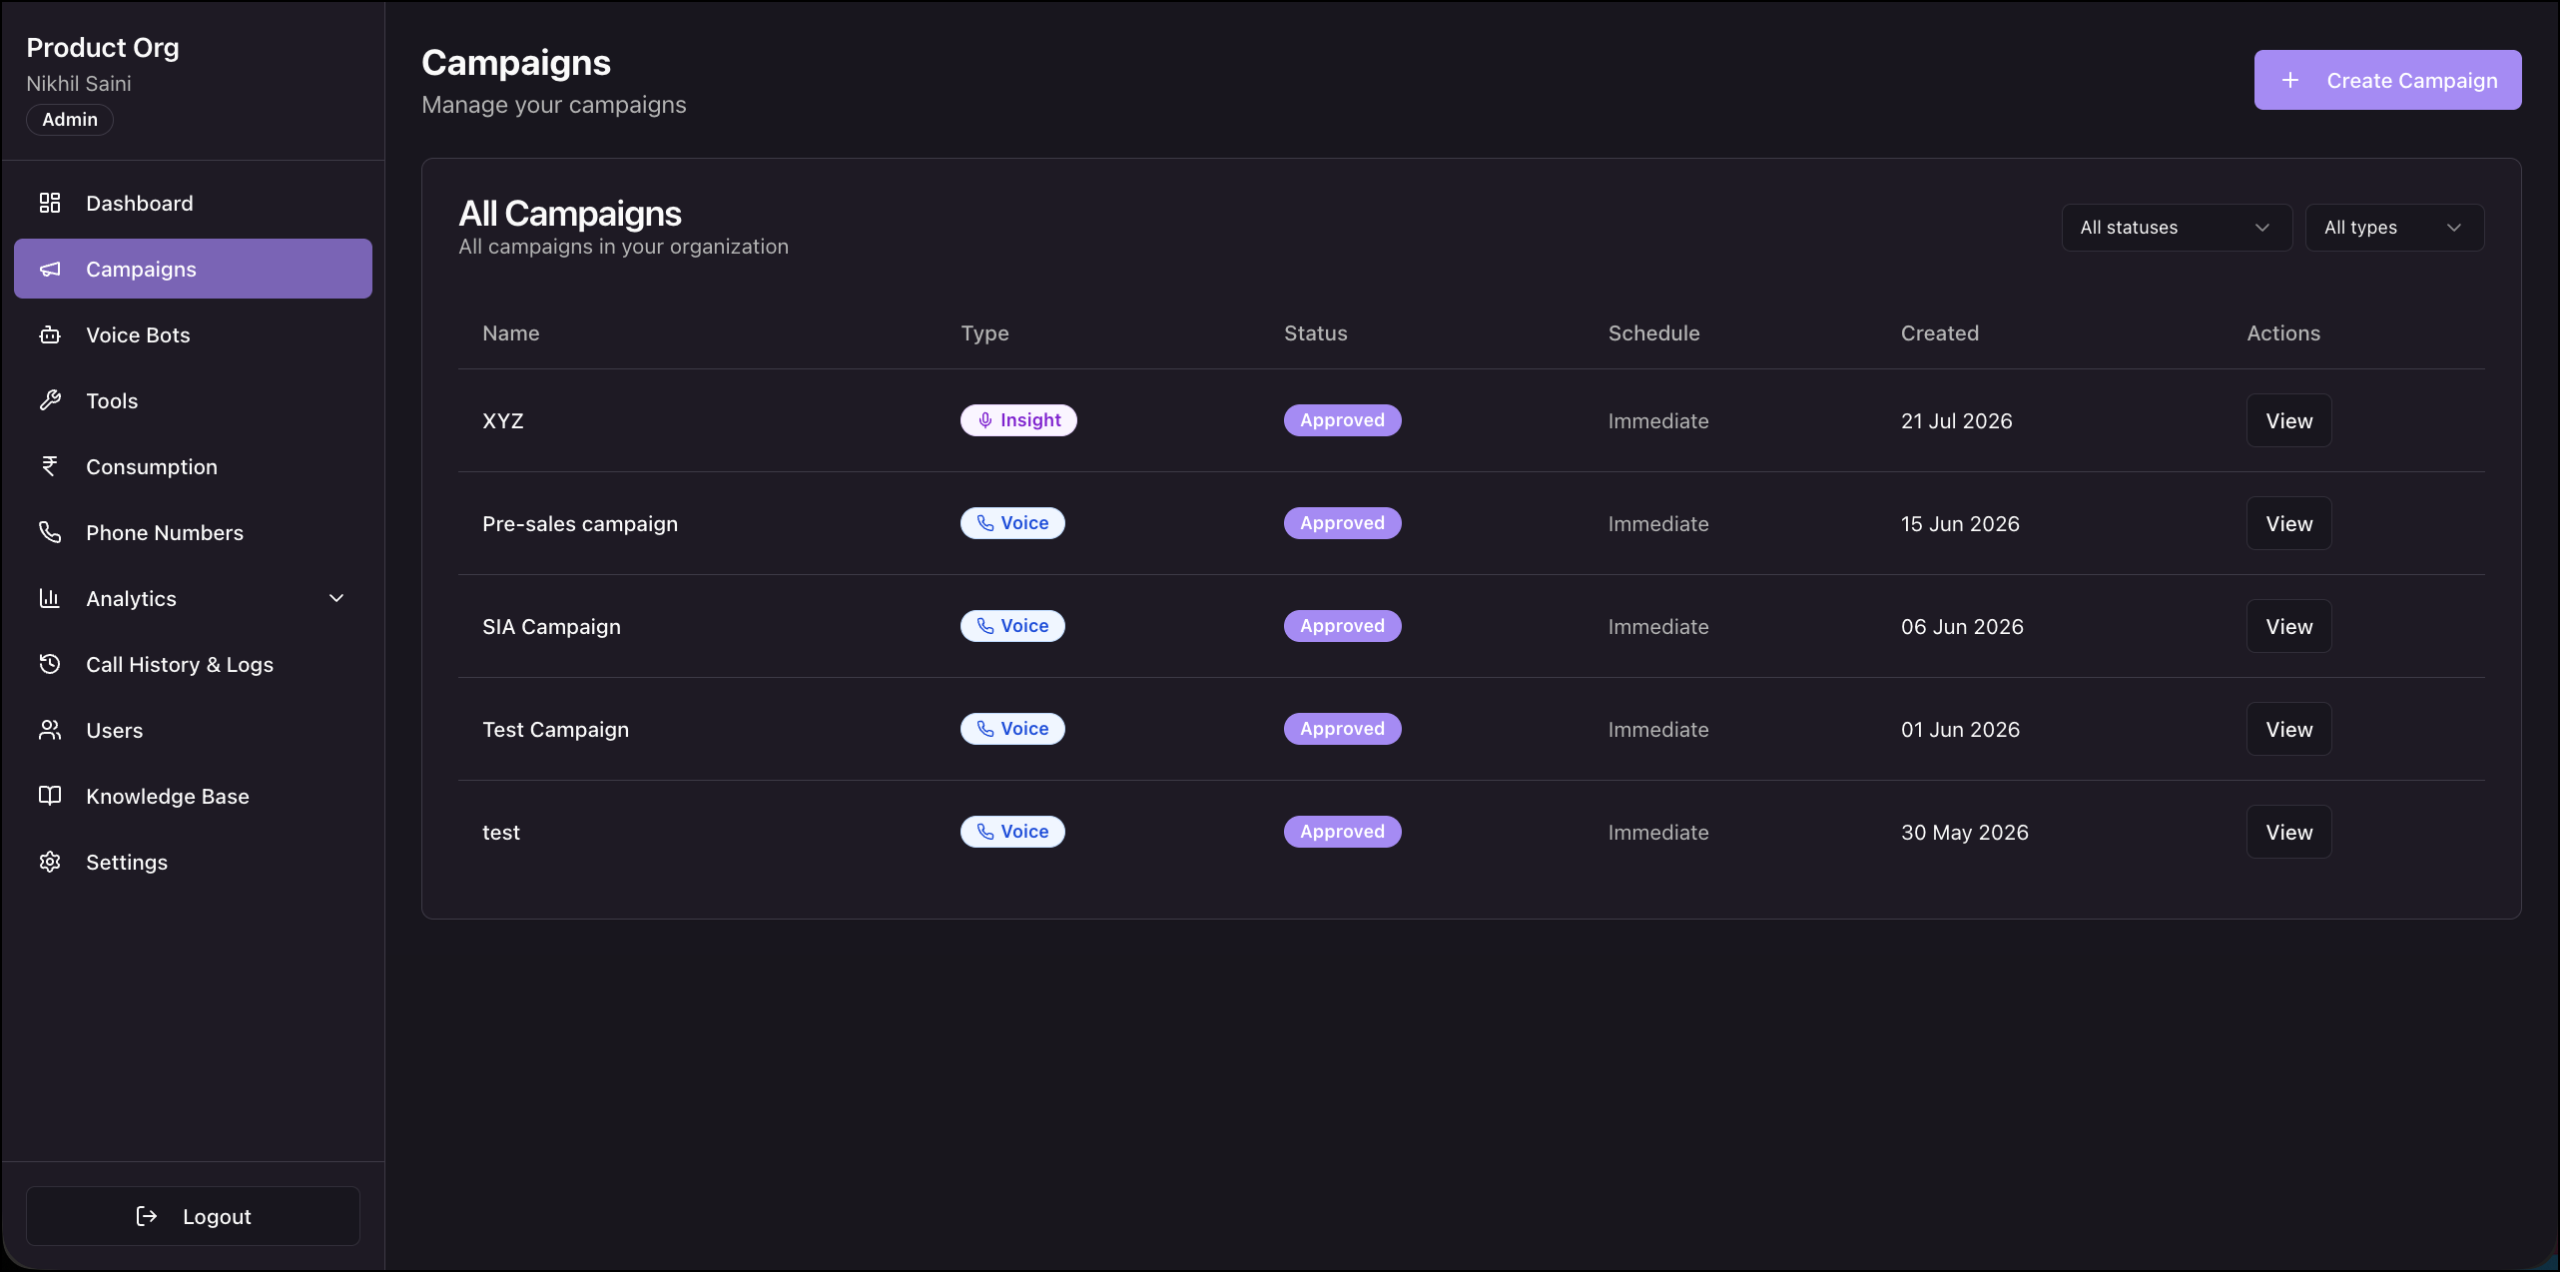
The Campaigns page lists every campaign in your organization, in both campaign types.
| Column | Description |
| Name | The campaign name you entered on the Basics step. |
| Type | A badge that reads either Voice or Insight. |
| Status | The current state of the campaign. |
| Schedule | The start behavior. Insight campaigns show Immediate, because they do not dial. |
| Created | The date the campaign was created. |
| Actions | The View button, which opens the campaign page. |
To find a campaign faster, use the status list and the type list in the top right corner of the All Campaigns section. Set the type list to Insight to hide every Voice campaign.
Any Questions?
Did you find this article helpful? Please let us know any feedback you may have in the comments section below. We’d love to hear from you and help you out!