


Get Started

Sales Suite
Field Ops
Marketing
Service CRM
Integrations & Apps
FloStack
Create and Run a Voice Campaign on Invorto

1. Feature Overview
A voice campaign is how you make an Invorto Voice Bot call a list of contacts from the Invorto portal. You create the campaign once, select the bot and the phone number the calls go out from, and then upload your contacts as a CSV file. Invorto queues each number and dials it with the bot you selected.
Every column in your contact list, except the phone number, passes a value to a variable in the bot’s system prompt or greeting message. This is how a single campaign speaks to each contact personally. For example, one appointment reminder campaign can call 500 patients, and each patient hears their own name, appointment date, and department.
The campaign also controls the pace and timing of the calls. You set a concurrency limit, which is the number of calls Invorto runs at the same time, and you can schedule the campaign to run only on the days and hours you choose.
You can create as many campaigns as you need from the same bot. A new campaign with a new contact list doesn’t change the bot in any way.
2. How It Works
Here’s the end-to-end flow of a voice campaign –
- Create the campaign – Select Invorto Voice as the campaign type, then select the published bot, the outbound phone number, the analysis configuration, the schedule, and the concurrency limit.
- Upload your contacts – Download the CSV template from the campaign page, add one row per contact and one column per prompt variable, and upload it.
- Invorto dials the contacts – Invorto queues every number you upload and dials as many at a time as your concurrency limit allows, within your calling window.
- The bot holds the conversation – The bot greets each contact with their own values filled into the variables, and converses until the call ends.
- Invorto generates the insights – After each call ends, Invorto analyzes the transcript and generates the call insights configured on the bot. If you’ve added a callback URL, Invorto also posts the results to it.
- You track the results – Watch the calls progress on the campaign page, and review the recording, transcript, and insights of every completed call.
3. Prerequisites
- You must have access to the Invorto portal, with an Admin role that allows campaign creation.
- You need a published voice bot. Draft bots don’t appear in the campaign’s bot dropdown. For more information, see Creating a Voice Bot.
- Your organization must have an outbound phone number assigned to it. You can view your numbers on the Phone Numbers
- Keep your contact list ready, with a phone number for every contact and a value for every variable your bot’s prompt uses.
- If you want Invorto to send the call results to an external system, you will need a webhook URL.
4. Create a Voice Campaign
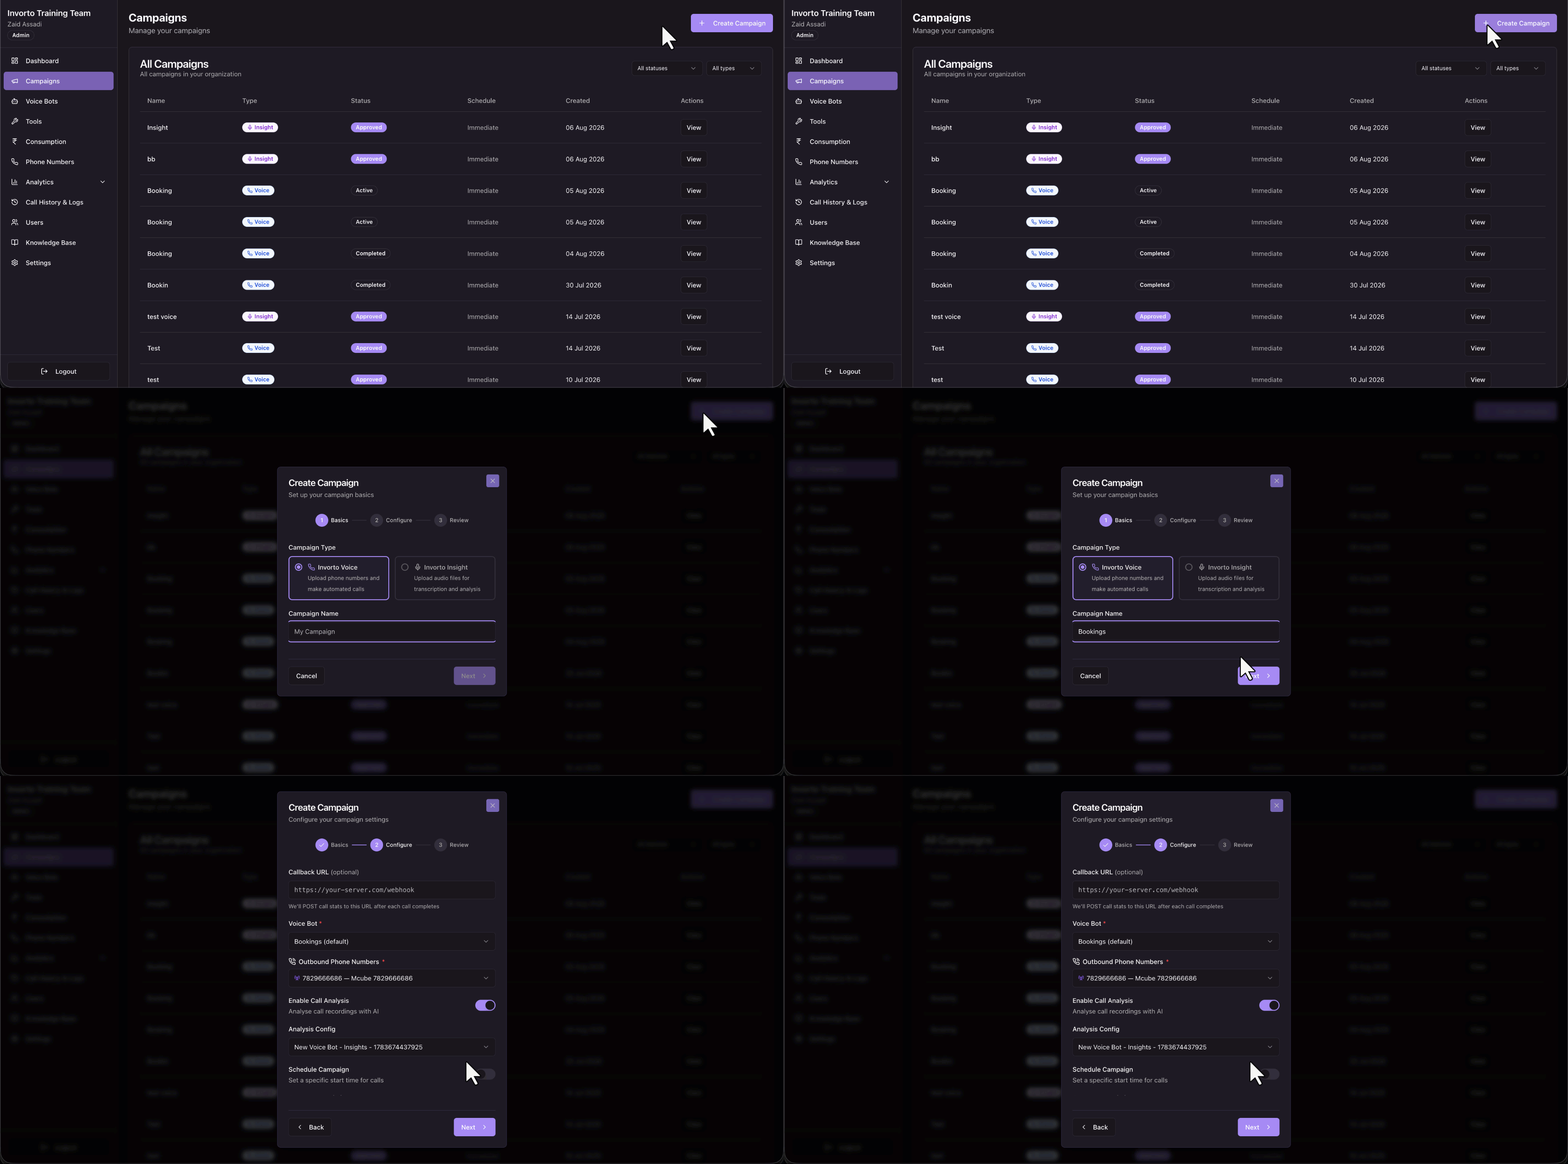
Creating a campaign is a three-step wizard: Basics, Configure, and Review.
4.1 Step 1: Basics
- On the Invorto portal, navigate to Campaigns.
- Click + Create Campaign.
- On the Create Campaign pop-up, select Invorto Voice as the campaign type.
- Enter a Campaign Name.
- Click Next.
4.2 Step 2: Configure
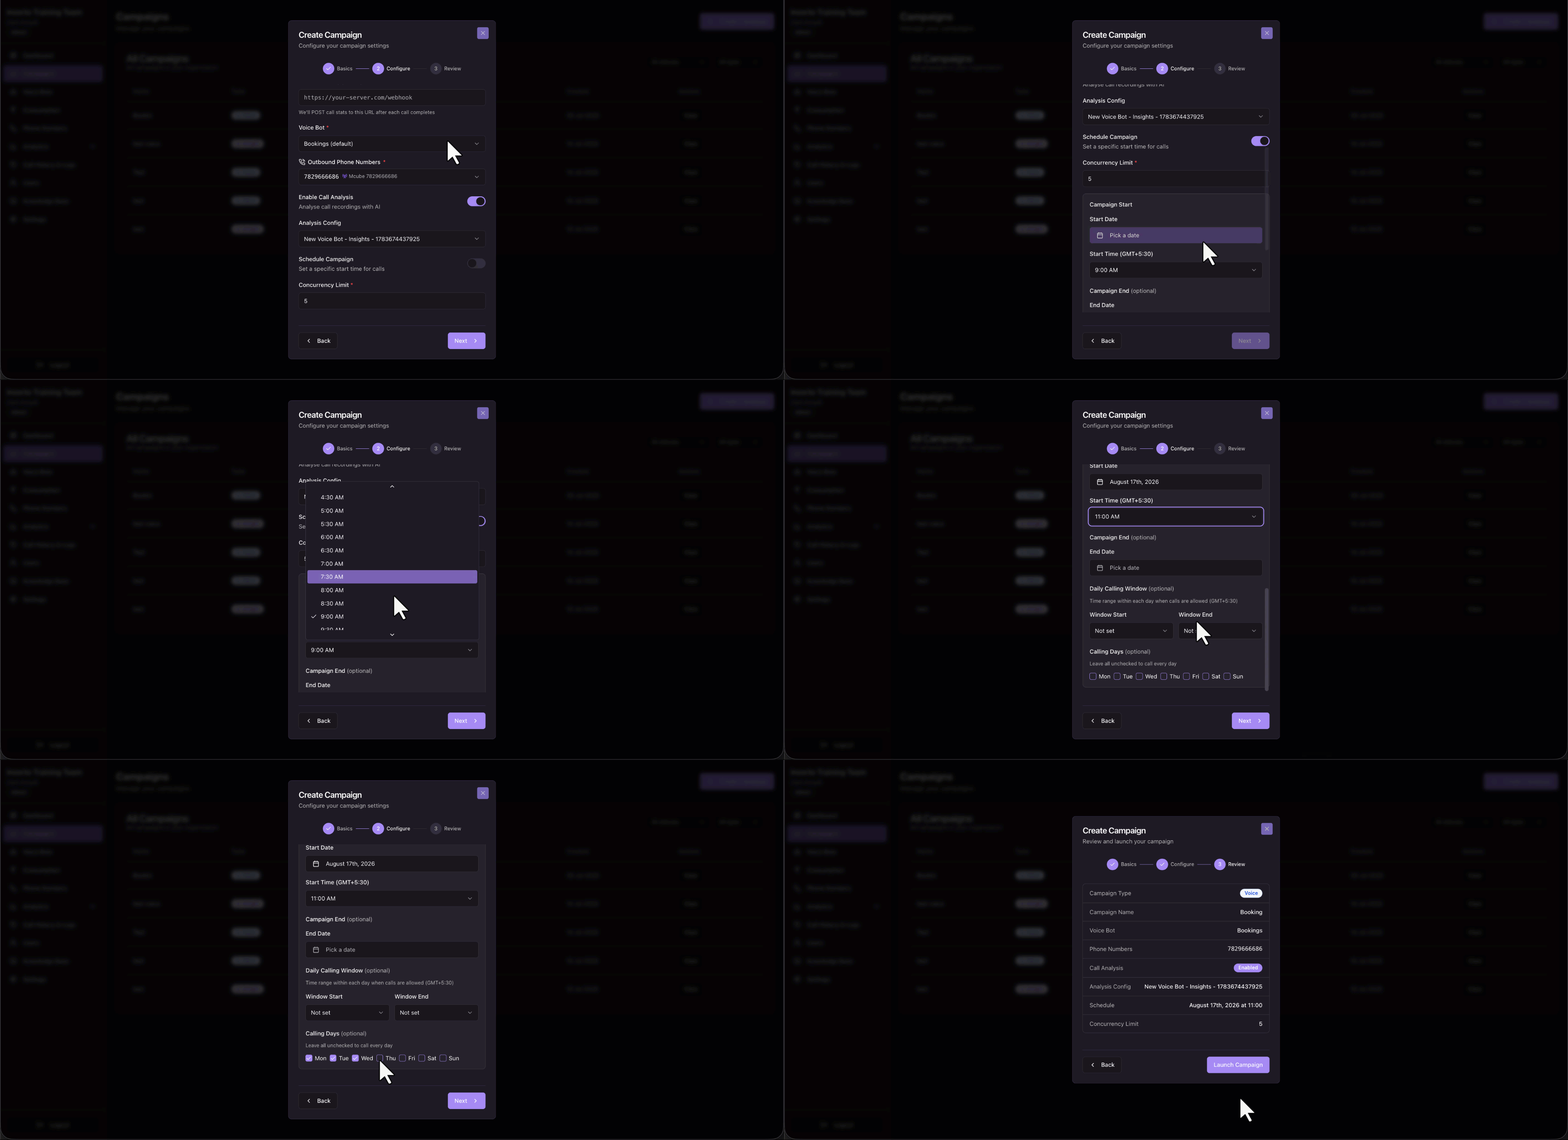
In this step, you select the bot that makes the calls and control how the calls go out.
| Field | What it Does |
| Callback URL | Optional. A URL that receives the call details after each call in this campaign ends. You can also add it later on the campaign page. |
| Voice Bot | The published bot that makes the calls in this campaign. The campaign uses the version of the bot that was published when you configured the campaign. |
| Outbound Phone Number | The number your contacts see on their phone. Your assigned numbers are listed on the Phone Numbers page. |
| Enable Call Analysis | Turns AI analysis on for every call in the campaign. Leave this on so you get a summary, sentiment, outcome, score, and your custom fields for each call. |
| Analysis Config | The bot’s call insights configuration, which decides what Invorto extracts from each call. This is the Insights Config ID shown on the bot’s Details panel. |
| Schedule Campaign | Restricts the campaign to a date range, specific calling days, and a daily calling window. Invorto holds any contacts you upload outside the window and dials them when the window opens. If you leave this off, the campaign dials contacts as soon as you upload them. |
| Concurrency Limit | The number of calls this campaign runs at the same time. Invorto queues the rest and dials them as calls finish. Your organization’s limit is the ceiling for all campaigns running together. |
Once you’re done, click Next.
4.3 Step 3: Review and Launch
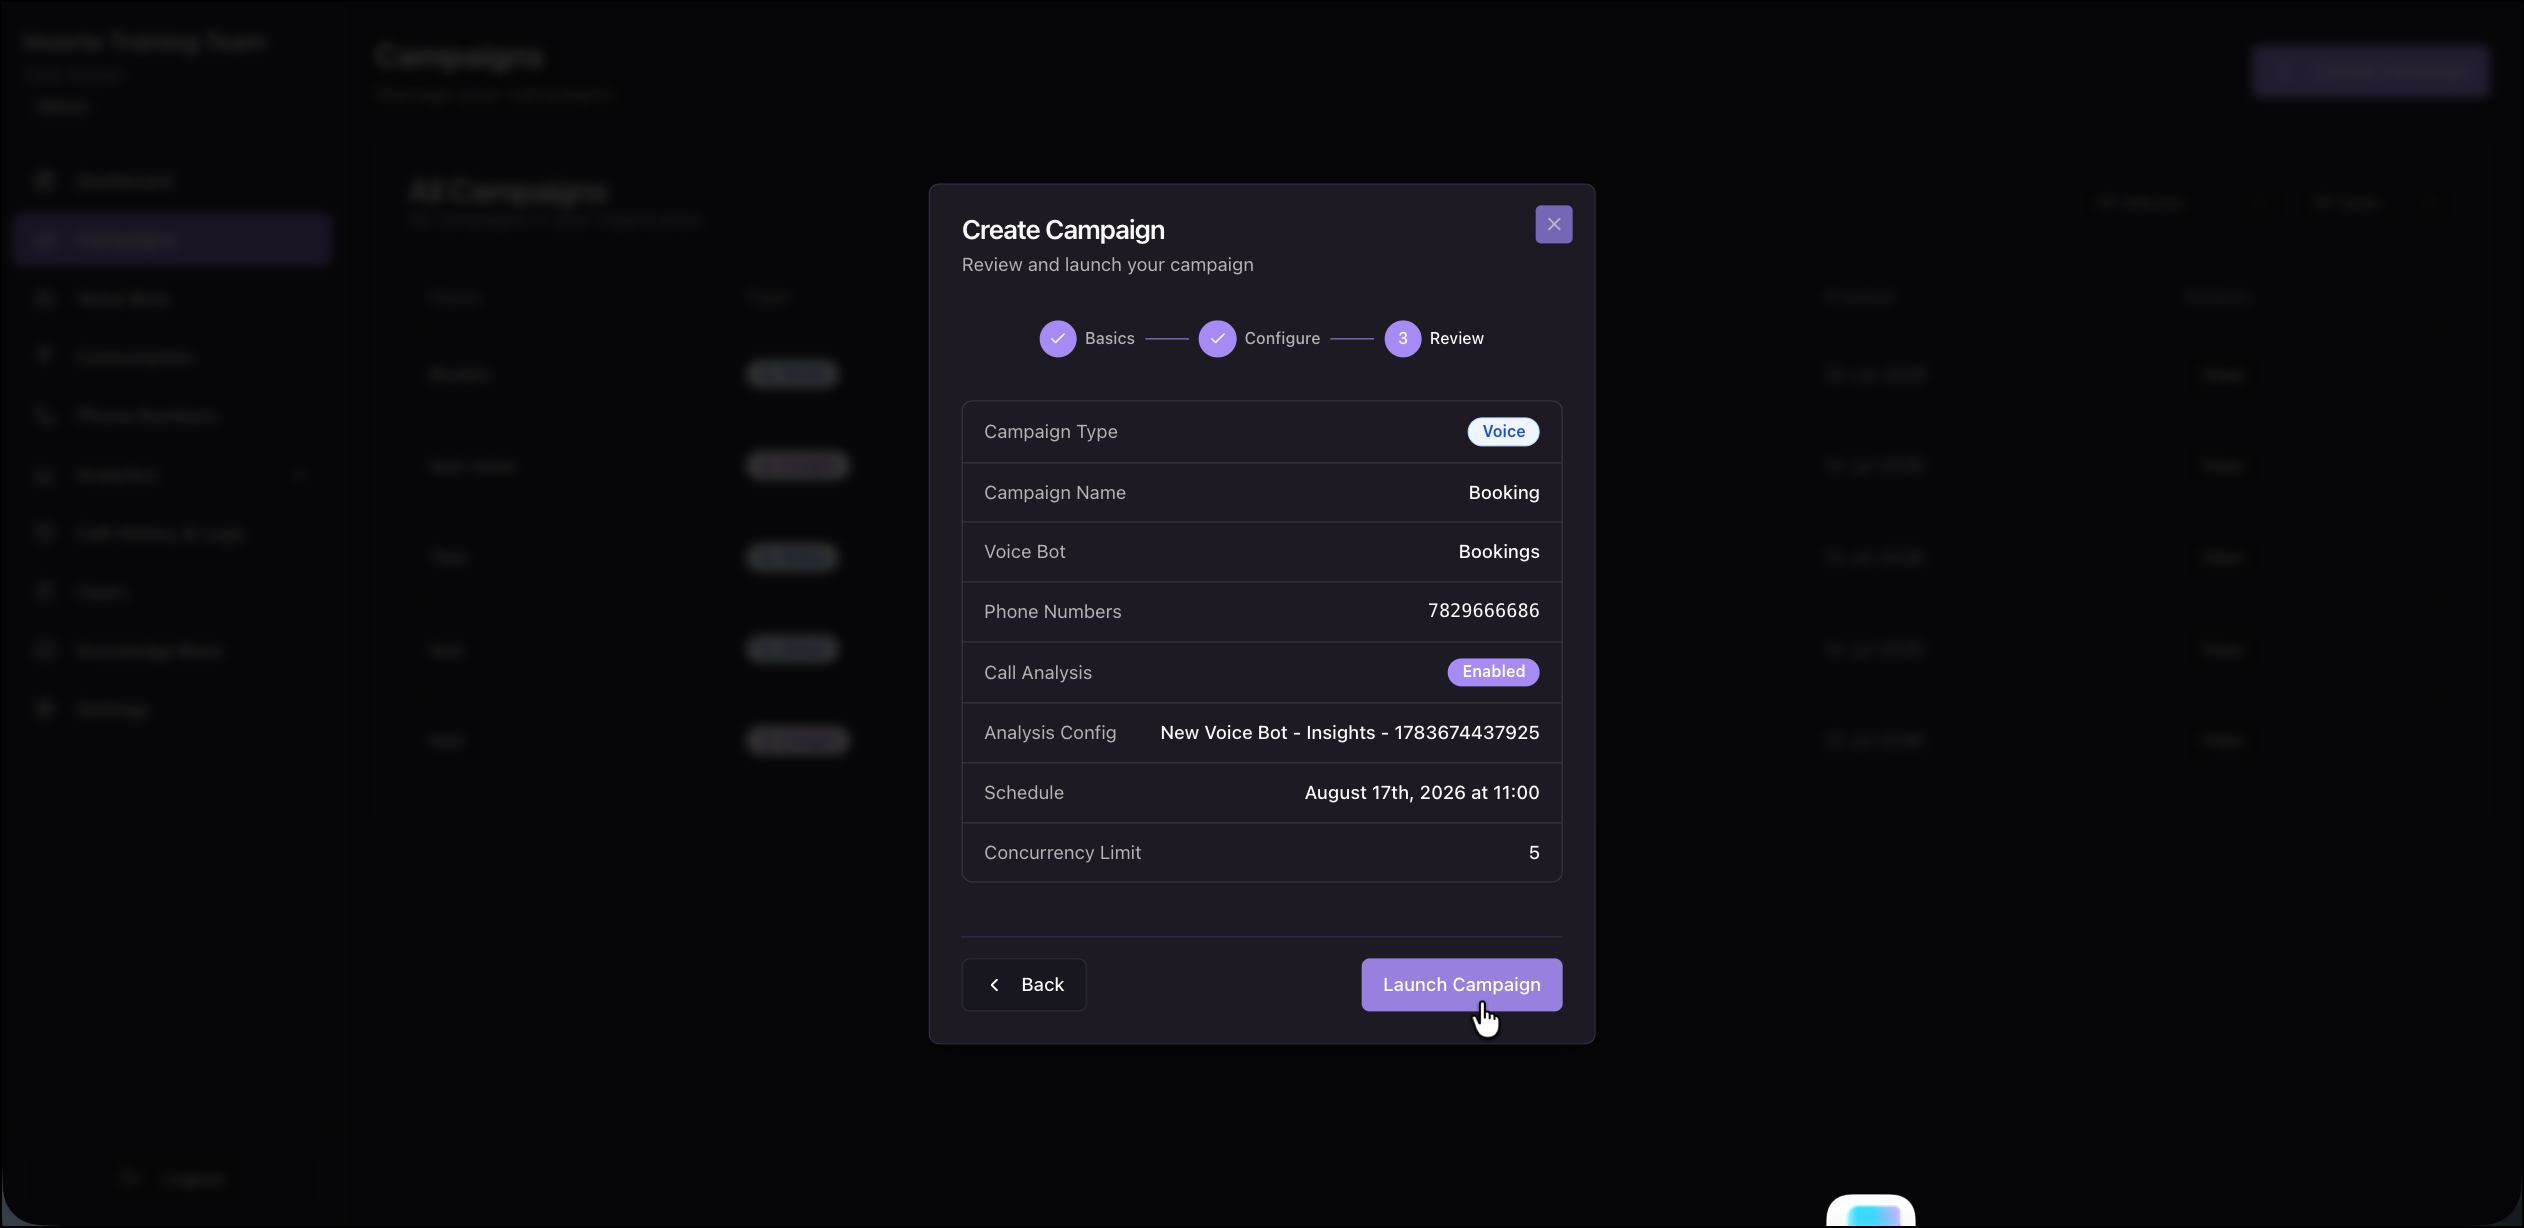
- Review every setting on the summary.
- To correct a setting, click Back.
- Click Launch Campaign.
The campaign opens, and Invorto is ready to dial. The campaign starts calling as soon as you upload contacts, or when the scheduled window opens.
5. Prepare Your Contact List
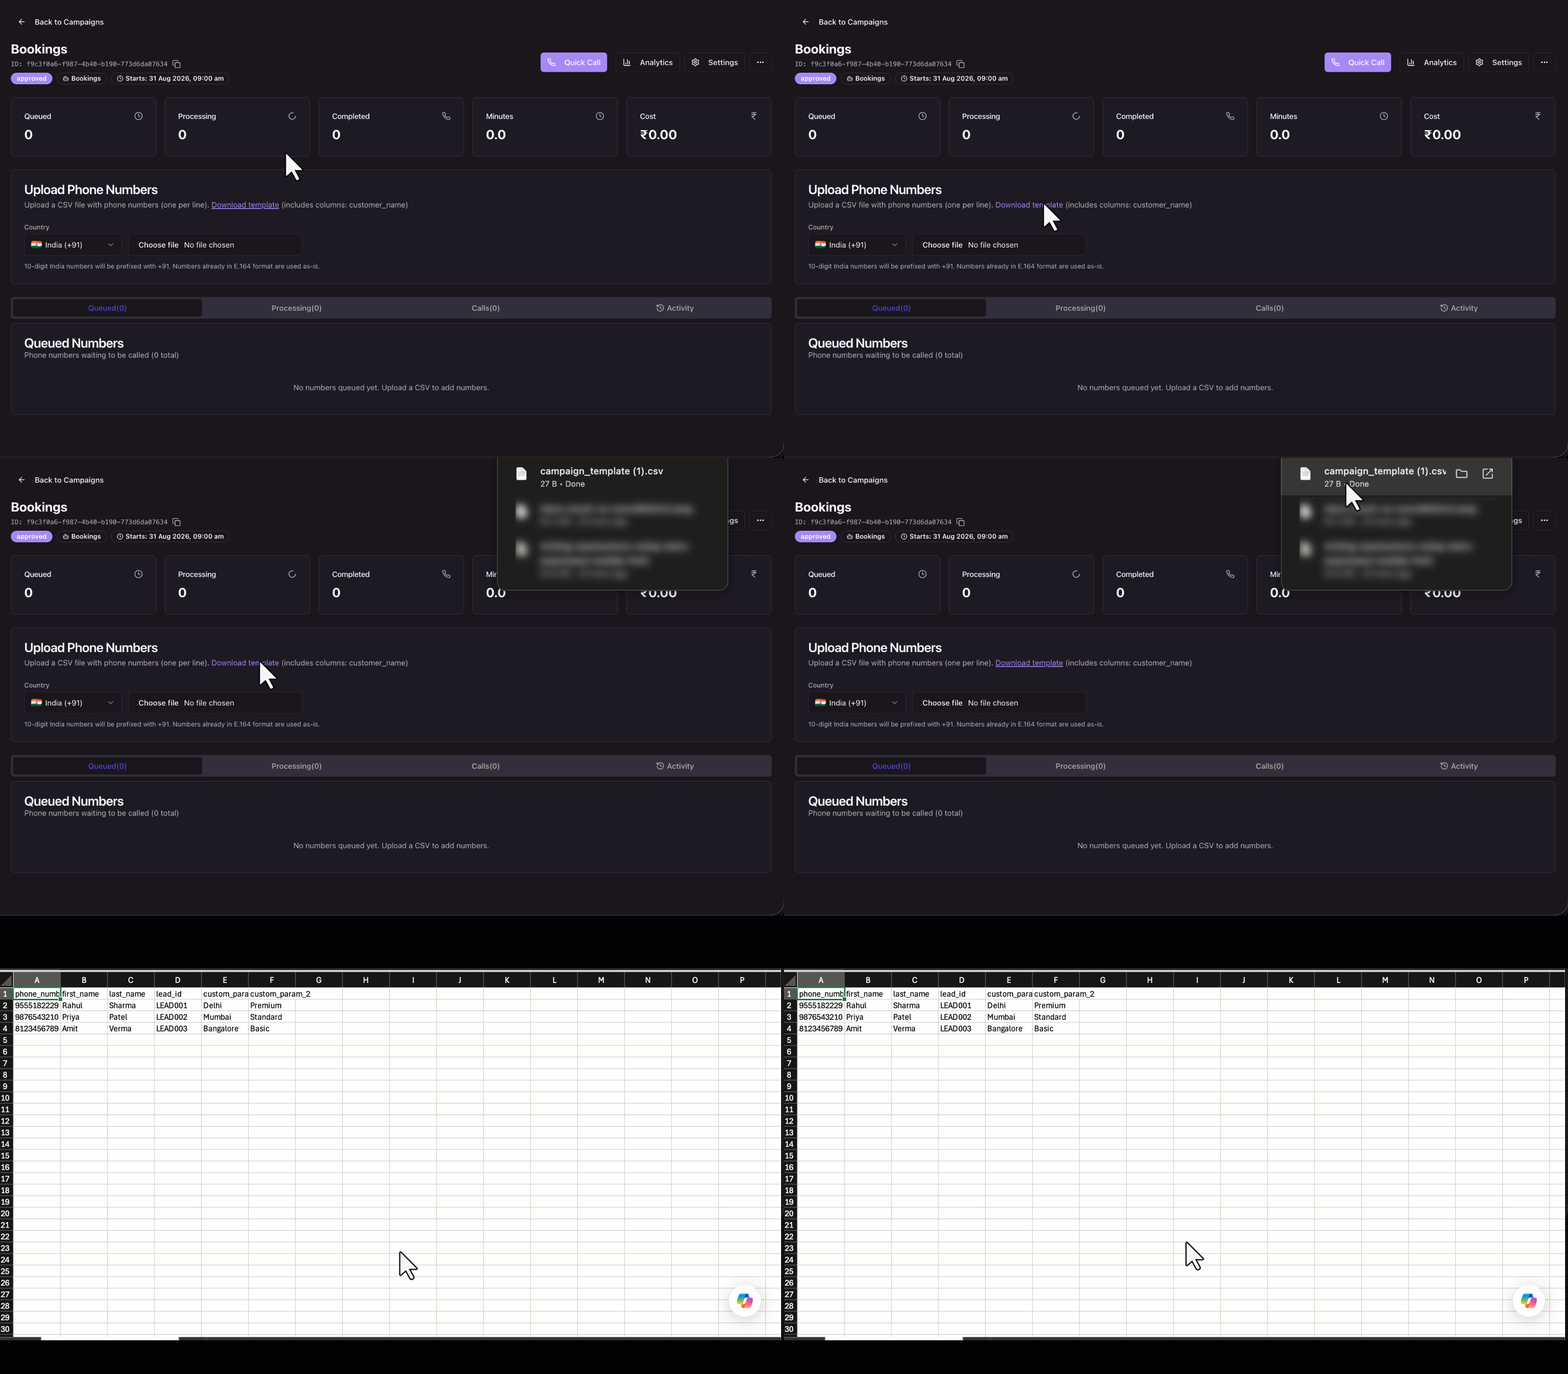
Your contact list is a CSV file with one row per contact. The campaign provides a template with the correct columns.
- On the campaign page, under the Upload Phone Numbers section, click Download Template.
- Open the downloaded file in a spreadsheet application.
- Keep the phone_number column, and add one column for every variable in your bot’s system prompt and greeting message. The column header must match the variable name exactly.
- Enter one contact per row, with a value in every column.
- Delete any blank rows below your data.
- Save the file in CSV format.
For example, a bot whose greeting says “Hi {{first_name}}, this is Riley from Lakeside Health, calling about your {{department}} appointment on {{appointment_date}}” needs a contact list like this –
| phone_number | first_name | last_name | department | appointment_date |
| 4155550142 | Maria | Alvarez | Cardiology | July 24 |
| 3125550178 | Devin | Cole | Radiology | July 25 |
Keep these rules in mind when you build the list –
phone_numberis the only required column. Every other column is a prompt variable.- Column headers are case sensitive.
patient_nameand aPatient_Namecolumn don’t match. - Add a column for every variable the bot uses, even if the value is the same for every contact.
- Extra columns that your prompt doesn’t use are ignored, so you can leave a reference column such as lead_id in the file.
- Save the file as CSV. The uploader doesn’t accept spreadsheet formats such as XLSX.
6. Make a Quick Call
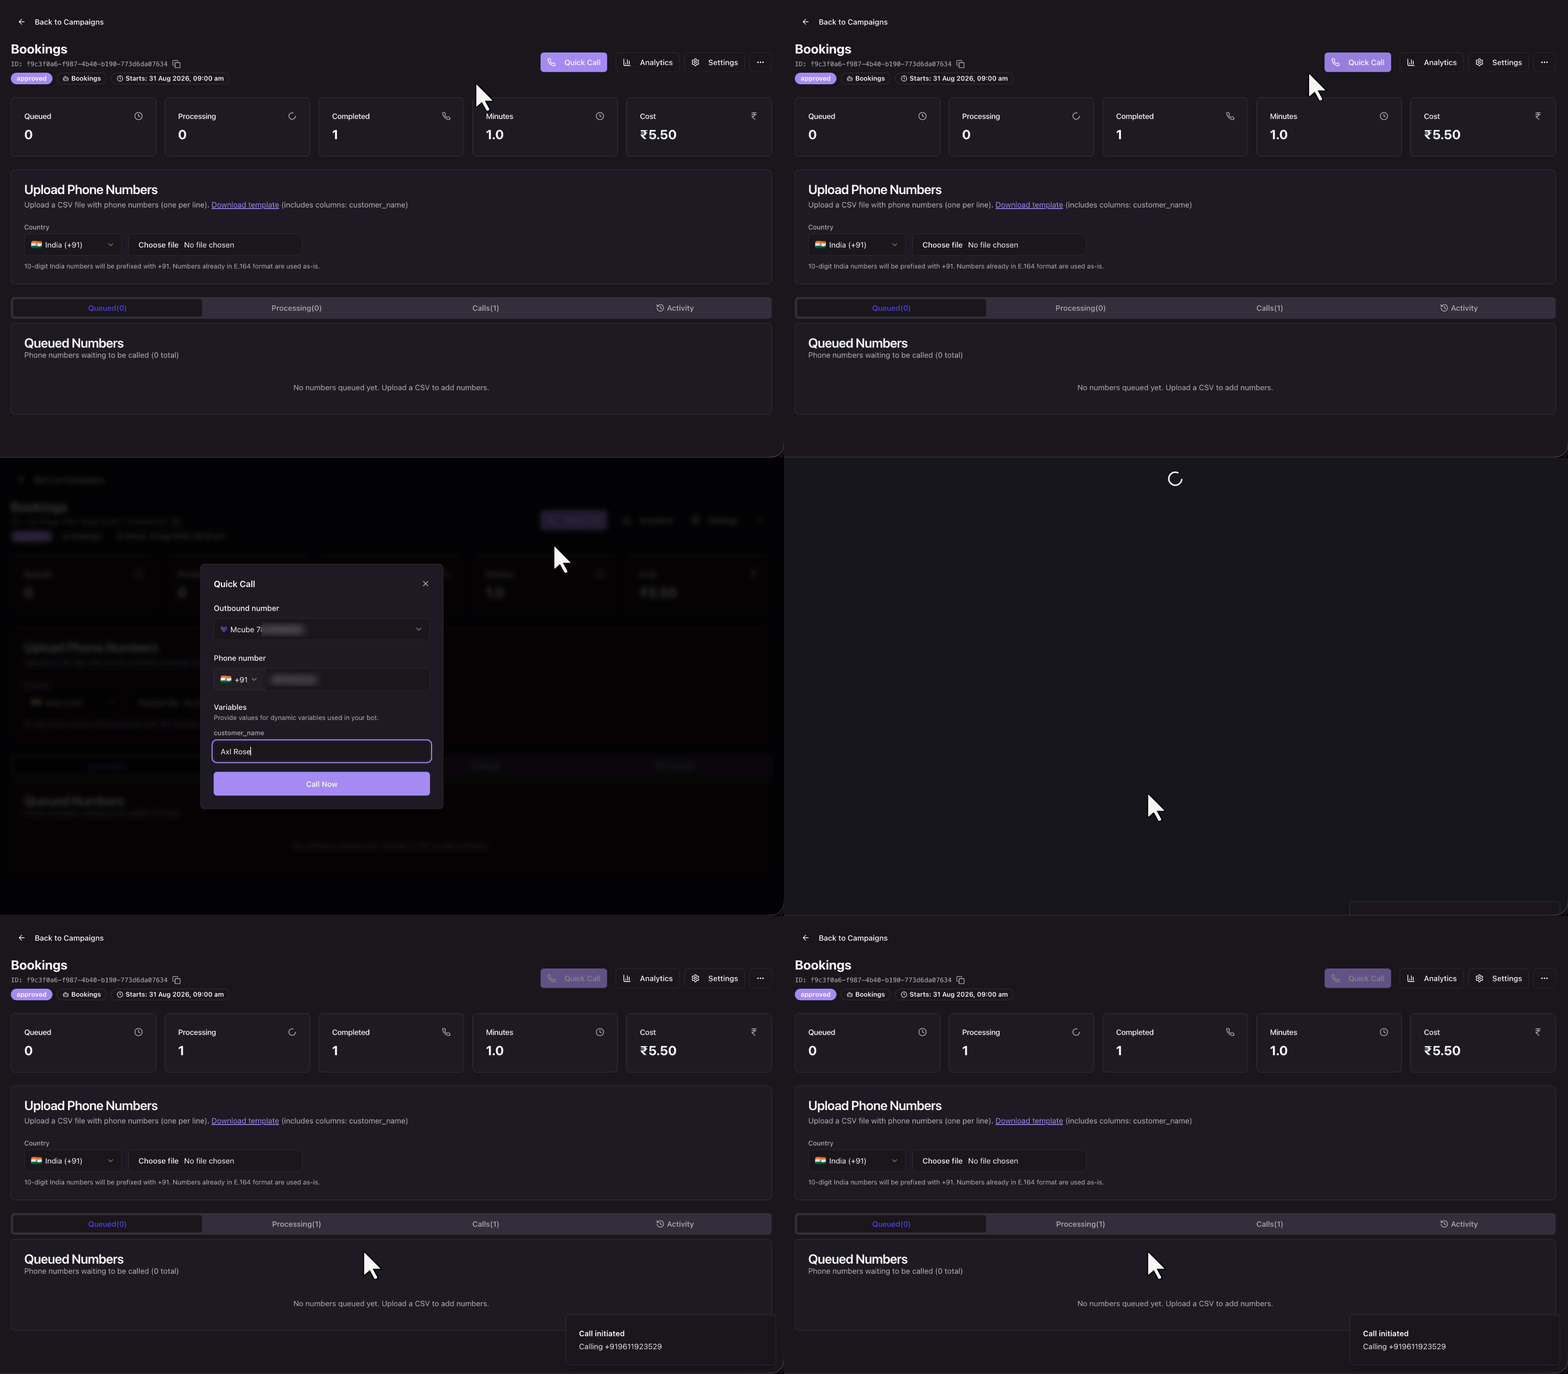
Before you upload a full list, you can call a single number from the campaign to check that everything is wired up correctly.
- On the campaign page, click Quick Call.
- Enter the phone number to call.
- Enter a value for each variable the bot uses.
- Start the call.
The call uses this campaign’s bot and outbound number, and it’s analyzed and reported like any other call in the campaign.
7. Upload Contacts and Start Calling
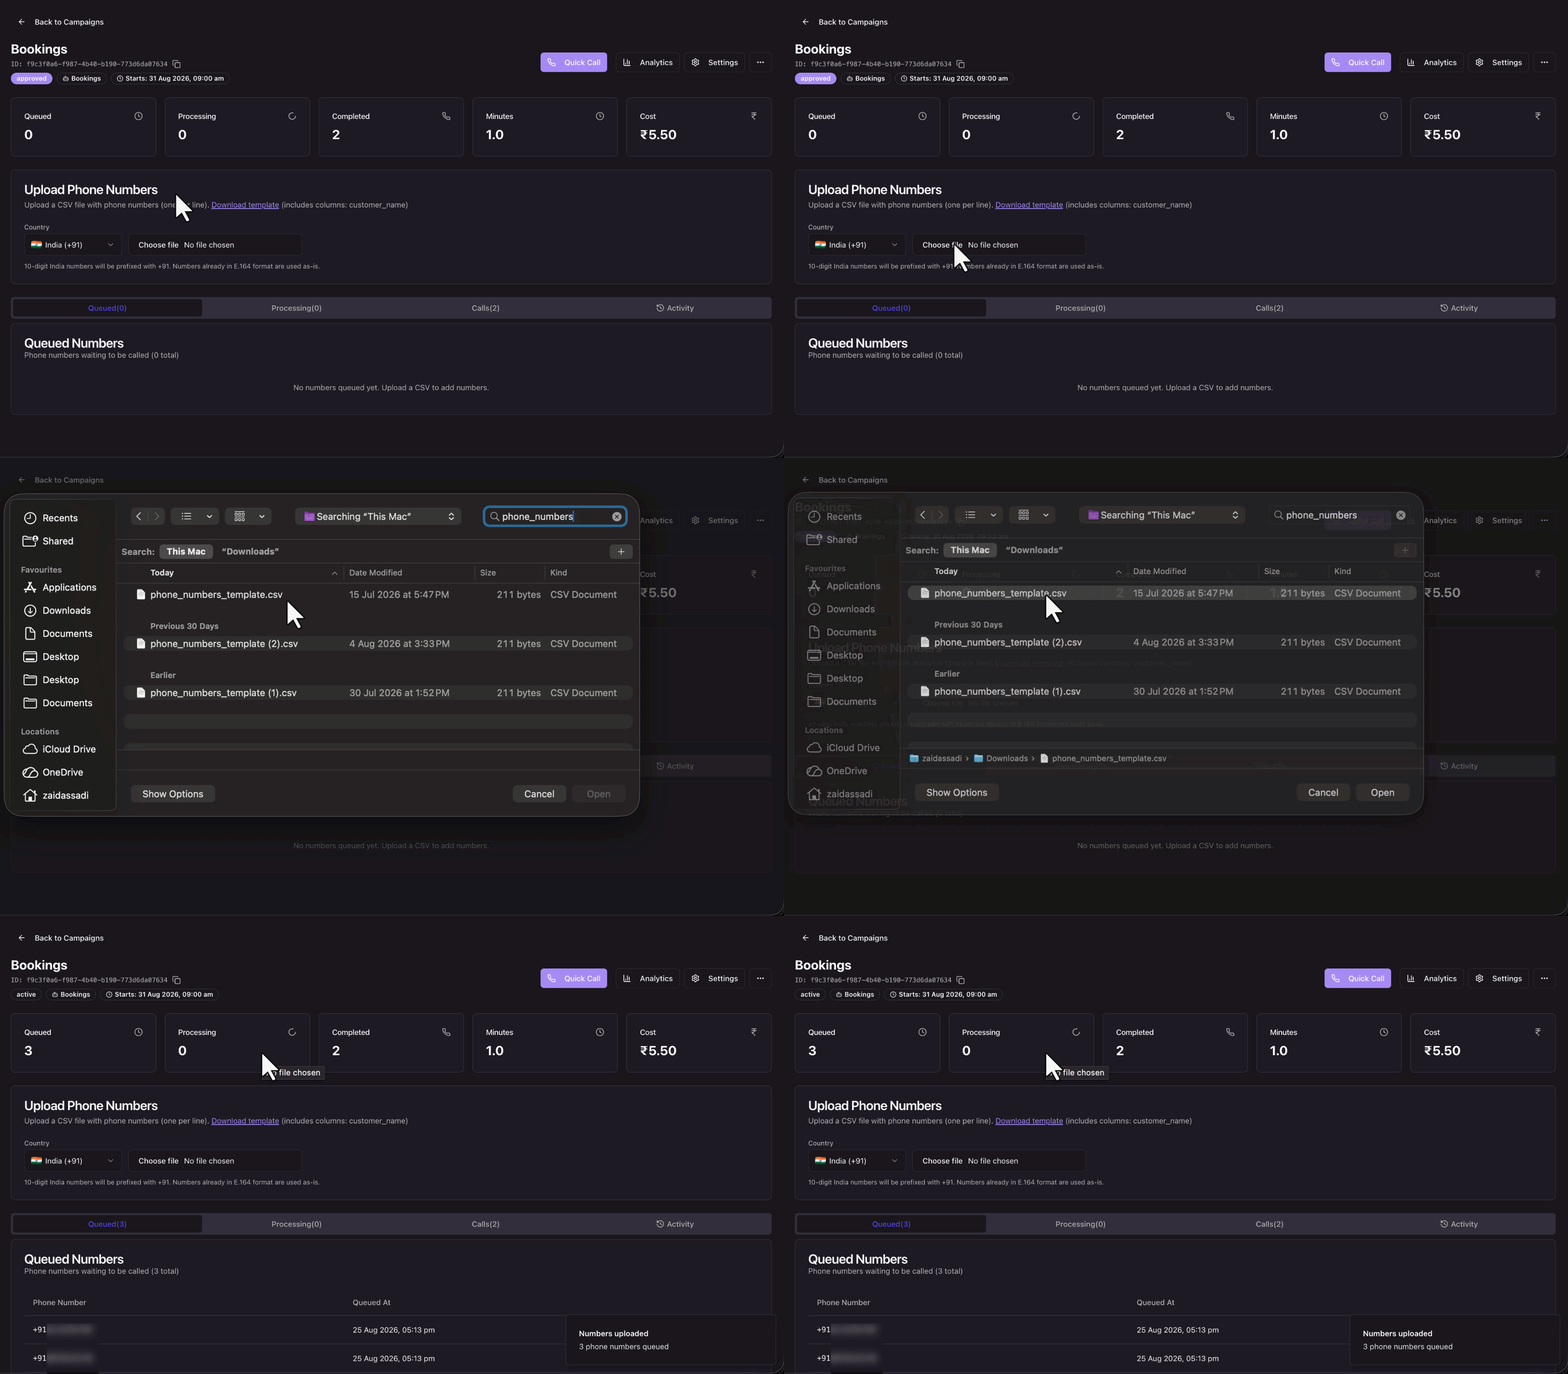
- On the campaign page, go to the Upload Phone Numbers
- Select the Country your contact numbers belong to.
- Click Choose File and select your saved CSV file.
- Confirm the upload.
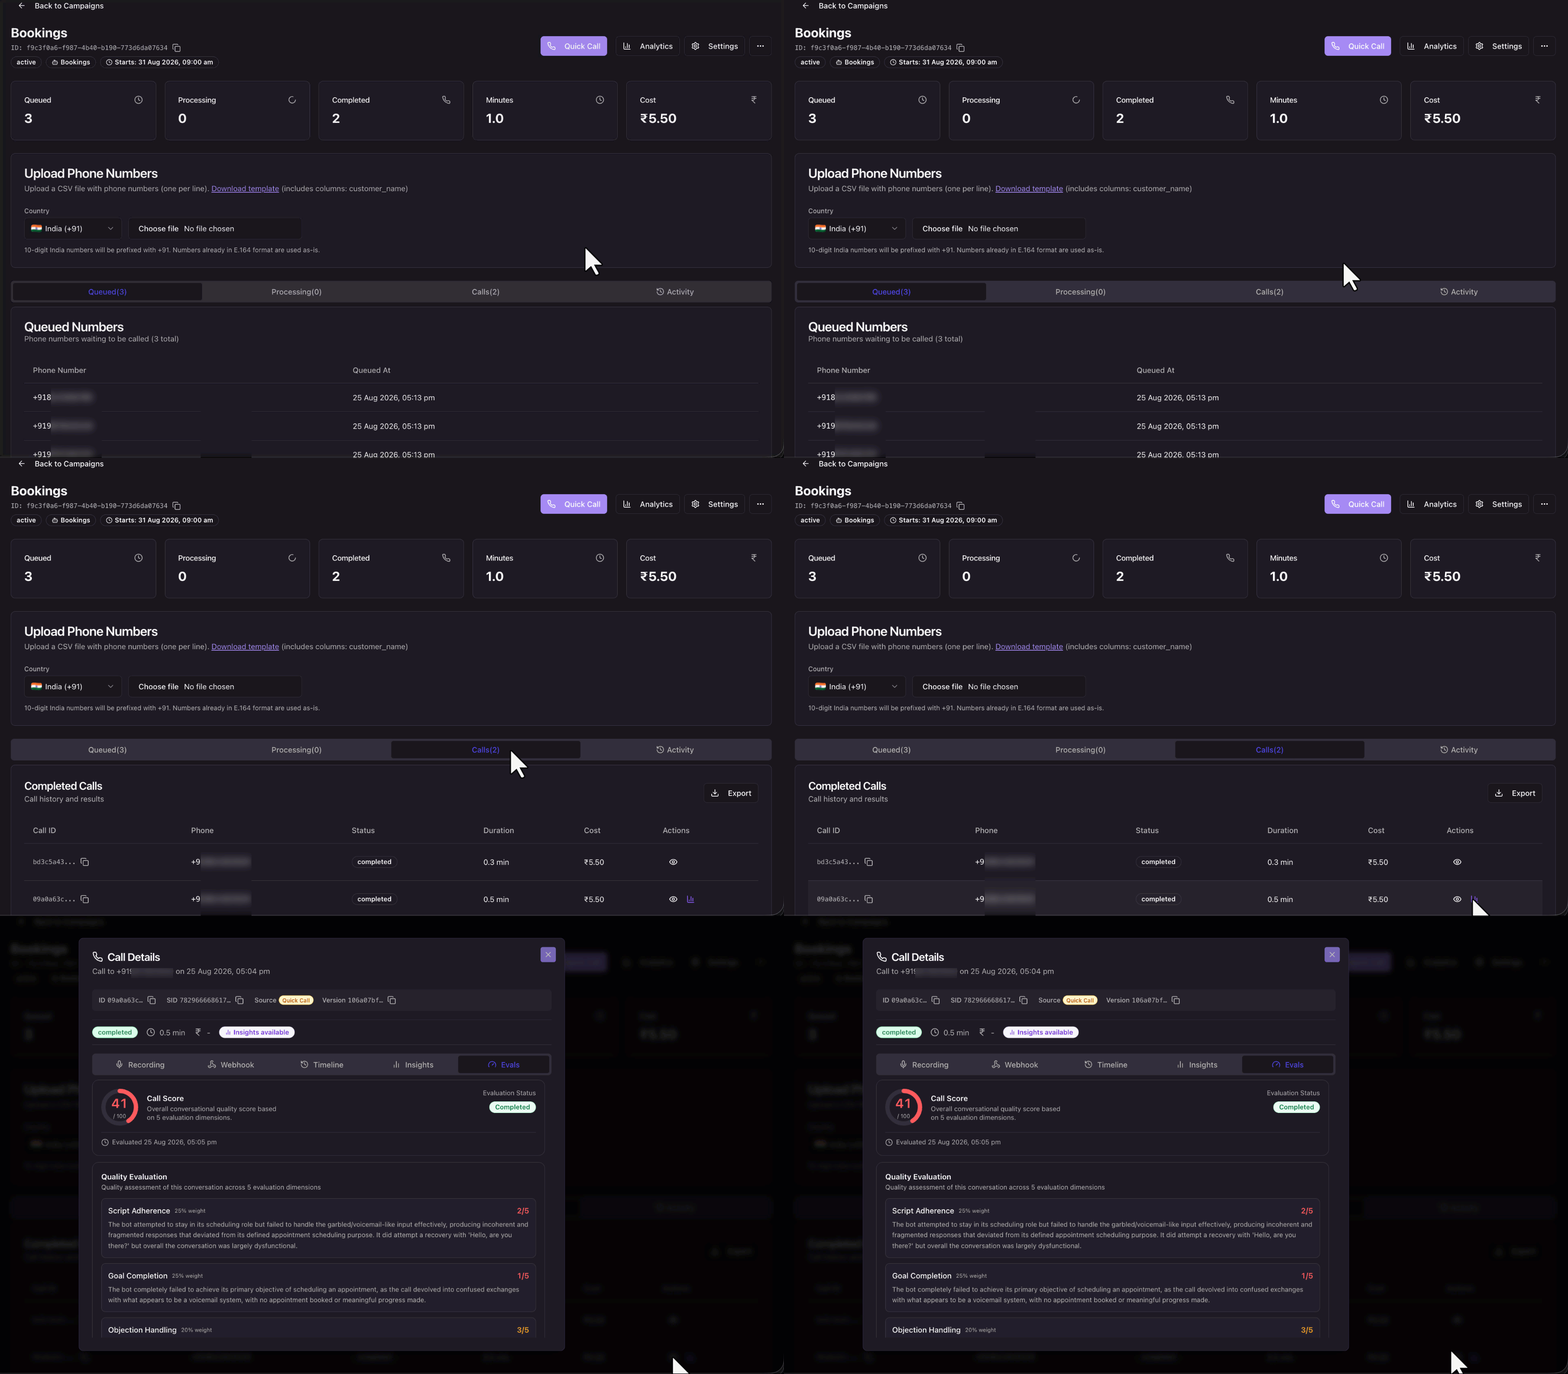
Invorto confirms how many numbers were queued. The Queued tile increases, and each number appears in the Queued Numbers list with the time it was queued. Calls begin as soon as the campaign’s calling window is open and a concurrency slot is free.
You can upload more than one file to the same campaign. Each upload adds its numbers to the existing queue.
8. Monitor the Campaign
The campaign page header shows the campaign’s name, its status, and its ID with a copy icon. Copy the ID when you want to attribute calls made through the API to this campaign.
8.1 Campaign Tiles
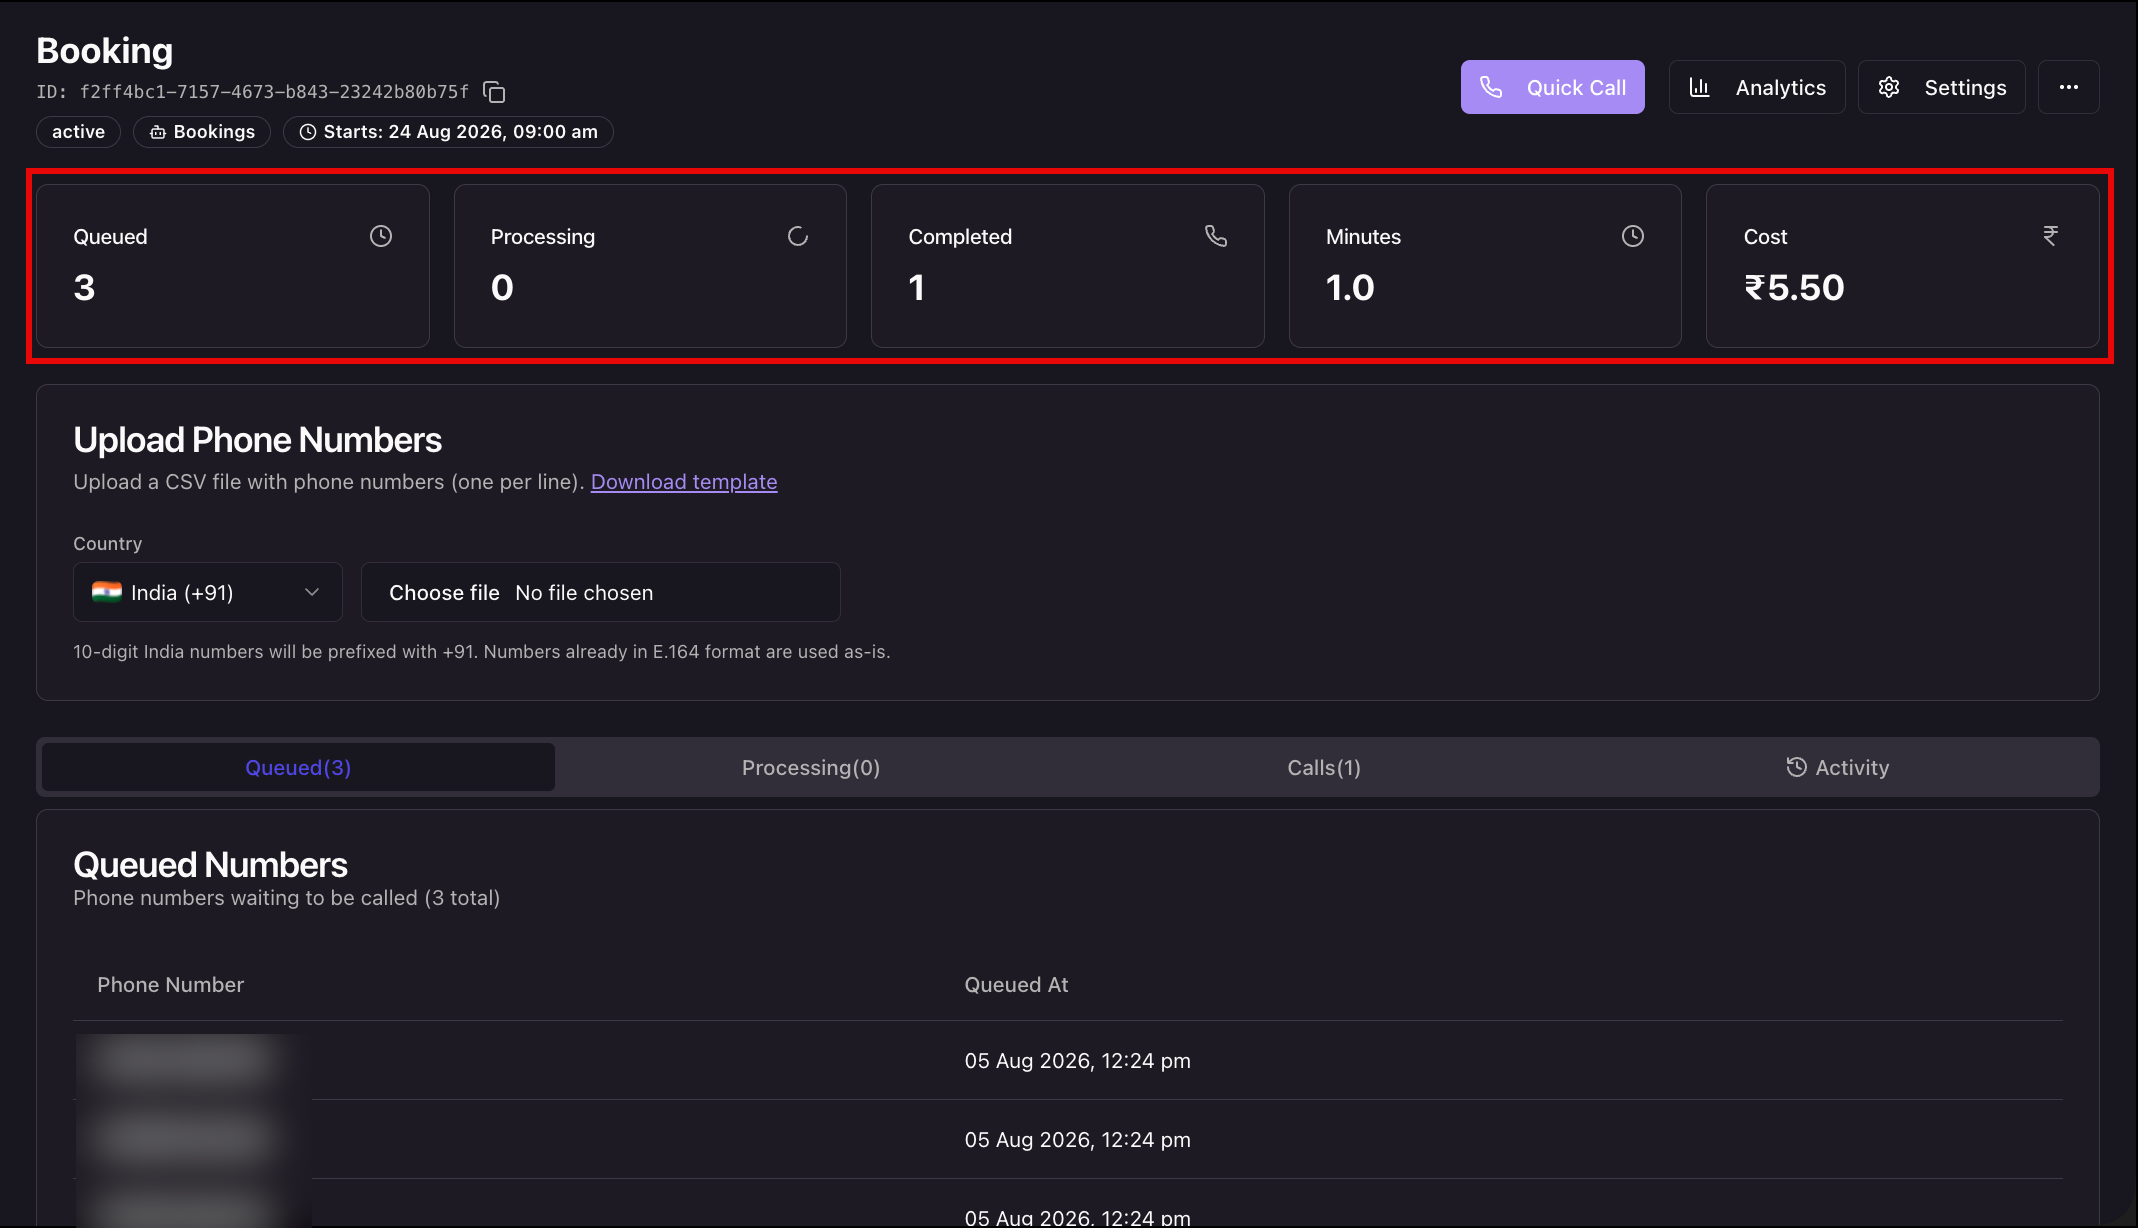
The tiles at the top of the campaign page update as the campaign runs.
| Tile | What it Shows |
| Queued | Contacts waiting to be dialed. |
| Processing | Calls that are connected right now. |
| Completed | Calls that have ended. |
| Minutes | The minutes this campaign has consumed so far. |
| Cost | The consumption this campaign has generated so far. |
8.2 Call Lists
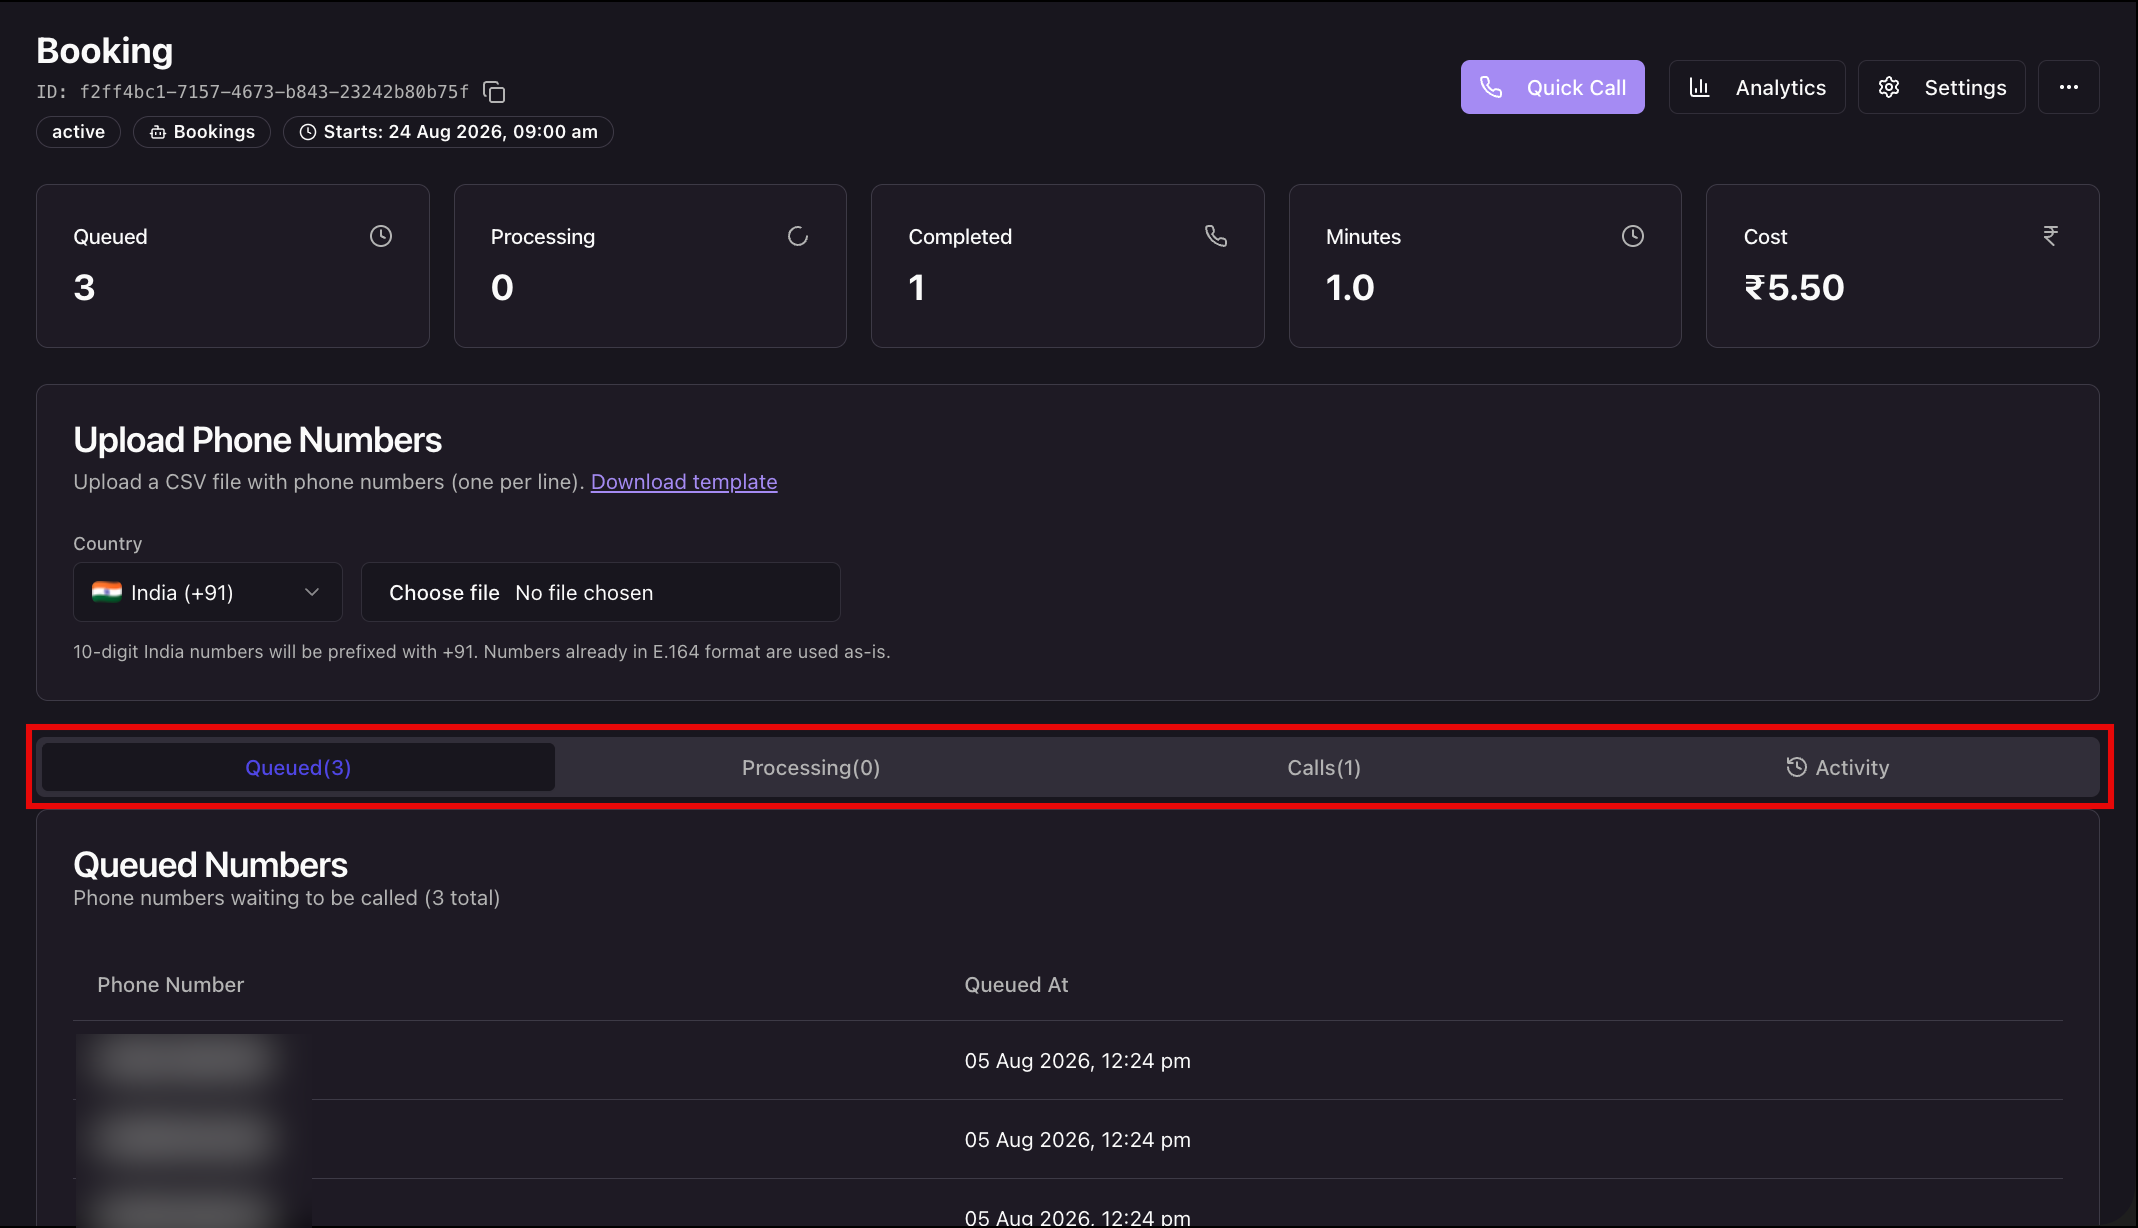
The tabs below the upload section list the contacts in the campaign at each stage.
| Tab | What it Shows |
| Queued | Phone numbers waiting to be called, with a total count. |
| Processing | The calls that are connected right now. |
| Calls | Every call the campaign has completed. |
| Activity | The campaign’s activity log, such as uploads and status changes. |
8.3 Call Details and Insights
Open a completed call from the Calls tab to review –
- The call status and duration
- The call recording
- The full transcript of the conversation
- The insights Invorto generated: the summary, sentiment, call score, call outcome, key highlights, actionable insights, and any custom fields configured on the bot
Use these calls to improve the bot. If contacts repeatedly misunderstand a question, or the bot answers something the wrong way, edit the bot’s system prompt, publish it again, and run your next campaign with the improved version.
8.4 Campaign Analytics
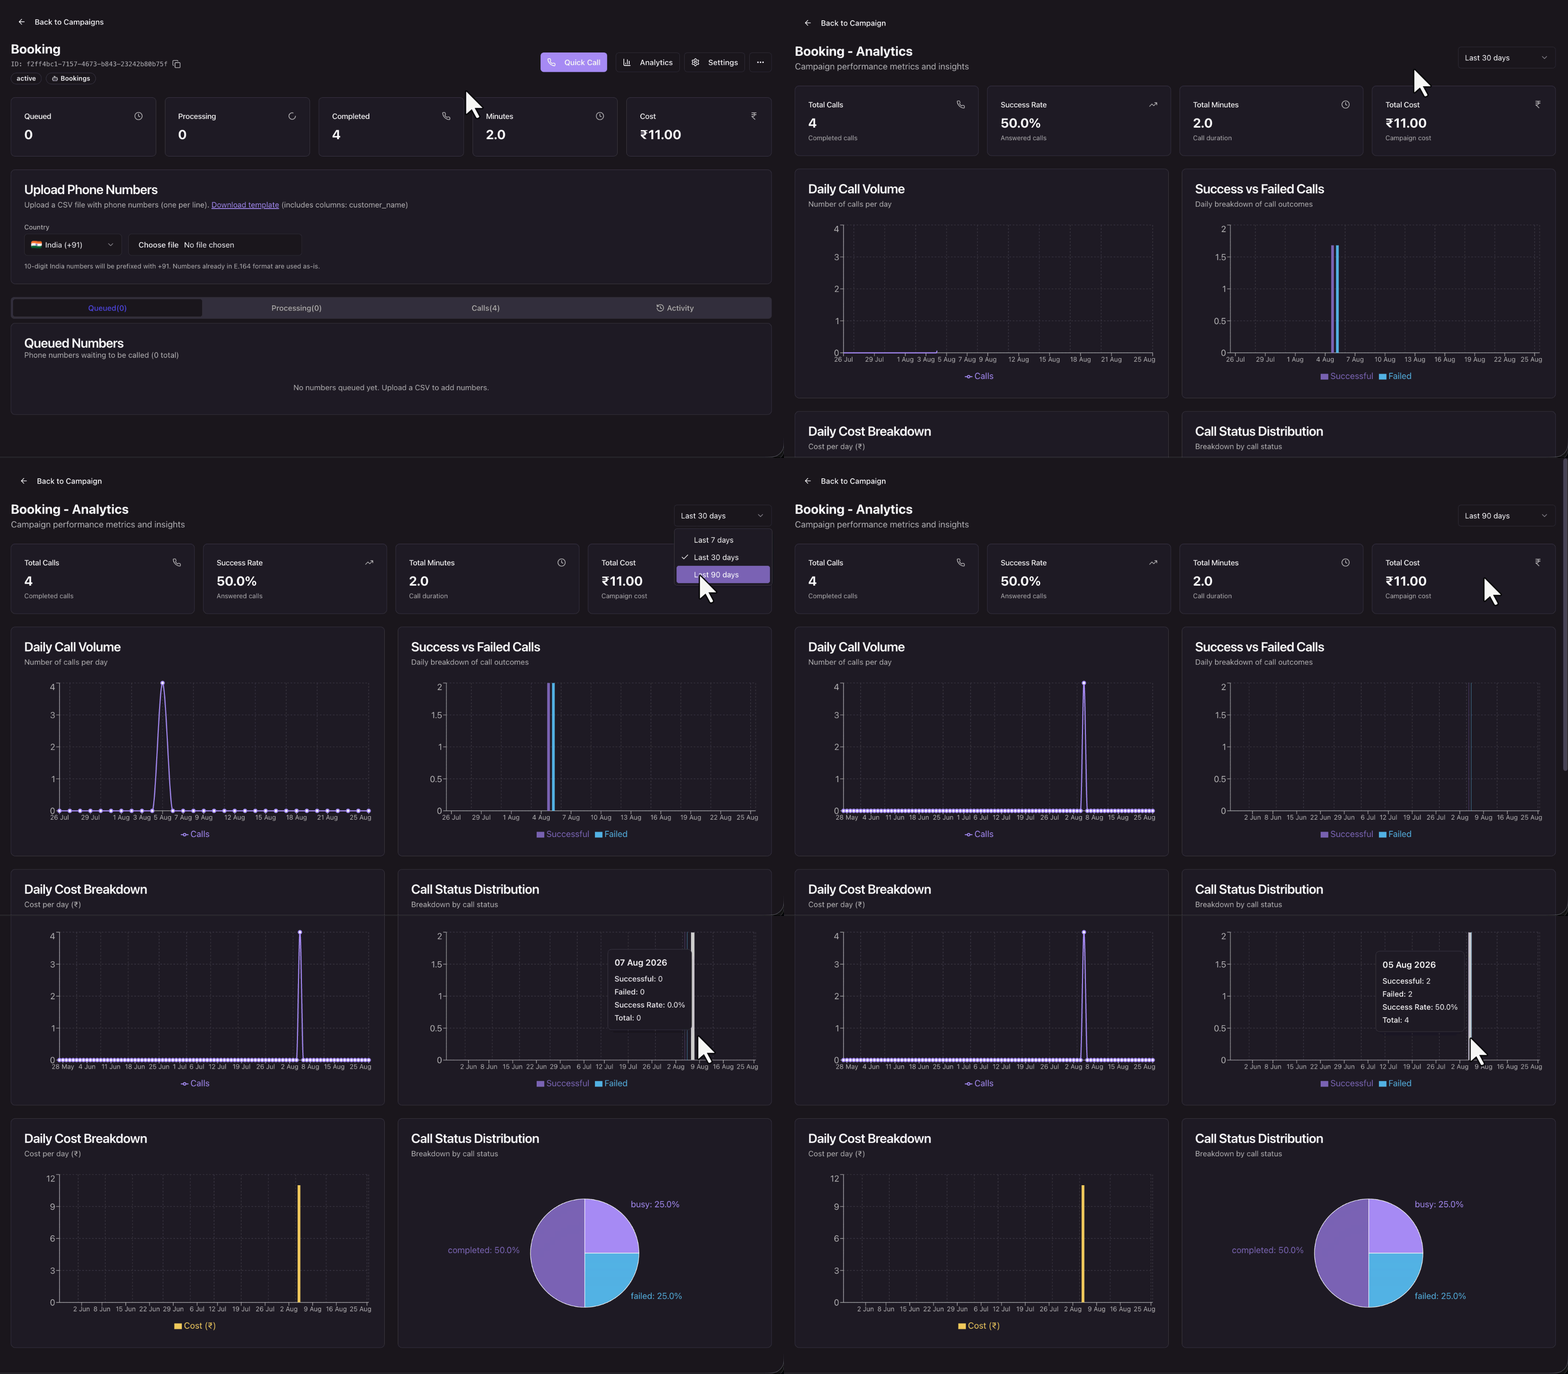
To see how the campaign performed overall, click Analytics in the campaign page header. This page reports on this campaign only. Use the date range dropdown to switch between Last 7 days, Last 30 days, and Last 90 days, and click Back to Campaign to return.
| Metric | What it Shows |
| Total Calls | The number of completed calls in the selected date range. |
| Success Rate | The share of the campaign’s calls that were answered. |
| Total Minutes | The total call duration for the campaign. |
| Total Cost | The consumption this campaign has generated. |
The charts below the tiles break the same data down over time –
| Chart | What it Shows |
| Daily Call Volume | The number of calls the campaign placed each day. |
| Success vs Failed Calls | A daily comparison of successful and failed calls. |
| Daily Cost Breakdown | The consumption for each day. |
| Call Status Distribution | The share of calls by final status, for example completed, busy, or failed. |
9. Manage Your Campaigns
9.1 Campaign Actions
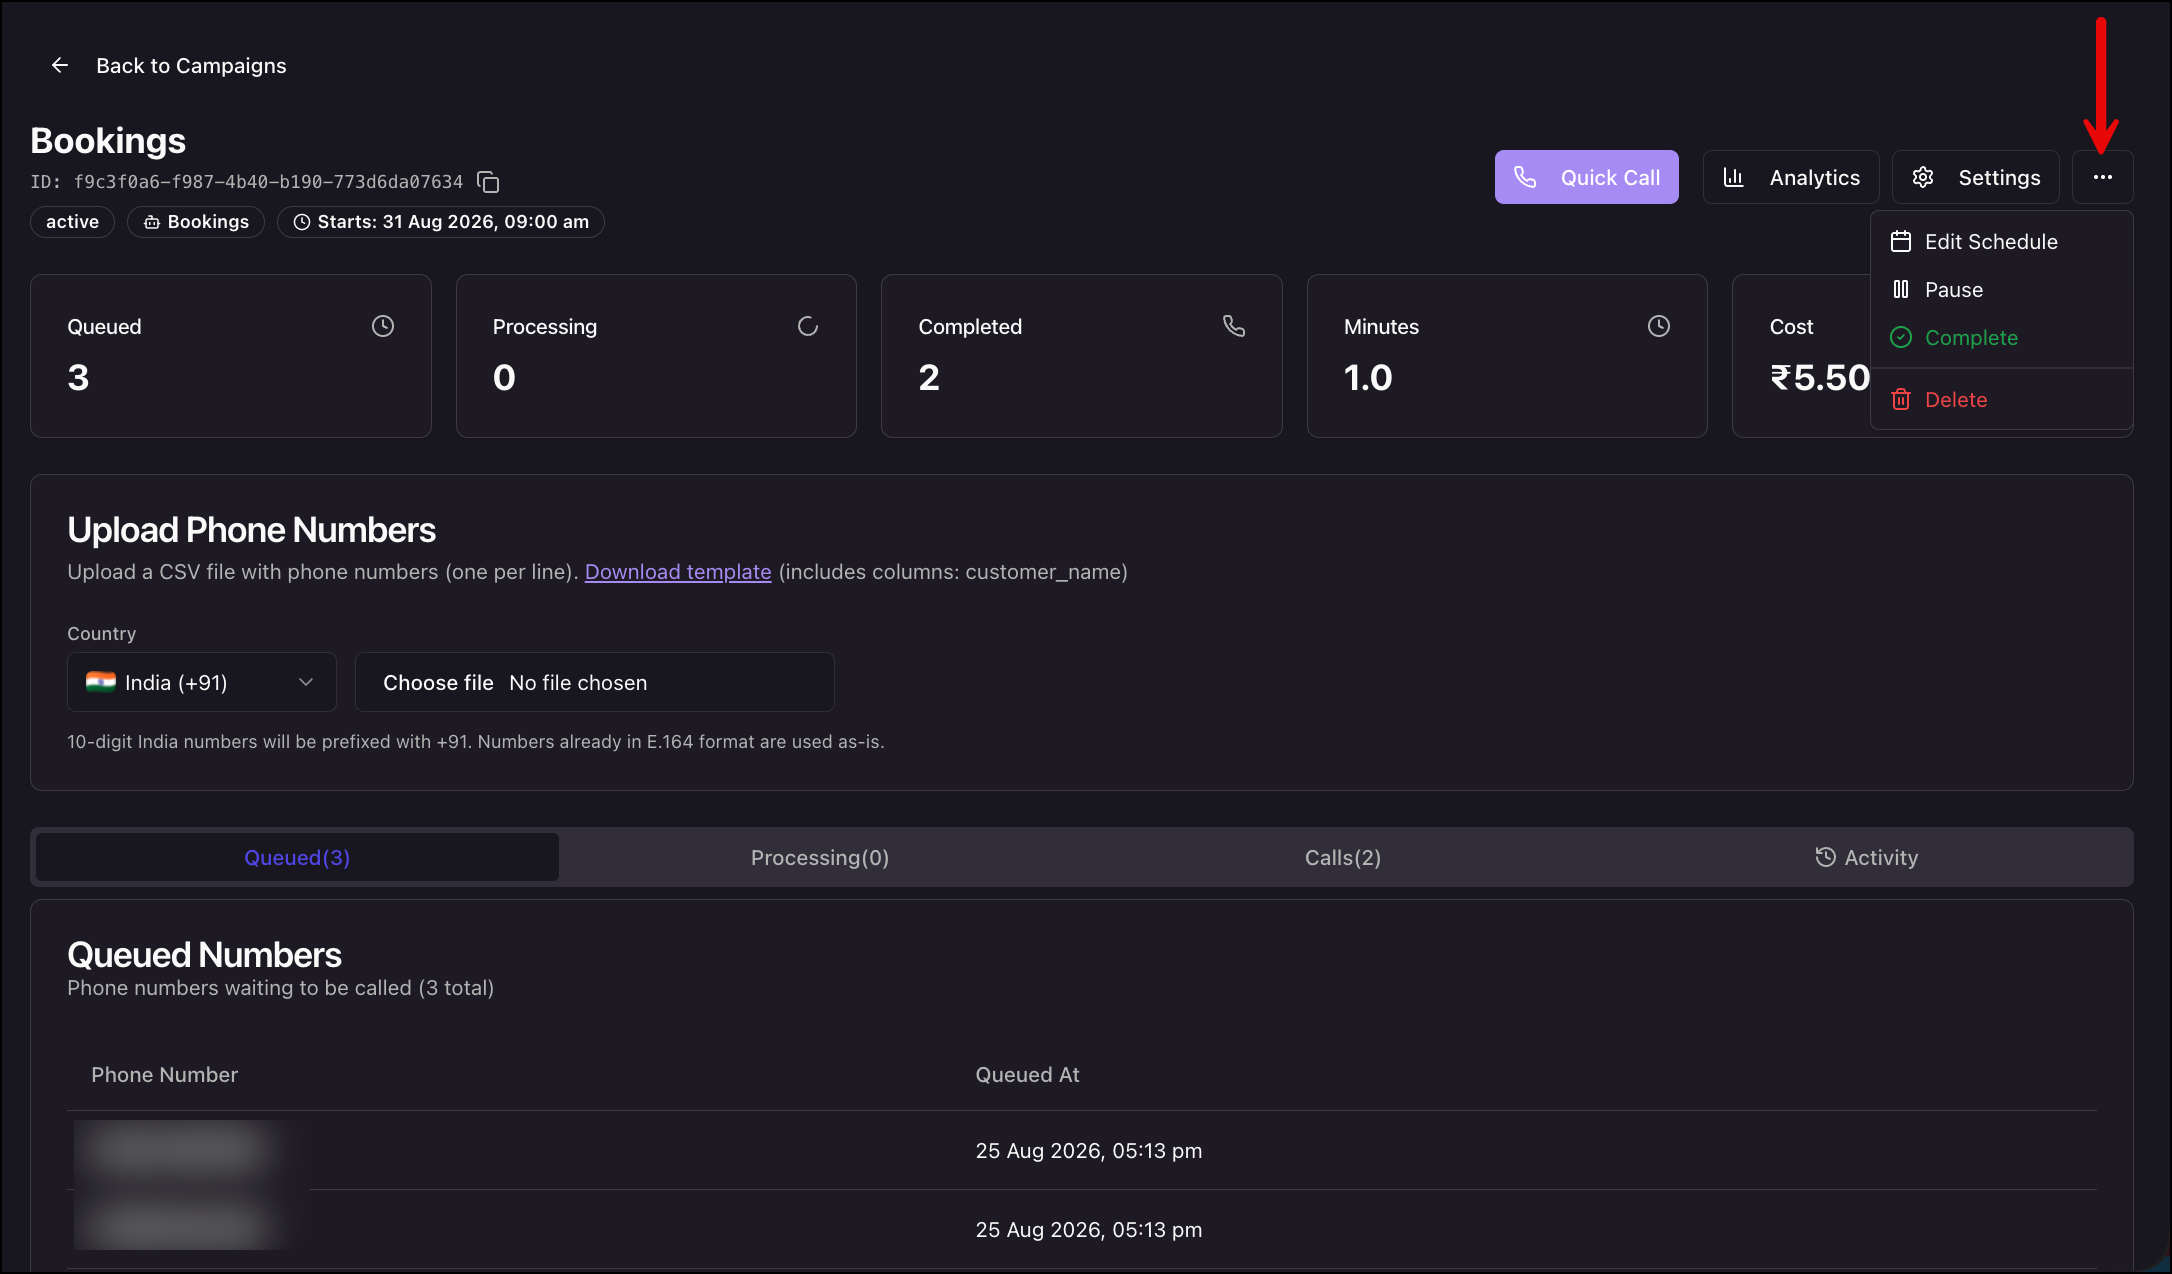
The campaign page header has an options menu (the three dots) with the actions you need after the campaign is running.
| Action | What it Does |
| Edit Schedule | Changes the campaign’s dates, calling days, and daily calling window after it’s launched. Use this to extend a campaign, or to stop it from calling outside business hours. |
| Pause | Stops the campaign from dialing. Contacts already in the queue stay queued, and calls that are connected finish normally. Use the same menu to start the campaign again. |
| Complete | Closes the campaign. Invorto stops dialing, and the campaign moves to Completed. Its calls, recordings, insights, and analytics stay available. |
| Delete | Removes the campaign and its data from your organization. |
Note:
- Complete a campaign you’ve finished with instead of deleting it. Completing preserves the campaign’s calls and reports. Deleting removes them.
- To stop a campaign temporarily, for example while you correct your contact list, use Pause rather than Complete. A completed campaign doesn’t dial again.
9.2 Campaign Settings
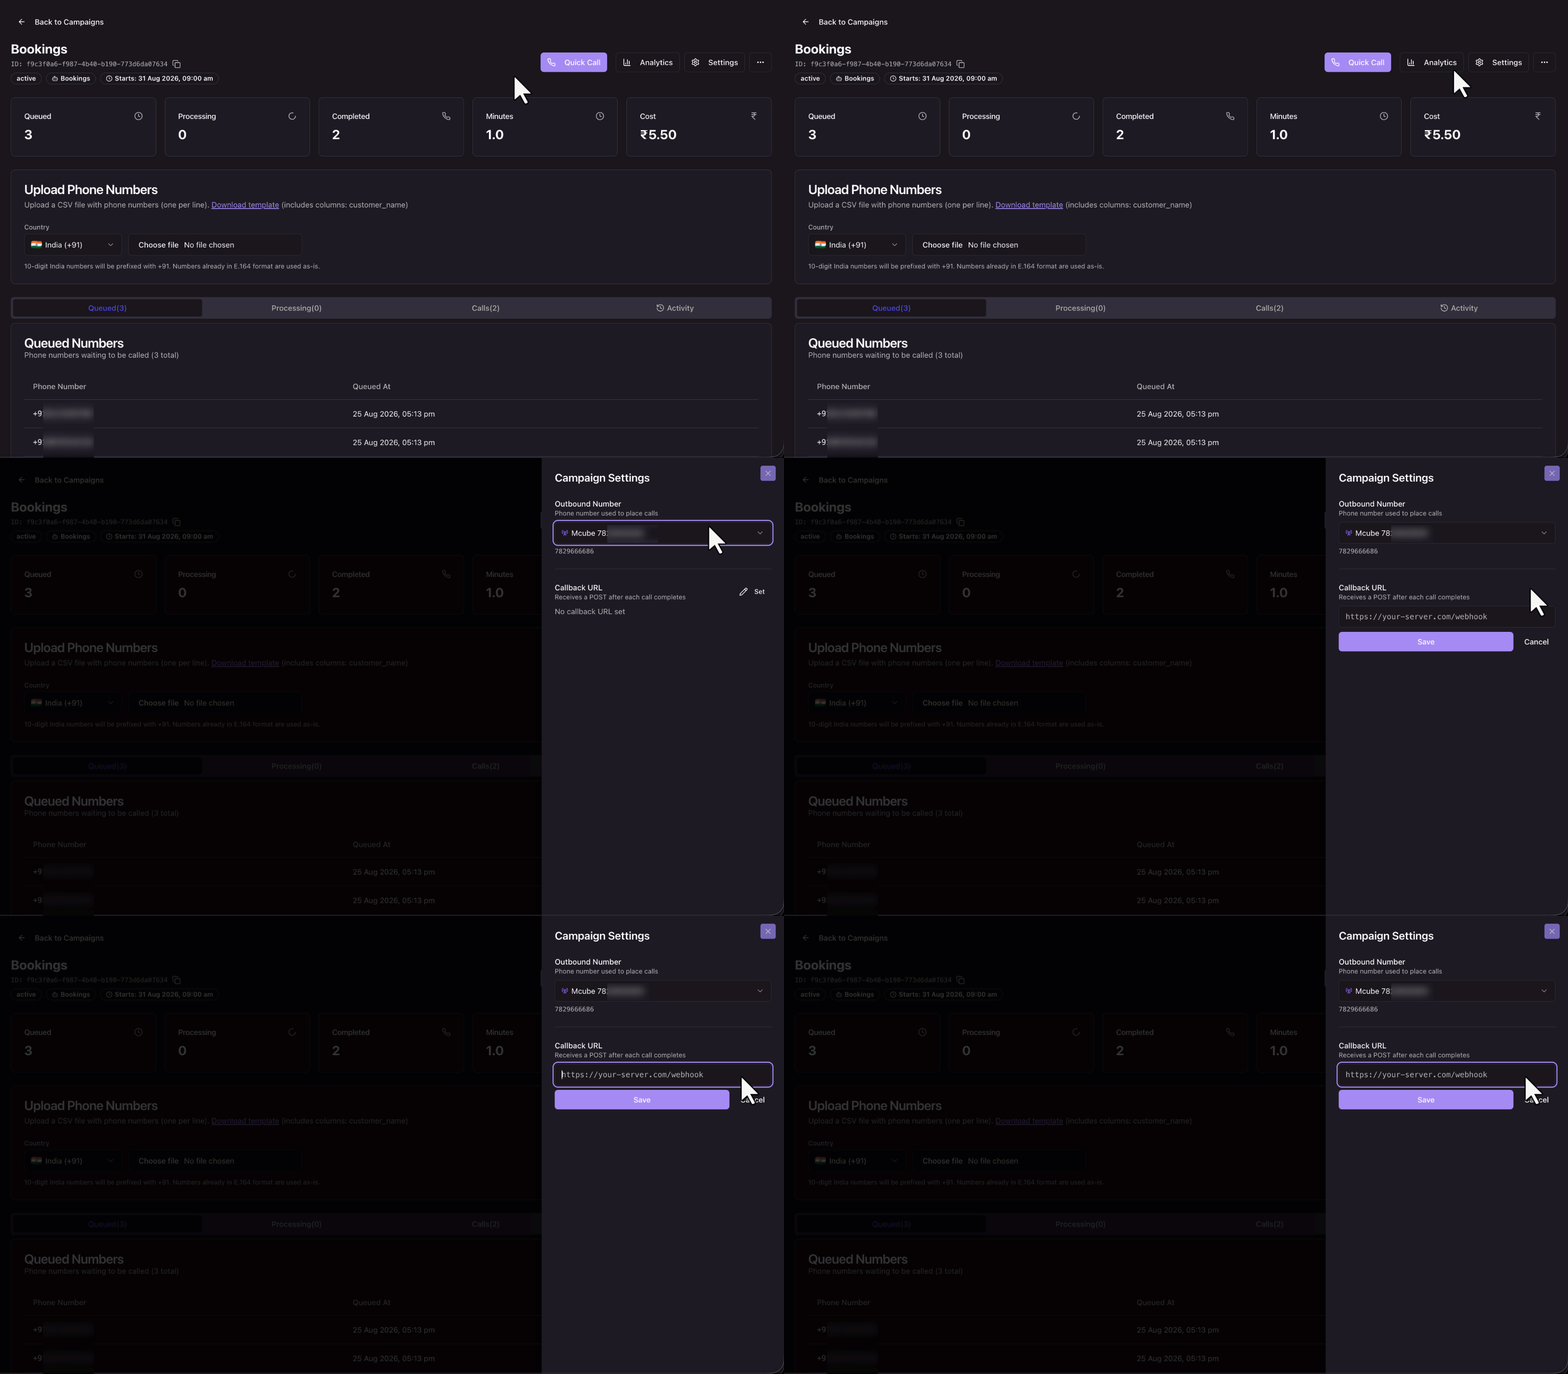
Click Settings in the campaign page header to review the campaign’s outbound number and the callback URL that receives the call details.
9.3 All Campaigns
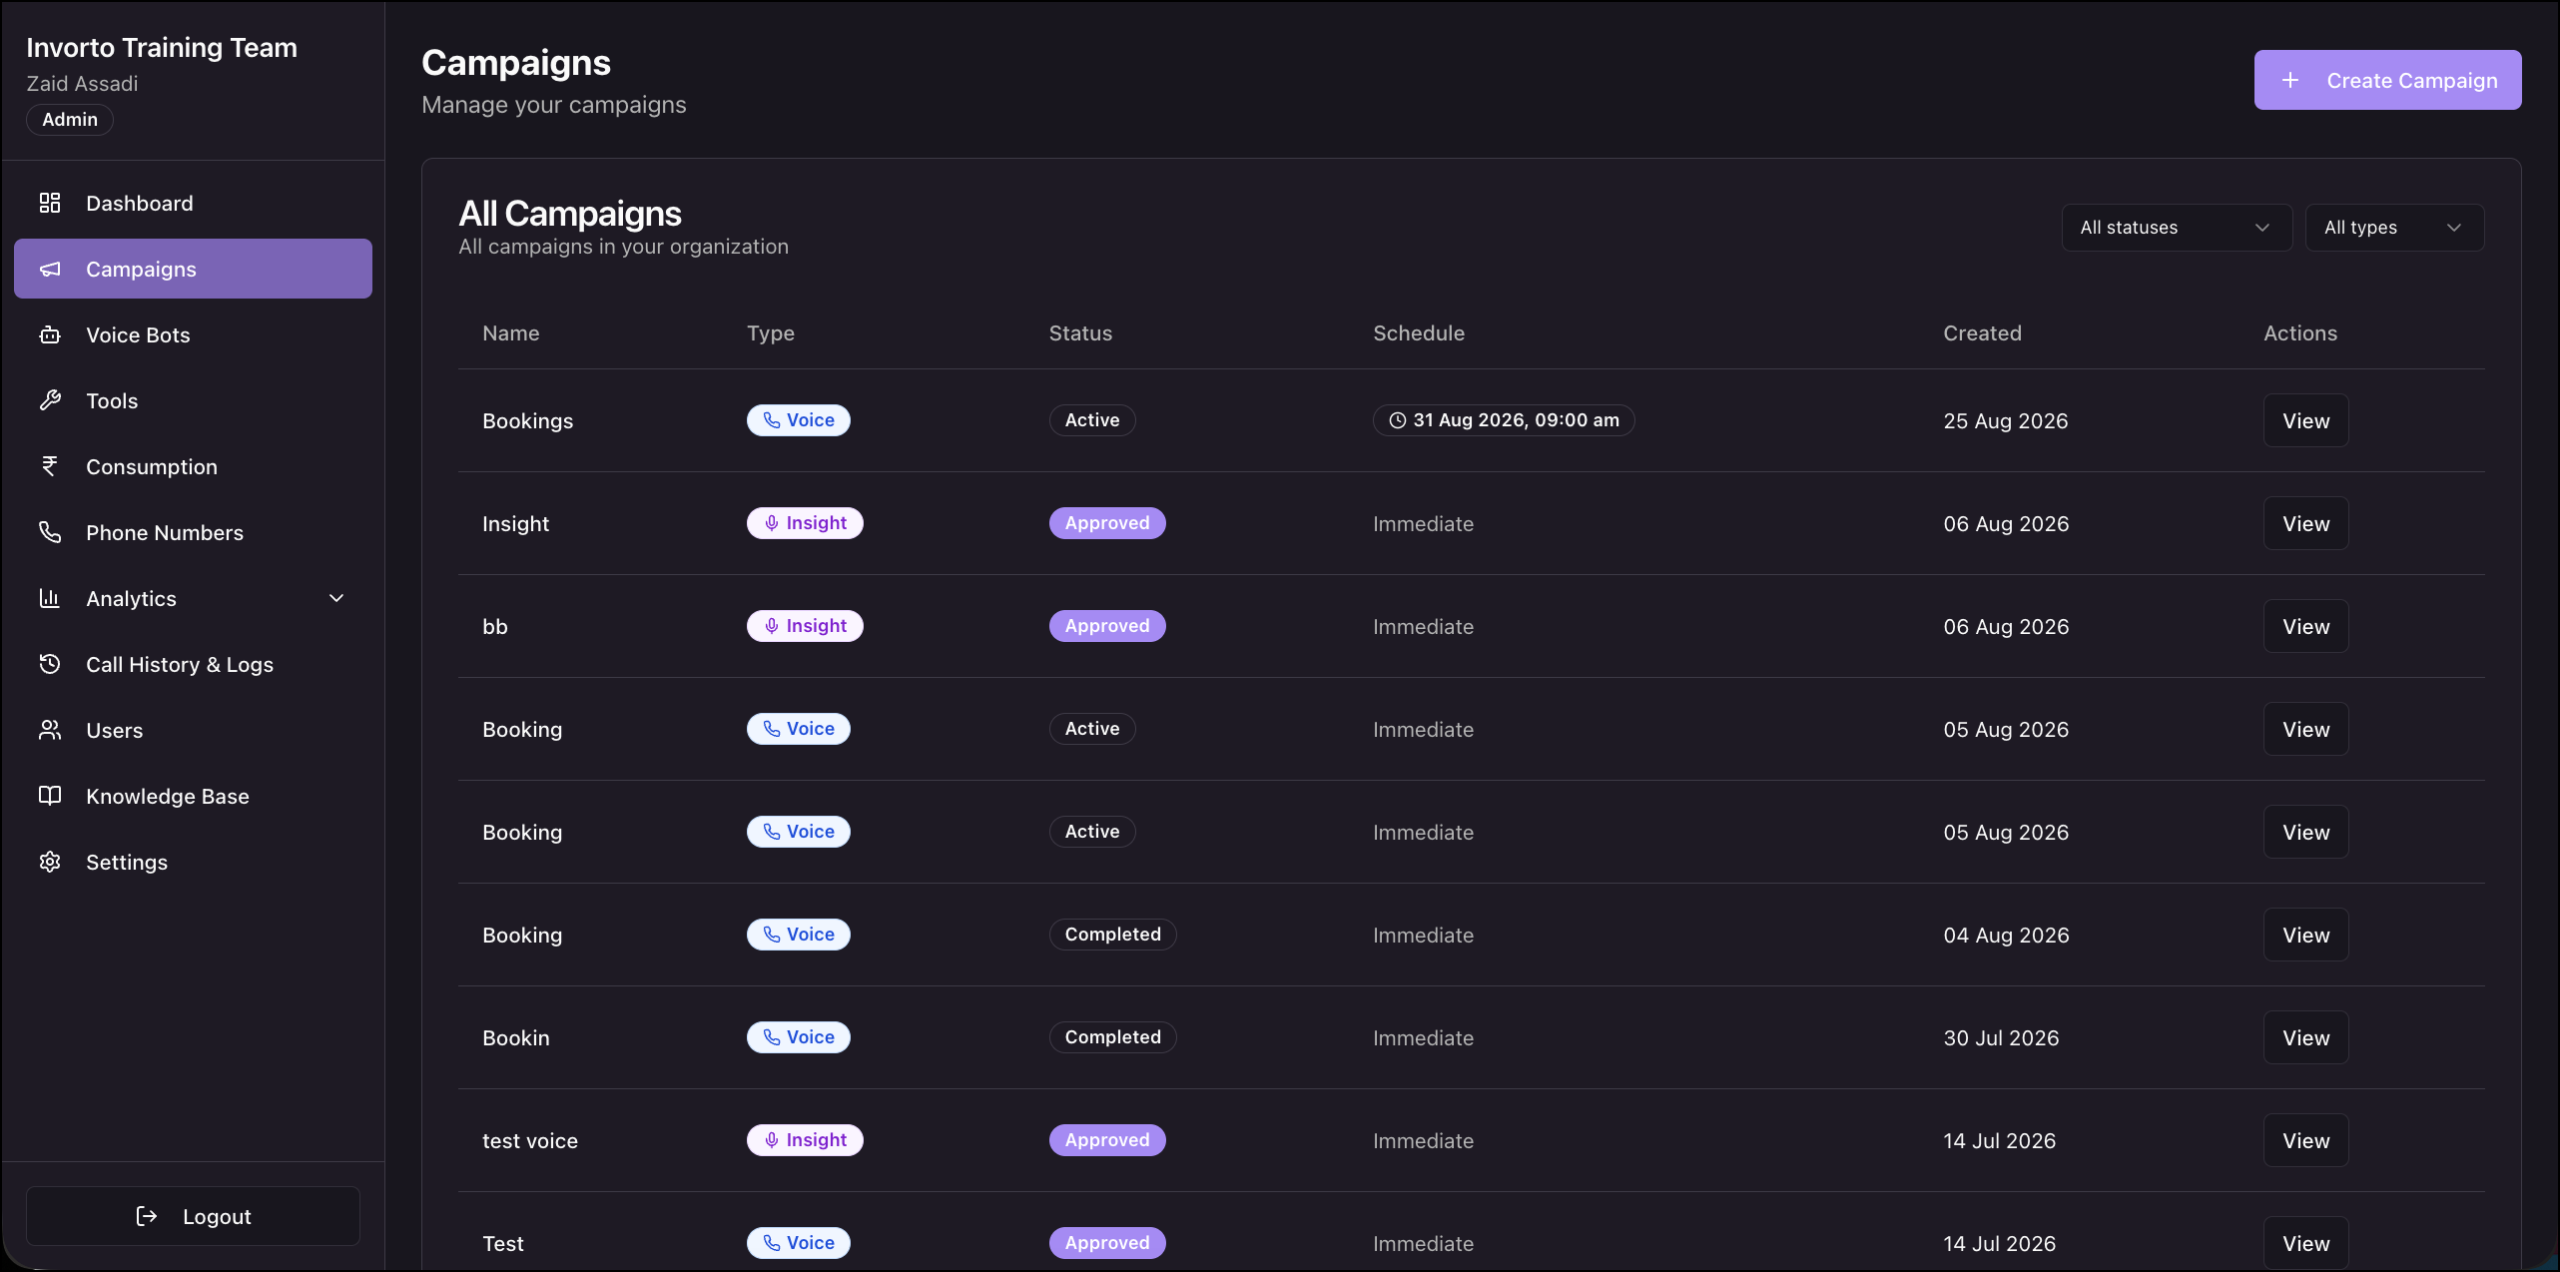
Navigate to Campaigns to see every campaign in your organization, with each campaign’s name, type, status, schedule, and creation date.
| Status | What it Means |
| Approved | The campaign is created and ready, but hasn’t started calling yet. A campaign stays in this status until its scheduled start time arrives, or until you upload contacts. |
| Active | The campaign is calling contacts. |
| Paused | You paused the campaign. It holds its queued contacts and doesn’t dial until you start it again. |
| Completed | The campaign has finished. Invorto has dialed every number uploaded to it, or you completed the campaign manually. |
10. Next Steps
- To review call volumes, outcomes, and sentiment across all your campaigns, see Analytics.
- To analyze recordings of calls your team has already made, see Create and Run an Insight Campaign.
Any Questions?
Did you find this article helpful? Please let us know any feedback you may have in the comments section below. We’d love to hear from you and help you out!