


Get Started

Sales Suite
Field Ops
Marketing
Service CRM
Integrations & Apps
FloStack
Manage the Invorto Voice Bot Knowledge Base

1. Feature Overview
The Knowledge Base module on the Invorto Voice Bot is where you store the reference content your bots use to answer questions. A bot’s system prompt tells it how to behave. The knowledge base gives it the facts.
Content is organized in two levels. A folder holds sources, and a source is a document you upload, a web page you point Invorto at, or text you type in directly. When a caller asks a question, the bot looks for the answer in the sources connected to it.
Opening Knowledge Base from the left navigation gives you the organization-wide view of every folder. You can also reach knowledge base content from inside a bot, on the AI & Knowledge tab.
2. Prerequisites
- An active Invorto Voice Bot account.
- The reference content you want the bot to use, as a document, a public URL, or text you can paste in.
3. Open the Knowledge Base
In the left navigation, click Knowledge Base.
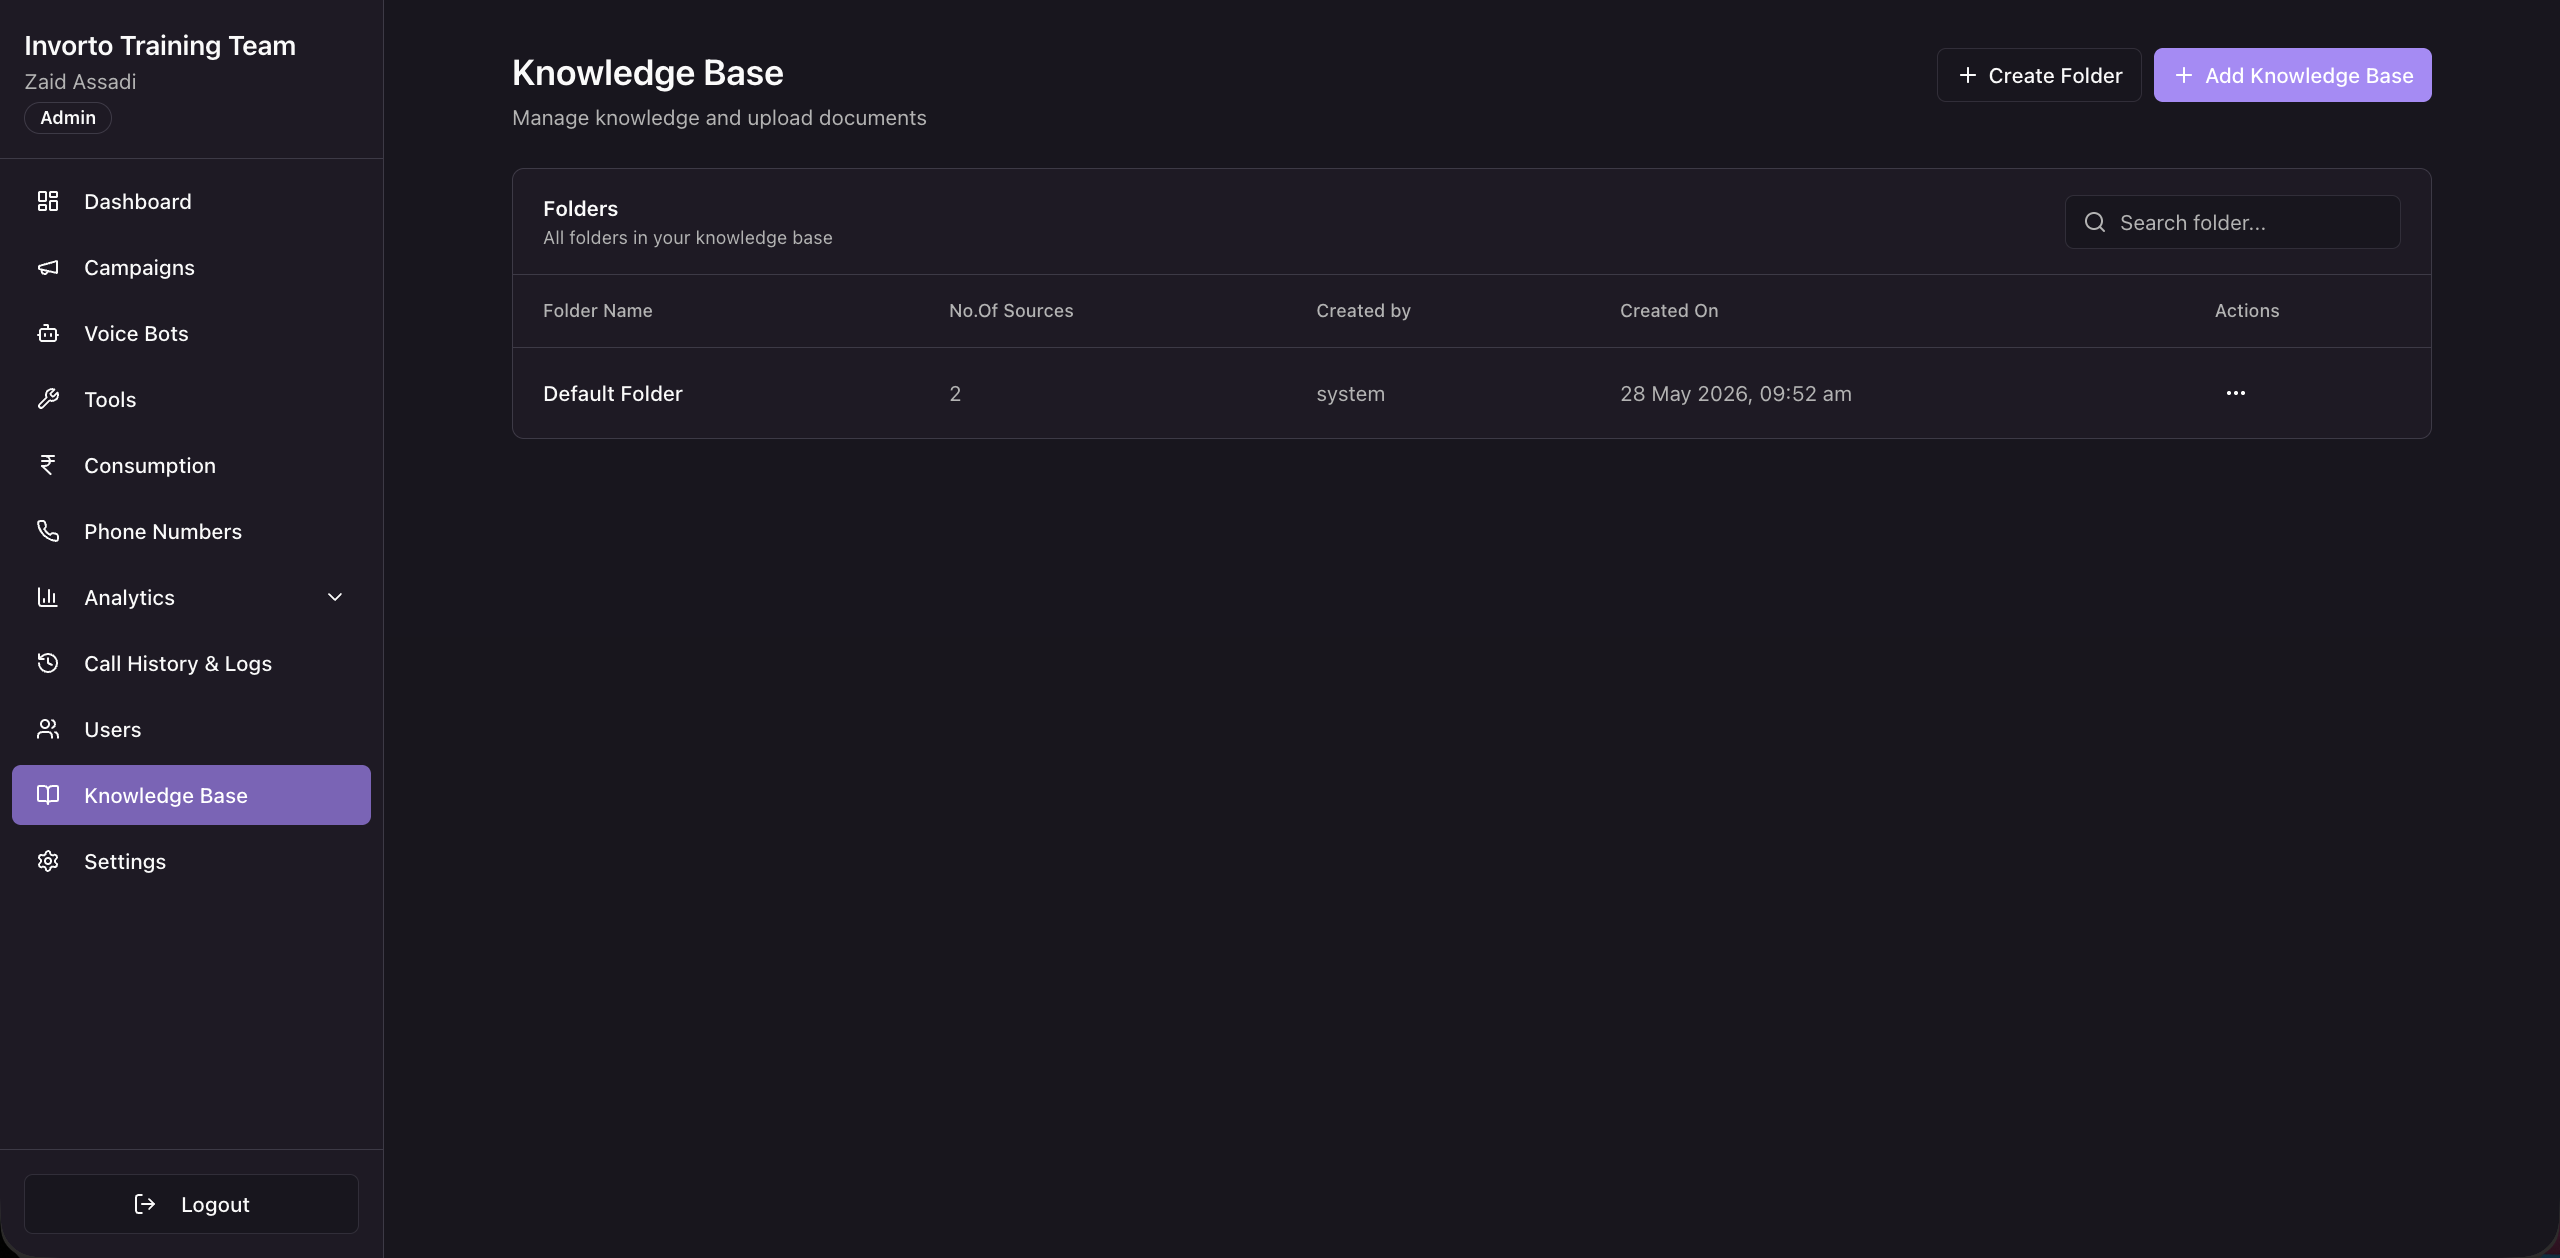
The Folders card lists every folder in your organization. A Default Folder is created for you when your organization is set up. Use the Search folder box at the top right of the card to find a folder in a long list.
| Column | What it shows |
| Folder Name | The folder name. |
| No.Of Sources | How many sources the folder holds. |
| Created by | Who created the folder. Folders created during setup show as created by the system. |
| Created On | The date and time the folder was created. |
| Actions | The row actions menu for the folder. |
4. Create a Folder and Add Knowledge Base
4.1 Create a Folder
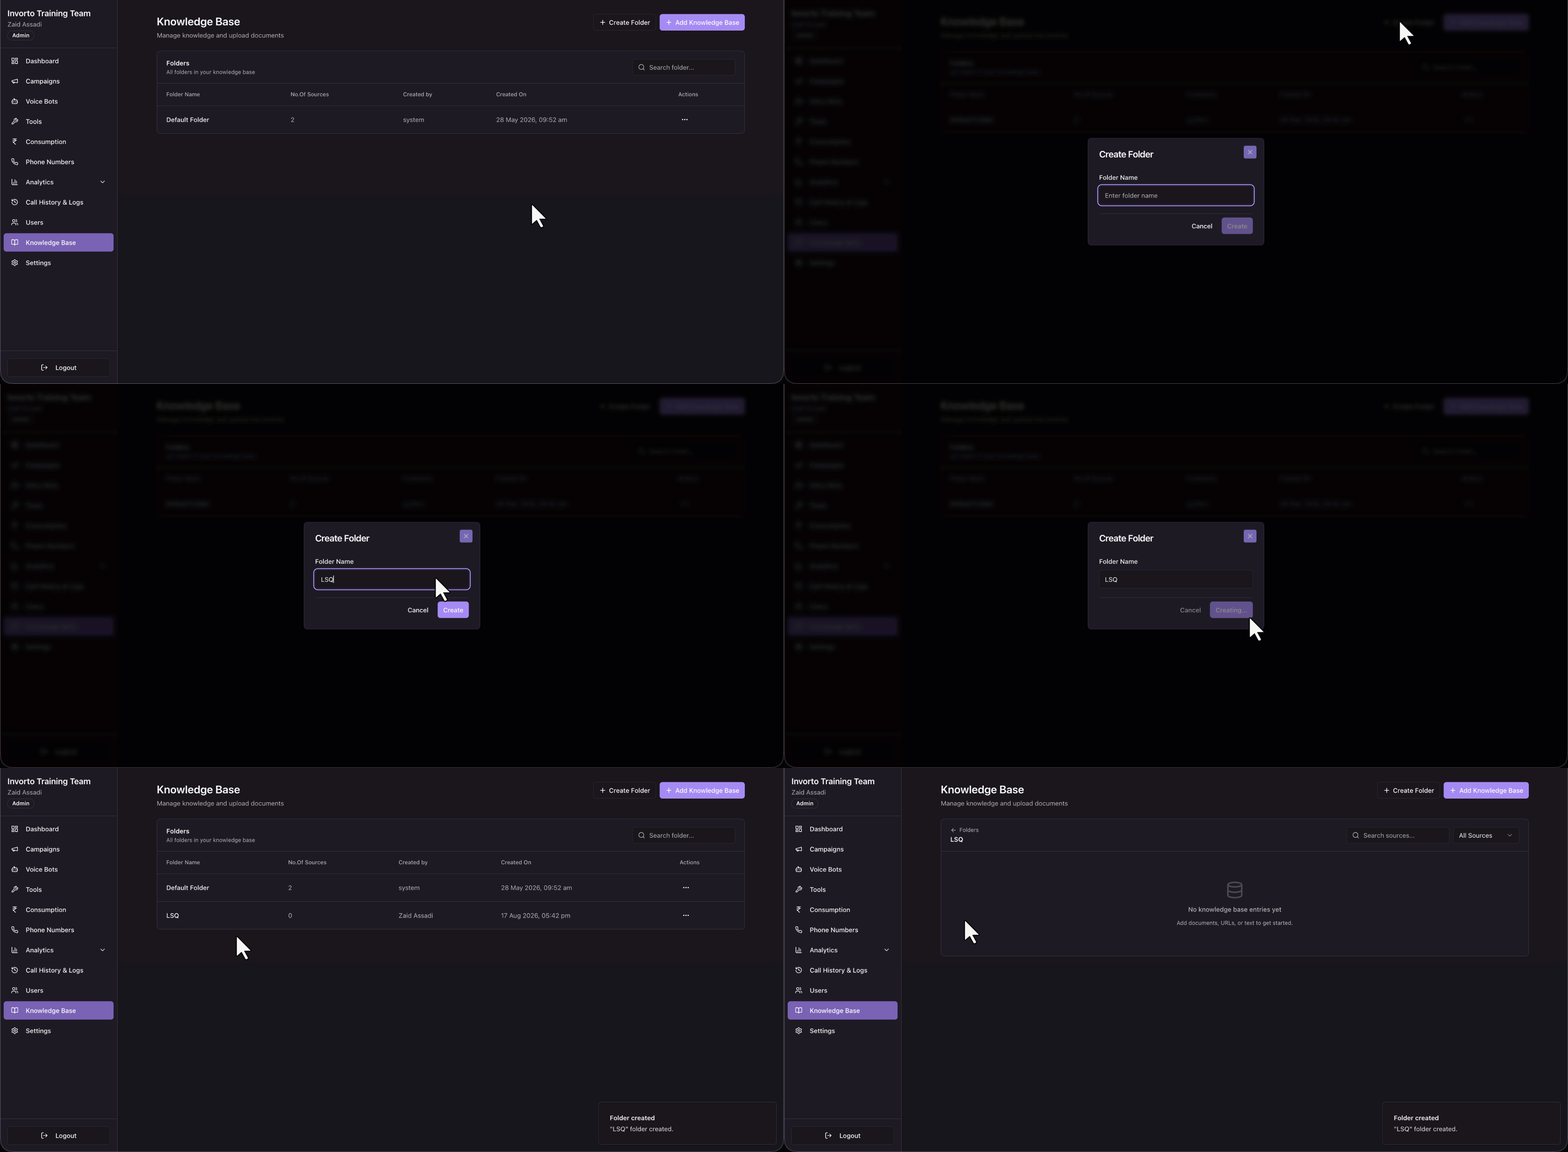
Group content by the audience it serves, so several bots for the same customer can share one folder.
- Click + Create Folder in the top right.
- Enter a folder name.
- Confirm on the pop-up.
The new folder appears in the Folders table with zero sources.
4.1 Add Sources to Knowledge Base
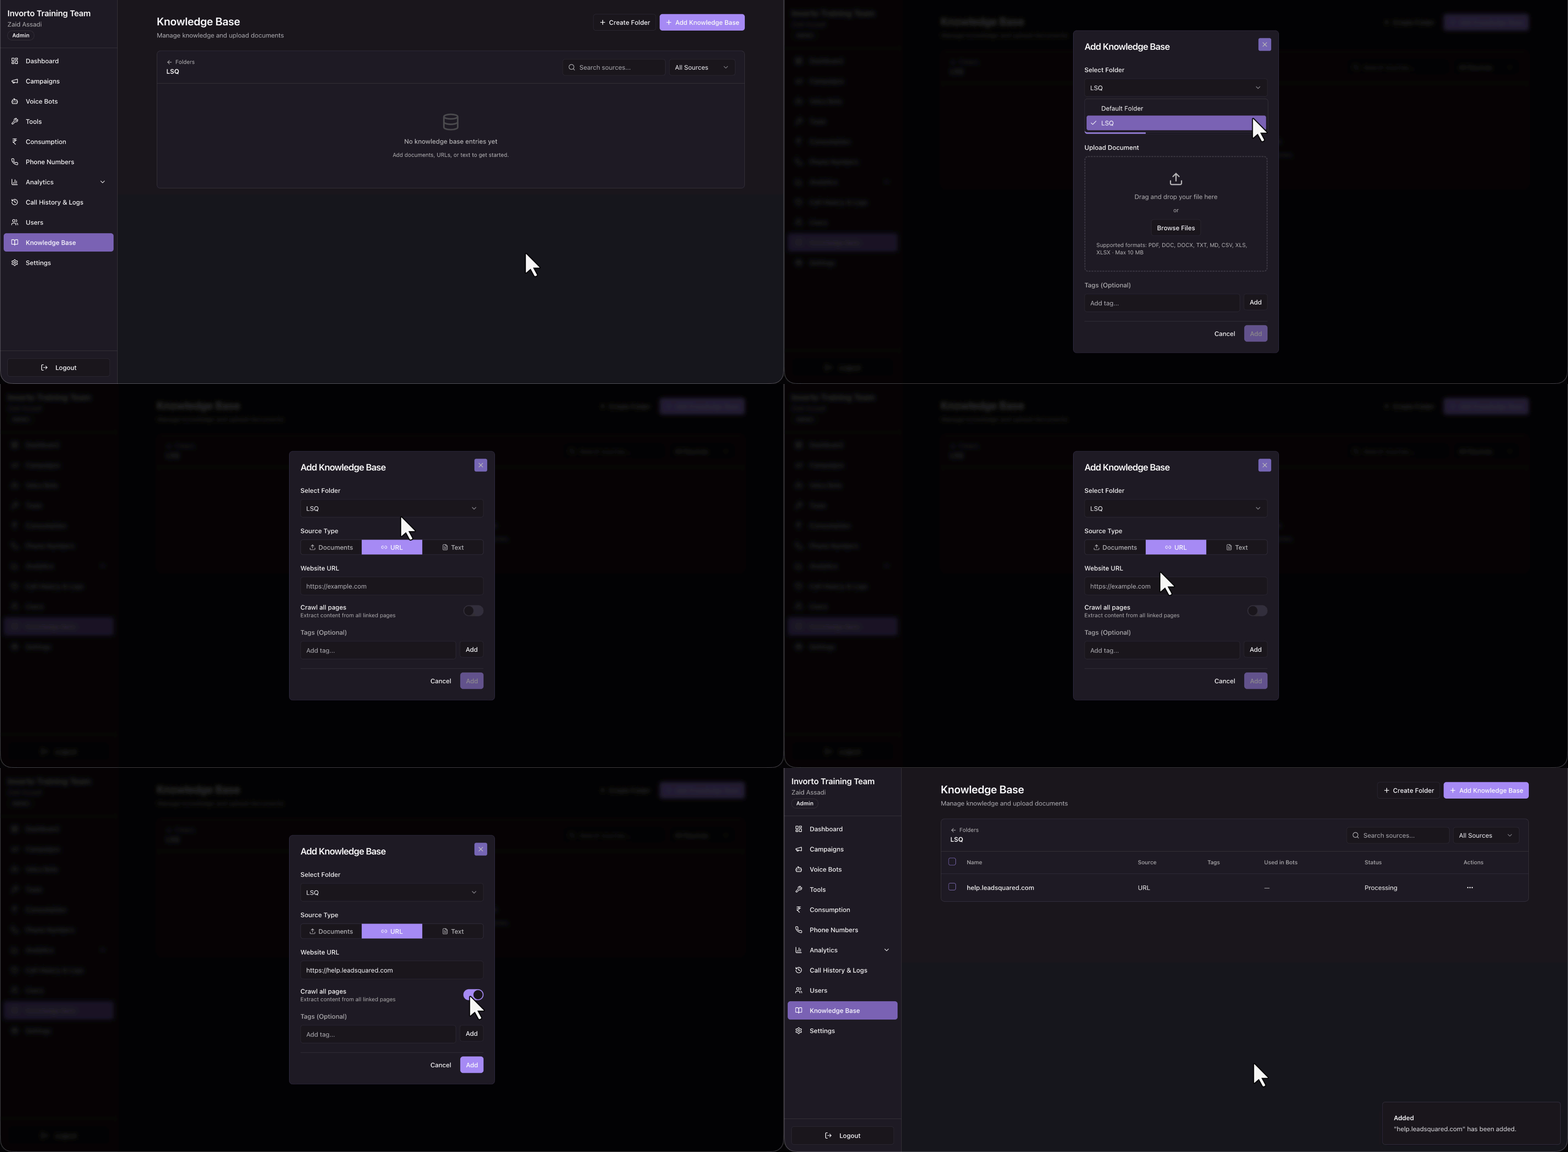
- Click + Add Knowledge Base in the top right.
- Select the folder in the Select Folder
- Select a Source Type, and provide the content for that source type –
- Upload Document – Under Upload Document, drag your file onto the upload area, or click Browse Files and pick it. The pop-up lists the formats it accepts and the maximum file size beneath the upload area: PDF, DOC, DOCX, TXT, MD, CSV, XLS, and XLSX. With a max size of 10 MB.
- URL – A web page you point Invorto at. You can toggle the option to extract content from all linked pages of the URL.
- Text Content – Select Text and type or paste your content into the Text Content box. A counter below the box shows how much of the character limit you have used.
- Add tags if you want them. Tags are optional and help you find sources later in a large knowledge base.
- Click Add.
5. Open a Folder and Read the Sources Table
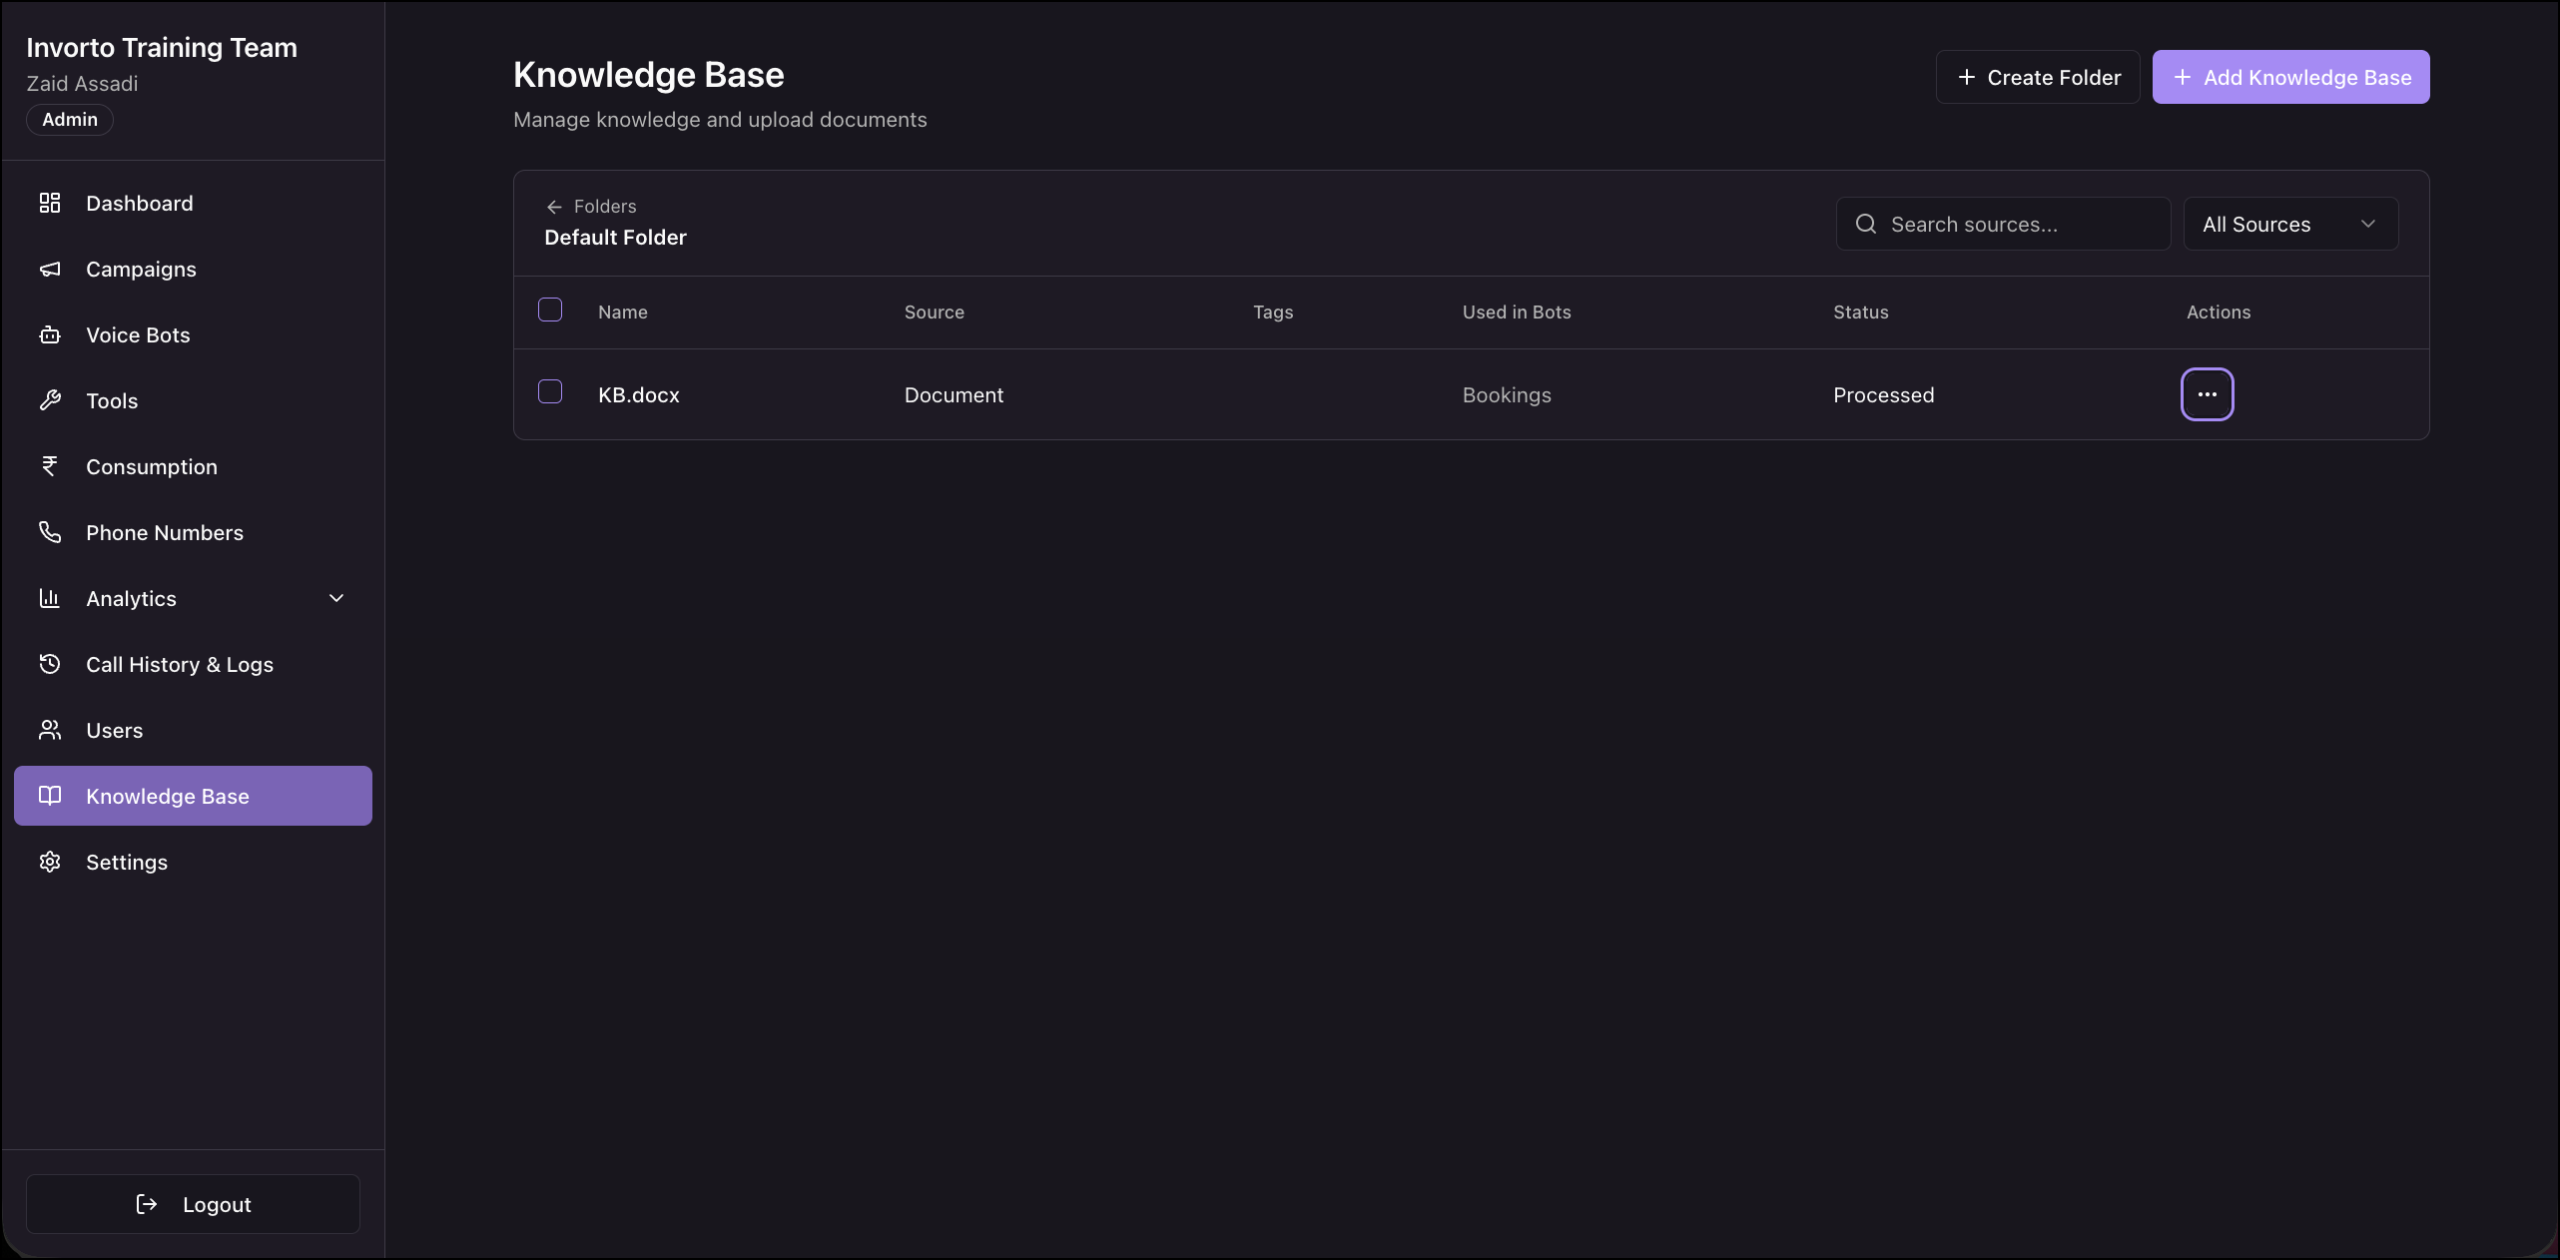
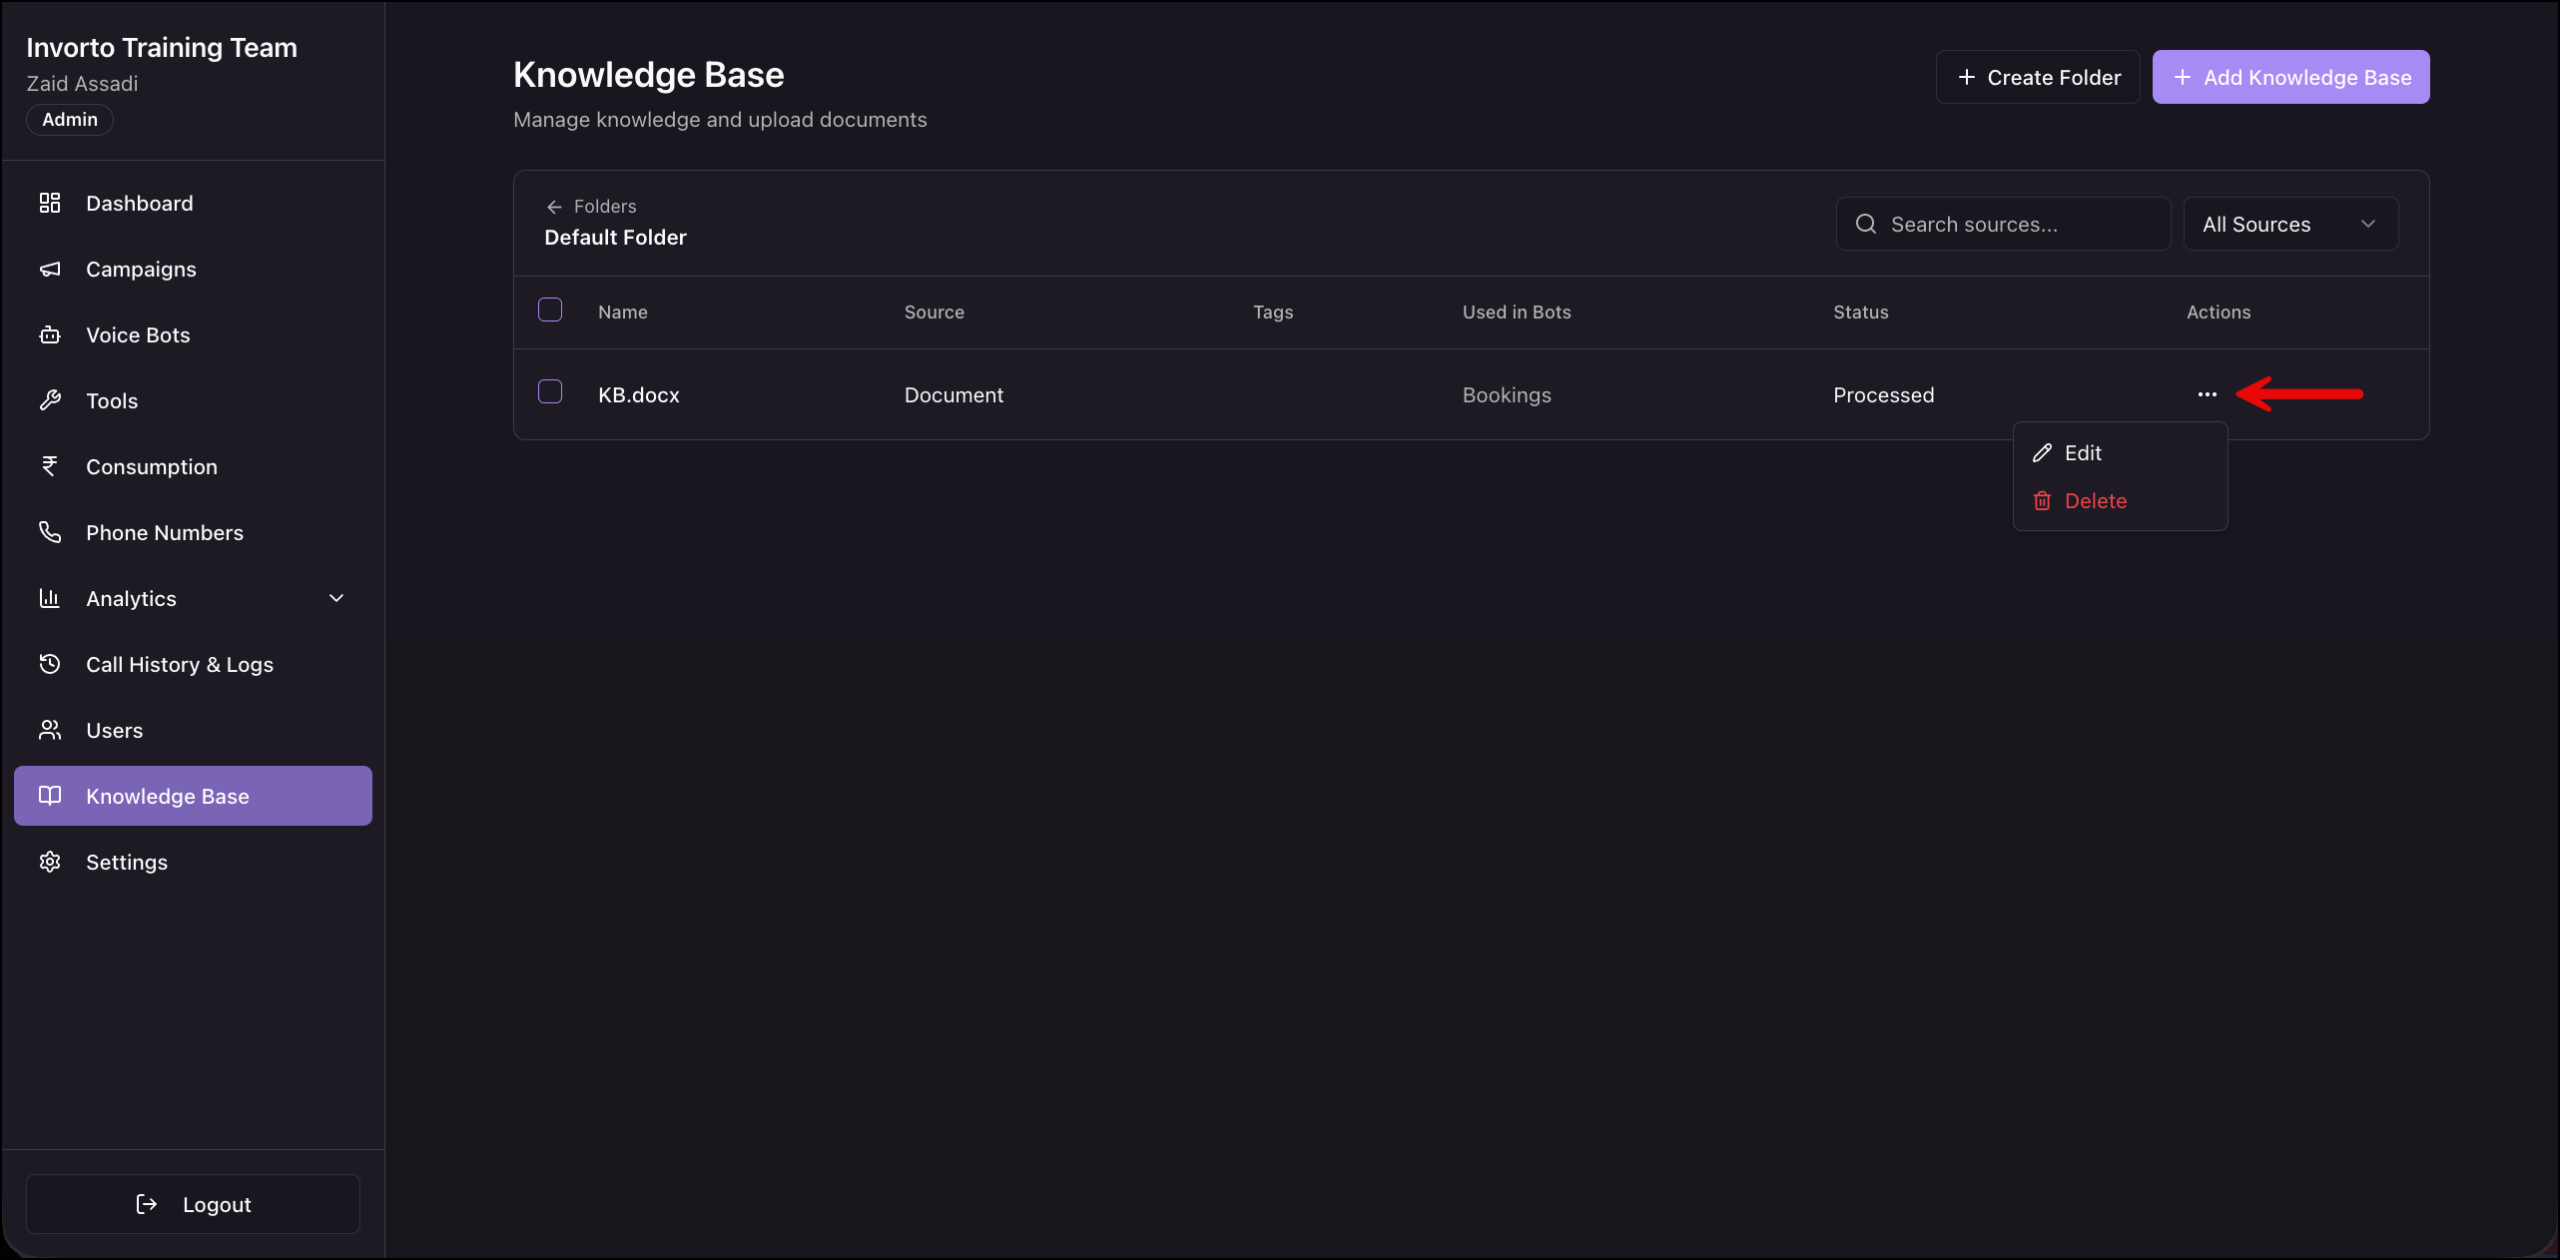
Click the folder you want to open. The folder name appears below the breadcrumb. Click Folders in the breadcrumb to go back to the folder list.
| Column | What it shows |
| Name | The source name. For an uploaded document this is the file name. |
| Source | The type of source. |
| Tags | Any tags you added to the source. |
| Used in Bots | The bots that currently use this source. A dash means no bot uses it. |
| Status | Where the source is in processing. |
| Actions | The row actions menu for the source: Edit or Delete the source. |
Use the Search sources box to find a source by name, and the All Sources list to show only one source type.
Note:
- A source shows Processed once Invorto has finished ingesting it and the bot can use it. Processing takes a few minutes. If you make a test call immediately after adding a source, the bot will not know about it yet. Wait until the Status column shows Processed, then test again.
- Used in Bots is the column to check before you change or remove anything. It tells you which bots will be affected. A source with a dash in this column is not connected to any bot yet, so it has no effect on any call.
6. Edit or Delete a Source
- Open the folder that holds the source.
- Check the Used in Bots column to see which bots use the source.
- Click the row actions menu in the Actions
- Click Edit to change the source, or Delete to remove it.
Any Questions?
Did you find this article helpful? Please let us know any feedback you may have in the comments section below. We’d love to hear from you and help you out!