


Get Started

Sales Suite
Field Ops
Marketing
Service CRM
Integrations & Apps
FloStack
Opportunity Import Templates

1. Feature Overview
In addition to manually adding opportunities, you can also bulk import them into LeadSquared. For businesses that handle a large volume of opportunities, different users may map fields differently during each import. For example, one user may import values for only Opportunity Name, Expected Deal Size, and Status, while another may import values for Opportunity Name, Expected Closure Date, and Owner. This can lead to inconsistent and incomplete records.
Import Templates address this by letting administrators pre-configure the opportunity fields, mandatory fields, and duplicate handling for imports. Admins can apply these templates to multiple teams, and users can select a relevant template when importing opportunities. This ensures every import follows the same structure and imports faster and more efficiently.
2. Prerequisites
- You must be an Admin user to configure this feature on your account.
- To enable this feature, contact your account manager or write to support@leadsquared.com.
3. How it Works
The Import Templates feature simplifies the Import Opportunities process by letting administrators configure pre-defined templates with the fields for which data must be imported. When a sales user imports opportunities using a template, the configured fields appear as the sample file. This standardises the import process across your account and speeds up imports by optimising how records are processed.
- Create an Import Template for an Opportunity Type, and select the opportunity fields to include.
- Configure the field mapping, and set which fields are mandatory.
- Set import rules to control how duplicate opportunities are handled.
- Configure the actions users can perform during an import, and the actions the system performs after the import completes.
- Apply the template to the Teams that need to use it.
- Users in those teams select the template when importing opportunities, download the sample CSV, and upload their data.
4. Create Import Templates
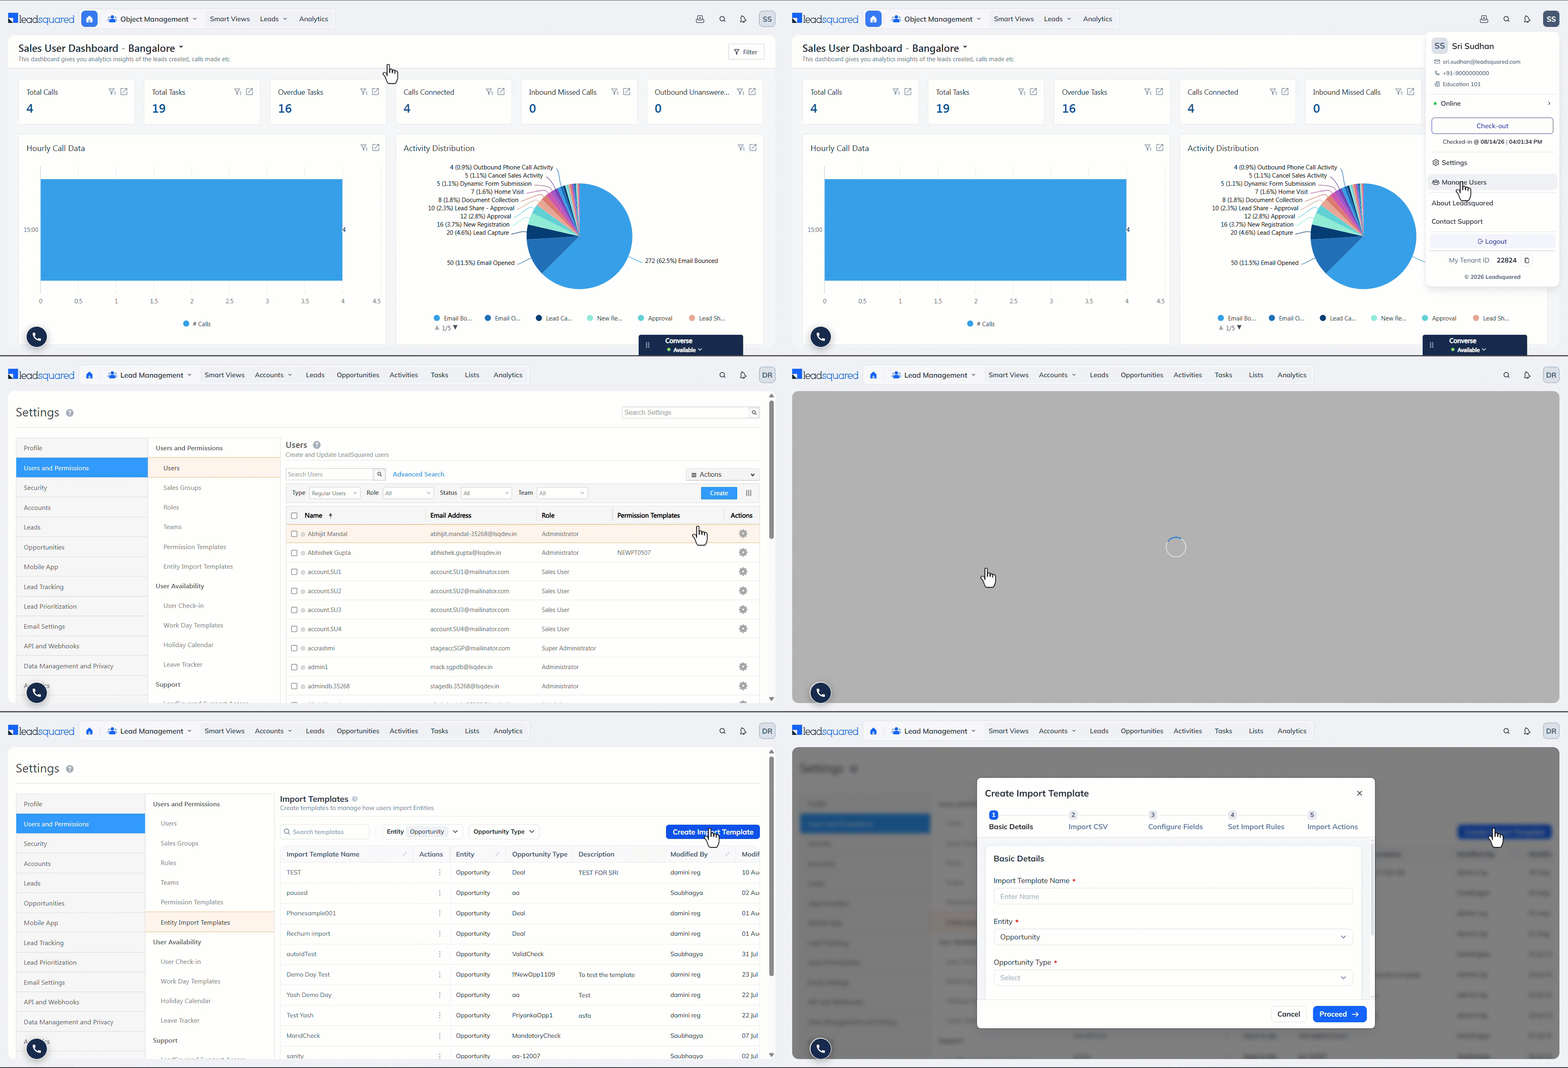
- Navigate to My Profile>Manager Users and click Entity Import Templates.
- On the Import Templates screen, click the Create Import Templates button.
We’ll look at the configuration for all the Create Templates tabs in the following sections.
5. Basic Details
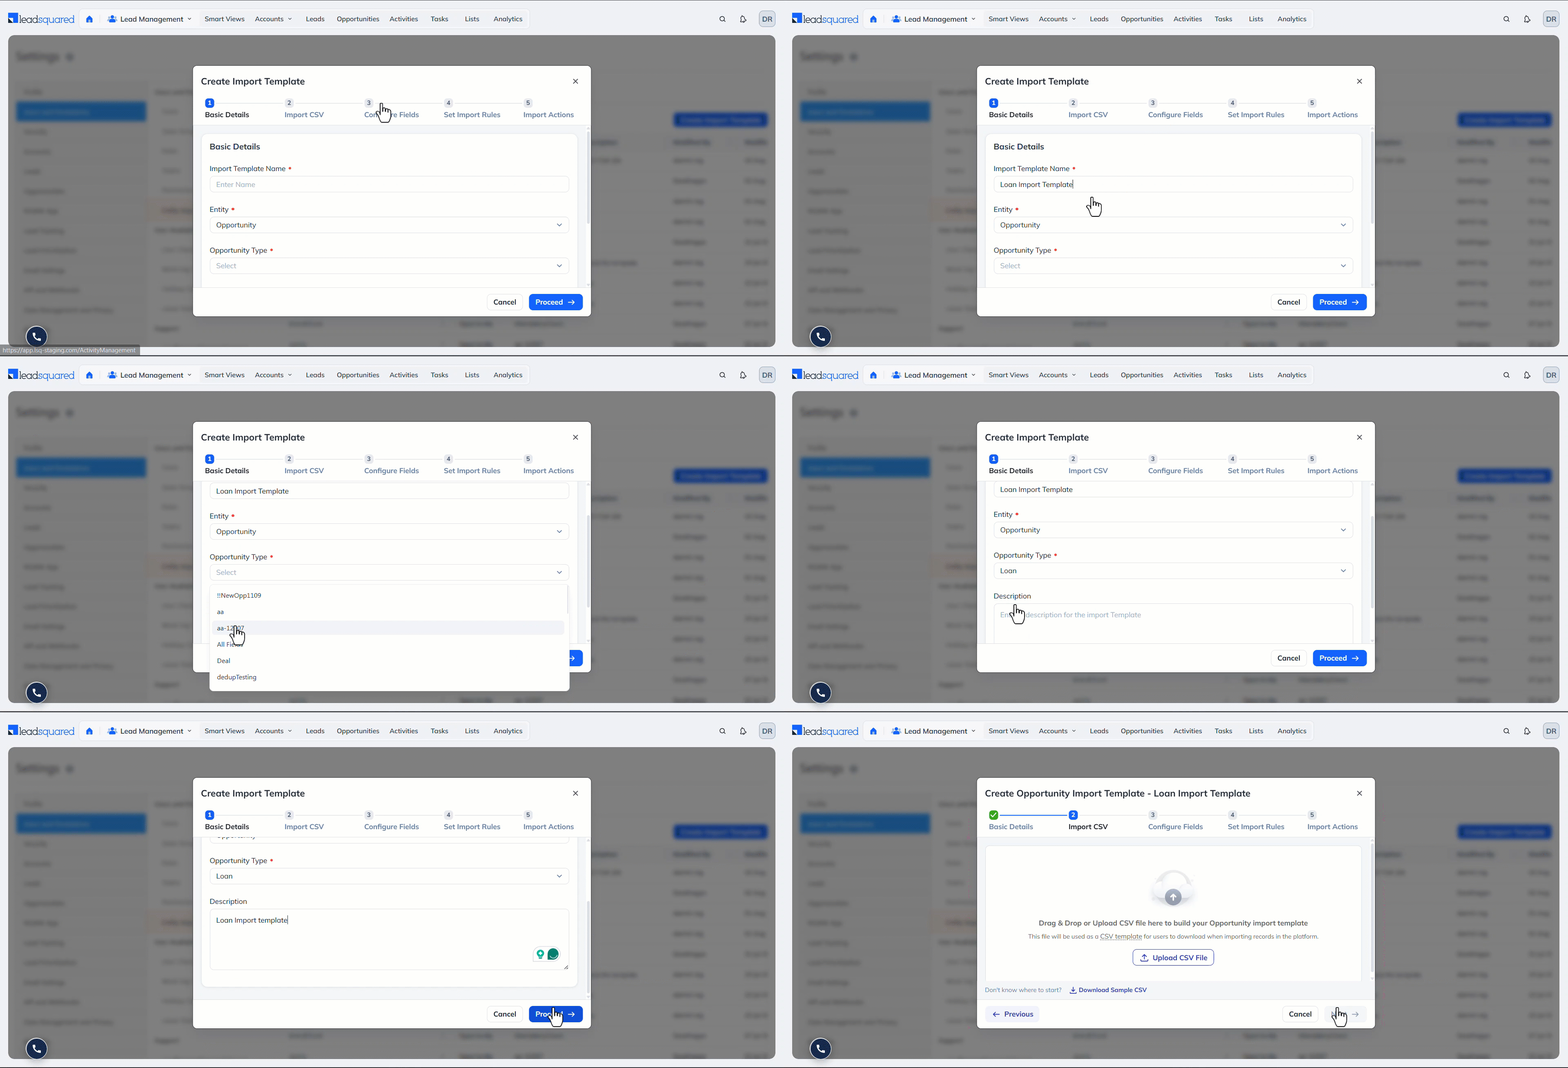
Enter the following details to identify the template –
- Import Template Name – Enter an internal template name to help users identify it.
- Entity – Select Opportunity.
- Opportunity Type – Select the Opportunity Type for which you want to create the template.
- Description – Add a description for the template. This is optional.
- Once you’re done, click Proceed.
Note:
- You can create multiple templates for each Opportunity Type.
- The template you create is available only for the selected Opportunity Type. You can create different templates for other Opportunity Types.
6. Import CSV
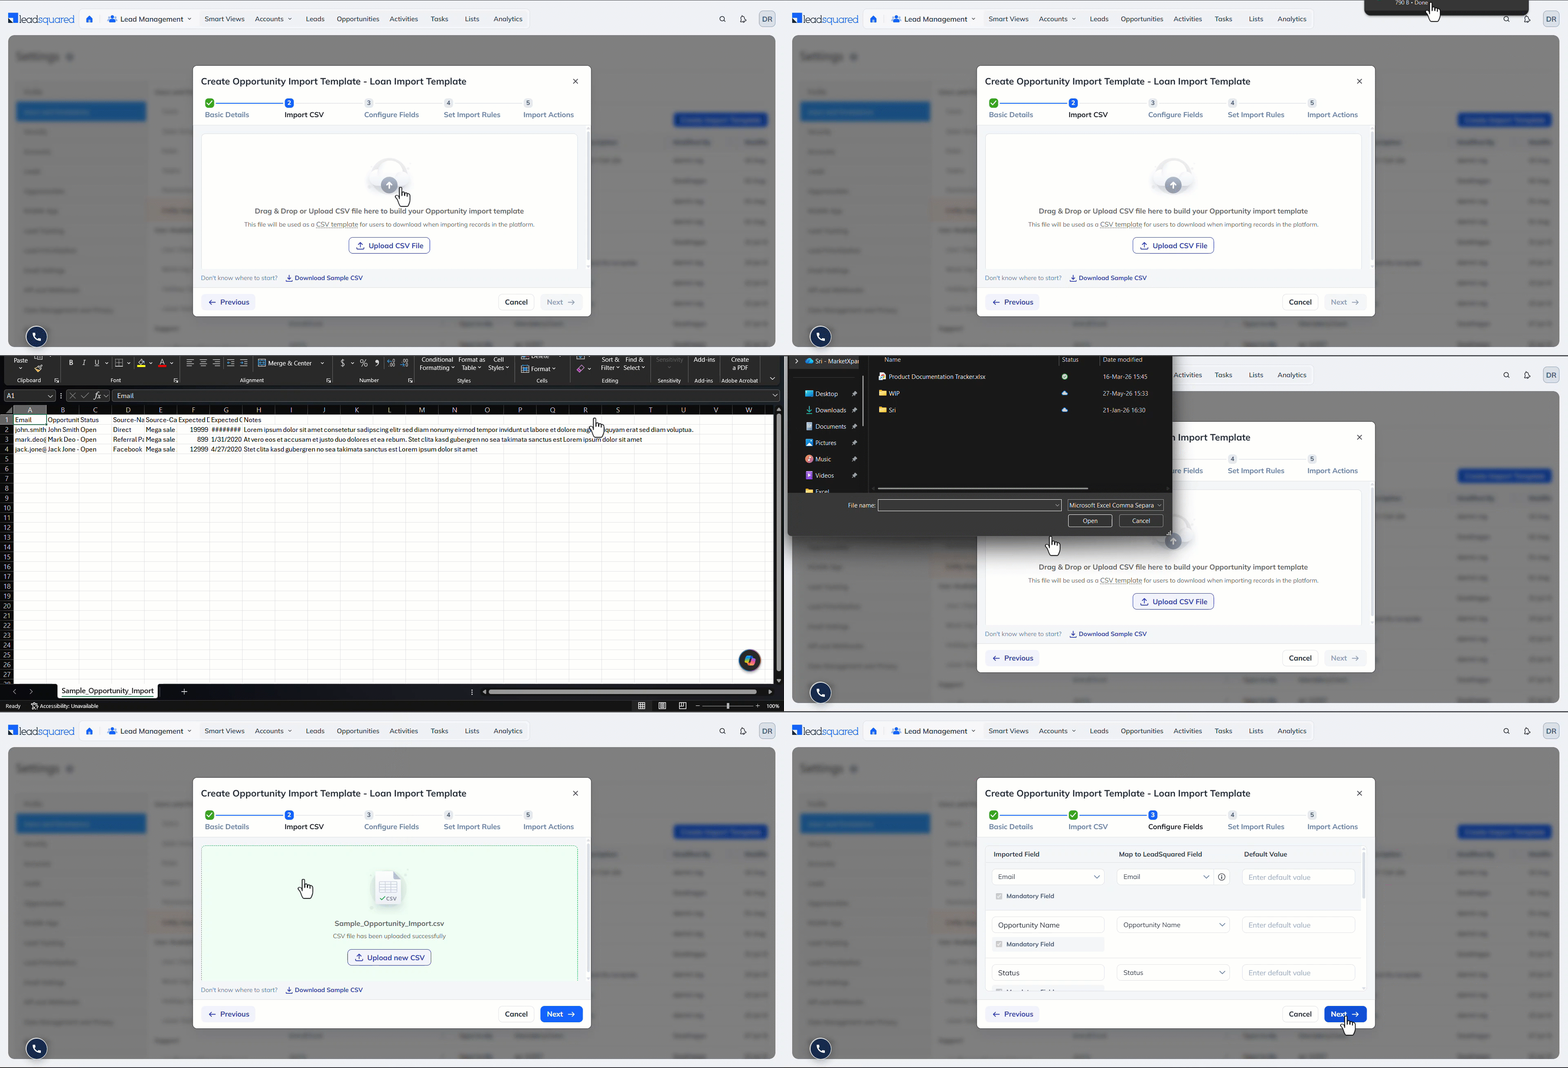
Select the opportunity fields you want to include in the template by uploading them into LeadSquared through a CSV file. To view the required field format, click Download Sample CSV. Use the sample file to enter all fields in the correct format. Once you’re done, click Upload CSV File to upload the file to LeadSquared.
If there are any errors in the file, fix them and re-upload the file. Once you’re done, click Next.
Note:
- The CSV file must include one unique lead field (such as email, phone number, etc.) or the Opportunity Auto ID.
- To obtain the Auto ID, use the Get an Opportunity by Id API.
- You can add multiple opportunity fields in the same file, exceeding the eight fields available in the sample file.
7. Configure Fields
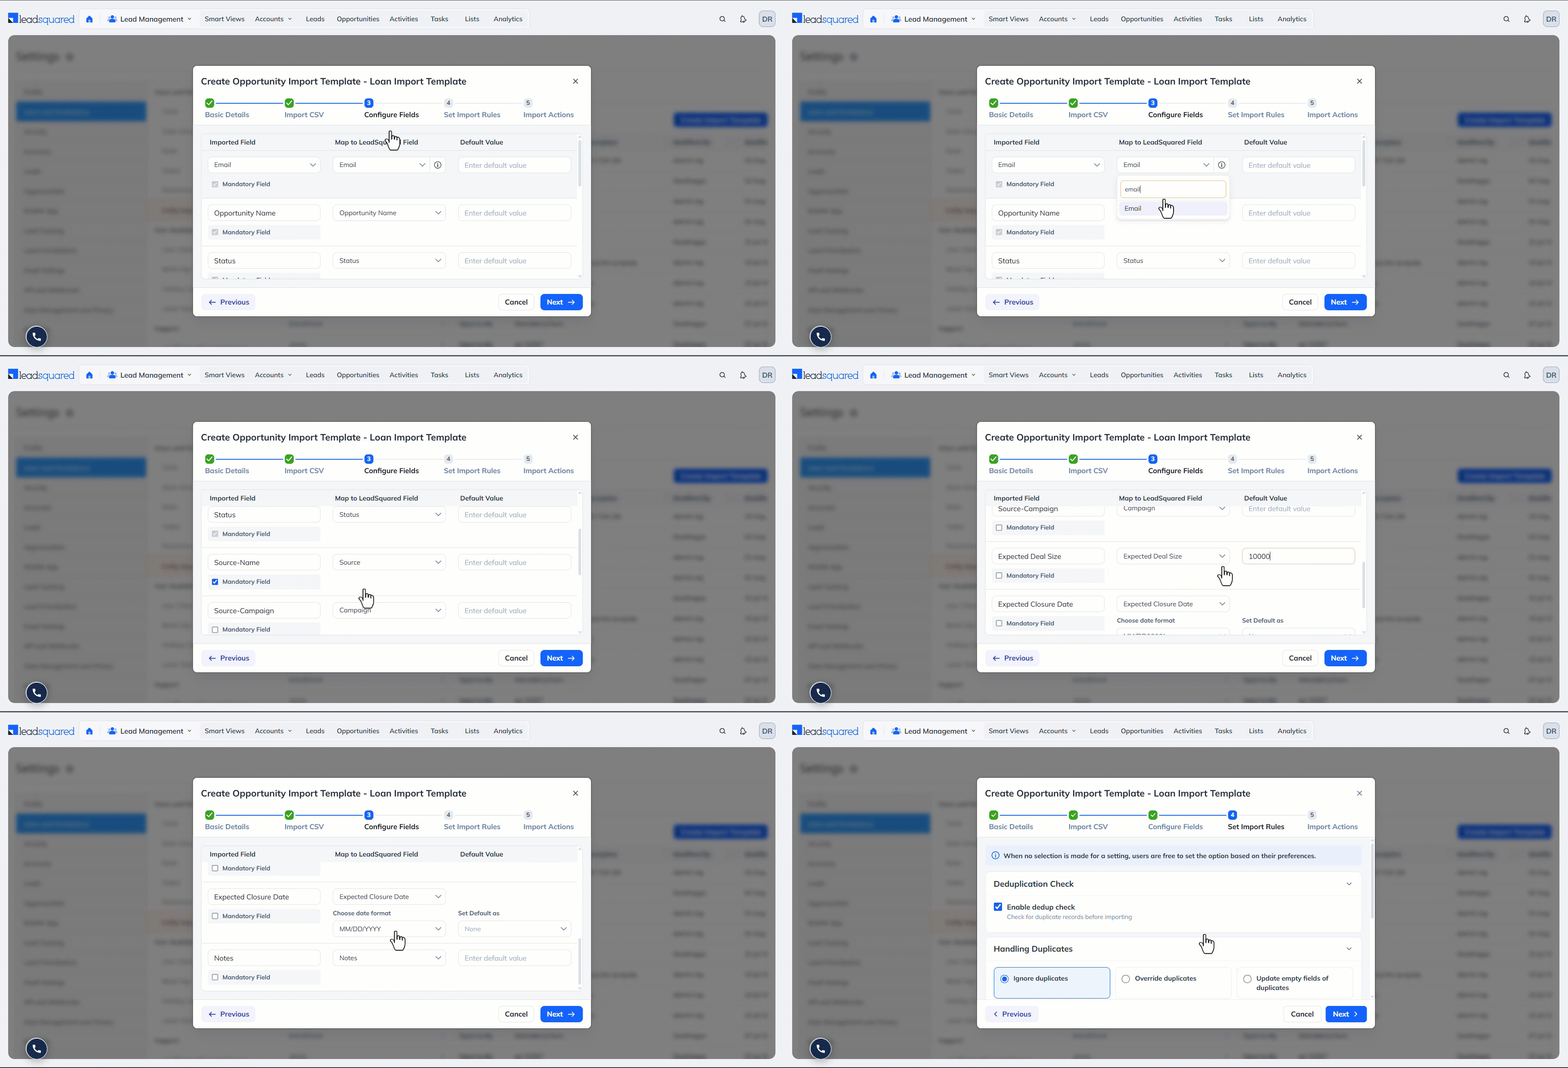
By default, CSV columns are mapped to the corresponding opportunity fields. This mapping imports the values from the file into LeadSquared. If required, you can update the mapping.
- Imported Fields – These are the columns in the CSV file. Use the dropdown to select the column you want to map.
- Map to LeadSquared Field – These are the available opportunity fields. Select the appropriate field to map.
- Mandatory Field – These are the mandatory opportunity fields. Map each field to the corresponding LeadSquared field.
- Default Value – If a CSV column is empty, the default value is populated in the corresponding LeadSquared field.
- For Date-Time fields, select the format configured for the field in LeadSquared.
Once you’re done, click Next.
8. Set Import Rules
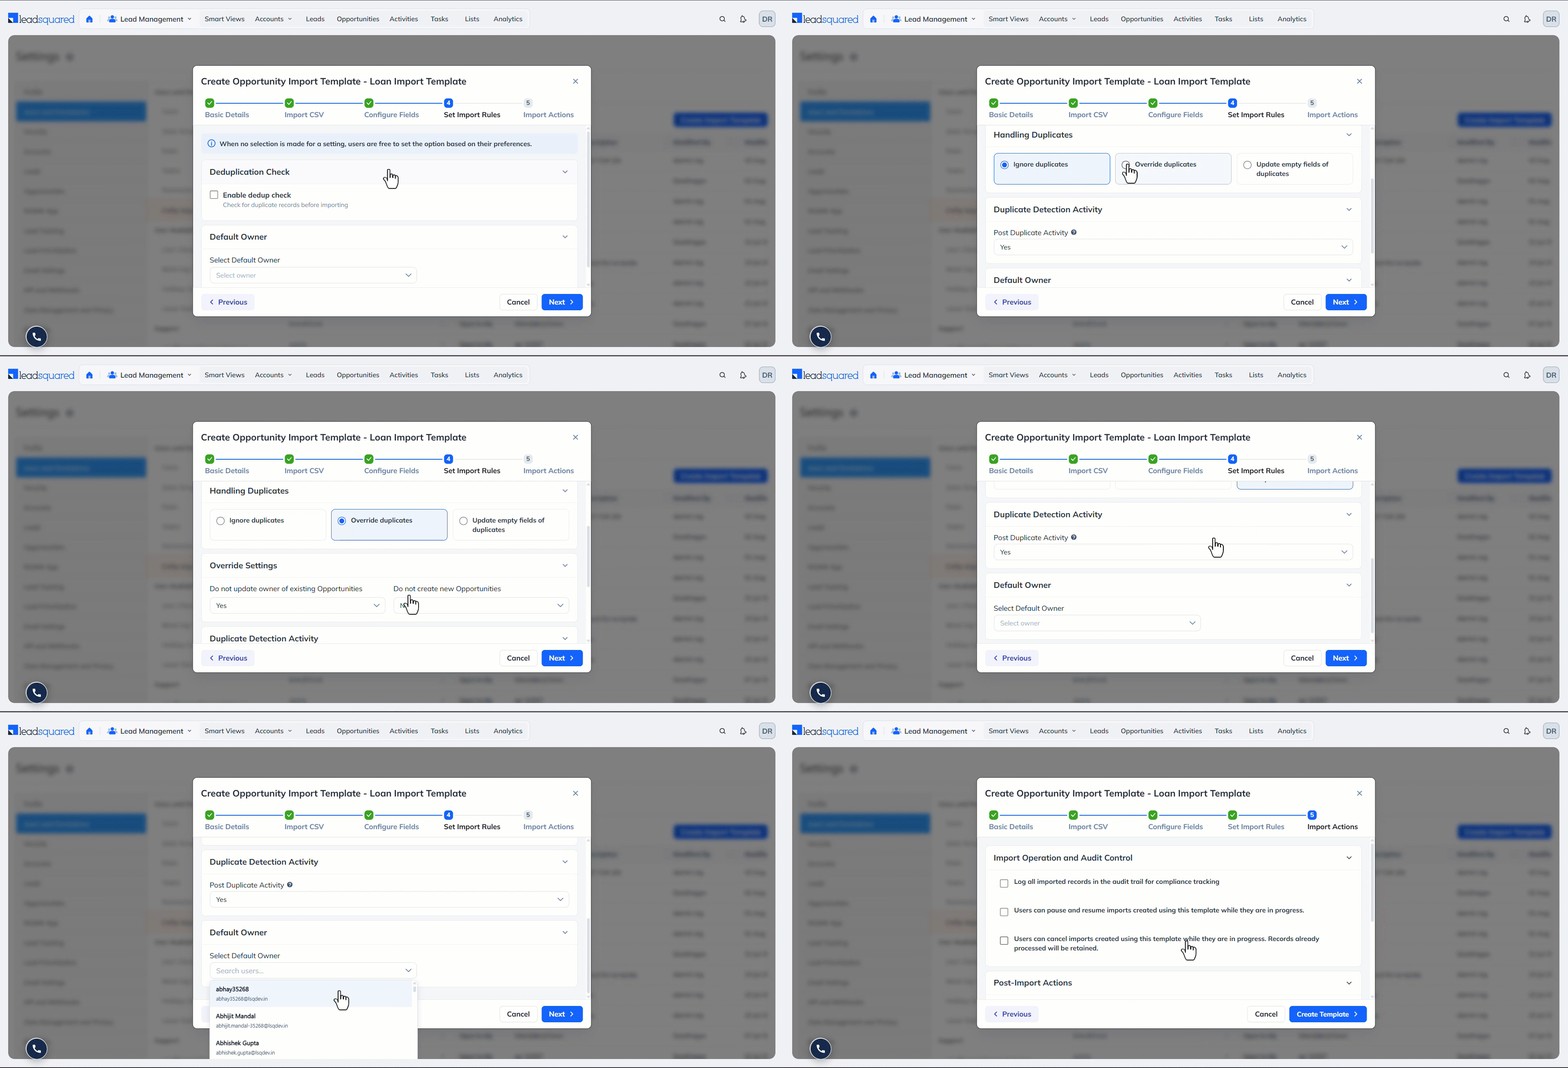
Duplicate opportunities occur when the same lead shows interest in the same Opportunity Type across multiple sources, such as websites, landing pages, or incoming calls. Set import rules to prevent duplicate opportunities from being created. To set these rules, enable the checkbox alongside Enable Dedupe Check.
- Ignore Duplicates – The system ignores duplicates in the file, and no new duplicate opportunities are created.
- Overwrite Duplicates – The system overwrites existing duplicate opportunities with data from the newly imported opportunities.
- Do not update owner of existing opportunities – Updates existing opportunities without changing the opportunity owner.
- Do not create new opportunities – Overwrites duplicate opportunities but does not create new duplicate opportunities.
- Update empty fields of duplicates – The system ignores existing duplicate fields that contain data and updates only empty opportunity fields with data from the import file.
- Post Duplicate Detected Activity – The system posts a duplicate detected activity on the Opportunity Details and Lead Details page when it detects a duplicate.
- Default Owner – Select a LeadSquared user as the default Opportunity Owner. If your CSV doesn’t contain an Opportunity Owner, the system assigns this user as the owner by default.
- Once you’re done, click Next.
9. Import Actions
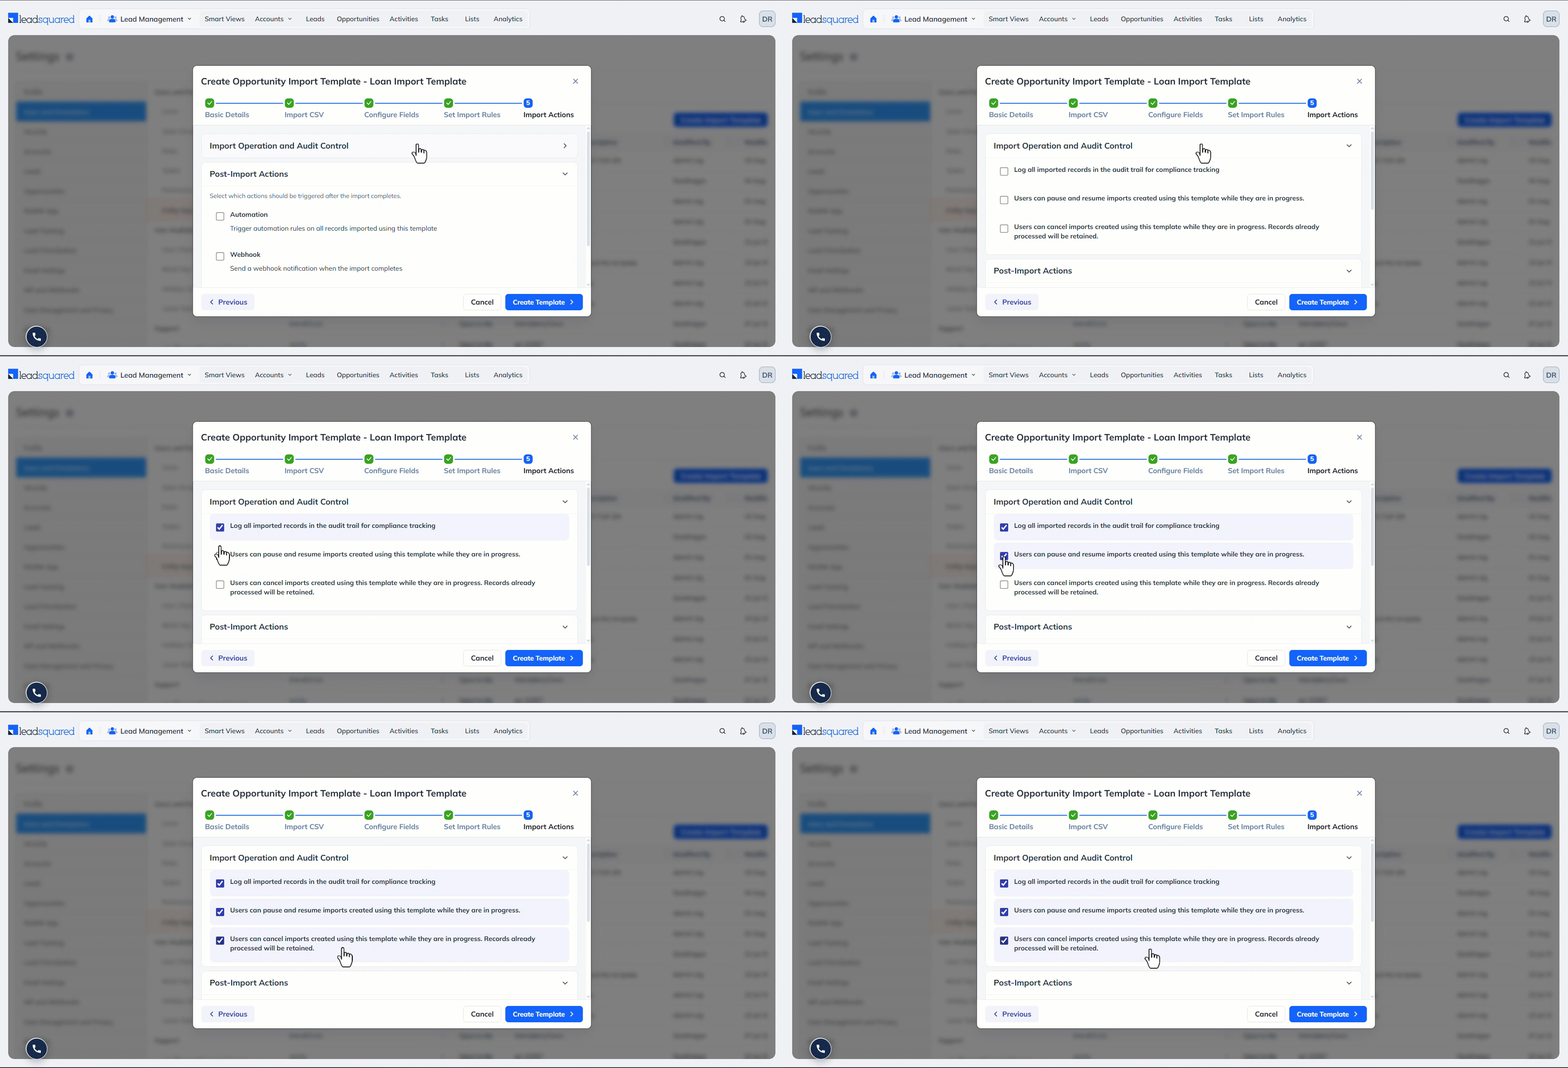
This section controls the actions users can perform during the import and the actions the system must perform after the import is complete.
9.1 Import Operation and Audit Control
Enable the options you want to make available for imports created using this template. These options control audit logging and whether users can pause, resume, or cancel imports while they are in progress.
9.2 Post Import Actions
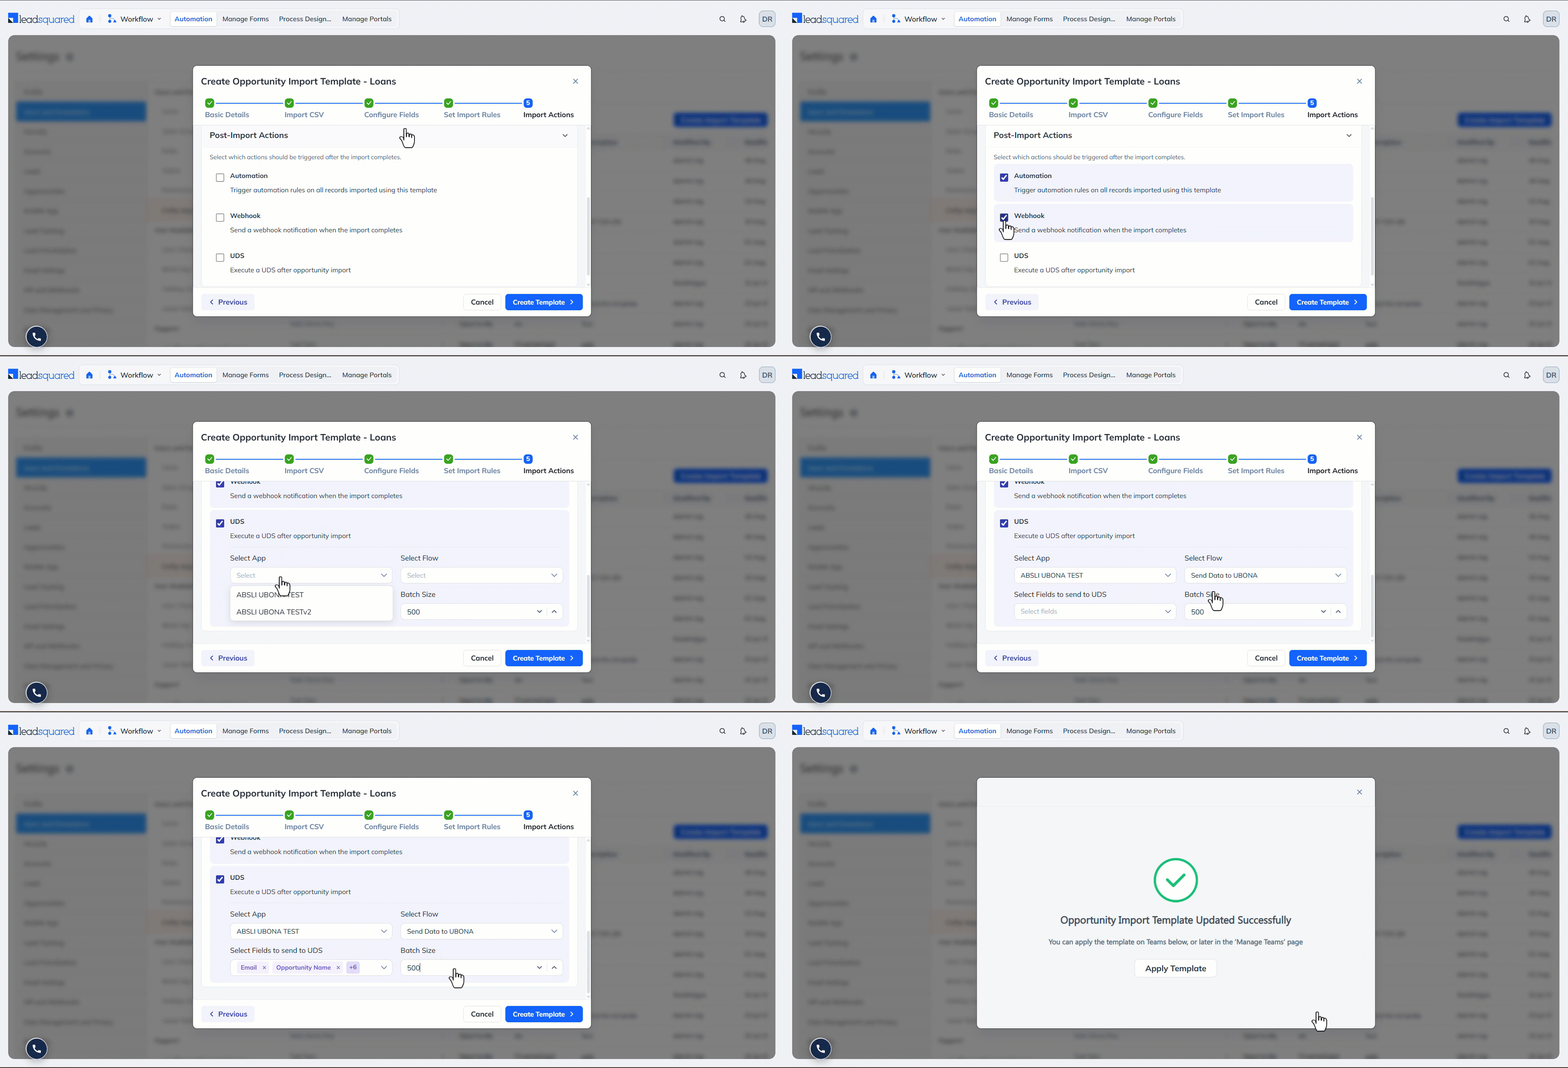
Select the actions you want the system to perform after the import completes.
- Webhook – When enabled, all webhooks configured to trigger when an opportunity field value updates run as expected, provided the import file contains that field.
- Automation – When enabled, all automation configured to trigger when an opportunity field value updates run as expected, provided the import file contains that field.
- UDS – When enabled, select the UDS app, data flow, UDS fields, and batch size to send data from the opportunity import file to a third-party app through UDS.
Once you’re done, click Create Template. You can now apply the template to your teams.
10. Apply Templates to Teams
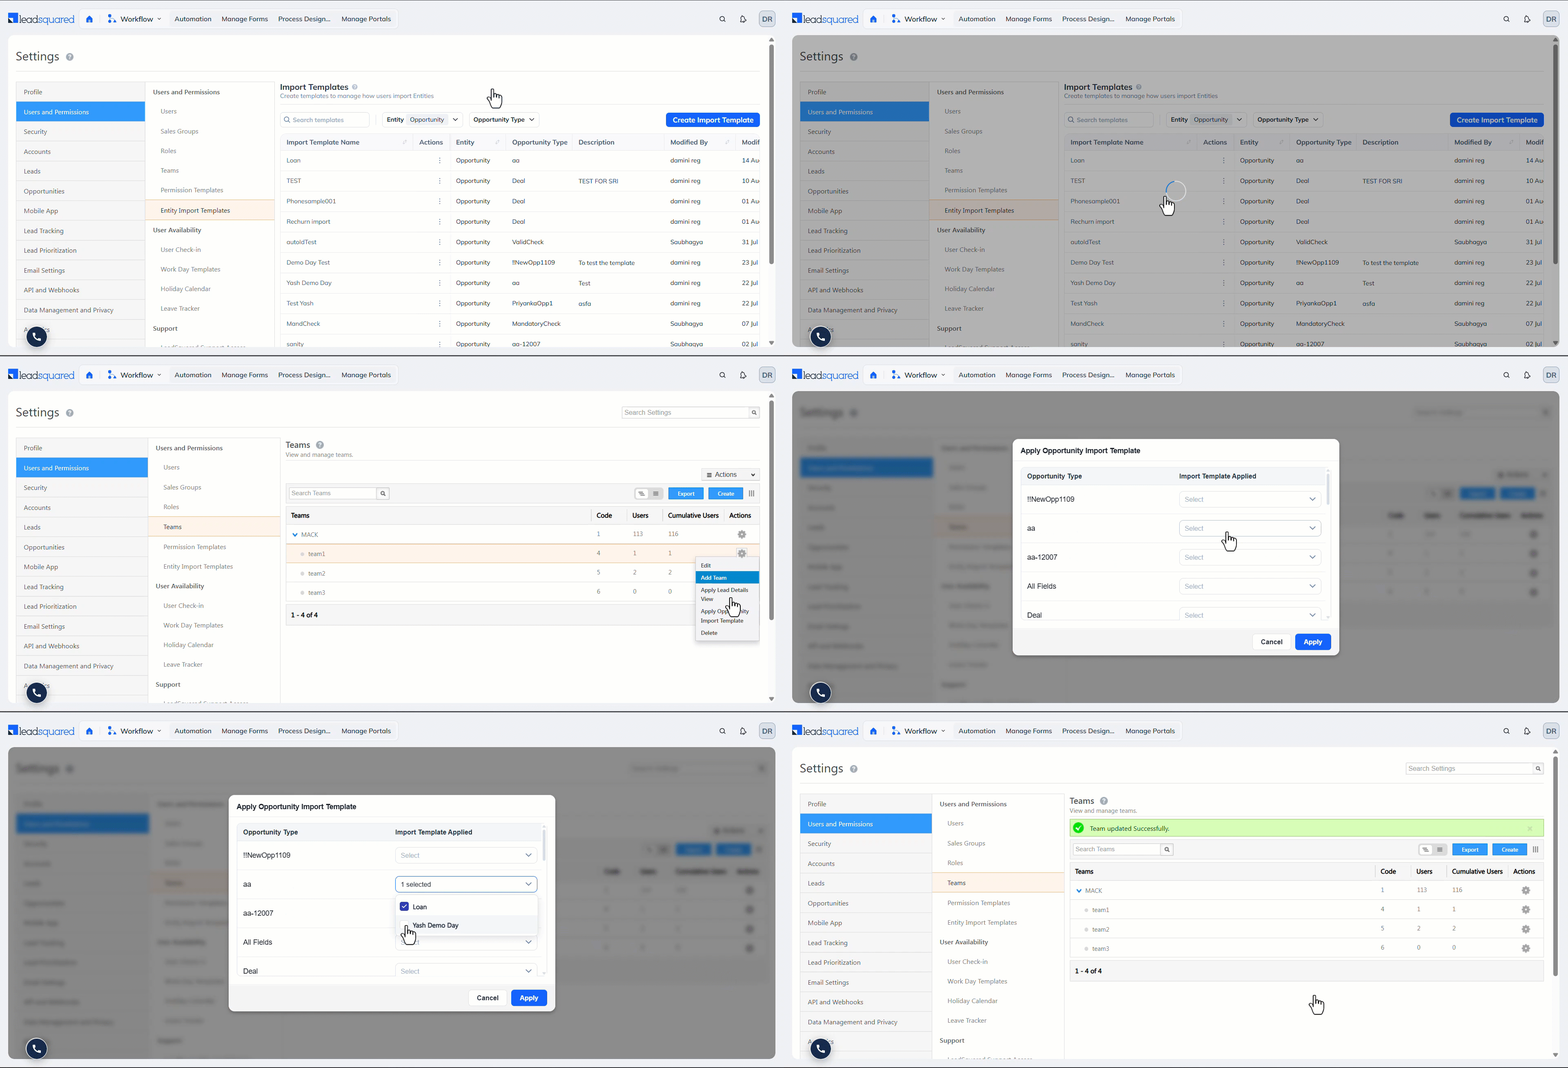
Once you create a template, assign it to the LeadSquared Teams that need to use it.
- On the Import Templates page, under Actions, click the three-dots menu, then click Apply Template.
- Alternatively, on the Opportunity Import Template Updated Successfully pop-up, after a template is created, click Apply Template.
- You will then be redirected to the Teams page.
- On this page, hover over the Actions icon alongside the team to which you want to assign the template, then click Apply Opportunity Import Template.
- On the pop-up, select the templates within each Opportunity Type that you want to assign to the team.
- You can select multiple templates across different Opportunity Types.
- Once you’re done, click Apply. Users in these teams can now use these templates when importing opportunities.
11. Use Import Templates
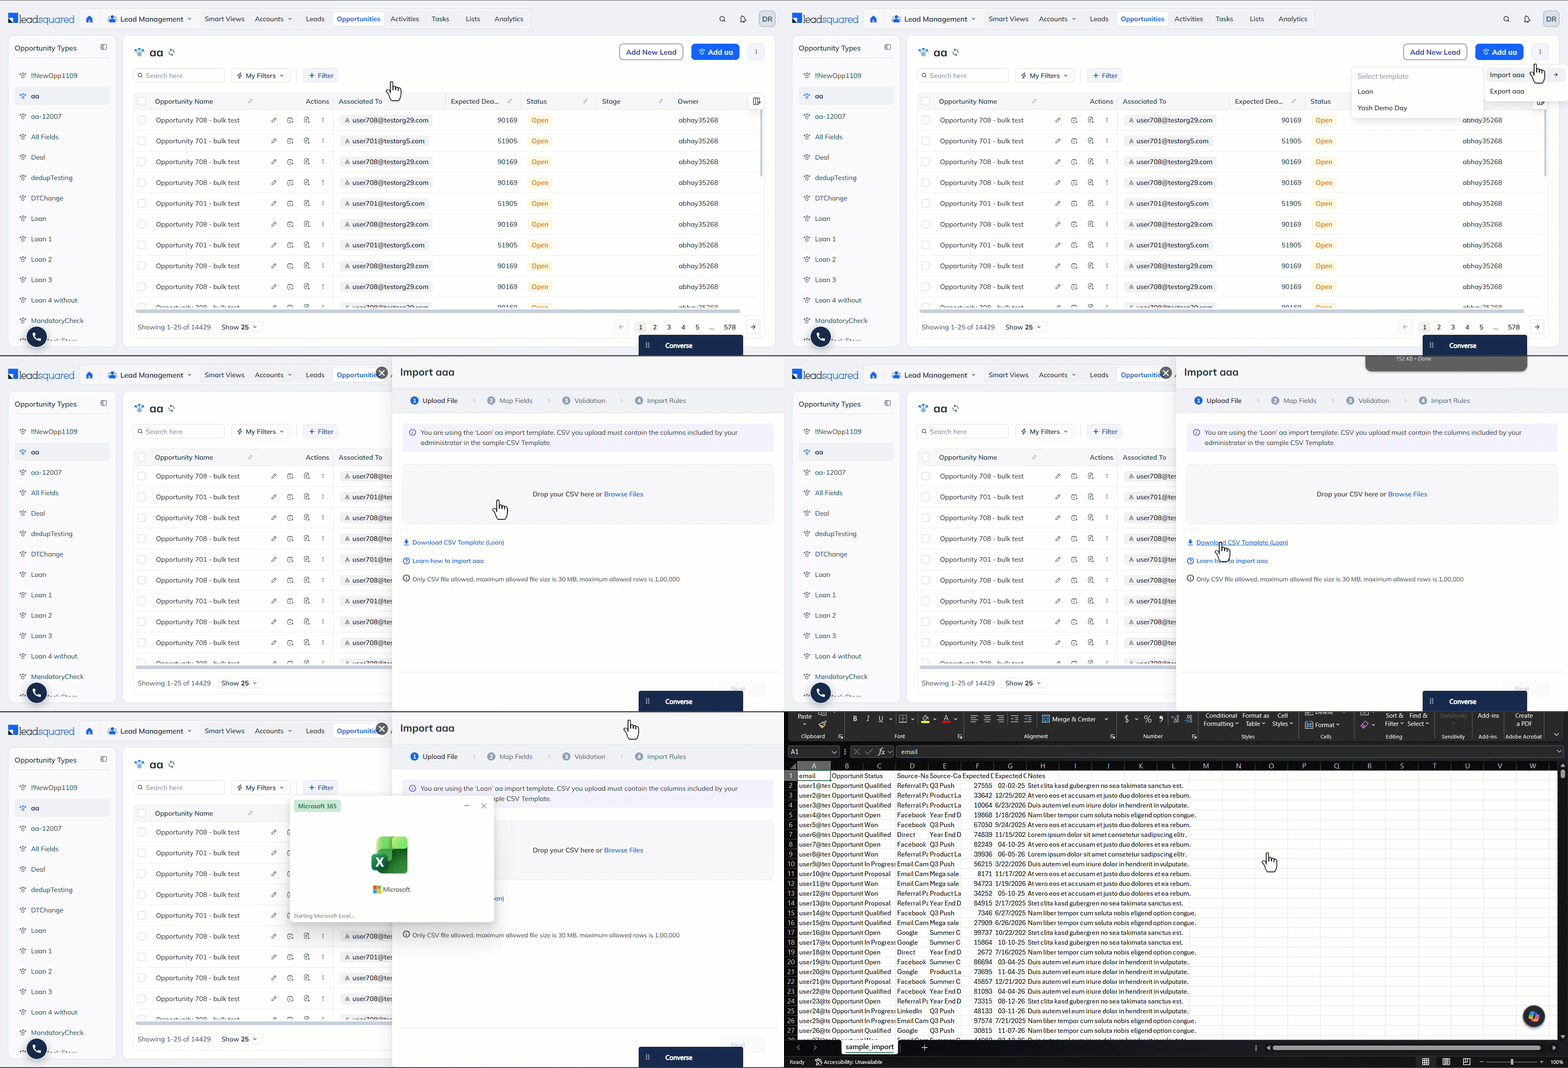
As a sales user, to use the Import Template assigned to you –
- Navigate to the Manage Opportunities page for the Opportunity Type you want to import.
- In the top-right corner, navigate to the three-dots menu, hover over Import Opportunities and select the template you want to use.
- On the import pop-up, download the template’s sample CSV file and enter the required opportunity data. To know more, read Import Opportunities.
- Once you’re done, Import. The opportunities are now imported into LeadSquared.
12. Pause, Resume and Cancel Imports
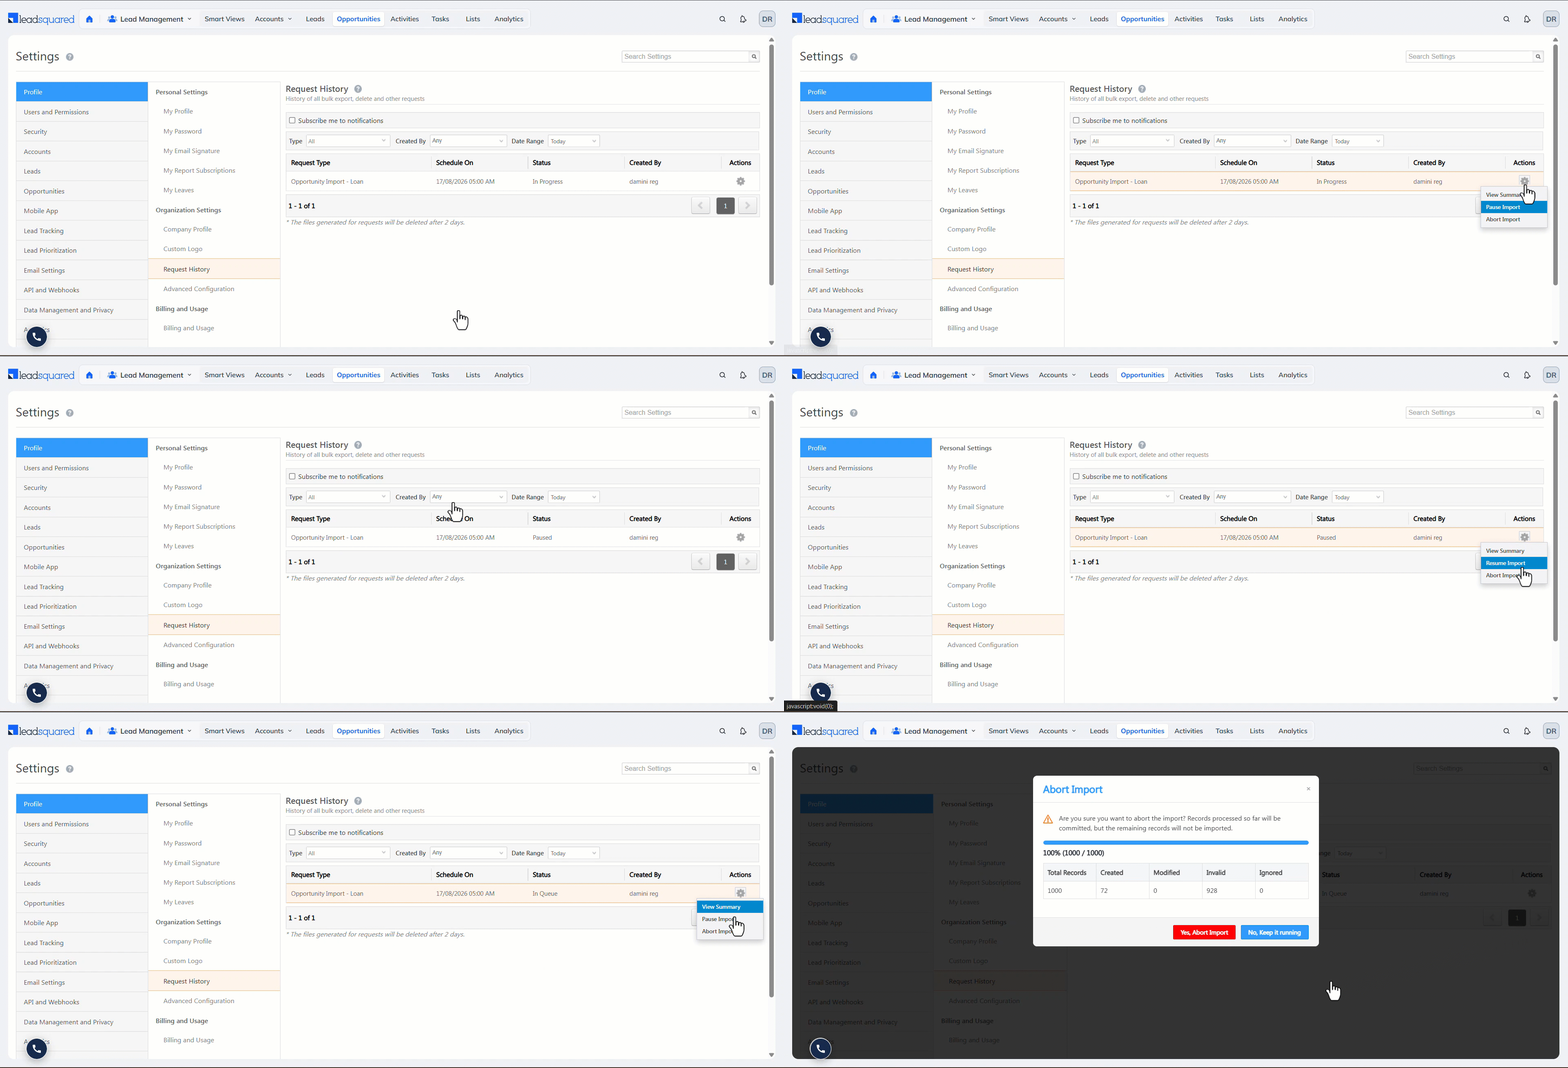
On the Request History page, hover your cursor on the settings icon to perform the following actions for an opportunity import that’s In Progress –
- Pause Import – Lets users pause an opportunity import while it’s in progress.
- Resume Import – Lets users resume a paused opportunity import.
- Abort Import – Lets users cancel an opportunity import while it’s in progress.
Any Questions?
Did you find this article helpful? Please let us know any feedback you may have in the comments section below. We’d love to hear from you and help you out!