


Get Started

Sales Suite
Field Ops
Marketing
Service CRM
Integrations & Apps
FloStack
Manage Leads Page

1. Feature Overview
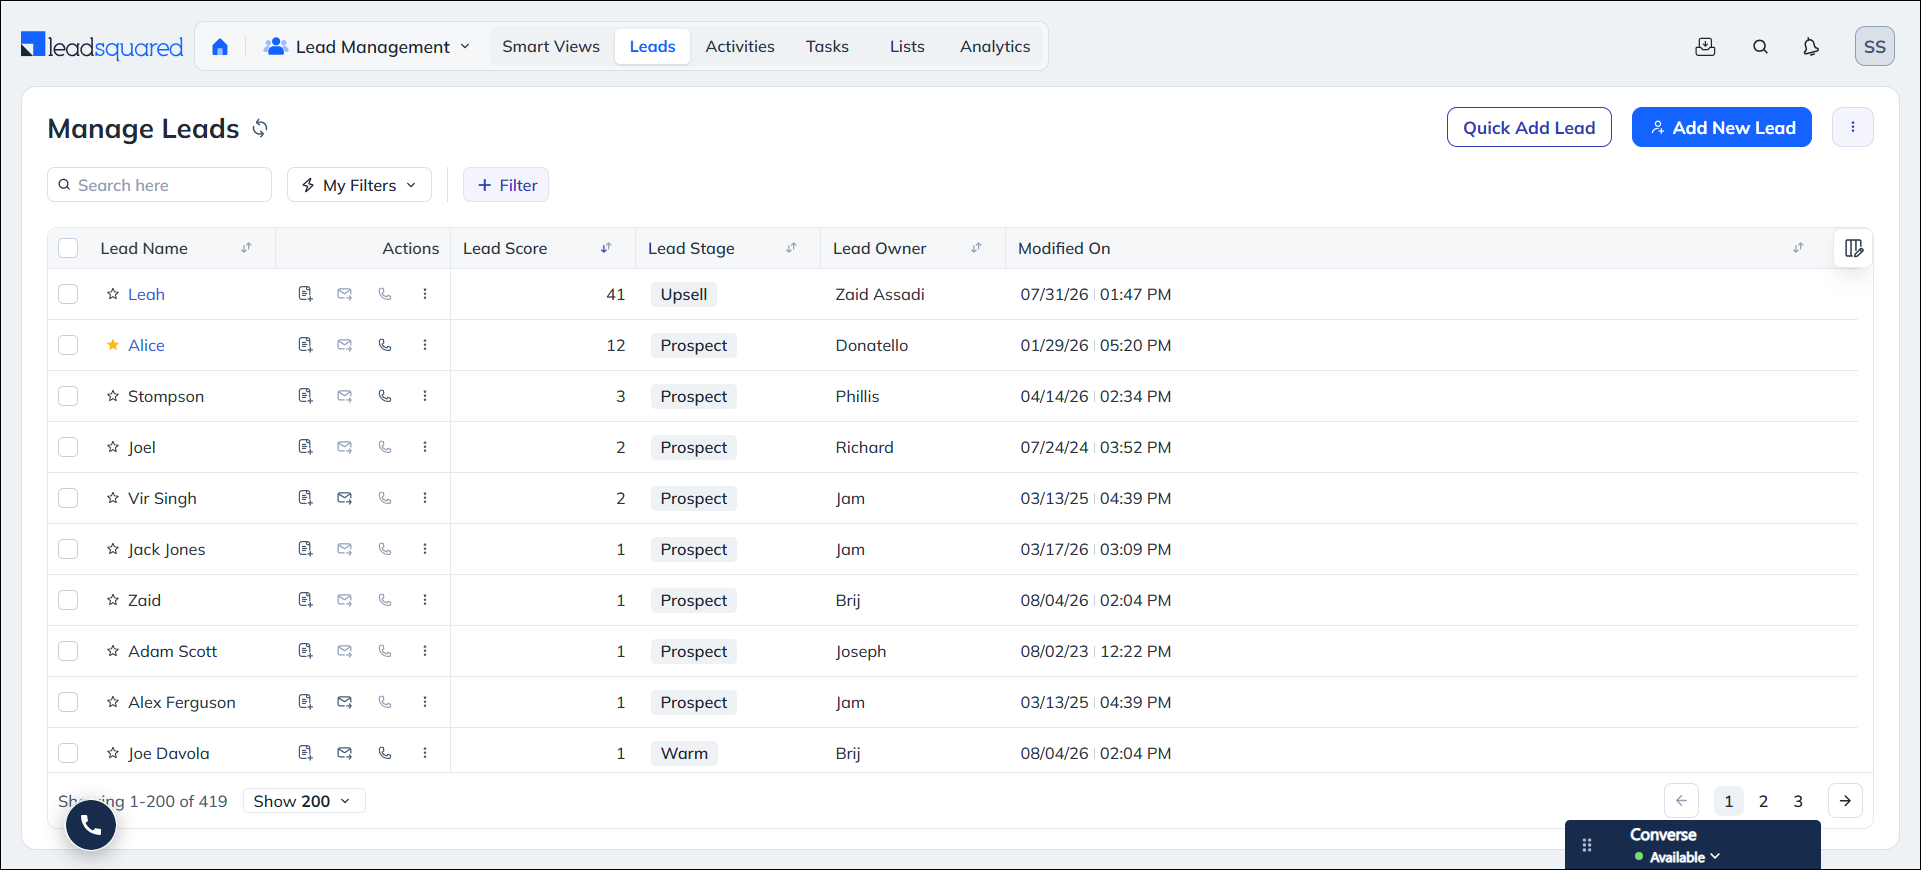
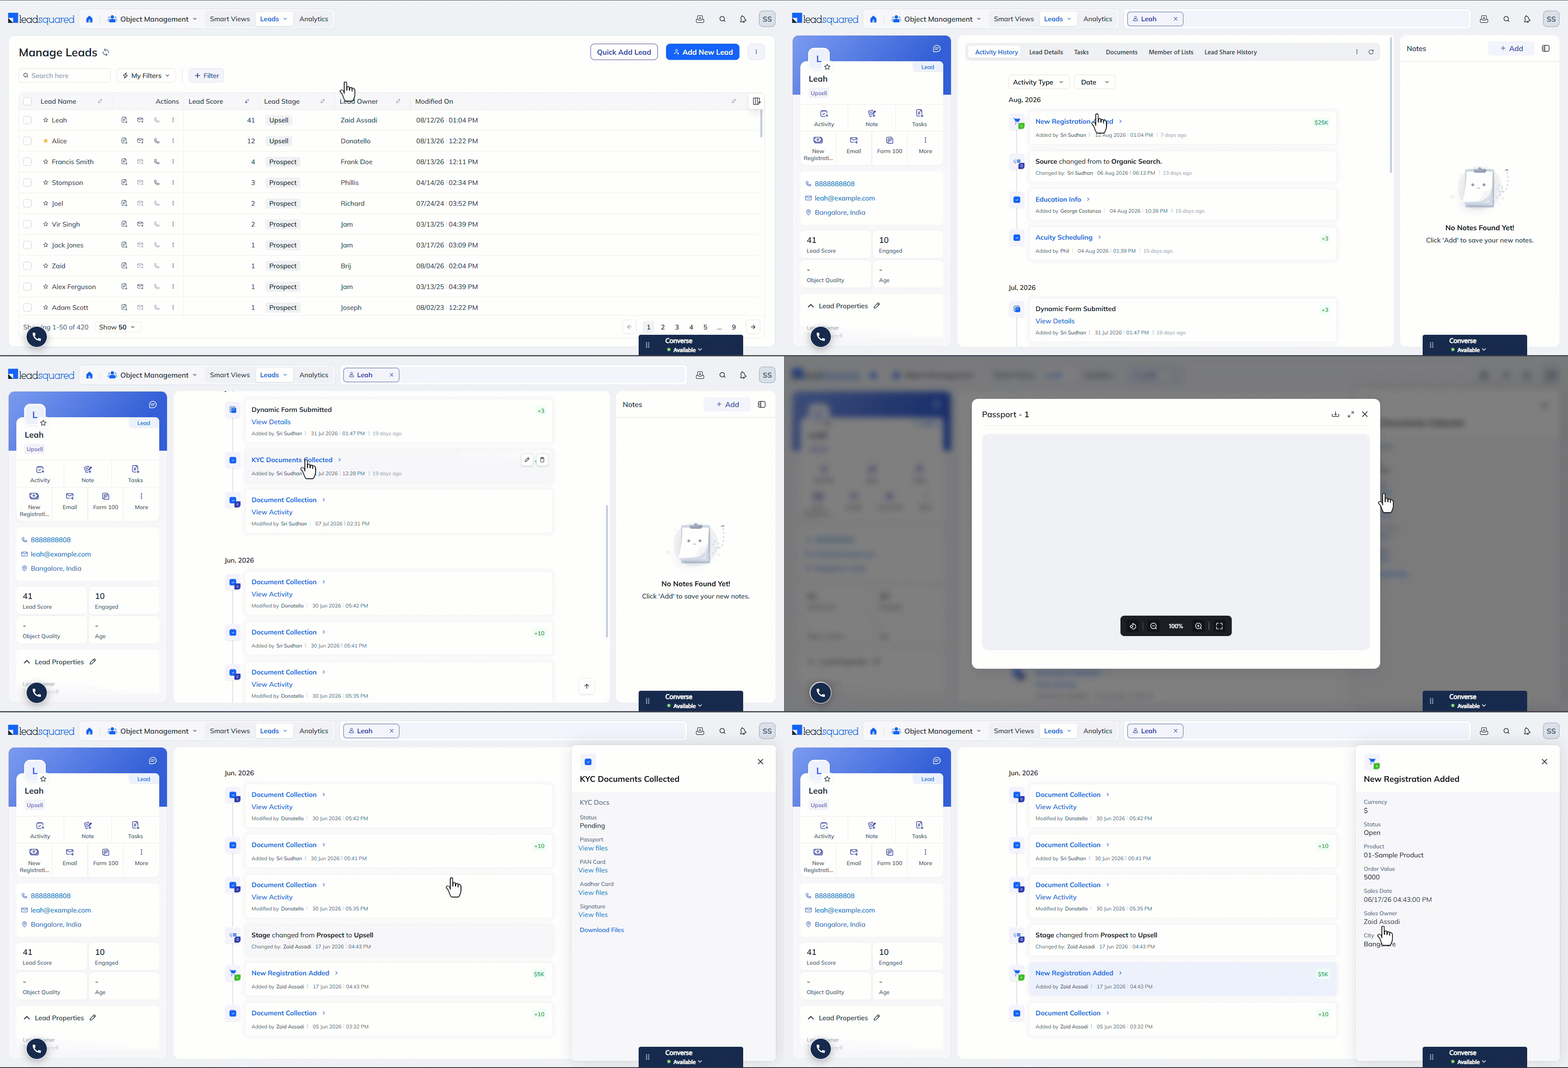
Leads are your potential customers. The Manage Leads page displays all leads created in your account and serves as the primary workspace for managing them throughout the sales process. From this page, you can add and edit leads, send emails, clone leads, add bulk activities and tasks, create opportunities and tickets, and more. You can also filter leads using Advanced Search and Quick Search to find specific records quickly. This article helps you understand, customise, and use the Manage Leads page.
Note:
- To view leads, activities, and tasks side by side on separate tabs, use Smart Views. You can also customise filters and automatically refresh filtered leads. To know more, see Smart Views
- To view all the Opportunities created in your account, refer to Manage Opportunities Page.
- To view all the Accounts created in your account, refer to Accounts Management.
- To view all the Tickets created in your account, refer to Ticket Views Page.
2. Access the Manage Leads Page
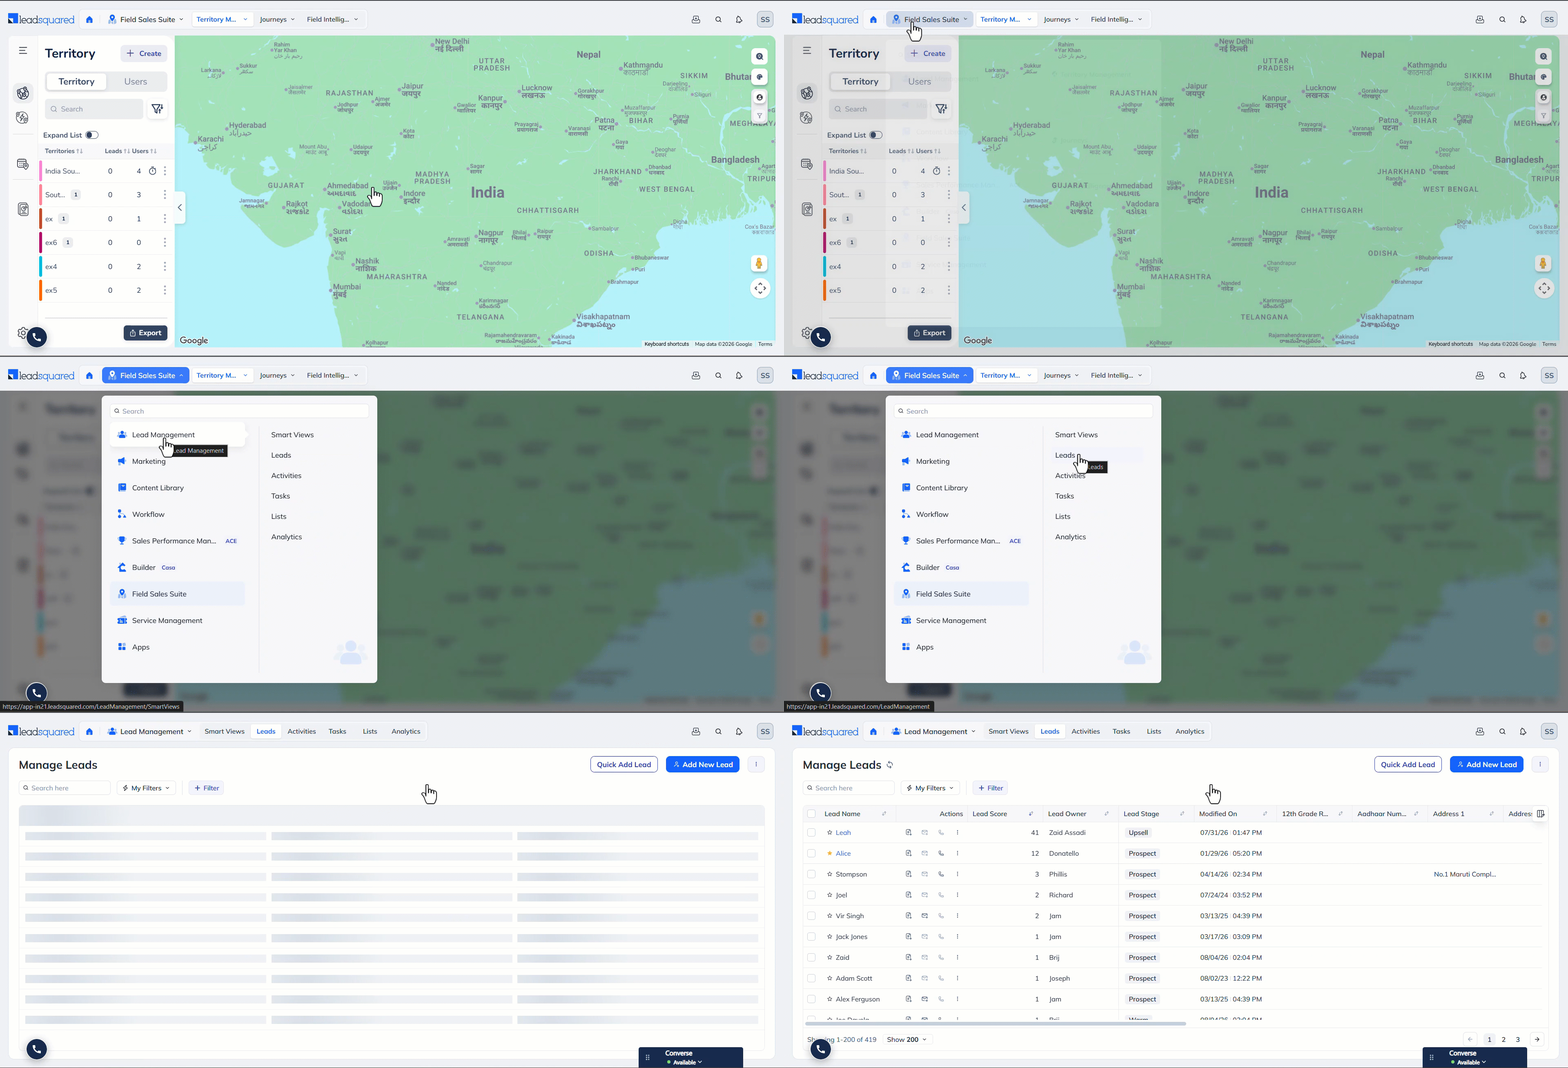
By default, all user roles can access the Manage Leads page by navigating to Lead Management>Leads.
3. Quick Add Lead
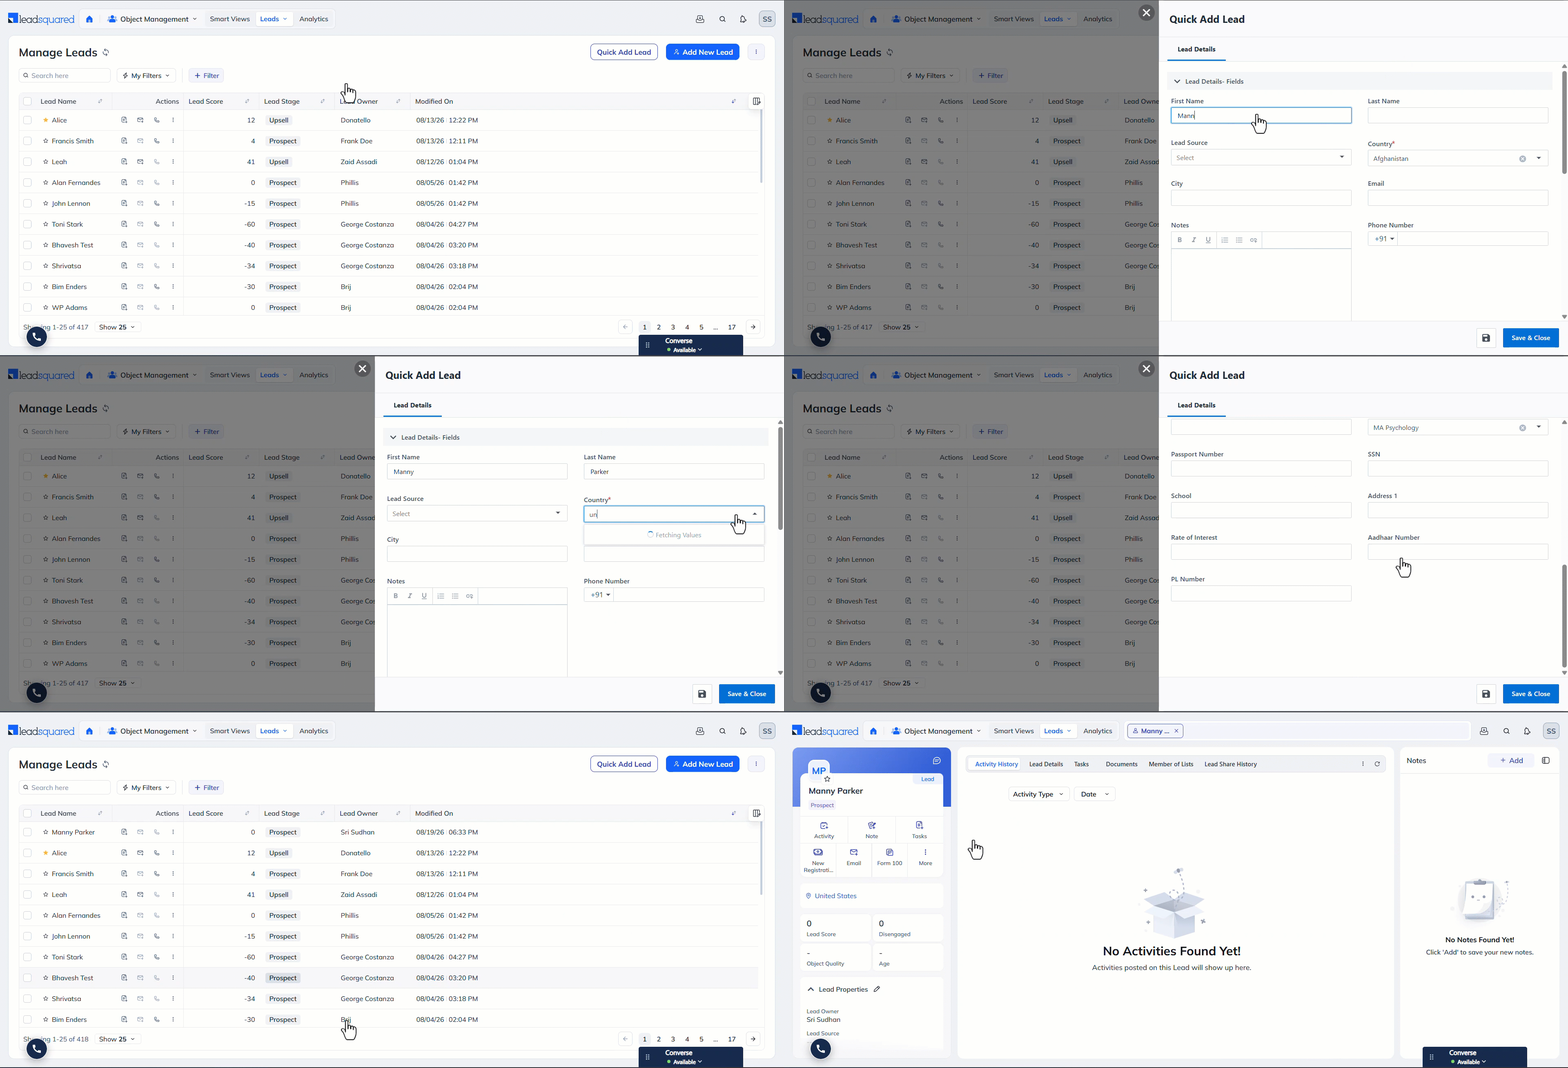
The Quick Add Lead form lets you manually create and add a lead by entering details for a few important and mandatory lead fields configured by your admin. This lets you add leads quickly without spending too much time creating them.
- Navigate to Lead Management>Leads, and click Quick Add Lead.
- On the Quick Add Lead form, enter the details for the relevant lead fields.
- You must enter details for all mandatory fields, marked with a red asterisk*.
- Once you’re done, click Save & Close.
- To save the lead details as a draft without creating the lead, click the save icon.
4. Add New Lead Form
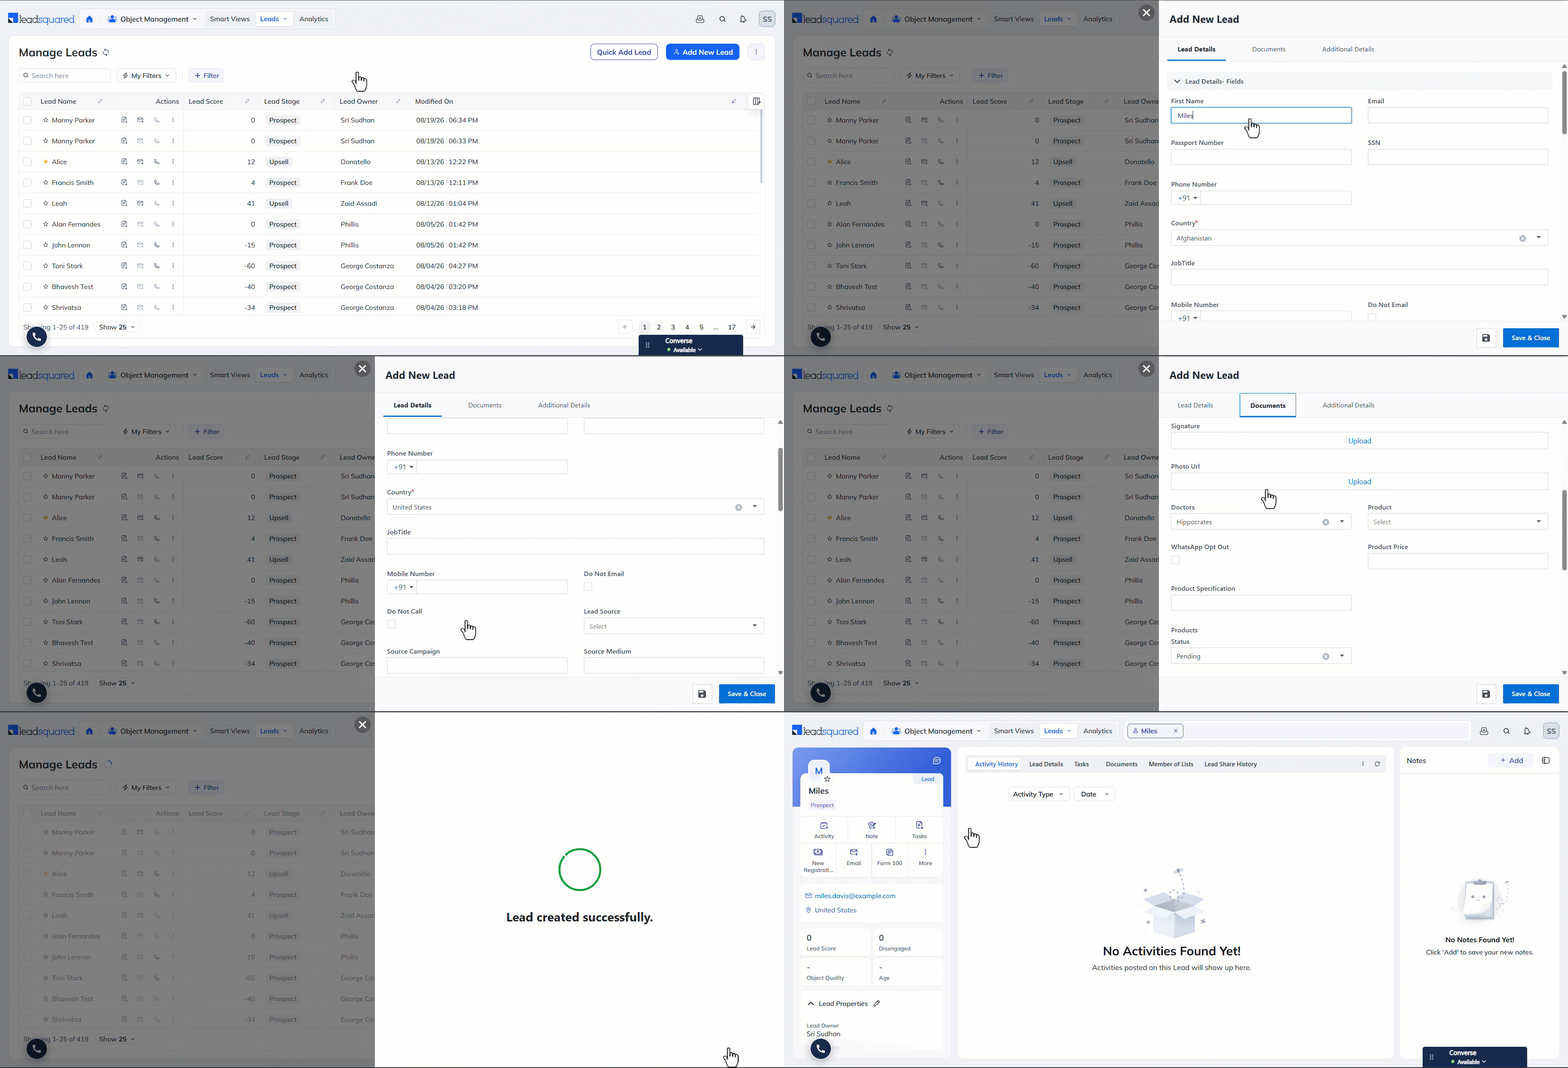
The Add New Lead form lets you enter detailed lead information across multiple fields and tabs configured by your account admins. You can enter information in the form tabs configured by your Admin, such as Lead Details (name, email, phone, etc.), Additional Details (employment type, salary, citizenship, etc.), and Family Details (parent names, spouse name, children names, etc.) to capture comprehensive lead information. This helps you maintain complete and organised lead records.
- Navigate to Lead Management>Leads, and click Add New Lead.
- On the Add New Lead form, enter the details for the relevant lead fields.
- You must enter details for all mandatory fields, marked with a red asterisk*.
- Once you’re done, click Save & Close.
- To save the lead details as a draft without creating the lead, click the save icon.
5. Individual Lead Actions
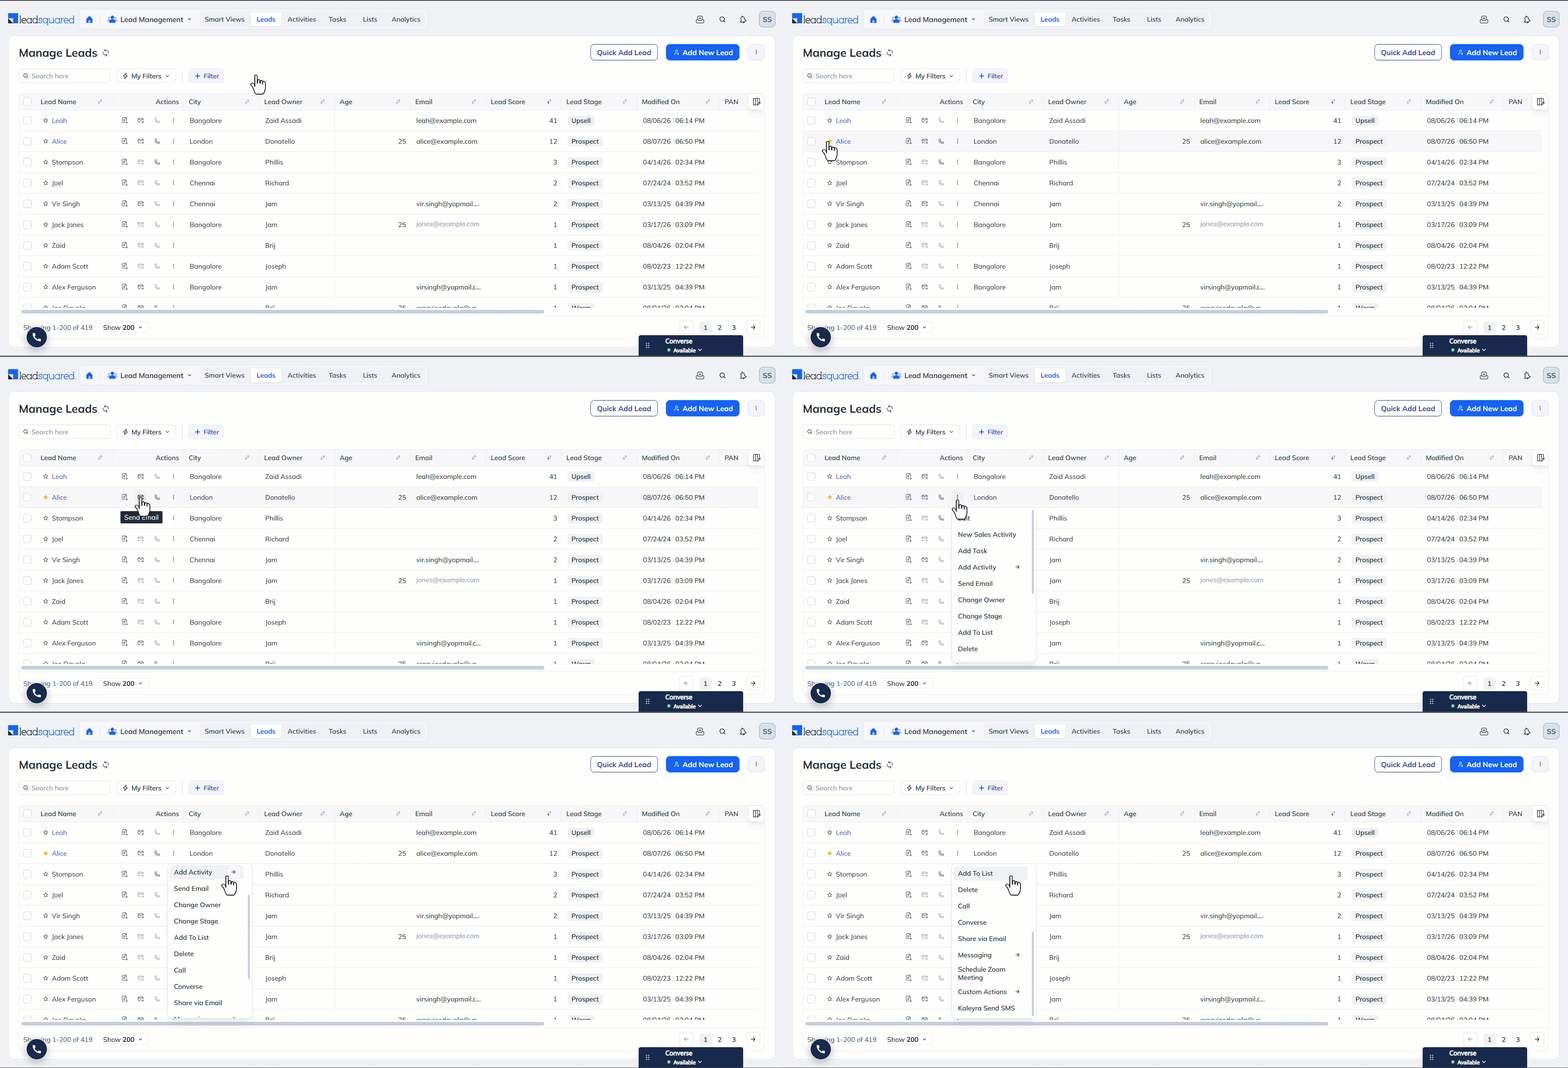
Perform the following individual actions on a lead –
- Star a Lead – Click the star icon to mark a lead that requires special attention. When you star a lead, it is automatically added to the Starred Leads List, available under the Manage Lists page. To know more, read Star your Leads.
- Add Task – Click the rectangular form icon to add a task to the lead. Tasks include appointments (such as Meetings and Phone Calls) and to-dos (such as Document Collection and KYC Check) that help you convert leads into customers. To know more, read Add Tasks to Leads.
- Send Email – Click the email icon to send a direct email to the lead. To know more, read Send Quick Emails from the Manage Leads Page.
- Call – Click the call icon to place a phone call to the lead.
Hover over the three-dots menu alongside a lead to perform the following additional actions –
- Edit – Lets you edit an existing lead’s details (such as phone number, email, city, etc.).
- New Sales Activity – Sales activities help you capture and manage revenue-related transactions for your leads. This action lets you post a sales activity directly to a lead. To know more, read Sales Activity Management.
- Add Task – Click the rectangular form icon to add a task to the lead. Tasks include appointments (such as Meetings and Phone Calls) and to-dos (such as Document Collection and KYC Check) that help you convert leads into customers. To know more, read Add Tasks to Leads.
- Add Activity – Activities are the various events that have taken place in a lead’s sales journey (like Email Opened, Phone Call – Inbound, Documents Collected, etc.). This action lets you post custom activities directly on a lead.
- Send Email – Click the email icon to send a direct email to the lead. To know more, read Send Quick Emails from the Manage Leads Page.
- Change Owner – Change the lead owner to another user in your account.
- Change Stage – Update the lead to a different stage.
- Add to List – Lead lists group leads in your account based on one or more common factors (such as all leads in Bangalore or all leads created through the source email). Add the lead to an existing lead list.
- Delete – Deletes the lead from your account for reasons such as non-performance or lack of interest. To know more, read Delete Leads.
- Call – Click the call icon to place a phone call to the lead.
- Converse – Converse is an omnichannel engagement platform that lets you have real-time conversations with leads. This action lets you start a chat with a lead. To know more, read LeadSquared Converse.
- Add Opportunity – Add a LeadSquared Opportunity to the lead.
- Share via Email – Share lead information with other users in your account through email. To know more, read Share a Lead via Email.
- Messaging – Nurture your leads by sending messages through WhatsApp or SMS. Configure the WhatsApp or SMS connectors before you chat with your leads. This helps you engage leads instantly from a single platform.
- Custom Actions – In addition to the default actions listed above, custom actions from installed and configured LeadSquared apps (such as the Custom Actions Connector, SMS Connectors, etc.) are also available here.
Note:
- To call a lead from the Manage Leads page, the phone number must include the country code. Otherwise, the Call icon is greyed out for that lead. To know more, read Telephony Advanced Configuration Through General Settings
- Enable the Quick Actions setting for the activity type you want to add through the Add Activity action.
6. Bulk Lead Actions
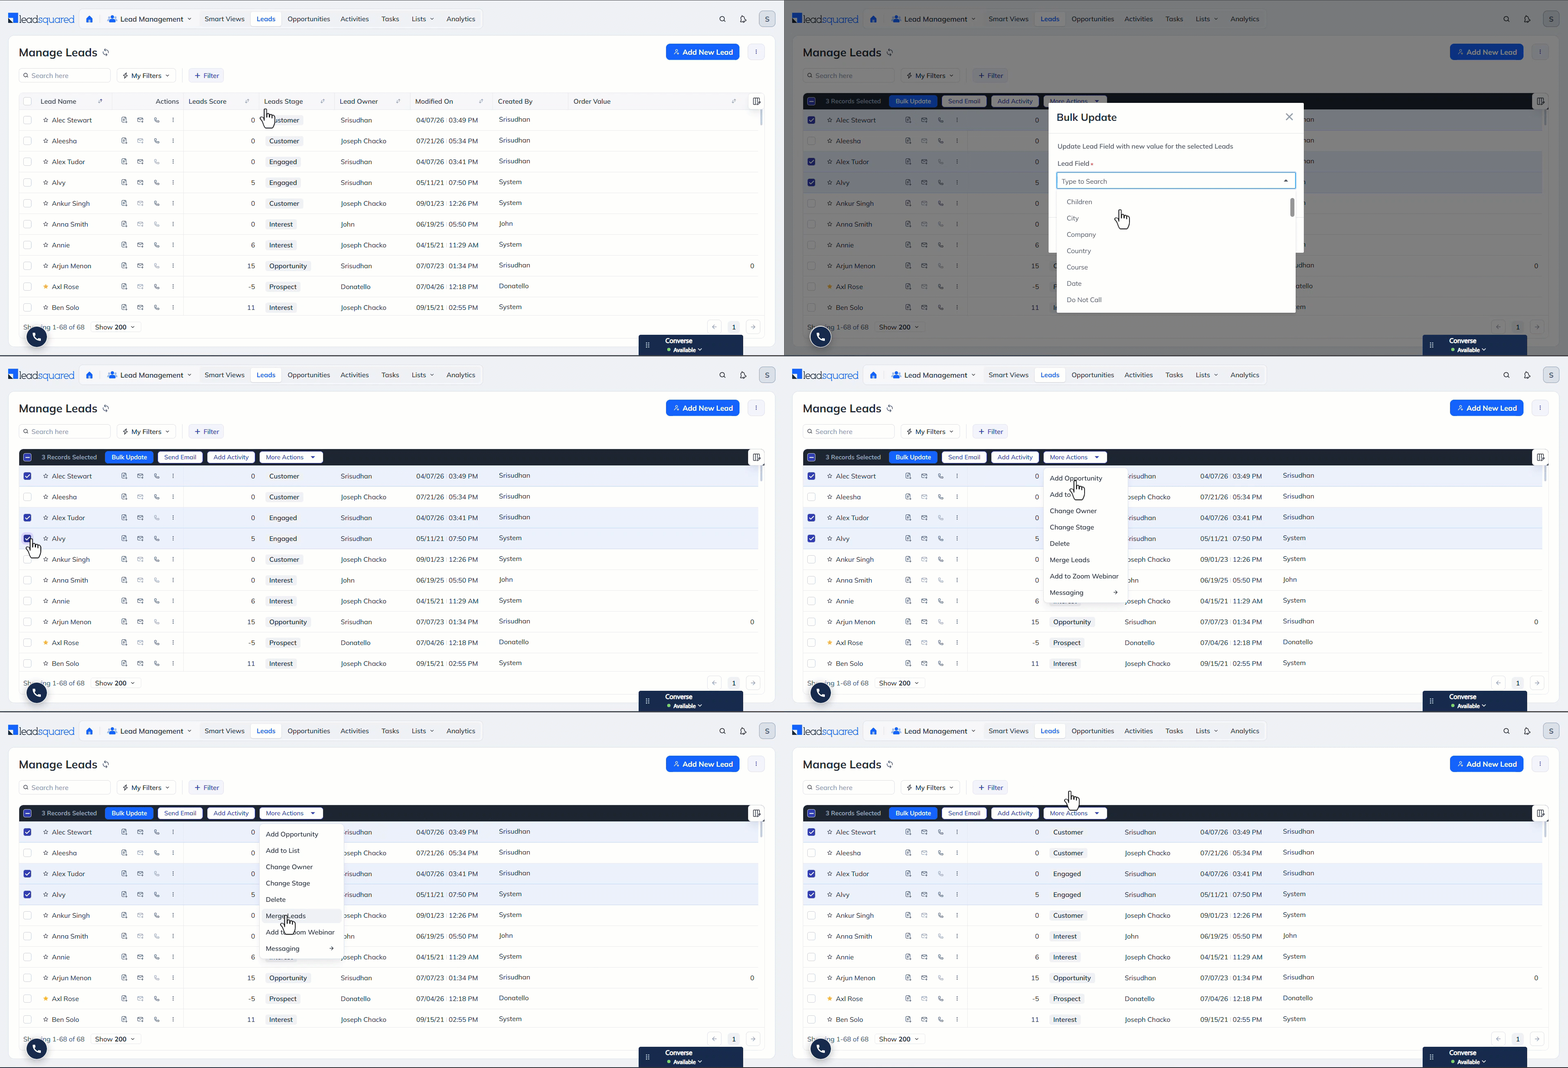
To perform the following bulk actions on multiple leads, select the leads using the checkboxes next to their names –
- Bulk Update – On the Bulk Update pop-up, you can update custom and system lead field values for all selected leads, all leads in your account, or the first N leads. For example, if you enter 10, the first 10 leads on the Manage Leads page are updated.
- Send Email – Send the same email to the selected leads.
- Add Activity – Add custom activities to the selected leads.
- Add Opportunity – Add opportunities in bulk to the selected leads.
- Add to List – Add the selected leads to an existing lead list.
- Change Owner – Update the owner for all selected leads to the same user.
- Change Stage – Update the lead stage for all selected leads to the same stage.
- Delete – Delete all the selected leads. To know more, read Delete Leads.
- Merge Leads – Merge duplicate leads into a single lead. This lets you choose which lead details to retain and which to overwrite. To know more, read Merge Leads.
- Custom Actions – In addition to the default actions listed above, custom actions from installed and configured LeadSquared apps (such as the Custom Actions Connector, SMS Connectors, etc.) are also available here.
Note:
- To select all leads visible on the Manage Leads page, click the checkbox next to Lead Name in the column header.
- You can display up to 200 leads on one page.
- You can send bulk emails to up to 25 leads from the Manage Leads page. To send emails to more than 25 leads, read Email Campaigns.
- You can add bulk activities only for custom Activity Types with the Quick Add setting enabled.
- You can merge up to 20 leads in a single operation.
7. Basic Lead Search
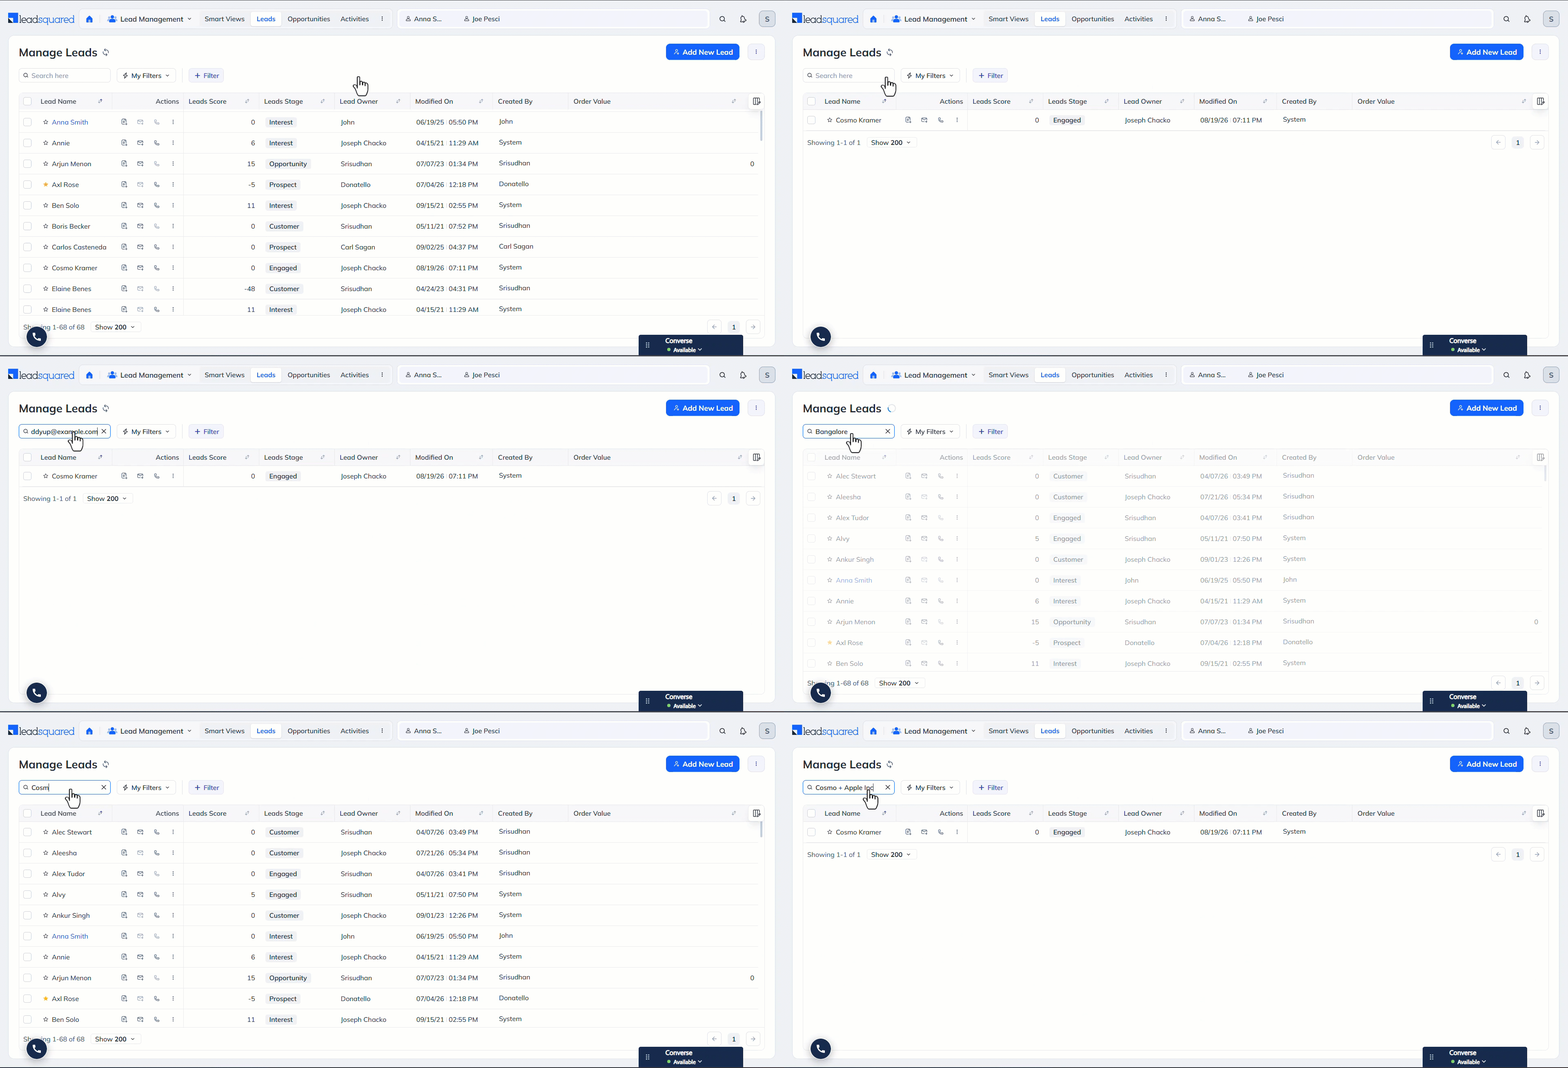
Search for leads on the Manage Leads page by entering their details in the Search bar. You can search by name, email address, phone number, city, and more.
You can also search using full words (for example, “Cosmo”), partial words (“Cos”), multiple words (“Cosmo + Bangalore”), or exclude terms using a minus sign (“Cosmo – Chennai” shows leads named Mitch who are not from Chennai), and for an exact string, by enclosing it in double quotes (“Cosmo Apple Inc”). To learn more, refer to Quick Search.
8. Filters
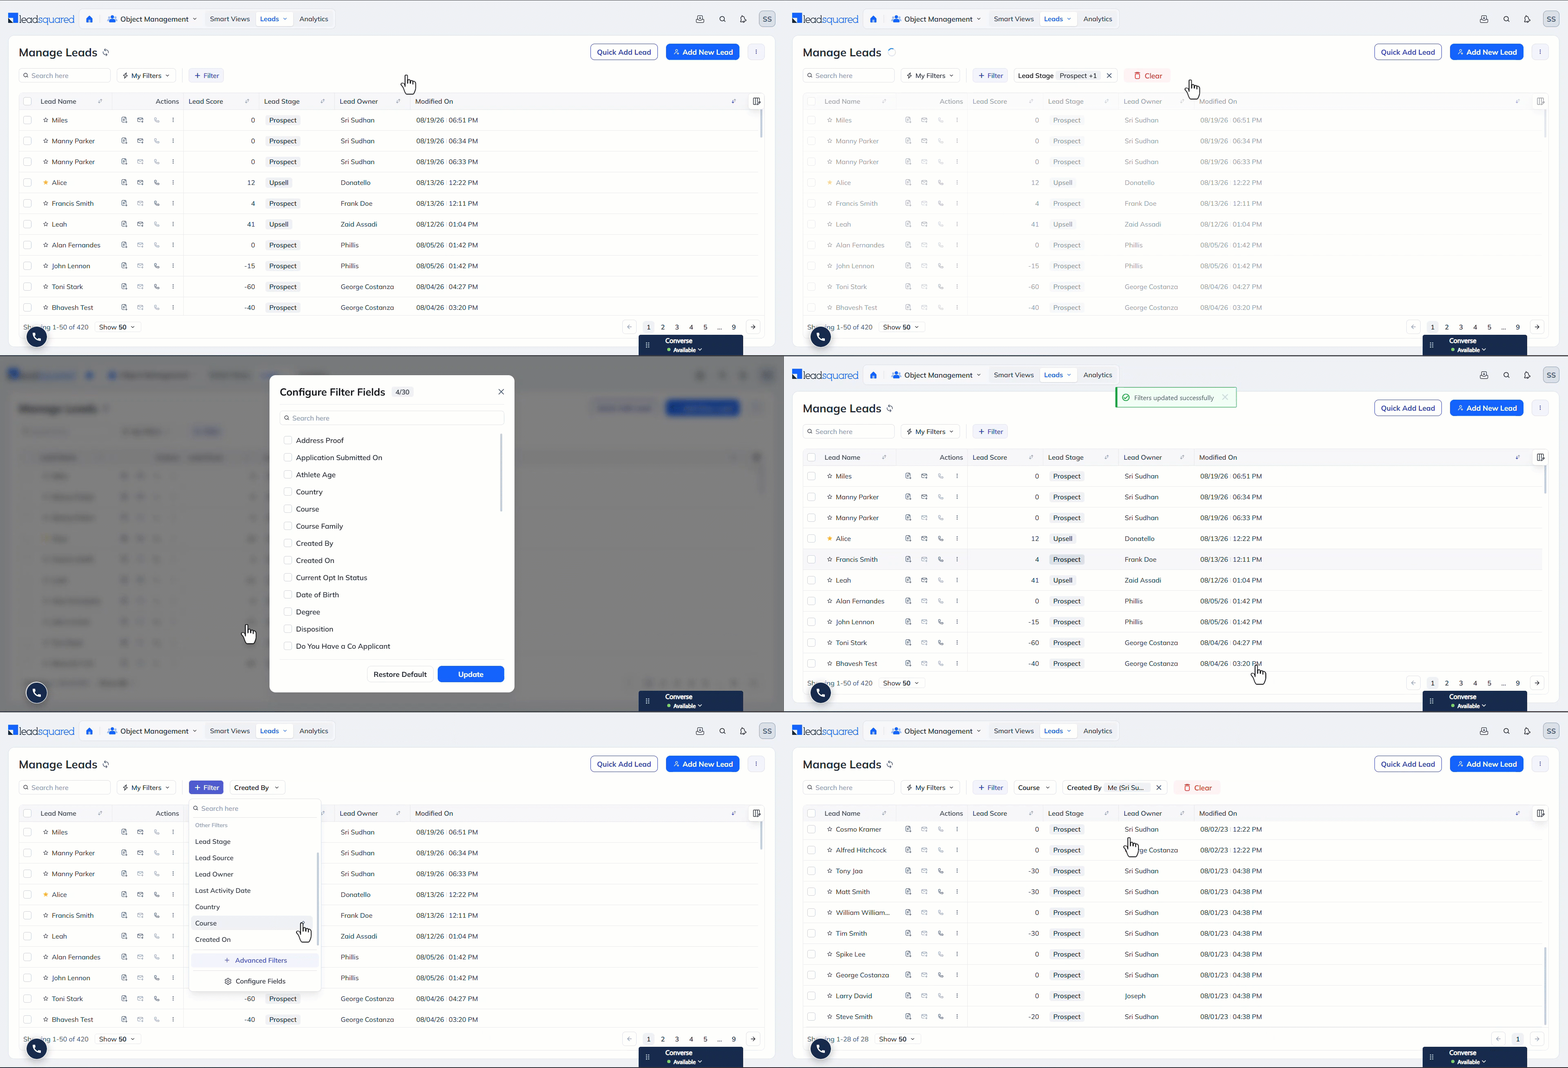
Filters let you select up to 20 lead fields to find leads based on the values you enter. For example, if you add Lead Stage as a filter and select Prospect and Warm, the Manage Leads page displays all leads in these stages.
- To add fields as filters, click Configure Fields and select the lead field.
- Once you add a field, click the pin icon to pin it as a filter. The pinned filters will always be visible on the Manage Leads page, next to the Filters button.
- You can add up to 30 fields as filters and pin up to 20 of these fields.
To know more, refer to Create Quick Filter to Find Leads.
9. Advanced Filters
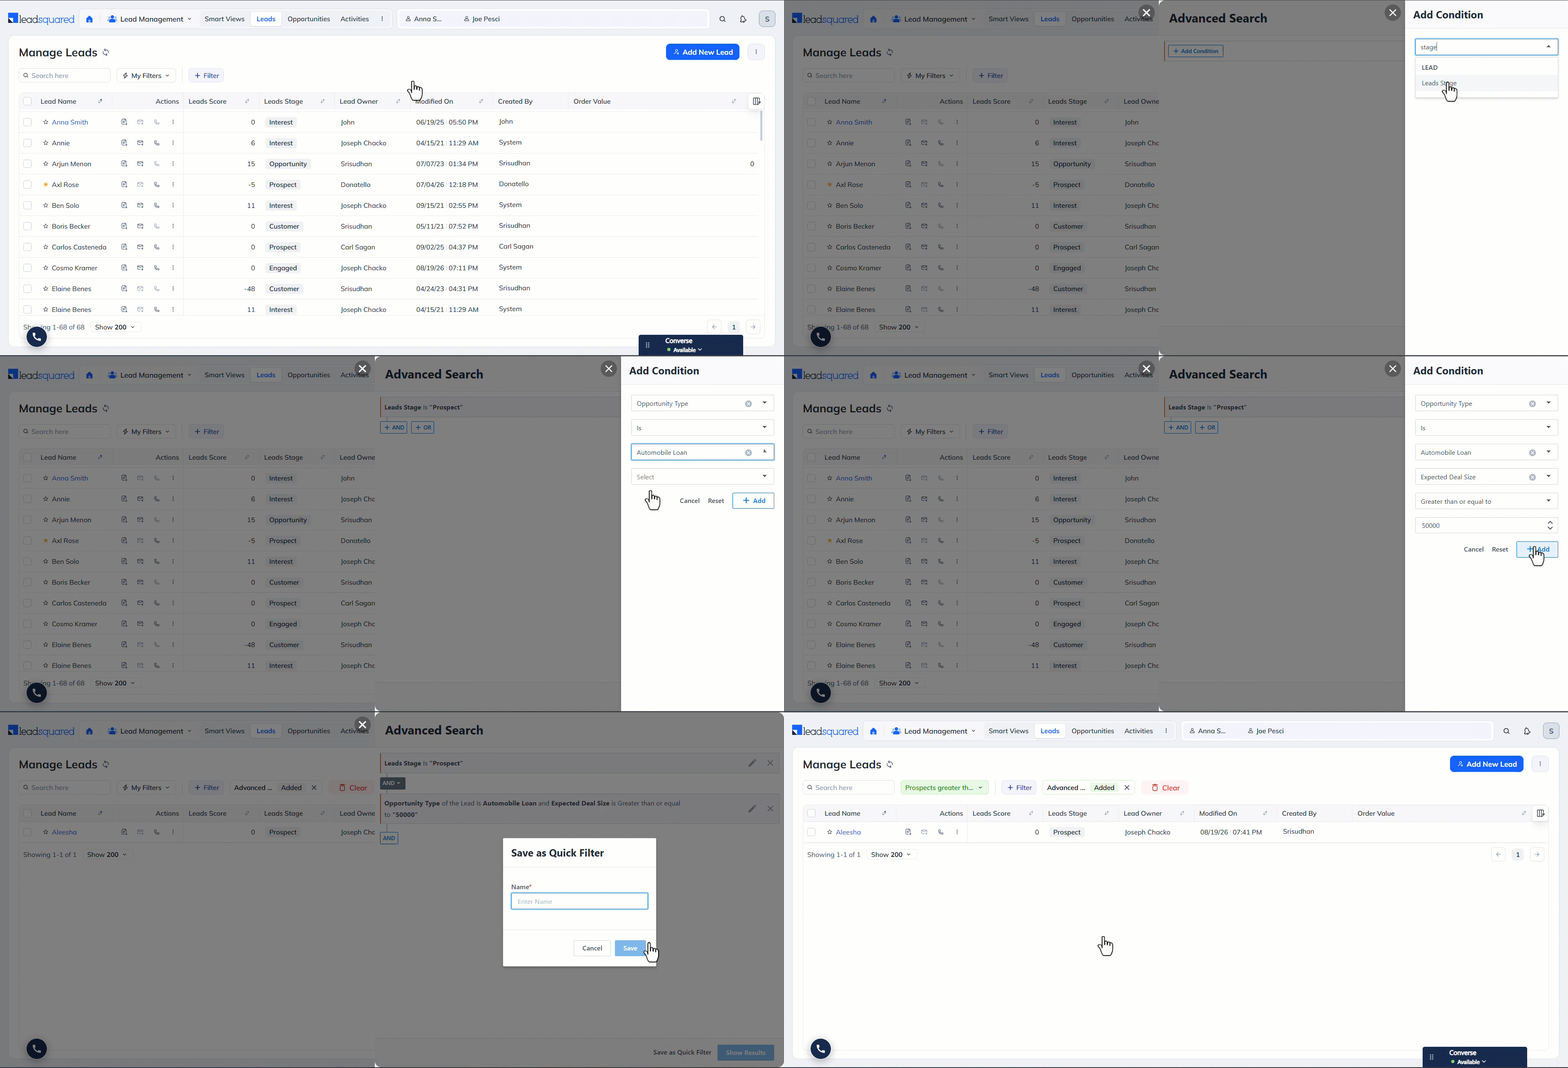
Advanced Filters let you find leads that meet one or more search conditions. For example, you can search for leads created in Bangalore, with Joseph as the lead owner, and currently in the Engaged stage. You can save these conditions as My Filters to reuse them and quickly find leads that meet the same criteria in the future. This helps you identify and work with the most relevant leads.
- Click the Filter button, and then click Advanced Filters.
- On the Advanced Search pop-up, click Add Condition to enter the relevant search conditions.
- From the dropdown, select the entity (lead, opportunity, activity, task, or sales group), the corresponding field (such as Lead Stage, Expected Deal Size, or Meeting Task), and the value for that field (such as Lead Stage is Prospect, Expected Deal Size greater than 50,000, or Meeting Completed on This Month).
- You can then add multiple conditions using the AND or OR conditions.
- AND – Fetches records that meet all the conditions you add. For example, use AND to find leads with the Lead Stage set to Engaged and an Expected Deal Size greater than 50,000.
- OR – Fetches records that meet any of the conditions you add. For example, use OR to find leads with the Lead Stage set to Engaged or the Lead Stage set to Qualified.
- Once you’re done adding conditions, click Show Results.
- To save these conditions for future use, on the Advanced Search pop-up, click Save as Quick Filter, enter a relevant name, and click Save. The filter is available under My Filters, along with all the advanced filters saved in your account.
10. Import and Export Leads
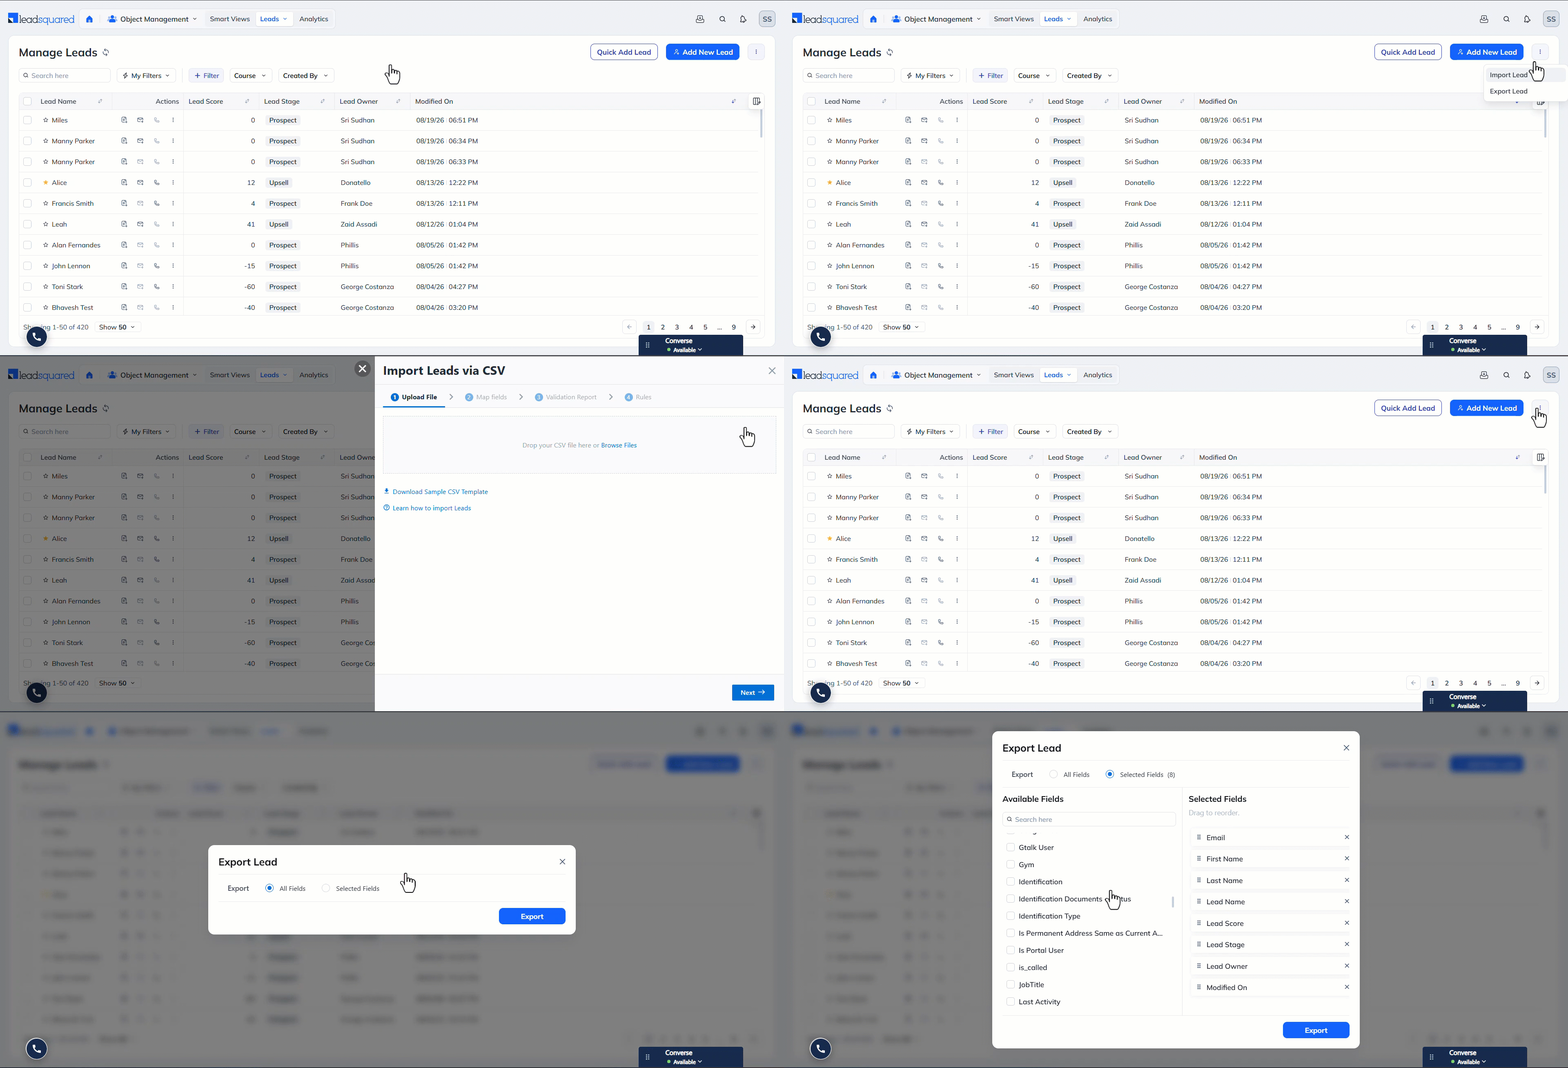
Under your profile name, click the three-dots menu to import and export leads.
- Import Leads – Import leads into LeadSquared through a CSV file. This lets you add multiple leads at once, saving time and effort. To know more, refer to Import Your Leads.
- Export Leads – Export all lead fields or specific lead fields in a CSV file. This makes it easy to analyse, back up, and share lead information outside LeadSquared. To know more, refer to Export Your Leads.
11. Manage Columns
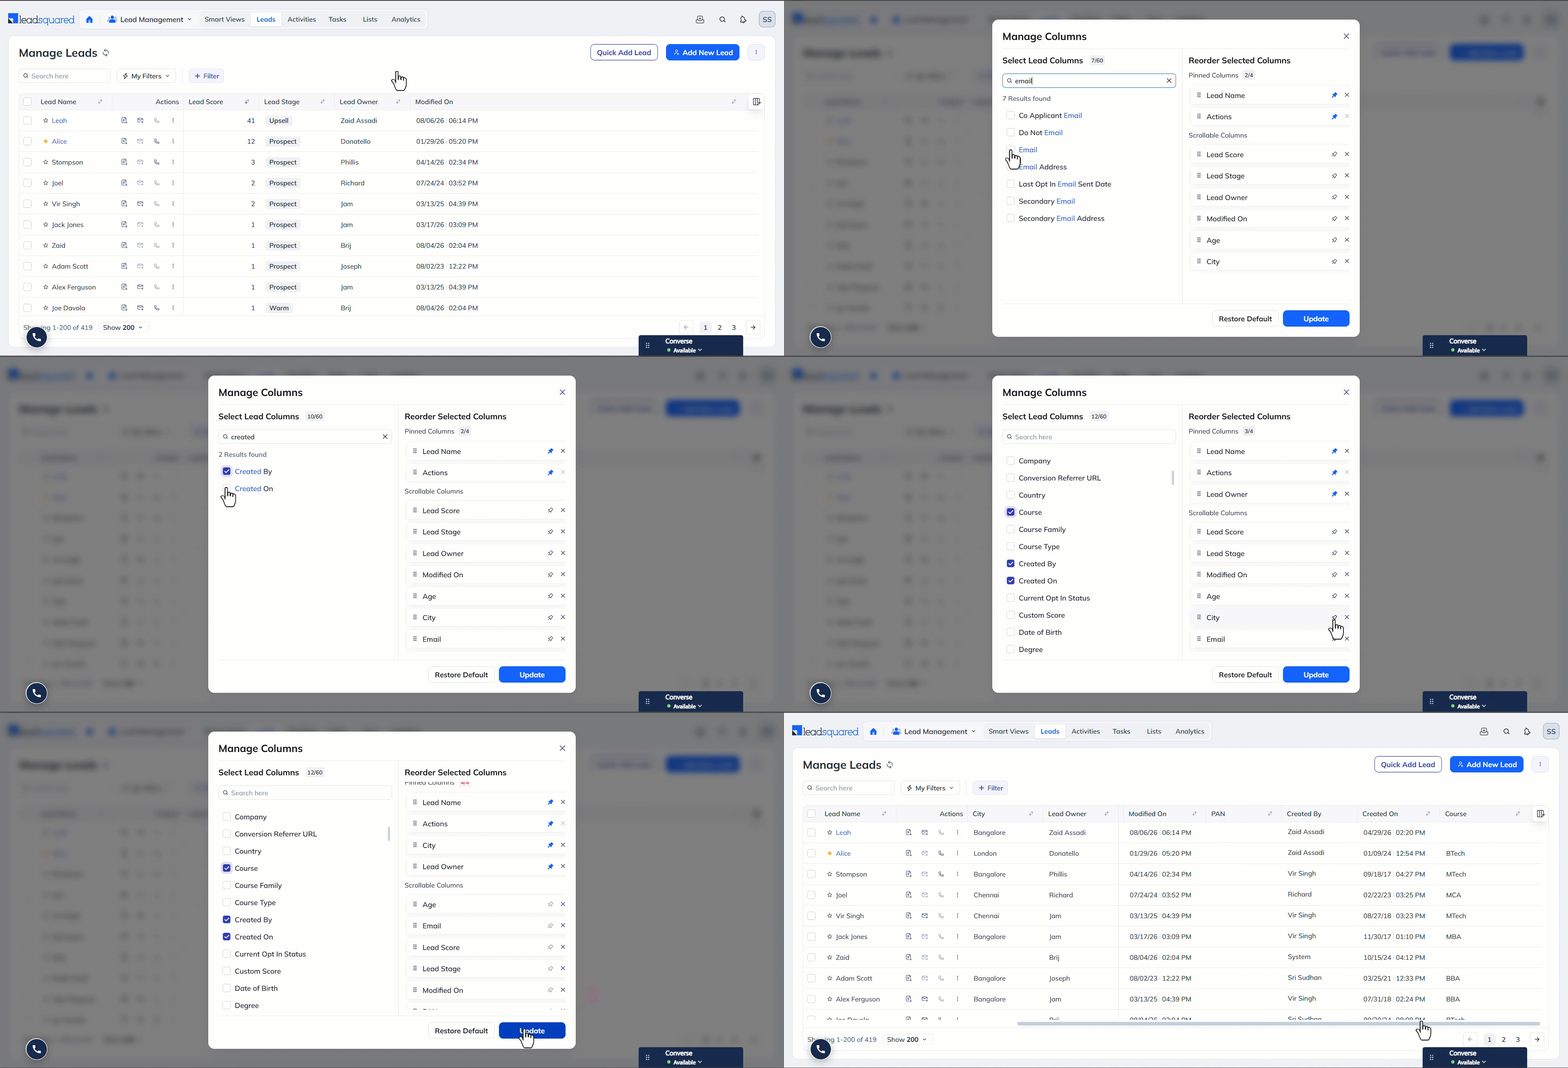
On the Manage Leads page, lead fields are displayed as columns in the grid. By default, the Lead Name, Actions, Lead Score, Lead Stage, Lead Owner, and Modified On columns are displayed. However, each user can customise the columns to suit their preferences. These customisations apply only to their own account and do not affect other users’ accounts. To customise these columns –
- On the top-right corner of the lead grid, click the Manage Columns icon.
- On the Manage Columns pop-up, under Select Lead Columns, select the default and custom lead fields you want to display as columns in the lead grid.
- After adding the columns, under Reorder Selected Columns, drag and drop the columns in the order in which you want to view them on the grid.
- Pinned Columns – When you scroll horizontally across the grid, the pinned columns remain visible while the other columns scroll in and out of view. Use the pin icon to pin up to four columns
- Scrollable Columns – Select the order in which you want to view the scrollable columns.
- Once you’re done, click Update.
Note:
- The Actions column is pinned by default and cannot be unpinned or reordered.
- You can add up to 60 columns.
- After customising the columns, click Restore Default to revert to the default set of six columns.
12. Other Page Actions
In addition to the actions listed above, you can also perform the following actions on the Manage Leads page –
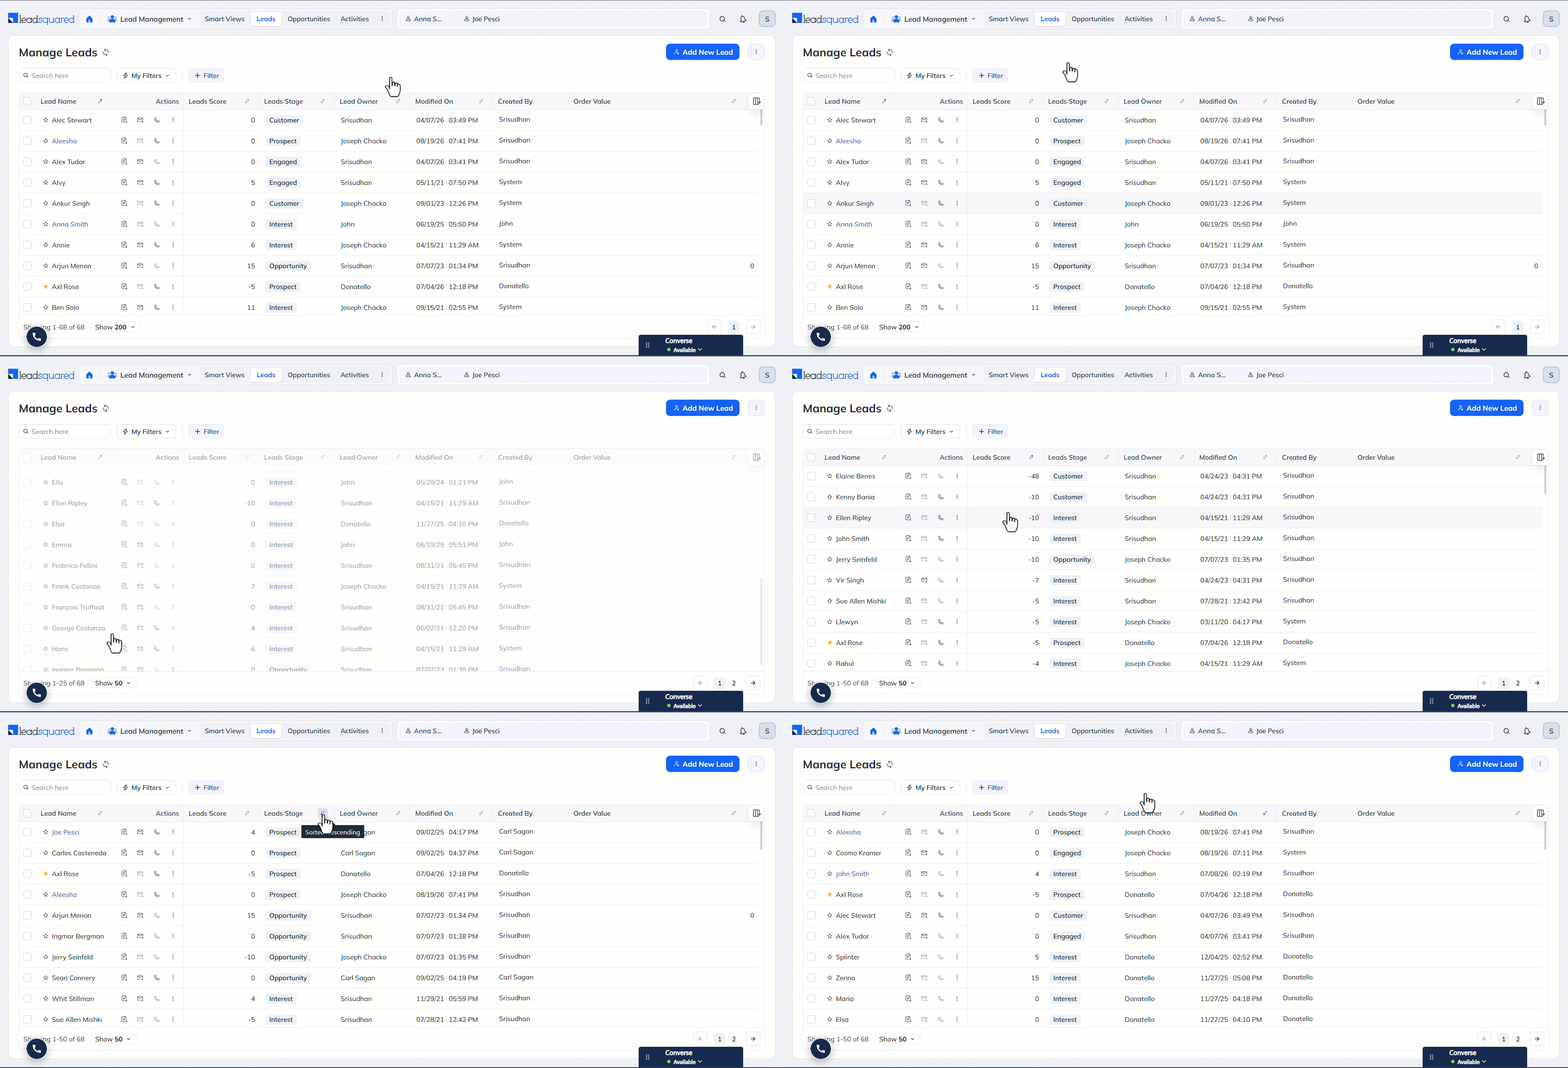
- Refresh – Hover over the Refresh icon (next to Manage Leads) to see when the page was last refreshed and when the latest lead data was fetched.
- Click the icon to manually refresh the page and fetch the latest lead data.
- Sorting – Sort columns in ascending or descending order. You can sort text columns alphabetically, numerical columns in ascending or descending order, and date columns from oldest to latest or latest to oldest.
- Pagination – Configure how many leads you want to view on the Manage Leads page. You can choose from 10, 15, 25, 50, 100, or up to 200 leads.
13. Next Steps
To work on an individual lead, refer to the Lead Details Page. The Lead Details page brings the lead’s profile, activity history, opportunities, tasks, tickets, documents, and notes together on one screen, giving you complete context for the lead.
Any Questions?
Did you find this article helpful? Please let us know any feedback you may have in the comments section below. We’d love to hear from you and help you out!